DVM350 - Baby monitors ALECTO - Free user manual and instructions
Find the device manual for free DVM350 ALECTO in PDF.
User questions about DVM350 ALECTO
0 question about this device. Answer the ones you know or ask your own.
Ask a new question about this device
Download the instructions for your Baby monitors in PDF format for free! Find your manual DVM350 - ALECTO and take your electronic device back in hand. On this page are published all the documents necessary for the use of your device. DVM350 by ALECTO.
USER MANUAL DVM350 ALECTO
natural_image
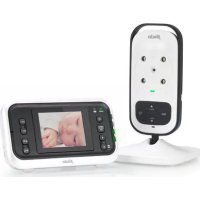
Two electronic devices: a black-and-white photo tablet displaying a sleeping baby and a white DCD camera mounted on a stand (no visible text or symbols)Alecto®
DVM-350

natural_image
Color palette bar with grayscale shades and a central crosshair symbol (no text or labels)NL: GEBRUIKSAANWIJZING 3
FR: MODE D'EMPLOI....17
D: BEDIENUNGSANLEITUNG 31
GB: USER'S MANUAL 45


2

INHOUDSOPGAVE
1 INTRODUCTIE....4
2 FUNCTIEOVERZICHT
2.1 BABY-UNIT 4
2.2 OUDER-UNIT 5
3 INSTALLEREN
3.1 BABY-UNIT....6
3.2 OUDER-UNIT 6
4 GEBRUIKEN
4.1 IN/UITSCHAKELEN 8
4.2 OUDER-UNIT 8
5 SYSTEEMUITBREIDING
5.1 ALGEMEEN.... 12
5.2 AANMELDEN EXTRA CAMERA'S 12
6 TIPS EN WAARSCHUWINGEN
6.1 ALGEMEEN....13
6.2 INSTALLATIE 13
6.3 ONTVANGST-INDICATIE / BUITEN BEREIK MELDING 13
6.4 VERTRAGING IN BEELD EN GELUID 13
6.5 VOEDING....14
6.6 STORINGSVRIJ....14
BEREIK 14
6.8 AFLUISTEREN/AFTAPPEN 14
6.9 ONDERHOUD 15
6.10 MILIEU EN AFDANKEN 15
6.11 IN GEVAL VAN GEEN BEELD, GEEN GELUID....15
7 VERKLARING VAN CONFORMITEIT....15
8 SPECIFICATIES....16
9 GARANTIE....16


1 INTRODUCTIE
natural_image
Line drawing of a mechanical device with a base and handle, no text or symbols present
natural_image
Color palette bar with grayscale shades and a central crosshair symbol (no text or labels)2.2 OUDER-UNIT:
natural_image
Technical line drawing showing a screwdriver inserted into a device, with no visible text or symbolsGEBUKSAANWJZING
6.8 AFLUISTEREN/AFTAPPEN:
natural_image
Line drawing of a vacuum cleaner device with a 10-pin connector (no text or symbols)
natural_image
Color palette bar with grayscale shades and a central crosshair symbol (no text or labels)2.2 UNITE PARENT :
natural_image
Diagram showing a screwdriver inserted into a device casing, with no visible text or symbolsnatural_image
Line drawing of a mechanical device with a cylindrical shaft and tripod base (no text or symbols)4 UTILISER
4.1 ALLUMER/ETEINDRE :
Unité bébé :
6.5 STROMVERSORGUNG....42
6.6 STÖRUNGSFREI 42
6.7 REICHWEITE 42
6.8 MITHÖREN/ABHÖREN 42
6.9 WARTUNG 43
6.10 UMWELT UND ENTSORGUNG....43
6.11 KEIN DISPLAY, KEIN TON....43
7 KONFORMITÄTSERKLÄRUNG....43
natural_image
Technical line drawing of a mechanical device with a base and handle, no text or symbols present
natural_image
Color palette bar with grayscale shades and a central crosshair symbol (no text or labels)2.2 ELTERN-EINHEIT:
natural_image
Diagram showing a device being inserted into a device, with no visible text or symbolsnatural_image
Line drawing of a mechanical device with a cylindrical shaft and tripod base (no text or symbols)4 ANWENDUNG
6.5 STROMVERSORGUNG:
6.11 KEIN DISPLAY, KEIN TON:
1 INTRODUCTION....46
2 FUNCTION OVERVIEW
2.1 BABY UNIT 46
2.2 PARENT UNIT 47
3 INSTALLATION
3.1 BABY UNIT 48
3.2 PARENT UNIT 48
4 USE
4.1 SWITCHING ON/OFF 50
4.2 PARENT UNIT 50
5 SYSTEM EXPANSION
5.1 GENERAL 54
5.2 REGISTERING ADDITIONAL CAMERAS.... 54
6 TIPS AND WARNINGS
6.1 GENERAL 55
6.2 INSTALLATION 55
6.3 RECEPTION INDICATOR / OUT-OF-RANGE NOTIFICATION ..... 55
6.4 DELAY IN IMAGES AND SOUND 55
6.5 POWER SUPPLY 56
6.6 INTERFERENCE-FREE 56
6.7 RANGE....56
6.8 EAVESDROPPING/WIRETAPPING....56
6.9 MAINTENANCE 57
6.10 ENVIRONMENT AND DISCARDING....57
6.11 IN CASE OF NO DISPLAY, NO SOUND....57
7 DECLARATION OF CONFORMITY....57
8 SPECIFICATIONS....58
9 WARRANTY....58
1 INTRODUCTION
The Alecto DVM-350 is a wireless audio/video observation system, suitable for indoor use.
You can choose to continually watch and listen to your baby or you can have the baby monitor switch on automatically as soon as your baby starts crying.

ATTENTION
Before the initial use of your set, make sure to remove all protective materials from the parent unit and baby unit.
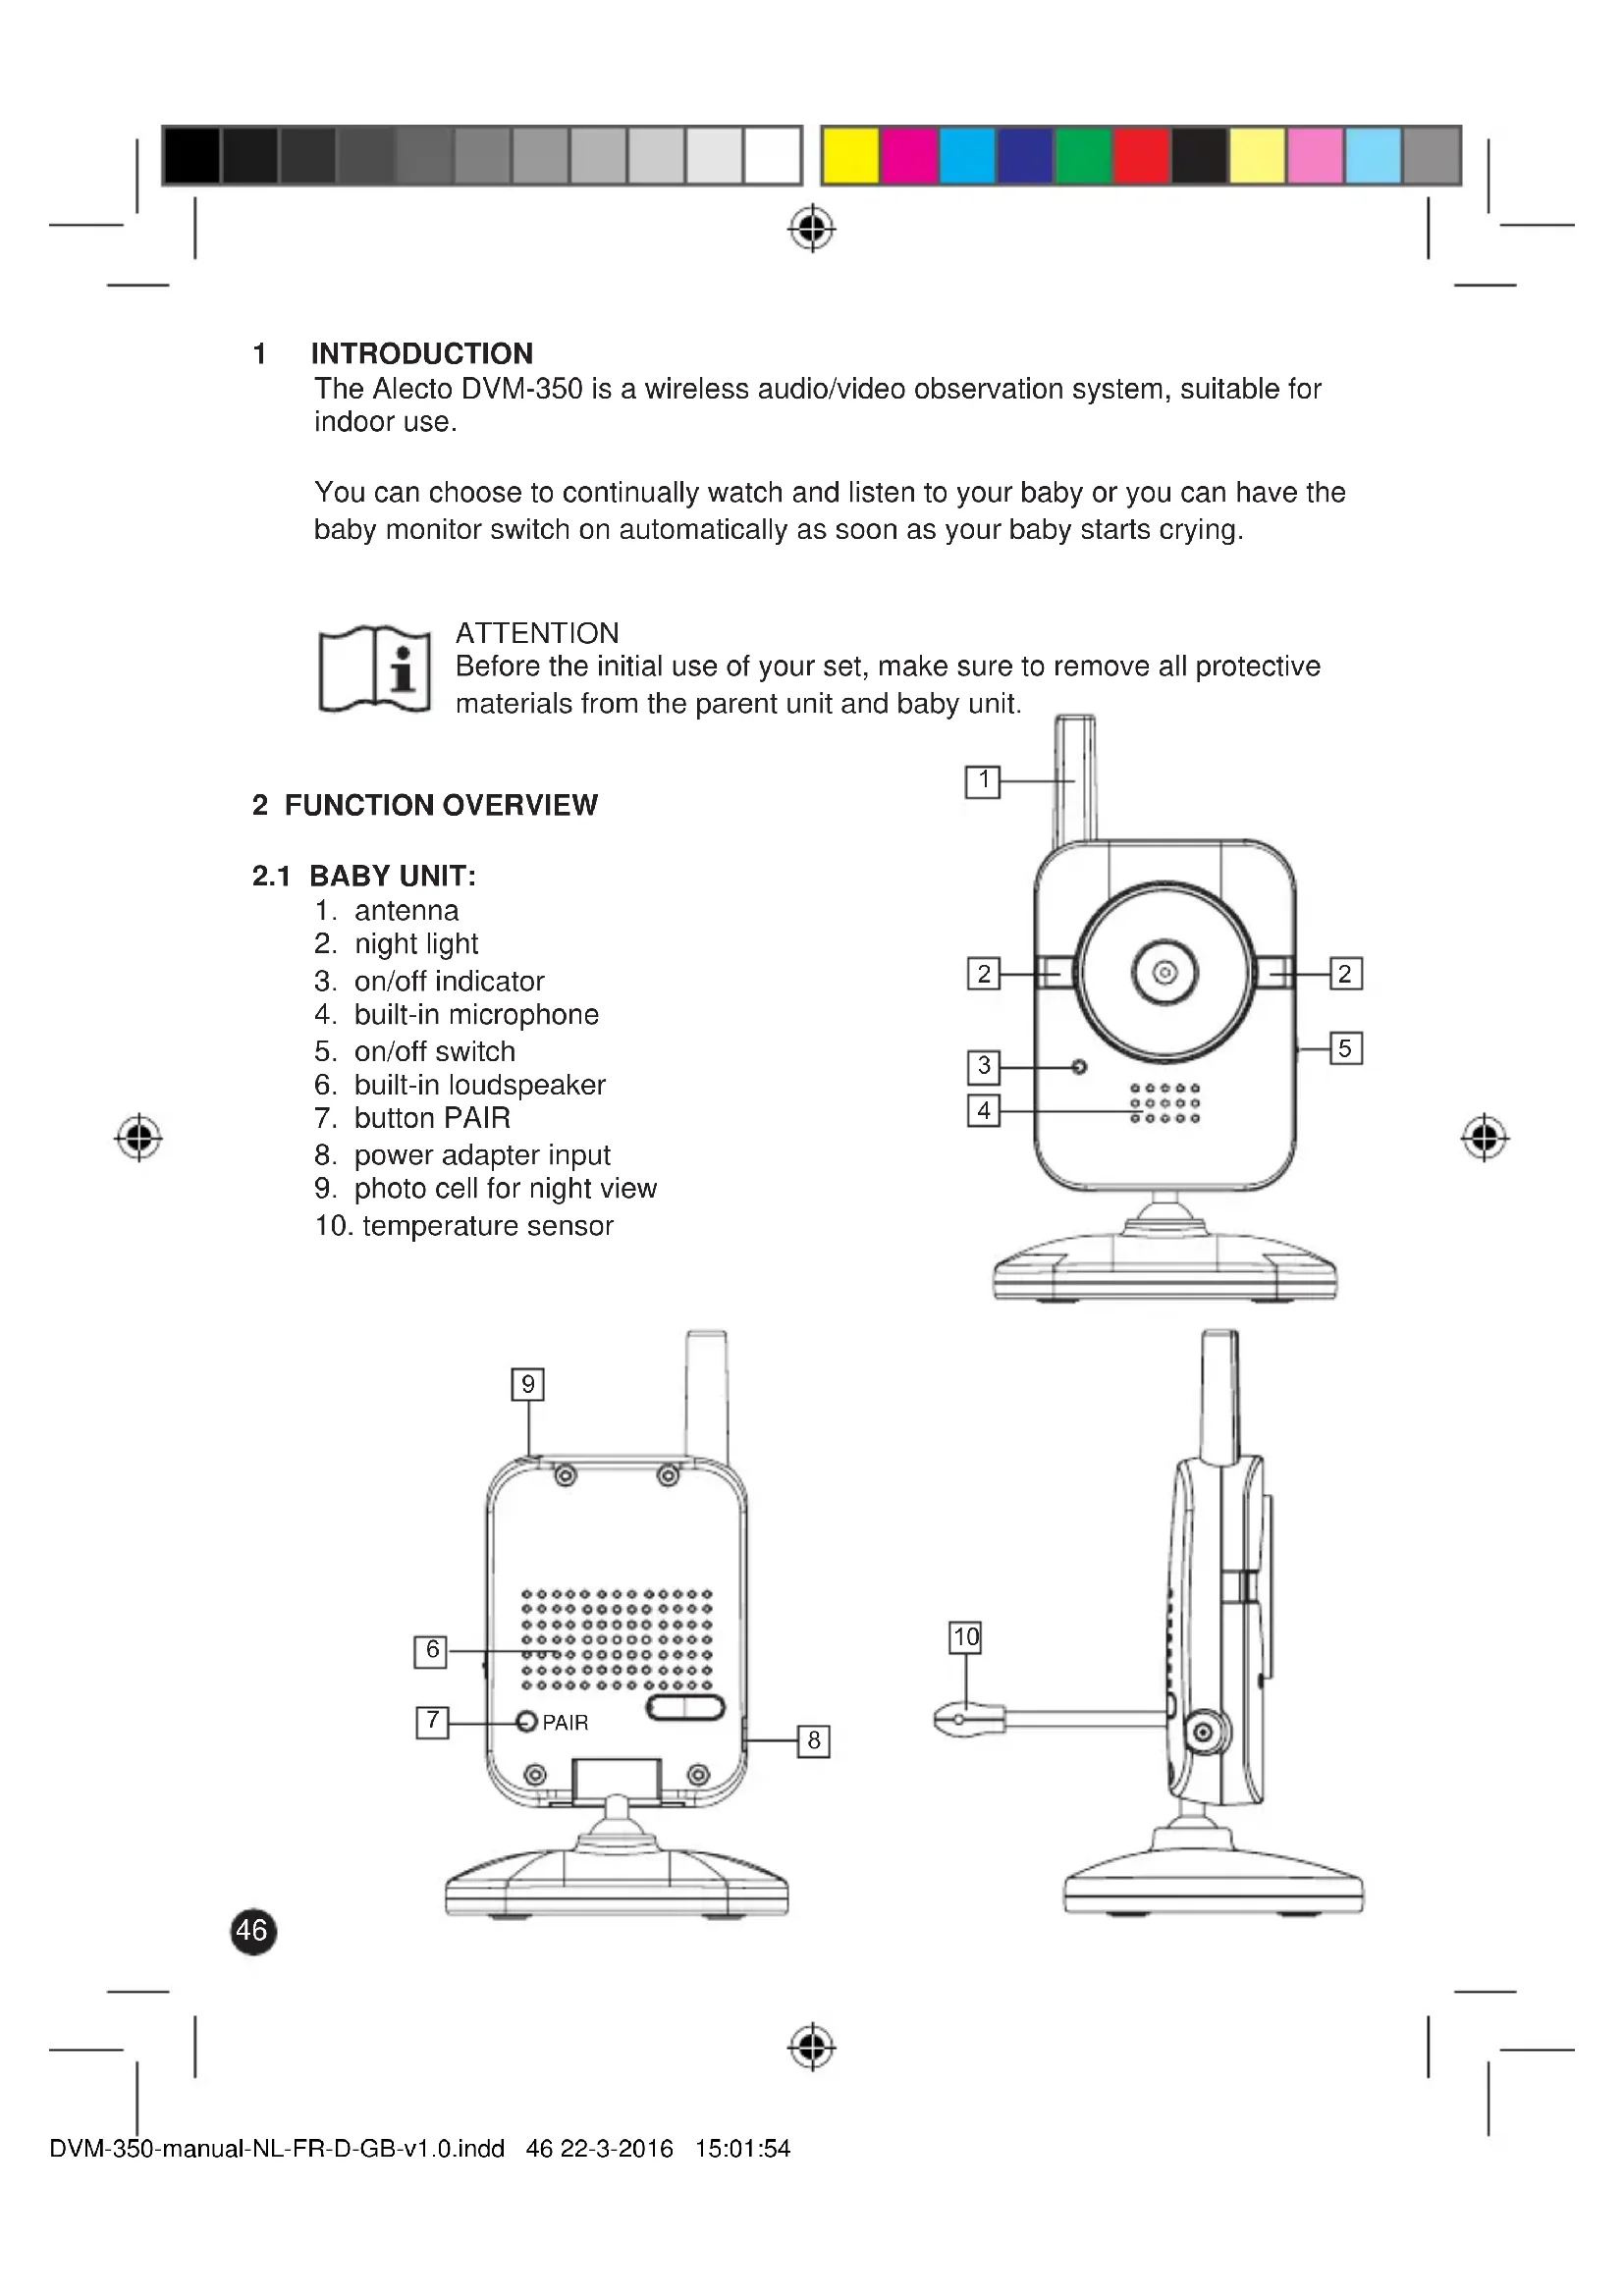
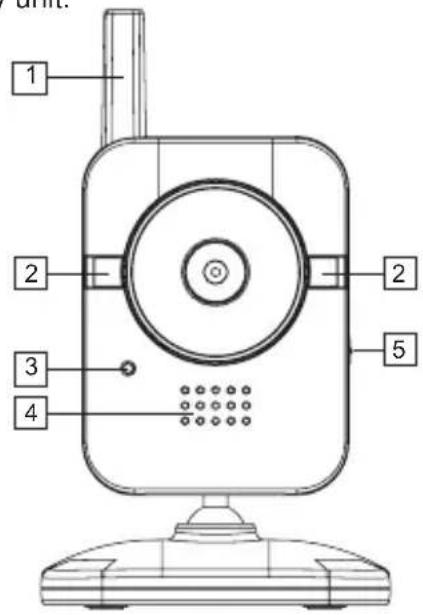
2 FUNCTION OVERVIEW
2.1 BABY UNIT:
- antenna
- night light
- on/off indicator
- built-in microphone
- on/off switch
- built-in loudspeaker
- button PAIR
- power adapter input
- photo cell for night view
- temperature sensor
text_image
1 2 3 4 2 5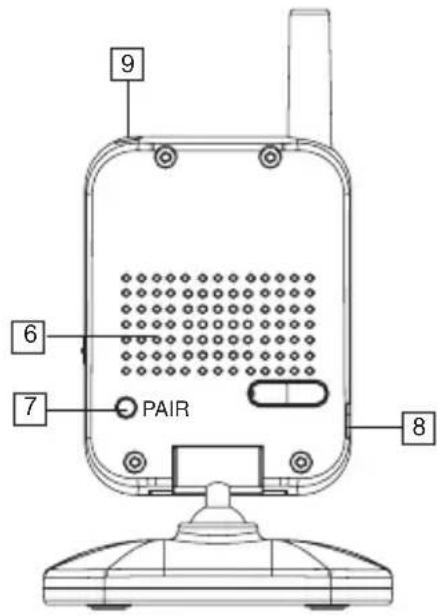
text_image
9 6 7 PAIR 8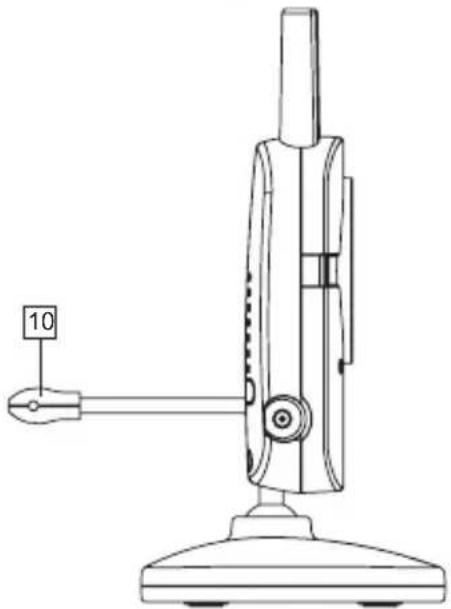
natural_image
Line drawing of a vacuum cleaner device with a labeled component (no text or symbols present)
natural_image
Color palette bar with grayscale gradient and a central crosshair symbol (no text or labels)2.2 PARENT UNIT:
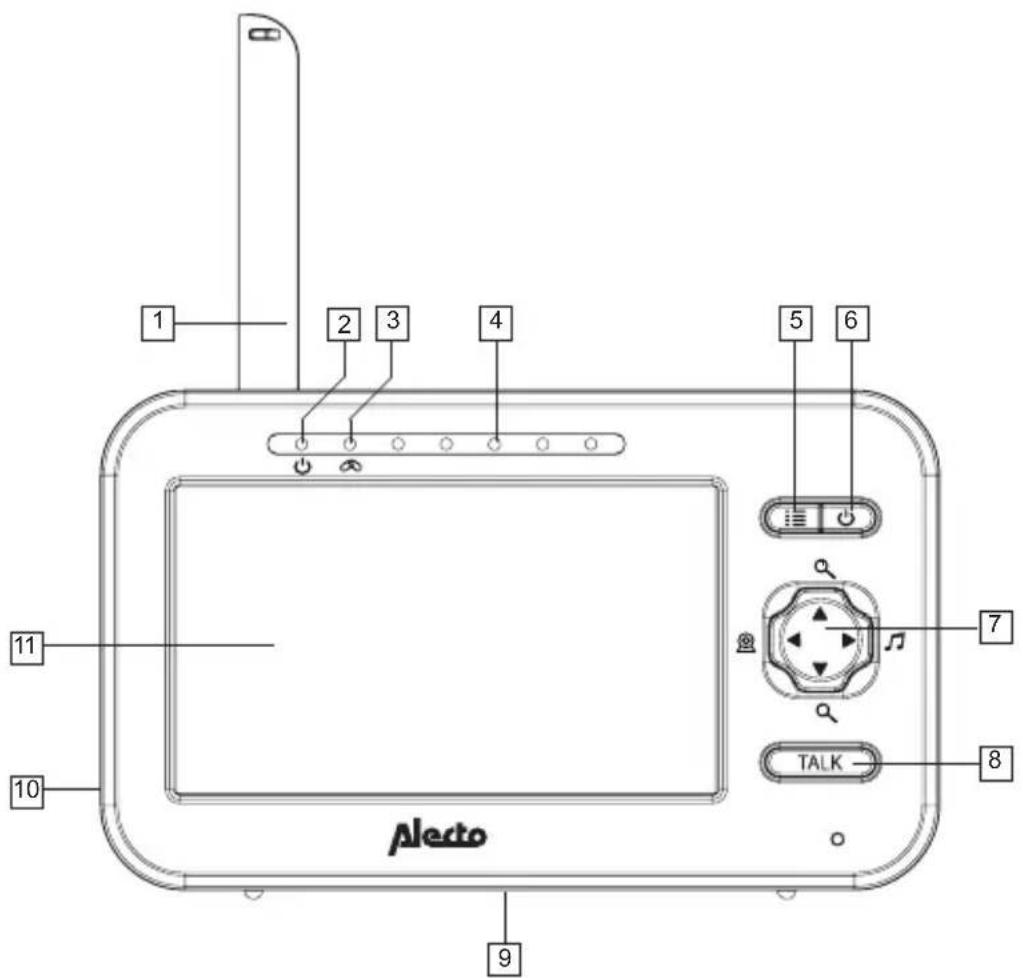
- antenna
- on/off indicator
- connection indicator (flashes when there is no connection between the parent unit and baby unit; this indicator will be off when the connection is OK)
- 5 sound indicators to show how loud your baby is crying
- button press and hold to open the settings menu
- on/off touch button: press and hold to switch the parent unit on or off, press shortly to only switch the display on or off
- buttons ▲, ▼ and ◀: various functions, see these user instructions
- TALK button, talk-back button towards the baby unit
- battery cover with table support (rear)
- power adapter input
- Display
text_image
1 2 3 4 5 6 7 8 9 10 PlectoUSER'S MANUAL
3 INSTALLATION
3.1 BABY UNIT: (CAMERA)

The baby and parent units are not waterproof, therefore they are only suitable for indoor use.
Power adapter:
- Connect one of the included power adapters to the DC5.9V input on the side of the baby unit.
- Insert the adapter into a 230V wall socket.
Only use the supplied power adapter.
Make sure the baby cannot touch the baby unit or cable. Keep the baby unit at least 2 meters away from the baby and bundle cables that are too long with tape or cable ties specifically for this purpose.
Table model or wall model:
You can place the baby unit on a table, cabinet or desk or you can hang it on the wall.
In case of wall mounting:
Drill two holes next to each other in the wall separated by a distance of 4,8 cm and insert plugs and screws. The head of the screw should stick out of the wall for several millimeters.
Suspend the baby unit by sliding the notches in the camera support over the screws in the wall and pushing the baby unit a little downwards.
Finally, use cable clips to neatly tuck away the adapter cable.
Tips for placement:
- For use as a baby monitor: place the baby unit at least 2 meters away from your baby and make sure to safely tuck away the adapter cable.
- For optimal range, it is advisable to set up the baby unit as high as possible, free from large metal surfaces.
3.2 PARENT UNIT:
The parent unit is not waterproof and therefore only suitable for indoor use.
Power supply:
The parent unit can be powered directly by the included rechargeable battery or via the supplied power adapter. As soon as you connect the power adapter, it will charge the battery allowing for mobile use of the parent unit.
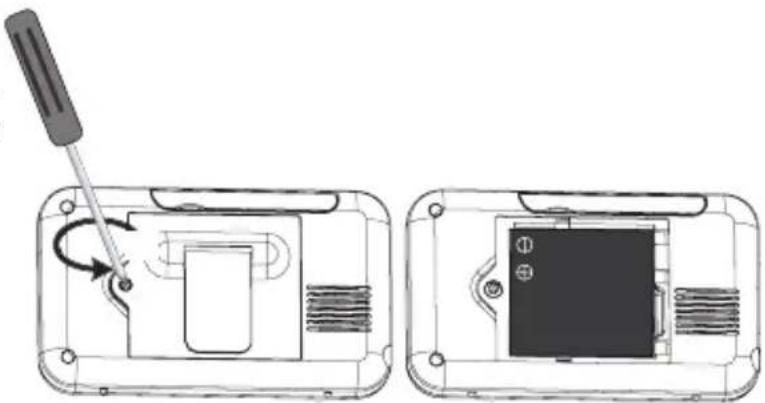
Battery:
- Open the battery compartment by unscrewing the battery cover on the rear of the parent unit.
- Insert the battery.
- Replace the battery cover onto the parent unit and tighten the screw.
natural_image
Diagram showing a screwdriver inserted into a device casing, with no visible text or symbolsNever forcibly insert the battery.
Only use the supplied rechargeable Li-ion battery.
Power adapter:
- Connect the other power adapter to the DC5.9V input on the side of the parent unit.
- Insert the adapter into a 230V wall socket.
Only use the supplied power adapter.
Make sure nobody can trip or fall over the adapter cable. You can bundle cables that are too long with tape or cables ties available specifically for this purpose.


Charging:
The battery will be charged as soon as you connect the power adapter and insert it into a 230V wall socket.
- For initial use, charge the battery for at least 15 hours, even if the indicator shows a fully charged battery.
- The charging circuit for the battery is managed electronically and there is no risk of overcharging, this allows you to leave the adapter connected at all times.
- In case you will not use the set for a longer period of time (>2 months), please make sure to disconnect the adapter from the wall socket and remove the battery from the parent unit. When starting to use the set again, make sure to properly charge the battery.
Table support:
The table support is located at the rear of the parent unit.
Unfold it to place the parent unit on a table or cabinet.

natural_image
Line drawing of a mechanical device with a cylindrical shaft and tripod base (no text or symbols)USER'S MANUAL
4 USE
4.1 SWITCHING ON/OFF:
Baby unit:
- Slide the switch on the right side to ON to switch on the baby unit.
- Slide this switch to OFF to switch off the baby unit.
Parent unit:
- Shortly press and hold the button to switch on the parent unit.
- Shortly press and hold again to switch off the parent unit.
4.2 PARENT UNIT:
Reception volume:
- Repeatedly press the button ▲ increase the reception volume.
- Repeatedly press the button to decrease the reception volume.
You can choose from 5 volume levels and volume off.
During the setup, the display will show the selected level.
Talking back:
- Press the button to talk back through the baby-unit (keep the button depressed while talking).
The volume of the baby unit is a fixed setting which you cannot change.


Zoom:
- Shortly press ⊕ and hold the button to zoom in.
- Shortly press the button and press the buttons, ,▼and ◀to view down, up, to the left or to the right.
- Shortly press the button 🔒 to zoom out again.
Display on/off:
- Shortly press the button to switch off the display (the sound will continue).
- Shortly press the button again to switch the display back on.
This function is separate from the function for automatically switch off the display and sound when your baby is sleeping. For this, refer to the user instructions below.
Lullabies:
- Shortly press the button to start the lullabies
- Use the buttons and to select the desired song. You can choose from 5 songs, the selected song will continue and be played repeatedly.
- After 15 minutes, playback of the lullabies will be stopped automatically or you can manually stop the playback at any time to press the button 📂
The volume at the side of the baby unit is fixed and you cannot change it.

Night light:
- Press and hold the button ☐ open the menu, now release this button.
- Repeatedly press the button ≡ until ⚙' appears on the display, followed by ON or OFF.
- Press the button ▲ or ▼ switch the night light on ('ON') or off ('OFF').
- Shortly press the button ☐ to save the setting and to close the menu.
Brightness:
- Press and hold the button ☑ open the menu, now release this button.
- The symbol will on the display, followed by the current setting.
- Press the button ▲ or ▼ to set the brightness from low intensity ( ) to ____ high intensity (※)
- Shortly press the button to save the setting and to close the menu.
Don't forget that a high intensity uses more power. When using the parent unit with the built-in battery, please select a low intensity to prolong the battery's life span.
Temperature indication and warning:
The temperature of the room with the baby unit is shown above in the display of the parent unit. You can select to show the temperature in degrees Fahrenheit or in degrees Celsius. Besides that, you can let the unit sound an alarm tone when the temperature in the baby room becomes too high or too low.
- Press and hold the button ☐ open the menu, now release this button.
- Repeatedly press the button 📄 until “’ appears on the display, followed by °C or °F.
- Press the button ▲ or ▼ switch between °C and °F.
- Shortly press the button ☐Lo' will appear followed by the lower threshold value for the temperature alarm.
- Use the button ▲ or ▼ set the lower threshold value (or select OFF if you prefer not to set a lower limit).
- Shortly press the button Hi' will appear followed by the upper threshold value for the temperature alarm.
- Use the button ▲ or ▼ set the upper threshold value (or select OFF if you prefer not to set a lower limit).
- Shortly press the button to save the setting and to close the menu.
As soon as the temperature becomes too low or too high, the unit will now sound short alarm tones while the temperature display will start flashing on the display.
Don't forget that the temperature is only an indication and you must take into account a possible deviation of + or - 2 degrees.
Switching display + sound off automatically when your baby is sleeping: (VOX)
You can set the baby monitor to only have images and sound when your baby is crying.
When your baby is sleeping quietly, then the parent unit will also switch to a sleeping mode. As soon as your baby starts crying, the display and sound will be switched back on instantly.
- Press and hold the button ≡ to open the menu, now release this button.
- Repeatedly press the button : until 'VOX' appears on the display, followed by the current level.
- Press the button ▲ or ▼ to set the activation level:
■____ low sensitivity, your baby must be crying loudly before the baby monitor switches on
...
...
...
■■■■ high sensitivity, your baby only has to cry softly for the baby monitor to switch on
OFF VOX switched off, the baby monitor will continuously show images and transmit sounds of your baby
- Shortly press the button ⏻ to save the setting and to close the menu.

When the display and sound are switched off because of silence, you can press a random button to switch the parent unit back on. The parent unit will switch back off again after one minute.

Automatic night vision:
The baby unit is provided with 6 built-in infra-red LEDs; these LEDs will automatically switch on when the baby room becomes darker and they will switch off again when it becomes light. The LEDs can light objects up to a distance of approximately 2 meters. When it's dark, that is when the night vision LEDs are switched on, the images on the parent unit will be displayed in black and white.
Attention: infra-red light cannot be perceived by the human eye; that means you cannot tell whether the infra-red LEDs are switched on with the naked eye. Depending on the type of the infra-red LED, you might be able to see a red glow.
Multi camera / scan function (only when using multiple cameras)

Attention: when using multiple cameras, the unit will NOT automatically switch to the camera where sound is being detected.
Refer to chapter 5 for registering additional cameras.
- Shortly press the button 🔒 to view the images of the next camera
- After all camera images have been shown, you'll get the choice 'SCAN'. This means that the images of the next camera will be shown with intervals of 10\~12 seconds
- After pressing the button 🔒, the images of camera 1 will be shown again.
- in the upper left corner of the display you can check which camera is being shown.
- the unit will NOT automatically switch to the camera where sound is being detected.
- when the unit switches to a camera that is not connected (camera is out of range or switched off), then a black image will appear on the parent unit during that period and the out of range tones will sound.


5 SYSTEM EXPANSION
5.1 GENERAL:
You can register up to 4 cameras on the DVM-350 parent unit. Via the menu of the parent unit you can select the desired camera or you can watch the images of all registered cameras in order (scan function).
Expansion cameras are available through the service department of Alecto via the phone number 073 6411 355 (NL), 03 238 5666 (B), 0180 503 0085 (D) or via www.alecto.nl
Camera: +DVM-340.100
Power adapter: +DVM-340.042
5.2 REGISTERING ADDITIONAL CAMERAS:
- Connect the power adapter to the new baby unit, plug the adapter into a 230V wall socket and switch on the camera.
- Press and hold the parent unit button 🔒 until after 4 seconds the image 🔒 appears, followed by the camera number.
- Use the parent unit buttons ▲ /▼ to select a free 'camera connection'.
A ‘√’ after a camera number shows a camera is already registered at this number. In this case, if you register a new camera at this number, then the old camera will be disconnected; it is therefore advisable to use a camera without ‘√’ - Shortly press the button ≡, the light ⚫ will start flashing quickly.
- Within 10 seconds, shortly press the button PAIR at the rear of the new camera. The indicator light at the front of the camera will start flashing quickly.
- After several seconds the parent unit will have detected the new camera and the images of this camera will be shown on the display of the parent unit.


6 TIPS AND WARNINGS
6.1 GENERAL:
- Thoroughly read the user's manual and follow all indications.
- Never place the baby unit or parent unit in wet or humid room or environment.
- Ensure adequate heat dissipation; never cover the parent unit, the baby unit and/or the power adapter(s) and never place them directly next to a heat source.
- Only use the supplied adapter(s); connecting a different type of adapter will damage the electronics.
- Make sure the adapter cables are free of any damage and ensure nobody can trip or fall because of these cables.
- Never dismantle the parent unit, the baby unit and/or the power adapter(s); only qualified personnel is authorized to do so.
6.2 INSTALLATION:
- Only connect or disconnect the power adapter to/from the baby unit or parent unit when the power adapter is removed from the wall socket.
- Never install the DVM-350 during thunder storms.
- Never touch any non-isolated adapter cables, unless the adapters are removed from the wall socket.
6.3 RECEPTION INDICATOR / OUT-OF-RANGE NOTIFICATION:
- In the upper left corner of the parent unit you can check the signal strength received from the baby unit:

- In all cases, the images and sound are displayed with the same quality.
- As soon as the parent unit loses the signal from the baby unit (out of range or the baby unit is switched off), ‘¶’ (no reception)) and ‘Out of Range’ will appear on the display. The unit will also emit two beep tones every 10 seconds.
- As soon as the parent unit is receiving the signal from the baby unit again, the display will illuminate.
6.4 DELAY IN IMAGES AND SOUND:
- The baby unit transmits the images and sound to the parent unit in digital blocks. The parent unit converts these signals back to a recognizable image and a comprehensible sound. Therefore, there is a small delay between the moment of movement and making sounds and the display and sounds of the parent unit.
- Besides that, the sounds and images on the parent unit are not exactly simultaneous.
6.5 POWER SUPPLY:
- Baby unit:
The baby unit can only be powered by the supplied power adapter.
The baby unit has no built-in battery for mobile use.
- Parent unit:
The parent unit is powered by the rechargeable 3.7V Lithium-Ion battery; this battery can power the parent unit for 6 to 7 hours.
In the upper right corner of the display, you can check the battery status:
: battery if full
: battery is only 2/3 full
■: battery is only 1/3 full, please charge
☐: battery is empty and the parent unit will switch off
: battery is charging
- : battery full / no battery installed
The red indicator will start flashing on the display approximately 5 minutes before the battery is completely empty. The unit also emits notification sounds. Please immediately connect the adapter.
The battery can fully charge an empty battery in about 6 hours, regardless whether the parent unit is switched on or off during this time.
6.6 INTERFERENCE-FREE:
- This baby display monitor is digitally coded. This means you will never receive signals from other devices, nor can the signal from your baby unit(s) be received by e.g. your neighbors.
- In case the baby unit(s) or parent unit is placed in or in the close vicinity of electromagnetic fields, the signal (images or sound) can be slightly affected. If this happens, try a different location for the baby unit(s) or parent unit or move, if possible, the source of the interference.
6.7 RANGE:
- The baby display monitor has a range of up to 300 meters in an open field and up to 50 meters indoors; this range depends on local circumstances.
- If the units get out of range from each other, the image will first 'freeze' for several seconds (no movement), followed by ⚙ (no reception) and then the display will turn black. The unit will also emit a warning tone every second.
6.8 EAVESDROPPING/WIRETAPPING:
- Eavesdropping/wiretapping of the signals from this baby video monitor is nearly impossible. Not only must one be within range of the baby video monitor, one also needs some very costly equipment.
6.9 MAINTENANCE:
- Only clean the baby monitor with a moist cloth; never use chemical cleaners. Before any cleaning, you must disconnect the adapters.
6.10 ENVIRONMENT AND DISCARDING:
- The packaging of this baby video monitor can be discarded as waste paper. However, we advise you to save this packaging so you can adequately protect the devices for transportation.
- Faulty or exhausted batteries must be delivered to your local collection site for small chemical waste. Never discard batteries as normal domestic waste.
- In case the baby video monitor is being replaced, please return it to your supplier; they will guarantee environment-friendly processing.

6.11 IN CASE OF NO DISPLAY, NO SOUND:
- are the parent unit and baby unit switched off? (adapter connected, full battery?)
-is the parent unit within range of the baby unit?
-is the baby unit switched off because no sound is being detected? (VOX)
-is the volume at the parent unit set to 0 (off)?
- If the above is all in order, remove the adapters from the wall sockets, take the rechargeable battery out of the parent unit, wait at least one minute and then reconnect everything. Now, switch the parent unit and baby unit back on.
- If you still receive no images or sound, please contact the customer service of Alecto via the phone number 073 6411 355 (Netherlands), 03 238 5666 (Belgium), 0180 503 0085 (Germany) or via internet www.alecto.nl
7 DECLARATION OF CONFORMITY
The Alecto DVM-350 meets all essential requirements and provisions as described in the European Directive 1999/5/EC.
The declaration of conformity is available on the website www.alecto.nl

text_image
www.Alecto.NLThe use of this equipment is allowed in all countries in the EU. In France, Italy, Russia and the Ukraine, only indoor use is allowed.
8 SPECIFICATIONS
Range: up to 50 meters indoors
up to 300 meters outdoors
Parent unit power: 3.7V Lithium-Ion battery (incl.)
model 055070.3.7V,1700mAh.
5.9VDC 800mA power adapter (incl.),
model: HX-AD059080-E02.
Baby unit power: 5.9VDC 800mA power adapter (incl.),
model: HX-AD059080-E02.
Frequency: 2.4GHz, digital frequency hopping (FHSS)
19 channels, auto selecting
Display 4.3" TFT LCD display
Recharging time parent unit battery: \~ 6 hours *
Life-span parent unit battery: 6\~7 hours *
*: the times mentioned above are estimates and depend on use and settings and on the condition of the battery.
9 WARRANTY
For the Alecto DVM-350 you have a warranty of 24 months from the date of purchase. During this period, we guarantee the free repair of defects caused by material and workmanship errors. All this subjected to the final assessment of the importer.

HOW TO HANDLE: If you notice any defect, first refer to the user's manual. If the manual provides no definite answer, please contact the supplier of this baby video monitor or contact customer service of Alecto via www.alecto.nl

THE WARRANTY BECOMES NULL AND VOID: in case of improper use, incorrect connections, leaking and/or incorrectly installed batteries, use of unoriginal parts or accessories, negligence and in case of defects caused by moisture, fire, flooding, lightning and natural disasters. In case of unauthorised modifications and/or repairs performed by third parties. In case of incorrect transportation of the device without adequate packaging and when the device is not accompanied by this warranty card and proof of purchase.
The warranty does not cover connecting cables, plugs and batteries. All further liability, especially concerning any consequential damages, is excluded.
text_image
USER'S MANUAL DVM-350-manual-NL-FR-D-GB-v1.0.indd 59 22-3-2016 15:01:56
natural_image
Color palette bar with grayscale shades and a central crosshair symbol (no text or labels)
text_image
Alecto® Service Help WWW.ALECTO.NL SERVICE@ALECTO.NL NL 073 6411 355 (Lokaal tarief) BE 03 238 5666 (Lokaal tarief) (Tarif local) DE 0180 503 0085 Lokale Festnetzkosten Hesdo, Australiëlaan 1 5232 BB, 's-Hertogenbosch The NetherlandsCE 60
v1.0