
Ascent A3500i - Blender Vitamix - Free user manual and instructions
Find the device manual for free Ascent A3500i Vitamix in PDF.
| Brand | Vitamix |
| Model | Ascent A3500i |
| Product type | High-end blender |
| Dimensions (with 64 oz container) | Height: 43 cm, Width: 20 cm, Depth: 28 cm |
| Weight | 4.5 kg (estimated) |
| Power supply | Voltage: 220-240 V, Frequency: 50-60 Hz, Power: 1200 W |
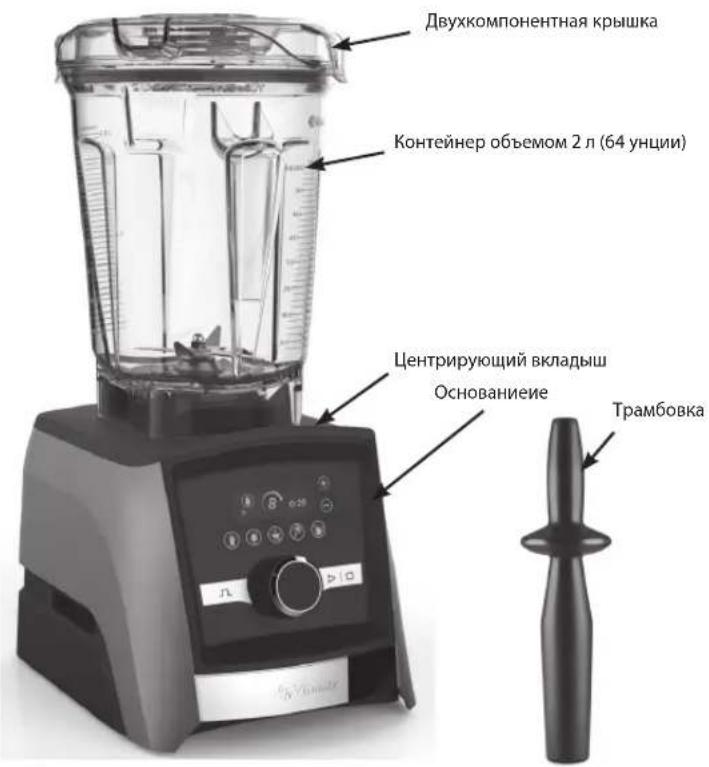
| Container capacity | 2 L (64 oz) - large container; compatible 20 oz (0.6 L) and 8 oz (240 ml) cups (optional) |
| Bowl material | Tritan plastic (impact-resistant and BPA-free) |
| Variable speed | 10 speeds (1 to 10) with rotary selector |
| Pulse function | Yes (dedicated button) |
| Automatic programs | Smoothies, Frozen desserts, Soups, Spreads, Self-cleaning |
| Wireless technology | Container detection and communication with base via Bluetooth (2.402-2.480 GHz, 0.001 W) |
| Timer | Yes, with +/- adjustment for variable speed; automatic stop at end of program |
| Touch screen | Touch control panel with digital display |
| Safety | Automatic shut-off, lid and container detection, motor overheating protection, lid lock |
| Cleaning | Integrated self-cleaning cycle; dishwasher-safe parts |
| Spare parts and repairability | Repair by authorized center; non-removable blade assembly; 10-year warranty |
| Warranty | 10 years (parts and labor) |
| Included accessories | 2 L container, lid, graduated cap, tamper |
Frequently Asked Questions - Ascent A3500i Vitamix
User questions about Ascent A3500i Vitamix
0 question about this device. Answer the ones you know or ask your own.
Ask a new question about this device
Download the instructions for your Blender in PDF format for free! Find your manual Ascent A3500i - Vitamix and take your electronic device back in hand. On this page are published all the documents necessary for the use of your device. Ascent A3500i by Vitamix.
USER MANUAL Ascent A3500i Vitamix
Some models are not available in all countries
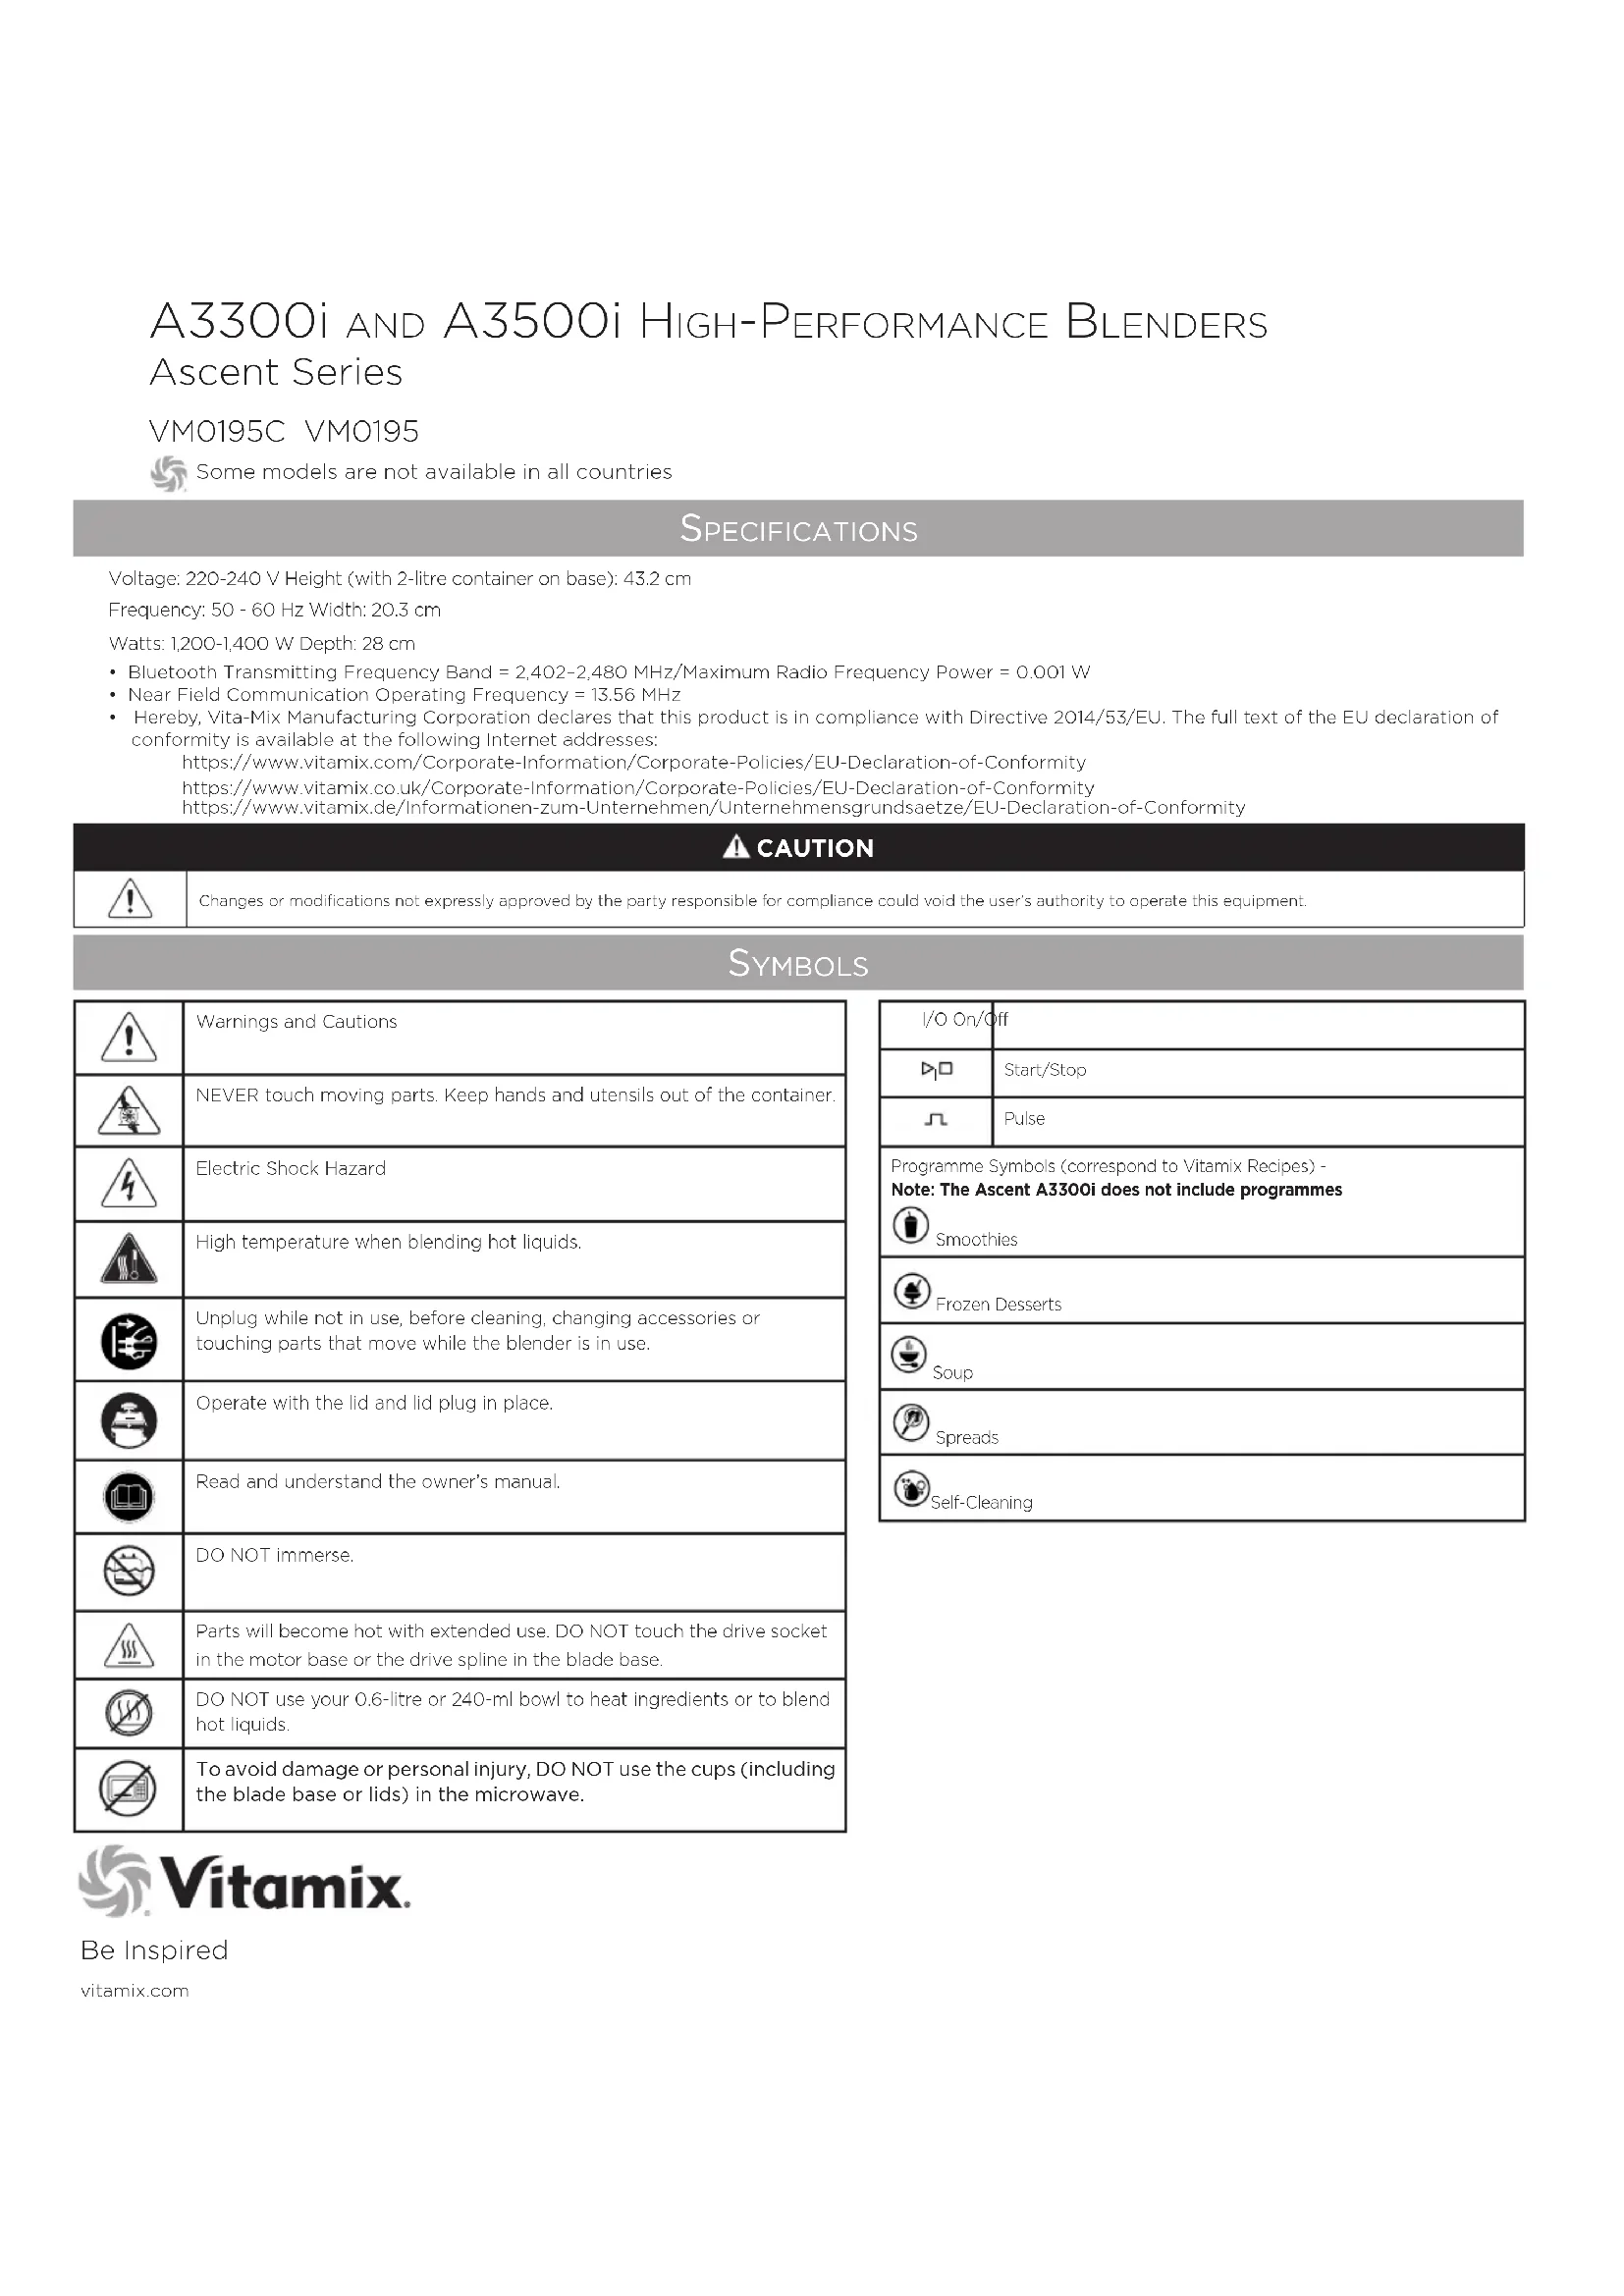
SPECIFICATIONS
Voltage: 220-240 V Height (with 2-litre container on base): 43.2 cm
Frequency: 50 - 60 Hz Width: 20.3 cm
Watts:1,200-1,400 W Depth: 28 cm
Bluetooth Transmitting Frequency Band = 2,402-2,480 MHz/Maximum Radio Frequency Power = 0.001 W
Near Field Communication Operating Frequency = 13.56 MHz
Hereby, Vita-Mix Manufacturing Corporation declares that this product is in compliance with Directive 2014/53/EU. The full text of the EU declaration of conformity is available at the following Internet addresses:
https://www.vitamix.com/Corporate-Information/Corporate-Policies/EU-Declaration-of-Conformity
https://www.vitamix.co.uk/Corporate-Information/Corporate-Policies/EU-Declaration-of-Conformity
Changes or modifications not expressly approved by the party responsible for compliance could void the user's authority to operate this equipment.
SYMBOLS
| Warnings and Cautions | |
| NEVER touch moving parts. Keep hands and utensils out of the container. | |
| Electric Shock Hazard | |
| High temperature when blending hot liquids. | |
| Unplug while not in use, before cleaning, changing accessories or touching parts that move while the blender is in use. | |
| Operate with the lid and lid plug in place. | |
| Read and understand the owner's manual. | |
| DO NOT immerse. | |
| Parts will become hot with extended use. DO NOT touch the drive socket in the motor base or the drive spline in the blade base. | |
| DO NOT use your 0.6-litre or 240-ml bowl to heat ingredients or to blend hot liquids. | |
| To avoid damage or personal injury, DO NOT use the cups (including the blade base or lids) in the microwave. |
| I/O On/Off | |
| □□ | Start/Stop |
| √ | Pulse |
| Programme Symbols (correspond to Vitamin Mix Recipes) - Note: The Ascent A3300i does not include programmes Smootheries | |
| Frozen Desserts | |
| Soup | |
| Spreads | |
| Self-Cleaning | |

Vitamix.
Be Inspired
vitamix.com
IMPORTANT INSTRUCTIONS FOR SAFE USE
WARNING: To avoid the risk of serious injury when using your Vitamix® blender, basic safety precautions should be followed, including the following. READ ALL INSTRUCTIONS, SAFEGUARDS AND WARNINGS BEFORE OPERATING THE BLENDER.
- Read all instructions.
- Do not use the blender for anything other than its intended use.
- Not intended for use by or near children or persons with reduced physical, sensory or mental capabilities, or lack of experience and knowledge. Close supervision is necessary when any blender is used by or near children or incapacitated persons. Children should be supervised to ensure that they do not play with the blender.
- WARNING: To avoid inadvertent activation, switch off the appliance and unplug from the outlet when not in use, before putting on or taking off parts, and before cleaning.
- CAUTION: In order to avoid a hazard due to inadvertent resetting of the thermal cut-out, power to this blender must not be supplied through an external switching device, such as a timer, or connected to a circuit that is regularly switched on and off by the utility.
- To protect against risk of electrical shock, do not put the blender base in water or other liquid.
- Always check that the blender is OFF before plugging the cable into a power socket. To disconnect, turn OFF the blender, then remove the plug from the power socket.
- Illuminated icons and numbers on the control panel indicate that it is ready to operate. Avoid inadvertent contact with the touch screen.
- Avoid contact with moving parts.
- Do not operate any blender with a damaged cable or plug or after the blender malfunctions, or is dropped or damaged in any manner. Call Vitaminmix Customer Service on 0800 587 0019 or +1 440 235 4840 or email service@vitamix.com at once for examination, repair, replacement or adjustment. If purchased outside the U.S.A. or Canada, contact your local Vitaminmix dealer.
- GFI circuit breakers might be installed in your kitchen. Look for them in outlets near sinks. If the blender won't operate, unplug the blender. Reset the wall outlet or circuit breaker. If the circuit breaker continues to trip, unplug the blender from the outlet. Allow the blender to sit for 24 hours before attempting to use it again. Contact Vitamix Customer Services if the problem persists.
- Alteration or modification of any part of the blender, including the use of any part or parts that are not genuine authorised Vitamix parts, may cause fire, electric shock or injury and will void your warranty.
- The use of attachments not expressly authorised or sold by Vitaminix for use with this blender, including preserving jars, may cause fire, electric shock or injury. Use in this way will void your warranty.
- Do not use outdoors.
- Do not let the cable hang over the edge of the table or counter.
- Do not place the motor base or container on or near a hot gas or electric hob, in or on a heated oven.
- Keep hands and utensils out of the container while blending to reduce the risk of severe injury to persons or damage to the blender. A rubber scraper or spatula may be used, but only when the blender is not running.
- The tamper provided must be used only when the main part of the lid is in place.
- Blades are sharp. Clean around the blade assembly in the container with extreme care to avoid injury. To reduce the risk of injury, never place a blade assembly on the motor base unless assembled to the Vitaminix container.
- Care should be taken when handling the sharp cutting blades, emptying the container and during cleaning.
- Do not leave foreign objects, such as spoons, forks, knives or the lid plug, in the container as this will damage the blades and other components when starting the blender and may cause injury.
- Never attempt to operate with damaged blades.
- Never attempt to operate with the centring pad removed.
- Always operate the blender with lid and lid plug firmly in place. Only remove the lid plug to add ingredients and to use the tamper.
- DO NOT remove the lid while blades are rotating. Only remove the lid plug to add ingredients and to use the tamper. If the lid is removed during operation, the motor base will stop and will not run until the lid and lid plug are in place on the container.
- DO NOT defeat the lid interlock mechanism.
-
Do not fill the 2-litre container, 0.6 -litre cup or 240-ml bowl above the marked maximum capacity line to avoid risk of injury due to damage to the lid and container.
-
When blending hot liquids or ingredients in the 2-litre (large) container, use caution; spray or escaping steam may cause burns. Always begin processing on the lowest speed setting, variable-speed 1. Keep hands and other exposed skin away from the lid opening to prevent possible burns.
- DO NOT use your 0.6-litre cup or 240-ml bowl to heat ingredients or to blend hot liquids. Heated ingredients and liquids may create internal pressure which could cause the cup to burst and cause injury.
- DO NOT continuously use your machine for more than 75 seconds when blending with a cup and blade base.
- If a cup becomes warm to the touch or steams or vents, immediately stop blending ingredients and turn off or unplug the blender. Allow the cup and ingredients to cool to room temperature before removing the blade base.
32 DO NOT use the cups (including the blade base or lids) in the microwave. - When making nut butters or oil-based foods, do not process for more than one minute after the mixture starts to circulate in the container. Processing for longer periods can cause over-heating.
- Make sure that the container or cup and blade base are flush with the centring pad to ensure that the drive spline is engaged with the drive socket before operating.
- Make sure to use the seal on the blade base and tighten the cup adequately to the blade base before blending.
- Never place the blade base onto the motor base without the cup attached to the blade base.
- The blender will reset itself in the event of power line surge and the counter will reset to '0'. This is a normal action for the blender to avoid hazards, if used as intended. The timer is only for the user's reference and is not considered an essential function of the blender's operation.
SAVE THESE INSTRUCTIONS
| WARNING | ||
| ! | To Avoid Injury. Read and understand the instruction manual before using this machine. | |
IMPORTANT INSTRUCTIONS FOR SAFE USE
This product is intended for HOUSEHOLD USE ONLY and is not intended to be used for commercial purposes.
Do not leave your Vitamix blender unattended when operating.
Any repair, servicing or replacement of parts must be performed by Vitaminix or a Vitaminix-authorised service representative.
NOTICE: THE FAILURE TO FOLLOW ANY OF THE IMPORTANT SAFEGUARDS AND IMPORTANT INSTRUCTIONS FOR SAFE USE IS A MISUSE OF YOUR VITAMIX BLENDER THAT CAN VOID YOUR WARRANTY AND CREATE THE RISK OF SERIOUS INJURY.
| WARNING | ||
| 4 | Electrical Shock Hazard. ONLY use an earthed outlet. DO NOT remove the earth. DO NOT use an adaptor. DO NOT use an extension cable. Always unplug before cleaning the motor base or when not in use. Do not put the motor base in water or other liquid. Failure to follow Instructions can cause death or electric shock. | |
PARTS AND FEATURES
| Technology - The blender, containers and cups communicate through wireless technology. Each container is programmed to run on the base for optimum performance according to its size and functionality. |
| Legacy Vitaminix Containers - Legacy Vitamin mix containers will not work with your Ascent blender base. Legacy machines are the Vitamin C Series, G Series and S Series. For more information about Vitamin mix products, please go to vitaminmix.com. |
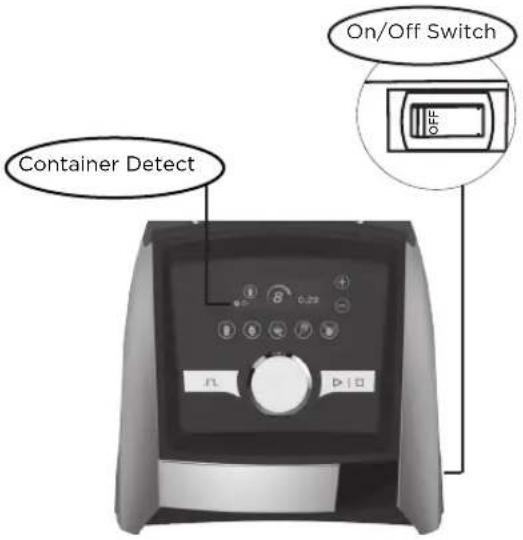
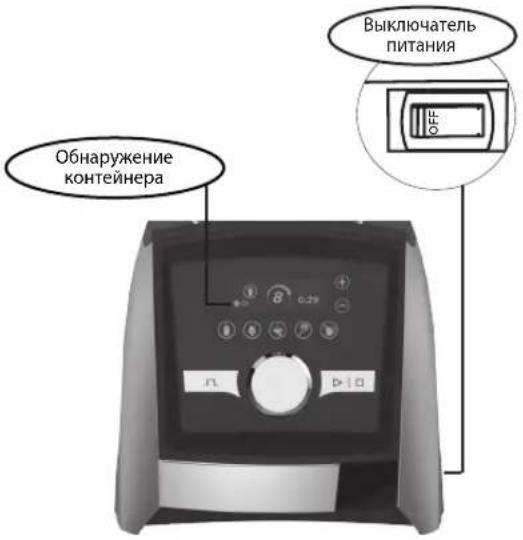
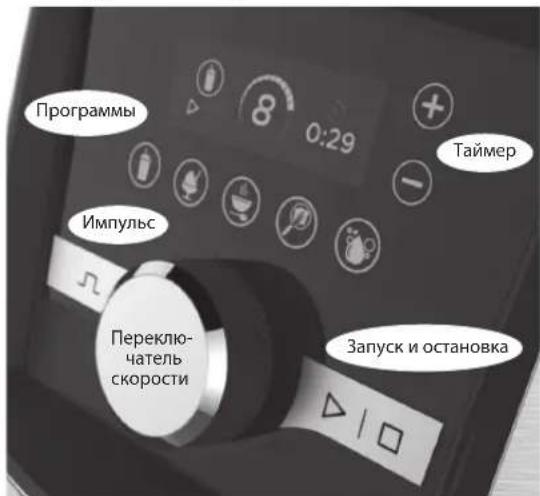
| On /Off (I/O) Switch - The On/Off switch (I/O) is located on the right side of the base. The On/Off switch controls power to the machine. |
| Sleep Mode - The blender will enter sleep mode if the control panel is not used after 60 seconds. The screen will dim and then a spinning vortex will appear on the control panel. Touch any icon or rotate the speed knob on the control panel to exit sleep mode. |
| Two Touch Operation - The control panel is designed to require two interactions of the controls to activate the blending cycle. |
| Container Detect - This symbol will be displayed on the control panel until a container with its lid in place is placed on the blender base. The blender will not operate until a container with a properly attached lid is in place on the motor base. The control panel will display Variable 1 when ready for use. |
| Start/Stop (▷□) - Stop the blender at any time by pressing Start/Stop (▷□) |
| Variable-Speed Dial - The Variable-Speed Dial gives you manual control from Variables 1 (slowest) to 10 (highest). |
| Pulse (▲) - The blades will rotate at the speed displayed on the control panel when pressed. |
| Using the Timer - The timer will count up when using variable speed until Start/Stop is pressed. Each container is programmed with a specific maximum run time. The blender will turn off automatically when the maximum run time has elapsed. To program a time for the blend: This feature is only available when using Variable Speed. Programme times are not adjustable with the limiter function. This feature will count down from the set time and the blender will shut off automatically. Press the + icon to increase blend time. To decrease time, press the - icon. The + and - icons do not work during the blend. To stop, press Start/Stop. |
| Programmes - The icons are listed in Vitamin mix recipes. The blender will automatically stop at the end of the programme. Programmes can be stopped by pressing Start/Stop at any time. Programme times are not adjustable with the timer function. When Start/Stop is pressed mid-programme, the blender will stop and Variable-Speed 1 will be displayed. If you want to run a programme, select it and press Start/Stop. Smoothies Frozen Desserts Soup Dips and Spreads Self-Cleaning |
| Error Codes - If you see an error code on the display, make a note of the numbers on the display after t help with the issue. |
| Motor - The motor is designed to protect itself from overheating. If the blender will not start immediately On/Off switch is On. If the motor has overheated, allow the motor to cool for 20-45 minutes. Tips to prevent 'overloading' your blender: • Only process Vitamin mix recipes when learning to use the blender. • Do not process recipes at lower speeds than recommended. • Do not process recipes at higher speeds than recommended. • Do not process recipes for longer than recommended. • Use your tamper to process thicker mixtures and keep ingredients moving around and through t |
| Tamper - Lids and tampers are not interchangeable between different container styles. types and sizes The container should not be more than two-thirds full when the tamper is used during blending 30 consecutive seconds. |

A3500i Control Panel
PARTS AND FEATURES
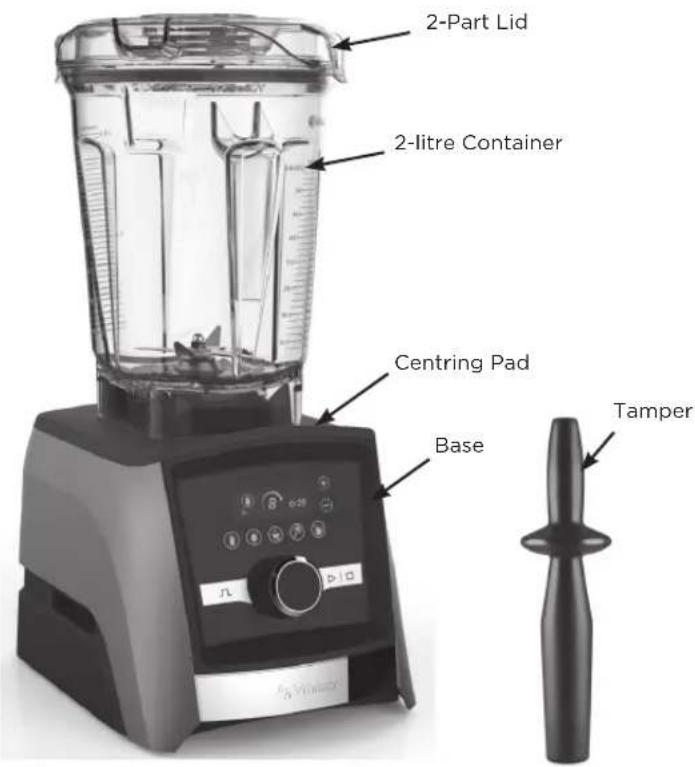
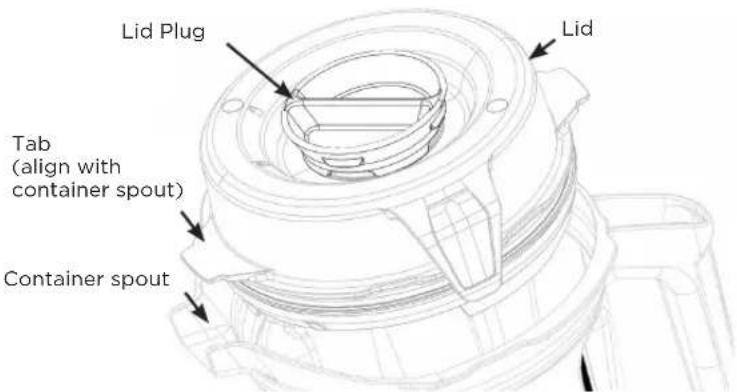
Container, Lid, Lid Plug and Tamper
CAUTION

Rotating Blades Can Cause Damage.
Lids and tampers are not interchangeable between different container styles, types and sizes. Use the tamper that was supplied with your blender.
Always use the lid and the lid plug when operating the blender.
- Never operate the blender without checking to make sure that the lid is securely locked in place.
- The lid plug is marked so it can be used as a measuring cup.
- Insert the lid plug through the lid plug opening. Lock the plug in place by turning clockwise. To remove, turn anti-clockwise and lift out.
- Remove the lid plug to use the tamper or to add ingredients.
- Legacy Vitamix containers (C, G and S Series) will not operate on the Ascent blender base.
Accessories
Accessories are available for creative recipe development. Visit vitamix.com for product offerings and inspiration.
WARNING
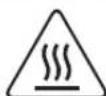


DO NOT use your 0.6-litre cup or 240-ml bowl to heat ingredients or to blend hot liquids. Heated ingredients and liquids may create internal pressure which could cause the cup to burst and cause injury.
DO NOT continuously use your machine for more than 75 seconds when blending with a cup and blade base.
If a cup becomes warm to the touch or steams or vents, immediately stop blending ingredients and turn off or unplug the blender. Allow the cup and ingredients to cool to room temperature before removing the blade base. Allow the cup and ingredients to cool to room temperature before removing the blade base.
Parts will become hot with extended use.
DO NOT touch the drive socket in the motor base or the drive spline in the blade base.
To avoid damage or personal injury, DO NOT use the cups (including the blade base or lids) in the microwave.
BLENDING
Note: The cups and bowls mentioned here are optional accessories of the Ascent Blenders. Please visit www.vitamix.com for more information.
WARNING
| To Avoid Possible Burns, Never Start on Speeds Above 1 when Processing Hot Liquids in a Large Container. Escaping steam, splashes or contents may burn. Always start on Variable 1, then slowly increase to 10. DO NOT use your 0.6-litre cup or 240-ml bowl to heat ingredients or to blend hot liquids. Heated ingredients and liquids may create internal pressure which could cause the cup to burst and cause injury. DO NOT continuously use your machine for more than 75 seconds when blending with a cup and blade base. If a cup becomes warm to the touch or steams or vents, immediately stop blending ingredients and turn off or unplug the blender. Allow the cup and ingredients to cool to room temperature before removing the blade base. Parts will become hot with extended use. DO NOT touch the drive socket in the motor base or the drive spline in the blade base. To avoid damage or personal injury, DO NOT use the cups (including the blade base or lids) in the microwave. |
IMPORTANT! Always use the lid and the lid plug on the Large Container when the machine is in operation. Never operate the blender without checking to make sure that the lid and lid plug are securely locked in place. After blending, wait until the blades completely stop before removing the lid or container/cup from the blender base.
- The On/Off switch is on the right hand side of the base. Press the On/Off switch to the On (I) position. After the blender is turned on, 'Vitaminix' will appear on the control panel. This symbol will be displayed on the control panel when no container is on the blender base.
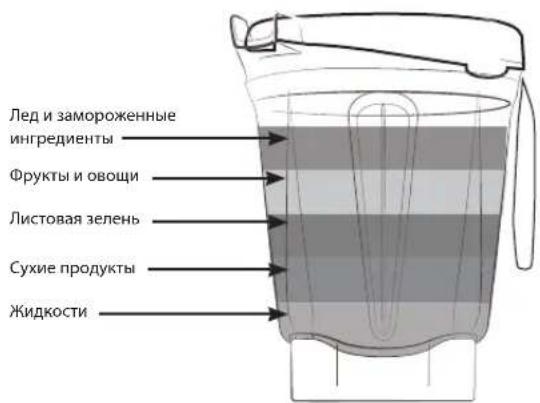
- Load your container according to your recipe or the load order below.
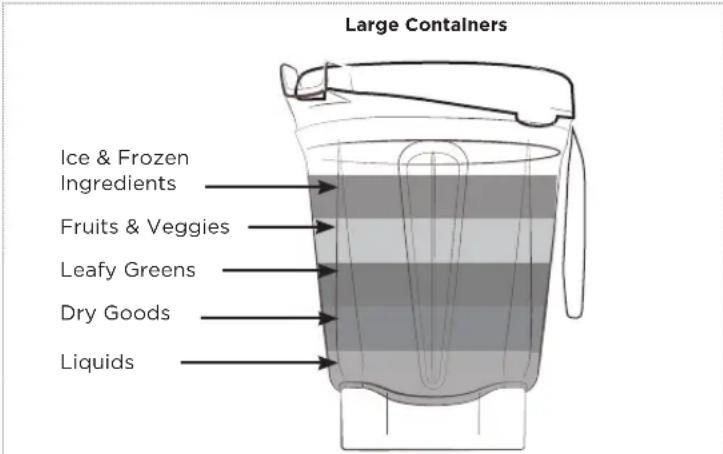
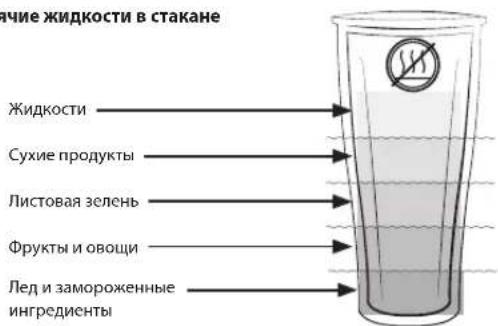
Note: Ingredients for cups load in the opposite order of the large containers.
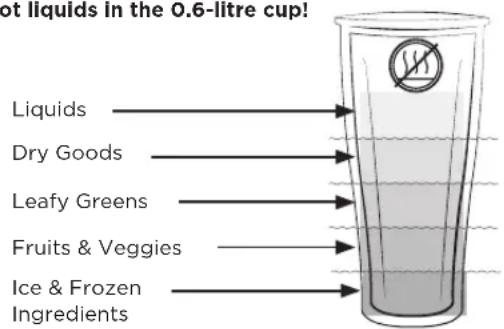
DO NOT blend hot liquids in the 0.6-litre cup!
0.6-litre cup
-
Perform one of the following:
-
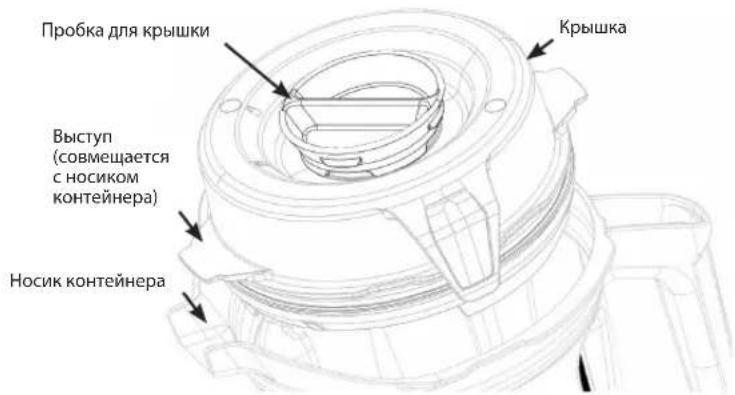
Large Containers - Put the lid onto the container. Align one tab on the lid with the spout of the container to ensure proper lid alignment and seal. Push the lid down into place until the two tabs snap onto the lip of the container. Insert the lid plug. Turn the lid plug clockwise to lock.
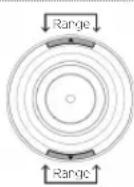
Cups - Put a seal on the bottom thread of the blade base. The seal should fit snugly and evenly around the thread. Locate the two arrows on the blade base. Thread the blade base onto the cup in a clockwise direction and ensure that the arrows line up within the range marked on the cup. DO NOT over-tighten.
-
Put the container (or cup and blade base) onto the blender base. Variable-Speed 1 will display when a container/cup is detected and the blender is ready to operate.
-
Perform one of the following:
To use variable speed:
a. Turn the variable-speed dial anti-clockwise until Variable-Speed 1 appears on the control panel.
b. To set a blend time, use the +/- icons on the controls.
c. Press Start/Stop. The blades will begin to turn and the timer will count the minutes and seconds that the blend has been processing.
d. Rotate the Variable-Speed Dial between 1 and 10 during the blending cycle to increase or decrease the speed of the blades.
e. At the end of the blend, rotate the Variable-Speed Dial anti-clockwise until Variable 1 is displayed, then press Start/Stop.
To use Programmes:
Note: The soup programme is not available for use with the cups. DO NOT blend hot liquid in the cups.
a. Press the icon for the desired programme. (The default programme time and variable-speed setting will be displayed on the control panel).
b. Press Start/Stop to start the programme. (The blender will automatically stop at the end of the programme.) Press Start/Stop at any time to stop the programme.
6. If the mixture stops circulating:
- Large Containers - Insert the tamper through the lid plug and stir until it 'burps'. If this does not work, press the On/Off switch to stop the motor. Remove the container from the blender base and use a rubber spatula to press the air bubble away from the blades. Add liquid if necessary. Replace the lid and lid plug. Return the container to the blender base and continue blending.
- Cups - Press the Start/Stop to stop the motor. Wait until the blades stop rotating. Remove the cup and blade base from the blender base. Turn the cup over. Unthread the blade base from the cup. Stir the ingredients. Add liquid if necessary. Reattach the blade base, place on the blender base and continue blending.
CARE AND CLEANING
BEFOREFIRSTUSE:
- Wipe the base with a warm damp cloth and wipe clean with a dry, soft cloth. Wash the container, cups, lids, lid plug and tamper with warm, soapy water. Rinse all parts. Wipe dry with a dry, soft cloth.
- Choose a space on the counter that is level, dry and clean. Plug the blender into an earthed, 3-prong outlet.
Note: Your Vitaminix container is designed to be completely cleanable without removing the retainer nut and blade assembly. DO NOT attempt to remove the retainer nut or blade assembly from the container. Our Normal Cleaning and Sanitising procedures or a dishwasher cleaning cycle will ensure a complete and thorough cleaning of your container and its components. If your container is damaged, please do not use. Contact Vitaminix Customer Service IMMEDIATELY.
Care and Cleaning of Large Containers:
To Clean:
- Fill the container half full with warm water and add a couple of drops of washing-up liquid.
- Snap or push the complete 2-Part lid into the locked position.
- Perform one of the following procedures:
Variable Speed:
a. Press Start/Stop.
b. Slowly increase the variable speed to 10.
c. Run the machine for 30 to 60 seconds.
d. Rotate the Variable-Speed dial back to Variable 1.
-
Model A3500i, press the Self-Cleaning Icon ( ) to select. Press Start/Stop. The programme will automatically stop when complete.
-
Rinse and drain all pieces.
To Sanitise: (Bleach) (Full-size Containers)
- Follow the cleaning instructions above.
- Fill the container half full of water and add 112 teaspoons of liquid bleach.
- Snap or push the complete 2-part lid into the locked position.
- Perform one of the following procedures:
Variable Speed:
a. Press Start/Stop.
b. Slowly increase the variable speed to 10.
c. Run the machine for 30 to 60 seconds.
d. Rotate the Variable-Speed dial back to Variable 1.
-
Model A3500i, press the Self-Cleaning Icon ( ) to select. Press Start/Stop. The programme will automatically stop when complete.
-
Allow the mixture to stand in the container for an additional 1½ minutes.
- Pour out the bleach mixture. Allow the container to air dry. Do not rinse after sanitising.
To Sanitise: (Vinegar) (Full-size Containers)
- Follow the cleaning instructions above.
- Prepare the vinegar solution: for the 2-litre container, dilute 475ml of vinegar in 475ml water.
- Snap or push the complete 2-part lid into the locked position.
- Perform one of the following procedures:
Variable Speed:
a. Press Start/Stop
b. Slowly increase the variable speed to 10.
c. Run the machine on variable-speed 10 for 2 full minutes.
d. Rotate the Variable-Speed dial back to Variable 1. Press Start/Stop.
- Allow the mixture to stand in the container for an additional 3 full minutes. The total contact time of the vinegar solution in the container should equal 5 minutes.
- Pour the vinegar solution out of the container over the inside surface of the 2-part lid. Repeat the sanitisation procedure again.
- Allow the container and lid to air dry. Do not rinse after sanitising. If necessary, rinse immediately before next use.
Lids, Lid Plug, Centring Pad and Tamper
The parts are dishwasher safe. If preferred, wash the parts in warm soapy water. Rinse clean under running water, then dry.
In-Place Cleaning: (0.6-litre cup or 240-ml bowl)
- Fill the container half full with water and add a couple of drops of washing-up liquid. DO NOT BLEND HOT WATER.
- Put a seal on the bottom thread of the blade base. The seal should fit snugly and evenly around the thread. Thread the blade base onto the cup in a clockwise direction just until tight.
- Put the cup and blade base onto the base.
- Press Start/Stop. Slowly increase the variable speed to 10.
- Run the machine for 30 to 60 seconds.
- Rotate the Variable-Speed dial back to Variable 1. Press Start/Stop.
- Rinse and drain all pieces.
To Sanitise: (Bleach) (0.6-litre cup or 240-ml bowl)
- Follow the cleaning instructions above.
- Fill the container half full with water and 1/2 teaspoon of liquid bleach. DO NOT BLEND HOT WATER.
- Put a seal on the bottom thread of the blade base. The seal should fit snugly and evenly around the thread. Thread the blade base onto the cup in a clockwise direction until just tight.
- Put the cup and blade base onto the base.
- Press Start/Stop
- Slowly increase the variable speed to 10.
- Run the machine for 30 to 60 seconds.
- Rotate the Variable-Speed dial back to Variable 1. Press Start / Stop.
- Allow the mixture to stand in the container for an additional 1 12 minutes.
- Pour out the bleach mixture. Allow the container to air dry. Do not rinse after sanitising.
To Sanitise (0.6-litre cup or 240-ml bowl) with Vinegar (minimum 5% acidity):
Note: If the vinegar has greater acidity, the water can be increased to get a minimum
2.5% solution.
For example, for 10% acidity use 1 part vinegar and 3 parts water.
1. Follow the cleaning instructions above.
2. Fill the container 150 ml with water and 150 ml white vinegar (60 ml with water and 60 ml white vinegar). DO NOT BLEND HOT WATER.
3. Put a seal on the bottom thread of the blade base. The seal should fit snugly and evenly around the thread. Thread the blade base onto the cup in a clockwise direction until just tight. Put the cup and blade base onto the base.
- Use Variable Speed:
a. Press Start/Stop.
b. Slowly increase the variable speed to 10.
c. Run the machine for 60 seconds.
d. Rotate the Variable-Speed dial back to Variable 1. Press Start/Stop.
- Allow the mixture to stand in the container for an additional 4 minutes (5 minutes total contact time).
- Pour the vinegar mixture out. Allow the container to air dry. Do not rinse after sanitising.
| WARNING | |
| ! | To Avoid Injury and Damage. To avoid inadvertent activation, turn off and unplug the blender before cleaning. |
| WARNING | |
| Electrical Shock Hazard. Always unplug before cleaning the blender base or when not in use. Do not put the blender base in water or other liquids. Failure to follow instructions can cause death or electric shock. | |
Blender Base
- Turn off and unplug the blender.
- Wash the outside surface with a damp, soft cloth or sponge that has been rinsed in a mild solution of washing-up liquid and warm water. Do not place the blender base in water. The centring pad can be removed for more thorough cleaning.
- Immediately dry all surfaces and polish with a soft cloth.
WARRANTY
10-Year full Machine Warranty
1.PRODUCT REGISTRATION.
You can register online at vitamix.com/warranty; or by calling our Customer Services Department on 0800 587 0019 or +1 440 235 4840. Failure to register your product purchase will not diminish your warranty rights. However, registering your purchase will allow Vitamin to better serve you with any of your customer service needs.
2. WHO CAN SEEK WARRANTY COVERAGE?
This Warranty is extended by Vitamin to the owner of this blnder for personal household use only. This Warranty does not apply to products used for commercial, rental or resale purposes. Should ownership of the blender change during the 10-year period, please update the blender's owner information at vitamix.com.
3. WHAT IS COVERED?
Vitamix warrants to the owner that if this Blender (a 'Blender' consists of a motor blender base, any container(s), lids and tamper(s) purchased together) fails within 10 years from the date of purchase due to a defect in material or workmanship or as a result of normal wear and tear from ordinary household use, Vitaminix will, within 30 days of receipt of the returned blender, repair the failed Blender or component part of the Blender free of charge.
If, at Vitaminix's sole discretion, the failed Blender or component part of the Blender cannot be repaired, Vitaminix will elect to either (A) replace the Blender free of charge or (B) refund the full purchase price to the owner, unless Vitaminix receives prior written notice of the owner's preference.
4. WHAT IS NOT COVERED?
This Warranty does not apply to Blenders used commercially or in non-household applications. This Warranty does not cover cosmetic changes that do not affect performance, such as discolouration or the effects of the use of abrasives or cleaners, or food build-up. This Warranty is only valid if the Blender is used and maintained in accordance with the instructions, warnings and safeguards contained in the owner's manual. Containers: Processing certain herbs and spices in the container/cup will result in cosmetic marring of the container/cup and may cause the blades to wear prematurely. Traces of sand, as well as coarse, gritty and abrasive herbs, will also cause the blades to wear prematurely. Herbs may contain volatile oils, cause the container/cup to retain the oils and cause permanent discolouration.
Vitamix will not be responsible for the cost of any unauthorised warranty repairs.
REPAIR, REPLACEMENT OR REFUND OF THE PURCHASE PRICE ARE THE EXCLUSIVE REMEDIES OF THE PURCHASER AND THE SOLE LIABILITY OF VITAMIX UNDER THIS WARRANTY. NO EMPLOYEE OR REPRESENTATIVE OF VITAMIX IS AUTHORISED TO MAKE ANY ADDITIONAL WARRANTY OR ANY MODIFICATION TO THIS WARRANTY WHICH MAY BE BINDING UPON VITAMIX. ACCORDINGLY, THE PURCHASER SHOULD NOT RELY UPON ANY ADDITIONAL STATEMENTS MADE BY ANY EMPLOYEE OR REPRESENTATIVE OF VITAMIX. IN NO EVENT, WHETHER BASED ON CONTRACT, INDEMNITY, WARRANTY, TORT (INCLUDING NEGLIGENCE), STRICT LIABILITY OR OTHERWISE, SHALL VITAMIX BE LIABLE FOR ANY SPECIAL, INDIRECT, INCIDENTAL OR CONSEQUENTIAL DAMAGES, INCLUDING, WITHOUT LIMITATION, LOSS OF PROFIT OR REVENUE.
Some states do not allow limits on warranties. In such states, the above limitations may not apply to you. Outside the U.S.A. and Canada, other warranties may apply.
5. WHAT VOIDS THIS WARRANTY?
Abuse, misuse, negligent use, alteration of the Blender, exposure to abnormal or extreme conditions or failure to follow the operating instructions in this manual will void this Warranty.
The Warranty is also void if repairs to the Blender or any component part of the Blender are performed by someone other than either Vitaminix or an authorised Vitaminix Service Provider or if any component part of a Blender subject to this Warranty is used in combination with a motor base or container that is not expressly authorised by Vitaminix.
6. HOW TO OBTAIN RETURN AUTHORIZATION UNDER THIS WARRANTY.
In the event that you need service or repair, please call Vitaminix Customer Services on 1.800.848.2649 or 1.440.235.4840. You will be asked to provide a date of purchase and proof of purchase for any blender that has not been registered with Vitaminix. For blenders subject to this Warranty, you will be provided with a return authorisation number, up-to-date shipping instructions and a pre-paid return collection label. Vitaminix will pay standard shipping costs on the return of a Blender for warranty service and repair and for return shipment of the blender to you after the warranty repair or replacement. The purchaser is responsible for the costs of special delivery requests.
Within the U.S.A. and Canada, this Warranty is honoured directly through the Vita-Mix Corporation.
United States Canada
Vita-Mix Corporation Vita-Mix Corporation
8615 Usher Road 200-1701 Shepherd Street East
Cleveland, Ohio 44138-2199 Windsor, Ontario N8Y 4Y5
+18008482649+18008482649
service@vitamix.com
service@vitamix.com
You will be deemed to have accepted the returned product 'as is' upon delivery unless you notify Vitamin of any problem, including shipment damage, within 48 hours of delivery.
INTERNATIONAL CONTACTS
EUROPE
BELGIUM
Dalcq SA
86 Rue de Hainaut
6180 Courcelles
Belgium
Tel: +32 (0) 19 63 38 33
www.theblender.be
BOSNIA &
HERZEGOVINA
Enzita d.o.o.
Pave Radana br.15
Banja Luka, 78000
Bosnia and Herzegovina
Tel:+387(0)66117188
www.Enzita.ba
info@enzita.ba
BULGARIA
Enzita EOOD
Simeonovsko shose 33
Sofia, 1000
Bulgaria
Tel: +389 (0) 76 487 171
www.Enzita.bg
info@enzita.bg
CROATIA
Enzita d.o.o.
Avenija Dubrovnik 15
Zagbrecki velesajam
(Kineski paviljon)
Zagreb, 10020
Croatia
Tel: +385 (0) 99 81 59 050
www.Enzita.hr
info@enzita.hr
CZECH REPUBLIC
Traminal s.r.o.
Kaprova 42/14
11000 Praha 1
Czech Republic
Tel: +420.773.753.333
www.atranet.cz
DENMARK
High on Life ApS
Bakkelvco2
8680Ry
Denmark
Tel: (+45) 42783276
info@highonlife.dk
FRANCE
Wismer S.A.
Tel: (+39) 02.61.45.16.1
Fax: (+39) 02.66.500.553
www.kunzi.it
nfo@kunzi.it
EASTERN EUROPE
Hollaender Elektro
GmbH & Co.KG
Flinschstrasse 35,
60388 Frankfurt
Germany
Tel: +49 69 4990131
gmbh@hollander-elektr.de
ICLAND
Kaelitaekni Ltd.
Rauoageroi 25
108 Reykjavik
Iceland
Tel: (+49) 89.864987.0
www.cooltech.is
LITHUANIA
Zaliavalgis.it
Dovanu stotele UAB
Pamenkalnio g.1
01116 Vilnius,
Lithuania
Tel: (+370) 52611011
Tel: (+370) 615627
www.zaliavalgis.lt
info@zaliavalgis.lt
LUXEMBOURG
Dalcq SA
86 Rue de Hainaut
6180 Courcelles
Belgium
Tel: +32 (0) 19 63 38 33
www.theblender.be
MACEDONIA
Nutri Vita
Mile Pop Jordanov
23a/51000
Skopje
Macedonia
Tel: (+389) 70.272.072
www.vitamix.mk
MONTENEGRO
Enzita d.o.o.
Podgorica, 1000
Montenegro
Tel: +381 (O) 65 21 550 65
www.Enzita.me
info@enzita.me
NETHERLANDS
MultiBrands Marketing
&Sales BV
Heereweg 337-A
2161 BL Sassenheim
The Netherlands
Tel: +31 (0) 252 241240
Fax: +31 (0) 252 241244
info@multibrands.nl
NORWAY
Lindenbaum Agentur AB
Hardemogatan 7
S-124 67 Bandhagen
Sweden
Tel: +(+46)857.034.777
www.theblender.se
info@theblender.se
POLAND
Logo S.C.
Ul, Kraszowicka 81
58-100 Swidnica
Poland
Tel: (+48) 71735 66 60
www.bestblender.pl
info@bestblender.pl
ROMANIA
Quark S.R.L.
Str. Mizil 2B, Sector
3032265 Bucharest
Romania
Tel: (+40) 21 345 1725
www.BeOrganic.ro
office@quark.com.ro
SERBIA
Enzita d.o.o.
Leposave Vujosevic 11/14
Beograd, 11000
Serbia
Tel: +381 (0) 65 21 550 65
www.Enzila.rs
info@enzita.rs
SPAIN
CONASI
Carlos Vn°4 Bajos
16 Upper Woburn Place
Office number 318
London WCIH OAF
Tel: (+44) 0800 587 0019
www.vitamix.co.uk
AFRICA & MIDDLE EAST
SOUTH AFRICA
CONGLOMUS CC T/A
HEALTHMAK!
9 Hoog Street
Utrecht
ZA
www.healthmakers.co.za
sales@healthmakers.co.za
ISRAEL
New Horizon
Maskit 27
Herzlia 46733
Israel
Tel: (+972) 9.9576422
Tel. (+972) 1.700.70.2009
www.newhorizon.co.il
BAHRAIN, KUWAIT,
OMAN, QATAR
AND SAUDI ARABIA
4Homes FZCO
PO Box 61379, Dubai UAE.
Tel: +971 43807611
Fax:+9714387612
4homes@4homes.ae
www.tavolashop.com
UNITED ARAB
EMIRATES
Vitality General
Trading LLC
PO Box 73265
Dubai
United Arab Emirates
Tel: +971 (0) 561089662
www.vitality.ae
info@vitality.ae
4Homes FZCO
PO Box 61379, Dubai UAE.
Tel: +971 43807611
Fax: +971 4 387612
4homes@4homes.ae
www.tavolashop.com
AUSTRALIA &
NEW ZEALAND
Vitamix ANZ Pty Limited
167 King St
Newcastle NSW2300
Australia
Tel:1-800-766437(AUS)
Tel:050-853-0697(NZ)
www.vitamix.com.au
www.vitamix.co.nz
https://www.vitamix.com/Corporate-Information/Corporate-Policies/EU-Declaration-of-Conformity
https://www.vitamix.co.uk/Corporate-Information/Corporate-Policies/EU-Declaration-of-Conformity
Tel: +33(0)329.82.27.71
www.wismor.fr
FINNLAND
Primulator Oy
Tyopajankatu 10A
H-00580 Helsinki
Finland
Tel: (+358) 972.60622
www.theblender.fi
ITALIEN
KUNZIS.p.A.
Via L. Ariosto,
19-1-20091 Bresso (MI)
Italian
Tel: (+39) 026145161
Fax:(139)0266.500.553
www.kunzuit
nfo@kunzlt
OSTEUROPA
Hollander Flektro
GmbH & Co.KG
Flinschstrasse 35.
60388 Frankfurt
Deutschland
Tol: +421.2,529.32868-9
amatko@settour.sk
SCHWEDEN
Lindenbaum Agentur AB
Hardemogatan 7
5-12467 Bandhagen
Schweden
Tel: (+46) 08-57034777
www.theblender.se
16 Upper Woburn Place
Office number 318
London WC1H OAF
Tel:(+44)0800.587.0019
www.vitamix.co.uk
AFRIKA UND NAHER OSTEN
SUDAFRIKA
CONGLOMUS CCT/A
HEALTHMAKERS
9 Hoog Street
Utrecht
乙A
Tel: +(27)343314824
www.healthmakers.co.za
sales@healthmakers.co.za
ISRAEL
New Horizon
Maskit 27
Herzlia 46733
Israel
Tel: (+972) 9.9576422
Tel: (+972) 1.700.70.2009
www.newhorizon.co.il
BAHRAIN, KUWAIT,
OMAN, KATAR
ONU SAUDI-ARABIAN
4Homos∠CO
PO Box 61379, Dubai UAE
Tel: +97143807611
Fax:+9714387612
4hones@4homes.ae
www.tavolashop.com
VEREINIGTE ARABISCHE
EMIRATE
Vitality General
Trading LLC
PO Box 73265
Dubai
Vitamix ANZ Pty Limited
167KingSt
Newcastle NSW2300
Australian
Tel:1-800-766437(AUS)
Tel:050-853-0697(NZ)
www.viia.com.s001.hk
www.vitamix.conz
BLENDERS HAUTE PERFORMANCE A3300i ET A3500i
Série Ascent
VM0195C VM0195

https://www.vitamix.com/Corporate-Information/Corporate-Policies/EU-Declaration-of-Conformity
https://www.vitamix.co.uk/Corporate-Information/Corporate-Policies/EU-Declaration-of-Conformity
Cleveland, Ohio 44138-2199Windsor, Ontario N8Y 4Y5
+1800848-2649
+1800848-2649
service@vitamix.com
service@vitamix.com
16 Upper Woburn Place
Office number 318
Londres WCIH OAF
T6L:(+44)08005870019
www.vitamix.co.uk
AFRIQUE ET MOYEN-ORIENT
AFRIQUE DU SUD
CONGLOMUS CC T/A
HEALTHMAKERS
Hoog Street
Ulrecht
乙A
Tel.:+(27)343314824
www.healthmakers.co.za
sales@healthmakers.co.za
ISRAEL
New Horizon
Maskit 27
Herzlia 46733
Israel
Tel:(+972)99576422
Tel: (+972) 1700 70 2009
www.newhorizon.co.il
BAHREIN, KOWEIT
OMAN, GATAR.
ET ARABIE SAODITE
4Homes FZCO
PO Box 61379, Dubai EAU
Tel.:+97143807611
Fax:+9714387612
4homes@4homes.ac
www.tayolashop.com
EMRATS
ARABESUNIS
Vitality General
Trading LLC
PO Box 73265
Dubai
Emirats Arabes Unis
Tel.:+971(0)561089662
www.vitality.ao
info@vitality.ae
4HomesFZCO
PO Box 61379, Dubai EAU
Te: +971 43807611
Fax:+971438
4homes@4homes.ee
www.tavolashop.com
AUSTRALIE ET
NOUVILLE-7ELEANDRE
Vitamix ANZ Pty Limited
167 King St
Newcastle NSW2300
Australia
TEL:1-800-766437(AUS)
Tel:050-853-0697(NZ)
www.vitamix.com.au
www.vilamix.co.nz
https://www.vitamix.com/Corporate-Information/Corporate-Policies/EU-Declaration-of-Conformity
https://www.vitamix.co.uk/Corporate-Information/Corporate-Policies/EU-Declaration-of-Conformity
Cleveland, Ohio 44138-2199 Windsor, Ontario N8Y 4Y5
+1-800-848-2649
+1-800-848-2649
service@vitamix.com
service@vitamix.com
Tel: +420.773.753.333
www.atranot.cz
DANIMARCA
High on Life ApS
Bakkeyvej2
8680Ry
Danimarca
Tel: (+45) 42783276
info@highonlife.dk
FRANCIA
Wisner S.A.
Zone Inova 3000 - allee n°5
88150 Thacn les Vosges
Francia
Tel: +33 (0) 32982.27.71
www.wismer.fr
FINLANDIA
Primulator Cy
Tyopajankatu 10A
HOO580Helsinki
Finlandia
Tel. (+358) 972.60622
www.theblender.fi
ITALIA
KUNZI S.p.A.
Vie L.Ariosto.
19-1-20091 Bresso (MI)
italia
Tel: (+39) 02.61.45.16.1
Fax:(+39)0266.500.553
www.kunzit.com
info@pkunzit
EUROPA ORIENTALE
Hollander Elektro
GmbH & Co.KG
Einschstras
60388Francoforte
Germania
Tel. +49 69 4990131
16 Upper Webum Place
Office number 318
Londra WCIH OAF
Tel:(+44)0800587.0019
www.vitamix.co.uk
AFRICA E MEDIO ORIENTE
SUDAFRICA
CONGLOMUS CC T/A
HEALTHMAKERS
9 Hoog Street
Utrecht
乙A
www.healthmakers.co.za
salos@healthmakers.co.za
ISRAELE
New Horizon
Maskit 27
Berzla 46733
Israeie
Tel: (+972) 9.9576422
Tel: (+972) 1.700.70.2009
www.newhorizon.co.il
BAHREIN, KUWAIT.
GMAN, GATAR
E ARABIA SAUDITA
4Homes FZCO
PO Box 61379, Dubai, Emirati
Arabi Unit
Tel: +971 43807611
Fax:+9714387612
4hmos@4hmos.a0
www.tavolashop.com
EMIRATI ARABI UNITI
Vitality General
Trading LLC
PO Box 73265
Dubai
Emirati Arabi Uniti
Tel: +971 (0) 561089662
www.vitality.com
info@vitality.se
4Homes FZCO
PO Box 61379, Dubai,
Emirati Arabi Unit
Tel: +971 43807611
Fax:+9714387612
4hmos@4hmos.ao
www.tavoileshop.com
AUSTRALIAE
NUOVA ZELANDA
Vitamix ANZ Pty Limited
167 King St
Newcastle NSW2300
Australia
Tel:+1-800-766437(AUS)
Tel: (+61) 050-853-0697 (NZ)
www.vitamix.com.au
www.vitamix.co.nz
https://www.vitamix.com/Corporate-Information/Corporate-Policies/EU-Declaration-of-Conformity
https://www.vitamix.co.uk/Corporate-Information/Corporate-Policies/EU-Declaration-of-Conformity
Cleveland, Ohio 44138-2199Windsor, Ontario N8Y 4Y5
1-800-848-2649
1-800-848-2649
service@vitamix.com
service@vitamix.com
Tel: +421.2.529.32868-9
amatko@settour.sk
SUECA
Lindenbaum Agentur AB
Hardemogatan 7
5-12467 Bandhagen
Suecia
Tol. (+46) 08-57034777
www.theblender.se
ALEMANIA, AUSTRIA Y SUIZA
Vita-Mix GmbH
Kurfuerstandamm 21
10719 Berlin
Alemania
Tel:(+49)80084826491
www.vitamix.de
ALEMANIA
16 Upper Woburn Place
Office number 318
Londres WCIH OAF
Tel: (+44) 0800.587.0019
www.vitamix.co.uk
AFRICA Y ORIENTE MEDIO
SUDAFRICA
CONGLOMUS CCT/A
HEALTHMAKERS
9 Hoog Street
Ulrecht
乙A
www.healthmakers.co.za
sales@healthmakers.co.za
ISRAEL
New Horizon
Maskit 27
Horizia 45773
Israel
Tel:(+972)9.9576422
Tel: (+972) 1.700.70.2009
www.newhorizon.co.il
BAREIN, KUWAIT
OMÁN, CATAR
YARABIA SAUDI
4Homes EZSS
61379, Dubáí (Emiratos Árabes)
Unidos)
Tel: +971 43807611
Fax: +9714 387612
4homes@4homes.ae
www.tavolashop.com
Vitamin ANZ Pty Limited
167 King St.
Newcastle NSW2300
Australia
Tel:1-800-766437(Australia)
Tel:050-853-0697(Nueva
Zelandla)
www.vitamix.com.au
www.vitarnix.co.nz
Cleveland, Ohio 44138-2199Windsor, Ontario N8Y 4Y5
1-800-848-2649
1-800-848-2649
service@vitamix.com
service@vitamix.com
Tel:+33.(0)3.29.82.27.71
www.wismer.fr
FINLANDIA
Primulator Oy
Tyopajankatu 10A
F-00580 Helsinki
Finlandia
Tel: (+358) 972.60622
www.theblender.li
ITALIA
KUNZI S.p.A.
Via L. Ariosto,
19-1-2009 Bresso (MI)
italia
Tel: (+39) 026145161
Fax: (+39) 02-66.500 553
www.kunziit.com
nfo@kunz.it
EUROPA DE LESTE
Hollender Elektro
GmH & Co.KG
Flinschstrasse 35.
60388 Frankfurt
Alemanha
Tel. (+389) 70.272.072
www.vitamix.mk
MCNTENEGRO
Enzita doo
Podgorica, 1000
Montenegro
Tel: +381 (0) 65 21 550 65
www.Enzita.me
info@enzita.me
PAISES BAIXOS
MultiBrands Marketing
&Sales BV
Heereweg 337-A
2161 BL Sassenhem
Palscs Baixos
Tel:+31(0)25224240
Fax+31(0)252241244
info@multibrencs.nl
NORJEGA
Lndenbaum Agentur AB
Haroemogatan 1
S-124 67 Banchagen
Suécia
Tel: +(+46)857.034.777
www.theblender.se
info@theblender.se
PCLCNIA
Logo S.C.
Ul. Kraszowicka 81
58-100 Swidnica
Polonia
Tel: (+48) 71735 66 60
www.bestblender.ql
info@bestender.pl
ROMENIA
Guark S.R.L.
Str. Mzil 2B, Sector
3032265Bucareste
Romenia
Tel: (+40) 21 345 1725
www.BeOrganic.ro
office@quark.com.ro
SERVIA
Enzita d.o.o.
Leposave Vujosevic 1/14
Begrado, 1000
Senvia
Tel: +381 (0) 6521 550 65
www.Enzita.rs
info@enzita.rs
ESPANF
CONAS
Carlos V n4 Bacs
16 Upper Woburn Place
Office number 318
Londres WCIH OAF
Tel: (+44) 0800 587.0019
www.vitamix.co.uk
www.healthmakers.co.za
sales@healthmakers.co.za
ISRAEL
New Horizon
Maskit 27
Herzla 46733
Israel
Tel: (+972) 9.9576422
Tel: (+972) 1,700.70.2009
www.newhorizon.co.il
BAHREIN, KUWAIT.
CMACATAR
EARABIA SAUDITA
4Homes FZCO
PC Box 61379, Dubai EAU.
Tel: +97 4380761
Fax:+9714387612
4homes@4homes.ae
www.tavolashop.com
EMIRADOS ARABES UNDOS
Vitality General
Trading LLC
PC Box 73265
Dubai
Vitamin ANZ Pty Limited
167 King St.
Newcastle NSW2300
Australia
Tel:1-800-766437 (AUS)
Tel:050-853-0697(NZ)
www.vitamix.com.au
www.vitamix.co.z
Cleveland, Ohio 44138-2199 Windsor, Ontario N8Y 4Y5
1-800-848-2649
1-800-848-2649
service@vitamix.com
service@vitamix.com
16 Upper Woburn Place
Office number 318
London WCIH OAP
Tel.(44)08005870019
www.vitarnix.co.uk
AERIKA EN MIDDEN-POSTEN
ZUID-AFRKA
CONGLOMUS CC T/A
HEALTHMAKERS
9 Hoog Street
Utrecht
乙A
www.healthmakers.co.za
sales@healthmakers.co.za
ISRAEL
New Horizon
Maskit 27
Berzia 46733
srae
Tel: (+972) 9 9576422
Tel: (+972) 1700 70 2009
www.newhorizon.co.il
BAHREIN, KOEWEIT
OMAN, GATAP
EN SAOEDI-ARABIE
4Homes FZCO
PO Box 61379, Dubai UAE
10:9/4580/6TI
Fax:+9714387612
4homes@4homes.aq
www.tavolashop.com
VERENIGDE ARABISCHE
EMIRATEN
Vitality General
Trading LLC
PO Box 73265
Dubai
Vitamin ANZ Pty Limited
16/KingSt
Newcastle NSW2300
Australia
Tel:1-800-766437(AUS)
Tel:050-853-0697(NZ)
www.vitamix.com.au
www.vitamix.co.nz
A3300i- JA A3500i-TEHOSEKOITTIMET
Ascent Series
VM0195C VM0195

Puh. (+39) 02.61.45.16.1
Faksi: (+39) 02.66.500.553
www.kunzijt.com
nfo@kunzi.it
ITA-EUROOPPA
Hollender Elektro
GmbH & Co.KG
Finschstrasse 35,
60388 Frankfurt
Saksa
Puh.:+49694990131
gmioh@hollander-elektro.de
ISLANTI
Kaelitaekni Ltd.
RauOaceroi 25
108 Reykjavik
Islanti
Puh. (+49) 89.864987.0
www.cooltech.is
LIETTUA
Zaliavalgis.it
Dovanu stotele UAB
Pamenkalnico 1
Ollie Vilna
Liettua
Puh: (+370) 52611011
Puh: (+370) 61562740
www.zaliavalgis.lt
info@zaialvalgis.lt
LUXEMBURG
Dalcq SA
86 Rue de Hainaut
6180 Courcelles
Belgium
Puh:+32(0)19633833
www.theblender.be
MAKEDONIA
Nutri Vita
Mile Pop Jordanov 23a/51000
Skopje
Makedonia
Puh: (+389) 70.272.072
www.vitamix.mk
MONTENEGRO
Enzita d.o.o.
Podgorica, 1000
Montenegro
Puh:+381(0)652155065
www.Enzita.mc
info@enzita.me
ALANKOMAAT
MultiBrands Marketing
&Sales BV
Heereweg 337-A
2161 BL Sassenheim
Alankomaat
Puh. +31 (0) 252 241240
Fakst+31(0)252241244
info@multibrands.nl
NORJA
Lindenbaum Agenturer AB
Hardemogatan 7
S-124 67 Bandhagen
Ruotsi
Puh. (+46) 857.034.777
www.theblender.se
info@theblender.se
PUOLA
Logo S.C.
Ul, Kraszowicka 81
58-100 Swidnica
Poula
Puh. (+48) 717356660
www.bestblenepi
info@bestblender.net
ROMANIA
Quark S.R.L.
Str. Mizil 2B, Sector
3032265Bukarest
Romania
Puh. (+40) 213451725
www.BeOrganic.ro
office@quark.com.ro
SERBIA
Enzita d.o.o.
Leposave Vujosevic 1/14
Beograd, 11000
Serbia
Puh. +381 (0) 65 21 550 65
www.Enzita.rs
info@enzila.rs
ESPANJA
CONASI
Carlos V n°4 Bajos
23680 Alcalá Real (Jaén)
Espania
Puh. (+34) 953102560
www.conasi.eu
info@conasi.eu
SLOVAKIA
Settour Slovakia spel. s r.o.
Lazaretska 29
81109 Bratislava
Slovakia
Puh.: +421.252932868-9
amatko@settour.sk
RUOTSI
Lindenbaum Agentur AB
Hardemogatan 7
S-124 67 Banchagen
Ruotsi
Puh: (+46) 08-570 347 77
www.theblender.se
SAKSA,ITAVALTA,SVEITSI
Vita-Mix GmbH
Kurfuerstendamm 21
1079 Berlin
Saksa
Puh: (+49) 800 8482 6491
www.vitamix.de
SAKSA
www.healthmakers.co.za
sales@healthmakers.co.za
ISRAEL
New Horizon
Maskit 27
Herzlia 46733
Israel
Puh: (+972) 9 9576422
Puh. (+972)1700702009
www.newhorizon.co.l
BAHRAIN, KUWAIT.
OMAN. QATAR,
JA SAUDI-ARABIA
4Homes FZCO
PO Box 61379, Dubai UAE.
Puh.:+9714380761
Faksi: +971 4387612
4homes@4homes.ac
www.lavolashop.com
YHDISTYNEETARABI
EMIRATES
Vitality General
Trading LLC
PO Box 73265
Dubai
Vitamin ANZ Pty Limited
167 King St
Newcastle NSW2300
Australia
Puh.:1-800-766437 (AUS)
Puh:050-853-0697(NZ)
www.vitamix.com.au
www.vitamix.co.nz
A3300i OCH A3500i HÖGPRESTANDAMIXRAR
Ascent-serien
VM0195C VM0195

https://www.vitamix.com/Corporate-Information/Corporate-Policies/EU-Declaration-of-Conformity
https://www.vitamix.co.uk/Corporate-Information/Corporate-Policies/EU-Declaration-of-Conformity
Tm:(+39)02.61.45.16.1
Fax:(139)02.66.500.553
www.kunzuit.com
nfo@kunzit
OSTEUROPA
Hollaender Flektro
GmbH & Co KG
Finschstrasse 35.
60388 Frankfurt
Tyskland
Tfn:149691990131
Str, Mizil 2B, Sector
30.32265Bukarest
Rumänien
1fn: (+40) 21-5451/25
www.BeOrganic.ro
office@quark.com.ro
SERBION
Enzita d.o.o.
Leposave Vujosevic 11/14
Beograd, 11000
Serblon
Tfn: +381 (0) 65 21 550 65
www.Enzilars.com
info@benzita.rs
SPANIEN
CONASI
Carlos V n°4 Bajos
16 Upper Weburn Place
Office number 318
London WCIH OAF
Tfn:(144)0800.587.0019
www.vitamix.co.uk
AFRIKA OCH MELLANÖSTERN
SYDAFRIKA
CONGLOMUS CC T/A
HEALTHMAKERS
9 Hoog Street
Utrecht
ZA
Tn+27)343314824
www.healthmakers.co.za
sales@healthmakers.co.za
ISRAEL
New Horizon
Maskit 27
Berzla 46733
israel
Tfn (+972) 9.9576422
Tfn: (+972) 1.700.70,2009
www.newhorizon.co.il
BAHRAIN, KUWAIT,
CMAN, GATAR
OCH SAUDIARABIEN
4Homes FZCO
PO Box 61379, Dubai UAE
1fn+9/14380/611
Fax:+9714387612
4homes@4homes.aq
www.tavolashop.com
FÖRENADE
ARABEMIRATEN
Vitality General
Trading LLC
PO Box 73265
Dubai
Forenade Arabemiraten
Tin: +971 (0) 561089662
www.vitality.ac
info@vitality.aae.com
4Homes FZCO
PO Box 61379, Dubai UAE
Tn:+97143807611
Fax:+9714387612
4homes@4homes.ae
www.lavolashop.com
AUSTRALIEN OCH
NYA ZEELAND
Vitamin ANZ Pty Limited
16/KingSt
Newcastle NSW2300
Australia
Tfn:1-800-766437(AU5)
Tin:050-853-0697(NZ)
www.vitamix.com.au
www.vitamix.co.nz
A3300i og A3500i HØJTYDENDE BLENDERE
Ascent-serien
VM0195C VM0195

https://www.vitamix.com/Corporate-Information/Corporate-Policies/EU-Declaration-of-Conformity
https://www.vitamix.co.uk/Corporate-Information/Corporate-Policies/EU-Declaration-of-Conformity
Cleveland, Ohio 44138-2199 Windsor, Ontario N8Y 4Y5
1-800-848-2649
1-800-848-2649
service@vitamix.com
service@vitamix.com
Du vil blive antaget for at have accepteret det returnere de product "som det er" after levering, med minre du underretter Vitamix om et problem, inklusive skade under forsendelse, inden 48 timer after levering.
INTERNATIONAL KONTAKTER
| EUROPA | FINLAND | MONTENEGRO | SLOVAKIET | AFRIKA OG MELLEMØSTEN |
| BELGIEN | Primalator Czy | Enzita d.o.o. | Scitour Slovak spo. s r.o. | SYDAFRIKA |
| Dalcq SA | Työpajankatu 10A | Podgorica, 1000 | Lazaretska 29 | CONGI OMUS CC T/A |
| 86 Rue de Hainaut | Ft.: +00580 Helsinki | Monteregro | 811 O9 Bratislava | HEALTHMAKERS |
| 6180 Courcelles | Finland | Tif.: +381 (0) 65 21 550 65 | Slovakict | 9 Hoog Street |
| Belgien | Tif.: (+358) 972.60622 | www.Enzita.me | TIF: +4212.52932868-9 | Utrecht |
| Tif.: +32 (0) 19 63 38 33 www.theblender.be | www.thcblender.fi | info@cnzita.ro | amatko@scctour.sk | ZA |
| BOSNIEN | ITALIEN | HOLLAND | SVERIGE | TIF: (+27) 34 331 4824 |
| HERZFGOVINA | KUNZI S.p.A. | MultiBrands Marketing | Lindenbaum Agentur AB | www.healthmakers.co.za |
| Enzita d.o.o. | Via L. Ariosto, | & Sales BV | Hardemogatan 7 | sales@healthmakers.co.za |
| Pave Radana br. 15 | 19 - 1 - 20091 Bresso (MI) | Hecerweg 337-A | S-124 67 Bandhegnon | ISRAEL |
| Banja Luka, 78000 | Italien | 2161 BL Sassenheim | Sverige | New Horizon |
| Bosnien Herzegovina | TIF: (+39) 02.61.45.161 | Holland | TIF: (+46) 08-570 347 77 | Maskit 27 |
| TIF: +387 (0) 66 117 188 www.Enzita.ca | Fax: (+39) 02.66.500.553 | TIF: +31 (0) 252 241240 | www.thcblender.sc | Herzia 46733 |
| info@enzita.ca | nfo@kunzi.it | info@multibranda.nl | TYSKLAND, ØSTRIG, SCHWEIZ | Israel |
| info@enzita.ca | ØSTEUROPA | NORGE | Vita-Mix GmbH | TIF: (+972) 9.9576422 |
| BULGARIEN | Hollander Elektro | Lindenbaum Agentur AB | Kurfurstendarmm 21 | TIF: (+972) 1.700.70.2009 |
| Enzita FOOD | GmbH & Co.KG | Hardemogatan 7 | Tysland | www.newhorizon.co.il |
| Simeonovsko shose 33 | Flinschstrasse 35, | S-124 67 Bandhagen | TIF: (+49) 800 8482 6491 | BAHRAIN, KUWAIT, OMAN, QATAR, |
| Sofia, 1000 | 60388 Frankfurt | Svorge | www.vitamix.de | OG SAUDIARABIEN |
| Bulgarien | Tysland | Tif: +(+46) 857.034.777 | TYSKLAND | 4Homes FZCO |
| TIF: +389 (0) 76 487 171 www.Enzita.bg | TIF: +49 69 4990131 | www.theblender.se | Keimling Naturkost GmbH | PO Box 61379, Dubal UAE. |
| info@enzita.bg | gmbh@hollander-elektrade | info@theblender.se | Zum Fruchthof 7a | TIF: +971 4 3807611 |
| KROATEN | ISLAND | POLEN | 21614 Butchthude | Fax: +971 4 387612 |
| Enzita d.o.o. | Kaelitaekni Ltd. | Logo S.C. | Tysland | 4Homes@4Homes.ae |
| Avenija Dubrovnik 15 | Raužagóřá 25 | Ul. Krasowicka 81 | TIF: (+49) 4161.51.160 | www.tevolashop.com |
| Zagrebacki velesajam (Kineski pavljon) | Island | Polen | www.kimling.de | DE FORENEDE ARABISKEMIRATER |
| Zagreb, 10020 | TIF: (+49) 89.864987.0 | TIF: (+48) 71735 66 60 | ØSTRIG | Vitality General |
| Kroatien | www.cooltechis | www.bestblender.pl | Hollander Elektro GmbH | Trading LLC |
| Kroatien | LITUAEN | info@bestblender.pl | & Co.KG | PO Box 73265 |
| TIF: +385 (0) 99 81 59 050 | Zaliavalgis.li | RUMENIEN | 60388 Frankfurt | Dubai |
| www.Enzita.hr | Dovenu stobolac UAB | Quark S.R.L. | Tysland | Do Forcnede Arabiske Emiras |
| info@enzita.hr | Pamenkalnico g. 1 | Str. Mizil 2B, Sector | TIF: +49 69 4990131 | TIF: +971 (0) 561089662 |
| TJEKKIET | OII6 Vilnius, Litauen | 3032265 Bucharest | gmbh@holcendr-olekiro.de | info@vitality.ae |
| Treminals.r.o. | TIF: (+370) 52611011 | TIF: (+40) 21 345 1725 | SCHWEIZ | 4Homes FZCO |
| Kaprova 42/14 | TIF: (+370) 61562740 | www.BcOrganic.ro | Keimling Naturkost | PO Box 61379, Dubal UAE. |
| IIIOOO Praha 1 | www.zaliavalgis.li | office@quark.com.ro | Fürsterlandstrasse 96 | TIF: +971 4 3807611 |
| Tjekkiet | info@zaliavalgis.li | SERBIEN | 9014 SL Gallon | Fax: +971 4 387612 |
| TIF: +420.773.753.333 www.atranet.cz | LUXEMBURG | Enzita d.o.o. | TIF: 0800 534 654 | 4Homes@4Homes.ae |
| DENMARK | Dalco SA | Loposavo Vujosović 11/14 | www.keimling.ch | |
| High on Life ApS | 86 Rue de Iainaut | Beograd, 11000 | STORBRITANNIEN | AUSTRALIEN OG |
| Bakkelavye 2 | 6180 Courcelles | Serbien | OG IRLAND | NEW ZEALAND |
| 8680 Ry | Belgien | TIF: +381 (0) 65 21 550 65 | Vila-Mix Europe LTD | Vitamix ANZ Pty Limited |
| Denmark | TIF: +32 (0) 19 63 38 33 | www.Enzita.rs | Regus Wouurn Place | 167 King Sl |
| TIF: (+45) 42 78 32 76 | www.theblender.be | info@enzita.rs | 16 Upper Woburn Place | Newcastle NSW2300 |
| info@highonlife.dk | MAKEDONIEN | SPANIEN | Office number 318 | Australian |
| FRANKRIG | Nutri Vita | CONASI | London WC1H OAF | TIF: 1-800-766437 (AUS) |
| Wismar S.A. | Mile Pop Jordanov 23a/51000 | Carlos V n°4 Bajos | TIF: (+44) 0800.587.0019 | TIF: 050-853-0697 (NZ) |
| Zone Inova 3000 - allée n°5 | Skocje | 23680 Alcaïé la Roal (Jaén) | www.vitamix.co.uk | www.vitamix.com.au |
| 88150 Thaon les Vosges | Makedonien | Spanien | www.vitamix.co.nz | |
| Frankrig | TIF: (+389) 70.272.072 | TIF: (+34) 953 10 25 60 | ||
| TIF: +33.(0)329.82.27.71 www.wismer.fr | www.vitamix.mk | www.conasi.eu | ||
| info@conasi.eu |
©2017 Vita-Mix Corporation. Ingen dele af donne publikation ma gengives ell overfores i nogen form ell er na nogen made, ell lagres pa en database, ell genoprettelsessystem uden skriftig tilladelse fra Vita-Mix Corporation.
A3300i og A3500i, BLENDERE MED HØY YTELSE
Ascent-Serien
VM0195C VM0195

https://www.vitamix.com/Corporate-Information/Corporate-Policies/EU-Declaration-of-Conformity
Cleveland, Ohio 44138-2199Windsor, Ontario N8Y 4Y5
1-800-848-2649
1-800-848-2649
service@vitamix.com
service@vitamix.com
Det regnes som at du har godlatt det returnerte produktet «slik det er» ved tilbakelevering, med minre du varsler Vitamix om et problem, inklert skader under forsendelse, innen 48 timer etter leveringen.
INTERNASJONALE KONTAKTER
EUROPA
BELGI A
Daleq SA
86 Rue de Hainaut
6180 Courcelles
Belgia
Tf+32(0)19633833
www.theblender.be
BOSNIA OC
HERZEGOVINA
Enzita d.o.o.
Pave Radana br.15
Banja Luka, 78000
16 Upper Webum Place
Office number 318
London WC1H 0AF
Tf. (+44) 0800 58/0019
www.vitamix.co.uk
AFRIKA OG MIDTØSTEN
SQR-AFRIKA
CONGLOMUS CC T/A
HEALTHMAKERS
9 Hoog Street
Utrecht
乙A
TI:+(27)343314824
www.healthmakers.co.za
salos@healthmakers.co.za
ISRAEL
New Horizon
Maskit 27
Berzia 46733
israel
TIF(+972)99576422
Tf: (+972) 1/00/0 2009
www.newhorizon.co.il
BAHRAIN, KUWAIT
OMAN, GATAR
OG SAUDI ARABIA
4Homes FZCO
PO Box 61379, Dubai UAE
1f+9/14380/611
Faks: +9714387612
4homes@4homes.ae
www.tavolashop.com
DEFORENE ARABISK
EMIRATER
Vitality General
Trading LLC
PO Box 73265
Dubai
Vitamix ANZ Pty Limited
167King5t
Newcastle N5W2300
Australia
TIF:1800766437(AUS)
TI:0508530697(NZ)
www.vitamix.com.au
www.vitamix.co.nz
BbICOKOIPON3BOIDNTIELHbIE BJIENDEPbI A3300i n A3500i
Cepnia Ascent
VM0195C VM0195

HeKOTOpHe MoDennIOCTyNHi He Bo Bcex CTpaHax
TEXHNUECKNEXAPAKTEPUCTUKN
Handkerneim:
220-240B
Bicota (c kohmeepom o6bemom 2n (64yllm),yctahobneHHMa HooHOBAAe):43,18cm
Yactota:50-60TUILAPMHa:20,32cm
MoUHooTb:1200-1400B7Iy6mHa:27,94cm
-10noca hactoT nepeaHn daHHbX no Bluteoth -2402-2480 M, MaKcMaJIbHaM MoUHOCTb BHTCHHana -0.001 BT
PaOohar hactotaKOMMyHnKaun6NnHero nona=13.56 MTU
HactoM KmnaV HtMnnting Corporation 3AABET,TO 30 Hne coBcTBye TpeKMBE 2014/53/EC.101hN TeKT deKApuO coOBetCTBN DpeKMBE EC doctynen no Cteyicmm HtepeH-epaam
https://www.vitamix.com/Corporate-Information/Corporate-Policies/EU-Declaration-of-Conformity
https://www.vitamix.co.uk/Corporate-Information/Corporate-Policies/EU-Declaration-of-Conformity
https://www.vitamix.de/informationen-zum-Unternehmen/Unternehmensgrundsaieze/EU-Declaration-of-Conformity
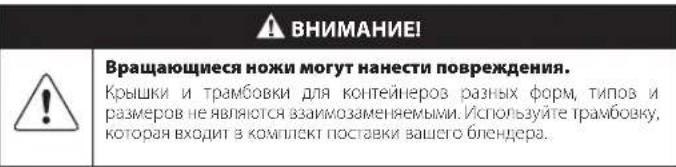
| BHIMAHINE! | |
| ! | Весенке Истеного вл. м直观но, Каторы Н сбли по Собechь Stropoho, OTBETСBEHNO SAOBENJI STAPARIOE, MONET PRINVECTY KIMSEHNO ПОЛБOSTELI ПABA H EKSTLYAATUO 3'01O OБОРДОБИН |
O6O3HAAUHnA
|  | Проблемене и predecessornexим. |
|  | ПИВKOМСЛДУАL He npikacaimteb K davnyuimcna cactram uctpojctba. Ie nolueaite rykin kIM INHCTPUMNTB B KOHTOHnep. |
|  | Одироть пораменя релкір'veckим током. |
|  | Бусокая Tempropatура有很大 смешаьим горяпх xидкостей |
|  | Од��очaite pigtahime,есл bileндер He mclnoiayetca, a takke neped ouyctkoi, zameho HOBOWOIA TATEHINIX PrinlTOOCbieniy IMI ECSM BO BPEM RApbot Brshnyepa HeobxoJIMIO prnkocchyns Ka ETO DABKUIMCR CHTAM. |
|  | Бо вроча работы устюадва дolyнь sbety utashoaney kpruika I pro66ka dire KoBuKII. |
|  | Бииматерьно Ильчate ryko8odCTBO рольOSTATEM |
|  | HE nTo pyxkaiye ystpojCTBO B XmIKKostb. |
|  | Проблемене виньчим vchnoBtobanii delaizn yustroCBA HappeBaTCEr. HE kaskaiTeB II peMa I prVBoDA Ha ochobain MOTOA IMI Nasa ToYBODA Ha ochobain 6IOKa Hokei. |
|  | HE nTo lyabte cheuhy obSbIMOM 0,6 [20 yuHIM) IMI 240 wI (8 yuHIM) IRI I noDIOIpeBa II trpeJeHIOBIMI IRI DM CMEUBAHIM rOgRIMX HADKOSTeI. |
|  | Воизбекане повождений пп tradeM He nCplnoB3yITE CTAKaHbI (BKVIOuaA ochobanie 6IOKa HOKeI IMI KpbIskn) B MMKPOBOLNHOBIM neHu. |
HN B KOEM CNYAE He hncnonb3yIte aadantrepbl.
HE mnoIb3yIte ydHHHTeB.
BceTa 03nKIOHAtae yctroBtOBeOTcet cTENIHTAHNepeCe OMHCTOK OCHOBAHNI MOTOHa HbEPMNPOCTR.
He norgkaTe ochoBaHne Mottopa B Body mnn Dpyrme JIKKOCTY.
HecobnDHeHHCTpyKmIOeT pNBeCTK CMePTTH NIN POpaeKeHHO 3NEkTPnueckm TOKOM.

KOMIOHEHTbI ΦYHKcUN yCTPOIcTBA
TexHONORN. B3MMDGCTBNE 6NEIepa KOTHEHPAMN CTKANAMN OcyIeTcBETC NOpeCDTOM BecnpoBDHOI ETHOCHIN.Pa07a KaKIOYcTAHNOHHO HO OCHOBAA KOHTHEPA 3aHOTpAMMPOBAA JUNO BOEChENH NITAMBIHXXXPAKAEPIKCTIK CORTACHO PMAEPy O CYKIOHONHIOCTHO KOTHEHPA.
PpKHe moen KOHtHepeB Vitiamx. PpKHe moen KOHtHepeB ViAMix HECOBMEIMC C OCHOBHM E 6hEnepa Ascent. K npKmM moen omocetor 6hEnepbVitamix cepA G N S Dn noyehn dononHnTbeHn HnpOpumn o6 nnnnVitamix nepnnt ha BeC-aH vitamix.com.
BbKIOaTeNb NtAHn (I/O). BbKIOaTeNb NtAHn (I/O) paonooH Ha npabO CTPOHe OCHOBHn, 3TO T BHKIOaHTeNb ynpaaNT noanN NtAHn KCTPOHCTBy.
Cnepnnpekmn. bneepnepexodm B ctnaepkemcn ennnaenb ytpanene H ncpno3yctc B teneH 60 cekynd, npKocB kopaA ymeuimntnc, pncre no naennn ytpanene H oOcbpntnr Bpaaiouhnn 3abmtck. nBnBxoJia n3 CIOE peKwMA KOCIMTEb NIOBO HA NAOBn HnnpoeHnrepykupeynpOBKnCKOPoTn H naennn ytpaneneH.
KcnnnyataaBbmykacnna. PAnenb ypaBnnePp3pa601ana TaKmOBpa3oM, 106bJINHAKnBnNnIaKnA CMEHNBAHN BNOCTAOHO BByX KACAH NEMENTOByPABNEHM.
06HApKHe HcN KOtHe cHdcto KpHKe He yCTaHOBnH Ha OHOBaHHe 6nHepe,Ha NaHenn ypaanene bdyet otobapakatca stot CmBOe HcHed He oydt paOaTb, noka Ha OHOBaHMe MToopa He oydt ycaHbCHKOHTKHeC pAbaVbNo zAKocnChnKpHKe. Korda yCTpoiXCTo BO oydt roTOBO kPbOte,Ha NaHenn ypaanene otobapakitc3AHeneneckopoc11.
3anycknoctahOBka(D)P6oTy6nCHpcpMOHHOCTAHOBHTbAIOOOIMCMHTHaKaTHcMncpckknqHATcN3aNYCKAOCTAHOBK
NpeKIOuATEbCKOPOCTn.CNOOMUHIO NPOCKIHOATcNA CKOPCTM MOXHO BUI6PaTB BYIHYKO CKOPOCTB BPAUCHINOTI 10(OT MMHMMBHJHO JMOKCMMANBOH)
Mmnybc()PnHakattnToH KHOKHNHOHbBydtBpaatcbcockpOCTbO,otobpaKaemHaHanHeYynpaAen
Cnnonb0abHne TaMepa. Pm NcTIOB0BANHpeyIpyeMOCKOPoTH TaMep 6yJe1OCHITIBaI npOJIOHTENbHOCTPbAOBTBNTOB No HAKAANTPeKIOHARETABNCKA NOCTAHOBK.NIN KAKIOKOHTHEPA 3IPOI pAMIMPO3HO OPEJEHHNEO MKAOMNHEBOE POH BILOTHEH NPOpAMMBNo IcIEVHMMAKCMNAHBOHO BPEMeBIOHNHOH NPOpAMMb6BNIeEO BkIHNOAeTOAIMOATMHeKN.
IporpamMPOBAAHCnpoDOKTHIOCTCMCUNBAHIN3AfoHKmuaNOCTyHaTOnbKOprnNcNtOBaHIMpcrtyMcyMOCKOCTNMBHEHPTPODOKNTENHOCTBbIPOTNHEHNIPOPAMN CNOOMBFOFHyKmuaTAMePAHPOMAOHO.3afoHYKmuaOBceHNAEATOPAHNBOTCROTET03aHANHOJPODQNHTENBOHCSBNNIOHNHNEHNO,NOICTEEHMN KOTOPORB1HepBkIOAHTCHABOMATHECNK.106bYBEHNHbIPoONQNTENHOCTCBMEHNAH,NABMMTe 3NaOHK「1,406bymEHNAHTPPODOKNTENHOCTCBMeHHNAH,NABMMTe 3NaOHK「1,406b
Iporpammbl. Ipepeh3aHcKOB npBeneB KnHrE peueHbVitamix OctaHOBKa paobTH 6nHepa ByeT BInONHeA HOMATWHECKN IO 3aBepHHN IiporpaAMM IIpoPAMM MoKHO OCTAHABINBAI B JIOOCH MOMENT HAKATME IpeKHOATAIyCA N OCTAHOBK.NMeHHTb IPODIOPIENBIIOCTb BNOHIEHIMIPOpAMM C NOMUBO yHKJIAI Taimepa HeoMOKHO. Pna KaHAI IN PeKIOHATEIN Salycka N OCTAHOBK B CepeJIHNE IporpAMM PaOta 6nHJIepa OCTAIBINBAIEC, a HAJCIMNE OTOBpaAeT hAeHne cKOPOCTN T.HOBs BAUYCTNTB IporpAMMy, BHBEPNIPEIPOIPAMMY HAKMMTEpeKIOHATEB 3anycka N OCTAHOBK.
CMYAN 10POXEHNEJcepti


PAnenbynpabEnMaMoennA3500i
KoBIOO60k. Lcnn Bv BnHTe Ha Dnncne Kc ooi6Kn, 3aivwite uHpbl, npBaeHHHe noCte Koda oui6Kn. ObaTInecb C ny6by KOMNAHIM Vitamix no paBote c KmeHTAMm Hnn K CBOeMy
Motop, MTOOCHIOTCBOOMTCTNCTPcRb0e, LcNtBnHep H2aYCKaTcra Cpa7oNcBxKIOHcH, y6DHTCBb TOM, HTO YCTPOAETBOIIOKIOHcHO K cTHI NTO BIKHOATCNILITANHAA
Pekomehdau no npedombaeenu nepezy3ku 6niendepa:
B npocccococboaepa nonbayte tonko peent, npocctabnHbckmnaHcVitamix.
Pn npnoToBneHn 6nH He nCnNoB3yIte CkOpoCT HnKe peKOMeHNOBaHHoH.
PnPiPiFIOBHeHm6IIN He HcIOJIb3yIe CKoPCt, KOTOPaIIpeBbIaIe peKOMeHIOBaHHyIO.
Ppuecc npriotobnne 6nir n jnoe nnbocnpekomei obaanor Bpemnn.
HcnoB3yIe TpaMBOk ynOcbOaOTKn TcyTbX Cmecn n CneNTe 3a Te, TTObN HrpeDHeTH BpAunncn npoxoHNupe3 HOK.
Tpamboka. KpbuHn TpaMboKn IINKOTeHepoB paTbX fOpM, TNOB H pAmepoB H E BAMO3AHEEMM. NcOnbByte TpaMboKy, KOtpor BxOHT B KOMNKeT NoCTABKN bauero 6IeHjepa.
Fm np Cmnnn mnnn nnnn ennnn nnnn nn nnnn nnnn nnnn nnnn nnnn nnnn nnnn nnnn nnnn nnnn nnnn nnnn nnnn nnnn nnnn nnnn nnnn nnnn nnnn nnnn nnnn nnnn nnnn nnnn nnnn nnnn nnnn nnnn nnnn nnnn nnnn nnnn nnnn nnnn nn
KOMHOHEtBn ΦyHKuN yCTPOIcTBA
KoHTeHep, KpbIuKa, np6ka dny KpbIuKm TpaM6OBKa
Bo BEmn EKnIyatay yCpoAcb HeoXOIMHOeJHa HcNtOB3aB KpHbIKy Hpo6Ky DKBKU.
HnB Koem Cnyae He BknoaHte 6neHep,He npOBepn NIOTHOCb FKCAUNKpblka
HaipokoeBdKPMKNHHeceHoC01BcTbYIOJIe 06O3AeHHN 1R HIOJIbSOaHnIPOOKB KHEETE MEOI OCIaKAI.
BCTABTE NO6K BY CNEHANBHOE OBEPCHE B KPBWKE,3aFHKUPYIE PNO6KY,NOEBPHYE no no HACOBONCTPCKK,TO6b CHATNPO6KY,NOEPHATC CE pOTK HACOBONCTPCKNK INBANEKITc
CTOBbBOcONbOaBtBCTpAMo8KoHnIO6ABHTB KOHTeHep HrpoAeHTb, HsckntpePocKy
- PnckHne moe T KOHTHepeB Vilamix (cepA C, G H S) HcOoMecTAMC c OCHOBaHmE 0henHepeA Ascent.
BcnoMaTeBhIe npncnoc6JeHna
Ipa 6cbn 6cbn bpeentob taKge doctynb I BCnOMaTeBhble npncoc6neHry. To6bl npocmotpetb accoptmeHT n3denn n NOnyHTBdoXHOBEHne, nocette Be6-cain vitamix.com.
APDEUYPTPEXDEHME


HE nCnoB3yIe cTakAH oBemOM 0,6 I (20 yHnH) Hnn YauWy oBemOM 240 M (8 yHnH) dNn NodorpeBa HnrpeHneTOB HnN DnA CMeunBaHHR OropnHx HnKocTe. HarpetbIe HnrpeMEnbI HnKocCTM Ory Tco3daTb BHYtpHee daBHee, BCNEcTBue Yero cTakAH MoKet LoHHTb HnHeCTN TaBPAA.
HE nnonb3yte yctpoCTBO HENpepbIBHO HA npoTKeHm 6OJe 75 ckynd c npmeHem ctaKaHa N OCHOBAHn 6NoKa HOKeJ.
ECNI tAkan Harpencn, h3 Nero nepn nnnoBnnncb TpeunHb, HeMeJeHNO ppeKpTaNTE CmUeHBAHNE HnrpeNeHTOB n BkiIOuNTe 6neHepnn OTKIouNTe ETO eTcNnTAnH. PpeKe Yem cHMaNbOchOBAHNE 6NoKa HOKeJ, DoXdntCeb octbHaHry CTaKaHa N HrnpTeHOB To KO mHaTHoTEMnepaTybp. IpeKeJe Yem cHMaNbOchOBAHNE 6NoKa HOKeJ, DoXdntCeb octbHaHry CTaKaHa N HrnpTeHOB To KO mHaTHoTEMnpaTybp.
PnpnoonnntbHmncnB3OBAHm DeTann yCtpoCTBa HArpeBaIOrTa.
HE kacaTecb rHe3a npB0da Ha OCHOBAHM MOTopa nnna 3a npB0da Ha OCHOBAHN 6Ioka HOKeJ.
Bo n36exaHne NOpeJeHn IIN TpaBM HE nCnoIb3yIe CTaKaHbI (BKNIOaOCHOBaHHe 6NOKa HOKeJ NIN KpbIiKu) B MKNPOBOHOBo neH.
CMEUNBAHNE
PpmeHne. yomhytbc taKaHb HaaBnABnIOCTcdoonHnteBbIMnpncocobnHm dna 6neepoAscent. nanyuHnDononHntbHOHfOpMaun noCetteBe6-cAIT www.vitamix.com.
APEDYIPTPEKDEHME
Bo n36exahne oKorob Hn B KOem clyuae He 3anyckaite yctpoCTBO Ha ckopctn Bblwe 1 pna CmeunbaHnr ropaux xukocte B 6bnbwm konTeHepe. Bixoannap, a taekse bniletaouine 6pblrnn annyactnbl npoyKTOB Moryt CTab npnuhoon oxkotob.
Bcerda 3anyckaite yctpoCTBO co cokoptb1o 1 mmedheny ybenmuahe Tcokocb do 10 HE nnonbnyte ctahan o6bemom 0,6 n (20 yumn nnu wou obemom 240 m8 (8 yumn) aan noDorpeba HnRPeDneHnO nnn I anme CmeunbaHnr ropaux xukocte HarpeTbe uHrpdeHnbl n KUKOCTM Moryr co3daTb BHTpEnHee daBHeNHe, BCNECTBne Yero cTAkan moKet NOnHyb n HaneCtn TpaBMy. HE nCnoIb3ayte yctpoCTBO HnepepbIBHO na POTRAKeHN 60one 75 cekynd c npimeneHHenem cTakAHn OCHOBHn 6NoKA HOXei. Ecn tcahan Harpenc, n3 Hero ndt nap nnoBNBncb TpeunHb, HemeJeHNO pKePaTne CmeunBaHne HnRpeDneHToB n BkiHouHTe 6JHepe nO kTNAnHTe erO to CETnNTAAN. PpeJe qem ChImMaTb OCHOBaHne 6NoKA HOXei, DoXdntecb OCTbBAHn CTaKaHa n HnRpeDneHOB DO KOMHAHOI TEMNepatypbl.
Pnp npoDOnJIeHbHom nCIOJIb3OBAHN DeTANy UcPonCTBa HArpeBaHTcR.
HE kacaintecb rhe3da npuB0a Ha OCHOBAHIM MOTOPa Nnna pNBOHa Ha OCHOBAHIN 6noka HOKei.
Bo n36ekahne NOBpeKdHm Hn TpaBM HE nCIOb3yIe CtaKaHb (BKIOUaA OCHOBAHne 6LOKA HOKe HIN KpbIJKN) B MKNPOBOHOBO NeyH.

BAXHOI BoBpem3KcnpnyataunyucpOCTBa c60nbuHm KOthEnepmo Heo6xmoBCrda nCnONb3OBaTb KpbUkN np06Ky dnn KpbUkN Hn B Koem Cnyae He mCnONb3ynte 6nHepe, He npOpBeRn pNoTHocTb fNkCaun KpbUkN np06Kn dnn KpbUkN. Nocne CmeuBaHn DOxJNTecb NoHOnH octAHOBKn HOKeJ, npExde Yem ChmMatb KpbUkN nn KOthEnep n6no CTakah C OCHOBANH 6nHepe.
- BknoHateB nTahnpaCPONoKeH Ha npabcO cOHOaHa. NpepeDte BknoHateB nTAHN BO BKNQHOeHNOoKeHne (I). Pocne BKnHOeHn 6NeHepa H naHEn ynpBaHEHa OTbopaNTCA HAdnbc Vtamix. EcnK NoHTHeH He yCTaHOeHn HA OCHOBaHn 6NeHepa, Ha NaHEn ynpBaHn6CyTeOTbopaKeHN CmBO
- 3arpyme INHPpeMeHTB A KOHTeHep cornaHpeJeTy UIN NPOAky 3arpyK, npBaEeHHOMy Hnke.
KoHTeHepb6oBwOro 06bema
PIMMCHNC, B cTakaHb MHPCNCHTu 3aRpyXaOTCH 3 o6pTHOMCnRdKe, PnmeHMOM DnKoHTeHepo8 60bnwOcO b6ema.
HE CmeuHbAaTe RopAynKe KmKocTn B cTaKaHe 06bEmoM,6nJ
CTaKaH 06bEmOM 0,6n(20ynu)
-
BbnonHHTe OHy Hn npBeneHHx Hxpe npOydp.
-
PnKIOB0AHNI KOHTHePA 6oBLOO oobMa: NmecTne KpUky HA KOHTHePc. CoMeCTHcOpINbYbCTyTHa KpUkE c HOCNOM KOHTHePc dNBOeCneHNHa DnNEKAAero BbpaHbAHA INIHOrO pnoJIraHHa KpUHK. PaMeCtNB KpUky, HADABnBAITE Ha ee, NOKA Ida fXcATOPa He aauenKHYc HA OoJKe KOHTHePA. BcIabTe npOByd nKpUHK. No KpUHK no YacOBaCRn CTrpCn de NnKCaUy.
IpnKOBaHIN CTAKAH NOMECTIVE POKNADHY HABHOO peBbOy OCHOBHIN BnKa HOKe. POKNAGD KNOH BnHIOHO pAnBOHMcPOAeUcHBAOKpyb6b. HANHTDE ABC TcPENKHO OHOBHIN BnKa HOKe HABVHTYE OCHOBHIN BnKOHO HcTAKAH HApBaNEHNO HAcoBoH CTPNKE DO CoMHeuH CTpeONK 06o3aHHeHO HcTAKAH OTpEka. HE 3aTtBNaTe CnHUMCmCbHo.
-
NIOeCTHRE KOHTEHEO (NIN) CTAKAH N OCHOBANHE 6NOKA HOXK) HA OCHOBANHE 6NEHepa. KOrda KOHTIEH INI CTAKAH Bdyet 6o-APyK, a 6iHep 6dyet rTOA K AKNrYATAuH, Hn DnTHee 6yETOTOPAOKH CKOooCT1.
-
BbnonHHTe OHy H3 npBBeHeHHx Hnke npoueDpy.
Vicnnonb30aHnepeynnpoBckopocTN.
Noopn Hnnnne nnnnne nee nee nee nee nee nee nee nee nee nee nee nee nee nee nee nee nee nee nee nee nee nee nee nee nee nee nee nee nee nee nee nee nee nee nee nee nee nee nee nee nee nee nee nee nee nee nee nee nee nee neee
5. 406b3a4ab npoDnKHTeBHOCTc CMLBaHm, nCnOB3yTe 3Haekn «+» n «-», npDnBapntenBHO BOpB aCOOTBETCTBYUIM ANEMENT ynpBnEHN
H. Kahtne MteXnKHeTaeBtanyckcOnOctOBHKo. HoxNtHbTpOaBtsc, a TaImeP bSyedOTCHHTBbT pOToKThTeHbHOct CMeUBAHN B MaHTyN XeCHyHX.
TTOb yBENINNTM NIMYEMHBNTCKOPCTB BAPUHMA HOXN BO EPMN CMEHNBAHNOBEPHNEIPEKNIHATEBCKOPCTTAK,TOb bB6pTaHEoDxOMyoCKOeCTOT1do10.
A. 103a8epuHCHM CmuaBAAHMA NOOpaHbAAIe NpeKIOHATCB CKOPCTN POTNB HACOBIT CPKIK, nOKA HcJIINNE He OTOPAHNTCA BAHHEME CKOPCTI, I, NOCE HrERo HAKMITE NPECKIOHATCBAITyCKI INOCTAOHBK.
Vicnnonb30aHHe NoorpaMn
PpMueaHme. IpRgMaMaI pnproTOBHeNcyna HeoCTynHa npn MCnoB3ObaHNs CTaKAnOB. HEcmuBauTe TOpUne JxKIOKTn B CTaKaHe.
Cleveland, Ohio 44138-2199 Windsor, Ontario N8Y 4Y5
1-800-848-2649
1-800-848-2649
service@vitamix.com
service@vitamix.com
PnOTCYCTBnI PpEbpntbHOro yBcDmTeHnBa dpeK KomaHIVitamix O KaKx-n6o np6neMax (BKnUyA NOBPEKeHHe BO BpEm TpaHCnpTPOaKN) 8 TeueHne 18 cAcob noCteIOCTABKN BOBpaHHe yCTpoNCTBO paCCMaTPBaETcKa KpINHToe BAAM B COCTOAHN NkEcTBHa MoMeHT DOCTABKN.
KoHTAKTHA INHOPMAUaM MECTbIX IpeCTABNTeJIbCTB
| EBPONA | ФИЛПОНДА | ЕLEСТОПОДА | СROSБАКАВ |
| Primulatorу Ory | Enzita d.o.o. | Settour Slovakia spol. s.r.o. | |
| BETLIMN | Tуралижcztu 10A | Podgorica, 1000 | Iazaretskiz 29 |
| Dalicq SA | Fl-00580 Holsinki | Montecgiro (Hcpriorovsk) | 811.09 Brajslava |
| BS Rue de Iainaut | Finland (Дионлелдä) | Ten: +381 (0) 65-21-550-65 | Slovackia (Crosobria) |
| 8180 Courcelles | Ten: (+358) 972-66072 | www.Enzitame | Ten: +421-2479378689 |
| Belgium (Sorexie) | www.theblender.fr | Infogenzita-me | amatkogsettour.sk |
| Ten: +32 (0) 19-63-38-38 | n.laftfli | HMI(HPIAH)(b) | IIIBH (M) |
| www.theblender.de | KUNZI S.p.A. | MultBrands Marketing | Lindenbaum Agentur AB |
| BOCI IMR N | Viz. L. Ariosto. | & Sales BV | Hardemogatan 7 |
| TEPLETOBIVIA | 19-1-20091 Bresso (M) | Heereweg 337-A | 5-121.67 Handhagen |
| Enzita do.c. | Italy (Aranza) | 2161 BL Sassenheim | Sweden (Uleusya) |
| Pave Radana br. 15 | Ten: (139) 02-61 45-16.1 | The Netherlands (Hucopianus) | Tul: (145) 08 570 347 77 |
| Bianai luka, 78000 | Ф�к: (+39) 02-66-500-553 | Ten: +31 (0) 252-241240 | www.theblender.se |
| Bosnia and Herzegovina (Boschni) | www.kunzil | Ф�к: 131 (0) 252 241244 | 「FRUMANII, ABCTPIN, UIBFRI (APB)」 |
| Tcn: 1387 (0) 66 117 188 | n.lagikunzali | info@multibrands.nl | Vita-Vix GmbH |
| www.Enzita.ba | BOCTOCHAR EBPONIA | IICOPBENIR | Kurfcourtstandarn 21 |
| info@enzita.ba | Hollander Elektro | Lindernbaum Agorturur AB | 10719 Berlin |
| bOI APBIR | GmbH & Co.KG | Hardemogatan 7 | Germany (TePMEN) |
| Enzita COOD | Hirschstrasse 35, | S-124.67 Bandhagen | Ten: (+19) 800-8182-6919 |
| Simeonovski shose 33 | 60388 Frankfurt | Sweden (Udacum) | www.viatimdc |
| Sofia, 1000 | Germany (Tepmenia) | Ten: (+46) 857-034-777 | www.TePMEN |
| Bulgaria (Borozpav) | Ten: +9.69-1990131 | www.theblender.se | Kaiming Naturkost GmbH |
| Ten: +389 (0) 76 487-1/1 | gmbghollaender-elektróde | Infogenthbender.se | Zum Fruchthof 7a |
| www.Enzita.bg | Инstitute | IICIPINIA | 21617 Bruxehude |
| info@enzita.bg | Kaitejaekni Ltd. | Logo S.C. | Germany (TePMEN) |
| XOBPAATNI | Raufgelegd 25 | UL Krasowicka 81 | Ten: (+19) 4161-51-160 |
| Lnztia do.c. | TUR Heykjavik | HB-100 Swinckia | www.keimling.de |
| Avcijna Dubrovnik 15 | Iceland (McFarlane) | Poland (Ioroua) | ABCTPEN |
| Zagrobadi vecejam | Ten: (148) 89 864987 0 | Ten: (148) 71735 66 60 | Iollaender Elektro GmbH |
| (Kineski pavilion) | www.cooletechis | www.bestblender.pl | & Co.KG |
| Zagrob, 10020 | ЛигILA | Hinschstrasse 35, | United Arab Emirates (Ошанштейнг) Apoxeckce Evansko |
| Croatia (Kopacir) | Zalvalglit | PyMSIIIMR | 603881 Frankfurt |
| Ten: +385 (0) 99-81-59-050 | Dovarru slostlc UAB | Quark S.R.L | Germany (TePMEN) |
| www.lnztia/hr | Faronkalingo.1 | Str. Midl 2B, Sector | Ten: +49 69 490131 |
| infogenzita.hr | 01116 Vlinus, | 3032265 Bucharest | gmbh@holanrider-elektróde |
| NEILCKAR PECTVII/KA | Litmusia (Hmra) | Romania (PyMCN) | IITIKI (APVH) |
| Traminal s.r.o. | Ten: (+3/0) 5261011 | Ten: (+40) 21-345-1/25 | Kaiming Naturkost |
| Kaprova 42/14 | Ten: (+370) 61562740 | www.BeOrganico.ro | Fürschnittsrisiko 96 |
| 11000 Pravo 1 | www.zalvalglit | offre@quark.com.tr | 9014 St. Gallen |
| Czech Republic (Hochschar Pocrynykova) | info@zalvalglit | CEPEBRI | Switzerland (Hlseljapan) |
| Ten: 145 (42) 73 333 | ILOKCI MePJI | Lnzira do.c. | Ten: 0800-531-654 |
| www.atranet.cz | Dalcq SA | Lcposavo Vujosovic 11/14 | www.kimling.ch |
| JUHIMN | 86 Rue de Hainszur | Beograd, 11000 | BELI/KOEBI TAHM |
| High on Life ApS | 6180 Courcelles | Serbia (Cepšev) | Иретахддя |
| Bakkolyvoj 2 | Belgium (Bontyak) | Ten: 1381 (0) 85 21 550 65 | Vita-Mix Europe 11D |
| 8680 Ry | Ten: 132 (0) 19 63 38 33 | www.Endtrans | Regus Wolum Place |
| Denmark (Jaans) | www.theblender.be | Infogenzitars | 16 Upper Wolum Flacc |
| Ten: (+145) 42 78 32 76 | MAKHTOKHIVI | MCTLAHIVI | Office number: 318 |
| info@highonlife.dk | Nutri Vita | CONASI | London WC11 OAI |
| ФРАLUДМ | Mile Pop Jordenov 23a/51000 | Carlos V m'4 Bajos | Ten: (+44) 0800 587 0019 |
| Wärmer S.A. | Skopje | 23660 Akala à Real (Jaën) | www.vitamix.co.uk |
| Zone Inova 3000 - allée n°5 | Macedonia (Macedonia) | Spzin (Vizcainu) | |
| 88150 Thonlos Vosgos | Ten: (+38) 70-27-07 | Ten: (+44) 95-3-10-25-60 | |
| France (Оразсí) | www.vitamikmk | www.conasci.eu | |
| Ten: +33 (0) 3-79-82-27-71 | info@conasci.eu |
Vita-Mix Corporation, 2017. Hikakan actb daHORO doKyMeHTa He moKET BocPou3BDOHTCBn nnpeBaTaBCB KAKOI To H6blno fOpme n c NMOUBO KAKX 6bl To H6bln o ceCTB, a TAKKE xpaHHTBCB B 63ax daHbIX nn nonCKOBx CNTeMx 63 neMbENHO papeuHnVita-Mix Corporation.
MIXÉRY S VYSOKÍM VYKONEM A3300i A A3500i
Série Ascent
VM0195C VM0195

TYTO POKYNY SI USCHOVEJTE
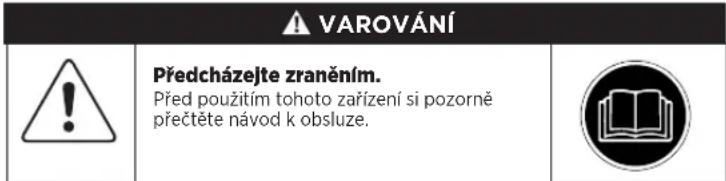
DULEZITE POKNY PRO BEZPECNE UZIVANI
Cleveland, Ohio 44138-2199 Windsor, Ontario N8Y 4Y5
+18008482649 +18008482649
service@vitamix.com
service@vitamix.com
Pokud do 48 hodin od dodani neoznámite spolecnosti Vitamix jakykoli problem vctne poskozeni pri preprave, bude to povazovano za vase akcepovani vraceneho produktu ,jak stoji a lezi".
MEZINÁRODNÍ KONTAKTY
EVROPA
BELGIE
Dalicq SA
86 Rue de Hainaut
6180 Courcelles
Bolgo
Te.:+32(0)19633833
www.theblender.be
BOSNA A HERCEGOVINA
Enzita d.o.o.
Pavo Radana br.15
Banja Luka, 78000
Bosna a Hercegovina
Tel.:+387(0)66117188
www.Enzita.ba
info@en/la.ba
BULHARSKO
Enyita EOOD
Simeonovsko shose 33
Sofia, 1000
Bulharsko
Tel.:+389(0)76487171
www.Lnzita.bg
info@enzita.bg
CHORVAISKO
Enzita d.o.o.
Avenija Dubrovnik 15
Zagroback volosajm
(Kineski paviljon)
Zagreb, 10020
Chorvatsko
Tel.6: +385(0)998159050
www.Enjila.hr
info@enzita.hr
CESKA REPUBLIKA
Traminal s.r.o.
Kaprova 42/14
11000 Praha
Ceska republika
Tol.6:+42077375333
www.atranet.cz
DANSKO
High on Life ApS
Bakkolyvej 2
8650Ry
Dansko
Te.:(+45)42783276
info@highonlife.dk
FRANCIE
Wismer S.A.
Zone Inova 3000 - alleen ^\#
88150 Thaon les Vosges
Francie
Tol.6:+35(0)32982271
www.wismer.fr
FINSKO
Primulator Oy
Tyopajankatu 10A
FI-00580Holsinki
Finsko
Tel.:(+358)97260622
www.theblender.fi
ITALICE
KUNZIS.p.A.
Via L. Ariosto,
19-1-20091 Bresso (MI)
Italie
Tel.:(+39)026145161
Fax: (+39) 02 66 500 553
www.kunzi.it
nfo@kunzlt
VYCHIODNI EVROPA
Hollander Elektro
GmbH & Co.KG
Elipschstrasse 35.
60.388 Frankfur
Nemecko
Tel. c.: +49 69 4990131
Tel. 6: (+34) 953102560
www.conas.eu
info@conasi.eu
SLOVENSKO
Seltour Slovakia spo. r.o.
Lazaretska 29
8109Bratislava
Slovensko
Tel.:+421252932868-9
amatkoc@sottour.sk
SVEDSKO
Lindenbaum Agentur AB
Hardemogatan 7
5-124 67 Bandhagen
Svedsko
Tel.:(+46)08-57034777
www.theblender.se
NIMSK2-PAKSL5K2
SVYCARSKO
Vita-Mix GmbH
Kurfuerstendamm 21
10719 Berlin
Nemecko
Tol.:(+49)80084826491
www.vitamix.de
NEMECKO
16 Upper Woburn Place
Office number 318
London WC1H OAF
Tel.:(+44)08005870019
www.vitamix.co.uk
AFRIKA A STREDN I YCHOD
JIZNI AFRIKA
CONGLOMUS CCT/A
HEALTHMAKERS
9 Hoog Street
Utrecht
乙
Tel.:+(27)343314824
www.healthmakers.co.za
sales@healthmakers.co.za
ZRAEL
New Horizon
Maskit 27
Herzliya 16733
Israel
Te. c: (+972) 9 9576422
Tel.:(+972)1700702009
www.newhorizon.com
BAHRAJN, KUVAJT, OMÁN
KATAR
ASAUDSKARABIE
4HomesFZCO
PO Box 61379, Dubal, SAE
Tel.:+97143807611
Fax:+9714387612
4homes@4homes.ae
www.tavolashop.com
SPOJENE ARABSKE EMIRATY
Vitality General
Tracing LLC
PO Box 73265
Dubai
Spojene arabske emiraty
Tel.:+971(0)561089662
www.vitality.ao
info@vitality.aq
4Homes FZCC
PO Box 61379, Dubai, SAE
Te.:+97143807611
Fax+9714387612
4homes@4homes.ae
www.tavolashop.com
AUSTRALIE
ANOVY ZELAND
Vitamin ANZ Pty Limited
167 King St
Newcastle N5W 2300
Australie
Tel. c: 1800766437 (AUS)
Tel.:0508530697(NZ)
www.vitarnix.com.au
www.vitarmix.co.n/
https://www.vitamix.com/Corporate-Information/Corporate-Policies/EU-Dclaration-of-Conformity
https://www.vitamix.co.uk/Corporate-Information/Corporate-Policies/EU-Declaration-of-Conformity
6a3ata Ha MoTOpOT Hn KOr He To KoPnCTIne 6bHepeoT
He Ctabajte ja 63ata Ha MToPoT BO BODa HnH Dpyra TeHocT.
HenoHTyBaIbeTo Ha ynaTcBATA MoKeJa npedn3Bnka
CMPTHNNCTpyenydpap.
ДЕЛОВИ KAPAKTEPHCTИКИ
| Texhonorjna -Бгелор, садупгота Садупгота ишилд Камыншагтпгелор Бгелор,在 Тхонorьna. Сенилд Вимлд Вимлд Вимлд Вимлд Вимлд Вимлд Вимлд Вимлд Вимлд Вимлд Вимлд Вимлд Вимлд Вимлд Вимлд Вимлд Вимлд Вимлд Вимлд Вимлд Вимлд Вимлд Вимлд Вимлд Вимлд Вhamla |
| Стату садупд OТВamix -Стату садупд OТВamix Нета Дд ргелор Ascent. Стату anapatсо сесялд C, серулд Gи сретулд Sа Вимлд Sa Вимлд Sa Habeke varpovalnyа Зрпогалдпглд Vlimix, nocetere Jy vlimix.com. |
| Короча за Вгунуваве/Икгунуваве (I/O) -Короча за Вгунуваве/Икгунуваве (I/O) cc Hbora Ha dochata Stpana Od 6aatala. Короча за Вгунуваве/Икгунуваве ro Kontrponippa Hanojya beto Ha anapatc. |
| Реким Ha мірунуваве -Бrchdopot Kc BnncBc BO ргелм Ha Мірунуваве bo AO KoTHPonrHata Tabla He CC KocNCTs 50 cckyHd. Lkrpanot Ke ce zateNHmHa ha KCHPonrHata Tabla Ke ce pprakne BpTNO.Дррете НжОЯ Инс CBpTete To TrkaniTe 3a 6pavHa Ha KCHPonrHata Tabla Za Na Inepe OY,рекIMO I HalmyuBaHe. |
| Равota co Дра дурпа -Коррштата Tabla e JusajnHpvahy aja Барa Jbe INTEpAKUma Ha KCHPonrHata 3a Da To akHbpya TmKluycot Ha bneHypanhe. |
| Осырване сад -Осырчambi -Ke ce trpokraske Ha KCHPonrHata Tabla JpOJeka Ha basata Ha bchElyepot He ce nostabu caJ, co KaTak. bHvdpot Hema da pabovn ldoKoA capot co prapavnno Prpukhien Kanak He ce noctabu Ha basata Ha motpot Ha KCHPonrHata Tabla Ke ce prpukhaco prpomemnibba 6ozha 1 kora Ke bde podrotebch 3a KopriscTeLc. |
| Стату /Стот (D) -Зэрету ro bngdopot Bo cekoe bpreve co prpimskaihe Cstot/Tron (D) |
| Корpopуна за помен�ва 6рзиHa -Коррштата за помен�пььбрзиHa Daba paHak KCHPonrAod pprokemnibba 6рзиHa (Ha6abHa) ур 10 (Ha6bpS). |
| Пуширале (-) -КORA Ke ce рогинские, ce wintata Ke potparrat co bogoshinaba prpikaxha Ha KCHPonrHata Tabla. |
| Коррстене Ha Tajmepot -Тajmepot Ke поинда БрOMноге кORA ce korectn prpomenHmb 6brmHa doedka He ce pprvnche KORHTo za Cstot/Tron. Cekoj ca dprpampana co odporchodno Maksivamno bpoeme Ha pabota. bInchdepot Ke cc NckTyrMn ATOmattachka KORA Ke to JOCTVHE MAKCIMANHOTe bpreve Ha pabota. |
| Прррампаьсу bpreve za bngdunbaTe: ObaaФундяla e doctanHa caro KORA ce korectn prpomenHmb 6рзи.Врршьага Ha prррампспс He mokat da ce meyBaat co fHyNKUgata za Tajmep. ObaaФундяla ke dofoBya od noctaeHto bpreve Me bengdopot Ke ce NOKTIN ABTOMATKl. Пглintschte JI KhoKHTa +Zda ra do trolomnte bpreto Ha bngdHpBaLb. 3a Da Ro HAMATRc bprmsTo,prpimchete ja NOKHATA -ИкнHTe +И- He pabotar za bpreve Ha bngdHpBaHTo. 3a Da ro pprakhtete,prpimchete Chart/Tron. |
| Прррам -ИкнHTe ce habezenih 30 peueTinie Ha Vlimax. bngdopot Ke tanpe ATOmatKHa kprot od noqprpamata. Pprpamltre mochat da ce prpoknHAT co prpimckalbHa Chart/Tron Bo cekoe bpreme. BpemnLiTa Ha prpornpamite He mokat da ce meyBaat co Фундяla za Tajmep. Kora Ke ce prpimckhe Chart/Tron Bo TKot Ha HekOJa prpogama, bngdopot Ke zarepe Ke ce prpikhane prpomenHmb 6рзиHa.Аксakate da aklnlvparre He kooja prpompa, naBepeite je prpogamtaia nprpinckhete Chart/Tron. Hannitoja -Хршату Deceprr Cytna Strozni VdmNB Camoctojo IO YuzhHe |
| Корови за рршka -Акгаболитце Кord za рршka Ha engahot, zanilisteteпбрсileшо.Tc Pokobite ttco nokayBaat Ha ekpahot no Kordot za ршka. Поршкajе оЧуЖьдота КсоксниHa Vlimax innm priodnabHout da BaBn nokoiHnat da ro ppriniete prpoklenovt. |
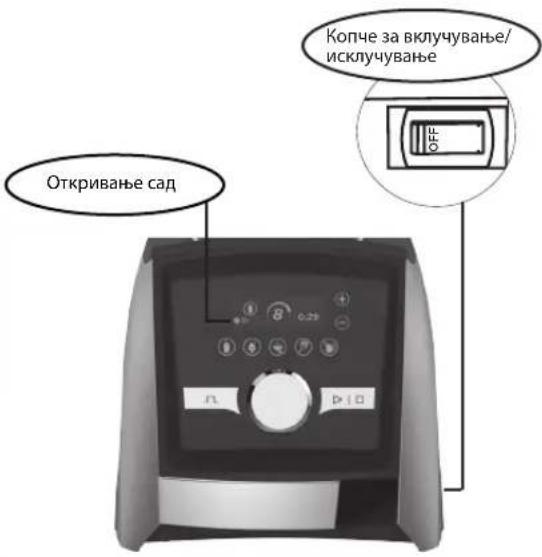
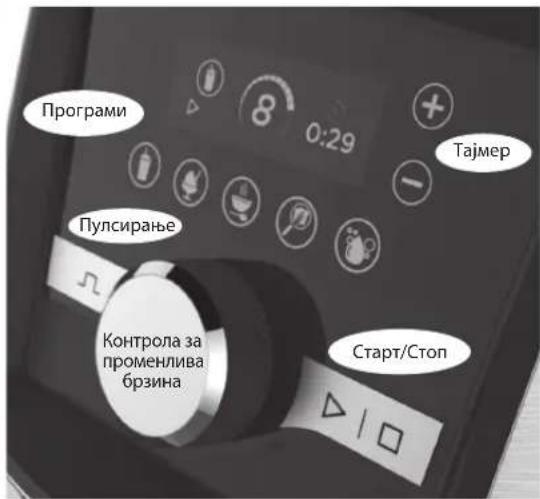
KoHTponHaTa6nHaA3500i
Motop - Motopot e Hanpaben ha ce saaHm on nppebahe. Ako 6bnHepot He aonue He bau, npoepepe da nctro Bknyuine 80 ukeep n dan m konhtero sa kkyuhae/vcknyybahe e noctabe Ho H knyuBaHe. Ako motopot cc npocpc, octaTe ro da cnaiaokoy 2045 MHHn.
Cosemu 3a da cnpeumme, npneonmoepayaehe"Ha 6neHdepom:
C6paobcyaajr cmo pceenTn oVamixdoekayHHTe da fo koprxcntte bnehepeo.
HeobpaotybajTrepeeHTHaNOMaHb6pAHINODnpenopaahntc
HeobpboybaitepeuHnHaonoeM6paHnOnPepnoeHnne.
Hc06pa8ybajrcpuerrnnoepnoaipahohto.
KopvCTeJeJaMeaHkTa33DaOpoeTyBATENpyCTnMeaAHHMn33daCBOcMOKKeTpeDBeKHeHaCooTeKtEckOyHnH3CeHmTA.
Meuanka Kanayte HcMcknHc McknDa cC KOPKCTAT Kaj paaHHN CTANOB, TINOB n rtonemHH Ha capbB. KopKCTeJa Meuankata uro 6nfa doctabCh a co hncdepot.
Capot He cme da ce nnonn noeke ca dae pteHHN Kora ce KOHCTM MEANA npi 6nnpaBte, Ta da na hert Hne nppebahe, HL KOPXCTeTe JAA MANKAATA NOOITNOO 30 noepobatnerHm CekyHM.
ДЕJOВИΚΑРAKTEРUCTИΚ

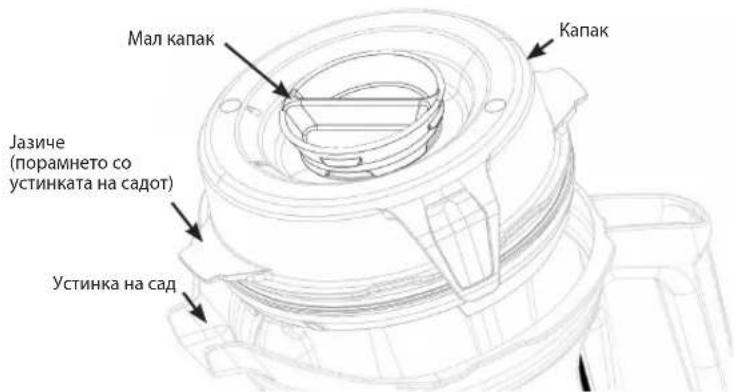
Cap, Kanak, Man Kanak Meean Ka
ABHMMAHME

PotpaqKnte ceuHa Moke da npedn3BnKaaT oWTeYBaHe.
KanaiJITNE MIIaJIKNITE HE MOKE Na CE KOPACTAT Kaj paaMNHN CTINCBN, TIOOBH NIOEMNH HA CAPOB. KopcTeTe ja MeaIaNkata WTO 6nla DACTAChCo BNCHEDPOT.
CekoraawkopntcTnKanakotNkanhotkanakKora6hncpota
Hikorai He KOpctete ro 6henepo8e3 da npobepnne daa Kaanokte 6e36eHIO npuubpcTeH.
Ha manhot Kanak Hma OHaKaH 3a Da MOKe Da CC KOpNCTNaKo MepnIka
CTABETO MANNOT KANAK BO OTBOPOT HA KANAKOT. PmUvBPCTe Ro Taka ITO Ke Ro CBPTNTe Hadecho. 3aJa rN3BaJIITE, CBPTE To HaneBO nNOHHTeTo.
- V3baTeTo ManNt Kanak 3a da Ja KopnCTHTe Muaankata Nm 3a da IopaTe CoctoJKN.
- Crapnte caOBn og Vitamix (cepim C, G n S) Hema na paobTaHa baata Od 6neHdepot Ascent.
DogaToou
IocTaanHc ce doaTOUa 3a KpeaTHBHO co3daBaHe peuentn. Iocetete ro vitamix.com 3a noHyda Ha npOnBDOH n Hcnpaunja.
| ПРЕДУПРЕДУBAБЕ | |
| HE koprastete ja chawata od 20 yu(n) nii od 8 yu(n) (240 m) 3a da 3arpebaTE coctojk uuu nii 3a da 6nehdnpate jeekn TeuhoCTn. 3arpeahnte cokojk uu TeuhoCTN moce da co3daad BHaTpehen npitncoc kTO moce da doBede do pacnPCHyBaBe Ha caDTN da pndin3bNa noBpeDA. | |
| HE koprastete ro anapatot 6e3 nepekn noDOnOro od 75 cekyndn kORA 6nehdnpate co haua u ochobata Na ceuHIna. | |
| Ako chawata ctahe tonla Ha donipr, ako ce 3amargn nii ako n3nyBa napea od hea, beDaHn pnectaneHete co 6nehdnpate Hto ha coctojknte ucknyte | |
| ro 6nehdopot nii n3BaTepe Ro Ka6enot od stkepot. Octabete rna waa tna coctojknte da ce n3naDat do co6ha Tempepatya nped da ja otctpaHNTe ochobata Na ceuHIna. | |
| Octabete rna waa tna coctojknte da ce n3naDat do co6ha Tempepatya nped da ja otctpaHNTe ochobata Na ceuHIna. | |
| Denobite Ke ce 3aRpEAT kora ce koprastat noDOnr. | |
| HE donipajte ja bPtNiBaTa OCHOBa BO 6a3aTa Ha MOTOP, HHTy cnojkata co xJne6oBu BO OCHOBa Ta Na ceuHIna. | |
| 3a da n36BerHeTe 6TeTe nii liuHa NobpeDA, HE koprastete rna wauhite (BKnUyBajKn rni ochobata Na ceuHIna u KaNaIte) Bo MMKpo6paHOBa NeuKa. | |
BJIENHINPAHbE
3a6eneuka: Hauinie n cadoBte wto ce cnoHMaTHn OOBe ce donoHInTeHHIOoDaaou 3a 6neHepTe Ascent. 3a noose KINFOOPmaun, nocetete ja www.vitamix.com.
APEDYIPEDYBAHBe
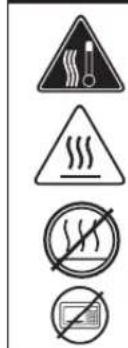
3a da n36berhe MeoHHn 3ropeHnH, NKoraAe He 3anoHyBaTe Co 6p3HHn Hd 1 Kora o6pa60yBaTe JeeKu TceHoCTn BO rOenC a.
Papeata wTo n3nerya, nctekybaBata nn coDPKnHATA MOxat Ba Be nonapat. CeKoraa 3anoHHeTe CO npomehnBa 6p3nHa 1,
a noTa oNeKa 3rOemByaje do 10.
HE KopHcTeJe ja aawata od 20 yHn (0,6 n)nn O8 yHn (240 m) 3a da 3arpeBaTe cocTojKn Hn 3a da 6neHnPaTe JeeKu TceHoCTn.
3arpeAHte coTojKn TeuHOCTn MoKe Da co3daT BHaTPeWeH PnNTncok WTo MOke Da DObeE do paCnpChyBaBe Ha caDor N da
npedn3bNkA NOpeDa.
HE KopHcTeTe ro anapatot 6e3 nepknnoo ng 75 cekynn Kora 6neHnPate co aha u ochOBata Ha ceHNata.
Ako Yauata cTane tonna Ha donnp, Ako ce 3amarrn Hn Ako n3nerya naepa Ond Hea, Behdau pectaHete co 6neHnpabeto Ha
coTojKe I ncknyeTe Ro 6neHApot nn HsBaTe Ro Ka6enot on Wtkepot. Octabe Tn Yauata n coTojKeIte da en3nadaTdo
co6Na Tempepatya nped da ja otctpanite OCHOBata Ha ceHNata.
Denobte Ke ce 3arpeT kora CE KopHcTat noOnro.
HE DonnpajTe ja BPTnBata OCHOBa BO 63ata Ha MOTOP, HHTy CNOjkata Co JXNE6OBu BO OCHOBata Ha ceHNata.
3a da n36berhe We Ta nn LInhna NobpeDa, HE KopHcTe Tn YauHt (BKJNUyBajKn rN OCHOBata Ha ceHNata IN kanaunite) BO MKNpo6paHOBA
neuka.

BAXHO! Cekoraaw KOpCTe ro kanakot n MAnnot Kanak Ha rolemnoT caKora 6neHepo pa60n. HnKoraw He KopCTe ro 6neHepo 63 da npobepnte danu Kanakot n Mannot kanac ce 6e36dno npuaBpcten. No 6neHnpabeto, noyekaTe dokeKa ceynata He 3anpat cocema nped da ro 3BaDInte kanakot nn caOTo/auaTAt Od 6a3ata Ha 6neHepot.
- KorHcTo 3a kIyIyBaIbO/IKKITyBaIbCe HAcra Ha Ickhata CIPAHa OJ BzAra. PmIMCHTe rKOHNrTO 3a BkIyIyBaIe/MKKnYBaIbHe Ha nOcKaBa KInyHeHO (OnKaIO bJeHepOT Ke Ce BkNAt, HA KOHTpONHATA Tabna Ke ce npabvVtamix.CmboonCce pOnkawe Ha KOnpHnata TaNa Kora Ha BzAra Ha 6neHepot Hema caJ.
- Hanahe rro cpoi oeppepeepoetno ncoeppepepeepoehtn nohne hne pnnknae noany.
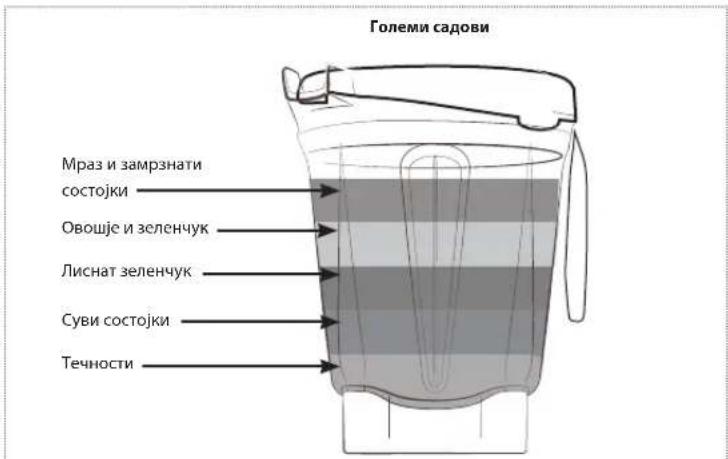
3a6eneuka:coctojknte 3a qunite Tpeba da ce ctabaaT no oobatch pocncl on pcnoonot 3ra toncmtc caobv.
HE6nHnpajTe Kekn TeuHocn Boaawatao 0,6 nItpn!
Yamao od 20 yHn (0,6 n)
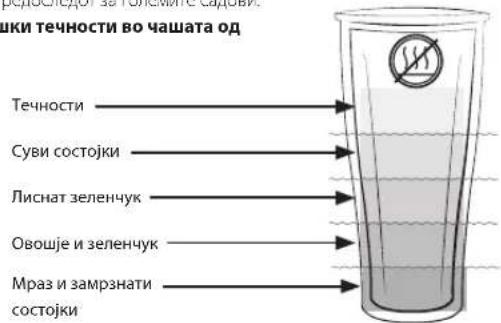
- Hanpahe Hnroo oncno hoe:
FenmcapoBnCabeToKanokHacapO. TnpamHne eJHO JanaeOp Kanakot coYTHNkata HacapO 3a da o0aMOKHe npabmHnO npamHybahe Ha KaNAKOT yMMHKATA. PpYNCHErO KaNAKOT dpeKa DBeTe jaaHHHa He ce npuBcPctT HpaobOn cCapO. CabeTe ro ManKoK CaPteTe Ro ManVor KaNk HaeCHO 3a da cnpuBcPCTM.
yHn - CnBcTe rynnHa HdoHnO HABoJ OJ, OHOBaHa Ha cHmIbTa.
YnnNtA Tpe6a da nre HnpawnHO uHakBO Ha HABoJ. HApTe Td eTepenKHa oOHOBaHa CeWnTA. HApTe J a OHOBaHa Ha cHmIbTa Ha
Haata HaeCHO npamHETe mCTpenKte BO pAWNTe Ha oncerOT oAHHE
HaunrA. HEcrajre IopemHory.
4.Crae ro capr (muaaata noohora hae cawata) ha 6aara o, bchncpct. Kora ke cccnnpc capyaa Hnepeo nnopten 3a pabot, ce npkane npcmnhba 6pmia1.
5.Hanpaere HeuTo OneHoo
3aJnKopVNTnpomHnBNT6pAH
a. CapreTe ja KOnTponata aHa npOMeHNbBa 6pMaHa HaneBcO pOeKa Ha KOHTponHata tabna He ce nojABn npOMeHNbBa 6paHa1.
6. 3a da oppeyte bpme Ha bneHnnpahe, KOpHCTe rM KOHHTe -/ HA KOHPTpmtte
B.ПИМСHERE Cnrt/Cnrt.CenHATA Ke nOHTIa Ce BOrT, a TajMePOT Ke IV 6pOM MmHyHITe NCKYHNTC DcNkA CC OcbapobTyBA MmBBHHTA.
B. BpTeJa KcHponata 3a npomEnnBa 6paHa Noemyf 1 n 10 pno 6ne-ynpaHeta 3a da Ja 3roenme HINHAMATTE 6paHATA HceHHATA.
Ha Kpaot oB 67nHpyaHbeto, CpeTRe ja KOHTpOra Ta npOMeHNBa 6paHa Haneo pDpexHa He ce npKae npOMeHNBa 6paHa1, na npTHHeTe Cptr/CtOn.
3aDnKopvntte nporpamnte
3a6eneuka: nporpaama 3a cyna He e doctanha 3a KopncTehe co yauWte. HE 6neHnpajTe Jeku TeyHOCTN BO YauWite.
a. pntiacherejiaikoharaatacakaharatnporpama.(HaKoHpnonHnraTabnaKe cenpiKaHATcAnpaphtO BPCME Hn nporpaMn nocraBkata 3n pomChmmb6pmaHa).
6. Pnncnene Cnpt/Tron 3a da ja cnapybae npnpamata.(Bnepeot aromatckn ke aane Ha kpaot qnpamata)Pnncnere Cnpt/Tron BO cekeo Bpeme 3a da ja npneHHer npnpamata.
6. Ako MeuabuHaTa npctaHe da uipkynpa:
Torennm capoBn - CabeTe ja Meuarkata HbO BopOT ha MauKOT KANK N MeuaJIte DOpEa He Nanee BILLOKOT BOdyx. Ako 03A he dyHIOIOHima, npMTHcHETe ro KonHrta 3a BnYyBaHe/HEKtYBaHe 3a da Ro NKcyIymeot MopoTe. TprHHe fo catoq O Saata Ha bneepoc n Kopvckete rmyema hnayna 3a da RaNCTVcHTe BCaDyUHITe MEpyn HactPn Da CeeNATA.Dopaje TnHcHtAc 3raTe TaRoeMVOrMaNHOKanB Boatete ro catoHa Baetata Ha bneepoc n PpOdoWKeTe Co SInpapHeTo.
Hauin-Pnivnncie Crp/Tron 3a Ta To Bapre MOrpO. Poeaejdoepka Cemnna Hne pceanat J a npnoaA. YBaBcTe n Maata Na OoOBa H a Oocnna cNa Baata Ha bchcpot. Poeepre c Ja BaHata. OepTe J a ochoBa H a ceNnata cHa Wata. PnpMeJrae n coToojnt. Dopaje TeHoct Ako e nippeHo. NopRoPnpoBpCte J a OChBa H a CeNnata, cTaTe J ha Baata Ha bHepepor n npoyponckteco6bnHmpanbctto.
PnKAn YnCTeHbE
PNEI PBPATA YNOTPE6A:
- 106puiuie jia bata co tonna, mka cpi, na h6puiie je co cyba, nke kpi, Vwmuy rty capit, qauhnte, kaiutte, manot kanak Mnnnanaa co ono BOJc oipreHt. Atnkane Hmce genob. Hspsne Hc cyba, nke kpi.
- H36peTe MeTo Ha paoTHa TnOeMHa UTo e paHNo, cyo NcKTo BanyAte To 6nHepeTo Bo saenJhen LKeep Co Tpu RmN.
3a6eneea: cajot Wtirx e hapaaen H a Moxe J a ce TcHn UcCCHo 03 ot CpAhyBa H a Bepkata a npBpcByaee A Meekhmt co cno. H F cbuyyae c na H o cippana tane baprka ta nupprnpca ybe H meKmckn co ceno no caoi no cai no HauHne nocian ha HpaHnIO uHCTe be HdEHHNkUa H OaBHe B OaHbHa 3 GdoB oBe6DyBaT dOeOHO H aCnHt Ee H cato H CTn HOBHTe DOBn. Ako cagot ouitet, H KcpHctto r. BILLI KKTAnKpRto co CzybOba Ta kopovHnHn H VthM.
Tpuka u yucmebe Ha zonemume caoobu:
3a yucmebe:
- Hanchohe ro caot no nobnH co tonna boda hdojte Hcokny kau KTH Tceprctt 3A MHe-0 caobn
- Pneppe to pnn Haneere to kinnneHnntn nnakn Bc knye 103nlya
-
HanpaBae eHaHa oJ cHHeHBe nOaTakn
-
PpHMMHMBB6334
a. IlipnHcHre Crtp/ Cton.
6. Ioneka 3roneywaite ja rpoewenHbTa 8p3nHa do 10.
B. lyIITcTe ro anaparot da pabOn 60,30 60 ckyHn
Capeje ka konhponata a npomehmba bpa
Mpen A3500, nprrnncrte ja kohora ta Camocrojno Cnrehe () 2a npeere. Ipnrrnchcre Tcap7Cron.
- Mnnakhe Tn HmHcyte Ta Cte denob
3a de3unfekuja: (6enuno) (zonemu caobu)
- CnCnCTeTnNtATCTBaTaYnHTcE-BnORPC
2.HanonHcTeRtoCaoTdo no nOoBnHa co Baa 1/2naNHe TepHo denno. - HnBpctete rno HAeCTeTe rKoAMHETHOT DIOENEH KANAK 3O 3Akyeha no3MnHja
- Hanpaesecnhaocnncnne noctanm
PpHmEHHBb63HHa
a. lppnTACHETe Cnpt/ Cton
6. Fonega onesybaite ia nooemnepara doa hna co 10.
B. Tynreire to anapatr jpaabcn 30 60 cexyn.
Cbpere jakponara 3a poeimniba spnna do1
Wogm A35001, nprrachere ja kowra ta CamocjoHnmche ( ) 3a 2n 2n e. Hprrachere Ctapr7Cton.
Pp prpan a anomokkke kane ppe kone kane pnn
- Octabere ja meuaaaahata ja oocn bo caor yune 12 mnyta
- Mycypere ja meunabma nca bemnio. Octabe rto cayr na cynnna ha bosyix. He noanre to no nee hynpnpaeio.
3a de3unfekuja: (ouem) (zonemu caobu)
- Cnepre n ynatcTa Ta aicntbe norope.
- PnroBtere no pactbopot coue: 3a capoT o; 61 yHm (2 n), pactbopoe 16 yHm (473 m) ouer H 18 yHm (473 m) bOa.
- npapreere rnnnabteere to kannneHnnt Baoen Hekanck 6aeknyehto htnyj
- Hanpabete cHaOcneHHe NoCTaNK
PpHmEHHBb63HHa
a. Fmncnene Cnp/Clnn
6. Pnenea zronemyajraje j rpoemmmbana 6pnna do 10.
B. 304yHETe aIapatot na paoTn HApnoMHeHHa 6pHn10 1012m
r.CpBierejKoPonraaIpoMeHnBaSpnHaJp1.PnHneCt
- Octabe 1e Meaabnnto da ctoon bo caot yu TcH N MHHYTH BHYHTO pme HA KOHTA H PACTBOPOT OQT BO CADTPOBa na KHeCyB 5 MHHYTH.
- Iyypere ro paactoepor cooei od caed npeky bnaepnna nnoepnna od daeienr kana. Nopcpej na noankata 3a
- Octobre 1963, 24capit 1Kanakot da ce cyuata H Boudy. He nankheto no desnHppebe. Ako e nortpeho, wncna hte aehau nped cnehtno kopkehre.
Kanaqu, man kanak, noa 3a uehmpupahe u mewank
DenOBATE MIOKE DE CE MOAT BO MAHIMA 30 COOIN. AKO COATE, HENOBATE BO TONDA BOA co Dcetore Hnnoahtre rN IOA BODA, TIO SBDHMIETC F.
CamocmoHoucmeHe: (aasa o 20 yHu (0,6 n) unu cao 8 yHu (240 mJ)
- FANHIEIIOIOTIOIPOITINIBNAIOBQIPOJNJIIEHEKUNKYKAIINTEHNEHPEENI3AAMNHIECAOBAFEHNPAITEKIKIABOJA
- Cabeite ymyhka H a jyohrHabOoOcbHbA hcePiHa. ymyhka Tpea Ja rne npabnHO eHak3o Ha HaboJr Hasprete ja cchosata HA cchma Ta Halaia BepiKa Haechoo JcBHe He CE CTHE
- CTABETA PAUATA OCHOBATA HCAUHATA HSA
- Tnpnchete Cnpi/ Cnpi. Tnnesa 100ybae janpoenmnaaba 63ma no 10
- Tyurete to anaparot da saobom 30 do 60 cekyam.
- Cbprete KaHpmona Ta pmoenHbBbpma do 1. Ippnchete Crept /Cron
7.
3a de3unfkeuJa: (6enuno) (uao o 20 yHpu (0,6 n) unu cao o8 yHpu (240 mnl)
- Cnepene nynatbata 3a-ncntbe noreope
2.HaHnme HcAep no 1000000000000000000000000000000000000000000000000000000000000000 - Caaee Tnnnna H aonnnn H aon noochnata Hacnnnnta. ynnnntata pocda nne H cnaohno ha haojct Habre ta ochoeata Hceinnata Haauata BpTeKa Haechoo Deka He ce CTHe.
4.CTabete nHaLATA Hochobata Ha CauHATA Ha BaaTAta. - PTHCHTE CTAT/CTOT
- PnEka stnoemybaJre ja npomemHbata 4pmaHa p0 10.
- nyuTete ro anapator da paebetn 30 do 60 ckyHn
8.CepTe ja konTpponataa npovemnna 6pnHao 1. Ppmtne Crtap/CTon.
9.OCTAeTeJaMcLauhHATAaOCToNBOcTpyTe 12AHHyTA. - Myperte ja meuabnHata co benvno. OctabeTe ro canoT da ce Kuyn Ha boepy. He nakheTe ro 3eHHmnpaHTo.
IeunbekpuHa na yama o0 20ynu (0,6n) uTu caDm o0 8ynu (240 mn) co ouem (MuHymum Kucenoc m0 5%)
3a6eneka: Ako Kcncnocra e noroneMa, konmctbToHO B GoMa Moe Da ce roneMa da da cpoSne pactbop 2MIMMAY 2.5%
Ha pinnep, sa kncnoct op 10% kopactete 1 den oet n 3 daea boda.
- Cnepre nynarntbataa nucetbe nortpe
2.Bo catoH, HantoHnre 5 yuH (150 m) BODA M S yuH (150 m) bcn ouet (2 yuH (600 m), BOa H 2 yuH (600 m) bcn ouet). HL bILI DHPALI KELII KA BODA.
3. Gaaene rynnn Ka hao nno Hnao o jdoochba nacceanny, yinnae nptpeaane naenne panaan no aenno ha anooj t Iagreene ja ochoaba Hc cinnata hauhata Bpckn DNOOHO HC CC TNC. CTaeTn Hauhata OCHOBATA HcNATA Hb
4.KoOcTeBSeHaHnpCmEHTMBAATAbSFAH
a. Pnncnre Cnpt/ Cton
6. Ioneka rtonewybaite ja npcaehnmbata 6p3ha to 10
B. Pyreirei apapai Japabn60 ckyHm.
r. Capirej a konipnpana 3 npnepnnmbb60mna no 1. Pnpnncene Chp / Cton.
- OctabeTe JMaLABHATA JaOTcTOn BO CaJyT yIe 4 MHyTH (BkyNHO 5 MHyTH EpeMe HA KCHAKT).
- Vcypere jae mnnnna nana coane Octanee no cagmne acy mna bnyx He mnnene rno neaepipapbe
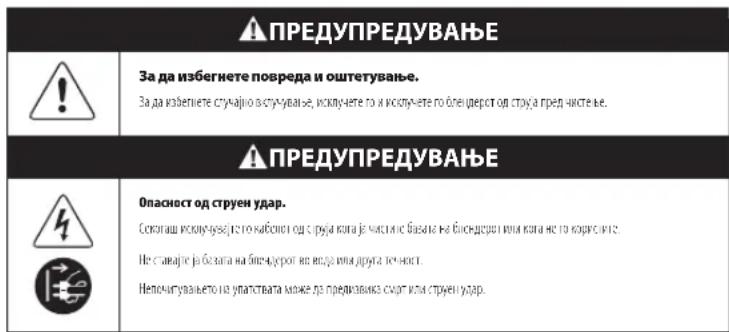
Ba3aHa 6nHepepm
- Mckiyere to finneepn in kkiyere oq tkeep.
- 130000000000000000000000000000000000000000000000000000000000000000000000000000000
- Bepua Akyuree nCtne noBcunnnn nRspnene rco meka kpnna
TAPAHUNJA
DecetroHnHa eNocha rapaunja Ha MaunHaTa
1. PEGNTPAUJA HA IPON3BOJOT.
MoKeJa ro pernctprpate npkky HtepeHr Ha vitamix.com/warranty mco JabyaHe Ha hauata Cnyx6a 3a KopncuHa Ha 1,800,848,2649 knu 1,440,235,4840. Ako He ro pernctprpate KytBaHceto Ha pnoBdoT ToA Hema da r n PohuHT BauIne npaba Ha rapaHuaJa. Cenak, perntpapheTo Ha kyTuBaHbeto Ke My CBO3MOKn Ha Vitamix noqobpo da odroepoHa cHte baun Notpe6n KaKa Kynybaa.
2. KOJ MOXKE DA BAPA AKTUBNPAHBe HA TAPAHUNJATA.
Obaa rapaHnja ja daaba Vilamix HA corCTBENIKOT HA OBOJ 6IeHep cMo 3A NINHA, domuHa yIorpe6a. Obaa rapaHnja he BAKN 3A npin3BDOU nTO ce KOpNCtAT 3A KOMEPUNJHa HAMEHa, H3JIyMaBIE IN pncipodaXb. Ako corCTBENIKOT HA 6IcHepOT CE npoMeH BO TCKOT HA decetroDNIHOT nepOD, aKypnpajTe IINHOPMuaNTte 3A conCTBENIKOT Ha 6IeHepOT Ha vitamix.com.
3. WTO E NOKPNEHO.
Vitamix My rapaTnHa h concTeBNIKOT deKa OBOJ 6NEHep (6NEHep" ce cOToN o63a Ha MOrPot H 6NeHepo, 3eHO Co CnTe CaOBn, kanaun mewanKn KynEHn 3aeHHo y np0k o10 no 100mHOnD atyMOT ha kyIbAteko KepzayrHa NdeEeKHa MaepnAnot HmIspAbOtKa TnIK KaKo pezeyrTa HOpMaTHo AbeHe e Doo6Hyaeha domaiuho ynotpe6b, bocp 30 nno doBnAbeTo HA BpAteHep 6neHep,Vitamix BcnnnHKe ro npann paacnainHt 6neHep i neonot o6neHepo.
Ako, cnped, conctbeho Haorhahe HaVitamix, pacunnHOT 6neHepu nn en OJ 6neHepot He moke da ce nonpaBv, Vitamix Ke 36epe (A) u n da ro zameHH 6neHepot 6ecnnTHo u (5) da My ro bpatn Ha Kyybaohr H3c03a koi Kyien 6neHepot, oceH e Ako Vitamix He doobin npTeXOHO NCMHeIO B3eCtByBaHe 3a Toa ITO npETNOHTa CONCTEHIKOT.
4. LTO HE E NOKPNEHO.
Papainjatahe baxn 3a bnehepn lto ce kopncteene 3a KoeepinlaHn Hane Hn Hnabnp on DmoknHCTBO. Tapaillnata He NOKpMa Ko3meTNK npoMeHH KOHe BnJaT h paOta, KAKo 10ce oe yBaBae Ha obaJnt aEeKtnc 6d KopcnTebe Hb abpaBn CpeCtBA 3a CpeCTBa 3a Hn HatanoxyBaBe Hx pAHA. TapaHJIjata BaXn cmo Ako 6neIepOT ce KOPcNc Hc od npayrctaa, npdynpdeybaBata n 3aHTNHTE MEPKn HabeENH BO yHATCTBO TO 3aYITPOE.
CaOpBn: 6bAp0KtHa Na OndpeHn 6bnN n3aunHn BO caOTo/uaata Ke npEIMBAKn KOMeTNUO KoTeTyBaHbe Na caOTo/uaata N MoKe Da npEIMBAKn npEBrPmeHo 13a6yBaHb e CeuHNTA. ITO kTa, n TpaR oD cSten Hn KpyeHn necok, KaKo n a6p3aUNHn BkMn MoKe da npEIMBAaAT npEbrPmeHo 13a6yBaHb e Ha ceuHNTa. 6bnKite MoKe da copdkxat nCnpAubnB MaCna Kon MoKe da npEIMBAaK aT caOTo/uaata Da rN 3aDpxn Macnata N da npEIMBAKaatt TrajA npOmeHa Ho jota.
Vitamix Hema da 6nde odrobope 3a Tpookot 3a HeOBlaacteHIN nonpaBkN BO rapaHTHNOt poK.
IIOIPABKATA, 3AMEHATA IIN BPAKAHETO HA N3HOCOT HA KYNBAHBE CE EKKNYSBHN PABHN JIKOBH NA KYNBAUOT N ELOCHA OTOBOPOHCT HA VITAMIX CNOPED OBAA TAPAHUJA. HNTY EDEH BPAOTEH NIN PNPTCTABHUK HA VITAMIX HEMA OBJACTVAHBE DA JABA KAKBA BINO DIOONIHETNAI TAPAHUJA NIN KAKBA BUNIO POMEHA HA OBAA TAPAHUJA WIO MOKE IA BIDe OEBP3VBAHCA 3A VITAMIX. CNOIE TOA, KYNBAUOT HE TPEBA JA CE NOTTINPA HA DIOONIHETNIH NJO BOJI NIN BPAOTEH NIN PNPTCTABHUK HA VITAMIX. BO HNTY EDEH CNYAJ, BE3 PAJINKA JAIN CE 3ACHOBA HA DOROBOP, OSECUTETYBAHBE, TAPAHUJA, PKEPIOK (BKLYVYBAJKN IN HEBPEXHOCT), CTPOFA OTOBOPOHCT NIM DPYTO, VITAMIX HEMA IA BNDI DE OTOBOPEH 3A HNKAKBA CNEIJAJHA, NOCPEDHA, CNYAJHA NIN NOCLEDNHYA WTETA, BKLYVBAJKN I, BE3 ORPAHNYBAHE, 3A YBA HA IPOOHT NIN IIN PNXOD.
HeKoI 3eMn Ie JosBOnyBaAT orpaHmHyBaHbE Ha rapaHcIMTe. Bo Tne 3eMn, rcpelHaBeJeTte orpaHmHyBaHa MoKe Ja He BaxKaT 3a Bac. HapBoOp OJ CAn J KaiHaJa MoKe Ja BaxKaT npTu rapaHcIM.
5. WTO JA NOHNU TYBA OBAA TAPAHUNJA.
310yTpe6a, HnnpaaHn HnHmMaTeHa yTOpe6a, NMeHa Ha 6Heepo, NIOKByBaBe Ha HeocbnaeHN nN EKCTpeMn ycnoe HnHOHTyBaBe Ha ynatCTBaTa 3a pabota od Oba yntctco Ka ja noHtat oba rapaHnja.
Tapaunjatae Heaackeyka nakoce H3BpUaT nonpaKn Ha 6bnepoT mHa Koj 6nlo den od 6bnepoT od cTpaHa HeKo kO He eVamix nH cepbcpe Obnacteh od Vitamix nA KO Heo od 6bnepoT kO j 10kpuH co oba rapaunja ce Kopvnt BO KOMbHaJia co 63a Ha MOp Tn ca kon He ce 3peHo OdopeH ouViamix.
6. KAKO DA IOBENE TIO3BOJNA 3A BPAKAHbE CNOPEI OBAA IAPAHUNJA.
Ako Bn e Iotpe6beH cepBnc mnn nnonpaKa, KOHTAKTIPajte co Cnybata 3a KOPNCNHa Vitamix Ha 1.800.848.2649 mnn 1.440.235.4840.Ou Bac ke ce no6apaa da ro HabeTe datymoHa kyynbaIcTo nKOnk33 aKnyyBaIbTO 3a cckOJbNcDpIto He c pRcHCTPpAraH KaYtAmix. 3a bNcDprn KOnC o NKpHcH Co OBAa rapaunja, Ke doBncte bpoj 3a dozEona 3a bpakaibc, HajiHOBN ynatCTBa 3a Ncnpaka i Ondnaped nntaeha nobpaTaHe tAnke Ta NoiHnBe.Vitamix Ke n nnTn CTanadpHnTe TPOoun 3a nCnpaka np BpaKaHbeto Ha 6hEndepot 3a cepBcnPabHe n nonpaKa nOpaHua J HA 6hEndepot Do Bac otKako Ke ce nBapuien cepBncipae Hm BAemaHa cnped rapaunjata. Kyyaavot e odrobope H 3a TPOUoiu 3a cneuiJanHH 6apahna 3a Ncnpaka.
Bo CAn KaHada, oBaA rapaHnJa MoKe da ce nckopncT dmpekTH npeky Vita-Mix Corporation.
CAI KaHada
Vita-Mix Corporation Vita-Mix Corporation
8615 Usher Road 200-1/01 Shepherd Street East
Cleveland, Ohio 44138-2199 Windsor, Ontario N8Y 4YS
1-800-848-2649
1-800-848-2649
service@vitamix.com
service@vitamix.com
Ke ce cme taekcno npnafunepaetno npouBtakobkakobtoe no doctaybaheToocbeHko He ro nBectteVitamix 3a cekoj npobne, Bknyyajkn N ouTetyaHe npnncopaka, bo pok od 48 yaca no doctaybaheTo.
MeYHAPODHNKOHTAKTN
| EBPONIA | ФИЛСКА | LIPHA TOPA | СТОВАЙСА |
| bJIITIIJA | Primalator Czy | Enzita d.o.o. | Sellour Slovakia spol. s.r.o. |
| Dalicq SA | Tубайkanatu 10A | Podgorica, 1000 | Lazaretska 29 |
| 86 Rue de Haimaul | H-00580 Ilesinki | Lipha Toppa | 811.09 Bratislava |
| 6180 Courcelles | ФИХSCA | Tcn: +381 (0) 65 21 550 65 | Croatian |
| BENIJA | Tcn (+358) 972.60622 | www.Enzitame | Tcn: +421.2.52932868-9 |
| TeRc: 132 (0) 19.63 38 33 | info@cnztamc | amatkoc@scctoursk | |
| www.theblender.be | ITALIVUA | XOJIAHДПИА | UIBEДССА |
| БОСАМ XЕPLETOВИHA | KUNZI S.p.A. | MultiBrands Marketing | Lindenbaum Agentur AB |
| Enzita d.o.o. | Via L. Avisto, | & Sales BV | Hardemogatan 7 |
| Pave Radana br. 15 | 19-1-2009 Brasso (MI) | Hecroweg 337-A | S-124 67 Bandhagen |
| Banja Luka, 78000 | Mranjia | 2161 BL Sassenheim | UIBeIJCSA |
| Bocma Kexperiy Ovima | Ten: (+39) 026.145.16.1 | Xonai-pjja | Tcn: (+46) 08-570 347 77 |
| TeRc: +387 (0) 66 117 188 | Ф�с: (+39) 026.500.553 | Tcn: +31 (0) 252 241240 | www.thcblender.sc |
| www.Enzitaba | nfo@kunzit | Φ�С: +31 (0) 252 241244 | TEPMAHIVA, ABCTPNJIA, UIBAIIAPVIJA |
| info@enzitaba | nfo@kunzit | info@multibrands.nl | Vita-Mix GmbH |
| BYTAPVIJA | ICTOCHNIA EBPOIÀ | IIOBILIIKA | Kurufsrstandamm 21 |
| Enzita ECOD | Hollander Elektro | Lindenbaum Agentur AB | 10/19 Berlin |
| Simeonovsko shose 33 | GmbH & Co.KG | Hardemogatan 7 | Teplavnija |
| Sofia, 1000 | Hinschstrasse 35, | S-124 67 Bandhagen | Tcn: (+49) 800 8482 6491 |
| Byrapija | 60388 Frankfurt | Шеблеса | www.vitamix.de |
| TeRc: +389 (0) 76 487 171 | Терганья | Ten: (+46) 857.034.777 | TEPMAHIVA |
| www.Enzitabg | Tcn: +49.69.4990131 | www.thcblender.sc | Keimling Natrukst GmbH |
| info@enzitaba | gmbh@hollander-electro.de | info@thcblender.se | Zum Fruchthof 7a |
| XPBATCKA | ИСТОПЕ LA EВПОДA | ПОЛСКА | 21614 Buxiehude |
| Enzita d.o.o. | Kaeltaekni Ltd. | Logo S.C. | Teplavnija |
| Avenija Dubrovnik 15 | Raußagordi 25 | UI Krasowicka 81 | Tcn: (+49) 4161.51.160 |
| Zagrebski velesjam | 108 Reyjavik | S8-100 Šwidnica | www.keiming.de |
| (Kneski pavilji) | Истд. | Плиж. | ABCTPNJIA |
| Zagreb, 10020 | Tcn: (+49) 89.864987.0 | Tcn: (-48) 71735 66 60 | Hollander Elektro GmbH |
| Xpapika | www.cooltechis | www.bestblender.pl | & Co.KG |
| TeRc: +385 (0) 99.81 59.050 | ДИТВАНДА | info@bestblonder.pl | Finschstrasse 3s, |
| www.Enzita/hr | Zalivalglt | POMAIIVA | 60388 Frankfurt |
| info@enzita.hr | Dovanu stotćte UAB | Quark S.R.L | Тормени |
| ФELIKA PETYSLIVKA | Pamenkalino g. 1 | Str. Mio 2B, Sector | Tcn: +49.69.4990131 |
| Trarnial s.r.o. | Плесыя | Рованиja | gmbh@hollander-electro.de |
| Kaprova 42/14 | Ten: (+370) 52611011 | Ten: (+40) 21 345 1725 | ШВALДAPVIJA |
| 11000 Praha 1 | Ten: (+370) 61562740 | www.bcoOrganic.ro | Keimling Natrukst |
| Чебец Ретунова | www.zaliavalgisl.it | office@quark.com.ro | Furstenlandstrasse 96 |
| TeRc: +420.773.753.333 | info@zaliavalgisl.it | CPBIVIA | 9014 St. Gallen |
| www.atranet.cz | ДИКСЕMDБΥΤ | Enzita d.o.o. | Штaliaчарiva |
| ДАнСКА | Dalicq SA | Leposavo Vujoscvič 11/14 | www.kiming.ch |
| High on Life ApS | 86 Rue de Hainaut | Beograd, 11000 | ОБЕДИVENETO KPAJICTBO |
| Bakkelyvej 2 | 6180 Courcelles | Cpbivja | И КРСКА |
| 8680 Ry | Балпяя | Ten: +381 (0) 65 21 550 65 | Vita-Mix Europe LTD |
| Даньа | Ten: +32 (0) 19.63 38.33 | www.Enzitars | Regus Woburn Place |
| TeRc: +45) 42.78 32.76 | www.thcblondon.orb | info@enzitars | 16 Upper Woburn Place |
| info@highoniledk | MAKLOVIJA | ШДALIVIA | Office number 318 |
| ФАРHIЛДИA | NutriVita | CONASI | London WC1H OAF |
| Wismor S.A. | Mile Pop Jordanov 23a/5 1000 | Carlos V'94 Bajos | Tcn: (+44) 0800.587.0019 |
| Zone Inova 3000 - allée n°5 | Skopje | 23680 Akalála Rcal (Jačn) | www.vitamix.co.uk |
| 88150 Thon les Vosges | Мадониja | Шлариja | |
| Фашива | Ten: (+389) 70.27.20.7 | Ten: (-34) 953 10 25 60 | |
| TeRc: +33 (0)39.82.27.71 | www.vitamixmk | www.conasicu | |
| www.wismer.fr | info@conasicu |
2017 Vita-Mix Corporation. HHTy eEN dE ON oBa a ny6nkaunja He CMee da ce penpouyu npa nn npehece BO HHTy eHa fOpMa n npeky HHTy eHNo cpeCTBO, HHTy da CE 3ayBa BO 63a Ha noatoqnnCttem 3a N3BNeKyBaBe noatoqnn, 63 nncmHa do3bona od Vita-Mix Corporation.
BLENDERELE DE INALTÄ PERFORMANTA A3300i SIA3500i
Seria Ascent
VM0195C VM0195

Putere:1200-1400W Adancime:28cm
Bandafrecentapentru transmisieBluoteoh-2402-2480MHz/Putere maxima penta rufreceenta radio-0,001 W
- Freecentä de fonctionare Near Field Communication (NFC) = 13,56 MHz
Prn urmare, Vita-Mix Manufacturing Corporation declarac c acest produs respecta Direcva 2014/53/EU. Textul complat al Declaratioi de conformitate UE est disponibil la umatoare adres de internet. https://www.vitamix.com/Corporate-Information/Corporate-Policies/EU-Declaration-of-Conformity
Cleveland, Ohio 44138-2199Windsor, Ontario N8Y 4Y5
1-800-848-2649
1-800-848-2649
service@vitamix.com
service@vitamix.com
Se va considera cai acceptat produsul returnat,ca atare"la livrare, cu excepia czului in care anunai Vitamix referitor la probleme, inclusiv detiorarea expedierii, in decurs de 48 de ore de la livrarc.
INFORMATII DE CONTACT LA NIVEL INTERNATIONAL
| EUROPA | FINLANDA | MUNTENESRU | SLOVACIA | AFRICA 5JORIENTUL MULOCHU |
| BELGIAC | Primulator Oy | Linzta d.o.o. | Settour Slovakia spo.l.o.o. | AFRICA DE SUD |
| Bdacoq SA | Työppajankatu 10A | Podgorna, 1000 | Lazaritska 29 | CONGI OMUS.CO 17A |
| B6 Rue de Iainaut | Fl. 00380 Helsinki | Muntenegru | 811.09 Braslava | TILALI IMAKURIS |
| 6180 Courcelles | Finlanda | Tel: 1381 (0) 85 21 550 65 | Slovacia | 9 Hoog Street |
| Belga | Tel: (1 358)972.60922 | www.Enzukmuc | Tel: 1421.2.52032858 9 | Utrecht |
| Tol: 132 (0) 19-63 38 33 | www.theblenderh | infogenzitame | arnatko@settoursk | ZA |
| www.theblenderche | ITALIA | OLANDA | SUHDA | Tel: (+77) 341331 1821 |
| BOSNIA S | KONZ SpA | Multi brands Marketing | Lindenbaum Agentur AB | www.healthmakers.co.za |
| HI RIVCKINA | Via L. Ariosto, | & Selos BV | Hardmonogauan 7 | selos@coitalmaksrccozla |
| Enzita d.o.o. | 19-1-20091 Bresso (MI) | Heereweg 337-A | S-124-67 Bandhagen | ISRAEL |
| Pave Radana br. 15 | Italia | 2161 BL Sassonheim | Sudcia | New Horizont |
| Banja Luka, /8000 | Tel: (+39) 02.61.45.16.1 | Olanda | Tel: (+49) 08 570 347 77 | Masikt 2/ |
| Bosnia H1 Kralgovina | Fax: (+39) 02.66.500.553 | Tel: +31 (0) 252 241240 | www.theblenderse | Horla 46733 |
| Tel: +387 (0) 66 11 / 188 | www.kunz.li | Fax: 131 (0) 252 241244 | GIMMANIA, AUSIIIA, HVLIIA | Israel |
| www.Enzita ba | info@multibrands.nl | Vita Mix GmbH | Tel: (1972) 95576422 | |
| info@cnizutuba | EUROPA DE EST | NORVEGINIA | Kurfcuşsummandn 21 | Tel: (1972) 1.700.70.2009 |
| BULGARIA | Ioliaender Llektro | Lindenbaum Agentur AB | 10/19 Berlin | www.newhorizon.com |
| Enzita FIOOD | GmbH & CoXG | Hardmonogatian 7 | Gormania | BAHAN, KUWAI, OMAN, QATAR, SI ARABIA SAUDITA |
| Simoneovsko shoch 33 | Finschstrasse 35, | S-124 67 Banchagen | Tel: (+49) 800 8482 6491 | 41 homes 1 ZCO |
| Sofia, 1000 | 60388 Frankfurt | Suedia | www.vtambode | Vitality General |
| Bulgaria | Gormonia | Tel: (+146) 857.034.777 | GIMMANIA | |
| Tel: 1389 (0) 76 487 171 | www.theblenderse | www.theblenderse | Kozimling Naturkost GmbH | PO Box 61379, Dubal UME |
| www.Enzita.org | info@theblenderse | Zum Fruchthof 7a | Tel: 1971 4 3807611 | |
| info@cnizutuba | ISLANDA | POLONIA | 21614 Buxtehude | Tax: (+971) 4 387612 |
| CROATIA | Koblackni Ltd. | Logo SC | Gormonia | 4hornos@hroms.ac |
| Enzita d.o.o. | Ruzdagero 25 | Ul. Kraszewicka 81 | Tel: (+49) 4161.51.160 | www.tavolashop.com |
| Avenja Dubrovnik 15 | 108 Ryjkjavik | 58 100 Swicnica | www.kusmlirgde | EMIRA HIF ARABIE UNITE |
| Zagrebski velesajam | Islanda | Polonia | AUSTRIA | Vitality General |
| (Kincaj pavlon) | Tel: (+49) 89864987.0 | Tel: (+49) 71735 66 660 | Hollanderbck Elektro GmbH | Trading LLC |
| Zagreb, 10020 | www.botstenderpl | & CoKG | PO Box /3265 | |
| Croatia | LITUANIA | info@bestblenderpl | Flinchstrasse 35, | Dubai |
| Tel: +385 (0) 99 81 59 050 | Zallalayglisit | ROMANIA | 60388 Frankfurt | Emirate Arabe Unite |
| www.Enzita.hr | Dovzuru stotele UA8 | Quark S.R.L. | Germanna | Tel: +971 (0) 561089662 |
| info@cnizutuba | Parmekni nic g.1 | St. Misl 2B, Soctor | Tel: 149 69 4990131 | www.vkaliyaac |
| REPUBLICA CDIA | 1 Itiuanis | 3052265 Bucuresti | gmbh@hollander-elektrade | info@vitalityae |
| Tramnal s.r.o. | Tel: (+370) 52511011 | Romania | HVIHIA | 4Homes F/C0 |
| Kaprova 42/14 | Tel: (+370) 61502740 | www.BeOrganicno | Fristandlondstrasse 96 | PO Box 61379, Dubal UME |
| 11000 Praha 1 | www.zallalayglisit | office@quark.com.ro | 9014 St. Gallen | Tel: +971 4 3807611 |
| Republica Cehla | info@cnizutuba | SERBIA | Dvojla | 4hornos@hroms.ac |
| Tel: +470,773,753,333 | Erual d.o.o. | Tel: 0800 534 654 | www.tavolashop.com | |
| www.atronctuz | LUXEMBURGS | Erla t.d.o.o. | Tel: 0800 534 654 | AUSTRIA |
| DANEMARCA | Dalcq SA | Leposave Vujolevac 11/14 | www.meilingch | AUSTRALIA |
| High on l'life Apps | 86 Blue de Hainaut | Beograd, 11000 | MARIA BRITANI | NOVA ZHANI |
| Bakkerjvij 2 | 6180 Courcelles | Serbia | SI RILANDA | Vitamin ANZ Piy Limited |
| 9880 Ry | Belga | Tel: +381 (0) 65 21 550 65 | Vtu Mix Europe LTD | 167 King Sl |
| Danemarca | www.theblenderbe | info@cnizutuba | Regus Woburn Place | Newcastle NSW2300 |
| Tol: (145) 42 78 32 76 | MACEDONIA | SPANIA | Office number 318 | Australia |
| info@highmontdick | Dacq SA | CONASI | London WC1H OAF | Tel: 1-800-766437 (AUS) |
| FRANTGA | Nutri Vita | Conasil | London WC1H OAF | Tel: 050-853-0697 (NZ) |
| Werner S.A. | Milc Pop Jordanov 23a/51000 | Carlos Vn'4 Bojos | Tel: (+44) 0800.587.0019 | www.vtiamkcomau |
| Zoric Inova 3000 - allio m5 | Macedonia | 23680 Alcalá la Real (Laén) | www.vtiamkcom.uk | www.vtiamkcomz |
| 88150 Thaon los Vosges | Tel: (+389) /02/20/2 | Tel: (+34) 953 10 25 60 | ||
| Tranga | Tel: (+33) 03,28,82,27,71 | www.conastueu | ||
| Tel: 133 (0) 29,82,27,71 | info@cnizutuba |
https://www.vitamix.com/Corporate-Information/Corporate-Policies/EU-Declaration-of-Conformity
https://www.vitamix.co.uk/Corporate-Information/Corporate-Policies/EU-Declaration-of-Conformity
Cleveland, Ohio 44138-2199 Windsor, Ontario N8Y 4Y5
18008482649 18008482649
service@vitamix.com
service@vitamix.com
Tel: +420.773.753.333
www.atranetc/
DANIA
High on Life ApS
Bakkeyvej 2
8680Ry
Dania
Tel:(+45)42783276
info@highonlile.dk
FRANCJA
Wismer S.A.
Zone inova 5000 - allco n°5
88150 Thaon les Vosges
Francja
Tel: +33 (0) 3.2982.27.71
www.wismer.fr
FINLANDIA
Primulator Oy
Tyopajankatu 10A
HI-OC58O Helsinki
Finlandia
Tel: (+358) 972.60622
www.theblender.fi
WEOCHY
KUNZLS.P.A.
Via L. Ariosto,
19-1-2009Bresso(MI)
Wlchy
Tel.(+39)026145161
Fax: (+39) 0266500.553
www.kunzitl.com
nfo@kunziit
EUROPA WSCHODNIA
Hollander Elektro
GmbH & Co.KG
Finschstrasse 35.
60388 Frankfurt
Niemcy
Tel:+49694990131
16 Upper Woburn Place
Office number 318
London WCIH OAR
Tel:(44)0800.587.0019
www.vitarnix.co.uk
AFRYKA|BLISKIWSCHOD
RPA
CONGLOMUS CCT/A
HEALTHMAKERS
9 Hoog Street
Utrecht
乙A
Tel.:+(27)343314824
www.healthmakers.co.za
sales@healthmakers.co.za
IZRAFI
New Horizon
Maskit 27
Herzla 46733
Israel
Tel: (+972) 9,9576422
Tel: (+972) 1700.70 2009
www.newhorizon.com
BAHRAJN, KUWEJT,
OMAN.KATAR
IARABIA SAUDYJSKA
4Homes FZCO
PO Box 61379, Dubai ZEA
Tel:19714380761
Fax: +971 4387612
4hmes@4hmes.
www.tavolashop.com
ZJEDNOCZONE EMIRATY
ARABSKIE
Vitality General
Trading LLC
PQ Box 73265
Dubai
Vitamix AN7 Pty Limited
167 King St
Newcastle NSW2300
Australia
Tel:1-800-766437(AUS)
Tel:050-853-0697(NZ)
www.vitamix.com.au
www.vtamx.co.nz
Cleveland, Ohio 44138-2199 Windsor, Ontario N8Y 4Y5
1-800-848-2649 1-800-848-2649
service@vitamix.com service@vitamix.com
Tel: +420.773.753.333
www.alranet.cz
DANIMARKA
High on Life ApS
Bakkelyvej 2
8680Ry
Danimarka
Tel: (+45) 42783276
info@highonlife.dk
TRANSA
Wismer S.A.
Tel: (+39) 02.61.45.16.1
Faks: (+39) 0266.500.553
www.kunzi.it
nfo@kunzi.it
DOGUAVRUPA
Hollander Flektro
GmbH & CoKG
Flinschstrasse 35,
60388 Frankfurt
Almanya
Tel: +49 69 4990131
gmbh@hollander-elekro.de
IZLANDA
Kaclitaakni Ltd
Rau@geroi 25
108 Reykjavik
izlanda
Tel:(+49)89.864987.0
www.cooltech.is
LITVANYA
Zaliavalgis.it
Doyanu stotele UAB
Pamenkalinog.1
OII16 Vilnius,
Litvanya
Tel: (+370) 5261011
Tel:(1370)61562740
www.zalaiavalgis.it
info@zaliavalgis.it
LUKSEMBURG
Dalcq SA
86 Rue de Hainaut
6180 Courcelles
Belcika
Tel: +52 (0) 19 65 38 53
www.theblender.be
MAKEDONYA
Nutri Vita
Mile Pop Jordanov 23a/51000
Skopje
Makedonya
Tel: (+389) 70.272.072
www.vitamix.mk
KARARAG
Enzita d.o.o.
Podgorica, 1000
Karadag
Tel: +381 (0) 652155065
www.Enzita.me
info@enzita.me
HOLLANDA
MultiBrands Marketing
& Saics BV
Heereweg 337-A
2161 BL Sassenheim
Hollanda
Tel: +31 (0) 252 241240
Faks. +51 (0) 252 241244
info@multibrands.nl
NORVEC
Lindenbaum Agenturer AB
Hardemogatan
S-124 67 Bandhagen
Isvec
Tel: +(+46)857.034.777
www.theblender.se
info@theblender.se
POIONYA
Logo S.C.
Ul. Kraszowicka 81
58-100 Swidnica
Polonya
Tel: (+48) 717356660
www.bestblender.net
info@bestblend
ROMANYA
Quark S.R.L.
Str. Mizil 2B, Sector
3032265 Bucharest
Romanya
Tel: (+40) 213451725
www.BeOrganic.ro
office@quark.com.ro
SIRBISTAN
Enzita d.o.o.
Leposave Vujosevic 11/14
Beograd, 11000
Surbistan
Tel: +381 (0) 65 21 550 65
www.Enzita.rs
info@enzita.rs
ISPANYA
CONASI
Carlos V n4 Bajos
16 Upper Woburn Place
Office number 318
London WCIH OAF
Tel:(144)0800.587.0019
www.vitamix.co.uk
AFRIKA VE ORTA DOGU
GUNey AFRIKA
CONGLOMUS CC T/A
HEALTHMAKERS
9 Hoog Street
Utrecht
Güney Afrika
www.healthmakers.co.za
sales@healthmakers.co.za
ISRAIL
New Horizon
Maskit 27
Herzlia 46733
Israel
Tel:(+972)9.9576422
Tel: (+972) 1.700.70.2009
www.newhorizon.co.il
BAHREYN, KUVEYI,
UMMAN, KATAR
VE SUUDI ARABISTAN
4Homes FZCO
PO Box 61379, Dubai BAE.
Tel:+97143807611
Faks:+9714387612
4homes@4homes.ac
www.tavolashop.com
BIRLESIKARAP
EMIRLIKLERI
Vitality General
Trading LLC
PO Box 73265
Dubai
Vitamix ANZ Pty Limited
167 King St
Newcastle NSW2300
Ayustralya
Tel:1-800-766437(AUS)
https://www.vitamix.com/Corporate Information/Corporate Policies/EU Declaration of Conformity
https://www.vitamix.co.uk/Corporate-Information/Corporate-Policies/EU-Declaration-of-Conformity
TTOA TTOA TOO ATOA TOO ATOA TOO ATOA TOO ATOA TOO ATOA TOO ATOA TOO ATOA TOO ATOA TOO ATOA TOO ATOA TOO ATOA TOO ATOA TOO ATOA TOO ATOA TOO ATOA TOO ATOA TOO ATOA TOO ATOA TOO ATOA TOO ATOA TOO
Poypma Ta Ekeovia oavepovrta onvuyec nVitamx To mveepb aatapnnte auotata oto teoc Tou npoyadmuac Mopoei va idkontere evnpypca omoundnote anyue to maTua Tou koumiou Evapn/ Aikonr. O xpvovu vnv npoypapauw dev puiocvtpe m t aeoupya Tou xpovobakton. Otav mntSe to koumi Evapc/Aikonr an peon Tou npoypapcu, to npveepb aatapnuoai Ka aepovipn taayimra 1.Fav OeTe va ekeleoe evn popypa, enieEte to npoypa kai nntes to koumi Evapn/Aikomr.
Smohties (yepva emopia. 20nA Atoec vie mnyua kai AoucE Autokap
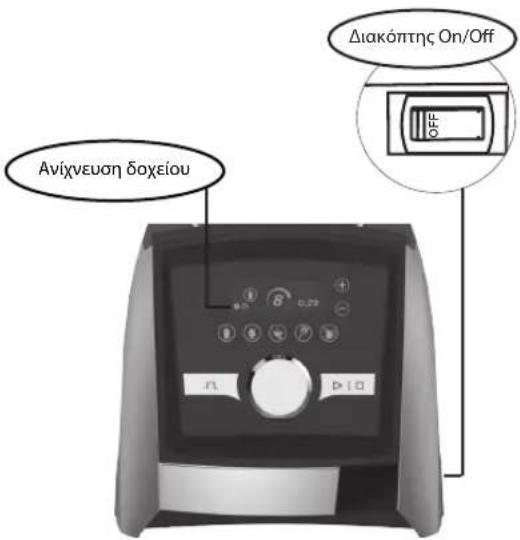
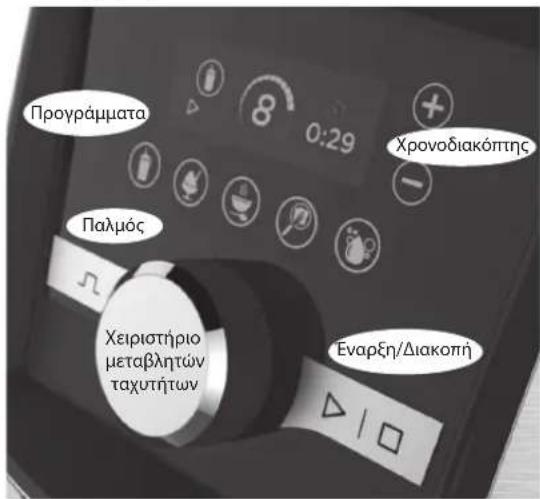
Nivaacac xepiopou A3500i
Kwokoi opaipawv Edn snt katoov kwiko apakatoc, oyn oov, onuikote tou, apipouc, n, oovnc, ou npapavkovtai taTov kwiko opalauotoc Kaote tv Eumptpon Hataov Tc Vitamin mix rrov siavopa aac yia va oac bongnoe va emoene to npobma.
Motep-To potep tnc oukevicVitamix eliv aoeiaepevo va npoateetot an no tvn uepBepaavon. Eav to unevtp dev ekvnoi quaoic beauweite ont exete balei atny npka tn ouokeur kai ot diakomnc On/Off eliv anenOn. Fav to potep uepepovBne, apioe to potep va kpudioyio 20-45 Aenra.
EuouhEc yia va anopeuyetye tvv unepopotwn tou nnevtep oac:
No extaleite anokaiotk ouvroq, trc Vitamix orav paBovire nuc, v npnponone tne mEvip.
Mny kteae ouovoye pe tayntec yopnotepe cno tc ouvotvece
Mny ekteale ouvayec pe Taxutntec upnotepec nio tic ouviotwpevec.
Mnyekteouayc ydiapkeiapeAuaepn ao ouvioueyn.
Na xpnqoioiee Tp d3o yia nV tneepocia npuutov knt ouexn knon Tov uukw eo an tok aeio
Paooc-Ta kaiia kai o paeoi ev npenei va eaaooovar tgeofoeioaou aouc kayepoeocnac Na pnooponee npo30 no ouv6ue to mivepoc
To doxio dev npenei va evai ymupevo nepootepo and to do 00 to av xnpaonoeir n pdooc kata ny avuicn. ta va anpexuxtuyov unepepauvar, MH xonoiionote tn pa8so yia npoctopo and 30 Seuteodenta ouvexouva.
EAPTMATA KAI XAPAKTHPISTIKA
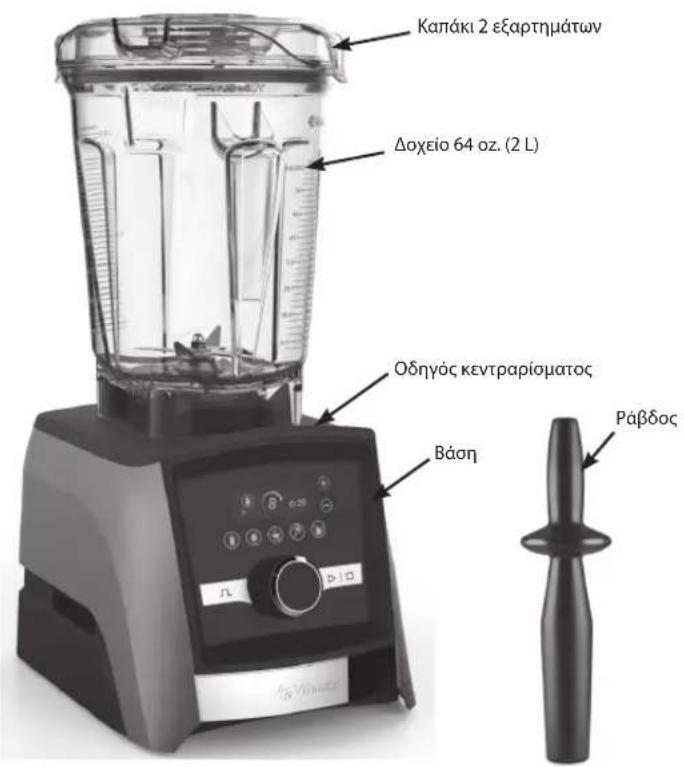
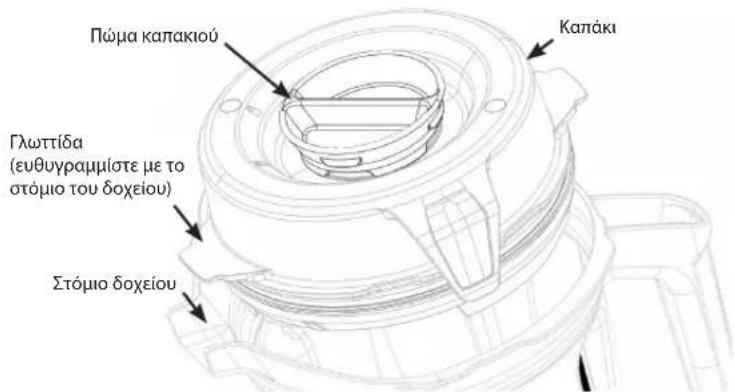
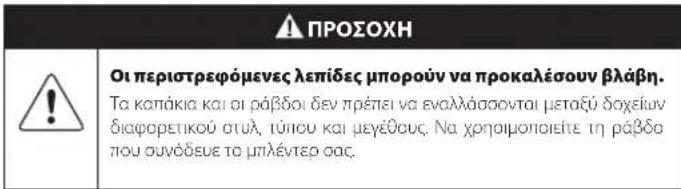
Oxio, Kanaki, Nwka Kaanakoi Ku Paboc
No npnpoonoe nndva to kaki ka to nuaou oov to mivep evoi aeoupyic.
Mn Cetene note to unAevre o ae Aetoupyia xupic va exete npuro Baeaiuoi ot to kndk Exe aoppaoia ooad on Eon tou.
To nua tou kaiakiou pepa ojuaia via va pnpoei va xponpmonBekai wcknnaeP
Lidyete to nupa tou kanakou peda ony onn tou kanakou. Aopaiote to nua onn beon tou opeovtdc, to defootpopa. Iva va to apapoeote, atpetye to apateodtoopa kai onkote to.
ApapaeTo nua an to kaki otay belet va xonaiounaet e npdo n va npoae
Ta maAnou tumou doxiei nC Vitamix (C, G kon S Series) dev Anoupyov pTn Baoon Tou npAevr Ascent.
Eeaprijmuata
Aiathevtai eapntmuata yia thn dnioupyia eupavtaotw ovayw. EmaekpTeite tov iototo vitamix.com ia pioovta kal emveuon.
Model A3500, matrie to exoio 1nnoaepapucic (y) yie 2nK8E. Prrnne to konui Eapen/Anonp. I npoypaqa o repurata autopora puaokipoei
- EmdowrE co mnppepee eepn
Tia anoluyavan: (Xlambda) (Oxieia nlpocu eyeoouc)
- AekouBrijntn napmnaov aBpyncn kBapuupnO.
- Tepnoe to dgeio tae pionjepepn 1 19 1000000000000000000000000000000000000000000000000
- Koumenei nme cokn pa kann 2 5pnpnnn no pncn on ton
- EKTeZ21 pia nOg 8fck bdoaocie
Merafune tegumrec
a. FmFJH To KcPm FeepnAamKoJn
B. Aufwand opres npolubonnpocayntacox to 10
y. Aepnre n 30 60
6. Tepapnepa to gcpipripo pcoepnnto tegorjrae eaoe noegorjno 1
Model A3500, nainrto exerioio Anonoknepnoc (wv an) Atee. nainrto konanl Fopre/Aunmri
Pepnppaaa aepnnnne aepnnae aeepnne
- Aprite to piu nio do gio 13 hantc emnneae.
- Abidote to plya rtc glaeprA. Ahoote to boeio vo oeywaeie pe quoob spno. Niny Emeovte terd trn onkupon.
Tia anoIauvan: (E8) (Oxieia nnpoc uoe
1.Akoaejoei n npainovn oepie Kaoepipoi
2. Ipoeopouoae 0e daiuue Eduo: cto doeio 64 oz,doiOe 16 oz (473 ml) Eduo 16 oz (473 ml) vepo
3. Komprizende f mirere chisiknpo to cinn 2 equimduo Cto sa apdckin onfon.
4. Euaie pia ane 1c efic dabnac
Metafamtec tagmrec
a. Notiote to koum Ewep, dokorn
B.Auereae apnoi npoepnnpogopoeao 10.
yAerjntn 00000000000000000000000000000000000000000000000
-
Nepatpatey to yepipnpi pae npnnnny taynnnne npe npompa 1. Pnntnre to kounl Evnp/Anonm.
-
Aipjoe 10 pijpe oio 6oegie yra 3 cokknpn kieni enikke. O ouwokx, gneoc, npapuwr, ton dkiuor, yoioo oio oogia iepenr no eiv 5 henn.
- Aideot to dabupu oobod and to bogio ot ny eouepnmpnmpnne nre kana 2 eepnndw. ErnoaBene ty danbokolin
- Aioe to do cayoo no to karko va oepowocu pa quaoo ppo. Mpy Eekwote pdo ty ondauon, Eov xpeotel, Eadavene to akpiaa nae npv evqeyn gairion.
2. NIOIO MNOPEI NA ZHTHSEI KAAYPH ERTYHSEI.
Hnapouoa eyyunon napexetai an tvitamix oov katoxou tou pniyevtp via npoownki oikakxpnionpovo. Hnapouoa enynon dev toyueia npoiovotau yia emopikouc okonouc, evkoiaoc n metanuohoeic. Eav nykupotma tou pniyevte aaldeke ta 10eouc nepidou. Evnpepae ta otioxeia tou katoxou otov ototonto vitamix.com.
3. KAIAYPsiI.
V Htivix euyudai oov kato 61e ourto o mveep (to aumvtepe) anoteelai aoia baan mveptpeo pot, tuxovdoie(a), kanaia kai paBouc nou to ouvoseauav) Taatnai vai leuupyeyi de. 10 xpvia anotnv npoeipnuay caojaoa oaoxiauk nokau kakotexviac, naeviae quaoloyikc fbpocad an no uovbnok iokakn xpran, nVitamix, evrc; 30 npovpov an tynpalabdou tou entoppepuov mveep, daenkeudae to mvevt pe to eepaiaou mveapdpawd.
Edv, n Vitamix kipvei on to mivtep nou dev aeoupyei on to ecaptnua tou mivtep dev mopoei va emakeuaotei, n Vitamix 0a emalee iere (A) va avikataotno to mivtep dwoepav, n (B) v aaoqiauovkatox o kataaovtac oaknoo to avinio ayopac, eokoc edn vitamix exie lae npwta ypanth sionoinn Tnpunjncn Tou liokttn.
4. TI ADEN KAAYNTETAI.
H npaoa eeyyepn deiyai yia nayrnnnnae nn aynnnae yan anen anon oonu anen anen anen anen anen anen anen anen anen anen anen anen anen anen anen anen anen anen anen anen anen anen anen anen anen anen anen anen anen anen anen anen anen anen anen anen anen anen anen anen anen anen anen anen anen anen anen anen anen anen an
Oxieia: H avaen kantoivw uipowikov no xanayapikov so doxio/kuene Ioo oyneoi aolaiouk oovdo xioiu koteau k vodexetai va npokalee iyn npoepaov tnv npoepaov. Oi kpoonotocntc ou, oxvtpokoiuavk ta paxiwuupwokov enianc 0 npokaleouov n npoopn oopopaov tuv anidow. Ta pupwiskia evdexetai va npieoyou mntka eiaia tou npokaouov tnu ouykpanot wv elaiw o so doxio/kuneia kai va onynoov oe mvio anoxpuaatuo.
H Vitamix 0eV a eivai unEoovyn iay to kooToc tuxoyn p Eouoio8otneuvv enkeuovkctc ywnon
H EINI KEYH, H ANIKATAA TAH H AINOZHIOMEHTOY TIMHATOS AROPAEINAI TA MONADIA KEA ANOKATAA TAH TOY AROPAETH KAI H MONADIKH YIOXPEOHE THVAMIX YIO THN IAPOYA EETYHEK. KANENA E PRAZOMENO H ANTIPPOQIOES THE VAMIX DEN EINAI EEOYIOAOTHMENOE NA NPOBAINEI OEIOIAADHNOTE IPOQEHET EITYHEH H OIOIAADHNOTE TPOIOHOIHSEH TH PAPOYAEETYHEH H OIOIA MIOPEI NA EINAI DEEMEYTIKH FIA THN VITAMIX. ANIETOHA, O APOTAS THE N IPEIENA BAZETAI SE ONIOEAAHNTIDE PPOQETE AHAQEEI OIOYOHDHOTE EPAZOMENOY H ANIPOQIOY TOHS VITAMIX. KEPIPTOSSH, EITE BAEEI YMBAIZHE, AIOZHMIOE, EETYHE, AAKOPPAIEA (SYMNEPIAAMBANOMENH THE AMEAEIA), ANTIKEIMENIKHE EYOYNHE EIIAAALG, H VITAMIX DEN QPEEI EYOYNH FIA KAMIA EIADIKH, EMMEESH, SYMTOMATIKH H ENAKOAOYOH ZHMIA PAES QYEQ, SYMNEPIAAMBANOMENON, XOPIEPIPOJIMO, TYXON ANIQAELON KEPAOYS HEODON.
Se opiouec noiie, deev ntpenovtnepiopoi otic eyyuoeic. 2e autec, tnoiieoc, o npanavw nepiopoi evexetai va uoyouv. EKrc, HTA kai Kavaa, evexetai va uyouv
5. TI AKYPQNEI THN NIAPOYSA EITHYSH
H Katoxpon, n Aavbaouev npon, npononainon tou mLevep, n EkEcor Tou oe avikovikc, n akpaic ouwnkec, n aubuaia triponoc, tw odyiv Aetoupyac Tou npovct. exepdiou, kaotouv aknpn Tny eyunon.
H evon oakuvetai enfoc evyivouv eniokeuec oto nneovteep neoiootne eaptnua toun aevtpe ano atao nou de ypvctai ontvVamix noe cdoaodnve avipnoo n 0epic nT vitamix, h eav oioiote eaptnua toun aevtpe nou dieneta at no npovoa eypon xpoiononee oe ouvoaao p aeon potep n doxcei nou de yekpive pnta nVitamix.
6. TPOIOE AHPSH EOYIOAOTHSH ENIETPOOHSEYMDONA ME THN IAPOYSA EFTYHsH.
eepwn nou xpealeite oepk n enoekun kaleote tny Eumptonn lataov nrc Vamix oto thpawu 1.800.848.2649 n 1.440.235.1840.Oa aoc nBtbe va aapepe tnv npoynv aoedc kai va npawaiaetree vay anoei h npaoacote vay apoc tou paevto, ed av exyivei ny eypapitou stnv Vamix. Oa abetae evapd eaeauofoqnc eniopnpic enipuupueae npopopieae antoanlnc kai ia npompanpuevn etikte npaaolpcn cia to npalvtpou nio npapuaeyon H Viamix O KaAuiy ta tumka ecoda anootoanc trc emiopoepc evoc maienepv oueepk cnki eoion un ty eynonkai ytn ny iinotpophou tou paevto eodc mea tv neiokneur n rty eyyonon O ayopaatncivai uneeuvoc yra nv kauynr uov ecdw yia edika arntmuara aortoavw.
TIC HNA KAI TOV KAVADA napouda eyyunon npelra ane0eiaac and Vita-Mix Corporation.
HywpeC NoAitec Kavadac
Vita-Mix Corporation Vita-Mix Corporation
8615 Usher Road 200-1701 Shepherd Street East
Cleveland, Ohio 44138-2199Windsor, Ontario N8Y 4Y5
1-800-848-2649
1-800-848-2649
service@vitamix.com
service@vitamix.com
Oa npeneva deaeite To enioppeoe npocv Otny kataaon nou piokeanr Te Tnv npadoon, ekoc edv evnepwate TnvVitamix va tuxov npobma, aunepiaauoevnc, onaoohne BaeNc kata anotnoa, evtoc 48 upov ano npapsoon.
SεθvεIg ΕΠαφε
EYPQINH
BEAIO
Dalcq SA
86 Rue de Hainaut
6180 Courcelles
Belgium
Tnλ: -32 (0) 19 63 38 33
www.theblender.he
BOESNIA &
EPZETOBINH
Enzita d.o.o.
Pave Radana br. 15
Banja Luika, 78000
Bosnia and Herzegovina
Tnλ: -387 (0) 66 117 188
www.Enzita.ba
info@enzita.bu
BOYATAPLA
Enzira FOOD
Simeonovsko shose 33
Sofia, 1000
Bulgaria
Tnλ: +389 (0) 76487171
www.Enzita.bg
info@benzita.bg
KPOATIA
Enzita d.o.o.
Avenija Dubrovnik 15
Zagrebski velesajam
(Kineski paviljon)
Zagreb, 10020
Croatia
Tn: -385(0)998159050
www.Enzita.hr
info@enzita.hr
T2EXIKH AHMOKPATIA
Traminal s.r.o.
Kaprova 42/14
11000 Praha 1
Czech Republic
Tnλ=420.773.753.333
www.aftranet.cn
ANIA
High on Life ApS
Bakkelyvej 2
8690Ry
Denmark
Tn: (+45) 42783276
info@highonlife.dkd
TAAALA
Wismer S.A.
TnA: (+39) 02.61.45.16.1
Φαξ:(+30)02.66.500.553
www.kunzi.it
nfo@kunzi.it
ANATOAIKH EYPQIH
Hollander Elektro
GmbH & Co.KG
Flinschstrasse 35,
60388 Frankfurt
Germany
Tnλ:+49694990131
gmhh@hollaender-elektr.de
12AAANIA
Kaelitaekni Ltd.
Rauδagerö 25
108 Rcykjavik
Iceland
Tnλ:(+49)89.864987.0
www.cooltech.is
AIOOYANIA
Zaliavalgis.lt
Dovanu stotele UAB
Parmenkalnio g.1
01116 Vilnius,
Lithuania
Tn: (+370) 52611011
Tnλ: (+370) 61562740
www.zalavalgis.ln
info@zaliavalgis.nl
AOYEEMBOYPRO
Dalcq SA
86 Rue de Halmaut
6180 Courcelles
Belgium
Tnλ:132(0)19633833
www.theblender.be
PIAM
Nutri Vita
Mile Pop Jordanov 23a/51000
Skopje
Macedonia
Tnλ: (+389) 70.272.072
www.vitamix.mk
MAYPOBOYNIO
Enzita d.o.o.
Podgorica, 1000
Montenegro
Tnλ: +381 (0) 65 21 550 65
www.Enzita.me
info@enzita.me
OAAANAA
MultiBrands Marketing
&Sales BV
Heereweg 337-A
2161 BL Sassenheim
The Netherlands
Tnλ+31(0)252241240
Φαξ: +31 (0) 252 241244
info@multibrands.nl
NOPBHTLA
Lindenbaum Agenturer AB
Hardemogatan 7
S-124 67 Bandhagen
Sweden
Tnλ: +(+46) 857.034.777
www.theblender.se
info@theblender.se
HOA2NIA
Logo S.C.
UJ.Kraszowicka 81
58-100 Swidnica
Poland
Tnλ: (+48) 71735 66 60
www.bestblender.pl
info@bestblender.pl
POYMANIA
Quark S.R.I.
Str. Mizil 2B, Sector
3032265 Bucharest
Romania
Tnλ: (+40) 21 345 1725
www.BeOrganic.ro
office@quark.com.ro
SEPBIA
Enzita d.o.o.
Leposave Vujošević 11/14
Beograd, 11000
Serbia
Tnλ: +381 (0) 65 21 550 65
www.Enzita.rs
info@enzita.rs
ISIANIA
CONASI
Carlos V n4 Bajos
16 Upper Woburn Place
Office number 318
London WC1H O4
Tnλ: (+44) 0800.587.0019
www.vitamix.co.uk
APPIKH & MEESH ANATOAH
NOTIA AΦPIKH
CONGLOMUS CC T/A
HEALTHIMAKERS
9 Hong Street
Urecht
ZA
Tnλ: +27)34.331 4824
www.healthmakers.co.za
sales@healthmakers.co.za
ISPAHA
New Horizon
Maskit 27
Herzlia 46733
Israel
Tnλ:(-972)9.9576422
United Arab Emirates
Tnλ:+971(0)561089662
www.vitality.ac
info@vitality.ae
4Homes FZCO
PO Box 61379, Dubai UAE.
Tmλ: +971 43807611
_c + 9714387612
4homes@4hom
www.tavolashop.com
AYETPAALA&
NEA ZHAANIA
Vitamix ANZ Pty Limited
167 King St
Newcastle NSW2300
Australia
Tnλ:1-800-766437(AUS)
Tnλ:050-853-0697(NZ)
www.vitamix.com.au
www.vitamix.co.nz
A3500i,A3300i jI 1
Ascent
VM0195C VM0195
jdl jg jia 100

#
17:(s#i 64 a#g g 240 220
8:6050
11:1400-1200
0.001= 2480-2402=
13.56=JdA 2y
Vita-Mix Manufacturing Corporation 45
https://www.vitamix.com/Corporate-Information/Corporate-Policies/EU-Declaration-of-Conformity
https://www.vitamix.co.uk/Corporate-Information/Corporate-Policies/EU-Declaration-of-Conformity
yaiyaiyaiyaiyaiyaiyaiyaiyaiyaiyaiyaiyaiyaiyaiyaiyaiyaiyaiyaiyaiyaiyaiyaiyaiyaiyaiyaiyaiyaiyaiyaiyaiyaiyaiyai
Ae 10000000000000000000000000000000000000000000000
Vitamix 45
pssu 100000000000000000000000000000000000000000000000000000
- (1) 2015 Vitamix 45, 2015, 2015, 2015, 2015, 2015, 2015, 2015, 2015, 2015, 2015, 2015, 2015, 2015, 2015, 2015, 2015, 2015, 36, 37, 38, 39, 40, 41, 42, 43, 44, 45, 46, 47, 48, 49, 50, 51, 52, 53, 54, 55, 56, 57, 58, 59, 60, 61, 62, 63, 64, 65, 66, 67, 68, 69, 70, 71, 72, 73, 74, 75, 76, 77, 78, 79, 80, 81, 82, 83, 84, 85, 86, 87, 88, 89, 90, 91, 92, 93, 94, 95, 96, 97, 98, 99, 100
aal aal alaae aal ae aal aal aal
aai 1
a 1
e 1
1
a a a a a a a a a a a a a a a a a a a a a a a a a a a a a
1
Aglb jialgaiiie aiaiui gai
y
ydy (ydy ydy dy dy dy dy dy dy dy dy dy dy dy dy dy dy dy dy dy dy dy dy dy dy dy dy dy dy dy dy dy dy dy dy dy dy dy dy dy dy dy dy dy dy dy dy dy dy dy dy dy dy dy dy dy dy dy dy dy dy dy dy dy dy dy dy dy dy dy dy dy dy dy dy dy dy dy dy dy dy dy dy dy dy dy dy dy dy dy dy dy dy dy dy dy dy dy dy dy dy dy dy


#
www.vitamix.com Ascent jy
#

10 10
10,1 (Variable Speed)
Variable Speed)
Variable Speed 1
(Start/Stop)
Aaii iiaaaii aaii aaii aaii aaii aaii aaii aaii
1
(aai aiee eae ae aee
KjLJ (Start/Stop) / jj
(Start/Stop)/j
3 . 10
J 1
y
/
1 1 (1) 1 0
a 1
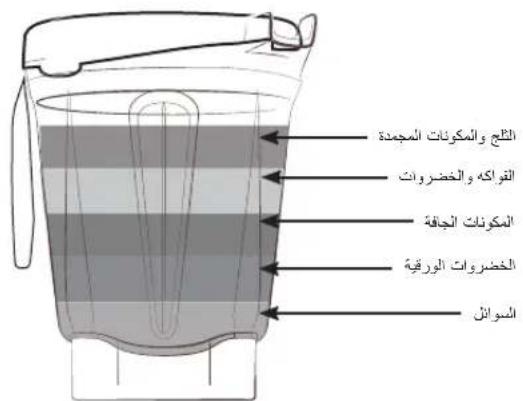
aaij 20 aaii
(0.6)
y 1
3
!0.6aayaiiialilisip
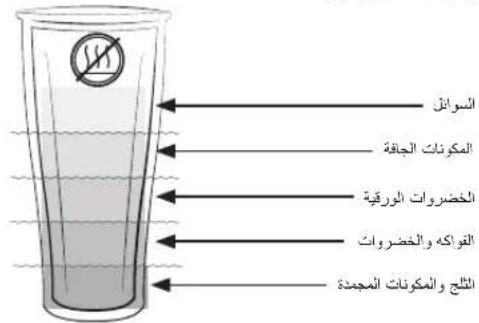
i
169 =
1
y 2
3
(Start/Stop)
10 1
A6030 1
(Variable I) 1
y/1j 1
(Start/Stop)
JyLsie 1jllg j
aill 100d
()
1
2
3
4
6jai4c
(Start/Stop)
10 1
6030 1
(Varieble 1) (Varieble Speed)
/1j0000
(Start/Stop)
JasLusiejglaljy
5
6
()
1
173) 16 16 16 16 16 16 16 16 16 16 16 16 16 16 16 16 16
3
4
yaaal 1
(Start/Stop) / /
10 1
10y 1
(Variable 1) (Variable Speed)
(Start/Stop)
e 5
3.58a5
6
7
a 1
a 100
paa aaiy aaiy aaiy aaiy aaiy aaiy
#
pgei 10 dai jaiie Jais
1
140.235.4840 1800.848.2649 1000000000000000000000000000000000000000000000
Juaa aiay 2
y
.ritamix.com 1
a
10 11 11 11 11 11 11 11 11 11 11 11 11 11 11 11 11 11 11 11 11 11 11 11 11 11 11 11
a 30 1
Vitamix 25
Vitamix 25
y
a 1
p 1
a 1 1 1 1 1 1 1 1 1 1 1 1 1 1 1 1 1 1 1 1 1 1 1 1 1 1 1 1
y 1 y
Jauaall 1, aaiy e xalai yai kiy jay Viatamix 4j
VITAMIX 45
VITAMIX 50
g (j) 1111111111111111111111111111111111
aaii 1
y
Jaaal 130 Jaa 128
Jaaal 1
Vitamix 452 1000000000000000000000000000000000000000000000000
Vitamix 25 g (1g) poe dne e / 2000 2000 2000 2000 2000 2000 2000 2000 2000 2000 2000 2000 2000 2000 2000 2000 2000 2000 2000 2000
Jaaal 1ie yag sla!
1.440.235.4840 1.800.848.2649 7Vitaminix 2
Vitamix 45
aaln aal n 1000000000000000000000000000000000000000000
VitaMix Corporation 2014
125
Windsor, Ontario N8Y 4Y5 Cleveland, Ohio 44138-2199
https://www.vitamix.com/Corporate-Information/Corporate-Policies/EU-Declaration-of-Conformity
https://www.vitamix.co.uk/Corporate-Information/Corporate-Policies/EU-Declaration-of-Conformity
Cleveland, Ohio 44138-2199 Windsor, Ontario N8Y 4Y5
1-800-848-2649 1-800-848-2649
service@vitamix.com service@vitamix.com
Bosnia and Herzegovina
電話:+387(0)66117188
www.Enzita.ba
info@enzi.com
保加利亚
Enzita EOOD
Simeonovsko shose 33
Sofia, 1000
Bulgaria
電話:+389(0)76487171
www.Enzita.bg
info@enzita.bg
克羅地亞
Enzita d.o.o
Avenija Dubrovnik 15
Zagbrecki velesajam
(Kineski paviljon)
Zagreb, 10020
Croatia
電話:+385(0)998159050
www.Enzila.hr
info@enzita.hr
捷克共和国
Traminal s.r.o.
Kaprova 42/14
11000 Praha 1
Czech Republic
電話:+420.773.753.333
www.btranet.cz
丹麦
High on Life ApS
Bakkelvyej 2
8680Ry
Denmark
電: (+45) 42783276
info@highonlife.dk
法國
Wismer S.A.
Zone Inova 3000 -
alleen°5
88150 Thaon les Vosges
France
電話:+33.(0)329.82.27.71
www.wismer.fr
芬蘭
Primulator Oy
Tyopajankatu 10A
FI-00580 Helsinki
Finland
电话:(+358)972.60622
www.theblender.fi
義大利
KUNZI S.p.A.
Via L. Ariosto,
19-1-20091 Bresso (MI)
Italy
电话:(+39)02.6145.16.1
传真:(+39)02.66.500.553
www.kunzi.it
nfo@kunzi.it
東歌
Hollander Elektro
GmbH & Co.KG
Flinschstrasse 35,
60388 Frankfurt
德國
電話:+49694990131
gmbh@hollander-elektrade
冰岛
Kaeitaekni Ltd
Rauoagero 25
108 Reykjavik
Iceland
電話:(+49)89.8649870
www.cooltech.is
立陶宛
Zaiavalgis.it
Dovanu stotele UAB
Pamenkalnio g.1
0116 Vilnius,
Lithuania
電話:(+370)52611011
電話:(+370)61562740
www.zaliavalgis.lt
info@zaliavalgis.nl
盧森堡
Dalicq SA
86 Rue de Hainaut
6180 Courcelles
Belgium
電話:+32(0)19633833
www.theblender.be
馬其頓
Nutri Vita
Mile Pop Jordanov 23a/51000
Skopje
Macedonia
電話:(+389)70.272.072
www.vitamix.mk
蒙特内哥羅
Enzita d.o.o.
Podgorica, 1000
Montenegro
電話:+381(0)652155065
www.Enzita.me
info@enzita.me
荷蘭
MultiBrands Marketing
&Sales BV
Heereweg 337-A
2161 BL Sassenheim
The Netherlands
電話:+31(0)252241240
传真:+31(0)252241244
info@multibrandslnl
挪威
Lindenbaum Agentur AB
Hardemogatan 7
S-124 67 Bandhagen
Sweden
16 Upper Woburn Place
Office number 318
London WCIH OAF
電話:(+44)0800.587.0019
www.vitamix.co.uk
非洲灾中来
南非
CONGLOMUS CC T/A
HEALTHMAKERS
9 Hoog Street
Utrecht
ZA
電話:+(27)343314824
www.healthmakers.co.za
sales@healthmakers.co.za
以色列
New Horizon
Maskit 27
Herzlia 46733
Israel
電話:(+972)9.9576422
電話:(+972)1.700.702009
www.newhorizon.co.il
巴林、科威特、阿曼、卡達
與沙烏地阿拉伯
4Homes FZCO
PO Box 61379, Dubai UAE.
電話:+97143807611
传真:+9714387612
4homes@4homes.ae
www.tavolashop.com
阿拉伯聯合大公國
Vitality General
Trading LLC
PO Box 73265
Dubai
United Arab Emirates
電話:+971(0)561089662
www.vitality.ee
info@vitality.ac
4Homes FZCO
PO Box 61379, Dubai UAE.
電話:+97143807611
傳真:+9714387612
4homes@4homes.ac
www.tavolashop.com
澳大利亞與細西蘭
Vitamix ANZ Pty Limited
167 King St
Newcastle NSW2300
Australia

- SPECIFICATIONS
- SYMBOLS
- Vitamix.
- IMPORTANT INSTRUCTIONS FOR SAFE USE
- WARNING: To avoid the risk of serious injury when using your Vitamix® blender, basic safety precautions should be followed, including the following. READ ALL INSTRUCTIONS, SAFEGUARDS AND WARNINGS BEFORE OPERATING THE BLENDER.
- SAVE THESE INSTRUCTIONS
- PARTS AND FEATURES
- CAUTION
- Rotating Blades Can Cause Damage.
- Accessories
- WARNING
- BLENDING
- If the mixture stops circulating:
- CARE AND CLEANING
- BEFOREFIRSTUSE:
- Care and Cleaning of Large Containers:
- To Clean:
- To Sanitise: (Bleach) (Full-size Containers)
- To Sanitise: (Vinegar) (Full-size Containers)
- Lids, Lid Plug, Centring Pad and Tamper
- In-Place Cleaning: (0.6-litre cup or 240-ml bowl)
- To Sanitise: (Bleach) (0.6-litre cup or 240-ml bowl)
- To Sanitise (0.6-litre cup or 240-ml bowl) with Vinegar (minimum 5% acidity):
- Blender Base
- WARRANTY
- 10-Year full Machine Warranty
- 1.PRODUCT REGISTRATION.
- WHO CAN SEEK WARRANTY COVERAGE?
- WHAT IS COVERED?
- WHAT IS NOT COVERED?
- WHAT VOIDS THIS WARRANTY?
- HOW TO OBTAIN RETURN AUTHORIZATION UNDER THIS WARRANTY.
- United States Canada
- INTERNATIONAL CONTACTS
- FINNLAND
- ITALIEN
- OSTEUROPA
- SCHWEDEN
- SUDAFRIKA
- ISRAEL
- BAHRAIN, KUWAIT,
- BLENDERS HAUTE PERFORMANCE A3300i ET A3500i
- Série Ascent
- AFRIQUE ET MOYEN-ORIENT
- AUSTRALIE ET
- AFRICA Y ORIENTE MEDIO
- SUDAFRICA
- A3300i- JA A3500i-TEHOSEKOITTIMET
- Ascent Series
- A3300i OCH A3500i HÖGPRESTANDAMIXRAR
- Ascent-serien
- SERBION
- SPANIEN
- AFRIKA OCH MELLANÖSTERN
- SYDAFRIKA
- Utrecht
- ZA
- Maskit 27
- FÖRENADE
- Dubai
- AUSTRALIEN OCH
- Australia
- A3300i og A3500i HØJTYDENDE BLENDERE
- INTERNATIONAL KONTAKTER
- A3300i og A3500i, BLENDERE MED HØY YTELSE
- VM0195C VM0195
- INTERNASJONALE KONTAKTER
- EUROPA
- BELGI A
- AFRIKA OG MIDTØSTEN
- BAHRAIN, KUWAIT
- DEFORENE ARABISK
- BbICOKOIPON3BOIDNTIELHbIE BJIENDEPbI A3300i n A3500i
- Cepnia Ascent
- TEXHNUECKNEXAPAKTEPUCTUKN
- KOMIOHEHTbI ΦYHKcUN yCTPOIcTBA
- Pekomehdau no npedombaeenu nepezy3ku 6niendepa:
- KOMHOHEtBn ΦyHKuN yCTPOIcTBA
- BcnoMaTeBhIe npncnoc6JeHna
- APDEUYPTPEXDEHME
- CMEUNBAHNE
- APEDYIPTPEKDEHME
- KoHTAKTHA INHOPMAUaM MECTbIX IpeCTABNTeJIbCTB
- MIXÉRY S VYSOKÍM VYKONEM A3300i A A3500i
- TYTO POKYNY SI USCHOVEJTE
- DULEZITE POKNY PRO BEZPECNE UZIVANI
- MEZINÁRODNÍ KONTAKTY
- EVROPA
- BELGIE
- Rue de Hainaut
- Courcelles
- Bolgo
- Te.:+32(0)19633833
- www.theblender.be
- BOSNA A HERCEGOVINA
- Enzita d.o.o.
- BULHARSKO
- Enyita EOOD
- Simeonovsko shose 33
- Sofia, 1000
- Tel.:+389(0)76487171
- www.Lnzita.bg
- info@enzita.bg
- CHORVAISKO
- Avenija Dubrovnik 15
- Zagroback volosajm
- (Kineski paviljon)
- Zagreb, 10020
- Chorvatsko
- Tel.6: +385(0)998159050
- www.Enjila.hr
- info@enzita.hr
- CESKA REPUBLIKA
- Traminal s.r.o.
- Kaprova 42/14
- Praha
- Tol.6:+42077375333
- www.atranet.cz
- DANSKO
- High on Life ApS
- Bakkolyvej 2
- 8650Ry
- Te.:(+45)42783276
- info@highonlife.dk
- FRANCIE
- Wismer S.A.
- Zone Inova 3000 - alleen n\#S
- Thaon les Vosges
- Tol.6:+35(0)32982271
- www.wismer.fr
- FINSKO
- Primulator Oy
- Tyopajankatu 10A
- FI-00580Holsinki
- Tel.:(+358)97260622
- www.theblender.fi
- ITALICE
- KUNZIS.p.A.
- Via L. Ariosto,
- 19-1-20091 Bresso (MI)
- Italie
- Tel.:(+39)026145161
- Fax: (+39) 02 66 500 553
- www.kunzi.it
- nfo@kunzlt
- VYCHIODNI EVROPA
- Hollander Elektro
- GmbH & Co.KG
- Elipschstrasse 35.
- Frankfur
- Nemecko
- Tel. c.: +49 69 4990131
- Tel. 6: (+34) 953102560
- www.conas.eu
- info@conasi.eu
- SLOVENSKO
- Seltour Slovakia spo. r.o.
- Lazaretska 29
- 8109Bratislava
- Tel.:+421252932868-9
- amatkoc@sottour.sk
- SVEDSKO
- Lindenbaum Agentur AB
- Hardemogatan 7
- 5-124 67 Bandhagen
- Tel.:(+46)08-57034777
- www.theblender.se
- NIMSK2-PAKSL5K2
- SVYCARSKO
- Vita-Mix GmbH
- Kurfuerstendamm 21
- Berlin
- Tol.:(+49)80084826491
- www.vitamix.de
- Upper Woburn Place
- Office number 318
- London WC1H OAF
- Tel.:(+44)08005870019
- www.vitamix.co.uk
- AFRIKA A STREDN I YCHOD
- JIZNI AFRIKA
- CONGLOMUS CCT/A
- HEALTHMAKERS
- Hoog Street
- 乙
- Tel.:+(27)343314824
- www.healthmakers.co.za
- sales@healthmakers.co.za
- ZRAEL
- New Horizon
- Herzliya 16733
- Te. c: (+972) 9 9576422
- Tel.:(+972)1700702009
- www.newhorizon.com
- BAHRAJN, KUVAJT, OMÁN
- KATAR
- ASAUDSKARABIE
- 4HomesFZCO
- PO Box 61379, Dubal, SAE
- Tel.:+97143807611
- Fax:+9714387612
- 4homes@4homes.ae
- www.tavolashop.com
- SPOJENE ARABSKE EMIRATY
- Vitality General
- Tracing LLC
- PO Box 73265
- Tel.:+971(0)561089662
- www.vitality.ao
- info@vitality.aq
- 4Homes FZCC
- PO Box 61379, Dubai, SAE
- Te.:+97143807611
- Fax+9714387612
- AUSTRALIE
- ANOVY ZELAND
- Vitamin ANZ Pty Limited
- King St
- Newcastle N5W 2300
- Tel. c: 1800766437 (AUS)
- Tel.:0508530697(NZ)
- www.vitarnix.com.au
- www.vitarmix.co.n/
- ДЕЛОВИ KAPAKTEPHCTИКИ
- Cosemu 3a da cnpeumme, npneonmoepayaehe"Ha 6neHdepom:
- ДЕJOВИΚΑРAKTEРUCTИΚ
- ABHMMAHME
- PotpaqKnte ceuHa Moke da npedn3BnKaaT oWTeYBaHe.
- DogaToou
- BJIENHINPAHbE
- APEDYIPEDYBAHBe
- Ako MeuabuHaTa npctaHe da uipkynpa:
- PnKAn YnCTeHbE
- PNEI PBPATA YNOTPE6A:
- Tpuka u yucmebe Ha zonemume caoobu:
- 3a yucmebe:
- 3a de3unfekuja: (6enuno) (zonemu caobu)
- 3a de3unfekuja: (ouem) (zonemu caobu)
- Kanaqu, man kanak, noa 3a uehmpupahe u mewank
- CamocmoHoucmeHe: (aasa o 20 yHu (0,6 n) unu cao 8 yHu (240 mJ)
- 3a de3unfkeuJa: (6enuno) (uao o 20 yHpu (0,6 n) unu cao o8 yHpu (240 mnl)
- IeunbekpuHa na yama o0 20ynu (0,6n) uTu caDm o0 8ynu (240 mn) co ouem (MuHymum Kucenoc m0 5%)
- Ba3aHa 6nHepepm
- TAPAHUNJA
- DecetroHnHa eNocha rapaunja Ha MaunHaTa
- PEGNTPAUJA HA IPON3BOJOT.
- KOJ MOXKE DA BAPA AKTUBNPAHBe HA TAPAHUNJATA.
- WTO E NOKPNEHO.
- LTO HE E NOKPNEHO.
- WTO JA NOHNU TYBA OBAA TAPAHUNJA.
- KAKO DA IOBENE TIO3BOJNA 3A BPAKAHbE CNOPEI OBAA IAPAHUNJA.
- CAI KaHada
- MeYHAPODHNKOHTAKTN
- BLENDERELE DE INALTÄ PERFORMANTA A3300i SIA3500i
- Seria Ascent
- INFORMATII DE CONTACT LA NIVEL INTERNATIONAL
- EuouhEc yia va anopeuyetye tvv unepopotwn tou nnevtep oac:
- EAPTMATA KAI XAPAKTHPISTIKA
- Eeaprijmuata
- Tia anoluyavan: (Xlambda) (Oxieia nlpocu eyeoouc)
- Tia anoIauvan: (E8) (Oxieia nnpoc uoe
- NIOIO MNOPEI NA ZHTHSEI KAAYPH ERTYHSEI.
- KAIAYPsiI.
- TI ADEN KAAYNTETAI.
- TI AKYPQNEI THN NIAPOYSA EITHYSH
- TPOIOE AHPSH EOYIOAOTHSH ENIETPOOHSEYMDONA ME THN IAPOYSA EFTYHsH.
- HywpeC NoAitec Kavadac
- SεθvεIg ΕΠαφε
- EYPQINH
- ANATOAIKH EYPQIH
- AOYEEMBOYPRO
- A3500i,A3300i jI 1
- Ascent
- #
- i
- 保加利亚
- 克羅地亞
- 捷克共和国
- 丹麦
- 法國
- 芬蘭
- 義大利
- 東歌
- 德國
- 冰岛
- 立陶宛
- 盧森堡
- 馬其頓
- 蒙特内哥羅
- 荷蘭
- 挪威
- 非洲灾中来
- 南非
- 以色列
- 巴林、科威特、阿曼、卡達
- 阿拉伯聯合大公國
- 澳大利亞與細西蘭
Brand : Vitamix
Model : Ascent A3500i
Category : Blender