Bluebot XEasy VCCB1XE - Robot vacuum BLAUPUNKT - Free user manual and instructions
Find the device manual for free Bluebot XEasy VCCB1XE BLAUPUNKT in PDF.
| Product Type | Robot Vacuum |
| Brand | Blaupunkt |
| Model | Bluebot XEasy VCCB1XE |
| Dimensions | 330 × 78 mm |
| Weight | 2.38 kg |
| Power Supply | 100-240 V, Li-ion battery 2150 mAh |
| Battery Life | 120 minutes |
| Charging Time | 240 minutes |
| Dust Tank Capacity | 0.51 L |
| Max Cleaning Area | Up to 120 m² |
| Noise Level | < 55 dB |
| Filter Type | HEPA and membrane |
| Connection | WiFi 2.4 GHz |
| Smart Functions | Bluebot Robotics app, Alexa voice control, remote control |
| Cleaning Modes | Auto, Edge, Spot, Zigzag |
| Included Accessories | Charging station, remote control, magnetic strips, side brushes, spare HEPA filter, cleaning brushes |
| Safety | Stair detection, magnetic boundary strip |
| Maintenance | Regular cleaning of tank, filters and brushes; battery replacement possible |
| Spare Parts Available | Battery, filters, side brushes, roller brush |
| Warranty | See manufacturer's terms |
Frequently Asked Questions - Bluebot XEasy VCCB1XE BLAUPUNKT
User questions about Bluebot XEasy VCCB1XE BLAUPUNKT
0 question about this device. Answer the ones you know or ask your own.
Ask a new question about this device
Download the instructions for your Robot vacuum in PDF format for free! Find your manual Bluebot XEasy VCCB1XE - BLAUPUNKT and take your electronic device back in hand. On this page are published all the documents necessary for the use of your device. Bluebot XEasy VCCB1XE by BLAUPUNKT.
USER MANUAL Bluebot XEasy VCCB1XE BLAUPUNKT
3.PRODUCTBESCHRIJVING
Alexa, ask Bluebot to start cleaning
Alexa, ask Bluebot to stop cleaning
Alexa, ask Bluebot to start spot cleaning
Alexa, ask Bluebot to start auto cleaning
Alexa, ask Bluebot to start edge cleaning
Alexa, ask Bluebot to start zigzag cleaning
Alexa, ask Bluebot to start charging
Alexa, ask Bluebot for his status
8.2 Bluebot Robotics app foulmelding
Congratulations! And thank you for buying a great new product from Blaupunkt. With the Blaupunkt Bluebot XEASY robot vacuum cleaner, you can clean most floor types with the greatest of ease.
This manual is specific to the Blaupunkt Bluebot XEASY robot vacuum cleaner as specified in section 2.1 Intended use. Hereafter the Blaupunkt Bluebot XEASY robot vacuum cleaner will be referred to as 'the robot'.
This manual is intended to help the user to set up and operate the robot. It also describes the operation of the robot with the Bluebot Robotics app and the Alexa app. Download these apps on your smartphone for maximum operating ease.
We kindly ask you to carefully read the information in this manual before using the robot, to familiarise yourself with its intended use and potential dangers and risks.
All rights reserved. No parts of this work may be reproduced in any form or by any means - (graphic, electronic, or mechanical, including photocopying, recording, taping, or information storage and retrieval systems) without the written permission of the publisher.
Revision 04/2018
support.blaupunktrobotics.eu
+31 (0)20 894 33 15
support@blaupunktrobotics.eu
We also have a live chat feature on our website!


TABLE OF CONTENTS
EN
- Reading guide 32
- Safety 33
2.1 Intended use 33
2.2 General safety 33
2.3 Product safety 33
2.4 Electrical safety 34
2.5 Fire and explosion hazard 34
2.6 Maintenance 35
2.7 Transport and Storage 35
2.8 Recycling and Disposal 35 -
Product description 36
3.1 Main parts 36
3.2 Included accessories.. 37
3.3 Remote control 38
3.4 Bluebot Robotics app 39
3.5 Alexa App 40
3.6 Available functions per control type 40 -
Getting started 41
4.1 Unpacking the box 41
4.2 Mounting the brushes 41
4.3 Installing the charging station 42
4.4 Placing the magnetic strips 43
4.5 Charging the robot 43
4.6 Placing the batteries in the remote control 44
4.7 Setting the time 45
4.8 Installing the Bluebot Robotics app on your mobile phone.. 45
4.9 Connecting the Bluebot Robotics app to your robot 45
4.10 Installing Alexa 47
-
Operation 48
5.1 Before running the robot 48
5.2 Running the robot 48
5.3 Using the Alexa voice control function 49 -
Scheduling the robot 50
6.1 Scheduling the robot with the remote control 50
6.2 Scheduling the robot with the Bluebot Robotics app 51 -
Maintenance 52
7.1 Maintenance schedule 52
7.2 Cleaning the dust bin and the filters 53
7.3 Cleaning the brush suction nozzle and suction passage.. 54
7.4 Replacing the battery.. 54
- Troubleshooting 55
8.1 Robot indicators 55
8.2 Bluebot Robotics app error notification 55
8.3 Contact 55 - Disposal 56
- Technical specifications.. 57
BLAUPUNKT


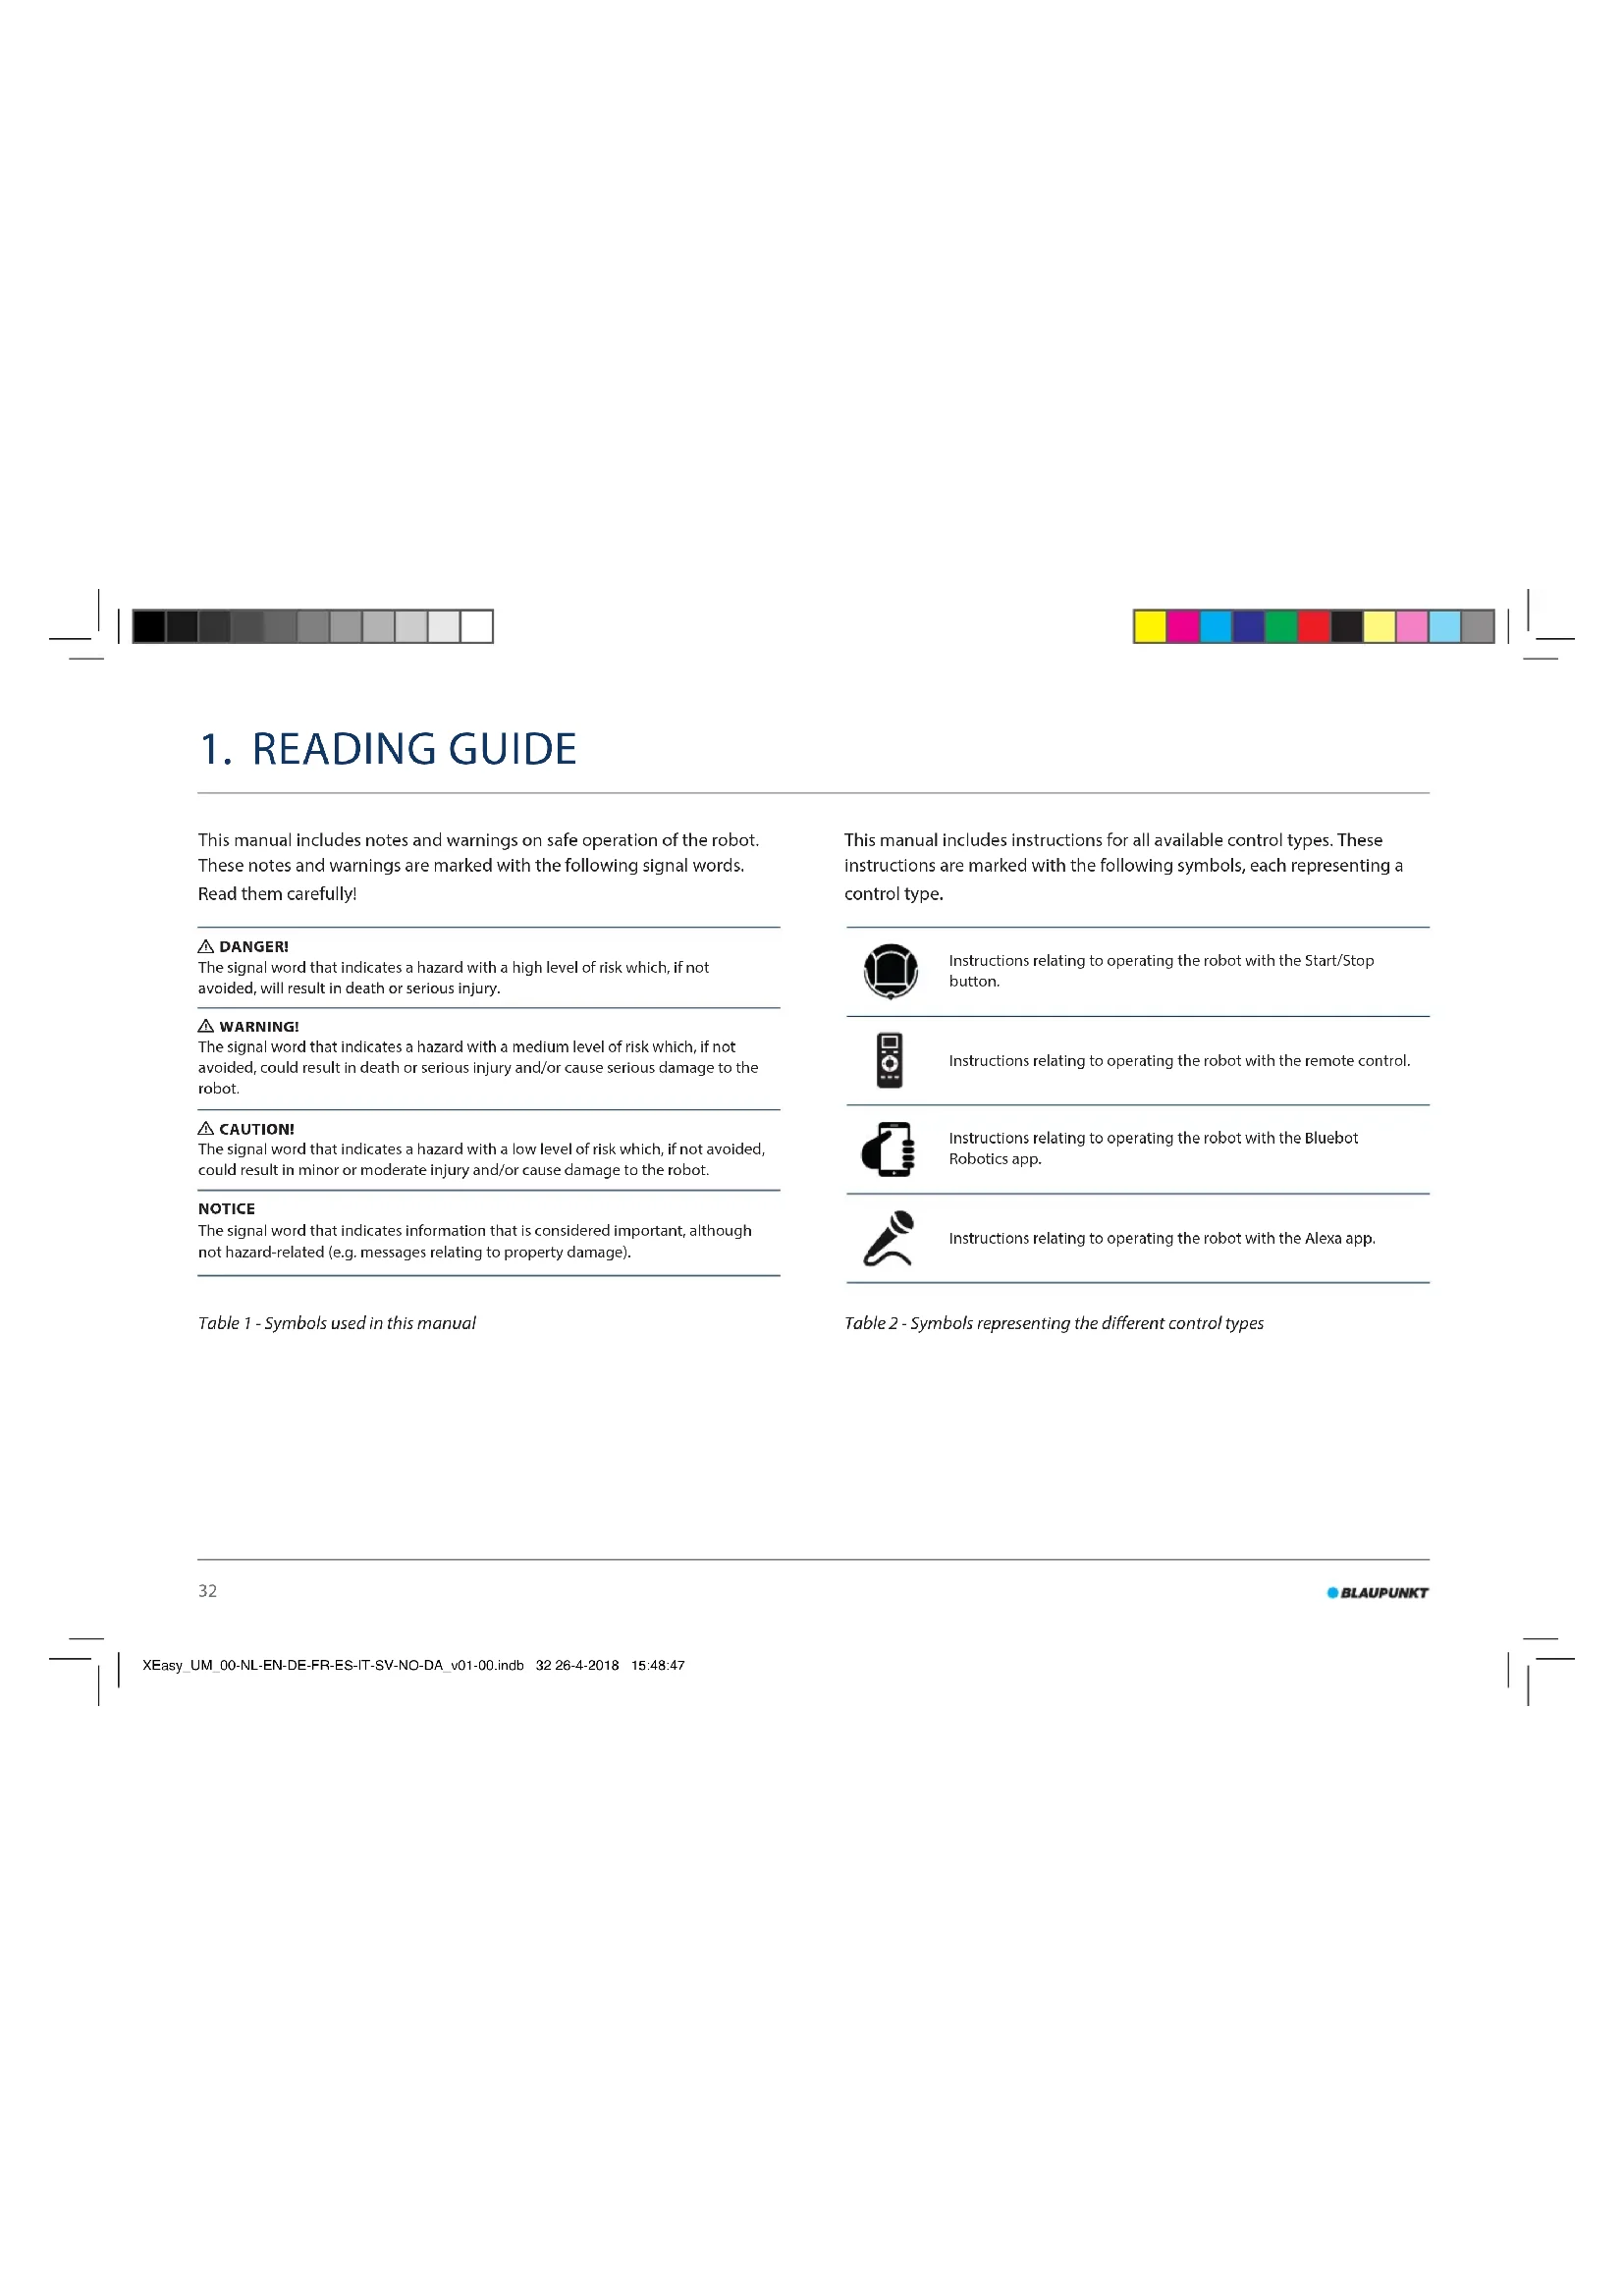
1. READING GUIDE
This manual includes notes and warnings on safe operation of the robot. These notes and warnings are marked with the following signal words. Read them carefully!
DANGER!
The signal word that indicates a hazard with a high level of risk which, if not avoided, will result in death or serious injury.
WARNING!
The signal word that indicates a hazard with a medium level of risk which, if not avoided, could result in death or serious injury and/or cause serious damage to the robot.
CAUTION!
The signal word that indicates a hazard with a low level of risk which, if not avoided, could result in minor or moderate injury and/or cause damage to the robot.
NOTICE
The signal word that indicates information that is considered important, although not hazard-related (e.g. messages relating to property damage).
This manual includes instructions for all available control types. These instructions are marked with the following symbols, each representing a control type.

Instructions relating to operating the robot with the Start/Stop button.

Instructions relating to operating the robot with the remote control.

Instructions relating to operating the robot with the Bluebot Robotics app.

Instructions relating to operating the robot with the Alexa app.
Table 1 - Symbols used in this manual
Table 2 - Symbols representing the different control types


2. SAFETY
This section contains safety instructions for protection from risk of personal injury or property damage. Failure to follow these instructions shall void any warranty.
2.1 Intended use
The Blaupunkt Bluebot XEASY robot vacuum cleaner is intended for cleaning a wide range of flooring, such as carpet, laminate flooring, tiles etc. The robot is not suitable for high pile carpets. On this material, the robot can become stuck and unable to move around.
The robot can be operated with Start/Stop button on top, the remote control, the Bluebot Robotics app and/or via the Alexa voice control function. To use this last function, you will need to purchase Alexa separately.
The robot is intended to be used with its original accessories only, and is intended for domestic use only. The robot is not intended for use in environments with high humidity, like bathroom areas.
2.2 General safety
- This appliance can be used by children aged eight years and above and persons with reduced physical, sensory or mental capabilities or lack of experience and knowledge, if they have been given supervision or instruction concerning use of the appliance in a safe way and understand the hazards involved.
- Young children and pets should be supervised to ensure that they do
not play with the appliance.
- The robot must be used in an environment with a temperature between 0^ and 40^ .
- Do not use the robot in a wet or moist environment (any environment with liquid), e.g. bathroom area or laundry.
- Do not use the product if it is defective.
- Only use the original accessories.
- Repairs must only be performed by Blaupunkt Robotics or its officially authorized partners.
2.3 Product safety
WARNING!
- The rotating wheels and roller brush of the robot can clamp fingers. Do not touch the wheels or roller brush while the robot is in operation.
- A damaged or leaking battery can cause fire, explosion or personal injury. Never dismantle the battery case. Do not throw the battery into fire or heat the battery and do not crush or throw the battery. In the event that battery leakage contacts your skin or clothes, immediately wash off the leakage with clean water.
- Before use, remove all fragile objects, cords, clothing, paper and loose cables from the floor and lift curtains and drapes off the floor to avoid any possible accidents.
Make sure the robot does not come into contact with cigarette ends, lighters, matches or any flammable substance.


- Do not place the robot on tables, chairs, etc, as damage may occur should it fall off.
- Do not let a curtain or any kind of wrapping material wind up in the drive wheels.
- Do not use the robot outdoors.
- Do not expose the robot to sunlight.
- Do not use a covered or wrapped robot.
- Do not block or insert objects into the ventilation holes of the robot.
- Do not put the robot near a heat source.
- Do not sit on the robot and do not attach an object to the top of it.
2.4 Electrical safety
WARNING!
- In the case of overheating during charging, stop using the robot immediately. Turn OFF the power switch and remove the adapter from the power socket.
- A damaged power cord can cause electric shock, overheating or fire. Do not destroy or modify the power cord and do not bend it too tightly. Do not heat the cord. Do not pull or press the inflexible cord excessively with heavy objects.
-
Dust on the metal terminals of the power plug can result in electric shock, overheating or fire. Regularly remove the dust from the power plug and surroundings with a dry cloth.
-
Wet hands can conduct the electric current from the robot unintentionally and cause electric shock. Do not touch the power cord, plug or adapter with wet hands.
- Charging and powering the robot with components that are not original parts can cause electric shock, overheating or fire. Only use the original battery, charging base and power adapter (UK Type Adapter Model No.: GQ12-240060-AB; EU Type Adapter Model No.: GQ15-240060-AG).
- A short-circuit occurs when the positive (+) pole and the negative (-) pole of the battery are connected. Short-circuits can cause heat generation in metal objects, fire or explosion. Prevent short-circuits by keeping metal objects or conducting substances away from the battery poles.
Before charging, check whether the adapter and outlet are properly connected.
The adapter must use an alternating voltage of 100-240 VAC. - Do not use the power adapter with an AC converter.
2.5 Fire and explosion hazard
- Do not switch the robot on within or let the robot enter a flammable and/or combustible environment.
- Do not use the robot to clean combustible or highly volatile substances, such as gasoline.


EN
2.6 Maintenance
- Never wash the main body or the charging device. Only the dustbin and filters are washable (except HEPA filters). Do not wash other parts of this robot. Return the dustbin and filters to the main body when dry.
- Clean the outside of the robot with a soft cloth. When the robot is very dirty, use a slightly damp cloth and a neutral solution.
- When the dustbin is full, empty it before next use.
- Cleaning and user maintenance should not be done by children without supervision.
2.7 Transport and Storage
- We recommend that you retain the original carton and packing materials for transporting the robot for service. This is the only way to safely protect the robot against damage in transit. If you do dispose of the carton and the packing materials, please remember to recycle with due care for the environment.
- Turn off the power switch when the robot will not be used for an extended period of time. Battery leakage may cause fire, injury or pollution to the environment. Cut the power source of the adapter and disconnect the plug from the socket.
2.8 Recycling and Disposal
- The battery must be insulated with tape when taken for recycling or disposal. Contact with other metals could lead to heating, bursting or fire. Bring the insulated battery to a technical service centre with an authorised reseller for disposal. Alternatively, dispose of the battery according to local laws.
- Turn off the power switch during transportation.
BLAUPUNKT


3.PRODUCT DESCRIPTION
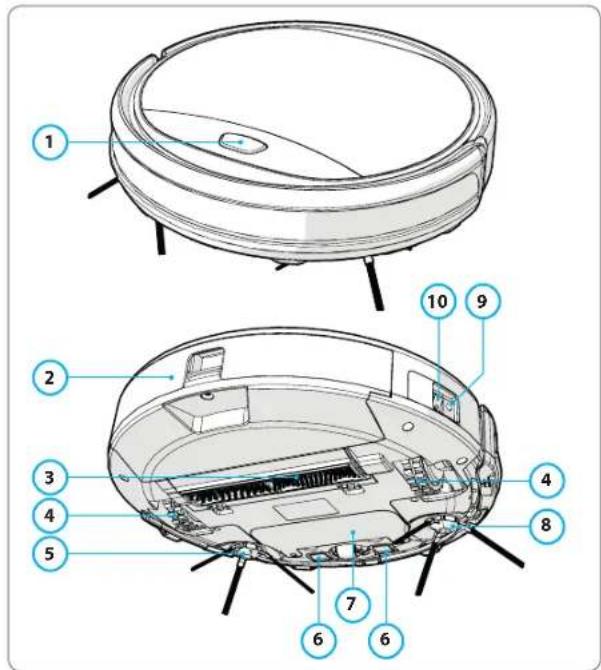
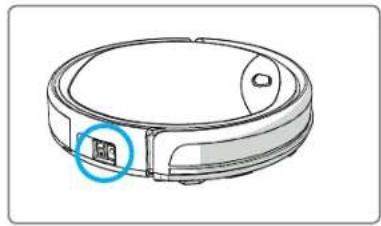
3.1 Main parts
No.Description
1 Start/Stop button
2 Dust bin
3 Brush suction nozzle
4 Wheel
5 Left side brush
6 Charge pole
7 Battery cover
8 Right side brush
9 Power switch
10 Charging socket
Table 3 - Main parts
Figure 1 - Main parts


EN
3.2 Included accessories

Figure 2 - Included accessories
No. Description
1 Charging station
2 Spare HEPA filter
34xSidebrushes (L = left,R = right
4 Battery for remote control (2 pcs)
5 Cleaning brush
6 Remote control
7 Magnetic strip
8 Power adapter
Table 4-Included accessories
BLAUPUNKT


3.3 Remote control
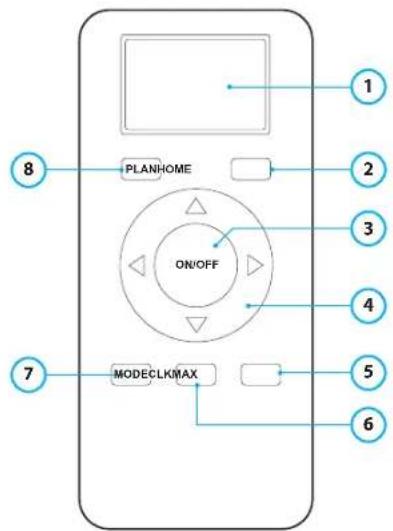
No. Description
1 Display: Shows time, date, modes and information.
2 HOME: Press this button and the robot will start automatic charging.
3 ON/OFF:
- Press this button to switch the robot to Standby when switched off.
- Press this button to start In Auto Cleaning mode when In Standby.
- Press this button to switch the robot to Standby when cleaning.
4 Direction buttons:
- In standby mode: move the robot forward, backward, turn left or turn right.
- In Clock mode: increase or decrease the time and date while setting time or scheduling.
5 Max: Enhance the suction power.
6 Clock Setting: Press this button to set the time.
7 Mode Cleaning: Switch between different cleaning modes
- MODE 1: Spot
- MODE 2: Auto
- MODE 3: Edge
MODE4:ZigZag
8 PLAN: Schedule a cleaning cycle.
Table 5 - Description of the remote control items


EN
3.4 Bluebot Robotics app
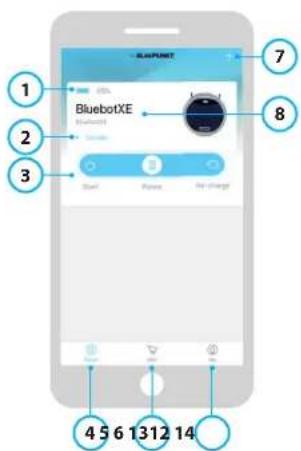
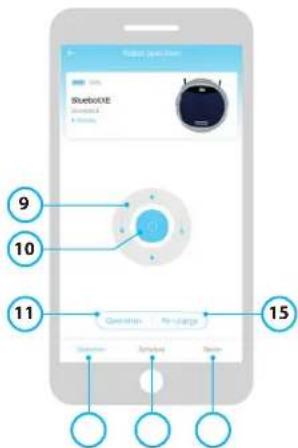
Figure 3 - Home screen and Operation screen
No. Description
1 Battery level indicator.
2 Working/Standby/Charging/Charging Complete/Auto recharging/Error/ Off line: The status of the robot.
3 Start/Pause/Re-charge: Start, pause or re-charge the robot.
4 Robot: Navigate to the Home screen of the robot.
5 Mall: Navigate to online shopping and service related to your robot.
6 Me: Displays your profi le, see Figure 4. Tap the cogwheel to go to Settings.
7 Add Device/My Robot/Manual: Add a new device, open devices overview or read the user manual.
8 Tap this area to jump to the Operation screen directly.
9 Up/Down and Turn Left/Turn Right: Control the movement of the robot manually.
10 Start/Pause: Tap this button to start in Auto Cleaning mode when in Standby. Press this button to switch the robot to Standby when cleaning.
11 Operation: Tap this button to change the cleaning mode (Auto/ZigZag/Edge/ Spot).
12 Operation: Open the Operation screen of the robot, see Figure 3.
13 Schedule: Open the Schedule screen of the robot.
14 Option: Open the Options screen of the robot. Here you can change the name, update firmware, disable/enable voice tips, open the error list, delete the robot and check the status and battery level.
15 Re-charge: Tap this button to send the robot back to the charging station for re-charging.
Table 6 - Description of the Bluebot Robotics app items
BLAUPUNKT


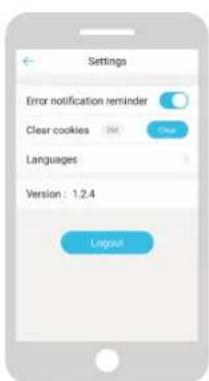
Figure 4 - Me Figure 5 - Settings
Tap the cogwheel in the upper right corner of the "Me" screen to open "Settings", see Figure 4 and 5. In "Settings" you can:
- Disable/enable error notification reminders
Clear cookies from your phones memory
Change the language - Check the installed version of the app
-Logout
3.5 Alexa App
You can control your robot using the Alexa voice control function. To use the Alexa voice control function you need to download the Amazon Bluebot Robotics app and you need to have an Amazon Account. See for more information, see section 5.3.
3.6 Available functions per control type
Depending which control type you use, different functions are available. Table 8 shows which functions are available for which control type.
Table 7 - Functions available per control type
| Cleaning modes | ||||
| Spot | ● | ● | ● | |
| Auto | ● | ● | ● | ● |
| Edge | ● | ● | ● | |
| ZigZag | ● | ● | ● | |
| Set Auto Cleaning schedules N/A The same | time every day | Set a different time each day as required | N/A | |


4. GETTING STARTED
EN
4.1 Unpacking the box
- Unpack the robot carefully and remove all wrapping material.
- Check the if the package contains all accessories (see Section 3.2). If any item is missing, please contact your reseller.
We recommend that you retain the original carton and packing materials in case it ever becomes necessary to return your robot for service. You can only return the robot in the original carton and packing materials otherwise the warranty will expire. This is the only way to safely protect the robot against damage in transit. If you do dispose of the carton and the packing materials, please remember to recycle with due care to the environment.
4.2 Mounting the brushes
Place the side brushes as shown in Figure 6.
The side brushes are indicated with "L" and "R". Make sure the L/R mark on the side brush matches the L/R mark on the base of the robot.
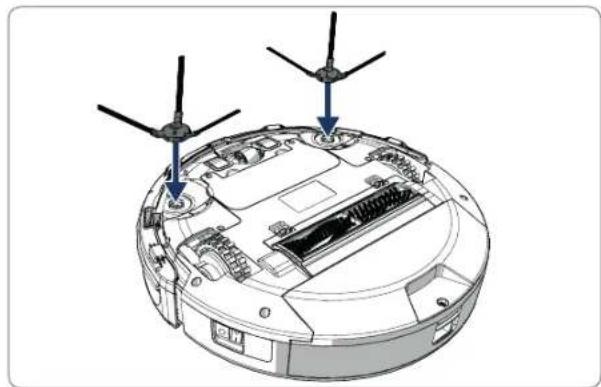
Figure 6 - Mounting the brushes
BLAUPUNKT
41


4.3 Installing the charging station
SAUTION!
Do not place the charging station within 120~cm / 4 feet of a stairwell.
To place the charging station in the required area:
- Place the charging station on a hard level surface, against a wall or other immovable object to prevent it from sliding.
- Make sure the robot has a clear path for return at the end of a cleaning cycle.
-
If possible, fix the charging station to the wall, by following the next steps:
-
Ensure the wall is hard, smooth, clean and dust-free to ensure a secure fix.
- Peel off the protective film from the rear.
-
Press the charging station against the wall. Note: the adhesive tape is removable and can be reused.
-
Connect the charging station to the mains, see Figure 7. The charging station will show a solid blue power light. Figure 8 shows an example of a possible floorplan.
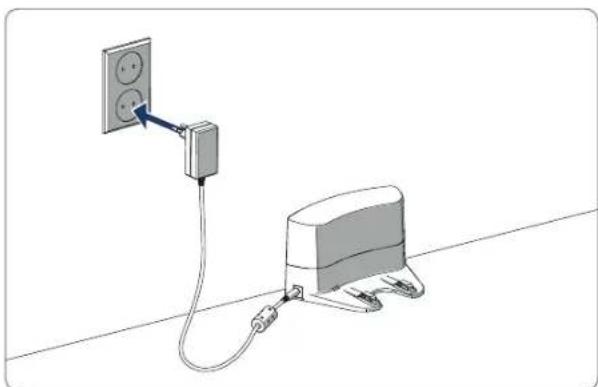
Figure 7- Connecting the charging station to the mains
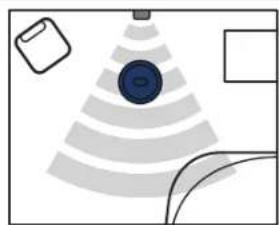
Figure 8 - Example of placement of the charging station


EN
4.4 Placing the magnetic strips
Place the magnetic strip on the floor to prevent the robot from bumping into objects.
The robot will detect the magnetic strip and move the other way. Figure 9 shows some examples of how you can use the magnetic strips.
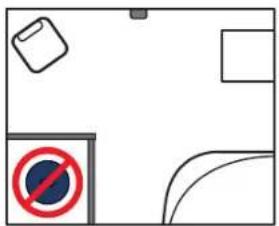
Figure 9 - Use of the magnetic strips
4.5 Charging the robot
NOTICE
Before the first use, ensure that the robot is charged for 12 hours.
There are two ways to charge the robot:
- In the charging station, see Figure 10. The power light on the charging station will light up when charging is underway.
- With the power adapter directly connected to the robot. To do this, insert the adapter into the robot and plug the other end into a power socket, see Figure 11.
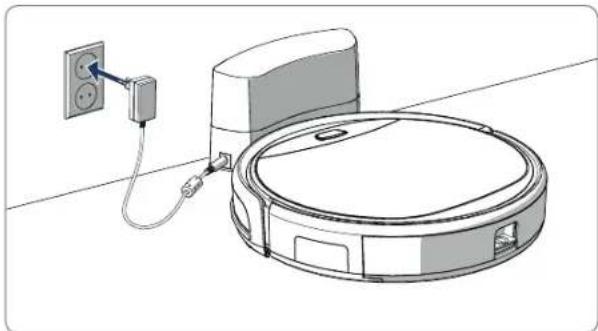
Figure 10 - Charging the robot with the charging station
BLAUPUNKT
43


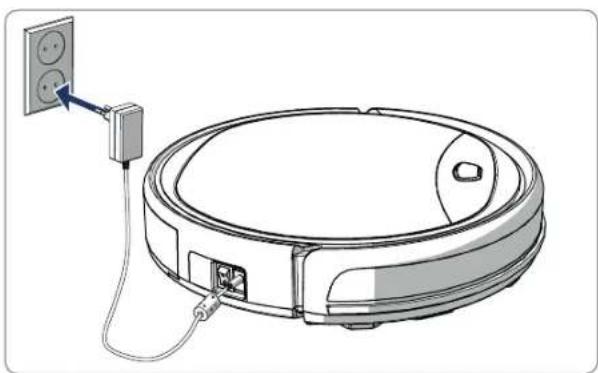
Figure 11 - Charging the robot directly with the power adapter
NOTICE
- Normally it takes approx. 4 hours to fully charge the battery.
- When fully charged, the light of the robot becomes solid blue and the robot will emit 5 short buzzes.
- When the battery is low, the light of the robot becomes solid red and the robot will emit 4 short buzzes.
4.6 Placing the batteries in the remote control
Remove the lid and insert the batteries into the remote control (see Figure 12). Place the lid back on the battery compartment.
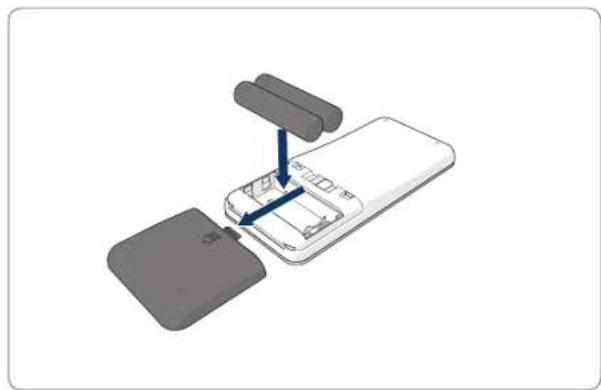
Figure 12 - Placing the batteries in the remote control


EN
4.7 Setting the time
Set the time with the remote control as follows:
- Press the CLK button on the remote control and hold for 3 seconds. On the remote display the hour numbers will flash.
- Press the Up or Down direction buttons to set the hour.
- Press the Right direction button to confirm. The minute numbers will now flash.
- Press the Up or Down direction buttons to set the minutes.
- Press the Right direction button to confirm. The set day will flash.
- Press the Left or Right direction buttons to set the day.
- Press the CLK button to confirm.
NOTICE
The remote's Current Clock Time function is solely to display the time and does not reflect or interfere with the scheduled time for cleaning.
4.8 Installing the Bluebot Robotics app on your mobile phone
NOTICE
Make sure your mobile phone is connected to WiFi.
- Swipe your screen down to update the data.
- Download the Bluebot Robotics app on your mobile phone from the Google Play or Apple Store.
- Install the Bluebot Robotics app on your mobile phone.
- Log in if you have already an account or register. To register fill in your username, e-mail and password.
You are now ready to connect the Bluebot Robotics app to your robot. See section 4.9.
4.9 Connecting the Bluebot Robotics app to your robot
NOTICE
Make sure your mobile phone is connected to WiFi. Make sure your phone is connected to 2.4 Ghz. The app does not function when you are connected to 5 Ghz.

- Go to the Home screen and tap the "+" button.
- Select "Add Device".
- Select the BluebotXE, see Figure 13.
- Make sure the power switch on the robot is in ON position.


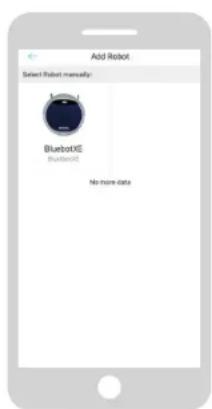
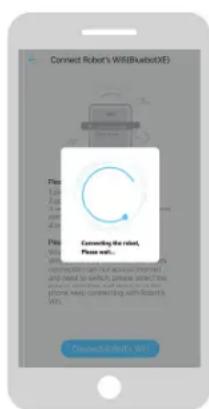
Figure 13 - Add device Figure 14 - Binding the robot
- Make sure the robot is in Standby mode. (Press the Start/Stop button if the robot is currently cleaning or switched off)
- Press and hold the START/STOP button on the robot for three seconds. The robot's WiFi is activated and the button light flashes blue.
- Tap "Reset" in the app.
The app continues to the "Config family Wifi" screen and displays the WiFi network that your mobile phone connects to.
- Type the WiFi password of the displayed WiFi network and tap "Next".
-
Hold your mobile phone close to the robot.
-
Tap "Connect Robot's Wifi". The app switches to the WiFi selection screen of your mobile phone.
- Select the "blaupunkt_BB." from the list of available WiFi networks. Wait until your mobile phone successfully connects.
- Return to the app. The popup "Binding the Robot, please wait..." is displayed, see Figure 14.
- Wait until the popup disappears and the Bluebot Robotics appears in the app. The button light on the robot is on continuously.
Your robot is now connected to the Bluebot Robotics app and logged into the cloud server successfully. You are able to operate your robot through the app. For more information see sections 5.2 and 6.2.
If you failed to connect, the button light will flash in red color for four times. Please try the following solutions:
- Make sure that your home WiFi is working correctly and your phone is connected to it.
- Switch off the robot, wait for 5 minutes and try to add the robot again.
- Position the robot closer to the WiFi router in your home and try to add the robot again.
- When connected to the "blaupunkt_BB." WiFi your phone may ask to switch to another WiFi network because the "blaupunkt_BB." WiFi cannot access the internet. Make sure to choose to stay connected to the "blaupunkt_BB." WiFi.


EN
4.10 Installing Alexa
You can control your robot by using the Alexa voice control function.
To use the Alexa voice control function you need to download the Amazon Bluebot Robotics app and you need to have an Amazon Account.
NOTICE
The app is subject to changes. Visit our website for the full manual of the Amazon Bluebot Robotics app.
- Make sure your robot is connected to Bluebot Robotics app (iOS or Android) and that the robot is online. See section 4.9.
- Log in to your Amazon Account.
- Enter the Alexa Skill home page.
- Search for 'Bluebot Robotics'.
- Click the button Enable.
- Input your Bluebot Robotics app account and password to link to Alexa Skill.
If successfully linked, the display will read 'BluebotXE has been successfully linked'. Now you can start to use the voice control function.
BLAUPUNKT


5. OPERATION
5.1 Before running the robot
Make sure that before you start running the robot:
- You have prepared the area (see section 4.3 and section 4.4).
The robot has been charged (see section 4.5). - The floor environment has been cleaned of all fragile objects and cords, clothing, paper and loose cables.
- All curtains and drapes are lifted off the floor to avoid any possible accidents.
Make sure that the power switch is on. - Place the robot in the charging station.
Table 8 - Activating the cleaning modes explained for different control types
5.2 Running the robot
| Spot N/A Press on MODE | on the remote control twice. Choose Mode 1. | Tap on OPERATION. Select SPOT. | EN: Alexa, ask Bluebot to start area cleaning DE: Alexa, start Spot-Reinigung mit Bluebot | |
| Auto Press the Start/Stop button (once or twice)* | Press the ON/OFF button (once or twice)* Or choose Mode 2. | Tap on START ** or tap on OPERATION and Select AUTO. | EN: Alexa, ask Bluebot to start cleaning DE: Alexa, start die Reinigung mit Bluebot | |
| Edge N/A Press MODE | on the remote control. Choose Mode 3. | Tap on OPERATION. Select EDGE. | EN: Alexa, ask Bluebot to start edge cleaning DE: Alexa, start Rand-Reinigung mit Bluebot | |
| ZigZag N/A Press MODE | on the remote control. Choose Mode 4. | Tap on OPERATION. Select ZIGZAG. | EN: Alexa, ask Bluebot to start zigzag cleaning DE: Alexa, start Zig-zag-Reinigung mit Bluebot | |
| Send to charging station | N/A Press HOME Tap on "Re-charge" in the Operation screen | EN: "Alexa, ask Bluebot to start charging" DE: "Alexa, lade den Bluebot auf" | ||
- Depending on the robot's status
Only works when the robot is in Standby


EN
5.3 Using the Alexa voice control function
NOTICE
The app is subjected to change. Visit our website for the full manual of the Amazon Bluebot Robotics app.
Ensure the apps are correctly installed first (see section 4.10). After the apps are installed and connected, you can control your robot using the Alexa voice control function. The following commands are available:
Give the following commands in English:
Alexa, ask Bluebot to start cleaning
Alexa, ask Bluebot to stop cleaning
Alexa, ask Bluebot to start spot cleaning
Alexa, ask Bluebot to start auto cleaning
Alexa, ask Bluebot to start edge cleaning
Alexa, ask Bluebot to start zigzag cleaning
Alexa, ask Bluebot to start charging
Alexa, ask Bluebot for his status
Give the following commands in German:
You can schedule the robot to start cleaning in Auto Cleaning mode at a desired start time.
The remote control allows you to set one start time that applies for every day, see section 6.1
- The Bluebot Robotics app allows you to set a different start time for each day of the week, see 6.2
6.1 Scheduling the robot with the remote control
Use the button PLAN on the remote control to schedule a cleaning cycle. When setting a schedule, time intervals are used for scheduling.
For example: If the current time is 8:00 am, and the remote setting number is 01:00, then the robot will start working 1 hour later, meaning that 9:00 am has been set as the scheduled cleaning time. The robot now will automatically start the cleaning cycle at 9:00 am every day.
- Ensure the robot is in standby or charging mode.
- Press PLAN on remote and hold for 3 seconds to enter scheduling. The Hour numbers will flash.
- Press the Up or Down direction buttons to change the hour.
- Press the Right direction button to shift to the Minute numbers setting.
- Press the Up or Down direction buttons to change the minutes.
- Press the ON/OFF button on the remote while pointing to the robot. You will hear an acoustic signal from the robot. Your robot will start the cleaning cycle on the set time every day.
If necessary, you can check if the robot has already been set. Press the PLAN button and you will hear an acoustic signal from the robot.
To cancel a schedule:
- Follow the steps as described above and set the time interval to 00:00.
- The schedule is now successfully cancelled.
NOTICE
The time interval uses integer times of 30 minutes.


EN
6.2 Scheduling the robot with the Bluebot Robotics app
Use the Bluebot Robotics app to schedule a cleaning cycle. You are able to schedule a different start time for each day.
- Tap on"Schedule".
- Tap on a day.
- Set the start time for cleaning.
- Tap on "Submit" to save the setting. You will hear an acoustic signal from the robot. On the set day and time, your robot will start the cleaning cycle.
To delete a schedule setting, do the following:
- Tap on a day.
- Tap on "Delete".
- Tap on "Confirm" to delete the schedule setting.
BLAUPUNKT


7. MAINTENANCE
7.1 Maintenance schedule
Please note the following:
For maintenance purposes we recommend doing routine checks after each use. For replacements of
HEPA FILTER: with normal usage, replacewith a new filter after 6 months
SIDE BRUSH: with normal usage, replace with a new brush after
6 months
PRIMARY FILTER: with normal usage, replace with a new filter after 2 years
NOTICE
The above indications are for reference only. They are the recommended replacement intervals to ensure optimum results, though it might not be absolutely necessary to adhere by these intervals. Users may also choose to replace these parts after 1 year, 2 years or even later. We do, however, recommend to replace some parts periodically, especially in case of intensive usage of the robot.
Activity After each
Weekly
use
Clean the robot housing and wheels with a soft cloth

Clean the dust bin and filters

Clean the side brushes with a soft cloth

Clean the charge poles with a soft cloth

Clean the charging station with a soft cloth

Clean brush suction nozzle and suction passage

(the roller brush can be washed with water)

Clean the magnetic strip with a soft cloth

WARNING
Before performing maintenance always make sure that the power switch is off and the robot is not in Standby or in Sleep mode.


EN
7.2 Cleaning the dust bin and the filters
To clean the dust bin and the filters, do the following:
- Make sure the power switch is off.
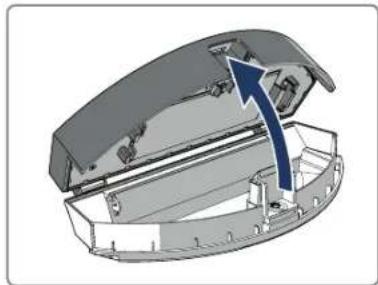
- Press on the release button and pull the dust bin out of the robot.
- Open the dust bin.
- Take out the primary filter.

- Take out the HEPA filter.
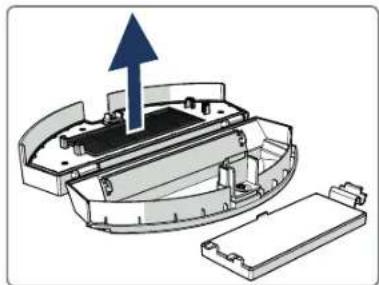
- Empty the dust bin.
- Wash the dust bin and primary filter with water and clean the HEPA filter with a brush. Let the primary filter air dry.
CAUTION
Do not dry the primary filter and HEPA filter in direct sunlight.
- Place the primary filter and HEPA filter in the dust bin. Make sure the primary filter is fully dry.
- Place the dust bin in the robot.
BLAUPUNKT
53


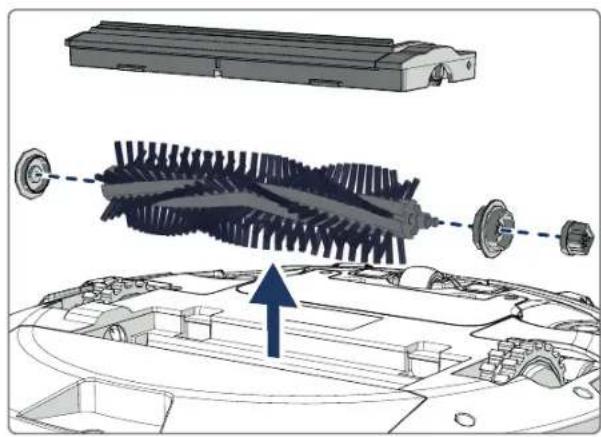
7.3 Cleaning the brush suction nozzle and suction passage
- Make sure the power switch is off.
- Take out and disassemble the roller brush kit and clean it with a soft cleaning cloth or tool. The roller brush can be washed with water.
- Clean the suction passage and the dust sensor with a soft cleaning cloth or tool.
CAUTIONI
Avoid the sensors getting wet. This could damage the robot permanently.
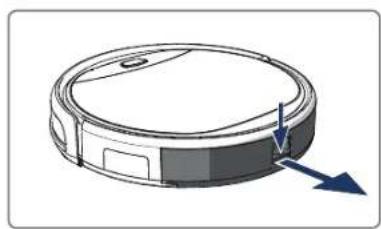
7.4 Replacing the battery
You can order a new battery in the Blaupunkt Robotics online shop.
To replace the battery, do the following:
- Remove the screws on the battery cover (see Figure 1; Pos. 7) with a screw driver.
- Remove the battery cover.
- Grasp the insulating tape at two sides of the battery and lift the battery.
- Unplug the wire connector that links the battery and the robot.
For extending the battery life, we recommend the following:
If the robot is not to be used for an extended period of time, fully charge the battery before use, turn the power off, remove the battery and store it in a cool, dry place.
- If the robot is not to be used for more than three months, charge the robot for 12 hours, turn the power off, remove the battery and store it in a cool, dry place.


8. TROUBLESHOOTING
EN
8.1 Robot indicators
No. Description Light color Light behaviour Sound
| 1 Standby mode Blue Breathing None | |||
| 2 Working mode Blue Solid None | |||
| 3 Docking mode Red Solid None | |||
| 4 In charging Pink Breathing None | |||
| 5 Charging full Blue Solid 5 buzzes | |||
| 6 Schedule confirmed Pink Solid (2 seconds) 1 buzz | |||
| 7 Schedule canceled | Pink | Twinkle (2 seconds) | 1 buzz |
| 8 Low battery Red | Solid 4 buzzes | ||
| 9 Power switch is turned off | Pink Twinkle | 1 buzz | |
| 10 Bumper fault | Blue | Flash one time | 1 buzz |
| Red | Flash two times | ||
| 11 Stair detect sensor or wheel fault | Blue | Flash two times | 1 buzz |
| Red | Flash two times | ||
| 12 Wheel overloaded | Blue | Flash one time | 1 buzz |
| Red | Flash three times | ||
| 13 Rolling brush overloaded | Blue | Flash two times | 1 buzz |
| Red | Flash one time | ||
| 14 Side brush overloaded | Blue | Flash one time | 1 buzz |
| Red | Flash one time | ||
| 15 Sleep mode None | 2 buzzes | ||
| 16 Robot activated | None | No light | 3 buzzes |
8.2 Bluebot Robotics app error notification
The Bluebot Robotics app will display a notification when the robot has experienced an error. Tap on Yes to open the "Error detail" screen.
The "Error detail" screen displays the cause and possible solution. Tap on "Search Robot vacuum cleaner" and the robot will give an acoustic signal to reveal its location.
8.3 Contact
For more information or support, please contact:
support.blaupunktrobotics.eu
+31(0)208943315
support@blaupunktrobotics.eu
We also have a live chat feature on our website!
BLAUPUNKT
55


9. DISPOSAL
The meaning of the symbol on the material, its accessory or packaging indicates that this product shall not be treated as household waste. Please dispose of this equipment at your applicable collection point for the recycling of waste electrical and electronic equipment. In the European Union and other European countries there are separate collec
tion systems for used electrical and electronic products. By ensuring the correct disposal of this product, you will help prevent potential hazards to the environment and to human health, which could otherwise be caused by improper disposal of this product. The recycling of materials will help conserve natural resources. Please do not therefore dispose of your old electrical and electronic equipment with your household waste.
Do not dispose of batteries as household waste but take them to a battery recycling facility.
For more detailed information about recycling of this product, please contact your local city office, your household waste disposal service or the shop where you purchased the product.


10. TECHNICAL SPECIFICATIONS
EN
Product code BPK-VCBB1XE
Dimensions 330× 78mm
Weight 2.38 kg
Voltage 100-240V
Power Up to 30 W
Noise level < 55dB
Filter type HEPA and membrane filter
Battery 2150mAh LI-Ion
Operating time 120 minutes
Bluebot Robotics app iOS 8.0 or above
Android 5.0 or above
WiFi connection 2.4 Ghz
Alexa voice control function
Wheel flexibility distance 25 mm
Cleaning area
Up to 120 m
Charging time
240 minutes
Dust bin capacity
0.5 L
BLAUPUNKT


VORWORT
Alexa, ask Bluebot to start edge cleaning
Alexa, ask Bluebot to start zigzag cleaning
Alexa, ask Bluebot to start charging
Alexa, ask Bluebot for his status
Alexa, ask Bluebot to start cleaning
Alexa, ask Bluebot to stop cleaning
Alexa, ask Bluebot to start spot cleaning
Alexa, ask Bluebot to start auto cleaning


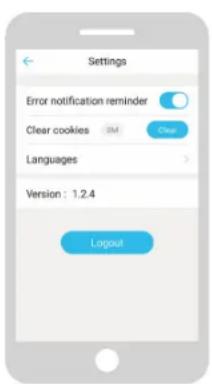
Figure 4 - Me Figure 5 - Settings
3.5 Application Alexa
Alexa, ask Bluebot to start cleaning
Alexa, ask Bluebot to stop cleaning
Alexa, ask Bluebot to start spot cleaning
Alexa, ask Bluebot to start auto cleaning
Alexa, ask Bluebot to start edge cleaning
Alexa, ask Bluebot to start zigzag cleaning
Alexa, ask Bluebot to start charging
Alexa, ask Bluebot for his status

105


6.PROGRAMMATION DU ROBOT
Alexa, ask Bluebot to start cleaning
Alexa, ask Bluebot to stop cleaning
Alexa, ask Bluebot to start spot cleaning
Alexa, ask Bluebot to start auto cleaning
Alexa, ask Bluebot to start edge cleaning
Alexa, ask Bluebot to start zigzag cleaning
Alexa, ask Bluebot to start charging
Alexa, ask Bluebot for his status

189


6. SCHEMALAGG ROBOTEN
Alexa, ask Bluebot to start cleaning
Alexa, ask Bluebot to stop cleaning
Alexa, ask Bluebot to start spot cleaning
Alexa, ask Bluebot to start auto cleaning
Alexa, ask Bluebot to start edge cleaning
Alexa, ask Bluebot to start zigzag cleaning
Alexa, ask Bluebot to start charging
Alexa, ask Bluebot for his status
4.10 Installation of Alexa
Alexa, ask Bluebot to start cleaning
Alexa, ask Bluebot to stop cleaning
Alexa, ask Bluebot to start spot cleaning
Alexa, ask Bluebot to start auto cleaning
Alexa, ask Bluebot to start edge cleaning
Alexa, ask Bluebot to start zigzag cleaning
Alexa, ask Bluebot to start charging
Alexa, ask Bluebot for his status
3 Dockingtilstand Rd Fast Ingen
4Ved opladning Lyserod Langsomt pulserende ingen
5 Opladning faerdig Bla Fast 5 summelyde
We also have a live chat feature on our website!
FR