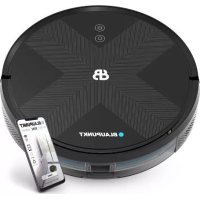
Bluebot XSmart VCBB1XS - Robot vacuum BLAUPUNKT - Free user manual and instructions
Find the device manual for free Bluebot XSmart VCBB1XS BLAUPUNKT in PDF.
| Product type | Robot vacuum |
| Brand | Blaupunkt |
| Model | Bluebot XSmart VCBB1XS |
| Included components | Charging dock, power adapter, remote control, 2 additional brushes, additional HEPA frame, magnetic strip, water tank and mop |
| Filter | Washable HEPA (do not wet) |
| Cleaning modes | Corner, zone (zig-zag 2x2 m), random, intensive (MAX, 2 passes) |
| Mapping | Gyro, zig-zag movement |
| Programming | Schedule planning via LED panel or app |
| Remote control | Remote control and BluebotXS app (iOS/Android) |
| Power supply | Rechargeable battery, automatic return to base |
| Cleaning accessories | Rubber edge component (general) and brush component (carpet) |
| Space limiter | Magnetic strip to place on floor |
| Water tank | Yes, with mop, for wet cleaning |
| Maintenance | Empty and rinse dustbin (HEPA filter not wet), clean brushes |
| Spare parts | Additional brushes, HEPA frame available |
Frequently Asked Questions - Bluebot XSmart VCBB1XS BLAUPUNKT
User questions about Bluebot XSmart VCBB1XS BLAUPUNKT
0 question about this device. Answer the ones you know or ask your own.
Ask a new question about this device
Download the instructions for your Robot vacuum in PDF format for free! Find your manual Bluebot XSmart VCBB1XS - BLAUPUNKT and take your electronic device back in hand. On this page are published all the documents necessary for the use of your device. Bluebot XSmart VCBB1XS by BLAUPUNKT.
USER MANUAL Bluebot XSmart VCBB1XS BLAUPUNKT
Bluebot XSMART Robotic
Quick Guide | Handleiding | Kurzanleitung | Manuel | Manual
Enjoy it.
Best in class
Customer Support I Kundendienst I Klantenondersteuning I Soporte Al Cliente I Support Client

help.blaupunktrobotics.eu

support@blaupunktrobotics.eu
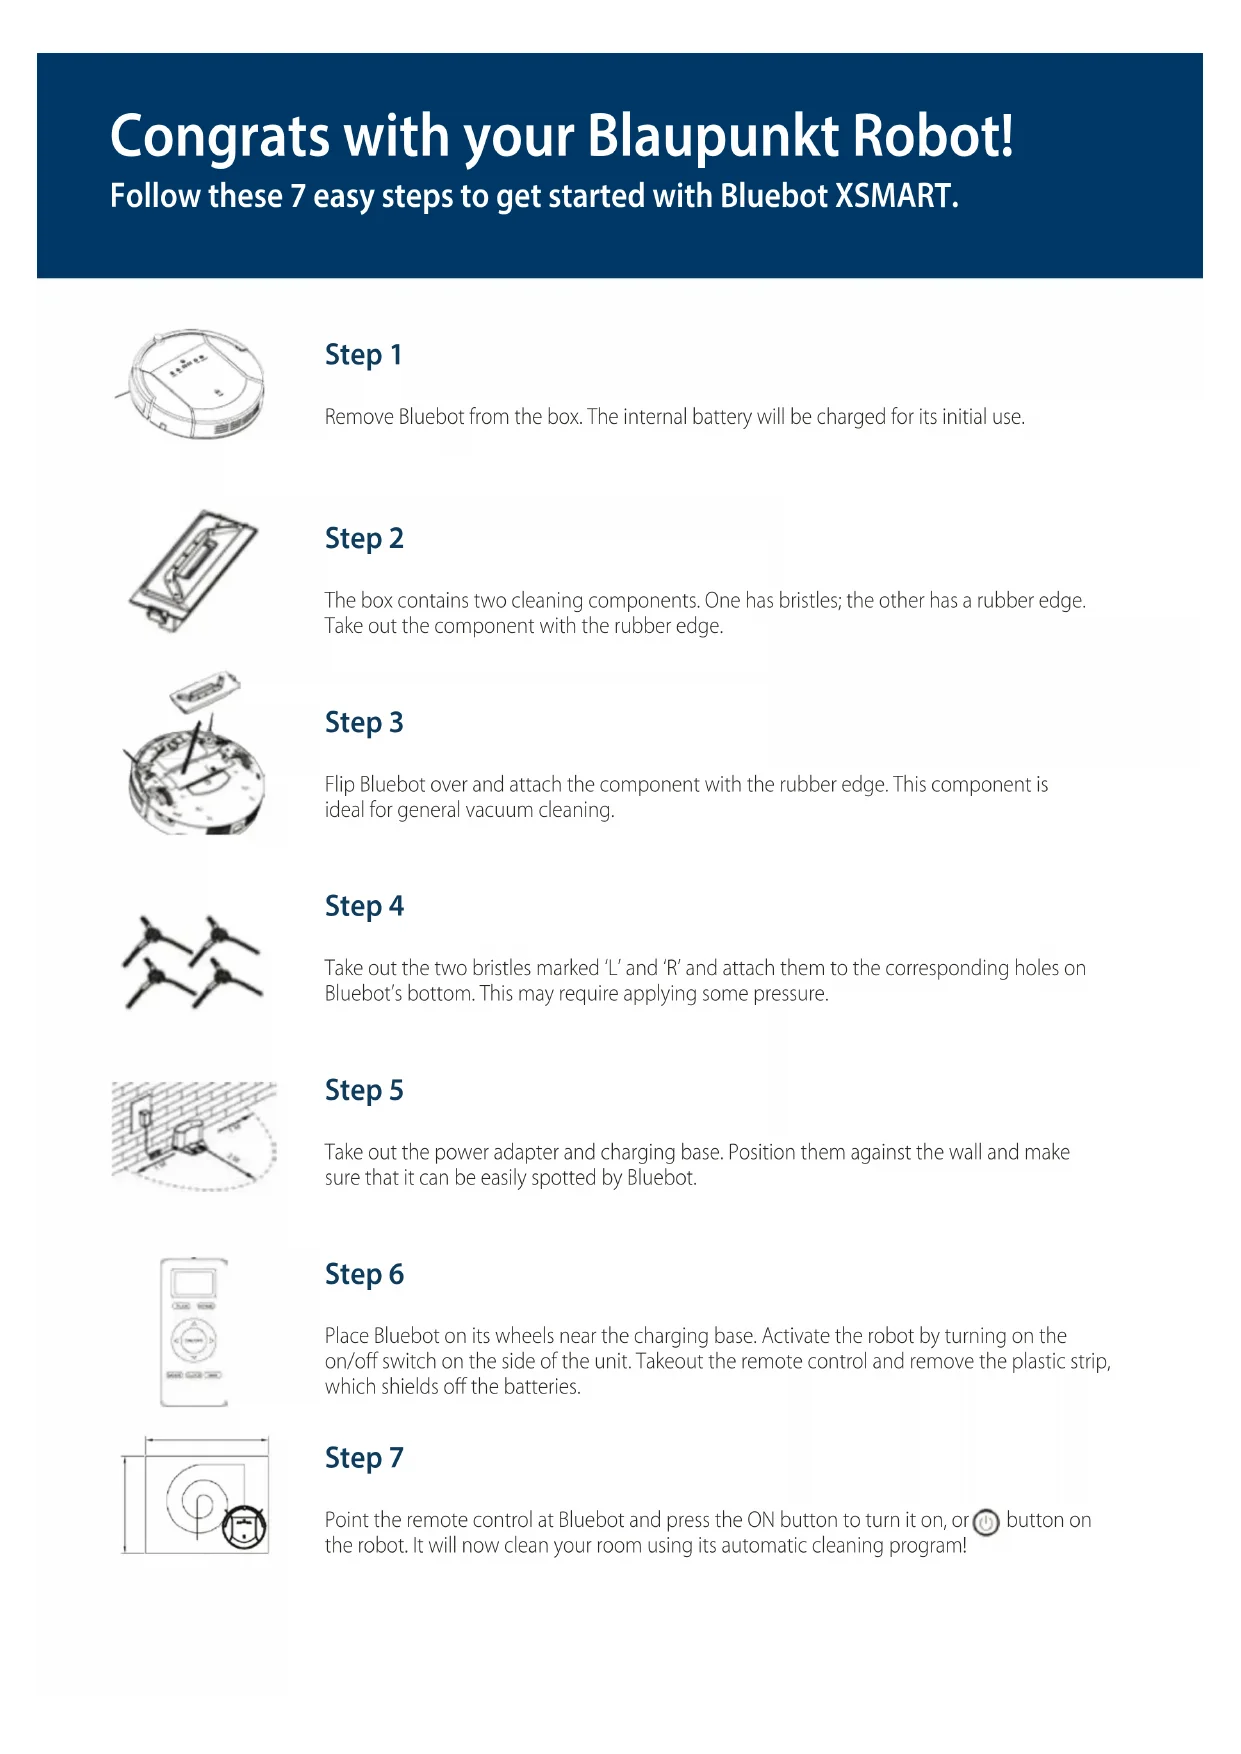
Congrats with your Blaupunkt Robot!
Follow these 7 easy steps to get started with Bluebot XSMART.
Step 1
Remove Bluebot from the box. The internal battery will be charged for its initial use.
Step 2
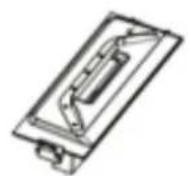
The box contains two cleaning components. One has bristles; the other has a rubber edge. Take out the component with the rubber edge.
Step 3
Flip Bluebot over and attach the component with the rubber edge. This component is ideal for general vacuum cleaning.
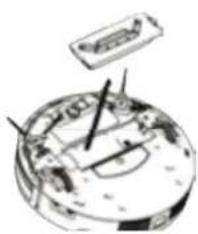
Step 4
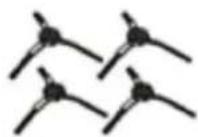
Take out the two bristles marked 'L' and 'R' and attach them to the corresponding holes on Bluebot's bottom. This may require applying some pressure.
Step 5
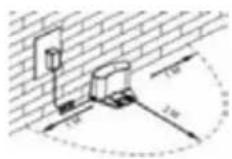
Take out the power adapter and charging base. Position them against the wall and make sure that it can be easily spotted by Bluebot.
Step 6
Place Bluebot on its wheels near the charging base. Activate the robot by turning on the on/off switch on the side of the unit. Takeout the remote control and remove the plastic strip, which shields off the batteries.
Step 7
Point the remote control at Bluebot and press the ON button to turn it on, or button on the robot. It will now clean your room using its automatic cleaning program!
Frequently asked Questions
Does Bluebot come with spare parts?
Yes, the box includes 2 extra bristles and an extra HEPA filter.
How do I clean the dust collection bin?
Turn off Bluebot and press the top lid labelled 'push'. Bluebot will now open, allowing you to remove the collection bin. The top of the bin holds a small brush, which can be used to clean the HEPA filter. Be careful: the HEPA filter must not get wet. The rest of the dust collection bin can be emptied in the trash and (optionally) rinsed with water. Let the collection bin dry completely before returning it to Bluebot.
What are the differences between the two included cleaning components?
The standard cleaning component with the rubber edge is used for general vacuum cleaning and should be used in most cases. The component containing bristles has been optimized for cleaning carpets and more excessive dirt.
How do I use the magnetic tape?
This strip is a so-called surface limiter. It can be used to prevent Bluebot from going to specific areas in your home. To use the magnetic strip before vacuuming, place the magnetic strip (flat side down) on the floor to block the area: the robot detects the stripes and avoids the surface. With this you can protect something valuable, keep Bluebot within a defined area or e.g. prevent Bluebot from driving up your carpet.
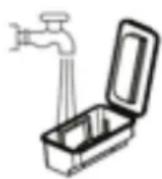
How do I use the water tank and mop?
Attach the mop using the velcro strip to the bottom of the water tank. Fill the water tank with water and a small amount of cleaning product. Make sure the rubber cap is sealed completely. Flip Bluebot over and attach the water tank by fitting the two small and two large pins in the robot. Turn Bluebot back on its wheels and turn it on. The water from the water tank will spread throughout the mop automatically.

How can I fix the docking station onto the wall?
The backside of the docking station contains adhesive tape. You can chose if you want to attach the docking station or not. For optimum stability of the docking station its recommended to fix it onto the wall. If you want to attach the docking station to a fixed location, please peel off the protection film at the back and press the docking station onto the wall. The wall or surface must be hard, smooth and clean without dust. For example, tile, aluminium, wood or a glass surface. Otherwise it might result in less good fixing onto the wall. The adhesive tape is removable and can be reused.
Which cleaning programs can I use?
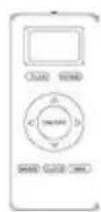
Press MODE button X1, X2, X3, X4, X5 on remote control to shift between different cleaning modes:
MODE 1: EDGE CLEANING: Robot will start along wall cleaning. Remote LCD display MODE 1 at lower right corner.
MODE 2: AREA CLEANING: 2X2 square meters in zig-zag pattern. Remote LCD display MODE 2 at lower right corner.
MODE 3: RANDOM CLEANING: Robot will start random cleaning. Remote LCD display MODE 3 at lower right corner.
MODE 4: INTENSIVE CLEANING: Remote LCD display MODE 4 at lower right corner.
Robot will start MAX-cleaning mode and cleans the same room two times
MODE (5): Robot will stop cleaning and standby. (There is no"MODE 5 displayed on remote LCD panel)
Press 'MODE' on the remote control while Bluebot is switched on.
How do I program a time schedule?
You can only program Bluebot when it is switched on or charging.
Schedule on Display Panel on Robot Unit
A. Setting robot current time (Make sure the robot is in standby or power on status).
a. Short press "PLAN" button to start current time setting. The LED panel will show the current system time.
b. Then the left two numbers on LED panel will flash. The left two numbers stand for Hour, Press "HOME" to increase hour or "MAX" to decrease it.
c. Press shift to minute setting mode, the right two numbers stand for Minute on LED panel will flash. Press "HOME" to increase it or "MAX" to decrease it.
d. Press button to save the setting, then press "PLAN" to exit (Before the setting is saved, if press "PLAN" to exit, the current setting will be invalid).
B. Setting the scheduling time (Make sure the robot is in standby or power on status).
a. Press "PLAN" and hold it for 3 seconds to start scheduling, then the left two numbers on LED panel will flash.
b. Press "HOME" button to increase hour or "MAX" button to decrease it.
c. Press to enter minute setting mode, the right two numbers on LED panel will flash. Press "HOME" button to increase it or "MAX" button to decrease it.
d. Press again to save the setting, then press "PLAN" button to exit (Before the setting is saved, if press "PLAN" to exit, the current setting will be invalid).
C. Cancel the scheduling
Follow above step B, set the scheduling time to be 00:00 and exit. Then Bluebot schedule will be canceled.
Where can I download the XSMART APP?
Visit www.blaupunktrobotics.eu for the APP manual.
The "BluebotXS" APP is available for iOS and Android and can be downloaded in App store or Google play.
Can I also control my XSMART with APP?
Yes the "BluebotXS" APP allows you to remotely control and schedule XSMART.
Visit www.blaupunktrobotics.eu for more information and to download the APP.
How does the mapping work?
With the help of Gyro mapping, Bluebot XSMART knows where it has cleaned already and where it did not clean yet. XSMART is able to clean your home with a higher efficiency in Zig-Zag pattern, without missing a spot. Once you started Bluebot XSMART, it will automatically start mapping. (Except with Edge and Random mode).
What do I do when Bluebot will not be used for a period of time?
Completely charge the battery and store Bluebot in a dry place.
How does Bluebot recharge?
Bluebot will return to its charging base automatically and recharge. Should you want it to recharge beforehand, simply press the 'HOME' button on the remote control. This will order Bluebot to return to the charging base. Alternatively, you can plug the charging cord directly into Bluebot.
Warranty details
Visit www.blaupunktrobitics.eu
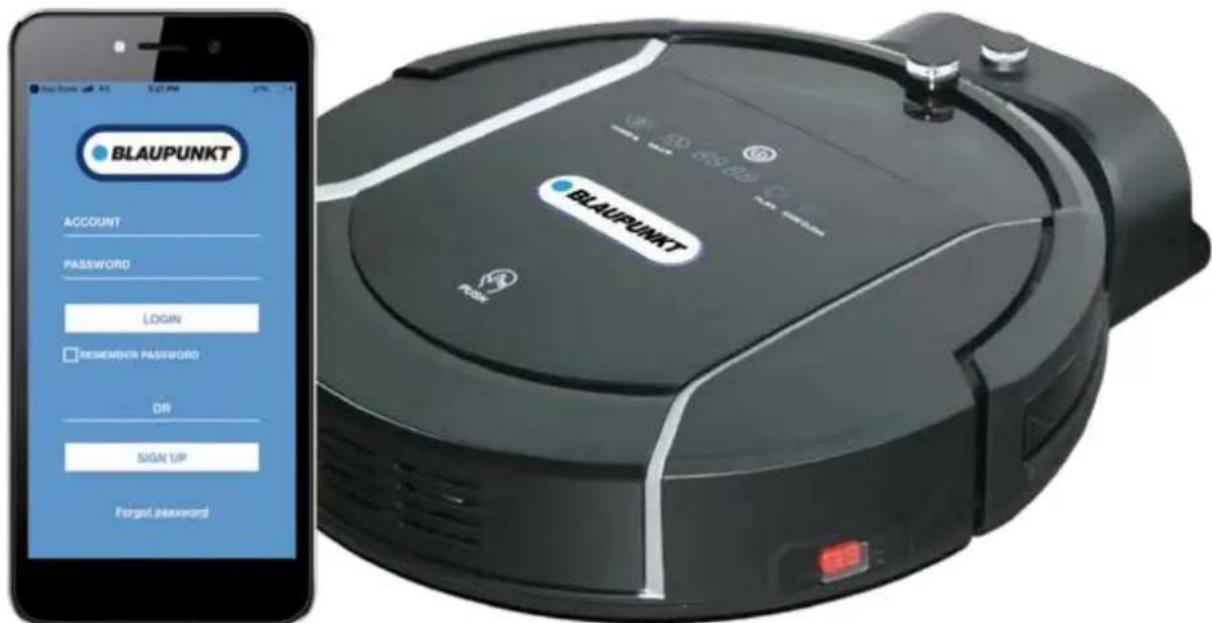
- Download the "BluebotXS" APP from Google Play or Apple Store.
2.2.Install the APP on your mobile phone.
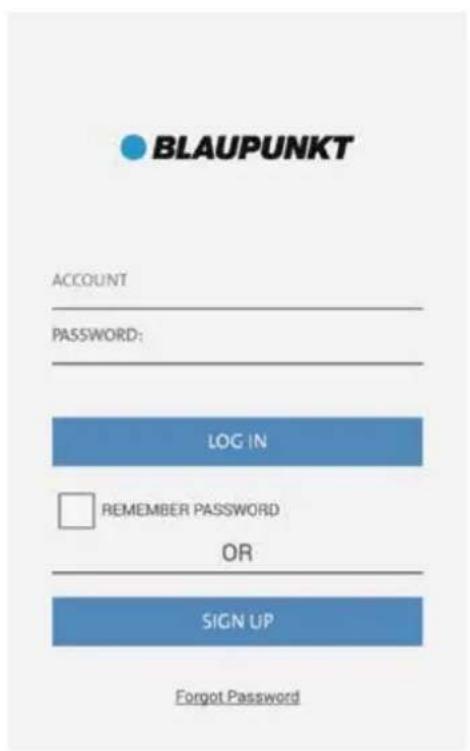
3.Register / Log in
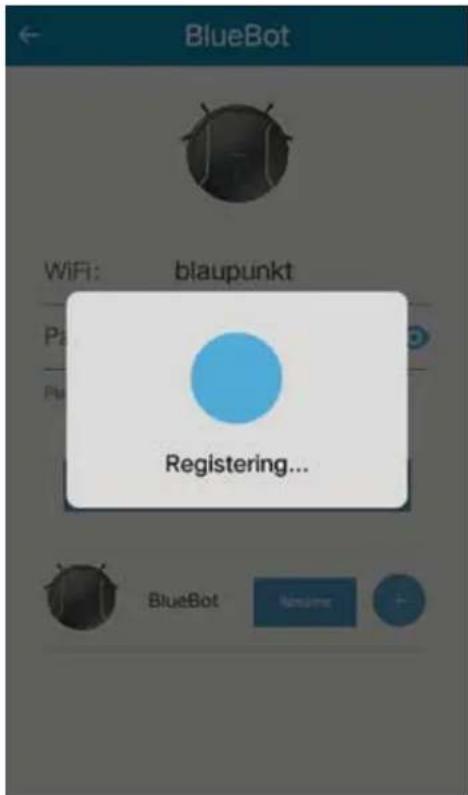
Tap the APP to open it. Click "SIGN UP" to enter "Register Page". Input your "USERNAME" "EMAIL", set a "PASSWORD" retype "password" in CONFIRM, then press "SIGN UP" to register a new account. If registration is successful, the APP will login and enter the Devices Adding page, if registration did not succeed, it will indicate an error. If you already have an account, just input your "UserID" and "Password" to login.

SMARTPHONE APP - INSTRUCTIONS
- Connect with your Bluebot XSMART robot
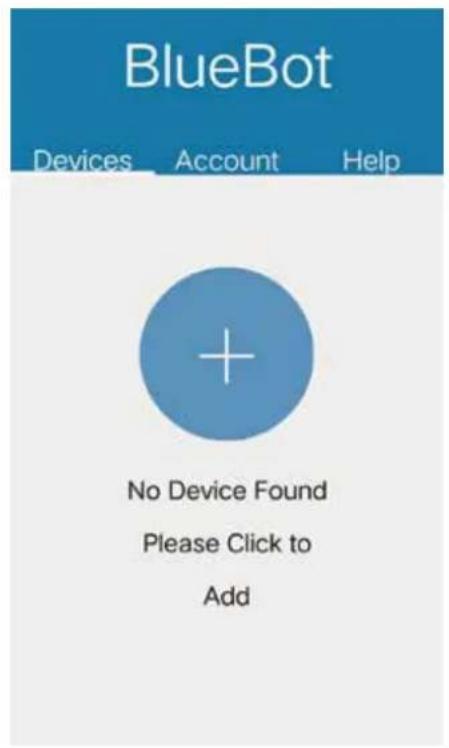
Step 1: Make sure your mobile phone is successfully connected with WIFI before you open the app, log in and enter Devices Adding page.
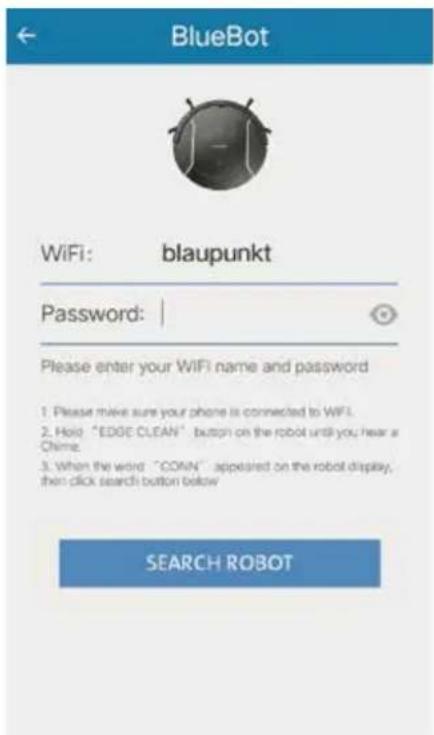
Step 2: Switch on the robot, and long press the "EDGE CLEAN" button on the robot's LED panel until it displays "CONN", indicating the robot is ready for WIFI connection.
Step 3: Press "+" button at Devices Adding page of App to enter WIFI connecting page.
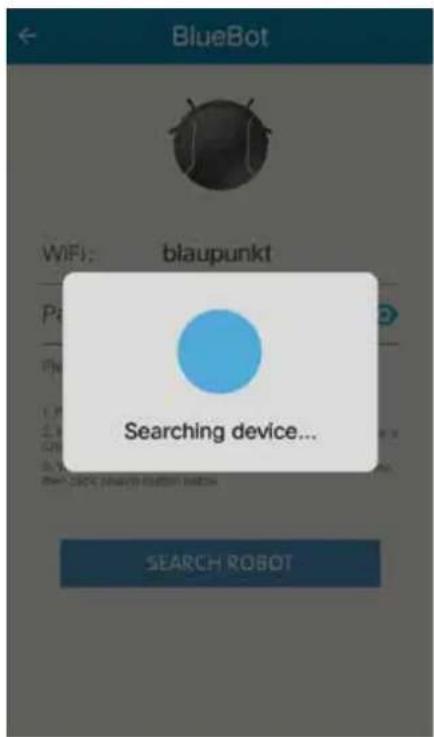
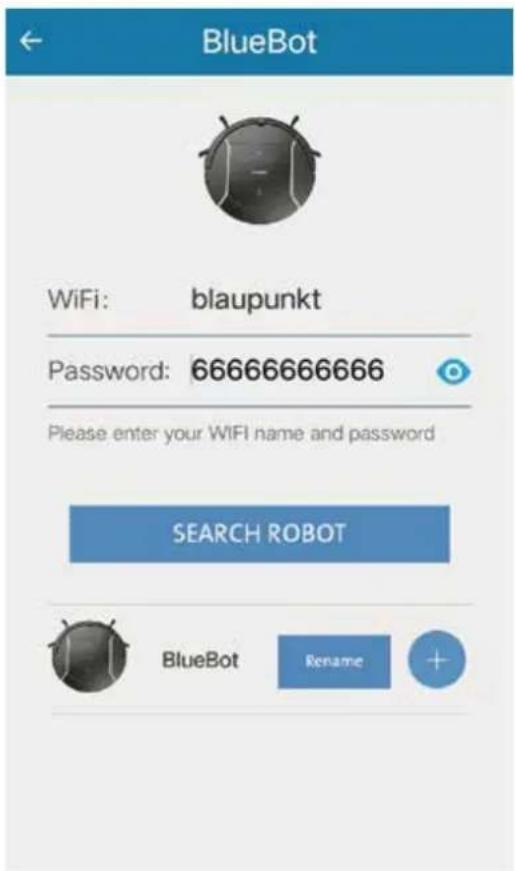
Step 4: Input your WIFI name and WIFI password correctly, tap "Search robot" on APP to search the available robots with "CONN" displayed.
SMARTPHONE APP - INSTRUCTIONS
Step 5: The available robots will display below the "search robot" button.
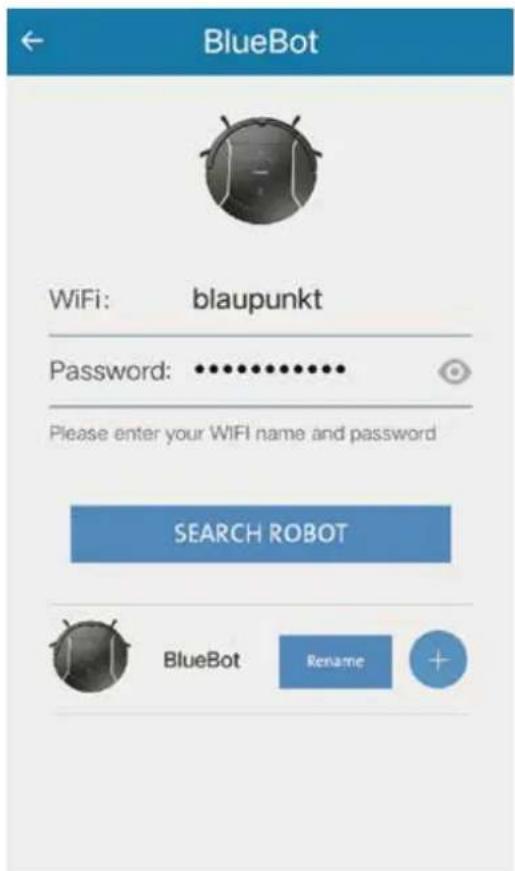
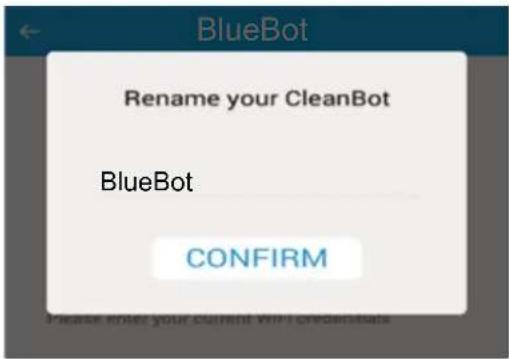
Note: At this step, you can press "+" button to connect the robot directly, and press "RENAME" button to edit robot name firstly.
SMARTPHONE APP - INSTRUCTIONS
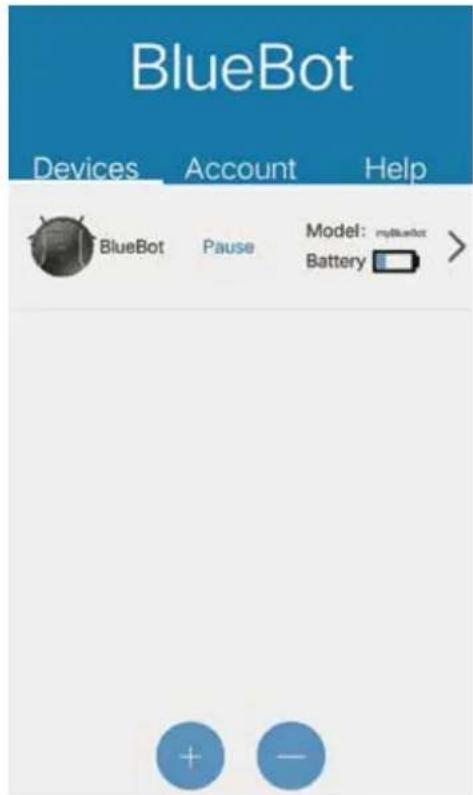
Step 6: After completing step 5, if the robot is connected and logged in to the cloud server successfully, the APP will jump to Devices page. Then you can see the connected robot in the devices list.
Note: If an error occurs, you can switch off the robot, quit the APP. Then turn on the robot again and long press the "HOME" button on robot, until its LED panel displays "SUCC" to disconnect the robot, then retry the connection from Step 4 to 6.
- Check the status of your Bluebot XSMART robot
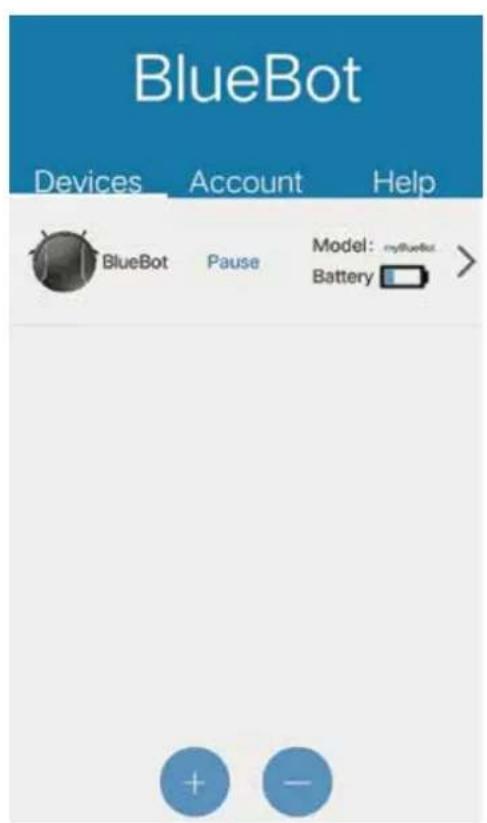
A. You can check the robot status at the devices list, including the robot connect status (online / offline), work status (working, pause, etc.), and battery capacity.
B. You can press ^ 喜 + ^ 喜 to connect another robot, or press ^ 喜 - ^ 喜 to disconnect your robot from the APP. You can refresh the checking of the robot status by pulling down the page.
SMARTPHONE APP - INSTRUCTIONS
- Control your robot
A. Click on the listed robot to check the robot details.
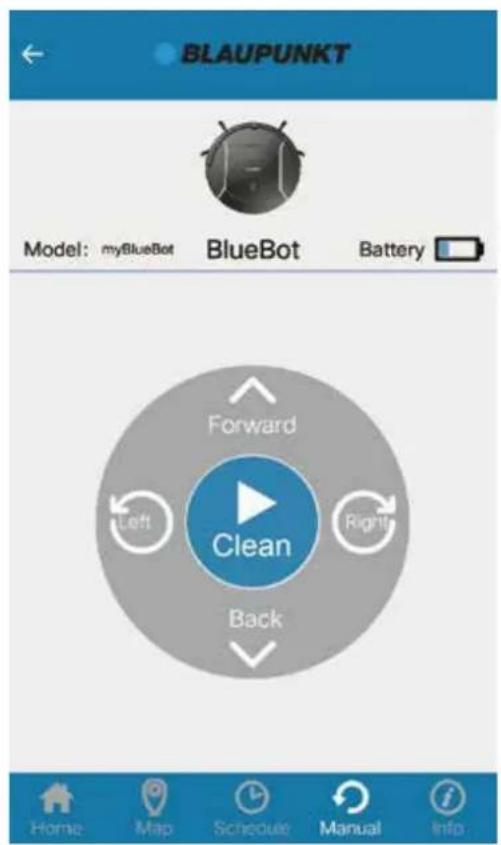
B. Press "Start" to enter manual control mode.

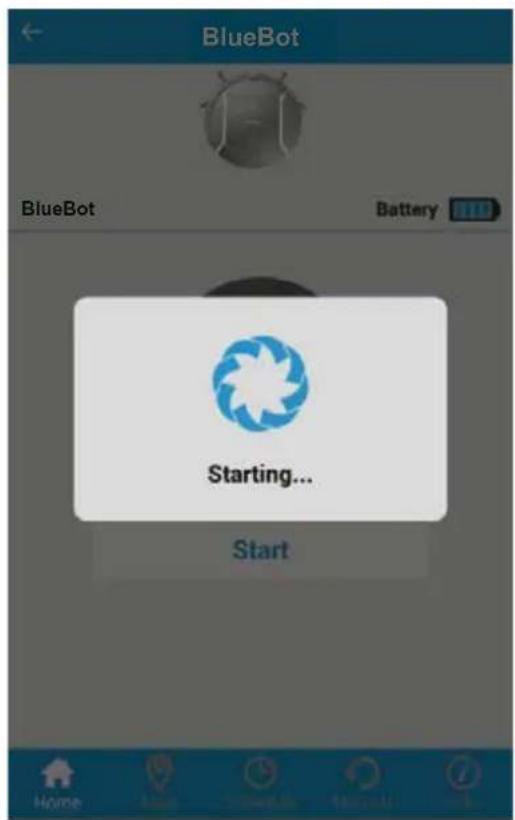
You can open the Devices page to check the status of your robot, it will turn to "Working"
Note: If you want to connect the robot with other account, pls delete the robot from your APP device list firstly, to disconnect it with your account.
SMARTPHONE APP - INSTRUCTIONS
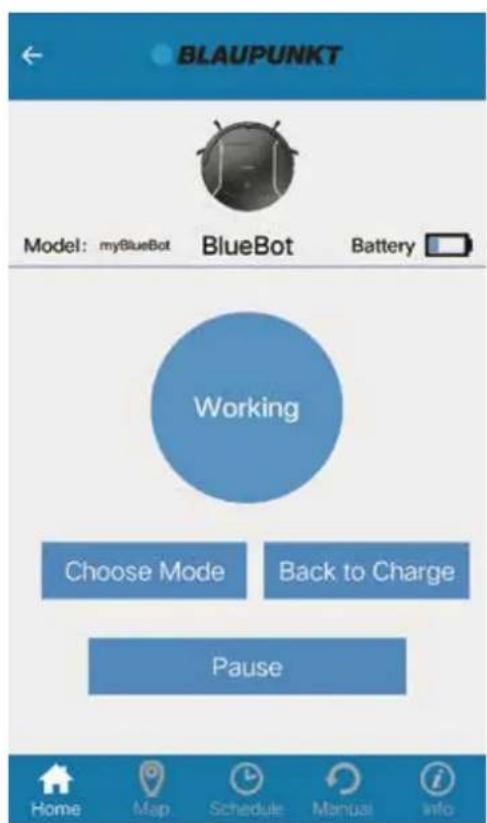
C. Press "Choose Mode" to select the working mode.
D. Press "Back to Charge" to make robot enter into HOME mode and go back to its charge station.
E. Press "Pause" to stop robot cleaning.
SMARTPHONE APP - INSTRUCTIONS
F. Press "Map" to check the real time cleaned area track map.

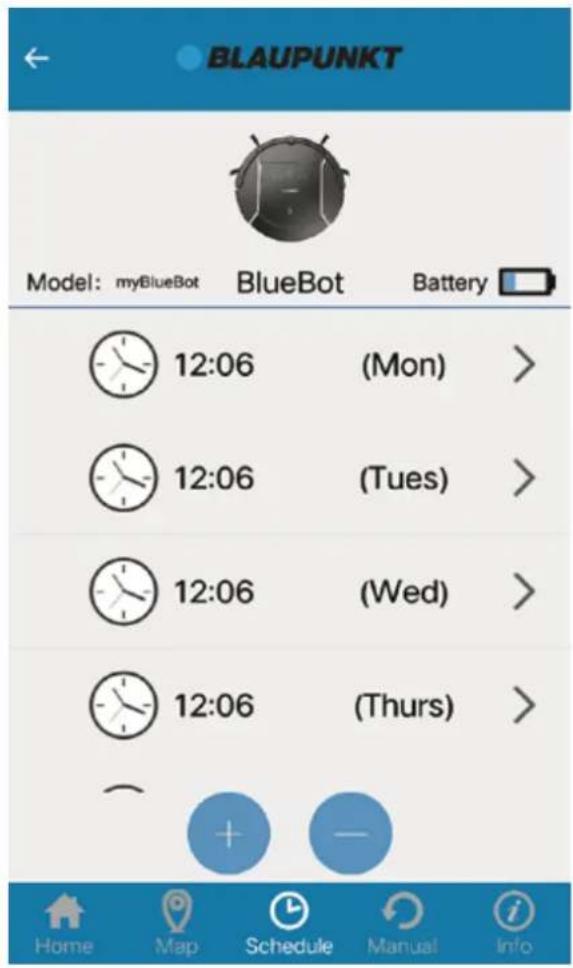
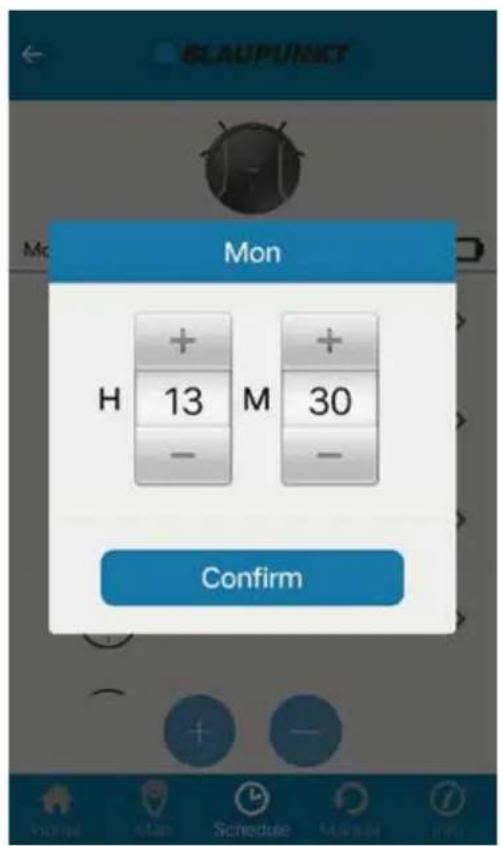
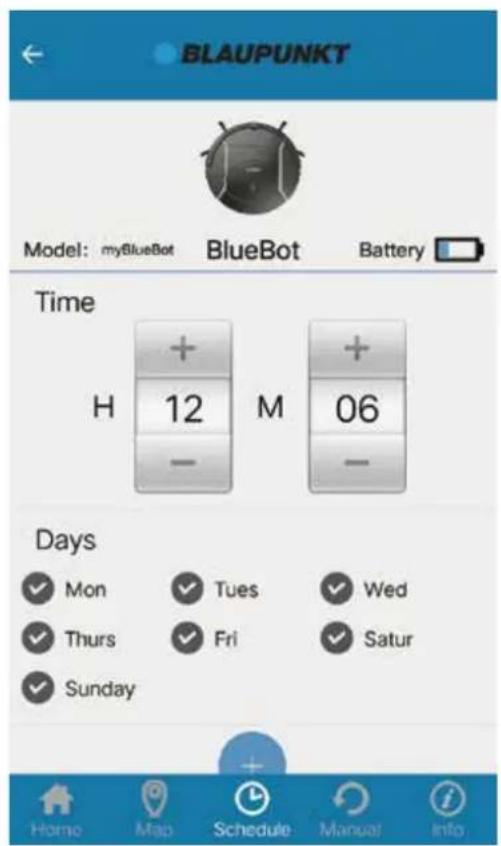
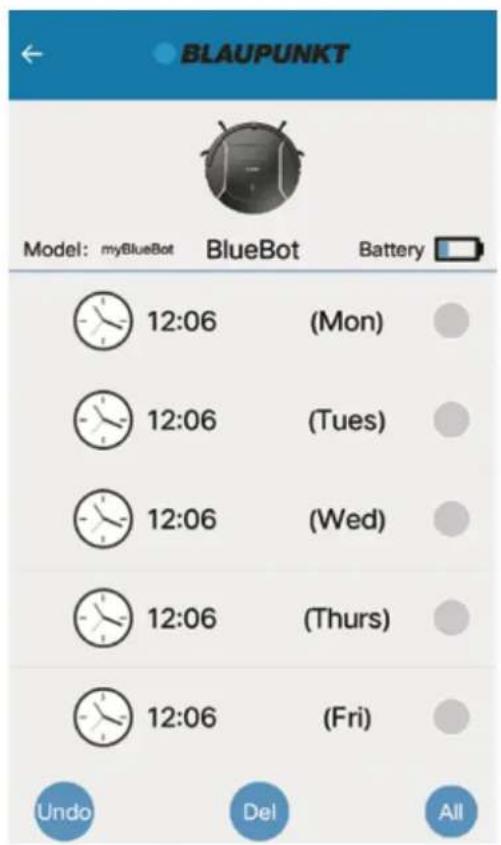
G. Press "Schedule" to enter the scheduling page.
You can schedule that the robot automatically starts to clean by inserting the time and date. You are able to schedule a different working time for each day. You can add/adjust or delete your schedule.
H. You can control the movement of robot in the "Manual" page.
SMARTPHONE APP - INSTRUCTIONS
SMARTPHONE APP - INSTRUCTIONS
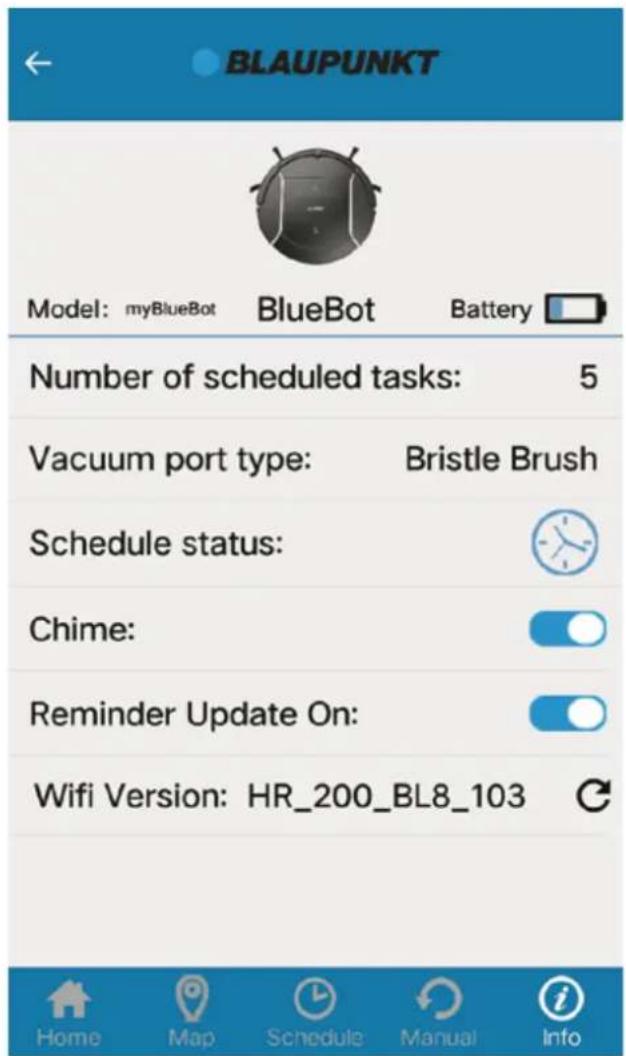
- You can check the setting of your robot in the "Info" page.
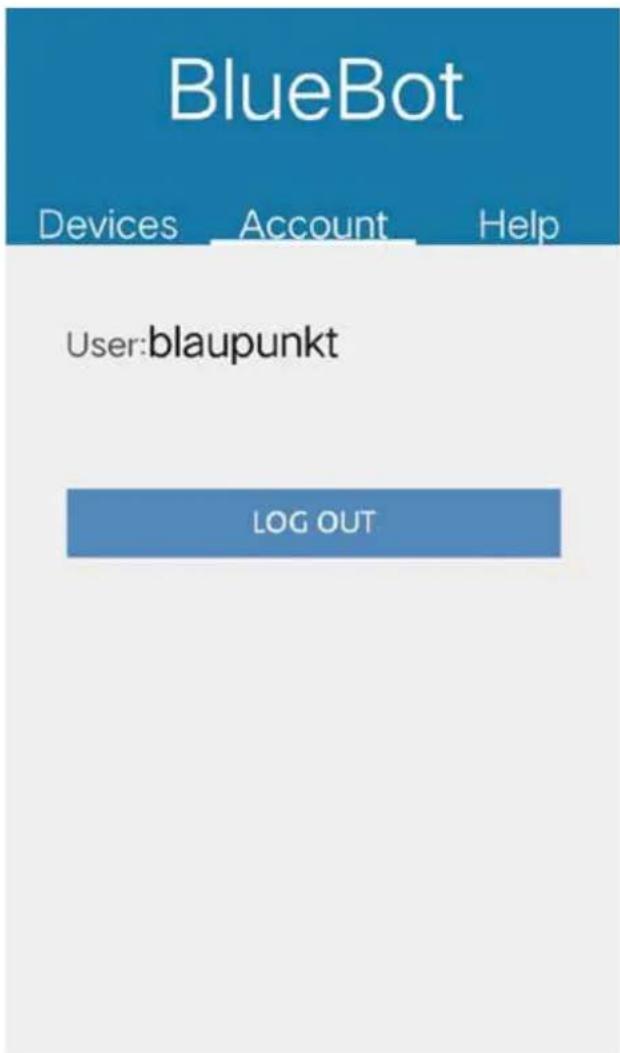
7. LOG OUT
Tap on "Account", you can log out from your account.
For questions please contact our customer service at: support@blaupunktrobotics.eu