Bluebot COMFORT Plus - Robot vacuum BLAUPUNKT - Free user manual and instructions
Find the device manual for free Bluebot COMFORT Plus BLAUPUNKT in PDF.
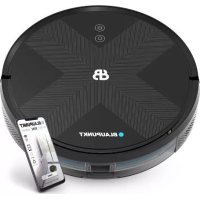
| Brand | Blaupunkt |
| Model | Bluebot COMFORT Plus |
| Product type | Robot vacuum with automatic dust emptying and charging station |
| Robot dimensions | 350 x 350 x 98 mm |
| Robot weight | 3.65 kg |
| Automatic station dimensions | 260 x 210 x 350 mm |
| Robot power supply | Li-ion battery 14.4 V 5000 mAh |
| Station power supply | 220-240 V ~ 50/60 Hz, 950 W |
| Rated output voltage | 24 V 1.2 A |
| Navigation type | Lidar (laser scan) for mapping and path planning |
| Dust bin capacity | 3.3 L (dust bag) |
| Cleaning functions | Sweeping, vacuuming, mopping (with 2-in-1 water tank), spot cleaning, scheduled cleaning |
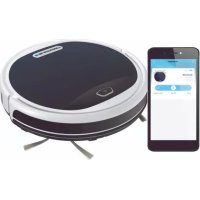
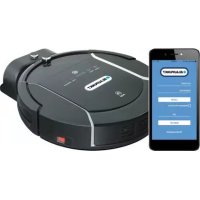
| Connectivity | Wi-Fi 2.4 and 5 GHz via Bluebot app (iOS/Android) |
| Sensors | Anti-drop sensors (x4), infrared sensors (x3), bumper sensor, wall position sensor |
| Noise level | Not specified in manual, estimated 60-70 dB |
| Maintenance | Regular cleaning of main brush, side brushes, sensors, HEPA filter, replacement of dust bag and mopping cloth |
| Safety | Anti-drop sensors, obstacle detection, automatic stop in case of anomaly, indoor use only |
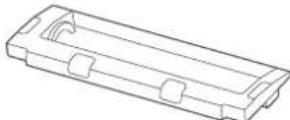
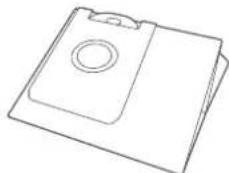
| Included spare parts | Additional side brush, additional HEPA filter+sponge, cleaning cloth (2x), 3.3 L dust bag (3x), cloth holder, cleaning brush |
| Warranty | 2 years against manufacturing defects |
| General information | Household use only, operating temperature 0-40°C, do not use outdoors or on wet surfaces |
Frequently Asked Questions - Bluebot COMFORT Plus BLAUPUNKT
User questions about Bluebot COMFORT Plus BLAUPUNKT
0 question about this device. Answer the ones you know or ask your own.
Ask a new question about this device
Download the instructions for your Robot vacuum in PDF format for free! Find your manual Bluebot COMFORT Plus - BLAUPUNKT and take your electronic device back in hand. On this page are published all the documents necessary for the use of your device. Bluebot COMFORT Plus by BLAUPUNKT.
USER MANUAL Bluebot COMFORT Plus BLAUPUNKT
With this manual we would like to support you in the set-up and usage of your Blaupunkt Bluebot robot.
For extra how-to videos, tips & tricks, FAQs or contact details, go to:
www.blaupunktrobotics.eu/support
In this manual you will find the following topics to support you in the setup of your robot:
1 Safety regulations 03
2 Product information 05
3 Installation of the robot & auto station 08
4 Installation of the Bluebot application 10
5 Usage of the robot & auto station 12
6 Cleaning settings 14
7 Maintenance 15
8 Basic parameters 24
9 Usage limitations 25
10 Troubleshooting 26
11 Warranty 28
1. SAFETY REGULATIONS
GENERAL SAFETY REGULATIONS:
Before using this product, please read the following safety instructions and follow all routine safety precautions.
Please read the instructions carefully, please keep the instructions.
Any operation inconsistent with this instruction manual may cause damage to this product.
WARNING:
- Use only the original rechargeable battery and charging station specially equipped by the manufacturer. Non-rechargeable batteries are strictly prohibited, please refer to "product parameters" for battery specification information.
- It is forbidden to use products in environments with open flames or fragile objects.
- It is forbidden to use products in extremely hot (above 40^ ) or extremely cold (below 0^ ) environments.
- It is forbidden to approach human hair, clothes, fingers and other parts to the opening and operating parts of the product.
- It is forbidden to use products on wet or stagnant ground.
- It is forbidden to use product near burning or evily hot object, for example a burning fireplace.
- It is forbidden for products to absorb any articles such as stones and waste paper that may clog the product.
-
It is forbidden for products to absorb any inflammable substances, such as petrol, toner and toner for printers or photocopies. Prohibit the use of products in clean areas with flammable items.
-
It is forbidden for products to absorb any burning articles, such as cigarettes, matches, ashes and other articles that may cause fire.
- It is forbidden to place articles at the suction opening. Do not use the product when the suction port is blocked. Clean up dust, cotton wool, hair, etc. at the suction opening to ensure smooth air circulation at the suction opening.
- Use the power cord carefully to avoid damage. It's forbidden to use the power cord to drag or pull the product and the product charging station. It's forbidden to use the power cord as a handle. It's forbidden to clamp the power cord in the crack of the door. It is forbidden to pull the power cord at sharp corners and corners. It's forbidden for the product to run on the power cord while the power cord should be far away from the heat source.
- Do not use a damaged charging station.
- Even if the product has been severely damaged, burning of the product is prohibited, which may lead to explosion of the battery of the product.
NOTE:
- Only authorized technicians can disassemble this product. Users are not recommended to disassemble this product by themselves.
- This product can only use the power adapter provided by the factory. If other adapters are used, the product may be damaged.
- Do not touch wires, sockets or power adapters when your hands are wet.
- Do not use cloth curtains or body parts to roll into the product drive wheels.
- Do not place this product near cigarette butts, lighters and other smoldering fires.
- Please clean the product after charging.
- Do not bend wires excessively or place heavy objects and sharp objects on the machine.
This product is an indoor household product. Do not use it outdoors. - Do not sit on the product.
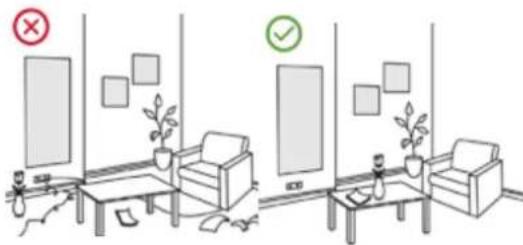
Do not use this product (e.g. bathroom) in a wet environment. - Before using this product, please remove all vulnerable items (e.g. glasses, lamps, etc.) on the ground as well as items (e.g. wires, paper sheets, curtains) that may entangle the side brushes and air suction passages.
- Do not put this product in a place where it is easy to fall (e.g. on desks and chairs by the stair case).
- Please carefully check whether the power adapter is connected to the socket before use, otherwise the battery may be damaged.
To prevent tripping, please inform other members of the house when this product works. - Please empty the dust bin before using this product when the dust bin is full.
The temperature used for this product is 0 to 40 degrees Celsius. - Do not use this product in high temperature environments.
- Please remove the battery from the machine before the product is scrapped.
- Please make sure that this product is not powered on when removing the battery.
- Please recycle the discarded batteries safely.
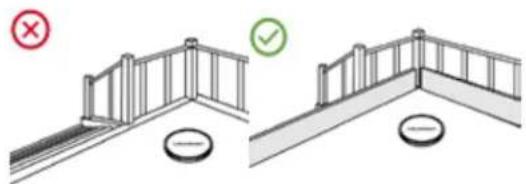
- Recommended to block the staircase exit or areas where the robot may fall. The antidrop sensors prevent the robot from tumbling down stars and steep drops. However, they may work less effectively when dirty or used on reflective/very dark-colored floors.
- To clean and maintain the robot and the auto station, you must turn off both. Pull out the power cord from the socket and disconnect the power supply first.
- Do not immerse the robot or the auto station in water for cleaning or rinse them with water.
- Do not whipe any part of the product with a damp cloth or any liquid.
- Do not use the mopping module on the carpet.
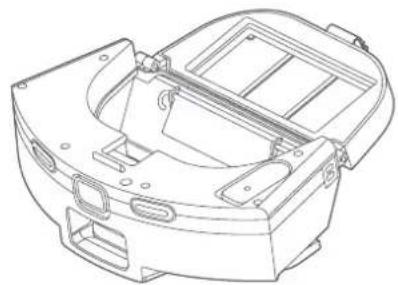
2.PRODUCT INFORMATION
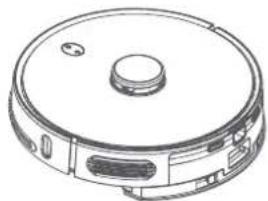
蓝BLUEBOT
Comfort Plus robot Auto station for dust
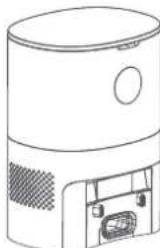
collection and charging

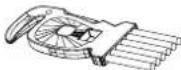
Instruction manual Side Brush
(1 installed + 1 extra)
Mop cloth support Cleaning brush
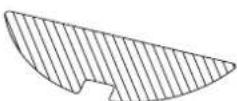
Mop (2x)
with knife
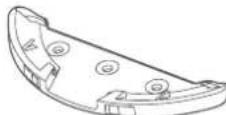
Main brush cover (installed)
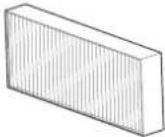
HEPA filter n°14 + Sponge filter (1 installed + 1 extra)
Dust bag 3,3L (3x)
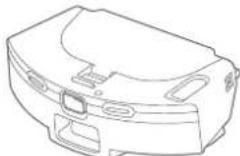
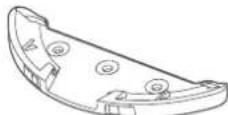
2-in-1 combi watertank 250 ml dustbin 300 ml (installed)
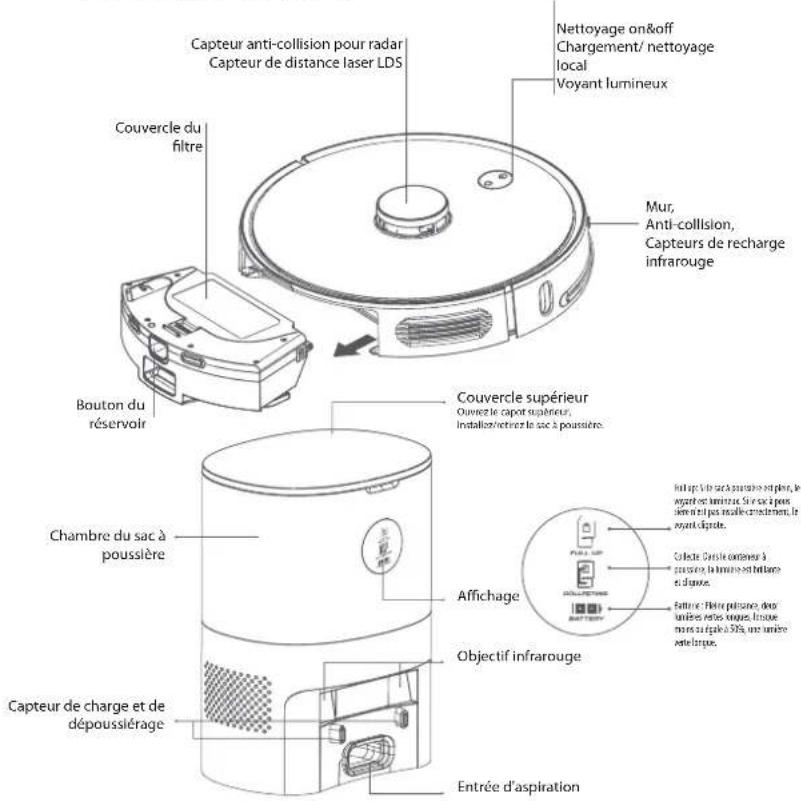
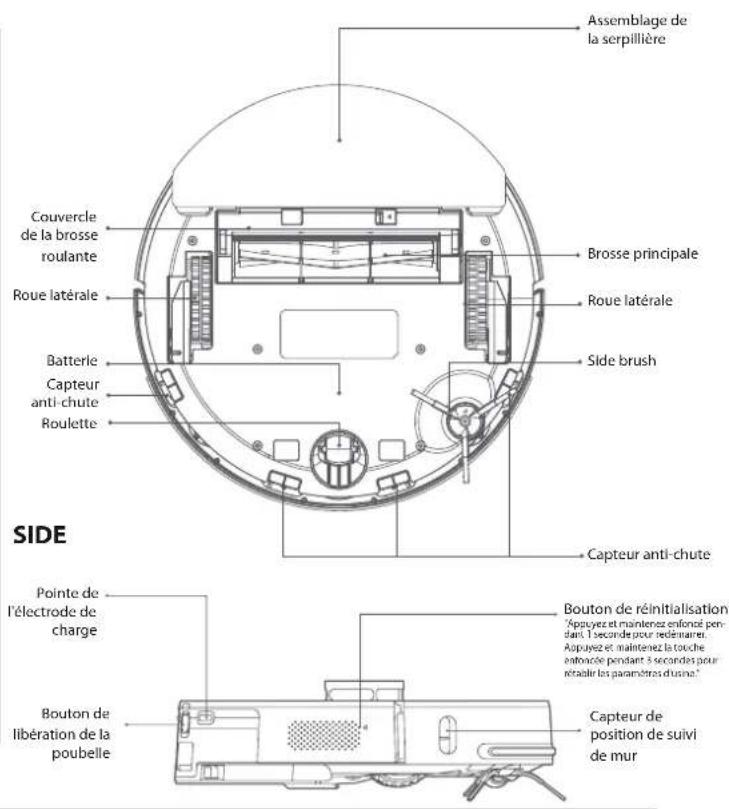
PRODUCT INFORMATION

BLUEBOT
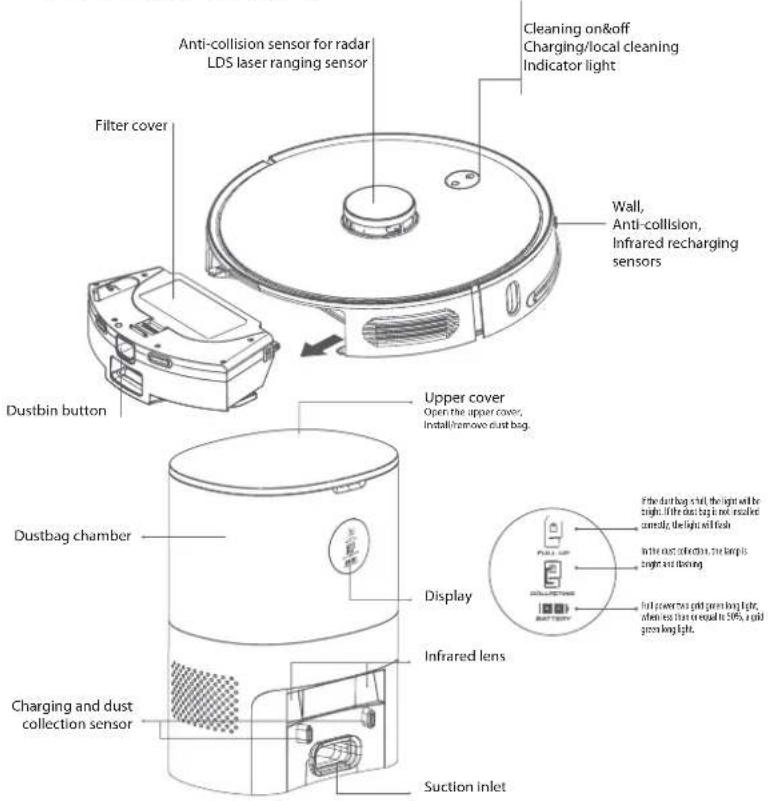
TOP & FRONT BOTTOM
INDICATORS REMINDER
| Machine status | Status of power indicator | Status of recharge indicator |
| Standby | Blue light long bright | Light off |
| Charging | Blue light breath | Light off |
| Pause | Blue light slowly flash | Light off |
| Cleaning/remote control | Blue light long bright | Light off |
| Recharging | Light off | Orange light long bright |
| Abnormal | Red light fast flash | Light off |
| Turned off | Blue light fast flash | Light off |
| Wi-fi not connected | Blue light slow flash | Light off |
| Wi-fi connected | Blue light long bright | Light off |
| Wi-fi being connected | Blue light long bright | Light off |
3. INSTALLATION OF THE ROBOT & AUTO STATION

AUTO STATION
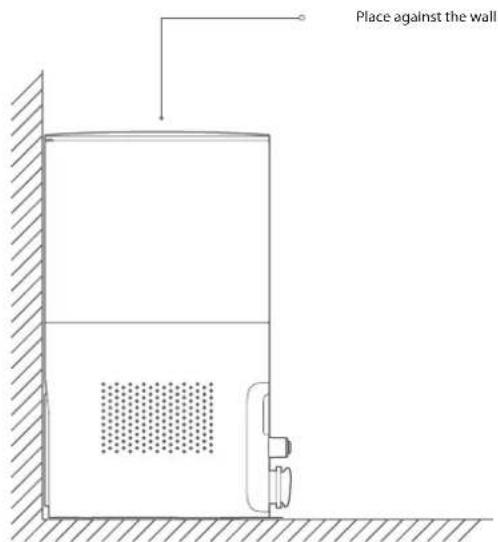
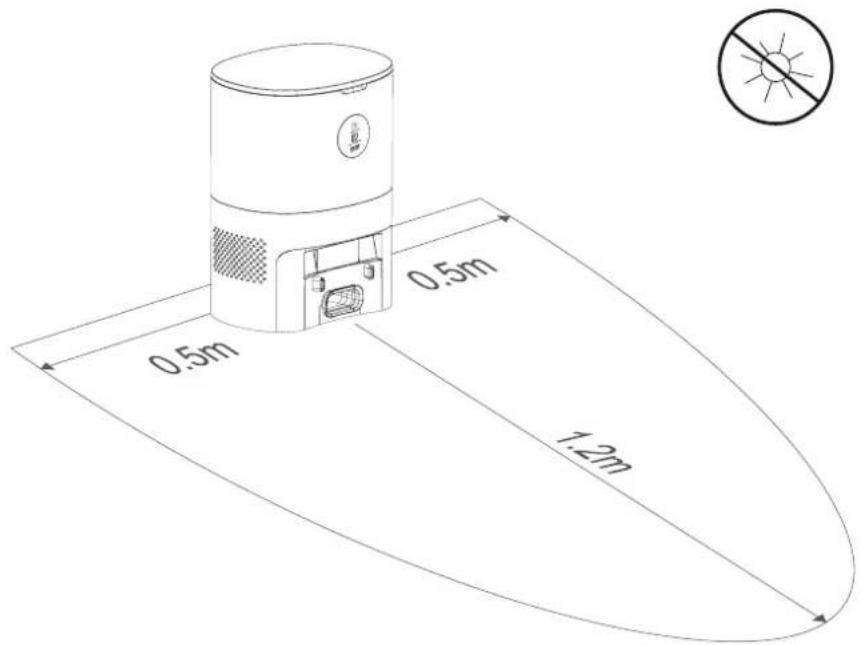
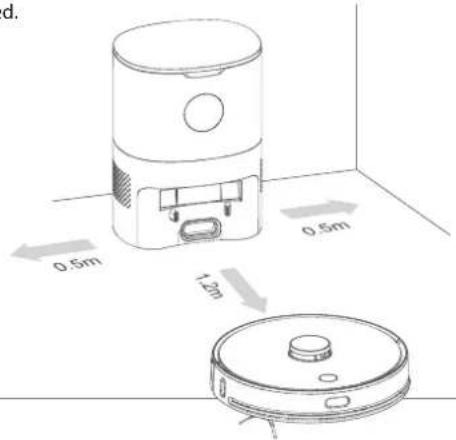
1 Lay the dust collection charging pile on the flat ground over 5cm away from the wall, insert the power plug into the socket meeting the requirements, and connect the power supply.
2 Ensure that there are no obstacles whitin 1.2m in front of the auto station and 0.5m on both sides.
INSTALLATION OF THE ROBOT & AUTO STATION

PRODUCT ASSEMBLY
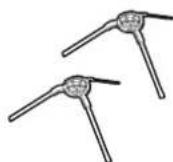
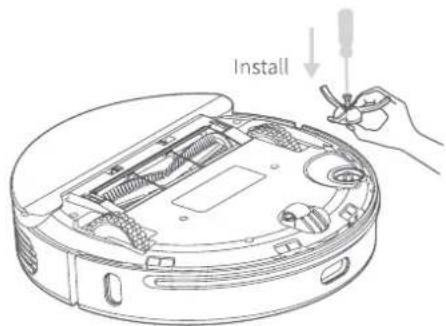
1 Install the side brush with a screw driver until tight.
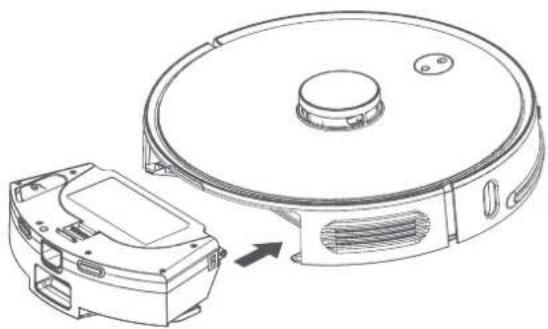
2 Place the 2-in-1 combi watertank in the robot.
4 Fully charge the robot (before 1st time use)
5 Connect with Bluebot app (optional)
6 Start cleaning
NOTE
- Please do not move the auto station without reason and keep it out of direct sunlight.
- If the auto station is relocated, the robot may fail in positioning and lose the map. When restarted, the robot will rebuild and memorise the map. In the rebuilt map the cleaning information for forbidden areas and other areas may have been lost.
- Direct sunlight will interfere with the recharging signal and consequently, the robot may be unable to return to the charging station.
- The robot cannot be used to remove liquids.
- If the battery level is less than 20% the machine will not work. Please charge it.
The machine will return to the auto station automatically if the battery level is less than 20% when in use and will be powered off and then start cleaning automatically after the battery level reaches 80% . - Please clear various wires (including the power line of the auto station) from the ground before use to avoid outage and damage of objects or wires when wires are dragged by the robot.
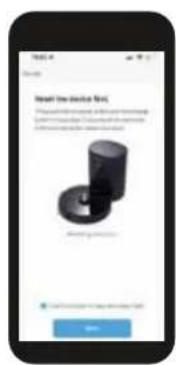
4. INSTALLATION BLUEBOT APP
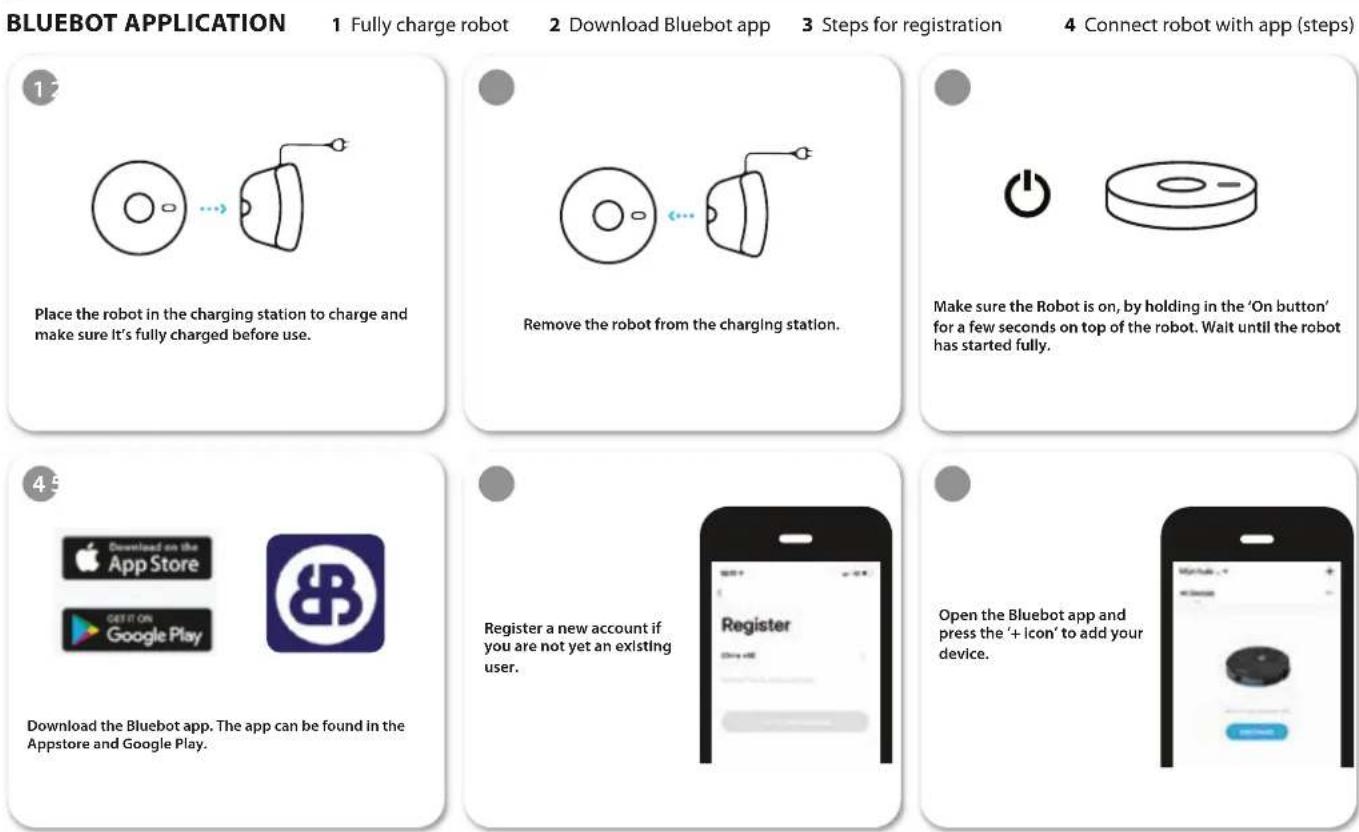
INSTALLATION BLUEBOT APP

蓝BLUEBOT
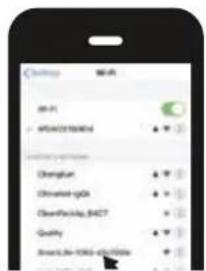
Select the BLUEBOT COMFORT PLUS (2.4 + 5Ghz)

Select your wifi network, enter the password and press confirm.


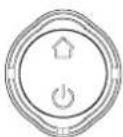
After your registration, make sure the robot is removed from it's charging station. Turn on your Robot by pressing the 'On button'. After that is done, press both the 'Home button' and 'On button' simultaneously for more than 3 seconds until the robot mentions that it lost its wifi connection.

Tick 'Confirm power on key blue slow flash' when applicable and press 'Next'.

Press on the 'Go to connect' button in the bottom of your screen.
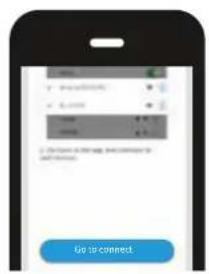

Select the 'SmartLife xxx' network from the list and return to the Bluebot app.
Your robot will now connect to the App.
5. USAGE OF THE ROBOT & AUTO STATION

REMOVE THE LIMIT BAR
Put the robot on the flat indoor ground, and remove the protection device of the limit bar at both ends of the front bumper.
CHARGING OF THE ROBOT
Press and hold the button for 3 seconds to start the sweeping and mopping robot, and then short-press the button to make the robot recharge automatically. The robot enters the ready state once fully charged.
- Fully charge the robot before starting cleaning.
- Before starting the cleaning, tidy away the wires and articles on the ground to avoid damage caused by winding, dragging and hitting during cleaning.
- It is suggested to start the robot at the auto station.
- When the battery is low during the cleaning, the robot will automatically return to the auto station for charging, and automatically return to the interrupted place to continue cleaning when the battery is full.
USAGE OF THE ROBOT & AUTO STATION

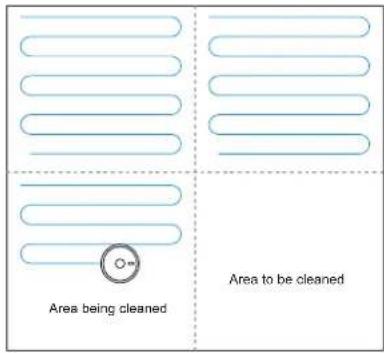
CLEANING MODE
After the robot is powered on, it will scan and generate the map and divide it into areas intelligently. Then sweep the areas one by one along the wall orderly, efficiently and thoroughly and plan the cleaning route in a bow/S shape. The robot will return to the charging station automatically after cleaning.
NOTE
Do not move the robot casually and frequently when it is cleaning. After moving, please put the robot near the original position. When it starts again, it will try to reposition itself. After successful positioning, it would follow the planned path and continue to work. If the positioning fails, the robot would abort previous mission, make a map and do the cleaning again.
SPOT CLEANING
When a local area needs a deep sweep, the user specifies a point on the map on the APP, the machine will automatically drive to the vicinity of the point, take the point as the center, and clean within 1.5m× 1.5m
6. CLEANING SETTINGS
MORE OPTIONS
Timer*
Set a timer to program the robot to clean at a certain time or day.
Manual
Control the robot manually with the remote control or use the Bluebot app on your phone as a remote control.
Find robot
Tap this button when you lost your robot and your robot will tell you where it is.
Map management*
Use this function to manage your maps (5 max.).
Water regulation
Control the water regulation and choose "Low", "Medium" or "High". This will regulate how wet the mop will become when using the robot including the 2 in 1 electric-controlled water tank.
Auto Boost*
Auto Boost will increase suction power when the robot gets more friction. This is designed to increase suction on carpets.
Custom mode*
So the robot can remember per area what route to use for cleaning.
Record*
View all your previous vacuum cleaning records. You can see how many m2 has been cleaned and the time it took. Here you can also load previously saved maps. Ideal when cleaning different area's (upper floor for instance).
Voice and volume
Setup your language and change the volume.
Do not disturb mode
Here you can schedule an do not disturb time period.
Consumables and maintenance*
Here you will find an overview of consumables and indicates when consumables need to be replaced or maintenance is required.
More info*
Here you will find network and robot information
Set wall / Restricted Area*
Use this function to create no-go zones within the area that you are cleaning. You can draw virtual walls that blocks the robot from crossing. Or you create a restricted area for either vacuuming or mopping.
* Via Bluebot app only
7. MAINTENANCE
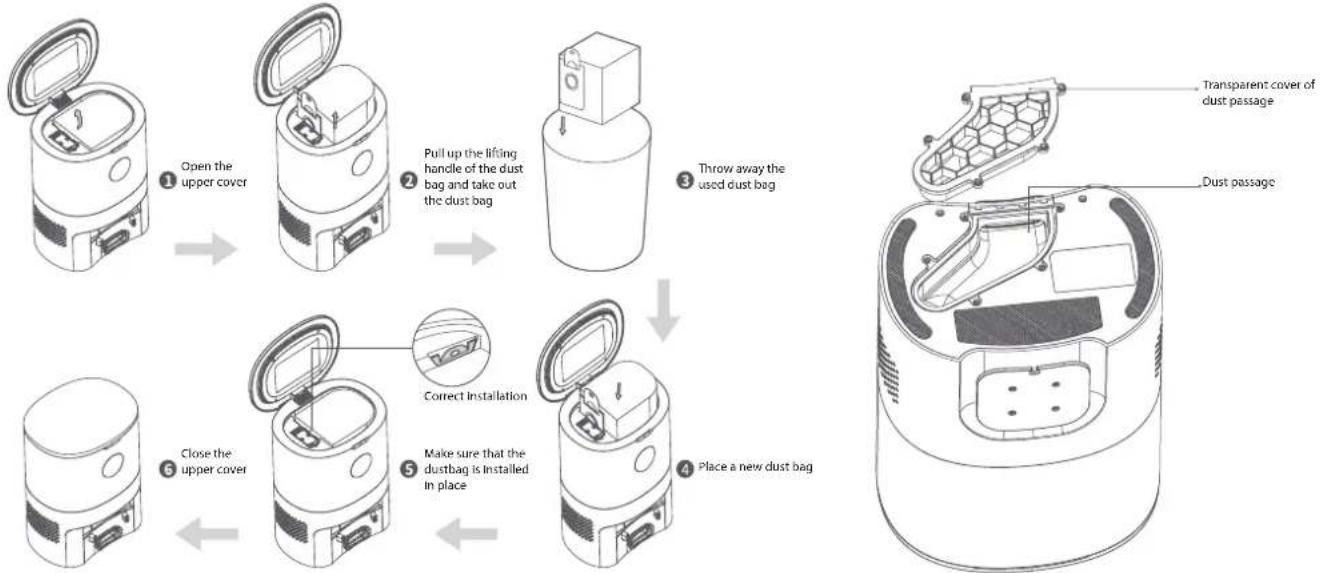
REPLACE THE DUST BAG
When the dust bag is full, the 'FULL UP'sign is continuously high brightness, and app notice is given. Please replace the dust bag in time. The 'COLLECTING' sign will be high brightness while the collector is working. When the host is fully charged, the mark of 'BATTERY'is all green and high brightness, battery power is less than or equal to 50% , just a half mark is high brightness.
CLEAN THE DUST PASSAGE
If the 'FULL UP' sign, The 'COLLECTING' sign and the BATTERY sign all is twinkling after the dust bag is replaced, it is recommended to pull out the power plug and reverse the auto station to check whether there are materials blocking the dust passage. If the dust passage is blocked, refer to the figure below and remove the transparent cover of the dust passage with a screwdriver to remove the blocking materials.
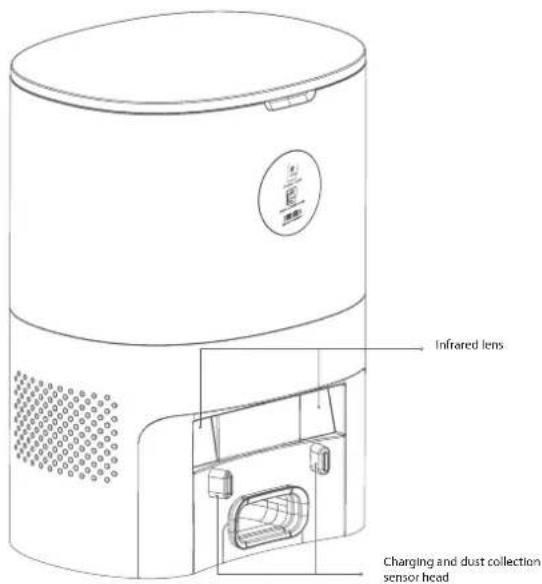
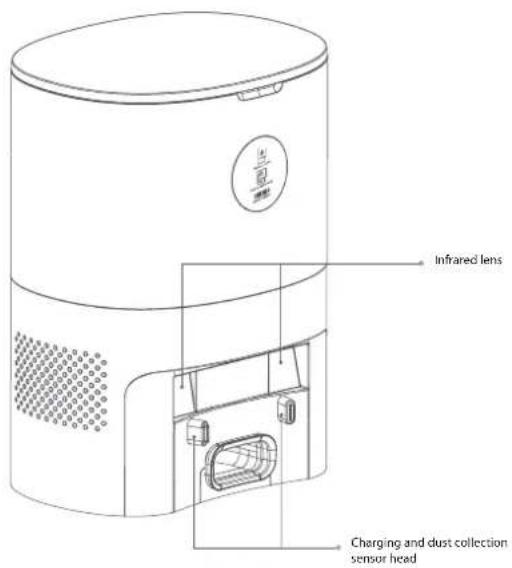
CLEAN THE INFRARED LENS/CHARGING AND DUST COLLECTION SENSOR HEAD
Wipe them gently with a clean, soft, dry cloth. It is recommended to clean them once a month.
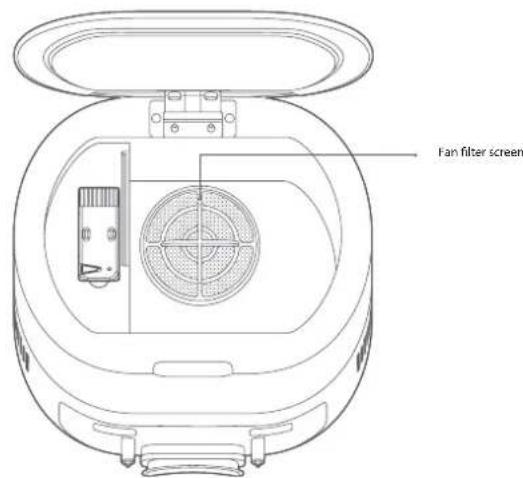
CLEAN THE FILTER SCREEN OF THE FAN
The filter screen of the fan is below the dust bag. If there is dust accumulation, wipe it gently with a clean, soft, dry cloth. It is recommended to clean them once a month.
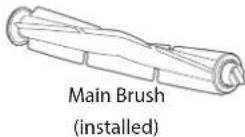
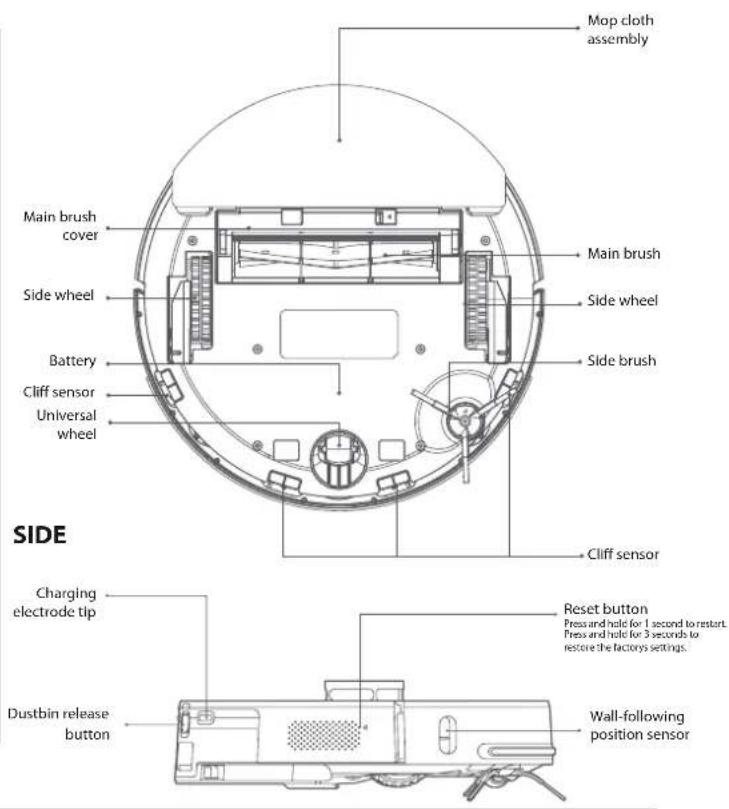
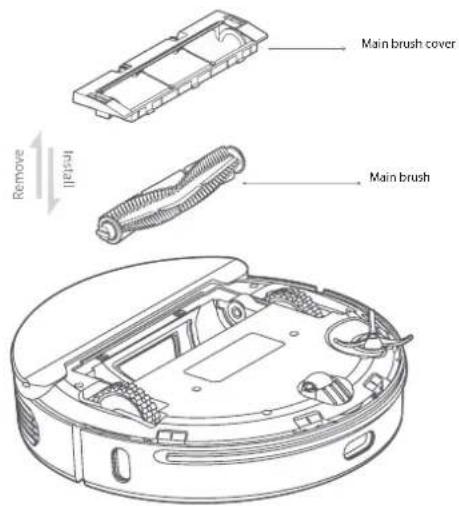
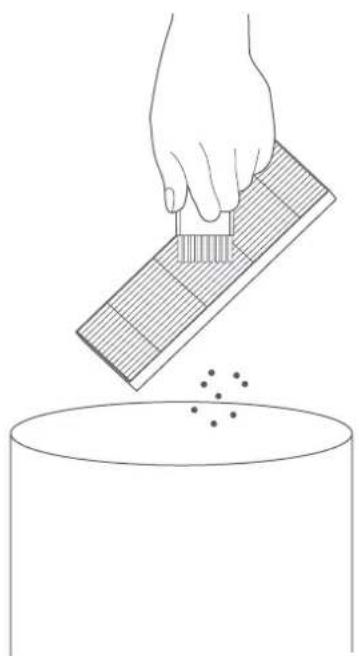
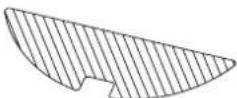
CLEAN THE MAIN BRUSH
The main brush is consumable and should be cleaned at least once a week. It is recommended to replace the main brush every 6-12 months to ensure the cleaning effect.
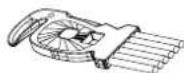
1 Reverse the robot, press the snap on the main brush cover, and remove the main brush cover and the main brush.
NOTE Be careful when reversing the robot to prevent damage to the lidar laser.
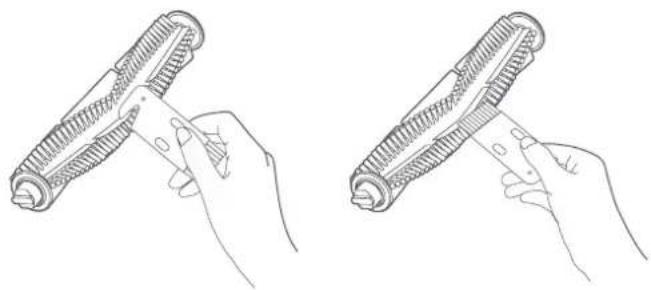
2 Cut off the hair twisted around on the main brush with the cleaning knife, and then clean the main brush with the cleaning brush with the other end of the cleaning knife.
3 Reinstall the main brush and the main brush cover. Press and fasten the snap.
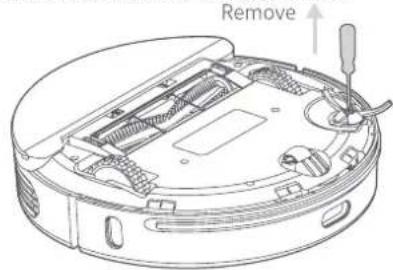
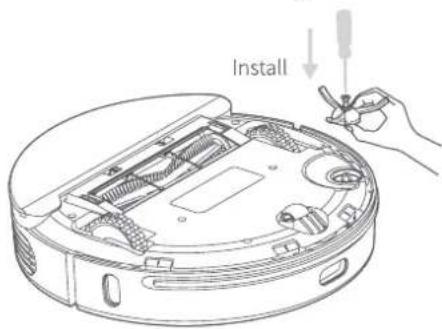
CLEAN/REPLACE THE SIDE BRUSH
1 Remove the side brush with a screwdriver.
2 Reinstall the side brush after cleaning, or install a new side brush.
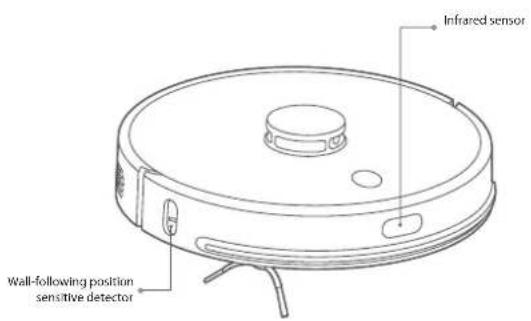
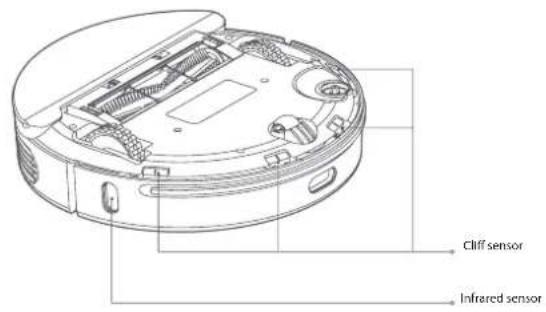
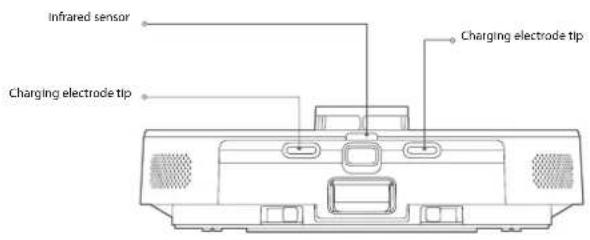
CLEAN THE SENSORS
It is recommended to use a clean, soft, dry cloth to wipe each sensor gently every week to ensure the normal use of the machine.
Robot:
Cliff sensor X4
Infrared sensor X3
Charging electrode tip X2
Wall-following position sensitive detector X1
Auto Station:
Infrared lens X2
Charging and dust collection sensor head X2
BATTERY
- The robot is furnished with high-performance lithium-ion batteries.
- To maintain battery performance, please keep the robot charged in daily use
- If the machine is left unused for any length of time, please shut down and keep it properly.
- Charge it at least every three months to avoid damaging batteries due to excessive discharge.
FIRMWARE UPGRADE
- Upgrade firmware using the Bluebot app. If new firmware is detected, upgrade it according to the report.
- The battery level should be ≥ 50% during firmware upgrade, so if needed the machine should be placed on the charging station to charge before the firmware upgrade takes place.
- Power failure restart When the button is not responding or can not be turned off, reset the button with the pin length for one second, and the robot will restart the power.
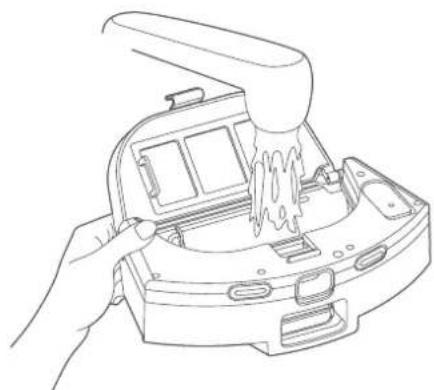
Clean the 2in1 water tank
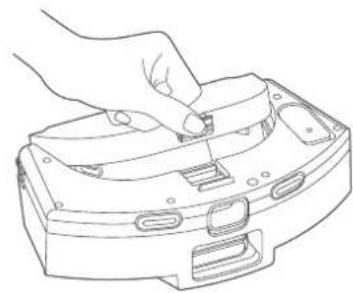
1 Press and hold the release button of the two-in-one water tank and at the same time pull it outwards.
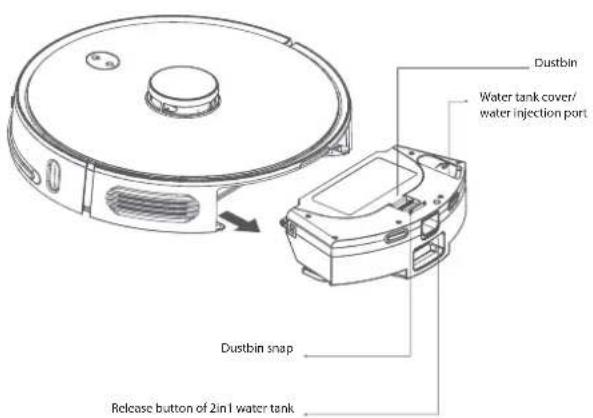
2 Open the dustbin by pressing the dustbin snap.
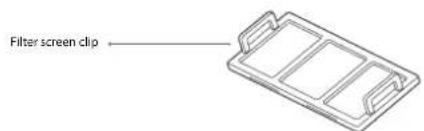
3 Remove the filter screen clip.

4 Take out the filter screen.
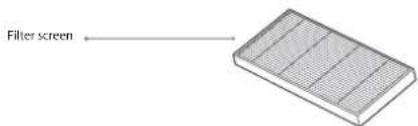
5 Remove the dirt on the filter screen and screen clip with a cleaning brush.
MAINTENANCE
BLUEBOT
6 Turn on the tap to clean the dustbin
7 Open the water tank cover and inject an appropriate amount of
water.
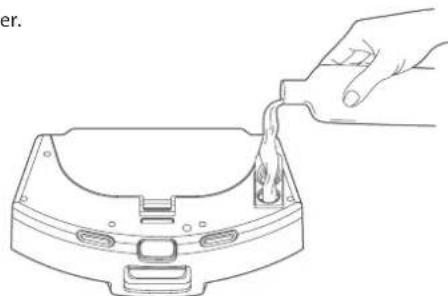
NOTE Only pure water may be used.
8 Please remove the water tank fittings from the machine according to the illustration and reverse it, remove the mop and clean it.
- If the mop is too dirty, it will affect the effect of mopping, please clean it in time
- Be sure to remove the mop for cleaning and screw it dry before installation. It is
forbidden to clean the two in one water tank while powered on. - The mop is a consumable and it is recommended to replace it every 3-6 weeks.
8. BASIC PARAMETERS

ROBOT
Item Parameter
Model BLUEBOT Comfort Plus
Overall dimension 350X350X98mm
Product weight 3.65kg
Li-ion battery 14.4V 5000mAh
Rated input 24V 1.2A
AUTO STATION
Item Parameter
Overall dimension 260x210X350mm
Rated input 220-240V 50/60Hz 950W
Rated output 24V 1.2A
一
9. USAGE LIMITATIONS
- The product is only used for floor cleaning in a home environment and cannot be used for outdoor (such as an open terrace), non-ground (such as a sofa), or a commercial or industrial environment.
- Please do not use the product in high areas (such as a balcony, open staircase, open terrace and furniture tops) without a protective fence.
- Please do not use the product at a temperature above 40^ or below 0^ or when there are liquids and sticky substances on the ground.
- Please hang up any cables on the ground before use to avoid being dragged by the robot.
- Please clear fragile objects and impurities (such as vases and plastic bags, etc.) from the ground to avoid damaging valuables when the robot is stuck or impacted slightly.
- People with physical, mental, or perceptual disorders (including children) are not allowed to use or operate the product.
- Children cannot use the product as a toy. Please keep children and pets away when the robot is working.
- Please keep the main brush and other cleaning tools out of reach of children.
- Please do not place objects (including children and pets) on a stationary or moving robot.
- Please keep hair, fingers, and other parts of the human body or pets away from the suction inlet when the robot is working.
- Please do not use the product to clean burning objects (such as burning cigarette ends etc.).
- Please do not use the product to clean long-piled carpet (some dark carpets may not be cleaned normally).
- Please prevent the robot from suctioning hard or sharp objects (such as waste decorative materials, glass and iron nails, etc.).
- Please do not move the robot by holding the protective cover of the laser distance sensor and collision bumper.
-
Please clean or maintain the robot and the charging station when shutdown or in the power-off state.
-
Please do not wipe any part of the product using a wet cloth or any liquid.
-
The LEDs emit very strong UV radiation. Don't look directly into the LED light, UV radiation can harm your eyes. To prevent even slight exposure, wear protective eyewear.
-
Keep out of reach of children.
-
Please use the product according to the User Manual. Users should be responsible for any damages and injuries caused by improper use.
Battery and Charging:
- Please do not use a battery, auto station or charger provided by any third parties.
- Do not discard used batteries at will. Before discarding the sweeping and mopping robot, the power supply must be disconnected and the batteries should be taken out of the sweeping and mopping robot for environmental protection.
- Please do not dismantle, report or refit battery or auto station arbitrarily.
- Please keep the auto station away from a heat source (such as a heating plate).
- Please do not wipe or clean the auto station dirt using a wet cloth or wet hand.
- Please do not just abandon used batteries. Used batteries should be disposed of by a professional recycling agency.
- If the power cord is damaged or broken, please discard it immediately and replace it through official channels.
- Please ensure the robot shuts down during transportation and the product should be transported in its original packaging.
- If the robot is left unused for a long period, it should be fully charged and then placed in a cool and dry place. Charge the robot at least every three months to avoid damaging batteries due to excessive discharge.
- You may not use detergent products in the water tank, as this may result in a blockage of the water supply to the mop.
- Do not disassemble, repair or refit the battery and auto station without permission.
- Do not pour water into the device or immerse it in water.
10. TROUBLESHOOTING
When the machine runs abnormally, the power indicator will blink in orange, and the machine will give a voice prompt when some faults occur. Please refer to the table below for a solution.
Voice prompt/fault phenomena Possible causes Solution
| Please check whether the radar is stuck | The lidar is blocked or stuck | Remove the obstacle or move the machine to an open place and restart it |
| Please check the anti-collision rail | The bump sensor is stuck | Clean up the foreign matters around the anti-collision rail, or move the machine away |
| Please clean the cliff sensor and avoid NO-GO areas | The cliff sensor is triggered after the machine is started up | Please wipe the cliff sensor and move the machine to a flat and open place to start |
| Please check the rotating brush | The main brush is stuck | Clean the main brush, or move the machine away |
| Please check the side brush | The side brush is stuck | Clean the side brush, or move the machine away |
| Please check the main wheels | The main wheel is stuck | Clean the main wheel, or move the machine away |
| 2-in-1 dust bin and water tank removed | The two-in-one water tank has been taken out | Please replace the two-in-one water tank and the filter screen, and confirm that the filter screen and the two-in-one water tank are installed in place |
| Low battery, start recharging | Low battery during cleaning | Low battery. Please charge the robot before using |
| The fan is abnormal | The fan is abnormal | Please try to turn the machine off and then restart it |
| Please clean right side edge sensor | The right side edge sensor is abnormal | Please wipe and clean the right side edge sensor |
| Radar cover is blocked | The radar cover is stuck | The lidar is pressed or stuck. Please move it to another position to start |
| The battery is damaged or not installed | The battery has abnormality during charging | The battery temperature is too high or too low. Please wait for the battery temperature to return to be normal before use |
| The machine doesn't start | Low battery level or abnormal ambient temperature | The battery level is low. Please charge it before use. The ambient temperature is too low (below 0°C) or too high (above so 0°C). Please use the product in the environment on 0°C ~ 40 °C |
| Cannot be charged | 1. The auto station is not powered on2. The charging electrode tip is dirty3. The charging electrode tip has poor contact | 1. Please confirm that the power cord of the auto station is connected to the power supply2. Regularly clean the charging electrode tip of the machine and the dust collection and charging sensor head of the dust collecti on charging pile3. Please eliminate the poor contact caused by the side brush or other blocking materials, and try to reposition the machine manually |

BLUEBOT
Voice prompt/fault phenomena Possible causes Solution
| Recharging failed. The auto station is not found | The auto station is blocked or too far away; the auto station is not connected to the power supply; there are strange materials at the bottom of the mop cloth support or the mop cloth is rolled up | Please put the auto station in the open area, and put the machine near the auto station to retry; please connect the auto station to the power supply; please clean up the bottom of the mop cloth support and tidy the mop |
| Abnormal behavior | Program exception | Turn off and restart |
| There are abnormal sounds during cleaning | Blocking materials are twisted on the main brush/side brush or the main wheel | Please turn off the machine for cleanup |
| The cleaning capacity is reduced or the dust drops | The dust bin is full or the filter screen is blocked or the main brush is entangled | Please clean the dust bin, the filter screen and the main brush in time |
| Regular cleaning does not work | Low battery | Regular cleaning can only be started when the remaining battery level is greater than 30%. Please keep the machine charged every day |
| Cannot be connected to APP | Abnormal Wi Fi network, wrong Wi Fi password or abnormal APP | Please ensure that the machine is in a good Wi Fi signal area; re-enter the Wi Fi password or reset Wi Fi; download and connect the latest version of APP |
| The mopping module out puts no water or little water | Not enough water in the water tank, too dirty mop or the mop support is not installed in place | Please check whether there is water in the water tank; clean the mop; and install the mop correctly according to the instructions |
| The floor mopping module out puts too much water | The water tank cover is not in place, and the water output is adjusted to the maximum | Please confirm that the water tank cover is installed in place, and adjust the appropriate amount of water in the APP |
| The dust collection performance degrades | Dust accumulates in the dust bag, causing the air flow into the suction nozzle to decrease. | Replace the dust bag |
| Cannot return to the auto station after fixed-point cleaning or moving | The robot constructs a new map or the distance is too far | After fixed-point cleaning or moving for a long distance, the robot will generate a new map. If the auto station is far away, the robot may not be able to recharge automatically. Please manually put the machine back to the auto station for charging. |
| Dust collection failed | The dust bag is missing or not installed in placeThe fan starts overheat protection or has faults | Please install the dust bag correctly, and try to collect dust again 30 minutes later; if it can't be solved, please contact after-sales customer service |
| The dust bag is full or blocked | The dust bag is full or blocked | Replace the dust bag, and clean the auto station (suction inlet, dust passage, fan filter screen, etc.) in time |
11. WARRANTY & RECYCLING
This product has 2 years warranty for manufacturing defects. The warranty period will be counted from the date of purchase of the product, according to purchase invoice. Product warranty only covers manufacturing defects, defects resulting from improper use are not covered in the warranty, such as (but not limited to) dropping the robot, improper transportation, connection to the mains power supply not in compliance with the voltage specified in this manual, insertion of foreign objects and natural wear of parts and parts Such as plastic parts (caps, buttons, handles, latch locks, power cables, etc.) and metal parts (wires, motors, etc.).
Also not covered are damages due to agents of nature, lightning, food, sea, oxidation, humidity etc.). The product will lose its warranty if it presents defects, which after analysis by our technicians, are characterised as being improperly used, used for professional use or for the purpose for which it is not intended (according to the Owner's Manual). This warranty will be void if it is found that the device has been tampered with, has been repaired by a person or service not authorised by Blaupunkt. The guarantee is only valid with the receipt/ invoice provided at purchase.
Blaupunkt undertakes to provide the above-mentioned services in the warranty period only in places where it maintains an authorised service. Consumers who are not located near an authorised service centre should be responsible for the costs and risks of transport to the authorised service of their choice.
Natural 'wear and tear' is not covered under warranty.
This product is for domestic use only.
DISPOSAL AND RECYCLING
This marking indicates that this product should not be disposed with other household wastes throughout the EU. To prevent possible harm to the environment or human health from uncontrolled waste disposal, recycle it responsibly to promote the sustainable reuse of material resources. To return your used device, please use the return and collection systems or contact the retailer where the product was purchased. They can take this product for environmental safe recycling.
Willkommen!
2. PRODUKTINFORMATION
BLUEBOT
Anti-sturz-Sensor X4
Infrarotsensor X3
11. GARANTIE & RECYCLING
2. INFORMATIONS SUR LE PRODUIT
BLUEBOT
INFORMATIONS SUR LE PRODUIT

BLUEBOT
TOP & FRONT BOTTOM
INFORMATIONS SUR LE PRODUIT
蓝BLUEBOT
RAPPEL DES INDICATEURS
ASSEMBLAGE DU PRODUIT
CLEAN/REPLACE THE SIDE BRUSH
2.PRODUCT INFORMATION
Dweilhouser Cleaning brush
Dweil (2x)
with knife
Here you will find an overview of consumables and indicates when consumables need to be replaced or ONDERHOUD is required.
Meer informatie*
10. PROBLEEMOPISSING

BLUEBOT
11. GARANTIE & RECYCLING
ELIMINACAO E RECICLAGEM
THIS APPLIANCE AND ITS ACCESSORIES AND BATTERY ARE RECYCLABLE
The meaning of the symbol on the material, its accessory or packaging indicates that this product shall not be treated as household waste. Please dispose of this equipment at your applicable collection point for the recycling of waste electrical and electronic equipment. In the European Union and other European countries there are separate collection systems for used electrical and electronic products. By ensuring the correct disposal of this product, you will help prevent potential hazards to the environment and to human health, which could otherwise be caused by improper disposal of the product. The recycling of materials will help conserve natural resources. Please do not therefore dispose of your old household electrical and electronic equipment with your household waste. Do not dispose of batteries as household waste but take them to a battery recycling facility. To more detail information about recycling of this product, please contact your local city office, your household waste disposal service or the shop where you purchased the product.
DE
ENTSORGUNG
WARNHINWEIS: VERGEGWISNERSE SICH, OB DIE BATTERIE GANZ ANTELEERT IST. ENTHEMENE SIE VORSichtigT DIE BATTERIE ODER DEN AKKUMULATOR.
DIE BATTERIE BZW. DER AKKUMULATOR UND DAS GERAT KONNEN JETZT GETRENNT ENTSORGST WERDEN.
Her sordn op h metral, d cassons of de pkraking w t eep oet d t rnat nug mowd behandl a hishuldelik f al. wergd zpe apparatusum vog in te soeppaliliecng lestrum vear ol aneilechic in elektonische apseurmarr lartig enzamld. In de Europee Uine ane ane Europee Iunen best er stendtkei meienlssmertvien for gebrakle dielechricn bee. Duer roent y zedn di chit creort wong wgewysen, heag u mopfie kissin bo ter maliren ad menemalei gneomthre to verimtnen, die andern zuon konnen wondens vorensckn ic stvcnds bhechshing veit pridn. The recying comnst, that higt neht he hcbad con mnnuillbiprenson. Wae the muaa did noier nve gnean mte hauhuldelik f al. Weep de batmen wet ag hushuldelik afai nae brnr ne aan aBerter recycling fiellant. Voeer more informatien over de recying van da product lnuit u contact opennes me: we klae glmeemtaar, wue hushuldelik alverwer: kings ciendt of wckiel ware u het product hegel.
NL
ELIMINATION
DIT APPARAATEN ZUN ACCESSOIRENS EN BATTERU ZUN RECYCLEBAAR
Published by Smart Life B.V.
Enjoy it.