BM 47 - Blood pressure monitor BEURER - Free user manual and instructions
Find the device manual for free BM 47 BEURER in PDF.
| Feature | Details |
|---|---|
| Device type | Electronic blood pressure monitor |
| Blood pressure measurement | Systolic and diastolic pressure |
| Display | LCD screen |
| Memory function | Storage of measurements for multiple users |
| Power supply | Batteries (type not specified) |
| Dimensions | Compact, easy to carry |
| Usage | Easy to use, suitable for home use |
| Maintenance | Clean with a soft cloth, avoid moisture |
| Safety | Do not use on irritated or injured skin |
| Warranty | Check conditions with the retailer |
Frequently Asked Questions - BM 47 BEURER
User questions about BM 47 BEURER
0 question about this device. Answer the ones you know or ask your own.
Ask a new question about this device
Download the instructions for your Blood pressure monitor in PDF format for free! Find your manual BM 47 - BEURER and take your electronic device back in hand. On this page are published all the documents necessary for the use of your device. BM 47 by BEURER.
USER MANUAL BM 47 BEURER
Quelle: WHO, 1999 (World Health Organization)
- Getting to know your instrument 18
- Important information 19
- Unit description 23
4.Preparing the measurement 24
5.Measuring blood pressure 24
6.Evaluating results 27 - Saving, displaying and deleting measurements 28
- Error message/trouble shooting 28
- Cleaning and storing the device and cuff 29
- Technical specifications 29
- Replacement parts and wearing parts 31
12.Warranty/service 31
Included in delivery
Blood pressure monitor
- Upper arm cuff
- 4 x LR6 AA batteries
Storage bag
- Instructions for use
Dear Customer,
thank you for choosing a product from our range. Our name stands for high-quality, thoroughly tested products for applications in the areas of heat, weight, blood pressure, body temperature, pulse, gentle therapy, massage, beauty and air. Please read these instructions for use carefully and keep them for later use, be sure to make them accessible to other users and observe the information they contain.
Best regards,
Your Beurer Team
1. Getting to know your instrument
Check that the device packaging has not been tampered with and make sure that all contents are present. Before use, ensure that there is no visible damage to the device or accessories and that all packaging material has been removed. If you have any doubts, do not use the device and contact your retailer or the specified Customer Services address.
The upper arm blood pressure monitor is used for noninvasive measurement and monitoring of adults' arterial blood pressure.
You can use it to measure your blood pressure quickly and easily, storing the results and displaying the progression of readings together with the average.
A warning is issued for anyone suffering from cardiac arrhythmia.
The recorded values are classified and evaluated graphically. Store these instructions for use for future reference and make them accessible to other users.
2. Important information

Signs and symbols
The following symbols are used in these instructions for use, on the packaging and on the type plate for the device and accessories:
| ! | Caution |
| i | Note Note on important information |
| Follow instructions for use |
| Type BF applied part | |
| --- | Direct current |
| Disposal in accordance with the Waste Electrical and Electronic Equipment EC Directive - WEEE | |
| 21PAP | Disposition of packaging in an environmentally friendly manner |
| Manufacturer | |
| Storage / Transport | Permissible storage and transport temperature and humidity |
| Operating | Permissible operating temperature and humidity |
| IP 20 | Protected against solid foreign objects 12.5 mm in diameter and larger |
| Keep dry | |
| SN | Serial number |
| CE 0483 | CE labelling This product satisfies the requirements of the applicable European and national directives. |

Advice on use
- In order to ensure comparable values, always measure your blood pressure at the same time of day.
- Do not take a measurement within 30 minutes after eating, drinking, smoking or exercising.
- Before the initial blood pressure measurement, make sure always to rest for about 5 minutes.
- Furthermore, if you want to take several measurements in succession, make sure always to wait for at least 1 minute between the individual measurements.
- Repeat the measurement if you are unsure of the measured value.
- The measurements taken by you are for your information only - they are not a substitute for a medical examination! Discuss the measurements with your doctor, and never base any medical decisions on them (e.g. medicines and their administration)!
- Using the blood pressure monitor outside your home environment or whilst on the move (e.g. whilst travelling in a car, ambulance or helicopter, or whilst undertaking
physical activity such as playing sport) can influence the measurement accuracy and cause incorrect measurements.
- Do not use the blood pressure monitor on newborns, pregnant women or patients with preeclampsia.
- Cardiovascular diseases may lead to incorrect measurements or have a detrimental effect on measurement accuracy. The same also applies to very low blood pressure, diabetes, circulatory disorders and arrhythmias as well as chills or shaking.
- This device is not intended for use by people (including children) with restricted physical, sensory or mental skills or a lack of experience and/or a lack of knowledge, unless they are supervised by a person who is responsible for their safety or are instructed by such a person in how to use the device. Supervise children around the device to ensure they do not play with it.
- The blood pressure monitor must not be used in connection with a high-frequency surgical unit.
- Only use the device on people who have the specified upper arm measurement for the device.
- Please note that when inflating, the functions of the limb in question may be impaired.
-
During the blood pressure measurement, blood circulation must not be stopped for an unnecessarily long time. If the device malfunctions, remove the cuff from the arm.
-
Avoid any mechanical restriction, compression or bending of the cuff line.
- Do not allow sustained pressure in the cuff or frequent measurements. The resulting restriction of the blood flow may cause injury.
- Ensure that the cuff is not placed on an arm in which the arteries or veins are undergoing medical treatment, e.g. intravascular access or therapy, or an arteriovenous (AV) shunt.
- Do not use the cuff on people who have undergone a mastectomy.
- Do not place the cuff over wounds as this may cause further injury.
- The blood pressure monitor can only be operated with batteries. Please note that data transfer and data storage is only possible when your blood pressure monitor is supplied with power. As soon as the batteries are empty, the blood pressure monitor loses the date and time.
- To conserve the batteries, the monitor switches off automatically if no buttons are pressed for one minute.
- The device is only intended for the purpose described in these instructions for use. The manufacturer is not liable for damage resulting from improper or careless use.

Storage and Care
- The blood pressure monitor is made up of precision electronic components. Accuracy of readings and the instrument's service life depend on careful handling.
- You should protect the device from impact, moisture, dirt, major temperature fluctuations and direct exposure to the sun's rays.
- Never drop the device.
- Do not use near strong electromagnetic fields, i.e. keep it away from any radio systems and mobile phones.
- Only ever use the cuffs provided with the monitor or original replacement cuffs. Otherwise erroneous results will be recorded.
- Do not press any buttons until the cuff is in position.
- If the instrument is not used for any length of time, we recommend removing the batteries.

Notes on handling batteries
- If your skin or eyes come into contact with battery fluid, rinse the affected areas with water and seek medical assistance.
-
Choking hazard! Small children may swallow and choke on batteries. Store the batteries out of the reach of small children.
-
Observe the plus (+) and minus (-) polarity signs.
- If a battery has leaked, put on protective gloves and clean the battery compartment with a dry cloth.
- Protect batteries from excessive heat.
Risk of explosion! Never throw batteries into a fire.
- Do not charge or short-circuit batteries.
- If the device is not to be used for a relatively long period, take the batteries out of the battery compartment.
- Use identical or equivalent battery types only.
- Always replace all batteries at the same time.
- Do not use rechargeable batteries.
- Do not disassemble, split or crush the batteries.
Repair and disposal
- Batteries do not belong in domestic refuse. Used batteries should be disposed of at the collection points provided.
- Never open the instrument. If these instructions are not heeded, the warranty will be null and void.
- Never attempt to repair the instrument or adjust it yourself. We can no longer guarantee perfect functioning if you do.
-
Repairs may only be performed by Customer Service or authorized dealers. However, always check the batteries and replace them if necessary prior to making any complaint.
-
For environmental reasons, do not dispose of the device in the household waste at the end of its useful life. Dispose of the unit at a suitable local
collection or recycling point. Dispose of the device in accordance with EC Directive - WEEE (Waste Electrical and Electronic Equipment). If you have any questions, please contact the local authorities responsible for waste disposal.
Notes on electromagnetic compatibility
- The device is suitable for use in all environments listed in these instructions for use, including domestic environments.
- The use of the device may be limited in the presence of electromagnetic disturbances. This could result in issues such as error messages or the failure of the display/ device.
- Avoid using this device directly next to other devices or stacked on top of other devices, as this could lead to faulty operation. If, however, it is necessary to use the device in the manner stated, this device as well as the other devices must be monitored to ensure they are working properly.
- The use of accessories other than those specified or provided by the manufacturer of this device can lead to an increase in electromagnetic emissions or a decrease in

the device's electromagnetic immunity; this can result in faulty operation.
- Failure to comply with the above can impair the performance of the device.

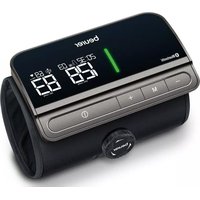
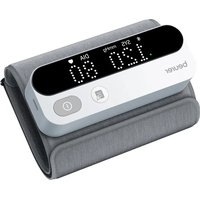
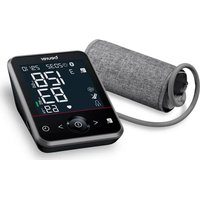
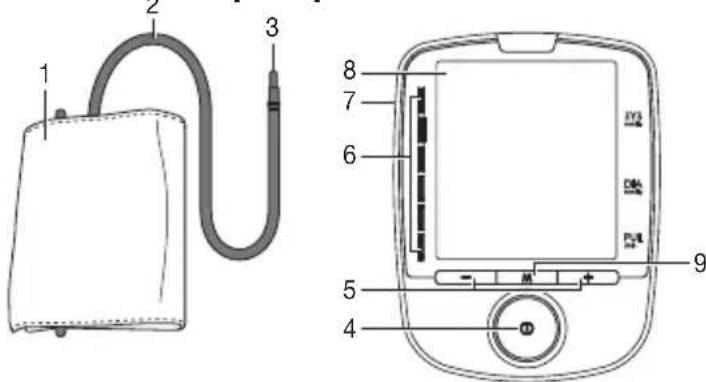
3. Unit description
- Cuff
- Cuff line
- Cuff connector
- START/STOP button ①
- function buttons -/+
- Risk indicator
- Connection for cuff connector
- Display
- Memory button M
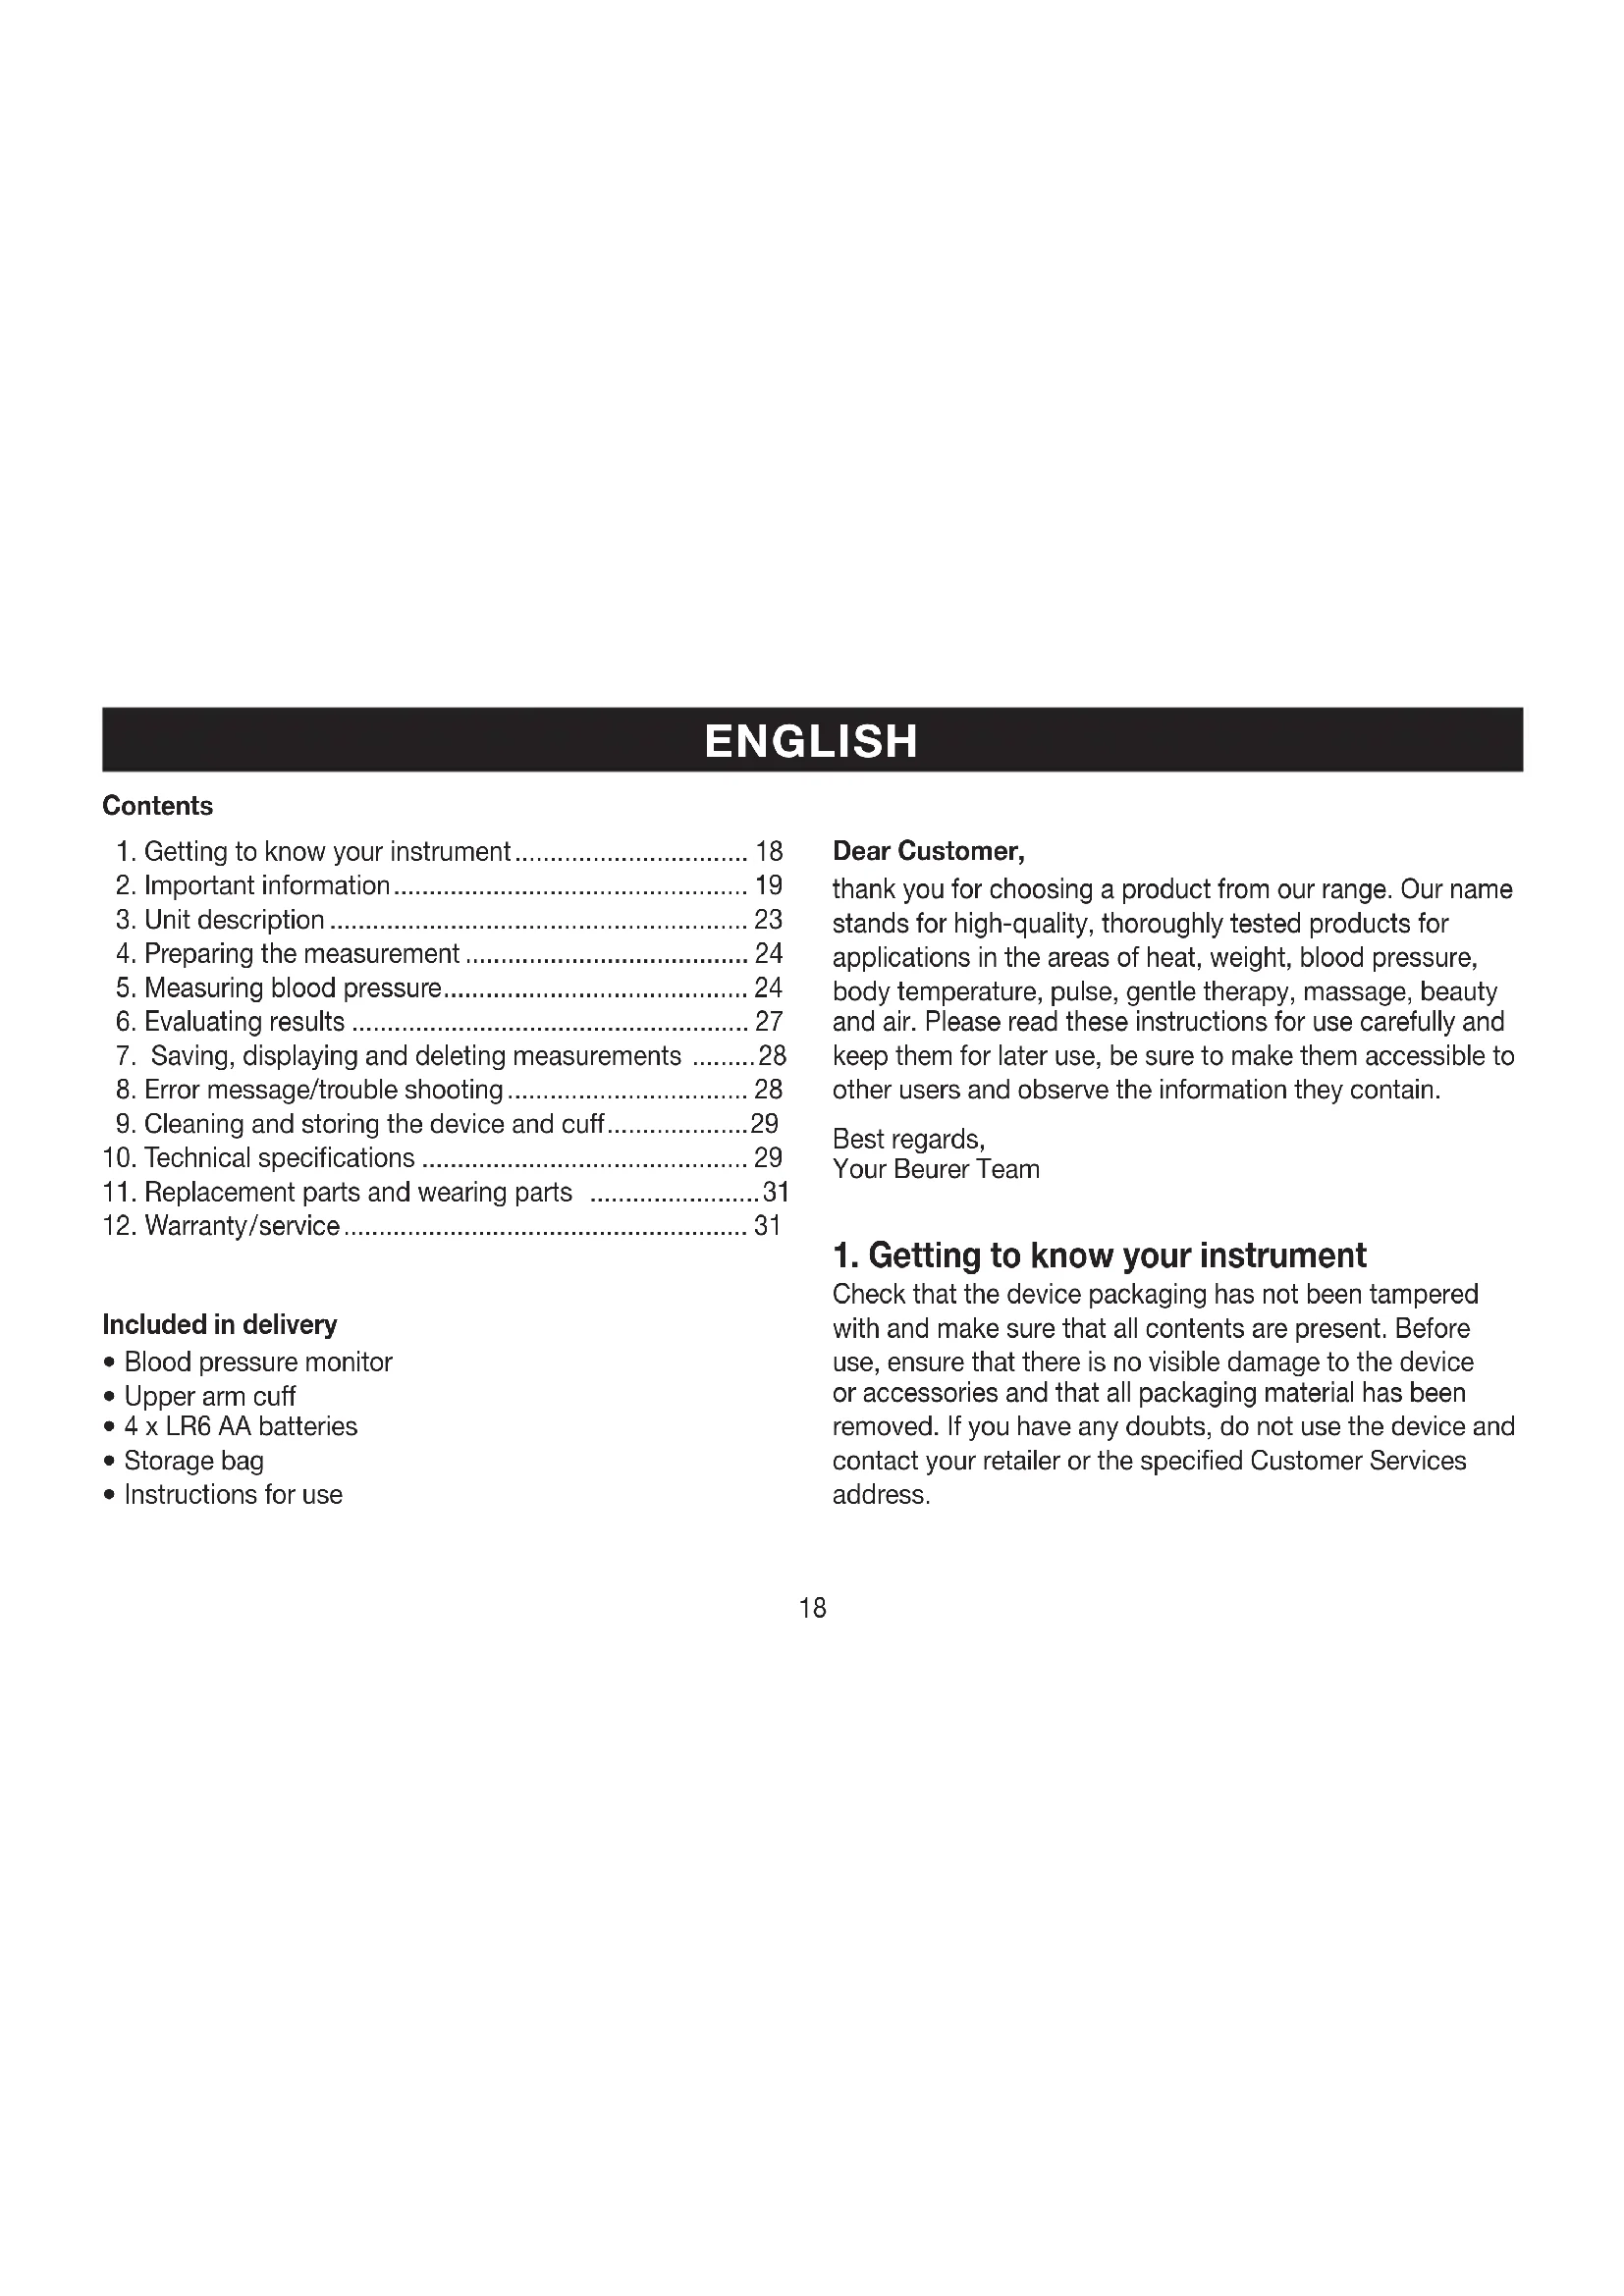
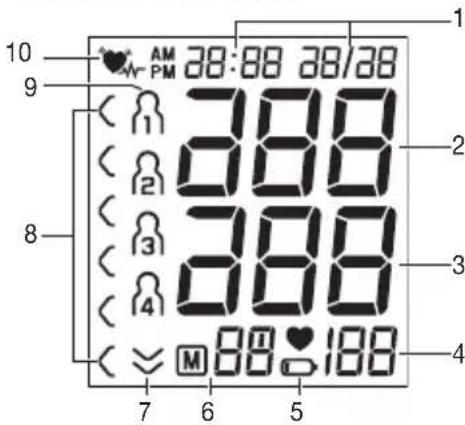
Information on the display:
- Time and date
- Systolic pressure
- Diastolic pressure
- Calculated pulse value
- Battery replacement symbol
- Memory display: average value (A), morning (R), evening (P) memory space number
- Release air
- Risk indicator
- User memory
10.Cardiac arrhythmia symbol
4. Preparing the measurement
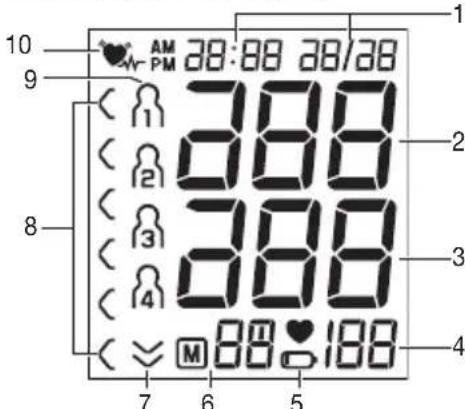
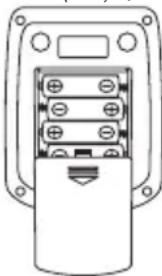
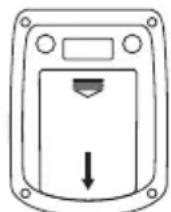
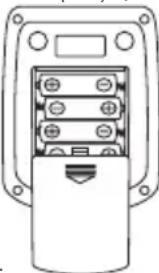
Insert the batteries
- Open the battery compartment lid.
- Insert four 1.5 V AA (alka-line type LR6) batteries.
Make sure that the batteries are inserted with the
correct polarity, according to the label. Do not use rechargeable batteries.
- Close the battery compartment lid again carefully.
- With inserted batteries, the unit permanently displays the time, date and selected user memory.
If the low battery indicator is permanently displayed, you can no longer perform any measurements and must replace the batteries. Once the batteries have been removed from the unit, the time must be set again.
Used batteries should not be disposed of in normal household waste. Dispose of them via your electronics retailer or your local recycling point. You are legally obligated to do so.

Battery disposal
- The empty, completely flat batteries must be disposed of through specially designated collection boxes, recycling
4xAA(LR6)1,5V
points or electronics retailers. You are legally required to dispose of the batteries.
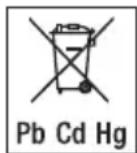
- The codes below are printed on batteries containing harmful substances:
Pb = Battery contains lead,
Cd = Battery contains cadmium,
Hg = Battery contains mercury
Setting the date and time
It is essential to set the date and time. Otherwise, you will not be able to save your measured values correctly with a date and time and to access them again later.
The time is displayed in the 24-hour format.
To set the date and time, proceed as follows:
- Press the memory button M for at least three seconds.
- The year display will start to flash. Set the year with the function buttons - / + and confirm with the memory button M.
- Set the month, day, hour and minutes and confirm each setting with the memory button M.
5. Measuring blood pressure
Ensure the device is at room temperature before measuring. The measurement can be performed on the left or right arm.
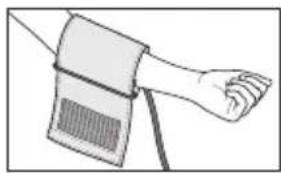
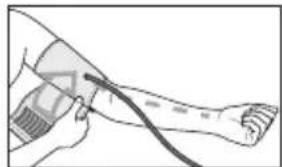
Attach the cuff
Place the cuff onto the bare upper arm. The circulation of the arm must not be hindered by tight clothing or similar.
The cuff must be placed on the upper arm so that the bottom edge is positioned 2 - 3cm above the elbow and over the artery. The line should point to the centre of the palm.
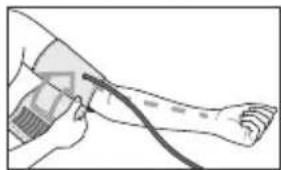
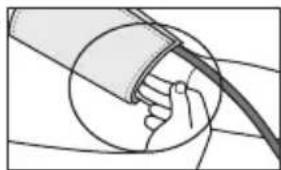
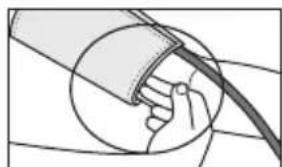
Now tighten the free end of the cuff, but make sure that it is not too tight around the arm and close the hook-and-loop fastener. The cuff should be fastened so that two fingers can fit under the cuff. Now insert the cuff line into the connection for the cuff connector.
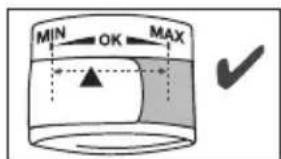
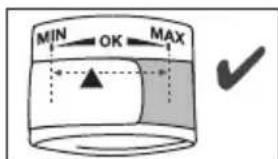
This cuff is suitable for you if the index mark () is within the OK range after fitting the cuff on the upper arm.
If the measurement is performed on the right upper arm, the line should be located on the inside of your elbow. Ensure that your arm is not pressing on the line.
Blood pressure may vary between the right and left arm, which may mean that the measured blood pressure values are different. Always perform the measurement on the same arm.
If the values between the two arms are significantly different, please consult your doctor to determine which arm should be used for the measurement.
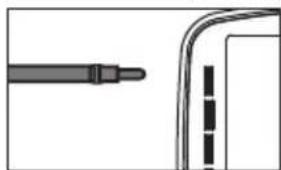
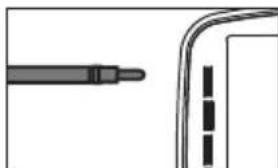
Now insert the cuff line into the connection for the cuff connector.
Caution: The unit may only be operated with the original cuff. The cuff is suitable for an arm circumference of 22 to 35~cm
A larger cuff for upper arm circumferences from 30 to 42cm is available from retailers or the service address under order no.162.795.
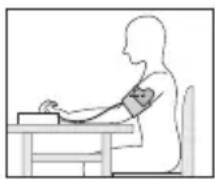
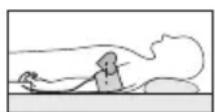
Adopt the correct posture
- Before the initial blood pressure measurement, make sure always to rest for about 5 minutes. Otherwise deviations can occur.
- Furthermore, if you want to take several measurements in succession, make sure always to wait for at least 1 minute between the individual measurements.
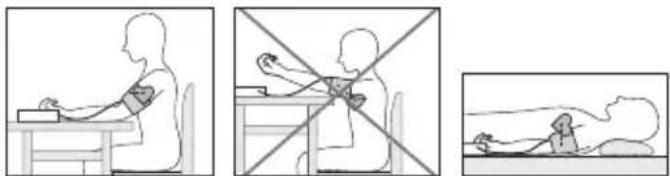
- You can perform the measurement while sitting or lying.
Make sure that the cuff is at heart level. - To carry out a blood pressure measurement, make sure you are sitting comfortably with your arms and back leaning on something. Do not cross your legs. Place your feet flat on the ground.
- To avoid falsifying the measuring result, it is important to remain still during the measurement and not to speak!
Selecting memory
Press the - or ^+ function button. Select the desired user memory (品) .. by pressing the - / + function button.
You have 4 memories with 30 spaces each to store the measurements of 4 different people separately. Confirm your selection with the START/STOP button ①
Performing the blood pressure measurement
- As described before, attach the cuff and adopt the posture in which you want to perform the measurement.
- Start the blood pressure monitor with the START/STOP button. After the full-screen display, the most recently stored measurement appears. If there is no measurement in the memory, the unit displays the value "0".
- The cuff automatically inflates. The cuff's air pressure is slowly released. If the device already recognise a tendency for high blood pressure, it will inflate and increase the cuff pressure again. As soon as a pulse is found, the pulse symbol displayed.
Systolic pressure, diastolic pressure and pulse readings are displayed. - Measuring can be cancelled at any time by pressing the START/STOP button
- Erappears if the measurement has not been performed properly. Take note of the chapter on error messages/ trouble-shooting in these instructions for use and repeat the measurement.
-
The measurement is automatically stored.
-
To switch off, press the START/STOP button ①. If you forget to turn off the unit, it will switch off automatically after approx. 1 minute.
Wait for at least 1 minute before taking another measurement.
6. Evaluating results
Cardiac arrhythmia:
This unit can identify potential disruption of the heart rhythm when measuring and if necessary, indicates this after the measurement with the symbol. This can be an indicator for arrhythmia. Arrhythmia is an illness in which the heart rhythm is abnormal because of flaws in the bioelectrical system that regulates the heartbeat. The symptoms (skipped or premature heart beats, pulse being slow or too fast) can be caused by factors such as heart disease, age, physical make-up, excess stimulants, stress or lack of sleep. Arrhythmia can only be determined through an examination by your doctor. If the symbol is shown on the display after the measurement has been taken, it should be repeated. Please ensure that you rest for 5 minutes beforehand and do not speak or move during the measurement. If the symbol appears frequently, please consult your doctor. Self-diagnosis and treatment based on the measurements can be dangerous. Always follow your GP's instructions.
Risk indicator:
The measurements can be classified and evaluated in accordance with the following table.
However, these standard values serve only as a general guideline, as the individual blood pressure varies in different people and different age groups etc.

It is important to consult your doctor regularly for advice. Your doctor will tell you your individual values for normal blood pressure as well as the value above which your blood pressure is classified as dangerous.
The bar chart on the display and the scale on the unit show which category the recorded blood pressure values fall into. If the values of systole and diastole fall into two different categories (e.g. systole in the High normal category and diastole in the Normal category), the graphical classification on the device always shows the higher category; for the example given this would be High normal.
| Blood pressure value category | Systole (in mmHg) | Diastole (in mmHg) | Action |
| Setting 3: severe hypertension | ≥180≥110 | seek medical attention | |
| Setting 2: moderate hypertension | 160–179 | 00–109 | seek medical attention |
| Setting 1: mild hypertension | 140–159 | 0–99 | regular monitor- ring by doctor |
| High normal 130– | 13985–89 | regular monitor- ring by doctor | |
| Normal 120–129 | 80–84 self-monitoring | ||
| Optimal <120<80 self-monitoring | |||
Source: WHO, 1999 (World Health Organization)
7. Saving, displaying and deleting measurements
- The results of every successful measurement are stored together with the date and time. If there are more than 30 measurements, the oldest measurements are lost.
-
Press the - or + function button. Select the desired user memory (A)... by pressing the - / + function button. Confirm your selection with the START/STOP button ①
-
If you press the memory button M, the average value R of all the stored measured values in the user memory will be displayed. If you press the memory button M again, the average value of the morning measurements for the last 7 days will be displayed. (morning: 5.00 - 9.00, display R). If you press the memory button M again, the average value of the evening measurements for the last 7 days will be displayed. (evening: 18.00 - 20.00, display P). If you continue to press the memory button M, the most recent individual measured values are displayed in turn with the date and time.
- You can delete the memory by pressing and holding the memory button M for 3 seconds.
- To switch off, press the START/STOP button
- If you forget to switch off the unit, it will switch off automatically after 1 minute.
8. Error message/trouble shooting
In the event of errors, the error message Er_ appears on the display.
Error messages may appear if:
- systolic or diastolic pressure could not be measured (Er 1 or Er2 appears on the display)
-
systolic or diastolic pressure was outside the measurement range (Hi or Lo appears on the display)
-
the cuff is fastened too tightly or loosely (Eor3 Er4 appears on the display)
- the pump pressure is higher than 300mmHg (Er5 appears on the display)
- pumping up takes longer than 160 seconds (Eaepears on the display)
- there is a system or device error (ErR, ErQ, ErT or ErB) appears on the display)
- the batteries are almost empty
In the above cases, you must repeat the measurement. Make sure that the cuff tube is properly inserted and that you do not move or talk.
Re-insert the batteries if necessary, or else replace them.
Technical alarm - description
Should the recorded blood pressure (systolic or diastolic) lie outside the limits specified in the section "Technical specifications", the technical alarm will appear on the display indicating either "Hi" or "LO". In such cases, you should seek medical assistance and check the accuracy of your procedure.
The limit values for the technical alarm are factory set and cannot be adjusted or deactivated. These alarm limit values are accorded second priority under the standard IEC 60601-1-8.
The technical alarm is a non-locking alarm and must not be reset. The signal shown on the display will disappear automatically after about 8 seconds.
9. Cleaning and storing the device and cuff
- Clean the device and cuff carefully using a slightly damp cloth only.
- Do not use any cleaning agents or solvents.
- Under no circumstances hold the device and cuff under water, as this can cause liquid to enter and damage the device and cuff.
- If you store the device and cuff, do not place heavy objects on the device and cuff. Remove the batteries. The cuff line should not be bent sharply.
10. Technical specifications
Model no. BM 47
| Measurement method | Oscillometric, non-invasive blood pressure measurement on the upper arm |
| Measurement range | Cuff pressure 0-300 mmHg, systolic 60-260 mmHg, diastolic 40-199 mmHg, Pulse 40-180 beats/minute |
| Display accuracy Systolic ± 3 mmHg, diastolic ± 3 mmHg, pulse ± 5 % of the value shown | |
| Measurement inaccuracy | Max. permissible standard deviation according to clinical testing: systolic 8 mmHg /diastolic 8 mmHg |
| Memory 4 x 30 memory spaces | |
| Dimensions L 134 mm x W 102 mm x H 52,5 mm | |
| Weight Approximately 280g (without batter- ies and cuff) | |
| Cuff size 22 to 35 cm | |
| Permissible operating conditions | +10 °C to +40 °C, ≤ 85 % relative air humidity (non-condensing) |
| Permissible storage conditions | -20 °C to +50 °C, ≤ 85 % relative air humidity, 800-1050 hPa ambient pressure |
| Power supply 4x1,5V | ---AA batteries |
| Battery life For approx. | 500 measurements, depending on the blood pressure level and/or pump pressure |
| Classification Internal supply, IP20, no AP or APG, continuous operation, type BF applied part | |
The serial number is located on the device or in the battery compartment.
Technical information is subject to change without notification to allow for updates.
- This unit is in line with European Standard EN 60601-1-2 (In accordance with IEC 61000-4-2, IEC 61000-4-3 and IEC 610004-8) and is subject to particular precautions with regard to electromagnetic compatibility (EMC). Please note that portable and mobile HF communication systems may interfere with this unit.
- This device is in line with the EU Medical Devices Directive 93/42/EEC, the „Medizinproduktegesetz“ (German Medical Devices Act) and the standards EN 1060-1 (non-invasive sphygmomanometers, Part 1: General requirements), EN 1060-3 (non-invasive sphygmomanometers, Part 3: Supplementary requirements for electro-mechanical blood pressure measuring systems) and IEC 80601-2-30 (Medical electrical equipment - Part 2 - 30: Particular requirements for the safety and essential performance of automated non-invasive blood pressure monitors).
- The accuracy of this blood pressure monitor has been carefully checked and developed with regard to a long useful life. If using the device for commercial medical purposes, it must be regularly tested for accuracy by appropriate means. Precise instructions for checking accuracy may be requested from the service address.
11. Replacement parts and wearing parts
Replacement parts and wearing parts are available from the corresponding listed service address under the stated material number.
| Designation Item number and/or | order number |
| Standard cuff (22-35 cm) 162.139 | |
| XL cuff (30-42 cm) 162.795 |
12.Warranty/service
Beurer GmbH, Söflinger Straße 218, 89077 Ulm, Germany (hereinafter referred to as "Beurer") provides a warranty for this product, subject to the requirements below and to the extent described as follows.
The warranty conditions below shall not affect the seller's statutory warranty obligations which ensue from the sales agreement with the buyer.
The warranty shall apply without prejudice to any mandatory statutory provisions on liability.
Beurer guarantees the perfect functionality and completeness of this product.
The worldwide warranty period is 3 years, commencing from the purchase of the new, unused product from the seller.
The warranty only applies to products purchased by the buyer as a consumer and used exclusively for personal purposes in the context of domestic use.
German law shall apply.
During the warranty period, should this product prove to be incomplete or defective in functionality in accordance with the following provisions, Beurer shall carry out a repair or a replacement delivery free of charge, in accordance with these warranty conditions.
If the buyer wishes to make a warranty claim, they should approach their local retailer in the first instance: see the attached "International Service" list of service addresses.
The buyer will then receive further information about the processing of the warranty claim, e.g. where they can send the product and what documentation is required.
A warranty claim shall only be considered if the buyer can provide Beurer, or an authorised Beurer partner, with - a copy of the invoice/purchase receipt, and
- the original product.
The following are explicitly excluded from this warranty:
- deterioration due to normal use or consumption of the product;
- accessories supplied with this product which are worn out or used up through proper use (e.g. batteries, rechargeable batteries, cuffs, seals, electrodes, light sources, attachments and nebuliser accessories);
- products that are used, cleaned, stored or maintained improperly and/or contrary to the provisions of the instructions for use, as well as products that have been opened, repaired or modified by the buyer or by a service centre not authorised by Beurer;
- damage that arises during transport between manufacturer and customer, or between service centre and customer;
- products purchased as seconds or as used goods;
- consequential damage arising from a fault in this product (however, in this case, claims may exist arising from product liability or other compulsory statutory liability provisions).
Repairs or an exchange in full do not extend the warranty period under any circumstances.
FRANÇAIS
Sommaire
Chere cliente, cher client,
Source: WHO, 1999 (World Health Organization)
Fuente: WHO, 1999 (World Health Organization)
Fonte: WHO, 1999 (World Health Organization)
Kaynak: WHO, 1999 (World Health Organization)
Onachocb B3pbBa! He 6pocaiTe 6aTapeKn B OROHb.
- He 3apjaKeTe n He 3aMbkaKeTe 6aTapeKn HAKOPOTko.
- Ecπn np6op dπnteIbHoe BpeM He nCnoJIb3yeTcR, n3BJIeKNTe 6aTapeKn n3 OTdElenHn nIra 6aTaapeek.
- IcnoJb3yIte 6aTapeKn TOnbKO OndHoro Tnna nn paBHOeHHbIX TINOB.
- 3aměнай Te BCE 6aTapečné cpažy.
- He nCnoB3yIe Te nepe3apxkaemble aKkyMylTOpbl!
- He pa36npaIte, He BCKpbIbAIte n He pa36nBaIte 6aTapeiKn.
iYka3aHnnopeMOHTyUYtJIN3aun
He BbIbpaCbIbAaTe NcNoJIb3OBAHbIe 6aTapeKn B 6bITOBoMycOp. YTINUN3NpyuTe NcNoJIb3OBAHbIe 6aTapeKnB IpEynCMOTpeHHbIX DnIg 3TOIpyHKTx C6opa.
- He pa36npaTne np6op. Heco6nOJeHne 3TOro Tpe6oBaHNy BeDeT K nOTepe rapaHTm.
HnB Koem cnyae He pemOHtuPyIte Hn He perynuPyIte np6op camocToTeIbHO. B 3tOM cnyae HaedxHocTb fVHKUHINPOBaHn6OJIbIe He rapaHTnpvETcR.
- PemOHThbIe pa60tI DoJXHbI pOn3BOuTbcra TOnbKO cepBnCHoClyK6oN JIn ABTOpU3OBaHHbIMn TOPRObIMn npEcdTaBHTeJIaMn. Ipeep npEcbYBaHeHneM npTeH3n npOBePbTe N pRn Heo6xOUMocTn 3aMeHnte BaTaapeKn.
B INHTepecax 3aunTbI OKpykaUeien cpeblno OKOHuaHmCpoka Cnyk6bl CneJyET yTNIN3npoBaTb np60Op OTdJIbHOOT 6bITOBORo MYCopa.
YtIN3aJnOJIKHa IpnON3BOuNTbCyepe3 COOTBETCTByIOUne NyKtbl c6opa B BaWei CTpaHe. Pnp6op CJeNyETyIN3InpOBaTb corIacHO NipeKTNBc EC no OTXoam 3JIeKTPnueckoro n 3JIeKTPoHnro 06OpdyobAHn - WEEE (Waste Electrical and Electronic Equipment). B cnyuae BOnpocOB o6paauTeCb B MeCTHyKOmmyHaNbHyOCnyk6y, OTBETCBEHHyO 3a YtIN3aJnO OTxODOB.
Yka3aHnno 3neKtpomarHHTHO COBmecTUMOCTN
- Pnp6op npedHa3HaueH dJa pa60Tb BycNoBnAx, nepeuCJIeHHbIX B HactoJeu INHCTpyKUIN IO npumHeHIO, B TOM YUCNE B DOMaHHX VcNoBnX.
- PnHaJIuHm 3JIeKTpOMaHHTbIX NOMEX BO3MOXHOCTN IcNoIb3OBAHnI pI6bopa MOrY T 6bITb OppaHueHb.I B pe3yIbTaTe, HApPIMep, MOrY T NOBJIaTbCra COo6UeHnI 06 OwIbKax IINI pOn3OJET BbIXoD n3 CToPA DInCnJe/ camOro pON6opa.
He nCNoJIb3yIte DaHHbI np6Op pIaOM C dpyrMMn yCTPOINCTBaMn I He yCTaHaBInBaIe erO Ha dpYrNe np6Opbl, 3TO MOKeT BbI3BaTb OUn6Kn B pa6Ote. OHaKo, ecn nCNoJIb3ObaHne np6Opa BCE-TaKn Heo6XoIMMo B TOM BIne, KaK ONuCAHO BbIe, CLeNyET Ha6JIOAdaTb 3a Hm N dpyrMMn yCTPOINCTBaMn, YTO6bI y6eINtbcR, YTO OHn pa6OtaIOT HauJeKaUIM MObpa3OM
-Приимеонис STОРоннх npHnadnexKHOCTeN, OTINuHouxCЯ OT npINarAemoro K DaHHOMy np6bopy, MOKET nPnBecTn K POCTy 3NeKTpOMaHTbIX NOMEX INO OCLa6JIeHNO NOMExOyCTOnuBOcTn pInbopa IN TEM CaMbIM BbI3BaTb OUn6Kn Bpa6OTe. - HecobJIOHeHne daHHoro yka3aHnMoKet OTpuCaTeBHOCKa3aTbCra Ha xapaKTepnCTnKaX MOUHOCTn pnp6opa.
3.Опсане пибopa
- MaHxeta
2.卍nHaHmHaXeTbI - WTeKep MaHKeTbI
4.Khonka BKJ./BblKJI. ①
5.ФункшонайыгьныеКонн -/+
6.Индикатор риска - Pa3bem dIy ITeKepa MaHxKetbl
8.Диспел徳 - KhoNka nAmrTu M
HdkaaHa ducnlee:
- Bpemn n daTa
2.CnctoJIuYeCKoe DaBJIeHne
3.ДиactoJIuYeCKoeIaBHeHne
4.ИзмеренhoeЗауньca
5.Cmbon Heo6xOIMOCn Cmehb 6aTaapeek - INdkaqna namrtn: cpeHne 3haueHne (R), yTpOM (R) Beepom (P), HmOp ryeKn namrtn
- BbIXoI Bo3dYxa n3 MaHKeTbI
8.Индикатор рисka
9.БLOK nAMrTn noJIb3OBAteIe
10.CmBbH npTMa
4.Под�тOBКИЗмеренIO
YctaHOBKa 6aTapeiKn
- OTKpoTe KpbIuKy OTeJeHnA Dn 6aTapeek.
BCTaBbTe YeTbIpe 6aTapeiKn1,5BAA (aJIkaJIINHObblte, TmN LR6).O6ra3aTeJbHOpnoCneDInTe 3a Tem, YTO6bl
6aTapeiKn 6bJIn yCTaHOBHeHbI C npaBnbl-HoN NOJIaRHOCTbIO B COOTBeTCTBnC M apKn-POBko. He nCnoJIb3yIte 3apjXaEMbIe aKKMyJlTOpbl.
- Choba TúaTeMbHO 3aKpOiTe KpbIuKy OTdJIeHnY dIy 6aTaapeek.
- Ecnn 6aTapeKn BCTaBHeHbI, npnbop Bcerda noka3BaET Bpemr N daTy N bblpaHHyNoIb3ObaTeNbckyIO pAmrTb.
EcnHa dnCnlee NOCToHNO OTO6paXaetc HNdkatop Heo6xOIMOCTN 3aMeHbI 6aTapeek ,TO npOBeHne N3MpeHn HEBO3MOXHO, CNeDyET 3aMeHnTB BCE 6aTapeKn. Iocne N3BLeueHn 6aTapeek Bpemr Heo6xOIMO yCTaHaBImBaTb 3aHOBO.
He Bb6paBbAaTe NcNoJIb3OBAHbIe 6aTapeKn B 6bITOBMyMycOp. YtINn3NpyIte INxYepe3 BaWero DInIepa 3JIeKtpoO6OpyIDoBaHnI INm MeCTHyIO ToKy c6opa BTOPCbIPbY. DaHHbI NOPaOK DeIcTBNI PpeDnIcaH B 3aKOHOdaTeNbHOM nopIKe.
4×AA(LR6)1,5V
Yttnn3aun6atapeek
- Bb6pa8BaIte NcNoB3OBAHHbIe, PONHOCTbIO pa3pJKeHNbIe 6aTapeKn B CneuAJIbHbIe KOHTHePbI, CdaBaITe BpyHKtI IpnEma CNEcOTXODOB INN B MaRa3INbI 3JeKTpOo6OpyDObAHnI. 3aKOH 063bIAeT NOB3OBATeNei 06ecneHTb yTNIn3aUIO 6aTapeek.
CneyuOuHn3nKn npEynpeXaIOT OHaJIuINB6atapeKkax TOKcNHybIX BeIecTB:
Pb = CBUNHeU,
IpyeHn 3MepeHn TemepaTpa np6opa
DOJXHa COOTBcTBOBaTb KOMHaTHOH. 3MepeHne MOxHO
OcyueCTBnTb Ha JEBoN Nn npaBoPyke.
HaedeBaHne MaHXeTbi
HaNoxte MaXeTy Ha 6hAKeHHyO pyKy BbIe JIOKTe. KpOBocHa6KeHne pyKn He DoJXHo 6bITb HApUSeHO n3-3a CnIuKOM y3KOJ OeXDbI N T. I.
HaKaIaBbIaIte MaHXeTy TaK, YTO6bl ee HIXHN KpaI pacNoIarlanCe BbIe JOKTeBOrO crN6a u apTePmN Ha 2-3 MM. UJaHr DOnXeH 6bITb HapPaBHe B CTOpOHy JaDoHn No CEHTpy. PIoTHo, Ho He CInuKOM Tyro o6epHnTE CBooDnHi KOHeU cMaHXeTb BOKpyr PyKn i 3aCTeRHTe C IOMouCbIO 3aCTeXKn-JINPyKn. MaXeTa dOnXHa npJIeratb TaK, YTO6bl IOd Hee MoXHo 6bIIO npocvHyTB DBa NaIbua.

BctaBte WnHaH MaHKeTbI Bpa3bem nIg WTekepaMaHKeTbI.
MaHxketa Bam noXoNT,ecnnoCne ee HaoXeHHa OTMeTKaHndekca() HaxoHTcB npeIax dnaana30Ha OK.
Ecnn n3mepehne BbINOJHReTc H a npabom npe,
I
I
IOKTH. IpocneTe 3a TEM, yTO6bI pyKa He Jexkana Ha
IIaHre.
IaBHeHBe IeBOH n npaBoH pyKe MoXeT OTnUaTbcra, YTO 6bAcHReT Bo3MOxHoe pa3nue B pe3yNbTaTAX n3MepeHn. Bcerda npoBoOHTe n3MepeHne Ha ODoHn ITo Jke pyKe.
Ecni pa3nueBpe3yltatax CnIuKOM BeNko,Heo6xoDIMO 06cyntb C BpaOm,Ha KaKo pyKe 6yDt npOBoDHTbcr N3Mepen.
BHMaHHe: Pn6Op pa3pe7aeTc NcNoIb30BaTb TOnbKo C opuHaJIbHbIM MaHKeTaM. MaHKeTa paccHTaHa Ha pyky c 6xbatom ot 22 do 35 cm.
IodHomepom162.795 moxho3aKa3aTb MaHKeTy 60JIb- Wero pa3mepa (nra OkpyXHOCTn pyKn OT 30 do 42 cm) B CneuaNIMPOBaHOM MaRa3nHe nIN NO aDpeCy cepBnC HOn cnyK6bl.
PpabnIbHoe noJoxHe nTeJa

OTdoxHnTe B TeHeHne PAnMnHy T nepeD nepBbIM N3MepeHnem apTepnaJIbHO daBHeHnI! B npotuBHOM cnyae BO3MOXHBI OTKIOHEHn pe3yJIbTaTOB N3MepeHn.
- Pn npOBeHn HeCKoJIbKnx NocJIeIOBaTeJIbHbIX CeaHCoB n3MepeHn INTepBaI MekJy HmMn DOnJKeH COCTaBJIaTb He MeHee MNHyTbl.
BbMOXeTe npoBOuNTb N3MepeHne B NOIOxKeHn CnIa HNJI Jexa. O6raTeNbHO CNeDInTe 3a TeM, YTo6bMaHXeTa HaxOduNaCb Ha yPoBHe cepDa.
-ДяИЗМерети КрOBЯHorO Давпeгья 3aIMTeуДобhoe noLOXeHne cnIg.СинHa n pyKndoJxHbI IMeTb onOpy. He ckpeuBaIte HOrn.IocTaBtE CTynHn POBHO Ha noJ.
- UTo6bI u36exKaTb uCKaXeHnpe3yNbTaTOB, BO BpeMn3MepeHn cIeDyET BcTe N Ce6r CnOKoHn H He pa3roBaPnBaTb.
Bb6op namrtn
HaxmTe yHKnOHaJIbHyIO KHOKy -nn+.BbI6epnte HxKyIO NJIb3OBaTeJIbCKyIO NaMBy (...C NOMOJbIO cyHKnOHaJIbHbIX KHOJOK-/+
B np6ope npedycmOTpeHa namTb Ha 4 noIb3OBaTeJI PO 30 queek kaxdA dIy coxpaHEny pe3yIbTaTOB n3MepeHn dIy tBipex YeIOBeK. NOpTBepDITe BbIbOp HaxKaTneM KhoNk BNJ./BblKJ. ①
I3mepehne apTepehnaBHoro daBneHn
HaIOXkTe MaHKeTy, KaK OINcaHO BbIe, N 3aIMTe yO6Hoe dIra I3MepeHnroNoIOXkeHne.
BknHouHTe np6op haxaTneM KhoNk BNKJ./BbIKJ. ① .PocIe nolHO3KpaHHoro n3O6paXeHnO tO6paXaETcR nocJeHn coxpaHeHHb pe3yJIbTaT n3MepeHn.EcIn B naMaTn HET COxpaHeHHbIX pe3yJIbTaTOB n3MepeHn, 6yDet OTo6paXaTbcra 3HaueHne «0».
MaHKeTa HakaunBaETcABTOMaTnueckn. TaBHeNBe BO3Dyxa B MaHKeTe MeIeHHo CHXKaETc. Pn paCno3HaBaHNCKIOHHO K BbICOKOMy DaBHeHIO MaHXeTa BHOBB6ydt HakaHaHa, n daBHeHne B Hei CHOba yBENuHTc. Ioka pacNo3HaETCr nybc, 6yET OTo6paKaTbcra CmBOJnylbca
- OTo6pa3aTcpe3yIbTaTbI n3MepeHn CnCTOnuYeCKoDaBHeHn, DaactOnuYeCKo DaBHeHn n Nylba.
- 13mepeHne MoKHO npeBaTb B IIO6oe BpeM HaKaTneM KhoKn BKJ./BbIKJ. ①
ErnoBJIeTcR,ecINn3MepeHHeYeJaIOcB BbIIOJIHHTb npabInbHO.BbIOJIHTe DeiCTBn,OncaHHbIE B rIabe «Coo6UeHne 06 OwN6Ke/YcTaPaeHne HncIpaBHOCTe" DaHHoINCHtpKcN INo pImHeHIO,INOBTOPe I3-MepeHne.
- Pe3yIbTaT n3MepeHn8 6yJeT coXpaHEn aBtOMaTnueckn.
-ДяВыкlioуенинхмITE KhoNky BKJ./BblKJI.①EcIn Bbl 3a6ydeTe BbIKIOHHTb np6Op, OH OTKIOHNTcra abToMaTmUHeCKn npImepHo uepe3 1 MmHyTy.
IpeepIOBTOpHbIM I3MepeHnEM NOOxKdnte He MeHee MInHyt!

6. Ouçehka pe3yJBTaTOB
HapyeHncaepdchoro pHTMa:
JaHHbI np6Op MOKeT nDeHTnФuPObaTb BO3MOXHbIe HApUSeHnA cepDeHOro pNTMa BO BpEmr N3MepeHn. Pn INx HaJIuHmN IocNe N3MepeHn OTO6pa3ntcra CMBOJ . 3To MOKeT yKa3bIBaTb Ha apITMnIO. ApITMnI - 3TO 60Je3Hb, Pn KOTOpOI BO3HNkaET aHOMaJIbHbI CEpeHbI pTNM, Bbl3BaHHbI OwIbKamB B 6No3neKTPueckOc CnCTeMe, peryInpuyIe6BHeHne cepDua. CmNTombl (HepaBHomepHoe IIN npExdEbpemEHoe cepDue6BHeHne, MeJIeHHbI INI CNIIJKOM 6bICTpbI Pylbc) MOrTy 6bITb Bbl3BaHbI 3aBoJeBaHnMn cepDua, Bo3paCTOM, PpePaCnIOJoxeHHOCtBu K 3aBoJeBaHnM, Ype3MepeHbIM yNotpe6JhHeM KoPe, HIKOTHa n aIKORoJr, CTpeccOM
IIN HeOCTaTcKOM CHA. ApITMMA MOKeT 6bITb BbIBNeHa TOJIbKO B pe3yIbTaTe obCleJIOBaHnY bPcaa.EcNI nocJe nepBOrO u3MepeHnHa H DCNIIe OTO6paXaetc CmB0l, NOBTopNTe u3MepeHne. ObpatNTe BHIMAHHe Ha TO, UTO B TeUeHne 5 MNHyT nepei u3MepeHnEM HeIb3a 3aHIMaTbCS AKTINBHO J DEaTEbHOCTbIO, a BO BpEmu u3MepeHn HEnb3a ROBOpNTb IIN DBIRaTbcE.CcNI CmB0L NOBIAETcY aACTo, ObpatNTecb K BpaCy. CamOJaRHoCTnKa i camOJeHne Ha oCHObe pe3yIbTaTOB u3MepeHn MOyT 6bITb ONaChb. O63aTeJIbHO cJeDyIte peKOMeHdaZnAM CBOero BpaCa.
HdNkatop pncka:
OueHky pe3yIbTaTOB n3MepeHn MOxHO npOBecTn C NOMoUTo TaBnUcbl, IpeDCTaBLeHHoN HIXe. Ondako 3TN CTaNaprTHbIe 3HaueHnCnyKAT TOlbKO 6uIM opneHTnpOM, TAK KAK INHINBUNyAunbHbIe 3HaueHnKPOBraHOrO daBHeHn y pa3HbIX JIODe BApBpyOTcR B 3aBNCmOCTn OT npHaJnEJKHOCTN K ToI NII NHOB03pactHO rpyPNe n T. P. BaxHo peryLapro KOHCyIbTnpOBaTBcR C BpaQom.BpaOpEnIT BaUn INHINBUNyAunbHbIe 3HaueHn HopMaJIbHOrO KPOBraHOrO daBHeHn, a TaKKe 3HaueHn, BbiJe KOtOpbIX KPOBraHOe daBHeHne cIeDyET KNaCCnΦnIpOBaTB KaK OnaCHOE. CToIbUataa DaIgPamma Ha DnCpIee n UkKaIa Ha npi6ope POKa3bBAIoT, B KaKOM dInaNa3OHe HaxODNTcR n3MepeHHoe daBHeHne.
Ecn 3nueHn CnCTOJIneCKoR n dnaCTOJIneCKoR O daBHeHn HaxOaTcB Pa3NbIX Dnana3OHax (Ha npimep, CnCTOJIneCKoe DaBHeHne - BbICOKOE B DOpyCTMblx IpeJenax, a DnactOJIneCKoe - HopMaJIbHOe), To rpaΦnueCKoe DeJeHne Ha npi6ope Bcerda 6ydet OTobpaKaTb 60lee BbICOKe IpeJenbl, KaK B ONIcaHHOM npIMepe: "BbICOKOE B DOpyCTMblx IpeJenax".
Cneinte 3a TeM, yTO6bl IHaH MaHXeTbI 6bl npabnBHO BCTabJIeH n YTO6bl Bbl He DnIRaINc bHe pa3roBaUN. PnHeo6xOIMocTn, 3aHOBO yCTaHOBtE 6aTapeKu nn 3aMeHIne cTapble.
CnHn TpeBOrn npn HecO6JIoHeHm TeXHnuecknx daHHbIX - onncahne
Ecnn n3MepeHHoe 3NaueHne apTePnaJIbHOrO daBHeHn (CnCTOnuYeCKoR O nn dnaCTOnuYeCKoR) HaxoNTc 3a npedeIamn rpaHnU, yka3aHnbIX B pa3dJe «TexHnueckne daHhIe», Ha nCnIee OTo6pa3ntcraHn TpeBOrn, IMeUosn BVn COooHnRA «Hi» nn «D». B 3tOM
Cnyuae CneIeNyET O6paTnITbcra K BpaCy NII IN PPOBepNTb IpaBnIbHOCTb IpoUeIyPbI N3MpeHnI.
Zródlo: WHO, 1999 (World Health Organization)