PCUMS 1125 - Blender PROFICOOK - Free user manual and instructions
Find the device manual for free PCUMS 1125 PROFICOOK in PDF.
| Product Type | Blender |
| Brand | ProfiCook |
| Model | PCUMS 1125 |
| Power supply | 220-240 V~, 50/60 Hz |
| Rated power consumption | 600 W |
| Protection class | II |
| Net weight | Approx. 2.36 kg |
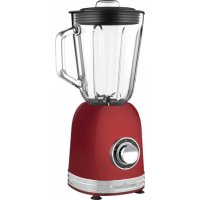
| Mixing bowl material | Glass |
| Number of speeds | 2 (low, high) + pulse mode (P) |
| Functions | Mixing, pulse mixing |
| Mixing bowl capacity | Not specified (estimated 1.5 L) |
| Included accessories | Measuring cap, bowl cover, mixing bowl, sealing ring, blade block, locking ring, motor housing, control knob, smoothie container, smoothie cover sealing ring, smoothie cover, smoothie blade block |
| Intended use | Domestic use: mixing liquids, chopping hard foods |
| Usage precautions | Do not use for nuts or chocolate, do not run empty, max operating time 2 minutes, cool down 1 minute between cycles |
| Safety | Overload protection, safety switch, sharp blades |
| Care and cleaning | Manual cleaning, do not immerse motor block, do not put in dishwasher |
| Operating time | Short-time operation: max 2 minutes, then cool down 1 minute |
| Cooling period after 5 cycles | Until room temperature |
Frequently Asked Questions - PCUMS 1125 PROFICOOK
User questions about PCUMS 1125 PROFICOOK
0 question about this device. Answer the ones you know or ask your own.
Ask a new question about this device
Download the instructions for your Blender in PDF format for free! Find your manual PCUMS 1125 - PROFICOOK and take your electronic device back in hand. On this page are published all the documents necessary for the use of your device. PCUMS 1125 by PROFICOOK.
USER MANUAL PCUMS 1125 PROFICOOK
2 Granny-Smith-Apfel
5-6 Minzblätter
250 ml klarer Apfelsaat
Crushed ice
Zubereitung:
m = 311 ;
Thank you for choosing our product. We hope you will enjoy using the appliance.
Symbols in these Instructions for Use
Important information for your safety is specially marked. It is essential to comply with these instructions in order to avoid accidents and prevent damage to the machine:

WARNING:
This warns you of dangers to your health and indicates possible injury risks.

CAUTION:
This refers to possible hazards to the machine or other objects.

NOTE: This highlights tips and information.
Contents
Overview of the Components 3
General Notes 35
Special Safety Precautions for this Appliance 35
Designated Use 37
Unpacking the Appliance 37
Overview of the Components/ Delivery Scope 37
Notes on Use 37
Operation 37
Recipe suggestions. 38
Cleaning 39
Storage 39
Troubleshooting 40
Technical Data. 40
Disposal. 40
General Notes
Read the operating instructions carefully before putting the appliance into operation and keep the instructions including the warranty, the receipt and, if possible, the box with the internal packing. If you give this device to other people, please also pass on the operating instructions.
- The appliance is designed exclusively for private use and for the envisaged purpose. This appliance is not fit for commercial use.
- Do not use it outdoors. Keep it away from sources of heat, direct sunlight, humidity (never dip it into any liquid) and sharp edges. Do not use the appliance with wet hands. If the appliance is humid or wet, unplug it immediately.
- The device and the mains lead have to be checked regularly for signs of damage. If damage is found the device must not be used.
- Use only original spare parts.
- In order to ensure your children's safety, please keep all packaging (plastic bags, boxes, polystyrene etc.) out of their reach.

WARNING:
Do not allow small children to play with the foil as there is a danger of suffocation!
Special Safety Precautions for this Appliance

WARNING:
- Risk of cuts! The mixer blades are sharp!
- Before replacement of accessories or additional parts which move during operation, the device must be switched off and cut off from the mains.
- Do not touch moving parts.
- Always check that the accessories are seated solidly and securely before switching the device on.
- CAUTION: Ensure that the blender is switched off before removing it from the stand.
WARNING:
- Always disconnect the appliance from the supply if it is left unattended and before assembling, disassembling or cleaning.
- Do not try to repair the appliance on your own. Always contact an authorized technician. If the supply cord is damaged, it must be replaced by the manufacturer, its service agent or similarly qualified persons in order to avoid a hazard.
- This appliance shall not be used by children.
- Keep the appliance and its cord out of reach of children.
Children shall not play with the appliance. - Appliances can be used by persons with reduced physical, sensory or mental capabilities or lack of experience and knowledge if they have been given supervision or instruction concerning use of the appliance in a safe way and if they understand the hazards involved.
- Do not immerse the motor housing into water for cleaning. Please observe the instructions that we have included for you in the chapter "Cleaning".
- Do not use the appliance if the mixing vessel is empty.
- Do not operate the appliance for more than 2 minutes. Afterwards, let it cool for approx. 1 minute before using it again.
- When you have used it 5 times in a row, let the appliance cool to room temperature before using it again.
- The machine should only be used under supervision.
- Do not manipulate any of the safety switches!
- Do not remove the lid during operation!
- Do not put your fingers into the filler opening.
- Objects like spoons or scrapers never may be in the mixing vessel during operation.
Designated Use
This device is used for:
- Mixing of liquids
- Chopping firm foodstuffs
Do not use for too hard foodstuffs such as nuts or chocolate.
It is intended for the use in private households and similar applications.
It is only to be used as instructed in this user manual. The appliance is not intended for commercial use.
Any other use shall be considered as not intended use and can lead to material damage or even personal injury.
The manufacturer shall not be liable for damages caused by not intended use.
Unpacking the Appliance
- Remove the device from its packaging.
- Remove all packaging materials like foils, filling materials, cable holders, and carton packaging.
- Check the scope of deliveries for completeness.
NOTE:
There may still be dust or production remains on the device. We recommend that you clean the device as described under "Cleaning".
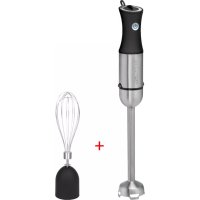
Overview of the Components / Delivery Scope
1 Refill opening cap / Measuring cup
2 Mixing vessel lid with refill opening
3 Mixing vessel
4 Seal ring
5 Knife block of the mixing vessel
6 Locking ring for blade unit
7 Motor housing
8 Setting switch
9 Smoothie container / Drinking cup
10 Seal ring from the lid of the smoothie container
11 Drinking cup lid with lock
12 Knife block of the smoothie container
Notes on Use
CAUTION:
- Do not overfill the containers. Observe the MAX marking.
-
Do not fill with liquids above 50^ .
-
Place the device on a firm and flat surface. Position it is such that it cannot tip over.
- Only switch on the appliance if the mixing vessel is closed with the lid. The refill opening in the lid must also be closed.
-
Froth requires a large capacity. Reduce quantities of liquids which produce a lot of froth.
-
Cut the food to be mixed into small pieces beforehand.
- Always add at least 200ml liquid when processing fruit with solid pulp.
- The knife is not suitable for crushing pure ice. When you want to prepare beverages with crushed ice, add the ice cubes when mixing the beverages. The ice will be crushed during mixing.
- The appliance is equipped with overload protection. If the motor should switch off during operation, immediately turn the switch to the position "0". Disconnect the mains plug from the wall socket. Let the appliance cool for at least 15 minutes before switching it on again. Reduce the quantity in the vessel.
- Use only a scraper made of plastic or rubber to remove the mixture from the vessel. Do not use metallic objects.
Electric Connection
- Before inserting the power plug into the outlet, check that the mains voltage to be used matches that of the device. You can find the required information on the nameplate.
- Connect the device only to a correctly installed safety socket.
Short-interval Use
The appliance is suitable for short-interval use of a maximum of 2 minutes. Let the appliance cool for 1 minute before using it again!
Pulse Mode
Switch to pulse mode by turning the control to the "P" position and then release it. Use this operation mode for example to chop larger pieces.
Operation
NOTE: Safety switch
Operation of the appliance is prevented in case of wrong installation.
- You can mount either the mixing vessel or the smoothie container on the base unit.
- Ensure that the function switch is in the "0" position.
Preparation of the Mixing Vessel
- Place the mixing vessel onto the motor housing. The base of the mixing vessel has guiding lugs. Insert the guiding lugs into the recesses of the motor housing.
- Secure the mixing vessel by turning it clockwise. It must engage.
- Now put the ingredients that are to be mixed into the mixing vessel.
- Put the lid on. Press it down firmly.
- Close the refill opening with the cap. Tighten the cap by turning it clockwise.
Preparation of the Smoothie Container
- Fill your ingredients into the smoothie container.
- Screw the knife block by hand onto the opening of the smoothie container.
- Turn the smoothie container upside down and set it onto the base unit.
- Tighten the smoothie container by turning it clockwise. It must engage.
Mixing
Operation is carried out with the setting control:
Level 0 = off
Level 1 = low rpm
Level 2 = high rpm
P = high speed in pulse mode
NOTE:
Mixing vessel and smoothie container can be operated in all speed steps.
Adding Further Ingredients to be Mixed (when Using the Mixing Vessel)
Items to be mixed or spices can be fed in through the filling aperture.
- Please switch off the machine before doing so.
- Before you switch the device on again, close the opening.
Stopping Operation
- Turn the switch to the position "0".
- Wait until the knife has stopped.
- Disconnect the mains plug from the wall socket.
-
Remove the container together with the knife block. A short counterclockwise turn is sufficient.
-
a) Take off the lid to pour the contents.
b) Turn the smoothie container upside down and replace the knife block by the lid (11). Make sure that the seal ring of the lid has been inserted!
IMF
IMPORTANT NOTE:
Citrus juices and food containing acids should never be stored in metal vessels.
Recipe suggestions
NOTE:
- The quantities listed in the following recipes refer to use of the mixing vessel.
- Adjust the quantities accordingly when you want to mix directly in the smoothie container.
Raspberry Cream Smoothie
Glasses: 4
Ingredients:
200 g raspberries
150 g skimmed milk yogurt
100 g whipped cream
50 g powdered sugar
Preparation:
Mix the raspberries and the yogurt in the smoothie maker. Stir in the liquid cream. Season with powdered sugar and pour into glasses. Decorate with fresh raspberries.
Strawberry Mango Smoothie
Glasses: 4
Ingredients:
1 ripe mango
300 g strawberries
2 tbsp mango syrup
2 tbsp cranberry full-fruit syrup
200 ml soy drink calcium with vanilla
Preparation:
Peel the mango and cut off the pulp along the seed. Weigh 250g of pulp. Rinse the strawberries thoroughly and dab them dry. Put 4 strawberries and the remaining mango aside. Cut the remaining strawberries and the weighed mango into small pieces. Mix the fruits, both syrups, and the soy drink in the smoothie maker. Cut the remaining mango into small cubes, stir them in, and freeze in the freezer for at least 2 hours. Fill the drink into glasses and decorate with strawberries.
Orange Carrot Smoothie
Glasses: 4
Ingredients:
300g carrots
-salt
4 juice oranges
1 pc. fresh ginger (3 cm)
1 pinch of red pepper
2 tbsp maple syrup
1 bunch coriander
1 lime
1 tbsp rape seed oil
- freshly ground pepper
-lime slices for decoration
Preparation:
Peel the carrots and cook them in a little salt water for approx. 30 minutes. Then drain them and let them cool. Squeeze the orange and measure
250 ml juice. Peel the ginger and grate it. Mix carrots, orange juice, ginger, red pepper, and maple syrup together in the Smoothie Maker and cool the mixture well. Rinse the coriander, shake it dry, and pull off the leaves. Squeeze the lime. Stir in the coriander, 1 to 2 tbsp lime juice, and oil. Pour the carrot mixture into glasses and add a little coriander. Season with salt and pepper and serve. If desired, decorate with a slice of lime.
Apple Kiwi Smoothie
Glasses: 4
Ingredients:
1 pc. (approx. 40 g) fresh ginger
4 kiwi fruit
150 g salad cucumber
2 granny smith apples
5 to 6 leaves of mint
250 ml clear apple juice
Crushed ice
Preparation:
Peel the ginger and grate it. Peel the kiwi fruit and cut them into pieces. Peel the cucumber and the apples, remove the seeds, and cut into small pieces. Wash the mint and dab it dry. Mix in the smoothie maker together with the apple juice. Together with the crushed ice, pour into four glasses and serve immediately.
Cleaning
WARNING:
- Always remove the plug before cleaning.
- Do not immerse the motor housing in water for cleaning in any case. Otherwise this might result in an electric shock or fire.
- The blades on the knife block are very sharp. A risk of injury exists!
CAUTION:
- Do not use a wire brush or any abrasive items.
- Do not use any acidic or abrasive detergents.
- The individual parts are not dishwasher-safe.
NOTE: Preliminary Cleaning
Fill the mixing vessel or the smoothie container halfway with water and turn the switch for approx. 10 seconds to "P". Then pour out the liquid.
Motor Housing
Clean the housing only with a damp cloth and a squirt of washing-up liquid. Dry with a cloth.
Knife Block of the Mixing Vessel
For this, also refer to figure on page 3.
Removal:
- Turn the mixing vessel on its head.
- Use moderate force to screw off the locking ring of the blade unit by turning it towards the marking.
- Take the knife block carefully out of the mixing vessel.
- Remove the seal ring for cleaning.
Installation:
- Place the dry seal ring onto the glass on the bottom of the turned mixing jar.
-
Place the blade unit onto the seal ring.
-
Insert the locking ring and tighten it by turning it towards the LOCK marking.
- Ensure that the knife block sits securely in position.
CAUTION:
Only operate the appliance if you have properly fitted the knife block with the seal ring! Otherwise the mixing vessel will not be sealed.
Accessories
Clean these parts in a bowl of hot water. Then dry everything before assembling the parts again.
NOTE:
The knife block of the smoothie container cannot be removed for cleaning.
Storage
- Clean the device as described. Let the accessories dry completely.
- We recommend that you store the device in its original packaging when it is not to be used for a longer period.
Always store the device at a well ventilated and dry place outside the reach of children.
Troubleshooting
| Problem Possible Cause Remedy | ||
| The device is not working. | The device has no power supply. | Check the socket with another appliance. |
| Plug in the mains plug correctly. | ||
| Check the main circuit breaker. | ||
| The device is fitted with a safety switch. This prevents the motor from starting up unintentionally. | Check for correct seating of the mixing vessel or the smoothie container. | |
| The appliance stops during operation. | The device is fitted with a protective switch. It blocks the motor in case of an overload. | Immediately turn the switch to the position “0”. Disconnect the mains plug from the wall socket. |
| Let the appliance cool for at least 15 minutes before switching it on again. | ||
| Reduce the quantity in the vessel. | ||
| The appliance leaks. The seal | ring in the knife block is missing. Insert the seal ring. | |
| Smoothie container: Unscrewing the knife block is very difficult. | The contents cause pressure during mixing. The airtight seal causes a vacuum. | This is normal and no fault. |
Technical Data
Model: PC-UMS 1125
Power supply: 220-240V\~,50/60Hz
Power consumption: 600 W
Protection class: II
Net weight: approx. 2.36 kg
The right to make technical and design modifications in the course of continuous product development remains reserved.
This device has been tested according to all relevant current CE guidelines, such as electromagnetic compatibility and low voltage directives, and has been constructed in accordance with the latest regulations.
Disposal
Meaning of the "Wheelie Bin" Symbol
Take care of our environment; do not dispose of electrical appliances via the household waste.
Dispose of obsolete or defective electrical appliances via municipal collection points.
Please help to avoid potential environmental and health impacts through improper waste disposal.
You contribute to recycling and other forms of utilization of old electric and electronic appliances.
Your municipality provides you with information about collecting points.
Instrukcja obslugi
UcTpaHHe HeNCpPaBHOCTeI. 59
TexHHueckne daHHbIe 59
06uhe 3ameyauHn
Ipeed hauanom 3KcNlyatauyn npnbopa BHmATEbHo npouHTaTe npnlaraymyo IHCTpykunIO NO 3KcNlyatauyn COxpaHNTe ee B HadeXHom MeCTe, BMeCTe C rapaHTnHbIM TaHOOM, KaccOBbIM YekOM N, NO BO3MOXHOCTN, KAPTOHHO KOPO6KO c ynaKoBOyHbIM MaTePnAnOM. EcIn daTe KOMy-1n60 nonoJIb3OBAtBCsrynp6OpOM, O6BaTeNbHO daTBe BpNDaCy dahnHy IO nHCTpykunIO no 3KcNlyatauyn.
-Поьзупесь пиборм толькх acтныm obpa3OM и понаЗачehи. Пибор He п徳нэчандя коммерчecKOrO Испльзовен.
He nolb3yntecb npnbopom noTOKpbItbIM He60m. PpeoxpnaHnTe npnbop OT xapbl, npmbix cOnHeuHbIX lyueBnAaXHoCTN (Hn B KOem Cnyae He nprykaTe erO B BodY) n yapob 06 octpble yrbl. He npKacaiTeCb K npnbopy BnAaXbIMn pykamn. Ecnn np6bop yBaXHnncn HnHAMOK, TyT Je BbIhTe BNk Ky n3 po3ETKn.
- Pnp6op n Ka6eJb cTeBOro nTahnHr Heo6xOIMO peryIaRHO 06cneDobAtb Ha HAIuHne CNeDob NOBpeKdEHHr. Ppi O6hApUkeHm NOBpeKdEHHr NOnb3ObaTbcr np6Opom 3anpeScaTc.
IcnoJb3yTeToJIbKOOpnHaHaJIbHbe3aIuaCTN.
- 13 coobpaqhen6e0nacchoCTnIpydTeHHe octabnIte IexaTb ynaKOBky (PiactNKOBbie MeUKN, KapTOH, neHO-npact n T.d.) 6e3 npncmOTpa.

PENEYIPPEXDEHNE:
He no3BOJnIte DeTm IrpTaB c nOIN3TNHeHOBo nIEHKO. Onachocb ydyub!
Oco6bIe yka3aHnI NO TexHnke 6e3OpacHOCTN DJIaHHoro yCTpOiCTBa
I PEPdUYPEXKDEHNE:
- Onachoctb nope3OB! Лe3BnЯ мнКера оуehь OCTpbie!
- Перацаменл пинадлжноеллдпгьхдетал,
- КOTOPье DBNЖУТСВ BO Bpeм рбOTы, HeOBxODIMO BbIKIQUHHTb yCTpoICTBO И OTKJIHOCHTБ erO OT эЛeKTPocETN.
He kacaitecboNDBnKhbx DeTaJe. - Bcerda npOBepaIte npabINbHOCTb yCTaHOBKn pInHaJNeXHOCTe n HaJeXHOCTb KpeJIeHn IpeEd BKJIouyeHnEm yCTpoiCTBa.
I PEPdUYPEXKDEHNE:
OCTOPOXHO:праздуем снмать блелерс постам, ybeintecb,чTO OH BblIOUyeH.
Bcerda otknioaute yctpoictBO n3 cetn, kOrda c HnM HnKTo He pa6oTaET, a TaKxe nepei NaHajom pa36opKn, c6OpKn n YnCTKn.
He nbitaTe OTpeMOHTnpOBaTb yCTpoNCTBO camOCToRteNbHO. O6aTeIbHo CBxHTEcB C aBTOpn3OBaHHbIM MaCTepOM. PnIOBpeXdEHN CeTeBOrO shHpa, BO n36eXaHne ONaCHocTn IopaXeHnAJIeKTPnueCKm TOKOM, shHyp CNeJyET 3aMeHnTb y n3rOToBtEJIa, cepBnCHOrO pPeIcTaBnteJIa IIIN dpynx KBaJIuΦnUPOBaHHbIX IInC.
-ДетямЗапецаETСЯПОь3OBaTBСАннБIM yCTpoIcTBOM.
XpaHnTe yCTpoiCtBO n shHyp noaIbwe OT deTei.
3anpeaetcAETM nIgpaTb C daHHbIM yCTPOINCTBOM.
- UcTpoIcTBa MOryt 6bITb NcNoJIb3OBAHbI IIOJbMn C OrpaHnueHbIMN cN3UeCKIMN yMCTBeHHbIMN cNoC06HOCTaMn, a TaKKe He IMeIoUHe ONbIta pa6oTbI, TOnbKO IOd pInCMOTpOM nIN PoCLe NOpUeHnRA HcTpykTaXa No 6e3OanacHoy 3KcPnyatauHn UcTPOIcTBa, eCNI 3TN IIOdN OCO3HaOT BCE PnCKN, CBraHHbIe C DaHHbIM np6Opom.
Bo BpeM ynCTkn 3aIpeuaeTcN nOpykaTb KOpnyc DnIraTeJI B BoNy. Heo6xOIMMo cO6IIOaTb INHCTpyKcN, npNBedeHHbIe B pa3- DeJe "YnCTka".
He nCnoJIb3yIte yCTpoIcTBO,ecnMnKcePbI 6okaJI HnueM He 3aNoJIHEn.
He depknte yctpoiCTBO BKIOUeyHbIM 6oJee 2 MInHyT. Pocne 3To- ro daIte np60py octbITb pImepHO B TeueHne 1 MInHytbl, npexJe qem nCpOJIb3OBaTb erO cHOBa.
- Послесиюльзовая пообopa 5 pa3 посядайтешу OCTытбdo komнathон TeMператуbl, пекдем Исюльзовать сюва.
- YcTpoIcTBo DoJIxHOb pa6OtaTb TOnbKO IOd npICMOTpOM.
He MaHnPyIpyTe BbIKIOUaTeJMaM6e3OpaCHOTn!
He chImaIte KpbIuKy BO BpeM pa6Otbl yCTpoITcBa!
He BCTaBnIe nalbI B OTBepCTne BOPOHKn. - Bo Время рабови прибoga He донусяся нахожденье BHyтп emKocTN loxeK n ckpe6koB.
Ha3haYeHne
3To yctpoiCTBO npedha3HaNeHO dIy cIeDyoUero:
He DonyckaIte nepenolHene KOHTeHepOB.Co6JIO DaIte HanoJIHeHne Do OTMeTKN MAX.
- He hanoHnIe 6okan kNdkocTm, TempepaKoTOpbIX Bblwe 50^
- YctahOBITE 3JIeKTPoPn6Op Ha TBepDyIO IOPOBHyIO NOBepxHOCTb. YCTAHOBITE eO rAK, YTO6bI OH He MOr ONPOKINHYtbcra.
BKnHouaTe yctpoCTBO TOnbKO eCN NMIKcePbHbI 60Ka13aKpbIT KpbIshKo. OTBepCTne IINr NOdaH, HaxOJaueecHa KpbIuKE, TaKke DoJNHO 6blT 3aKpbITo. - ΠeHa 3aHIMaET MHOrO MecTa. YMeHbIUnte KOJIuYeCTBO XIKKOCTN, IPOUN3BOJDAUeMHORIOHebl.
- 3apahee npoejxbte npoodykTbHa He6oJbUne KycouKn.
Bcerda 06abnTe kak MNHmym 200 Mm KINKOCTN, KOR Da o6pa6aTbIbAeTe cpykTbIC TBePOn MRAKOTbIO.
Hox He npirodoen IJnI dpo6neHn YnCToro Nbda. Pnp npiroTOBHeHn HAnITKOB C dpO6JeHbIM JbDom, D06aBnTne Ky6nN IbDa npn CmeuBaHm. Bo Bpem CmeuBaHnJIeD 6yDet dpO6ntbcra. - Pn6op ochaen 3auHToIOT neperpy3Kn. Ecn 3neKtpoDBirateIb OTKIOUaETcB BO Bpempa60tbl, He3aMeIINTeIbHO yCTAHOBITe nepeKIOUaTEIb B NOIOXeHHe "O". BItAunITE BNky n3 cTeBOI pO3eTKn. DaIte np6OpOocTb TB TEueHHe 15 MNHT, INPExJe YEM BKIOUHTb CHOBa. UMeHBUNe Obem XIKIOCTN B EMKOCTN.
ДяВькладьИнмссиИЗ EMKOCTN CNOЛьуТToJIbKO ПЯСТИКOBыИпpe3HOBыСКpe6OK.3aIpe-uaeTcR.
IopknHouyen
- Pered tem, kak BCTabnTb WTencelb B po3eTKy, y6eHITecb, YTO HAnpJxHeHne CETn COOTBeTCTByET CNEUΦNkaun yCTpoiCTBa. Tpe6yEmyIO INΦopMauHO MOXHO NaHTn Ha Ta6nUKe.
-ПодклочаиTe yctpoiCTBO TOIbko K npaBnIbHO yCTaHOJIeHHo,ИСпрвHо рОзТKE.
McnoJIb3ObaHne KOpOTKnx INHTepBaIOB
YcTPOIcTBo IpeHa3HaueHO dIpa60bI KopoTKMIM INHTepBaIaMn, MaKcIMyM IO 2 MInHytI. DaIte npu6Opy OCTbIb npImepHO B TeueHne 1 MInHytI, npexJe Yem NcNoJIb3OBA Tb erO cHObA!
MmnybchbIpeXIM
IpeeknOHTe yCTpoiCTBO Ha NmnyIbCHbI pexkIM, NOBepHyB nepeKIOUaTeIb B nIoXeHne P^ , n OTNyCTNB erO. Icnonb3yIte 3OT pekim paobtI, HanpImep, dI py6kn 6oJee KpynhbIX KyckOB.
3Kcnnyataua
I I PIMMEAHNIA: IpeoXpaHnteNbBbI BbIKnOaTeNb Ipn HnnpaBnBHO yCTaHOBKe np6op pa60TaTb He 6yJeT.
Ha ochobahne npnbopa Bbl mokeTe yctaHOBTb EMKoCTb Dnra CMeunBaHnI INN KOHTeHep Dnra CMy3n.
- Y6eIntecb, YTO nepeKJIIOuHaTeIb peKIMOB pa6oTbI CTOUT B NOJIOXEHIN "0".
IodroTOBka EMKOCTHn CMEWBAHn
- YctaHOBtE MmKcepHbI 6okan Ha KOpNc DnIRatEnr. OChOBaHHe MmKcepHoro 6okana ChabKeHo HnPaBJIHOuIMn yUkAmn. BCTaBbTe HnPaBJIHOuNe yUkN B yrLy6JeHnB V KOpNce DnIRatEnr.
2.3aФИKcPnyTe MmKcePbHn 6OKaJI, NOBepHyB erO no YacOBoi CTpeNke. OH DoJIKeH BOITN B 3aJenJIeHne. - HanonHHTe MmKcepbHb 6okan npOpykTaMn.
- Hadehbe Kpbikky. NIOTHHOHAKMITE Ha Kpbikky.
- 3akpoTe KOJINaKOM OTBepCTne IJnI NOaH.N. 3akpyTtTe KpbIuKy no YacobO B CTpeJIke.
TIOIROTOBka EMKOCTNn mcy3N
1.Clojnte BCE INHrpdeIneHTbB EMcKoCTb IJnCMy3N.
2. BkpyTne 6nok c HoxaMn B OTBepCTne KOHTeHepa dIy CMy3N.
3.ПepeBepHnTe KOHTeHepДЯ CMy3N I yCTaHOBnTe erO ha OCHOBaHne npi6opa.
4. 3akpyTnTe KOHTeHep DnA Cmy3n no YacBOi CTpeJIke. OHdoJKeH BOITB 3aJenHeHne.
MnKcep
OepaunBbInoJHReTcCnnoXeHnemnepeKluOHTeIa:
$$ \begin{array}{l} \mathbf {y p o B e H b} \mathbf {0} = \mathbf {B b i k n} \ \text {P e x i m} 1 = \text {H N 3 K i n e o b o p o t b i} \ \text {P e x i n m 2} = \text {c p e d h i n e o b o p o t b i} \ \begin{array}{c} \mathbf {P} = \text {B b I C O K A A C K O P O C T b B N M N Y J b C H O M} \ \text {p e x i m e} \end{array} \ \end{array} $$
I PIMMEUHNA:
EMKoCTbIJIcMSEUBAHnI KOHTeHep IJIa CMy3N MOryT pa6OtaTb Ha BCex CKOpocTJx.
HanoJIHeHne npOdyKtAmu
HnKOrda He xpaHnTe JIMoHHbI cok nnn npytne npOyKtbl, coepkaune KcNToB, B MeTaNmuecko Nocye.
PpeIraeMbIe peIeNTbI
I PIMMEYAHNIA:
- O6bEmblnepeHnCHeHHbIX npOdyKTOB BnpEpaIarAeMbIX peIeTTax COOTBeTCTByIOT NcIOJIb3OBaHIO B EMKOCTN DnA CMeUWBAHJ.
Perynpyte 06bembl COOTBECTBEHNO,ecn Bbl XOTNTCEmeuBaTb HENOCpeCDTBEHNO BOHTHepe DnI CMy3N.
CMy3n C MaHIOBbIM MOpOKeHbIM
CTaKaHbI:4
InhrpeDneHTbI:
201MaJIINHbI
150 r myogypra n3 o6e3knpenHoro monoka
100 rB36ntbix cJINBOK
50 r caxapno nydpb
PnuroToBneHne:
IpepeeMaTe MaHHy nIyypT B annapate dIpynproTOBHeHnCMy3N.3aMeaTe Kxdkne CInbKn.3anpaBte
caxapno npdoipn pa3neite no ctaKaHaM. CdeaIte ykpaSeHHe n3 CBexnx rOd MaHHbl.
Cmy3n n3 Kny6HnKn mHaHro
CTakaHbI:4
HnrpeDneHTbI:
1 cπeBn nIIO mHaIro
300 KnybHnki
2 CTOIOBbIX NOXKIN CINPONA MaHRO
2 CToIOOBbIX IOXKN CINPONA I3 UeJIbIX AROD KIIHOKBbl
200 Mr Kap6oHaTHoro COeBOr HAnNTKa C BaHnJIbHo
Пи���овлесн:
IoucHTe MaHro n OTpexbTe MAKOT b OT cEmen. B3BecbTe 250 mKOTn. TuaTeJIbHO NOMOte Kny6Hnky u ydaJInte C Hee n3nnuHIO Bnary. OTIOXnTE 4 rOdbi Kny6Hnki n OCTabUyOcRA MKAOTb MaHRO B CTOpOHy. IpoeXbTe OCTaJIbHyO Kny6Hnky I B3BeWeHHy MOKOTb MaHRO Ha MeJNKe KycOCHN. IepemeWaiTe rOdbi N ppykT, oBa ciPOna n CoEBbl HAnITOK a Annapate dIra npiroTOBHeHn CmY3n. IpoeXbTe OCTabUyOcRA MKAOTb MaHRO Ha MeJNKe Ky6Hnki, ZameJauTe IN B PNOyKT n NOMeCTnTE erO B MOPo3NJbHK, nO kpaHne Mepe, Ha 2 Yaca. Pa3NeIte HanITOK B CTakaHbI n CdenaJte YkpaSeHne n3 rOd Kny6HnKn.
Cmy3n n3 anenbcnoH mOpkoBn
CTakaHbI:4
HnrpeDneHTbI:
300 mopkoBn
-001b
4coUHbIX aneJIbCnHa
1 CBexkni m6npb (3cm)
1 ueoTka kpacHoro nepa
2 CToIOnOBbIX IIOKKn KJIeHOBOrO cIpona
1nyuokkopnaunpa
1 naHactoIIM
1 cToNoBaJ NoKka panCoBOro Macna
- CBEXKEMONOTbI Npeu
- JIOMTNIJIaIMHaHCTOJSeIeIyKpAWeHnIa
PnroTOBHeHne:
Почитente Морковь и Варпente в Немно поcodенhoe bode римерно 30 mHyt. 3aTeM cneite Body n octyindte MOPKOB. BbIXMITE lmMOH n OTMepbTe 250 mN coka. Почитente Im6bp n Hatpnte ero ha Tepke. CMeuaine MOPKOB, anelbcNHOBBI KOK, IM6bp, kpaCHnI nepeu n KJIeHOBBI cnpon Bmecte B aannapate dny npiroTOBHeHnCmy3n I xopoIo oxlaNTe CMEcB. POMOte KOpuaHdP, BCTPaxHnTe erO doCyxa n 3BNeKeNTe NICTb. BbIXMITE NaIM HactoIzni. 3aMeuaine B KopuaHdP ot 1-oi do 2-x loxek coka naIma HactoIzero n Macna. Pa3neTe MOPKOBHyO CMEcb n CTakaHAM n Do6abTBe B HIX HEMHOrO KOpuaHdPa. 3aPpaBbTe coIbIO n nepueM n noDaBaHTe. Ppi JeaHnI cdeNaTe ykpaSeHne NOMTKAMn NaIMHaCTOaIeO.
CMy3n H3 Ra6nok n KNBn
CTakaHbI:4
UHrpdeNeHTbI:
1 cBexknn m6bnp (npimepno 40 r)
4ФpyKta KINBn
150 r canaTbIX orypcO8
2A6Ioka H N C M I T
OT 5do6 JINCTOB MRTbI
250 MЛ OCBETNHeHOrO RaIouHOro cKa
U3melenbueHHnJIeI
PnuroBneHne:
IounCTNTe Nm6npb Hn Hatpnte ero Ha Tepke. NOnuCTNTe
fpykTBKnBn NnopeXbTe nx Ha KycOChN. NOnuCTNTe orypcbi
n Ra5nOKn, ydaJInte n3 Hnx CEmHa n nopexbTe Ha MeKne
kycochn. NOMOIte MAty n ydaJInte C Hee nnHIO Bnary.
CmeaaiTe B annapate dJa nprirotobHeHn Cmy3n BMeCTe
c Ra5NoUhblm cokom. Pa3neTBe B YeTbIpe CTaKaHa BMeCTe C
n3MeJIbYeHHbIM JbDom n Cp4ay NoDaBaHTe.
UncTka
I PENEYPEXDEHNE:
- Pered uNCTKO BceIa BbIHMaIe ITeKepe n3 cETn.
- Hn B Koem cnyae He norgykaite MOTOPbIOTCEK B BODy dIpy OCHCTKN. 3TO MOxET 6bITb pNUnHOJ 3JIeKTpueeCKOTo ydaPa IINI NOXapa.
- Лесьня HOжевог РОвки Oчениховocтры.Естб риck noJyehnna TpaBMbl!

BHIMAHHE:
He nCnoJb3yIte npOboHbIe 1eTkn nnDpyn e JapanaIOuIne npEIMTebl.
He nCnoJIb3yIte cnJIbHbIe nnIuapanaIOUne YnCTraUne cpeIcTba.
OTeJIbHbIeTeaIIHeRAJIIOCTc6e3ONaCHbIMnDINPOcydOMoeUHOMaUNHbI.

211 > 211 > 211
:
abssolgsglldu
ab + 5g^2 = a^2a^2 + c
15

-
0alj g jy, jz d uoo o yu Jauill ouy aolll cull dl
-
alall slog no jy alal ay
- = h^2 - ( 2 + 2) ^2 = - 1
S OBC = S COD + S BOC - S BOC
= 1
JswjP"P.
1...gali bll gjw jall jol jdai aai aao
920
aaii jilw ggiia 1000000000000000000000000000000000000000000
3
1001 1001
△
3a,aaall jaoagall Jai gall aol

yolai 1. jao ai k o ao ba oai ay Su Cus 13! yj jaoi
- 1.2.3.4.5.6.7.8.9.10.11.12.13.14.15.16.17.18.19.20.21.22.23.24.25.26.27.28.29.30.31.32.33.34.35.36.37.38.39.40.41.42.43.44.45.46.47.48.49.50.51.52.53.54.55.56.57.58.59.60.61.62.63.64.65.66.67.68.69.70.71.72.73.74.75.76.77.78.79.80.81.82.83.84.85.86.87.88.89.90.91.92.93.94.95.96.97.98.99.
bolool
aessllieia bia gbyjoc jyssu
$$ \mathrm {J} _ {\mathrm {a}} \dot {z} \dot {z} \dot {z} \dot {z} \dot {z} = 0 \mathrm {s g i a m b d} $$
aai jia 15g 1
an + 1 = 22( an - 1)
aagd aee
4ab = 2ab
dell 100000000000000000000000000000000000000000
(1)
aennnnnns Jno no yolgololololololol
U3JLJ 1
aJgljgljglJgacalgl
.0" 200
Lg 2
J 3
aLlwl jIe aJoool JwSg 8o0d 10g 4. Cjzaiu 1000
.
- 合成的 ( a^2 + 1) ( b + c) = 0 ( a^2 + 1( b + c) = 0)
.(11) 1100111111111111111111111111
aBbBbBbBbBbBbBbBbBbBbBbBbBbBbBbBbBbBbBbBbBbBbBbBbBbBbBbBbBbBbBbBbBbBbBbBbBbBb
:agogo abo hso
aegl 3 jolal 15 gaiy jai yaaai yjai jia jia a
.
nannnnnnaeogoo
ab = 10
aaloll oeg plaowol 1 aolll lclzogl 0g yssb
jaiiaiiaaiiee 8
a. 1000
4:U5
:UgSb1
J 200
aull E g jio cull o jy sui 150
a3gao aS100
3030 50
:
aillll 25113 jbjj jilal laii jaj jai jai jai jai jai jai jai jai jai jai jai jai jai jai jai jai jai jai jai jai jai jai jai jai jai jai jai jai jai jai jai jai jai jai jai jai jai jai jai jai
jlll jll l 100000000000000000000000000000
gjglgojgljlln
4:
12 < 3 + 1 ≤ 3
aolglg0e1
a|g|g|g>300
gulj u joo 0a do 2
pIoooyIoo
.(MAX)gssalldsolsoafoaaggl
a 50 50 50
y 48g
a 100000000000000000000000000000000000000
1
.0gjgjgjg jie g
.
.
gjlllal 1000000000000000000000000000000000000000000
jao aai jia jai daa 15 a b jao jao
a1 = 23,a2 = - 43,b1 = 56,b2 = - 78
..eegj jao laol allj
. adnnae pluonl gipauunny
1
·
.
aai jai jai
jggl y gall all bll 1g0 plalw wlae jgll li
- gjfojao doolwucui 1.001g 2. a3 3. 60 4. jao 5.
a
jP" gds pooll pdo jdo jdo
Igul gai gai ulu Jus dui Juaa gao aai.
山
gjg jie: abo blo
aal 1
Sb. 1234567890123456789012345678901234567890123456789012345678901234567890123456789012345678901234567890123456789
"0" 89 3 25
bollcoglue
aagcogc gacg aeg oae (ggy) ggyb Caae bblcag 5
0061 4g
120 1 1 1 1 1 1 1 1 1 1 1 1 1 1 1 1 1 1 1 1 1 1 1 1 1 1
1.
aJaaLdaLbdoLball 4
4S>0d1 3g2gUJLx Jooaalal aolaiy.5
.

juln joln ogl w!
jollxaoaolaggulgl 1
guyolololololololololololololololololololololololololololololololololololololololololololololololololololololol
duolougdeaojlaJilazai xiaojogL.3
yoo
. jLgJb Jab
AaLae gAeS1
aalabllg jyjgjj 1. gblg aai joo gdo
Jaaai 40
"
2a1b1c_1 = 90%
y 1
.8o 0d1
·
.8o 1
ab = 15 ②
1. a5^3 + a6^3 + a_7^3 = 8
·!
.
a 1
山
:do 1
glo5 jolll aaii gaii jaijolll 1e tll ciaa gajd
"abjj" 005 0ggo
aLwll gbi/ Ctiig51 gl aolo yjbi
0yIab6 yS=JbIa2x b1c 1
Uaiaiaiaiaiaia 2
3
16 × 25 个大球, 34 × 36 个小球
5
Jai 6
7
Sallbail 8
yall 1/laal yao 9
aill 111 10
la 11
y.assll 12
jab1 pluow
jlg011iip
15
aillgssll gaaill jia laaall aasb3y go aodjiny
aIag aJaii caiiaowll 3 Jaa jaoi
jglalpuiu 5. plaiuill Jdo aedogaa gos lo jgall pliauul
.
golal 15 15 15 g 0 0 0 0 0 0 0 0 0 0 0