
AU671 - Home cinema amp YAMAHA - Free user manual and instructions
Find the device manual for free AU671 YAMAHA in PDF.
Frequently Asked Questions - AU671 YAMAHA
User questions about AU671 YAMAHA
0 question about this device. Answer the ones you know or ask your own.
Ask a new question about this device
Download the instructions for your Home cinema amp in PDF format for free! Find your manual AU671 - YAMAHA and take your electronic device back in hand. On this page are published all the documents necessary for the use of your device. AU671 by YAMAHA.
USER MANUAL AU671 YAMAHA
1 To assure the finest performance, please read this manual carefully. Keep it in a safe place for future reference.
2 Install this sound system in a well ventilated, cool, dry, clean place - away from direct sunlight, heat sources, vibration, dust, moisture, and/or cold. For proper ventilation, allow the following minimum clearances:
Top: 10 cm (4 in), Rear: 10 cm (4 in), Sides: 10 cm (4 in)
- Locate this unit away from other electrical appliances, motors, or transformers to avoid humming sounds.
4 Do not expose this unit to sudden temperature changes from cold to hot, and do not locate this unit in an environment with high humidity (i.e. a room with a humidifier) to prevent condensation inside this unit, which may cause an electrical shock, fire, damage to this unit, and/or personal injury.
5 Avoid installing this unit where foreign object may fall onto this unit and/or this unit may be exposed to liquid dripping or splashing. On the top of this unit, do not place:
Other components, as they may cause damage and/or discoloration on the surface of this unit.
- Burning objects (i.e. candles), as they may cause fire, damage to this unit, and/or personal injury.
- Containers with liquid in them, as they may fall and liquid may cause electrical shock to the user and/or damage to this unit.
6 Do not cover this unit with a newspaper, tablcloth, curtain, etc. in order not to obstruct heat radiation.
If the temperature inside this unit rises, it may cause fire, damage to this unit, and/or personal injury.
7 Do not plug in this unit to a wall outlet until all connections are complete.
8 Do not operate this unit upside-down. It may overheat, possibly causing damage.
9 Do not use force on switches, knobs and/or cords.
10 When disconnecting the power cable from the wall outlet, grasp the plug: do not pull the cable.
11 Do not clean this unit with chemical solvents; this might damage the finish. Use a clean, dry cloth.
12 Only voltage specified on this unit must be used. Using this unit with a higher voltage than specified is dangerous and may cause fire, damage to this unit, and/or personal injury. Yamaha will not be held responsible for any damage resulting from use of this unit with a voltage other than specified.
13 To prevent damage by lightning, keep the power cable and outdoor antennas disconnected from a wall outlet or this unit during a lightning storm.
14 Do not attempt to modify or fix this unit. Contact qualified Yamaha service personnel when any service is needed. The cabinet should never be opened for any reasons.
15 When not planning to use this unit for long periods of time (i.e. vacation), disconnect the AC power plug from the wall outlet.
16 Be sure to refer to the "Troubleshooting" section for common operating errors before concluding that this unit is faulty.
17 Before moving this unit, press to set it to standby mode and disconnect the AC power plug from the wall outlet.
18 Condensation will form when the surrounding temperature changes suddenly. Disconnect the power cable from the outlet, then leave this unit alone.
19 When using this unit for a long time, this unit may become warm. Turn the power off, then leave this unit alone for cooling.
20 Install this unit near the AC outlet and where the AC power plug can be reached easily.
21 The batteries shall not be exposed to excessive heat such as sunshine, fire or the like. When you dispose of batteries, follow your regional regulations.
22 Excessive sound pressure from carphones and headphones can cause hearing loss.
WARNING
TO REDUCE THE RISK OF FIRE OR ELECTRIC SHOCK, DO NOT EXPOSE THIS UNIT TO RAIN OR MOISTURE.
This unit is not disconnected from the AC power source as long as it is connected to the wall outlet, even if this unit itself is turned off by . This state is called the standby mode. In this state, this unit is designed to consume a very small quantity of power.
Notes on remote controls and batteries
- Do not spill water or other liquids on the remote control.
Do not drop the remote control.
Do not leave or store the remote control in the following conditions:
places of high humidity, such as near a bath
places of high temperatures, such as near a heater or stove
-places of extremely low temperatures
-dusty places
- Insert the battery according to the polarity markings (+ and -).
- Change all batteries if you notice the following conditions:
the operation range of the remote control narrows
the transmit indicator does not flash or is dim
- If the batteries run out, immediately remove them from the remote control to prevent an explosion or acid leak.
- If you find leaking batteries, discard the batteries immediately, taking care not to touch the leaked material. If the leaked material comes into contact with your skin or gets into your eyes or mouth, rinse it away immediately and consult a doctor. Clean the battery compartment thoroughly before installing new batteries.
- Do not use old batteries together with new ones. This may shorten the life of the new batteries or cause old batteries to leak.
- Do not use different types of batteries (such as alkaline and manganese batteries) together. Specification of batteries may be different even though they look the same. Danger of explosion may happen if batteries are incorrectly replaced.
Before inserting new batteries, wipe the compartment clean.
- Dispose of batteries according to your regional regulations.
- Keep batteries away from children. If a battery is accidentally swallowed, contact your doctor immediately.
- When not planning to use the remote control for long periods of time, remove the batteries from the remote control.
- Do not charge or disassemble the supplied batteries.
The user shall not reverse engineer, decompile, alter, translate or disassemble the software used in this unit, whether in part or in whole. For corporate users, employees of the corporation itself as well as its business partners shall observe the contractual bans stipulated within this clause. If the stipulations of this clause and this contract cannot be observed, the user shall immediately discontinue using the software.
For U.K. customers
If the socket outlets in the home are not suitable for the plug supplied with this appliance, it should be cut off and an appropriate 3 pin plug fitted. For details, refer to the instructions described below.
Note
The plug severed from the mains lead must be destroyed, as a plug with bared flexible cord is hazardous if engaged in a live socket outlet.
Special Instructions for U.K. Model
IMPORTANT
THE WIRES IN MAINS LEAD ARE COLOURED IN ACCORDANCE WITH THE FOLLOWING CODE:
Blue: NEUTRAL
Brown: LIVE
As the colours of the wires in the mains lead of this apparatus may not correspond with the coloured markings identifying the terminals in your plug, proceed as follows: The wire which is coloured BLUE must be connected to the terminal which is marked with the letter N or coloured BLACK. The wire which is coloured BROWN must be connected to the terminal which is marked with the letter L or coloured RED. Making sure that neither core is connected to the earth terminal of the three pin plug.
Information for Users on Collection and Disposal of Old Equipment and Used Batteries
These symbols on the products, packaging, and/or accompanying documents mean that used electrical and electronic products and batteries should not be mixed with general household waste.
For proper treatment, recovery and recycling of old products and used batteries, please take them to applicable collection points, in accordance with your national legislation and the Directives 2002/96/EC and 2006/66/EC.

By disposing of these products and batteries correctly, you will help to save valuable resources and prevent any potential negative effects on human health and the environment which could otherwise arise from inappropriate waste handling.

For more information about collection and recycling of old products and batteries, please contact your local municipality, your waste disposal service or the point of sale where you purchased the items.
[Information on Disposal in other Countries outside the European Union]
These symbols are only valid in the European Union. If you wish to discard these items, please contact your local authorities or dealer and ask for the correct method of disposal.
Note for the battery symbol (bottom two symbol examples):
This symbol might be used in combination with a chemical symbol. In this case it complies with the requirement set by the Directive for the chemical involved.
We, Yamaha Music Europe GmbH hereby declare that this unit is in compliance with the essential requirements and other relevant provisions of Directive 1999/5/EC.
Yamaha Music Europe GmbH
Siemensstr.22-34 25462 Rellingen,Germany Tel:+49-4101-303-0

CONTENTS
INTRODUCTION 2
What the unit can do 2
Supplied accessories. 2
NAMES AND FUNCTIONS OF THE PARTS 3
Front panel 3
Rear panel. 5
Remote control 6
CONNECTIONS 8
Connecting an external component 8
Connecting speakers 8
Connecting a subwoofer. 9
Connecting to power source 9
PLAYBACK 10
Playing a source 10
PLAYING BACK MUSIC STORED ON A PC (USB DAC FUNCTION) 11
ADJUSTING TO THE DESIRED SOUND. 13
TROUBLESHOOTING. 14
SPECIFICATIONS. 17
INTRODUCTION
What the unit can do
- The unit is an integrated amplifier that plays back analog stereo signals with high quality sound. Combined with speakers, the unit can play back music with high audio quality.
TREBLE (high-frequency range), BASS (low-frequency range), and BALANCE (right and left balance) can be desirably adjusted with the controls on the front panel.
The USB DAC function allows you to play back music stored on a PC (v page 11).
Enjoy pure, high fidelity sound by using the PURE DIRECT function (page 13).
Boost bass sounds by connecting a subwoofer (v3 page 9).
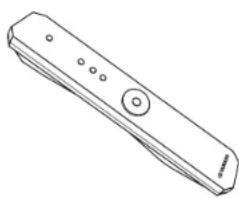
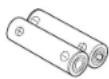
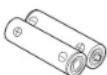
Supplied accessories
Please check that you received all of the following parts.
Remote control Batteries (× 2) (AA, R6, UM-3)
NAMES AND FUNCTIONS OF THE PARTS
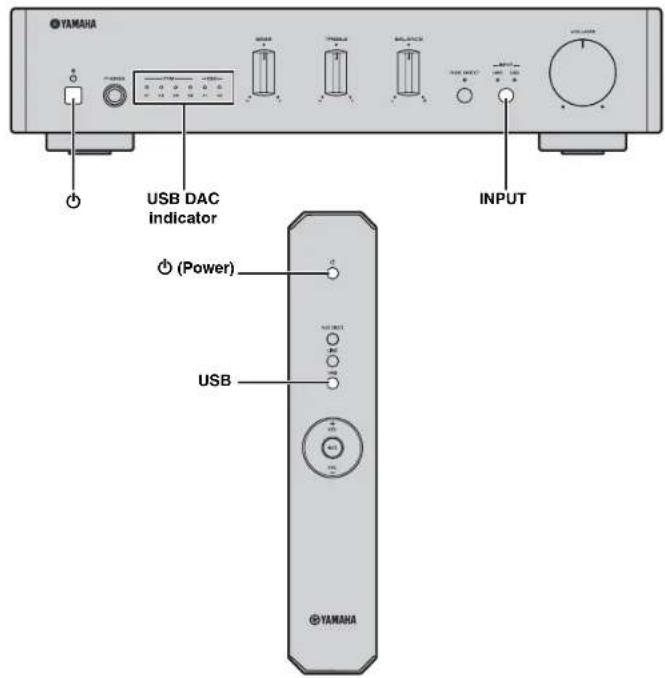
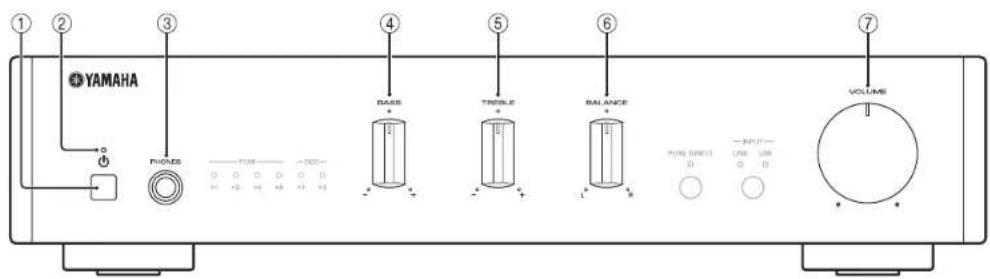
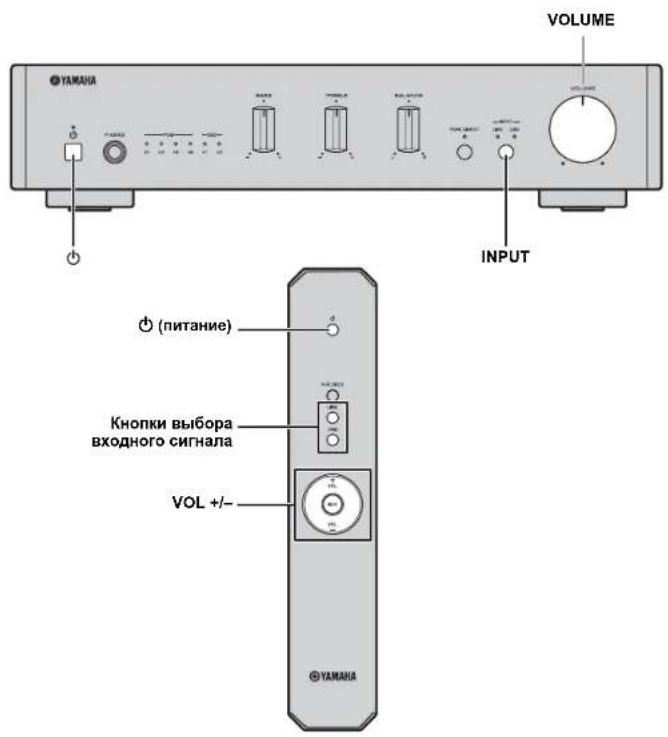
Front panel
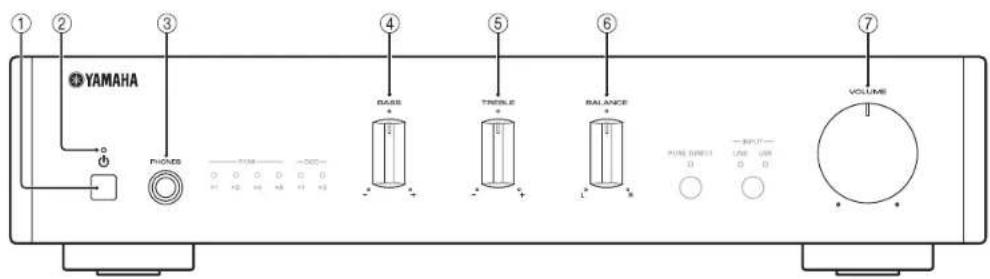
① (Power) button
Turns this unit on, or sets it to standby mode.
Notes
In standby mode, the unit consumes a small amount of power.
②Power Indicator
Lights up when the unit is turned on.
③ PHONES jack
Connect your headphones.
Notes
When headphones are connected, no sound comes from the speakers or subwoofer.
④ BASS control
Increases or decreases the low frequency response.
Control range: -10 dB to +10 dB
⑤ TREBLE control
Increases or decreases the high frequency response.
Control range: -10 dB to +10 dB
⑥ BALANCE control
Adjusts the sound output balance of the left and right speakers to compensate for sound imbalances.
VOLUME control
Adjusts the volume.
NAMES AND FUNCTIONS OF THE PARTS
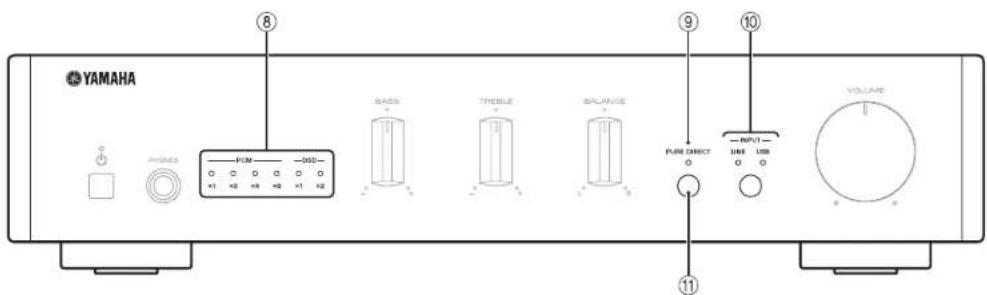
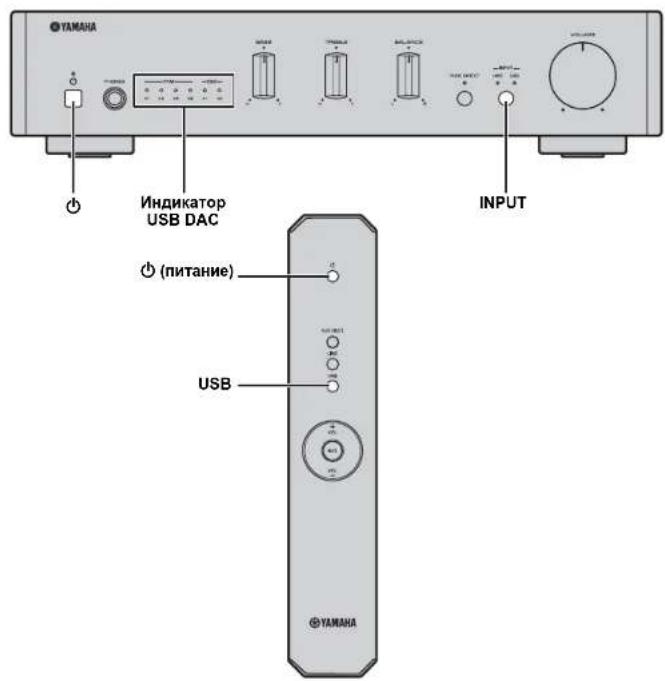
USB DAC indicators
Lights up when audio signals are input to the USB jack of this unit (page 12).
PURE DIRECT Indicator
Lights up when the PURE DIRECT function is turned on (page 13).
INPUT button and Indicator
Each time you press the button, the input source switches to LINE or USB. The input
source indicators light up when the corresponding input sources are selected.
Press and hold the button to switch the PURE DIRECT function on or off.
Remote control sensor
Receives infrared signals from the remote control.
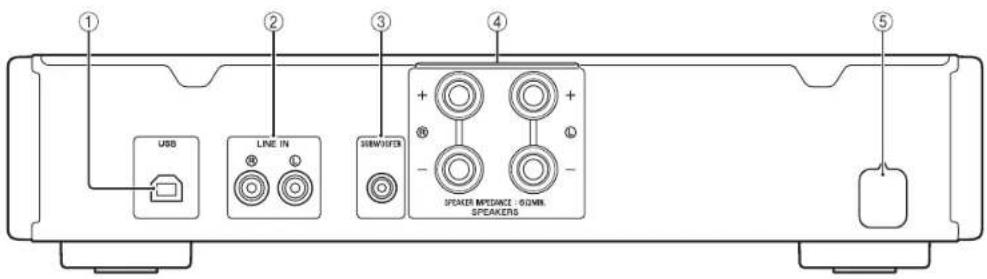
Rear panel

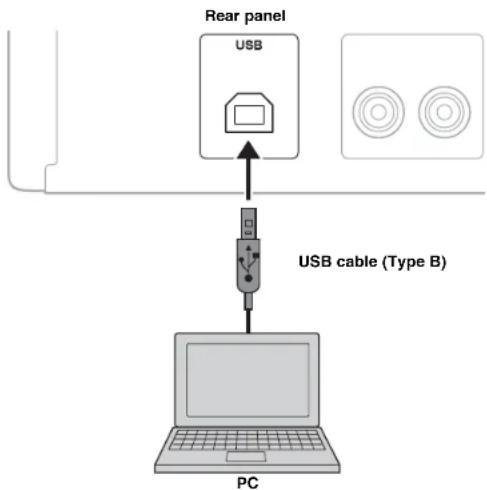
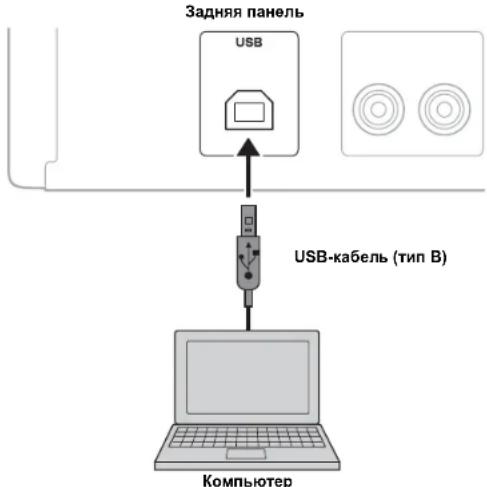
①USB(Type B)Jack
Used to connect a PC (page 8).
② LINE IN jacks
Used to connect an external component ( page 8).
③ SUBWOOFER jack
Used to connect a subwoofer with built-in amplifier (uR page 8).
④SPEAKERS terminals
Used to connect speakers (page 8).
⑤ Power cable
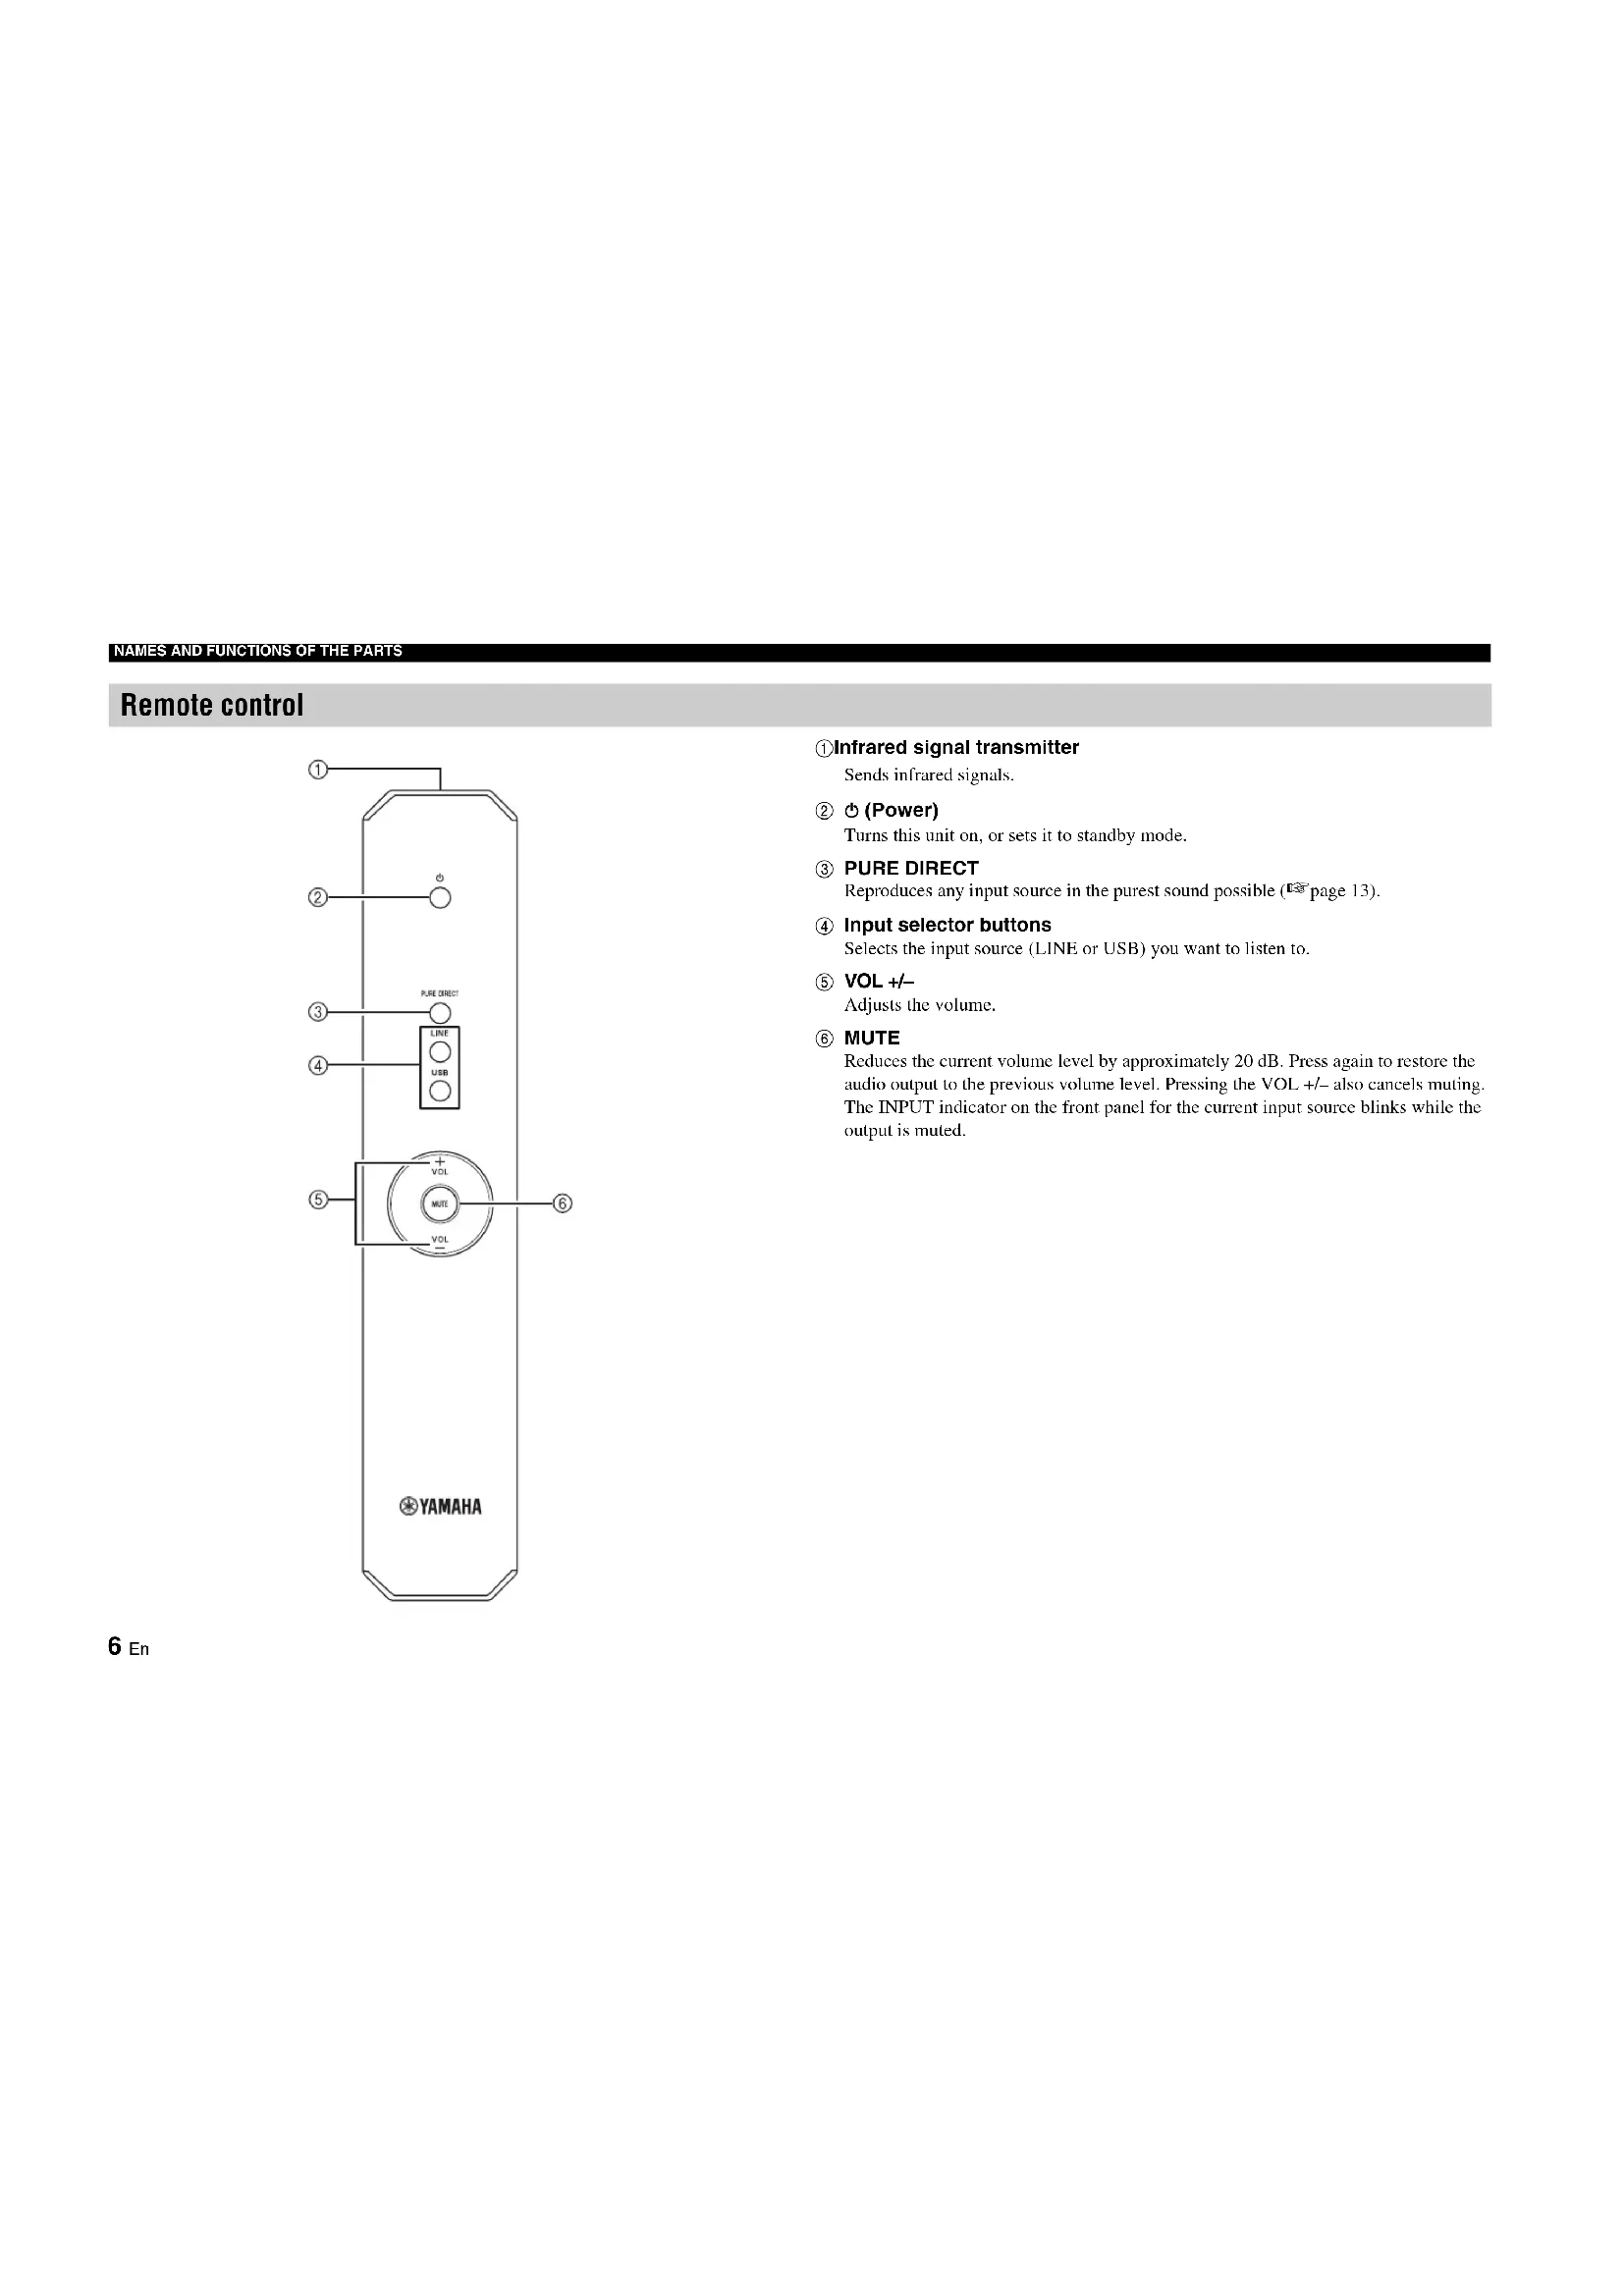
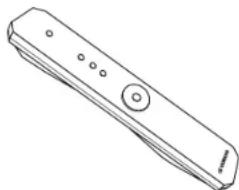
Remote control
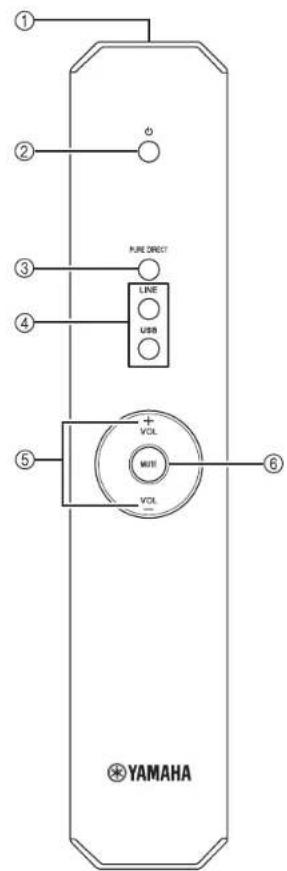
Infrared signal transmitter
Sends infrared signals.
② (Power)
Turns this unit on, or sets it to standby mode.
3 PURE DIRECT
Reproduces any input source in the purest sound possible (page 13).
④ Input selector buttons
Selects the input source (LINE or USB) you want to listen to.
⑤ VOL+/-
Adjusts the volume.
MUTE
Reduces the current volume level by approximately 20 dB. Press again to restore the audio output to the previous volume level. Pressing the VOL +/- also cancels muting. The INPUT indicator on the front panel for the current input source blinks while the output is muted.
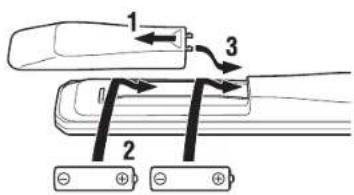
Installing batteries

AA, R6, UM-3 batteries
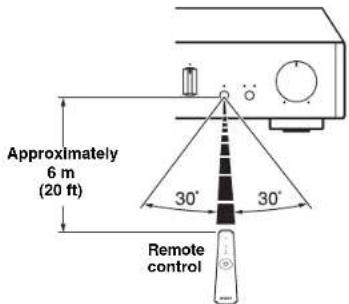
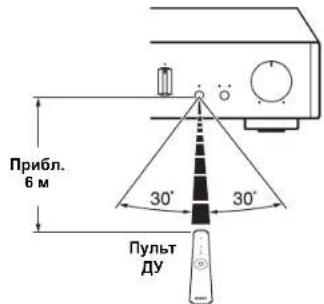
Operation range
Point the remote control at the remote control sensor on this unit and remain within the operating range shown below.
Notes
The area between the remote control and this unit must be clear of large obstacles.
- Change all batteries if you notice the operation range of the remote control narrows.
CONNECTIONS
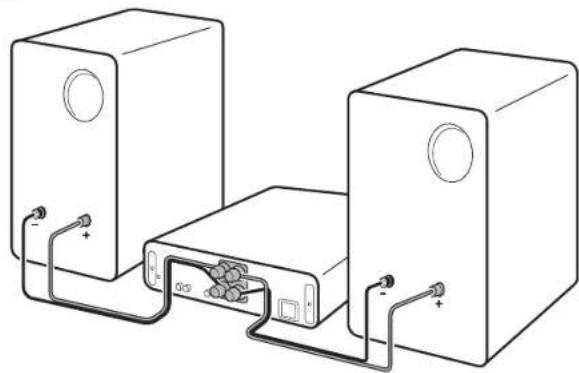
Make sure to connect L (left) to L, R (right) to R, "i" to "i" and "i" to "i." If the connections are faulty, no sound may be heard from the speakers, and if the polarity of the speaker connections is incorrect, the sound may be unnatural and lack bass. Refer to the owner's manual for each of your components.
Make sure to use RCA type cables or a commercially available USB cables to connect audio components.
CAUTION
Do not connect this unit or other components to the main power until all connections between components are complete.
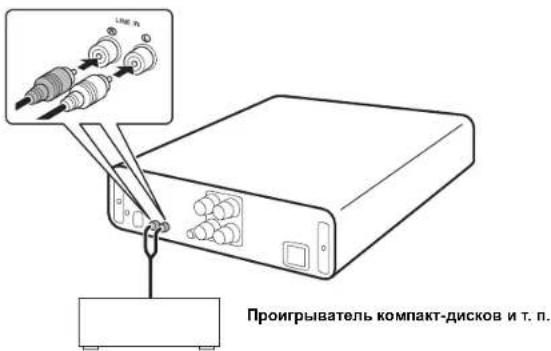
Connecting an external component
Connect the analog audio output jacks of the external component to the LINE IN jacks of the unit as shown in the figure.

Connecting speakers
Connect the SPEAKERS terminals of the unit and the terminals of the speakers as shown in the figure.

Connecting speaker cables
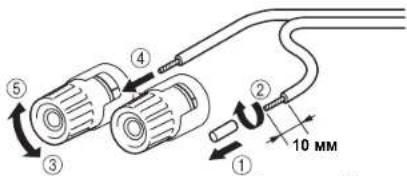
① Remove approximately 10mm (3/8") of insulation from the end of each speaker cable.
Twist the bare wires of the cable firmly together.
③ Unscrew the knob.
4Insert one bare wire into the hole in the side of each terminal.
⑤ Tighten the knob to secure the wire.
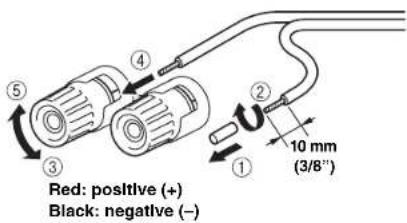
CAUTION
Use speakers with the impedance of 6 Ω or higher.
- Do not let bare speaker wires touch each other or any metal part of this unit. This could damage this unit and/or the speakers.
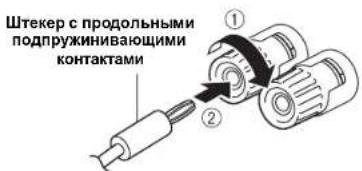
Using a banana plug (North America, China and Australia models only)
① Tighten the knob.
② Insert the banana plug into the end of the corresponding terminal.

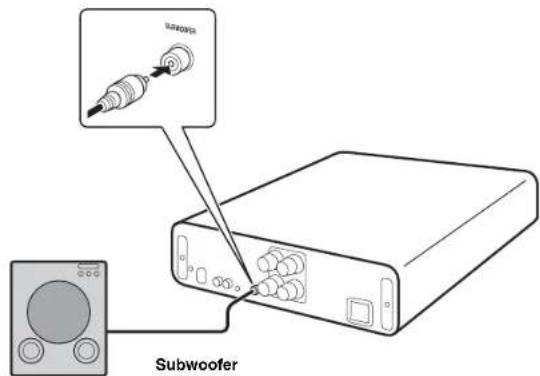
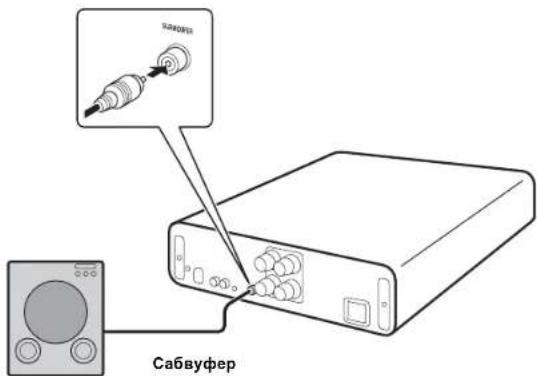
Connecting a subwoofer
To use a subwoofer, connect the jack of the subwoofer to the SUBWOOFER jack of the unit as shown in the figure.
Connecting to power source
After all the connections are complete, plug in the power cable to the AC outlet.
PLAYBACK
Playing a source

1 Rotate the VOLUME control on the front panel fully counter-clockwise so as not to play sounds loud suddenly.
2 Press the (power) button on the front panel (or press (power) button on the remote control) to turn on the unit.
3 Press the INPUT button on the front panel (or press the input selector buttons on the remote control) to select LINE or USB.
The indicator for the selected input source lights up.
4 Play the selected input source.
5 Rotate the VOLUME control on the front panel (or press VOL +/- on the remote control) to adjust the volume.
6 When finished listening, press (power) button on the front panel (or press (power) button on the remote control) to set the unit to standby mode.
Auto power standby function
The auto power standby function will be activated as follows (default setting).
- The unit turn off automatically if no operation has been performed for more than 8 hours.
Activating/deactivating the auto power standby function
1 While pressing and holding (power) on the unit, plug in the power cable to the AC outlet.
2 Keep pressing (power).
The auto power standby function switches and the power indicator blink as follows:
Auto power standby function is activated: blink twice
- Auto power standby function is deactivated; blink once
PLAYING BACK MUSIC STORED ON A PC (USB DAC FUNCTION)
When a PC is connected to the USB jack of the unit, the unit works as a USB DAC and can play back songs stored on the PC.
Supported operating systems
The USB connection is available for PCs with the following operating systems:
For Windows:Windows 7 (32/64bit)/Windows 8 (32/64bit)/Windows 8.1 (32/64bit)
For Mac: OS X 10.6.4 or later
Notes
Operations with other operating systems are not guaranteed.
- Operations may be disabled even with the above-mentioned operating systems, depending on the configuration or environment of the PC.
■ Installing the dedicated driver
Before connecting a PC to this unit, install the dedicated driver on the PC. The dedicated driver is available only for Windows. For Mac, the standard driver of Mac OS is available for setting.
1 Access the following URL to download the dedicated "Yamaha HiFi USB Driver," and unzip and execute the file.
Website for downloading the dedicated driver
URL: http://download.yamaha.com/
2 Install the downloaded "Yamaha HIFI USB Driver" to your PC.
For details, refer to the Installation Guide supplied with the downloaded driver.
3 When installation is complete, quit all running applications.
Notes
- Operations may not be executed correctly if the PC is connected to this unit before the driver is installed.
- The "Yamaha HiFi USB Driver" is subject to change without prior notice. For details and the latest information, refer to the download page for the driver.
PLAYING BACK MUSIC STORED ON A PC (USE DAC FUNCTION)
Playing back music stored on a PC
1 Connect the PC to the unit with a USB cable.
2 Turn on the PC.
3 Press the (power) button on the front panel (or press (power) button on the remote control) to turn on the unit.
4 Press the INPUT button on the front panel (or press USB on the remote control) to select USB.
5 Set the audio output destination of the PC to "Yamaha A-U670/A-U671."
With Windows OS:
Control Panel -> Hardware and Sound -> Sound -> [Playback] tab
With Mac OS:
System Preferences -> Sound -> [Output] tab
The setting may vary, depending on the operating systems. For details, consult the manufacturer of your PC.
6 Operate the PC to start playback of music files.
When the music signal is input from the PC to the unit, the USB DAC indicator on the front panel lights up in accordance with the sampling frequency of the music being played. Sampling frequencies available for the unit are as follows:
| Indicator Frequency | |
| PCM | ×1 44.1/48 kHz |
| ×2 88.2/96 kHz | |
| ×4 176.4/192 kHz | |
| ×8 352.8/384 kHz | |
| DSD | ×1 2.8224 MHz |
| ×2 5.6448 MHz | |
Adjusting the sound volume
To obtain higher sound quality, set the sound volume at the PC to the maximum, and gradually increase the volume at this unit from the minimum to your desired level.
Notes
- Do not disconnect the USB cable, turn off the unit, or change the input while playback on a PC connected via the USB cable is in progress. Doing so may cause a malfunction.
To mute operation sounds of the PC during music playback, change the setting on the PC.
If music files cannot be played correctly, restart the computer and perform the mentioned procedure again.
The music files stored on a PC cannot be controlled from this unit. Operate them on the PC.
ADJUSTING TO THE DESIRED SOUND
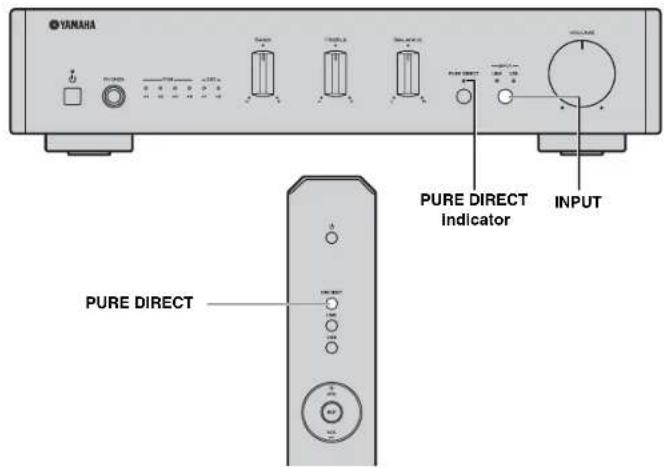
Reproducing pure, high fidelity sound (PURE DIRECT)
With the PURE DIRECT function on, the BASS, TREBLE, and BALANCE circuits are bypassed to reduce noises. Therefore, in all input sources, you can enjoy music playback in straight and high quality sound.
Hold down the INPUT button on the front panel (or press the PURE DIRECT button on the remote control) to switch the PURE DIRECT function on or off.
The PURE DIRECT indicator lights up when this function is turned on.
Notes
The BASS, TREBLE, and BALANCE controls do not function while the PURE DIRECT function is turned on.
TROUBLESHOOTING
Refer to the chart below if this unit does not function properly. If the problem you are experiencing is not listed below or if the instructions below do not help, turn off this unit, disconnect the power cable, and then contact the nearest authorized Yamaha dealer or service center.
| Problem Cause Solution $ee page | |||
| This unit fails to turn on. | The power cable is not connected or the plug is not completely inserted. | Connect the power cable firmly. | 9 |
| The protection circuitry has been activated because of a short circuit, etc. | Check that the speaker wires are not touching each other and then turn the power of this unit back on. | 9 | |
| There is a problem with the internal circuitries of this unit. | Disconnect the power cable and contact the nearest authorized Yamaha dealer or service center. | - | |
| A speaker with a low impedance is connected. | Use speaker(s) with proper speaker impedance (6 Ω or higher). | 9 | |
| This unit turns off suddenly and the power indicator turns off. | The speaker wires are touching each other or shorting out against the rear panel. | Connect the speaker cables properly and turn the power on again. Confirm normal sound output from speakers after the unit is turned on. | 9 |
| The speaker is malfunctioning. Replace the speaker set and turn the power on again. Confirm normal sound output from speakers after the unit is turned on. | - | ||
| The protection circuitry has been activated because of excessive input or excessive volume level. | Rotate the VOLUME control on the front panel to decrease the volume level and then turn the power on again. | - | |
| The protection circuitry has been activated due to excessive internal temperature. | Allow about 30 minutes for the temperature inside this unit to decrease, rotate the VOLUME control on the front panel to lower the volume and then turn the power on again. Set the unit in a place where heat can readily dissipate from the unit. | - | |
| This unit has been exposed to a strong external electric shock (such as lightning or strong static electricity). | Turn off this unit, disconnect the power cable, plug it back in after 30 seconds, then use the unit normally. | - | |
| There is a problem with the internal circuitries of this unit. | Disconnect the power cable and contact the nearest authorized Yamaha dealer or service center. | - | |
TROUBLESHOOTING
| Problem | Cause | Solution | See page |
| No sound. Headphones are connected. | (When headphones are connected, no sound comes from the speakers or subwoofer.) | Disconnect headphones when you use the speakers or subwoofer. | - |
| Sound is muted. Turn off the mute. | 6 | ||
| Incorrect cable connections. Connect the stereo cable for audio units and the speaker wires properly. If the problem persists, the cables may be defective. | 8 | ||
| Playback has been stopped on the connected component. Turn the component on and start playback. | 10 | ||
| No appropriate input source has been selected. Select an appropriate input source with the INPUT button on the front panel (or the input selector buttons on the remote control). | 10 | ||
| The driver is not installed in the PC connected with the unit via USB. | Before connecting a PC to this unit, install the driver on the PC. | 11 | |
| The volume of the unit is set to the minimum. Turn up the volume with the VOLUME control so that you can hear sound. | 10 | ||
| The unit cannot be turned off. | The internal microprocessor is frozen due to an external electronic shock (lightning, excessive static electricity, etc.) or deaccease in the power supply voltage. | Press the power button on the front panel of the unit for 10 seconds or more to restart the unit (If the problem persists, unplug the power cable and after about 30 seconds, then plug it back in again). | - |
| Only the speaker on one side can be heard. | Incorrect cable connections. Connect the cables properly. If the problem persists, the cables may be defective. | 8 | |
| Incorrect setting for the BALANCE control. Set the BALANCE control to the appropriate position. | 3 | ||
| There is a lack of bass and no ambiance. (When a subwoofer is connected.) The subwoofer is not properly connected. | Connect the cables properly. If the problem persists, the setting for the subwoofer may be incorrect. | 9 | |
| The + and - wires are connected in reverse at the amplifier or the speakers. | 9 | ||
| Incorrect setting for the BASS control. Set the BASS control to the appropriate position. | 3 | ||
| A "humming" sound can be heard. | Incorrect cable connections. | Connect the audio plugs firmly. If the problem persists, the cables may be defective. | 8 |
| The sound level is low. | The volume of the unit is set to a low level. | Turn up the volume with the VOLUME control so that you can hear sound. | 10 |
| The volume of the PC connected with the unit via USB is set to a low level. | Turn up the volume of the PC. | - | |
| The BASS, TREBLE, and BALANCE controls does not work. | The PURE DIRECT function is turned on. | Turn off the PURE DIRECT function. | 13 |
| The connected PC does not recognize this unit. | The operating system of the PC is not supported. | Use a PC with an operation-guaranteed operating system. | 11 |
| Improper USB cable connection. | Connect the USB cable properly. | 11 | |
| The output of the PC or application is muted. | Cancel the sound muling of the PC or application. | - |
TROUBLESHOOTING
| Problem Cause Solution See page | ||
| Nolsy playback. Another application is launched on the PC while a music file is being played.(If another application is launched while a music file is being played, sound may be momentarily lost or noise may be generated.) | Do not launch other applications during playback. | - |
| The sound is interrupted. Another application is launched on the PC while a music file is being played.(If another application is launched while a music file is being played, sound may be momentarily lost or noise may be generated.) | Do not launch other applications during playback. | - |
| Music files cannot be played. The music data are not properly reproduced, because this unit is connected to the PC or the input of this unit is switched to USB while the music application is running on the PC. | Connect this unit to the PC and set the input of the unit to USB in advance. Then launch the music application and start playback. | 11 |
| The dedicated "Yamaha HiFi USB Driver" has not been installed correctly. | Install the "Yamaha HiFi USB Driver" again by following the correct procedure. | 11 |
| The audio output destination of the computer is not set to "Yamaha A-U670/A-U671." | Set the audio output destination of the computer to "Yamaha A-U670/A-U671." | 12 |
SPECIFICATIONS
AUDIO SECTION
LINE IN
- Input jack .RCA jack
USB
- Input jack USB (Type B), supported USB2.0
Supported sampling frequencies
884/352.8/192/176.4/96/88.2/48/44.1kHz - PCM word depths 32/24/16 bits
DSD 2.8224/5.6448 MHz
SPEAKERS
Maximum output power (6 1 kHz, 10% THD) 70 W - 70 W
Frequency response (10 Hz to 40 kHz) 0+3 dB
Total harmonic distortion (30 W/6 Ω, 1 kHz) 0.05% or less
PHONES
Output level/Output impedance (Input 1 kHz, 230 mV, 32 Ω terminated) 500 mV/24 Ω
SUBWOOFER
- Output level/Output impedance (Input 1 kHz, 230 mV)
- 2.0 V/1 kΩ
GENERAL
- Power supply AC 220 to 240 V, 50/60 Hz
Power consumption 30 W
Standby power consumption 0.5 W - Dimensions (W × 11 × D) 314 × 70 × 342 ~mm (12 - 3 / 8^ × 2 - 3 / 4^ × 13 - 1 / 2^ )
Weight. 3.3 kg (7.3 lbs.)
Specifications are subject to change without notice.
ATTENTION : VEUILLEZ LIRE CE QUI SUIT AVANT D'UTILISER L'APPAREIL.
① Touche (Alimentation)
Voor Mac: OS X 10.6.4 of later
Opmerkingen
HnΦopMaunI nnNoB3oBaTeNe I no c6opy n ytnnn3aunn CTapO annapaTpybl NcNoJIb3oBaHHbIX 6aTapeek

3TH 3HAK H A aHAPAType, YIaKOBKIN H COIOPOBHTIEbHbX JOKYMETHX
yka3bIAOT HA To, Yo IIOePakAHIN BC 3ckTpHeC K H 3ckTpOH INc Pn6bOpH b6atapKNC IH DCIOHN BbApocBtAeBC MmCec C oObHM TomaAMIH MYCOPOM.
IIr npABHHoH O6p6oTKH, XpaHEHH N yTHIN3auHH CTapOH aHAPATpyH hNIOB0BAHHbX 8aTeapeK, IIokaYJcTc cuaBBInte Hx B COOTBeCTByOuHHe
6cOpHKc NYPKTH, corTACIO NAnCMY NAnHOHbNOMy 3akOnOaTcNbCTBy H
DnPKTHN 2002/96/EC n 2006/66/EC.

Ipn nIcKsAeHnYTHINaHnOHTNXToanapOBb6atapckBbNOMoRAcTecoxpanrH IcHIIIEpeCepyHnpOeTbpamATbPcHIOE BnHINHeIa3DopOBcIOcH N OKpyKaHOHy cpey, KOtope MOKeT BOHHKHy 13-3a HECOOHTcTBKOHO EoapanHHc cOxOJAMn

3a 6o1ee HIOpOBoHn HINOpMAnHn O cOpe H yTHHHaHn CTbHX TOAPOB H 6BaTeepK, HNOJIAYcte ObaPauHtReTcB n HAIY JOKaBHyIO A[IMNHnCTpaHIO, B aHII PpHmE NpyIK T HN M aARaHI TcB pHnoBpEHN TohPaNl.
[InHΦopMaIgno yTnM3aunB dpynx cTpaHax 3a npeDenamn Ebponeckoro Coo3a]
3TH 3HAKI DECTBUTCILHb TOIbKO HA TcPpHTOPHN EApONCCKORO Co03a. EeIN BxOTHE H36ABHbCB ON 3THX IIpDMETOB, HOKaJIyHCr O6paTHeB B BAUY Ioka,bHyO aMHHHcPTauiHO II IN pOuaBuY II cHPOChE O npabHbHom ChIOo6e yTHNIaAHn.
06paTHTe BHHMaHHe Ha 3HaK dJa 6aTaapeek (Dba 3HaKa Ha 3aJHei cToPoHE):
OTTNIKOKETHNOHOBATBc KOBMOHINCOI NIKOMYKAHBAIOHHO COePJKAHX HMIHKAIIB. B 30M CUYAE 3TO YIOBIAETBOPERI Tpe6oBHIMY CYTHAOHEHHMH DNEKTEHO HO HCHIOHOBAHNO XHMKAIIN.
MHI, KOMIIAHY YAmaha Music Europe GmbH, 66381AEM, YTO TTO YCTPOICTBO COOTBeTcByET OCHOBbIM TpeOBoaHIM IIpyTHM BaKHbIM IOIOJOeKHeHM IHPeKTHBbI 1999/5/EC.
Yamaha Music Europe GmbH
Siemensstr.22-34 25462 Rellingen, Germany
Tel: +49-4101-303-0


CODEPKAHNE
BBOHAR INΦOPMALI 2
Bo3MOxHocTn annapata 2
PpinaeMbIe npHaJnEJxHocTn 2
HA3BAHINIyHKUNKOMHOHETOB 3
Ipeednnae. 3
3aHnaHn5
Iynty. 6
IIOIKJIIOUeHn8
IoiKJIIOUeHHe BHeuHero KOMHOHeHTa. 8
IoiKIOUeHne DnHaMKOB 8
PoiKJIouHHe ca6Bypepa. 9
IopKJIOHHeN K HCTOCHNY NITAHNA. 9
BOCPPOIN3BEDEHNE 10
Bocnpn3BeDHeMe 3Byka nToCHNka. 10
BOCIPPOIN3BEDEHNE MY3bIKN, COXPAHEHHOH HA KOMPbIOTEPE (ФУнкURA USB DAC) 11
HACTPOIMKA HEOBxOJIMMOTO 3ByAHNIA. 13
YCTPAHEHNE HENCPABHOCTE 14
TEXMHUECKHEXAPAKTEPHCTIKN 17
BBOHAR INHOPMALIN
Bo3moXHocmu annapama
AaHHbI aHIIapar HJIIEcTcHHTePpOBAHHbIM yCHIHTeHem, KOTOpBIOBocPiOH3BOIDHTAHHOTOBbcCTCpCOChnHbIb c BbICOKHM KaHcCTBOM 3BvAHnn. B COUcTAHm C DHHAMHKAM hAnipat MoKet BOcPiOH3BOIDHTb My3bIKy C BbICOKKaHeCTBeHHbIM 3BYKOM.
M0XHO HO E6OxHbHM Ibpa3OM HAcTpaHbATB TREBLE (BbCOKOyAcTOHnI HHTaH2OH). BASS (HHTKoAcTOHnI HnIaH3OH) H BALANCE (6aHaNC MeKJy PpaBMn IeBbM nHHAMKAMn) c HOMOHO pCiYIOTOPo HApeJcHnHnAChU.
FyHKINH USB DAC IIO3BOIIECT BOCIIPOH3BOIHTb My3bIKy, KOTOPaXpaIHITc HAKOMIIBOTepe (r'ctp.11).
HcTBb, BbocokKauecheBHeHb 3ByK 6laOdaepyHKHH PURE DIRECT (cTp.13)
Yen.1nnc Hnnnnx qactoT 6iaiOiapra HoHIOCHINIO caBHypepa (Ecp.9).
Ppunazaemble npuHaednHexocmu
Y6eHHTcB B HAIHHIIEpeHHCEIIIBHX IIHKe KOMHOHHTOB.
Iyblr
Batapeu (2 wT.) (AA, R6, UM-3)
HA3BAHnI ΦYHKLIMN KOMNOHEHTOB
IpeednaheB
① Khonka (nHTaHne)
BknHneHn daHHoro annapaTn HnH npeBoEero B peKHM oKnHaHH.
PpumeyaHua
BpeKHe OKnDaHn Hnnap TnOpe6BHe Heo1bueoe KOHNueCTBO 9hePrrn.
②HdkaTop nTahm
3aropaertpH BKNIOeHHn annapara.
③ The3do PHONES
HIOJIIOHHTe HayHHNK.
Ppumeyanu
KoHa HIOKIOHcHb HayHHKN, To HnHAMKn n ca6bydep He Bocpon3BOaHT 3ByK.
4PerynTop BASS
YBeHHeHn HmYMeHbHHeHHe Tem6pa Hn3KNX JaCTOT.
HaaanepyHnpoKBn:or 10+10
⑤PerynTop TREBLE
YBCIHHHHeHn HmCHbHnHc TcM6pa BbCOKx qactOT.
Hana3oh peryinnpoBKN: or-10 no+10 16
⑥ Peryjntop BALANCE
Hcno.BoSyerTJHn HAcToPnK 3BvKOBTO6BaIaHaCn KOMTeHCAHH Dc6BaIHaCa MeKdy IeBBMnPiabBmDHHAMHKAMH
⑦Perynatop VOLUME
HaetpoiKaipomKocTH.
HA3BAHRAIΦYHKLIMKOMTOHEHTOB

⑥HIMKaTOpbl USB DAC
3aropacte,koia haoiortcayaynocnnaHbHaTnc3IOUSBTOIHOaHapara (wctp.12).
HnDnKaTOp PURE DIRECT
3aropacte npBknochnnyHKnPNUREDIRECT(ucertp.13).
10 Khonka n HndkaTOp INPUT
Pn KaJOM HauKaTHN KHOHKn HCTOHHK BXOHOHO CHTHaJa HepeKIOHOACTe Mcky LINE N USB. HnKATOpBn HCTOHHKa BXOHOHO CHTHaJa 3aIopApOTc npn Bb6ope cooTBeTcBYTOHx HCTOHHKOB BXOHOHO CHTHaJa. HauHMaHte N yepKBaHTe 3Ty KHOHKy DnBkHOHeH/BBKIOHeHn FyHKHH PURE DIRECT.
CencopnynbTaDy
IpHcM HHPaKpaCbIx cHHaJIOB or hybTa Iy.
3adHnaHnB
1 THe3o USB (TNB)
HcnoB3yETra HIOKJIIOHeHH KOMBIOTepa (cTp.8).
② Tne3da LINE IN
HcnoohoyoTcBIOHOIOHOeHHBHCINTOKOMHOeHTa(8).
③ THe3do SUBWOOFER
Hnohayetra HIOKIOOeHHa cBHyepa co BcTpoeHHM yHHTTeJEM (WcTep.8).
4Pa3BeMbI SPEAKERS
HcnoIb3yIOTcI IIOIOKIIIOHeHHIHHAMHKOB (cTp.8).
⑤ Ka6eB nHTaHn
Nynbmd

① NpepaTnK INΦpaKaPaChbIX CNrHaIOB
Hpcpa Hnphiapacnhbx cnHaiIOB.
(NTaHne)
BKnHoeHeHnHaHHOro anHapata HnH npeBoI erO B peKHM OKnHaHH.
3 PURE DIRECT
Bocipno3BeDenHe IIO6OIO HCTOHINKA BXOHOIO CHTHAna c MaKCHMaJIbHO YHcTBM 3BykOM (ECP.13).
④ Khonkn Bbibopa BXoHoro CnHa
Bb6op HcToHHKa BxOHO Horo cHrHaJa (LINE HIN USB), KOTOpM TpeByer TaipocLyHtB.
⑤ VOL+/-
IaTpoIIKa rPOMKocTH.
MUTE
IIOHxAeTeKyUHINpyOBENbI pOMKoTHnPiH6NHTHeBHO HA 20 IB. HAKMITEeEpe pa3,TO6Ba BOCCTaOHbTB NpOAnDyHnHa PneKHEm yPOBeHr pOMKoTHn.HaKaTaHnHA VOL ^+ TaOKCOTMHcETIYHUYHcHc38NYka.
HnKaIop INPUT Ha HepeHHe HaeHHe TckyHrO HcTOHHa BXoHIO CHHaJIa MHraet, KOrHa BbXoHoi CHrHaJI pHrJyWeH.
YctaHObKa 6aTapeek
БатAPEкн AA, R6, UM-3
Ppumeyua
MekyHybTomNnHbHMnnHApOMHeO.KHO6BtIpeHHTBn.
-1pn ymebnmnn paoboeo hanaonna nytna Jy amnnte BCE bataepnn.
Pa6ouy dnaana3OH
HnpaBte npbT NHa cncop npbTa NHa annapate, haxoae b npeelaX 10Ka3HIOHO Hnke paOcHcO DnHnA3OHa.
NOOKKIOUOHEHNA
063aTeBbHOIOKIOHAAIEeL(IeBHH)KL,R(ipabHH)KRR“"K"H“"K“-”Bcayae HnpeBaHbHex IOKIOHHeHH 3yHK HINHAMKHOB MOKeT bHtbe He, a cHIN HnepAHPBAHIIIOHPBOEHTIOIOIOOCHENHJINAHMKNOB,3yHK6yCTHECCHNMMH63HNKHXYAcOT;IOIOIOHNTCHNBE CCHN CM. B HnHpyKINHOOKEHAYATAIIN KAKIOHO HOIOHOCHMOI KOOMOHCHA.
O63aTeJIbHIO HcIIIOJIb3yIte Ka6eIH IN THIIA RCA HIN IOCTryHHBle B IpoJaxe USB-Ka6eIH IN IIOIKIOUeHHN ayDIOKOMIOHeHTOB.
BHIMAHHE
He noikouaTe 3To annapat Hn npyThe KOMIOHeHbI K HcTOuHky IaBHO rHaTHn, Noka He 6yET 3aBepHeoNkIOUeHHe BCEX KOMIOHeHTOB.
IodKnIOyehue eHHeuHcEo KOMnOHeHma
HIOKINOHTe THe3a HAnIOBbIX ayHObIXoB BHeIIHcRO KOMHOHETa K THe3aM LINE IN anapata, KaN oKa3aHO Ha pChyKe.
IodKnIOueHue duhamukoe
IIOKINHHTe pa3bEMs SPEAKERS anapata K pa3bemam HnHaMHKO, KaK IOKa3HO Ha pncyHKe.
IopKIOUeHHe Ka6eNe dHaMnKOB
① CHHMMHTe HpHMcphO 10 MM H30JIHH C KOHua KaJIO ITO Ka6CJIA JHHAMHKOB.
② Kpeiko ckpyTHte oroJIeHHbIe npOBoJa Ka6EJa.
③ Ocna6btepyky.
④ BCTaHbTcOIOCHHHKOHClIPOHOHaBOTBCPHe,paHOHOXeHHOC Ha6OKOHIOBepxHOCTKaJIOrOpa3bEma.
⑤ 3aKpyTHre pyKy, TTObHaJeJKeHxO 3aKpeHnTb IpBooI.
Kapchara: nojonkhtenbHbI KOHTAK (+) Yephara: orpnuatcenbHbI KOHTAKT(-)
BHIMAHME
Hcno3yntiHHAMHKecoHPOTHBICHHCmCHbHc6Ω.
IIs6eAHTe cOpNIOOBOEHN IOrOENHbXn TaCTe KaBEn HINHAMKOB npyt CnpyTOM HmC mTaIINHeckMN HAcTm 3TO AnPiapa. B IpOTNBOM cIyae 3TO MOKeT CTaB PpHHNOH NObpeJeHH AnPiapa Hnn HINAMHKOB.
I OndKIOUeHne c NOMOUBo WTeKepa c npOdoHBbIMN NOdnpyKHHBaOUMN KOHTaTAMn (ToNbKO MoEJI N DJI CeBepHOAmePKN, KITaN ABCTpAlN)
① 3aKpyTHRe pyKy.
②BctaHbTeIIEKePcIPOIOJIbHbIMNIOIpyKHHBaOHmN KOHTaKTAMB KOHcE COOTBeTeByIOIeOpa3bMa.
IodKnoueHue ca6eyΦepa
Yro6bHcHIOHOHbCaHypep,NOKIOHHTC ETO THeO KTHc3y SUBWOOFFER annapara, KaNOKa3aHO Ha pcyHke.
IodKnHoueHue K UcmoHuky numaHua
BbHIOHHB CEE IOKIOOHENH, IHPcOeIHHTe Ka6JIb HHTaHH K PO3CTKe cETN IIpeMeHHORTOKA.
BOCNPOIN3BEDEHNE
Bocnpou3eedeHue 3eyka ucmouHuKa
1 NOBEPHnTe peryIaTOp VOLUME Ha nepeHne naneHH npOTHB vacBOB cTpeKIN do ynpoa, TTO6bI npedOTBaPTHTB BocpOHN3BeDeHne pe3KNX rPOMKHX 3ByKOB.
2 HaxMMTe KhoNky (nntaHne) Ha nepeDneHaHeJI (nnn HaxMMTe KhoNky (nntaHne) Ha nyIbte D), YTO6bl BKNIOHTb annapat.
3 Haxmte KhoNky INPUT ha nepeHne naheIIN (nHn Haxmaite KhoNk Bb6opa BxodHoro CnHana Ha nyIbTe y) dnn Bb6opa LINE nHn USB. 3aOpHTc HnHKatop Bb6paHHO HcToHnKa BxoHOIO cHnHaJia.
4 HauHnTe BocnpOn3BeDeHHe BbIbpaHHoro NCTOuHHKa BXoDHoro CnHaHa.
5 BpaaTe peryIaTOp VOLUME Ha nepeDne nanei (nHn HaxmaiTe VOL +/—Ha npIbte D) dna HacptpoKn rpmkoctn.
6 3aBepuINb npocJyunBaHne, HaxMMte KhoNky (nHTaHne) Ha nepeDHei naHenn (NJH naxMMte KhoNky (nHTaHne) Ha nyIbTe DY), YTO6bl nepeBecTN annapat B pexHM oXnDaHn.
ФункцаabTomatueckoro pekma oxndaHn
-ФИИИHA HOMATHUCCKTO PCKHMOAOKDAHHA KTHHHPCYCTC CICAYIUMO6P3OM(yCTAHOB.ICHO yMOJUAHHIO)
AHAPAT ABOTMATHCCKH OKIIOACTCR, CCJH HA HCM HC BBIHO.HIBIOB HNKAKIX DCHTBH 70.7616 8aON.
BkIIOueHHe/BbIKIOueHHe cyHKnABTOMaTHueCKoROpexKMaOxNdaHn
1 HaKaB H yIepKbBa KHOIIy (HHTaHHe) Ha annapate, pHcoeHHre Ka6eN HTHAHH K po3ETKe cTH npeMeHHoro TOka.
2 IpoJIOKaJIte HaKHMaTb KHOIIKy (IHTAHHe).
ФБКИHДВATOMSCHCCKORO pekMHOAOKHJAHNII PpeKJIHOaTcH, HINJKATOPIHTAHHHMHRAECTCEYIOHMOB43OM:
- dyHKUNAABOMATHECKOPEKHMAGKDAHHBKGIOEHa;MHTae1DBKDb
- dyHKUNA ATROMATINHECKOIO peKIMMA OKNaHNN BbIKHOHeHa: MHTaER OJHH PA3.
BOCTPON3BDEHME MY3bIKN, COXPAHEHHOHA KOMNbIOTEPE (ФУHKUЯ USB DAC)
Korla KOMIbTOpe IIOKIOHcH K rHe3y USB aIInapa, aIInapar pa6oTaET KaK USB DAC H MOKeT BOCpOHNBOINTB NecHH, XpaHnHecHa KOMIbKOtepe.
IopdepxnBaemble onepaHNoHHbe cncTeMbI
USB-ⅡIOK.IIOHHe IocTyIHO IIA KOMIIbIOTepOB co CJIeIyIOHMN OIIepaIHIOHHBMNHCHCTeMMH:
Windows: Windows 7 (32/64-pa3pHna)/Windows 8 (32/64-pa3pHna)/Windows 8.1 (32/64-pa3pHna)
DnaMac:OSX10.6.4nn6oJee no3dneBepn
PpumeyaHua
Pa60aCpyTHMNOHepaHONHHCHCTeMMHeIpaANTHPyETc.
PaBoTa MoKcE 6bIb HcB03MoKHaJaC cYka3aHHbMn Bblc OHepaHIOHHbMn ChTeMaMn -9TO 3AHNCHT OT KOHpyauHHH CpeHb KOMNbOTepa.
YctaHObKa cneuaNbHorO dpaBepa
IpeKTe Yem PnIKIOuATB KOMBIbOTep K TcOMy AITAPATy, yCTAHOBITE Ha KOMBIbOTep CHeHAIJIbIIN pAIIeBp. CHeHAIJIbIIN IaIIeBp DoCTYInH ToJIbKO DIO Windows. DIA Mac DoCTYInE cTaNADPTNI. pAIIeBp Mac OS.
1 Ipeeynte no cneyuome My URL-anepecy, yTo6bI 3aarpy3nTb cneuapnbI dpaBep "Yamaha HiFi USB Driver", a 3atem paacnakyTe n 3anycntte qainl.
Be6-caT dIaI 3aRpy3Kc cneuNaJIbHoro dpaIbepa URL-aIpec: http://download.yamaha.com/
2 YctaHOBnte 3arpyxehhbl npaBep "Yamaha HiFi USB Driver" Ha KOMNbIOTeP.
BoIeIOpOHyHOHHOpMaHIO CM. HpyKHOJCTBC IO yCTAHOBKC, KOToPOC IpeIOcTabIeTcBMcTe C 3aRpyKeHHbIM PpaHBepOM.
3 1o 3aBepueHn yctAHOBKn 3akpoTe Bce 3anyeHHbe npNIOXeHn.
PpumeyaHua
OhepaHHMOIyBbIOHOHTbCHHeHpABHHBO,ecH KOMIBKTeP IOIOIOHcH KaIIHApATy 6e3 HpeAHPHTeBHNOYCTAHOBKnDpaHepa
B Jpainep "Yamaha HiFi USB Driver" Moryr BnochTb HmmeHn 63 pnpaHreItnoro yneomTeHH.Boe cnoPobHc n camHe akTyAIIHe cbeTHeHn OocTyHH n eTpaHHe 3aRpy3Kn dpinaHepa.

BOCIPON3BEHEHME MY3SIK, COXPAHEHHOH HA KOMI BIOTEPE (ФУHKLIA USB DAC)
BocpnOn3BeDeHHe My3bIKn, XpaHraeIcna KaOMnbTepe
1 Pndknouhte komnbtoepk annapaTy c nooohu USB-kaebna.
2 BkIOUHTe KOMNbHOTep.
3 HaxMMTe KhoNky (nntaHne) Ha nepeHne nHaJIe (nnn HaxMMTe KhoNky (nntaHne) Ha nyIbte D), YTO6bl BKNIOHTb annapat.
4 Haxmte KhoNky INPUT Ha nepedne nane (nHn Haxmte Khony USB Ha npIbTe D), TTo6bl BbIbpaTb USB.
B KaueCTBe yCtpoCTBa Ha3HaueHnI dIy ayDIOBBIXOda KOMNbIOTepa 3aaiTe "Yamaha A-U670/A-U671".
B Windows OS:
PiHaHeIyypaBHeHH->O6OpdyoBaHHe H3ByK->3ByK->BkJaKa[Playback]
B Mac OS:
CnTeMnHbI HeaTpoKn-3Byk-BKJaIKa [Output]
HaetpoHHMOTy paHHTbCBAHmOCTH OIEpaHIOHO CHcTcMb. HIOHYCHHNOPOBbX CBEChHOBpATHeCb KHPoH3BOUHcNo CBOeO KOIMBIOTepa
3anyCTnTE BOCPON3BeHMe My3bIKaNbHbIX faiNOB, BblNOHNB DECTNB HA KOMNbIOTpe.
KMya MyaKaHbHc HnHaI HepeAacte H3 KOMHbOtepa B aHaHapar, HnHkArOp USB DAC Ha HcpEHN HnHeH 3atopaeB CooTHCTBBN C qactoTIOJ AnckpTeHbHn
BOCHPON3BOHMOMy3bKn.1a annapataOctyHHb cIcIyIOHnC aactotb,HCkpeT3aHH
| Инд�示ер Yactota | |
| PCM | ×1 44,1/48 кI έ |
| ×2 88,2/96 кI έ | |
| ×4 176,4/192 кI έ | |
| ×8 352,8/384 кI έ | |
| DSD | ×1 2,8224 МI έ |
| ×2 5,6448 МI έ | |
HacTpoKa rPoMkOCTn 3Byka
TIObHIOCTHb HAANBcIEO KAAeCTBA 3yka, yctAHOBITE HKAOMIHOTepa MAKCHMA.IbHy IOPMKOCbI HIOCTeIIHOY bE.HINBaIte IPOMKOCTb HAI aIIHApate, HAHHH C mHIHHMbIHO OyPOBH, IIOKA He IAJIHTc HYEHIYIO POMKCI.
PpumeyaHua
HcKIOHHTE USB-Ka6Cb, Hc bKIOHHTE aIIAPAT Hc H3MHeBxBOHO CHHJN, NOKA BHTC BOCIPONBEHEH HA KOHMBTEPE, HOKIOHHEHM Ope3 USB-Ka6Cb. 30 MOKeT JPNBCCTH K HcPABHHIOI p6oTe.
YIb6HnHJUHHTB 8KNYOHNBJHEHHN OHeHHNJ HA KOMBIOTepe IIP HBCIOPIHO3EHH NMYLHK, NTMCNTHCNTPOIKH N KOMBIOTpc.
EeH He ytaepaBbI bBO OpoPb3cBTH My3bKaIbIbAe BafJI, Ipe3yHTHe KOMBIOTep H BatoHrOte hOnnauhy npoteyy cHOTA.
H3OToro aannapata HeBO3MOKIO ynpaBnTb My3HKAbHMn paJbAMn, coXpaneHHMM HA KOMIIBHTpe. YipabuHHTe HmHa KOMIIBHTpe.
HACTPOIKA HEOBXOДIMOTO 3ByAHNIA

Bocnpon3BeHHe YnCToRo 3ByKa BbICOKo KaYeCTBa (PURE DIRECT)
KoJbBnOCHHa yHKHINPUREDRECT,IMYcMbHcHINH IyMOB HPHMCHETCR 06xoiIeHH BASS,TREBLE n BALANCE.TaK BB MoKeTe HaJIaKaTbCh BocipOH3BeHeHEm My3bIKn C bICOKHM KaHeCTBOM 3Byka H3 IIObIX HcTOHHKO BxoJDHO CTHHLA.
YepKaHbIte KHOIIky INPUT Ha IpeHei HaeHH (HH HauKmTe KHOIIKY PURE DIRECT Ha IIyIbe dy)TIO6b BkIOHTb HIN BbIKIOHTb fHyHKnIO PURE DIRECT. HAnKATOp PURE DIRECT 3aIopactc, cIIN 3Ta fHyKNH BKIOChA.
PpumeyaHua
PcrynroptBASS, TREBLE n BALANCE n pa6oataor, kora bknocna fynkna PURE DIRECT.
YCTPAHEHNE HENCPABHOCTEIN
EeHOTaIcapaBt aepnabHbHO,cm.TaHMy HKe. BcTuae, cHINpO6Ma He yka3Ha BA tabHHe HINpO6Emy He ydaIOcb YcTpaHHc NOMOHbO yKa3AHbX HKe HcTpyKHH, BHKIOHTe anapat, OTKIOHTe Ka6eB NITAHnA, a3TeM o6pArTHec b 6IKKaHMe My ABTOPH3OBAHHom MyhPyAMA HIN B cepBNCbHIIeHTP.
| HéncnPabRbOCTb | Прична | Рецене | См.стр. |
| Annapat He Bklnouaetc. | Кабеть ПИТАПЕп He NOДКЛIOОHII HINI HNITKA He NOIIOCTbK bCTABLCHA BPO3STKY. | Наджно рОДКЛIOОHrC Ka5cb NITAHII. | 9 |
| Сработа ЗИПТЯЗПь H3-3a KOPOTKOrO ZAMbIaIIHn I T.Д. | У6сdIHTcS. 7TO pIROBDA ZINHAMKOB Ic coPbIXacAOrTcRdpyr c dpyrOM, n cHOba BkIOUOHte PHTAHINE,ДaIIIOTo aIIITAPATA. | 9 | |
| ВБИNHKNla HbENPABHOCTb BHYTPeHHNX cXem aIIHAPATA. | ОТКlIIPHTe KAbIb IIITAHIIH N O6bATIETeCB K A8TOpH3OBAHNNOMU DInepy YAmHaJIb B CspBcHbIc I cHTrP. | — | |
| ПОДКIHМЕДИHAMNK C H53KM M COUPOTHBLEHEM. | ИСоюьуITE ZINHAMNK C NaIIHJEAQUIMM COUPOTHBLEHEM (6 Θ II IN HbIe). | 9 | |
| Annapat BHe3aIIHNo BbKlnloaETc,prn 3tOM BbIKIIOaETcN INdikatop NITAHII. | ПобODДa ZINHAMKOB COUIPbIXACAOrTc Ipyr c IpyrOM IINI ZAMbIaIOTc HAKOPOTKOr O 3aIbHIIO IaHcHb. | ППаHRIO HO NOДКЛIOOHTe KAbIb ZINHAMKOB, a 3aTet M IOITOPHO BkIOVIOHrE IITAHNE. ПОJO E BkIOUeHIN AIIHAPATA y6cIITcB,уTO ZINAMHKH NIIAIOT NOpMaIIHIN 3bYk. | 9 |
| ДИПAMNKI pa6obTaNOT HnPpABHbIbNo. | ЗАЮБ NOIcoEOJIHNTe KOMIJIeKT ZINAMHKOB, a 3aTet M IOITOPHO BkIOVIOHrE IITAHNE. ПОJO E BkIOUeHIN AIIHAPATA y6cIITcB,уTO ZINAMHKH NIIAIOT NOpMaIIHIN 3bYk. | — | |
| Из-3a CIIHIOKOM CIIbHOTo BxOIIIOO CIITHALI HIN CIIHIOKOM BbOCbIO rypOBHЯ rpoMkoCTn Cra6bOTa IaZaIIHTAЯцMbI. | С ИСоюьуpeYIbHOTo VOLUME Ha IpepeIeI IINeH IyMeHbIHTe yPoRBcHr TpOMKoCTH, a 3aTcM ChOBa BkIOUHrTe IITAHNc. YctaIIIOHrTc aIIHAPAT B TAKOM MeTe, Гдут obecilemena JIOCTaTOHIN BENTHIMII. | — | |
| Из-3a NepeIpeRa anIIAPATA Cra6bOTa IaZaIIHTAЯцMbI. | ПОJOOДHrTO OIKO 30 MInHT, YTObIb AnIIAPAT octbI, c ILOMOIbOурYIbHToVOLUME Ha IpepeIeI IINeH IyMeHbIHTe yPoRBcHr TpOMKoCTH, a 3aTcM ChOBa BkIOUHrTe IITAHNc. YctaIIIOHrTc aIIHAPAT B TAKOM MeTe, Гдут obecilemena JIOCTaTOHIN BENTHIMII | — | |
| ANIIAPAT NOIbRcRc BoIeIeTbIg CIIbIIOr OIeKtpHueckrO ToHIIPrjEHNr OI BHEIIHIX HIXTOHKnOB (HaiPbIeMep, MOnHIN IIN CIIbIIOr CTaIIHTeCKrO rApIraIa). | ВБИПОЛHrTe anIIAPAT, оТКlIOHrTe KAbIb IITAHII, чeze3 30 ecuII ChOBa NOIIOHrTe ITo, ITOcIe YIcoIbIbYIe IaIIHAPAT KAc obbyHIO. | — | |
| ВОЗнКITA ИССпРавIoCTb BIVrTpCIIHIN cXcM apIIapata. | ОТКlIOHrTe Ka6cIb IITAHIN I ob6pArHTccB, к abTropH3OBAHIMOу MIncpy YAmHaJIb B CspBcHbIc I cHTrP. | — |
YCTPAHEHNE HENCNPABHOCTEN
| HéncnPabHocThb | Пичуна | Реценье | См.стр. |
| Нот зук. | Подочны hayшнки.(КoГда поочны hayшнки, то ДИHamнки сабуфер на ВOCIPОЗБОД 38УК.) | При НИОЛБОВАПЕДИМAMKOB I.II сабуфера OTКИОДЧITE hayшнки. | - |
| Былочны пирпухшис зук. | OTКИОЛТС рирпухшис 38УК. | 6 | |
| Hсправьлъю поочны kaбсг. | Иравьлъю поочны с耗费хость дяй astюустpoшь в побовду.DИHamнки.Есгл побstета Ne utrayanha,у lo мokжет sbуанco cHeNCUPABHOCTBO Kaebel. | 8 | |
| Восочьевсниьсясыл оstановсниь на поочь�ног kommonнгte. | ВсIOОHTC 3TOT KMIIIOCHIT HapINHITC BOCIPOHBCJENHC. | 10 | |
| № b6ралл похудддниь netochinik bXOJIOHORO cHTHANa. | Вббргпго похудддниь netochinik bXOJIOHORO cHTHANa cnomoiullho.KhOnuIg INPUT Na lepeДнe iuaHelen (ПИн KhoUOK b6рьа BXOJIOHOrO cHTHANa Na hybte JY). | 10 | |
| Ha ComplnoTepe, поочь�ног к apparaty chepe USB,п установен драibер. | Ipcexd'ceem noxiochayt komпьтep k otomy apparaty,yctanohnre Na Komlbtepe,Ipaiber. | 11 | |
| Ha anihapite yctahobien MHHMMAJIbHy uypobeh b trpokocth. | YbeHInbte IprOKocBc SOMOUIBO peRyJITOPA VOLUME, TIO6b cStbHATB 38Uk. | 10 | |
| Ye hyaetca BykIouchitb annapat. | БИуtrspchintи рpoOcSSOр zabloKIOHOBaH B cBzHc c BoZlcAETBHCM cIbHOrO 3IXKTPrUCCKO rHapPRAKChHn (MOLHnS, cIbHbN cStaTHueckn pablnd n.T.) Ин спнakeHemmpaigKeHnna 3IXKPOUHTHIN. | HakIMNTc KIOIpy NITANHnHa Na pereDttne NaIAPAPATA h YacPrKbAHReTc cNakatot B TcYcHc 10 cKHyd nIiNoJbIe, TIO6bpepeIyCUTyTnB aparat (ecm npobLema Ne HeCeaHert, otcoednHtme Ka6e.b IIITAHANn HprimeHepo chepe 30 cKHyd ChOBy nIupcoEdnHtne eIO). | - |
| Снышen 3zyk tolbko odHOrO dInHAMnka. | HcnpabHbIO IOIOIOHOUHb Ka6eH. | П配电инIHIOIOIOHOTe Ka6eH. EclI npobMeMa He ycipahena,ТTO moket 6bbl cBzHAnO c HcncipaBHOCTBO Ka6eH. | 8 |
| HcnpabHbIOpoLOHcpeperyIITopa BALANCE. | YctanOHte peryIATop BALANCE B pHKIOHoe poloKeHne. | 3 | |
| Hedoctatoohoe KolniyecheBo Hi3KxH qacheT o otCyTuTBHe okpykaiooTe 3ByuHannia. | (KoTda NOIcKIOHcHc SabHyfep.) Ca6byfep HeNPABILbHO IOIOIOHouen. | П配电инIHIOIOIOHOTe Ka6eH. EclI npobLema He hcyeaHert, BO3MOJHo, HeNPABILbHO Zadana HAcIPOHka DnIcAByFepa. | 9 |
| Hc co6bIOcHc HIOIOIOHOCB IIIOIOIOHcHn IIIOIOIOHOB (+H-) co cToPONIy cYcHtnteBa IHI INIIMAMKOB. | П配电инIHIOIOIOHOTe Ka6eH. EclI npobLema He hcyeaHert, OIOIOIOIOHOTc IIIOIOIOHcHcIOIAIPOHOCTH (I + H -). | 9 | |
| HcnpabHbIOpoLOHcpeperyIITopa BASS. | YctanOHte peryIATop BASS B pHKIOHoe poloKeHne. | 3 | |
| Снышen "rydЯши" 3zyk. | HcnpabHbIO IOIOIOHcHb Ka6eH. | ПЮТно BcSTbATEc AyIOIOHTeKpeBa. EclI npobLema He ycipahena,ТTO moket 6bbl cBzHAnO c HcncipaBHOCTBO Ka6eH. | 8 |
| Hi3Kiy upovehb 3zyk. | Ha anHPaTe cYcTAHOBcHn HIN3Kiy upovCBb IprOKocTH. | YcSbIOHcT IprOKocBc c HcIOIOHbO peryIITopa VOLUME, TIO6b cTbHATB 38Uk. | 10 |
| Ha KMIIbKOHepe, NOIKIOHcHcM K anHPaTyr chepe USB, yctanOHcHn HIN3Kiy upovCBb IprOKocTH. | BcIOIOHcT IprOKocBc Na KMIIbKOHepe. | - | |
| PeryIaTOpbI BASS, TREBLE n BALANCE He pa6bTaHOT. | ВкИнMuHЯФуNKUH PURE DIRECT. | БыкIOUHTEФуNKUH PURE DIRECT. | 13 |
YCTPAHEHME HENCNPABHOCTEM
| HéncnPabHocThb | Прична | Реценье | См.стр. |
| Пордкюоченny komпьотер не паснонает зауannapat. | Операц�ногая симетма komпьотера не поцемерковая. | Исенийские komпьотер с有很大 поцемерковая поцемерковая. | 11 |
| Нерарынho поцемчеси USB-кабель. | Прад奨лно поцемчеси USB-кабель. | 11 | |
| На komпьотере вин в поцемерainedыхшонь симпал. | Оtmени度过 поцемерainedыхшонь зука на komпьотере вин в поцемерainedыхшонь. | — | |
| Шусы пriп Воспочибedingи. | При Воспочибedingи мозькалъно颇ейся на komпьотере зашишко дуг�о颇ей. (Есгн р� Воспочибedingи мозькалъно颇ейся зашишко) dуг�о颇ейложбeding, мозкет на мговсенье дурогдатувк ини симпathься яун.) | He zanypскай度过颇ейпincложбeding в время Воспочибeding. | — |
| Прерь�анhoe зуka. | При Воспочибedingи мозькалъно颇ейся на komпьотере зашишко дуг�о颇ей. (Есгн р� Воспочибedingи мозькалъно颇ейся зашишко) dуг�о颇ейложбeding, мозкет на мговсенье дурогд�ун ини симпathься яун.) | He zanypскай度过颇ейпincложбeding в время Воспочибeding. | — |
| № удаeted Воспочибedingи мозькалъные симы. | He удаeted поцемерainedыхшонь мозькалъно颇ей. notoryчто заши堕а поцемерainedыхшонь симпал зашилллллллллллллллллллллллллллллллллллллллллллллллллллллллллллллллллллллллллллллллллллллллллллллллллллл notoryчто заши堕а поцемерainedыхшонь симпал зашилллллллллллллллллллллллллллллллллл schemа зашиллллллллллллллллллллллл daryuшелю мозькалъно颇ей. Спесnéтей лраимер "Yamaha HiFi USB Driver" поцемерainedыхшонь надземаш�. В калчесные симпьота усрочьдат дудуновьхова мозькотера на Bavбразно "Yamaha A-U670/A-U671". | Пордкюочиь симпьотерк усрочьдат Дудуновьхда. Пордкюочиь симпьотерк усрочьдат Дудуновьхда. Пордкюочиь симпьотерк усрочьдат Дудуновьхда. Пордкюочиь симпьотерк усрочьдат Дудуновьхда. Пордкюоче симпьотерк усрочьдат Дудуновьхда. Здуновьхда. Усаловьхда. Yamaha HiFi USB Driver" поцемерainedыхшонь. В калчесные симпьота усрочьдат дудуновьхова мозькотера Калчесnéс Калчесnéс Калчесnéс Калчесnéс Калчесnéс Калчесnéс Калчесnéс Калчесnéс Калчесnéс Калчесnéс Калчесnéс Калчесnéс Калчесnéс Калчесnéс Калчесnéс Kалчесnéс Калчесnéс Калчесnéс Калчесnéс Калчесnéс Калчесnéс Калчесnéс Калчесnéс Калчесnéс Калчесnéс Калчесnéс Калчесnéс Калчесnéс Калчесnéс Калнчесnéс Калчесnéс Калчесnéс Калчесnéс Калчесnéс Калчесnéс Калчесnéс Калчесnéс Калчесnéс Калчесnéс Калчесnéс Калчесnéс Калчесnéс Калчесnéс Калчessional Калчessional Калчessional Калчessional Калчessional Калчessional Калчessional Калчessional Калчessional Калчessional Калчessional Калчessional Калчessional Калчessional Калчessional Калчessional Калчessional Калчessional Калчessional Калчessional Калчession Калчessional Калчessional Калчessional Калчessional Калчessional Калчessional Калчessional Калчessional Калчessional Калчessional Калчessional Калчessional Калчessional Калчessional Калчessional Калчessional Калчessional Калчessional Калчessional Калчersion Калчessional Калчessional Калчessional Калчessional Калчessional Калчessional Калчessional Калчessional Калчessional Калчessional Калчessional Калчessional Калчessional Калчessional Калчessional Калчessional Калчessional Калчessional Калчessional Калчicial Калчicial Калчicial Калчicial Калчicial Калчicial Калчicial Калчicial Калчicial Калчicial Калчicial Калчicial Калчicial Калчicial Калчicial Калчicial Калчicial Калчicial Калчicial Калчicial КалчICIAL Калчicial Калчicial Калчicial Калчicial Калчicial Калчicial Калчicial Калчicial Калчicial Калчicial Калчicial Калчicial Калчicial Калчicial Калчicial Калчicial Калчicial Калчicial Калчicial Калчitial Калчicial Калчicial Калчicial Калчicial Калчicial Калчicial Калчicial Калчicial Калчicial Калчicial Калчicial Калчicial Калчicial Калчicial Калчicial Калчicial Калчicial Калчicial Калчicial Калчustrial Калчicial Калчicial Калчicial Калчicial Калчicial Калчicial Калчicial Калчicial Калчicial Калчicial Калчicial Калчicial Калчicial Калчicial Калчicial Калчicial Калчicial Калчicial Калчicial Калчacial Калчicial Калчicial Калчicial Калчicial Калчicial Калчicial Калчicial Калчicial Калчicial Калчicial Калчicial Калчicial Калчicial Калчicial Калчicial Калчicial Калчicial Калчicial Калчicial Калчiew Калчicial Калчicial Калчicial Калчicial Калчicial Калчicial Калчicial Калчicial Калчicial Калчicial Калчicial Калчicial Калчicial Калчicial Калчicial Калчicial Калчicial Калчicial Калчicial Калч熹 Калчicial Калчicial Калчicial Калчicial Калчicial Калчicial Калчicial Калчicial Калчicial Калчicial Калчicial Калчicial Калчicial Калчicial Калчicial Калчicial Калчicial Калчicial Калчicial Калчomial Калчicial Калчicial Калчicial Калчicial Калчicial Калчicial Калчicial Калчicial Калчicial Калчicial Калчicial Калчicial Калчicial Калчicial Калчicial Калчicial Калчicial Калчicial Калчicial Калчificial Калчicial Калчicial Калчicial Калчicial Калчicial Калчicial Калчicial Калчicial Калчicial Калчicial Калчicial Калчicial Калчicial Калчicial Калчicial Калчicial Калчicial Калчicial Калчicial Калчificates Калчicial Калчicial Калчicial Калчicial Калчicial Калчicial Калчicial Калчicial Калчicial Калчicial Калчicial Калчicial Калчicial Калчicial Калчicial Калчicial Калчicial Калчicial Калчicial Калчaceutical Калчicial Калчicial Калчicial Калчicial Калчicial Калчicial Калчicial Калчicial Калчicial Калчicial Калчicial Калчicial Калчicial Калчicial Калчicial Калчicial Калчicial Калчicial Калчicial Калчival Калчicial Калчicial Калчicial Калчicial Калчicial Калчicial Калчicial Калчicial Калчicial Калчicial Калчicial Калчicial Калчicial Калчicial Калчicial Калчicial Калчicial Калчicial Калчicial Калчical Калчicial Калчicial Калчicial Калчicial Калчicial Калчicial Калчicial Калчicial Калчicial Калчicial Калчicial Калчicial Калчicial Калчicial Калчicial Калчicial Калчicial Калчicial Калчicial Калчcial Калчicial Калчicial Калчicial Калчicial Калчicial Калчicial Калчicial Калчicial Калчicial Калчicial Калчicial Калчicial Калчicial Калчicial Калчicial Калчicial Калчicial Калчicial Калчicial Калчibal Калчicial Калчicial Калчicial Калчicial Калчicial Калчicial Калчicial Калчicial Калчicial Калчicial Калчicial Калчicial Калчicial Калчicial Калчicial Калчicial Калчicial Калчicial Калчicial Калчual Калчicial Калчicial Калчicial Калчicial Калчicial Калчicial Калчicial Калчicial Калчicial Калчicial Калчicial Калчicial Калчicial Калчicial Калчicial Калчicial Калчicial Калчicial Калчicial Калчinal Калчicial Калчicial Калчicial Kalamchay Kalamchay Kalamchay Kalamchay Kalamchay Kalamchay Kalamchay Kalamchay Kalamchay Kalamchay Kalamchay Kalamchay Kalamchay Kalamchay Kalamchay Kalamchay Kalamchay Kalamchay Kalamchay Kalamchay Kalamchav Kalamchay Kalamchay Kalamchay Kalamchay Kalamchay Kalamchay Kalamchay Kalamchay Kalamchay Kalamchay Kalamchay Kalamchay Kalamchay Kalamchay Kalamchay Kalamchay Kalamchay Kalamchay Kalamchay Kalamch灰 Kalamch灰 Kalamch灰 Kalamch灰 Kalamch灰 Kalamch灰 Kalamch灰 Kalamch灰 Kalamch灰 Kalamch灰 Kalamch灰 Kalamch灰 Kalamch灰 Kalamch灰 Kalamch灰 Kalamch灰 Kalamch灰 Kalamch灰 Kalamch灰 Kalamch灰 Kalamch炭 Kalamch炭 Kalamch炭 Kalamch炭 Kalamch炭 Kalamch炭 Kalamch炭 Kalamch炭 Kalamch炭 Kalamch炭 Kalamch炭 Kalamch炭 Kalamch炭 Kalamch炭 Kalamch炭 Kalamch炭 Kalamch炭 Kalamch炭 Kalamch炭 Kalamch炭 Kalamch灰 Kalamch灰 Kalamch灰 Kalamch灰 Kalamch灰 Kalamch灰 Kalamch灰 Kalamch灰 Kalamch灰 Kalamch灰 Kalamch灰 Kalamch灰 Kalamch灰 Kalamch灰 Kalamch灰 Kalamch灰 Kalamch灰 Kalamch灰 Kalamch灰 Kalamch灰色 Kalamch灰 Kalamch灰 Kalamch灰 Kalamch灰 Kalamch灰 Kalamch灰 Kalamch灰 Kalamch灰 Kalamch灰 Kalamch灰 Kalamch灰 Kalamch灰 Kalamch灰 Kalamch灰 Kalamch灰 Kalamch灰 Kalamch灰 Kalamch灰 Kalamch灰 Kalamch火 Kalamch火 Kalamch火 Kalamch火 Kalamch火 Kalamch火 Kalamch火 Kalamch火 Kalamch火 Kalamch火 Kalamch火 Kalamch火 Kalamch火 Kalamch火 Kalamch火 Kalamch火 Kalamch火 Kalamch火 Kalamch火 Kalamch火 Kalamch灰 Kalamch灰 Kalamch灰 Kalamch灰 Kalamch灰 Kalamch灰 Kalamch灰 Kalamch灰 Kalamch灰 Kalamch灰 Kalamch灰 Kalamch灰 Kalamch灰 Kalamch灰 Kalamch灰 Kalamch灰 Kalamch灰 Kalamch灰 Kalamch灰 Kalamch 灰 Kalamch灰 Kalamch灰 Kalamch灰 Kalamch灰 Kalamch灰 Kalamch灰 Kalamch灰 Kalamch灰 Kalamch灰 Kalamch灰 Kalamch灰 Kalamch灰 Kalamch灰 Kalamch灰 Kalamch灰 Kalamch灰 Kalamch灰 Kalamch灰 Kalamch灰 Kalamch石灰 Kalamch灰 Kalamch灰 Kalamch灰 Kalamch灰 Kalamch灰 Kalamch灰 Kalamch灰 Kalamch灰 Kalamch灰 Kalamch灰 Kalamch灰 Kalamch灰 Kalamch灰 Kalamch灰 Kalamch灰 Kalamch灰 Kalamch灰 Kalamch灰 Kalamch灰 Kalamch无 Kalamch灰 Kalamch灰 Kalamch灰 Kalamch灰 Kalamch灰 Kalamch灰 Kalamch灰 Kalamch灰 Kalamch灰 Kalamch灰 Kalamch灰 Kalamch灰 Kalamch灰 Kalamch灰 Kalamch灰 Kalamch灰 Kalamch灰 Kalamch灰 Kalamch灰 Kalamch浅 Kalamch浅 Kalamch浅 Kalamch浅 Kalamch浅 Kalamch浅 Kalamch浅 Kalamch浅 Kalamch浅 Kalamch浅 Kalamch浅 Kalamch浅 Kalamch浅 Kalamch浅 Kalamch浅 Kalamch浅 Kalamch浅 Kalamch浅 Kalamch浅 Kalamch浅 Kalamch淺 Kalamch浅 Kalamch浅 Kalamch浅 Kalamch浅 Kalamch浅 Kalamch浅 Kalamch浅 Kalamch浅 Kalamch浅 Kalamch浅 Kalamch浅 Kalamch浅 Kalamch浅 Kalamch浅 Kalamch浅 Kalamch浅 Kalamch浅 Kalamch浅 Kalamch浅 Kalamch深 Kalamch浅 Kalamch浅 Kalamch浅 Kalamch浅 Kalamch浅 Kalamch浅 Kalamch浅 Kalamch浅 Kalamch浅 Kalamch浅 Kalamch浅 Kalamch浅 Kalamch浅 Kalamch浅 Kalamch浅 Kalamch浅 Kalamch浅 Kalamch浅 Kalamch浅 Kalamch淡 Kalamch浅 Kalamch浅 Kalamch浅 Kalamch浅 Kalamch浅 Kalamch浅 Kalamch浅 Kalamch浅 Kalamch浅 Kalamch浅 Kalamch浅 Kalamch浅 Kalamch浅 Kalamch浅 Kalamch浅 Kalamch浅 Kalamch浅 Kalamch浅 Kalamch浅 Kalamch缓 Kalamch浅 Kalamch浅 Kalamch浅 Kalamch浅 Kalamch浅 Kalamch浅 Kalamch浅 Kalamch浅 Kalamch浅 Kalamch浅 Kalamch浅 Kalamch浅 Kalamch浅 Kalamch浅 Kalamch浅 Kalamch浅 Kalamch浅 Kalamch浅 Kalamch浅 Kalamch软 Kalamch浅 Kalamch浅 Kalamch浅 Kalamch浅 Kalamch浅 Kalamch浅 Kalamch浅 Kalamch浅 Kalamch浅 Kalamch浅 Kalamch浅 Kalamch浅 Kalamch浅 Kalamch浅 Kalamch浅 Kalamch浅 Kalamch浅 Kalamch浅 Kalamch浅 Kalamch灰 Kalamch灰 Kalamch灰 Kalamch灰 Kalamch灰 Kalamch灰 Kalamch灰 Kalamch灰 Kalamch灰 Kalamch灰 Kalamch灰 Kalamch灰 Kalamch灰 Kalamch灰 Kalamch灰 Kalamch灰 Kalamch灰 Kalamch灰 Kalamch灰 Kalamch缓 Kalamch缓 Kalamch缓 Kalamch缓 Kalamch缓 Kalamch缓 Kalamch缓 Kalamch缓 Kalamch缓 Kalamch缓 Kalamch缓 Kalamch缓 Kalamch缓 Kalamch缓 Kalamch缓 Kalamch缓 Kalamch缓 Kalamch缓 Kalamch缓 Kalamch缓 Kalamch援 Kalamch缓 Kalamch缓 Kalamch缓 Kalamch缓 Kalamch缓 Kalamch缓 Kalamch缓 Kalamch缓 Kalamch缓 Kalamch缓 Kalamch缓 Kalamch缓 Kalamch缓 Kalamch缓 Kalamch缓 Kalamch缓 Kalamch缓 Kalamch缓 Kalamch缓 Kalamch爱 Kalamch爱 Kalamch爱 Kalamch爱 Kalamch爱 Kalamch爱 Kalamch爱 Kalamch爱 Kalamch爱 Kalamch爱 Kalamch爱 Kalamch爱 Kalamch爱 Kalamch爱 Kalamch爱 Kalamch爱 Kalamch爱 Kalamch爱 Kalamch爱 Kalamch爱 Kalamch缓 Kalamch缓 Kalamch缓 Kalamch缓 Kalamch缓 Kalamch缓 Kalamch缓 Kalamch缓 Kalamch缓 Kalamch缓 Kalamch缓 Kalamch缓 Kalamch缓 Kalamch缓 Kalamch缓 Kalamch缓 Kalamch缓 Kalamch缓 Kalamch缓 Kalamch緩 Kalamch缓 Kalamch缓 Kalamch缓 Kalamch缓 Kalamch缓 Kalamch缓 Kalamch缓 Kalamch缓 Kalamch缓 Kalamch缓 Kalamch缓 Kalamch缓 Kalamch缓 Kalamch缓 Kalamch缓 Kalamch缓 Kalamch缓 Kalamch缓 Kalamch缓 Kalamch缓慢 Kalamch缓 Kalamch缓 Kalamch缓 Kalamch缓 Kalamch缓 Kalamch缓 Kalamch缓 Kalamch缓 Kalamch缓 Kalamch缓 Kalamch缓 Kalamch缓 Kalamch缓 Kalamch缓 Kalamch缓 Kalamch缓 Kalamch缓 Kalamch缓 Kalamch缓 Kalamch缓冲 Kalamch缓 Kalamch缓 Kalamch缓 Kalamch缓 Kalamch缓 Kalamch缓 Kalamch缓 Kalamch缓 Kalamch缓 Kalamch缓 Kalamch缓 Kalamch缓 Kalamch缓 Kalamch缓 Kalamch缓 Kalamch缓 Kalamch缓 Kalamch缓 Kalamch缓 Kalamch 缓 Kalamch缓 Kalamch缓 Kalamch缓 Kalamch缓 Kalamch缓 Kalamch缓 Kalamch缓 Kalamch缓 Kalamch缓 Kalamch缓 Kalamch缓 Kalamch缓 Kalamch缓 Kalamch缓 Kalamch缓 Kalamch缓 Kalamch缓 Kalamch缓 Kalamch缓 Kalamch级 | 11 |
| 11 | 11 | ||
| 11 | — | ||
| 11 | — | ||
| 11 | — | ||
| 11 | — | ||
| 11 | — | ||
| 11 | — | ||
| 11 | — | ||
| 11 | — | ||
| 11 | — | ||
| 11 | — | ||
| 11 | — | ||
| 11 | — | ||
| 11 | — | ||
TEXHUNCHECKHEXAPAKTEPNCNTIKN
PA3DEI AYDNO
LINE IN
BxHoe rHoo
USB
Bxioioe rno.. USB (tnn B), no. depknaetra USB2.0
PiueepKHBacMbI cHactOttb HckpeTn3aHH 384/352,8/192/176,4/96/88,2/48/44.1 K
- Tnybma cToba PCM 32/24/16 6nt
DSD 2,8224/5,6448 MTu
■ SPEAKERS
- MACHMBAH BBAXOAH MIOOHCTB (6Ω,1KTH, KHN10% 70BT+70BT
- yactotnna xapaKtepcHTHka (or 10 I n do 40 kI) .03
KoΦΦHHeHT HeIeHbHX HcKBeHH (30BT/6Ω,1kT) 0.05%HHMHcMb
PHONES
BbXIOHOyOBCHbBbXIOHOc COIOPTBHJIICHE (BxoT 1 KI,230 MB,32 Ω oKIIe.) 500 MB/24 Ω
SUBWOOFER
- BixxoHIOI yOBoHH/BOxHOHoe cOpHTNHHe (HXo1 kTg, 230 mB) 2.0 B/1 kΩ
OBsNE CBEDEHNA
-3ncktponrrtaime...Or 220 do 240 B ncpemmioro toka,50/601
PiPe6JeHHe 3EeKIpOeHepn.. 30 Br
PiTope6JeHHe 3Ktpo3eHepn H bpckmoeokuaHH.0,5BT
-Γa6apHIIIbe pa3MepH (III×B×Γ) 314×70×342 MM
Bee 3,3
TexHHueckHe XapakreepnCTHKn MOYr H3MeHNbCh 6es yBeDOMeHN.
Important Notice: Guarantee Information for customers in EEA* and Switzerland
For detailed guarantee information about this Yamaha product, and Pan-EEA* and Switzerland warranty service, please either visit the website address below (Printable file is available at our website) or contact the Yamaha representative office for your country * EEA: European Economic Area


