RA103 - Sports smartwatch OREGON SCIENTIFIC - Free user manual and instructions
Find the device manual for free RA103 OREGON SCIENTIFIC in PDF.
| Product type | Sports smartwatch |
| Brand | Oregon Scientific |
| Model | RA103 (RA183 for 30 m version) |
| Power supply | 1 CR2032 3V lithium battery |
| Battery life | Varies by use (backlight, alarm, ski chrono) |
| Water resistance | RA103: 50 meters / RA183: 30 meters |
| Main functions | Altimeter, barometer, UV index, ski chrono (50 runs), temperature, atmospheric pressure, weather forecast, alarm, backlight, mountain trip (tour), optional PC mode |
| Altitude range | -400 to 9,000 m (-1,312 to 29,520 ft) |
| Altimeter resolution | 1 m / 3 ft |
| Pressure range | 300 to 1,100 hPa (local); 900 to 1,100 hPa (sea level) |
| Temperature range | -10 °C to 60 °C (14 °F to 140 °F) |
| UV index | 0-25, resolution 0.1 |
| Ski chrono | Countdown up to 99 s, memory for 50 runs |
| Display | LCD with backlight |
| PC connectivity | Optional kit AD103 (USB cable + software) |
| Care and cleaning | Soft slightly damp cloth; avoid abrasive products, hot water, shocks |
| Safety | Do not swallow battery; do not open; do not expose to heat sources |
| Spare parts and repairability | Replaceable CR2032 battery; no user-serviceable parts |
| Included accessories | Watch, battery installed, case |
| Warranty | Consult Oregon Scientific customer service |
Frequently Asked Questions - RA103 OREGON SCIENTIFIC
User questions about RA103 OREGON SCIENTIFIC
0 question about this device. Answer the ones you know or ask your own.
Ask a new question about this device
Download the instructions for your Sports smartwatch in PDF format for free! Find your manual RA103 - OREGON SCIENTIFIC and take your electronic device back in hand. On this page are published all the documents necessary for the use of your device. RA103 by OREGON SCIENTIFIC.
USER MANUAL RA103 OREGON SCIENTIFIC
Outbreaker Mountain-Ski / Outbreaker Mountain-Ski Medium Model: RA103 / RA183 USER MANUAL
CONTENTS
Introduction 2
Key Features 3
Watch 3
LCD Display 4
Getting Started 4
Unpack the Watch 4
Turn On the Watch (First-Time Use Only) 5
Batteries 5
Switch between Main Modes 6
Using the Clock 6
Set the Clock / Calendar / Measurement Units .... 6
View Clock Displays 7
Set the Daily Alarm / Time Zone 8
Turn the Alarm Sound Off 9
Activate / Deactivate the Alarm 9
Using the Altimeter-Barometer 9
About the Altimeter-Barometer.... 9
Set the Altitude 9
Altitude Bar Chart 10
View Altitude Displays 11
Additional Altitude Features 11
Max / Min Altitude 12
Total Accumulated Max / Min Altitude 12
Vertical Speed 12
Max Ascending / Descending Speed 12
Altitude Alarm 12
Sea Level 13
Weather Forecast 13
Using the Ski Timer 13
About the Ski Timer 13
Set the Ski Timer 14
Set the Auto-Stop 14
Set the Auto-Reload 15
Ski Timer Sound Alert 15
Record and View Runs 16
Sea Level Pressure Display 16
UV-B Measurement 17
Tour Mode 18
Tour Memory 18
Activate Tour Mode 18
Record Markers in Tour Mode 19
Pause Tour Mode 19
Deactivate Tour Mode 19
Clear All Tour Memories 20
PC Kit (Optional Item - Sold Separately) 20
Set Up for PC Mode 21
Using the Software 21
PC Mode Options 21
Download Data 22
Backlight 22
Keypad Lock 22
Specifications 23
Warnings and Care Instructions 24
About Oregon Scientific 25
INTRODUCTION
Thank you for selecting the Oregon Scientific™ Outbreaker Mountain-Ski / Outbreaker Mountain-Ski Medium (RA103 / RA183) watch as your product of choice. This precision device includes the following features:
- Ultraviolet (UV-B) measurement with UV Index Ski timer which measures and records run time, altitude variance and average vertical speed - 50 runs max.
- Altitude measurement with user-set alarms and bar chart display
• Temperature measurement - Barometric pressure measurement with sea level line chart display
• Large capacity TOUR memory stores all recorded data - User-friendly PC software for analysing TOUR data (optional)
- Weather forecast with 4 displays
- Clock, calendar and alarm functions with backlight
• Water resistant up to: - 50 metres RA103
- 30 metres RA183
This manual contains important safety and care information, and provides step-by-step instructions for using this product. Read the manual thoroughly, and keep it in a safe place in case you need to later refer to it.
IMPORTANT
- The measurement functions built into the RA103 / RA183 are not meant to substitute professional measurement or industrial precision devices. Values produced by this watch should be considered as reasonable representations only.
- Oregon Scientific™ assumes no responsibility for any loss, or any claims by third parties that may arise through the use of this watch.
KEY FEATURES
WATCH
RA103 RA183
- UV sensor.
- SELECT / -: View screen displays within a main mode; decrease setting value; record a marker during TOUR Mode.
- ☎ / OTurn ON backlight for 5 seconds; lock / unlock the keypad.
- MODE: Switch to another Mode; quick exit during any setting mode.
- UV / +: View UVI display; increase setting value.
- ST / SP: Start / Stop timer.
- FUNC / SET: Enter setting mode; select another setting option; confirm setting value.
- LCD display.
- Altitude sensor.
LCD DISPLAY
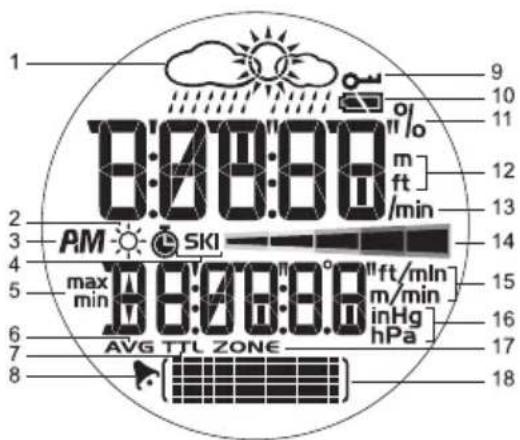
- Weather Forecast: 4 weather displays.
- ⚙: UV Index is shown.
- AM / PM: 12-hour clock is being used.
- SKI: Ski timer is shown or running.
- max / min: Max / Min altitude or speed readings.
- AVG: Average speed, altitude variance.
- TTL: Total time is displayed.
- ▶: Daily alarm is activated.
- ☐: Keypad lock is enabled.
- Battery status.
-
%: Percentage of the TOUR memory that has been used.
-
m / ft: Altitude units - metres or feet.
- /min: Metres or feet per minute.
- ——: UV Index scale.
- ft/min or m/min: Metres or feet per minute.
- inHg / hPa: Barometric pressure units.
- ZONE: Time zone hour offset.
- : Shows sea level chart; altitude bar chart; status of a setting.
GETTING STARTED
UNPACK THE WATCH
When you unpack your Outbreaker Ski watch, make sure to keep all the packing materials in a safe place, in case you need to later transport or return the product for servicing.
In this box, you will find:
- Watch
- 1 x CR2032 (3V) lithium battery - already installed
- Storage box
Compatible items sold separately:
- USB connection cable with CD-ROM and installation software (AD103)
TURN ON THE WATCH (FIRST-TIME USE ONLY)
Press FUNC. / SET for 2 seconds to activate the LCD display.
BATTERIES
The watch uses a 1 x CR2032 lithium battery, which has already been installed. See below for battery warnings.
| LOW BATTERY ICON | DESCRIPTION |
| The watch battery is low | |
| -- Appears when | the battery is too lowto operate the sensor. “--” is showninstead of temperature, altitude, UVIand barometer readings. The barand line charts will also be frozen |
NOTE Heavy use of the backlight, altitude alarm and ski timer will reduce the battery service life significantly.
To replace the watch battery:
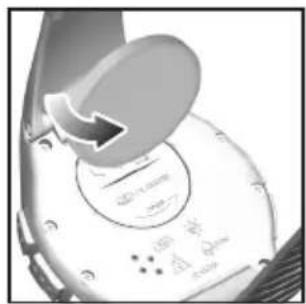
natural_image
Close-up of a mechanical component with a circular dial and arrow indicator (no readable text or symbols)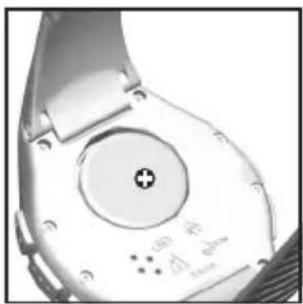
natural_image
Close-up of a smartwatch with a circular dial and plus button (no visible text or symbols)- Locate the battery compartment on the back of the watch.
- Using a coin, as shown above, twist the compartment lid counter-clockwise until it clicks out of place.
- With your finger, remove the old battery.
- Insert the new battery with the + side upwards.
- Replace the battery compartment lid by twisting it clockwise until it is firmly in place.
NOTE When you replace the batteries it is important to re-calibrate the altitude or sea level. To re-calibrate the watch you simply set the current altitude or sea level. (See "Set the Altitude" or "Sea Level" section.)
IMPORTANT
• Non-rechargeable and rechargeable batteries must be disposed of properly. For this purpose, special containers are provided for non-rechargeable and rechargeable battery disposal at communal collection centres.
- Batteries are extremely dangerous when swallowed! Therefore, keep batteries and the article away from infants. If a battery has been swallowed seek immediate medical advice.
- The batteries supplied must not be recharged, reactivated by any other means, dismantled, put into fire or short-circuited.
SWITCH BETWEEN MAIN MODES
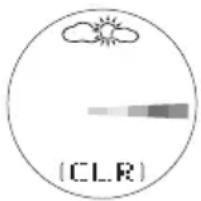
There are 4 main modes: Clock, Altimeter-Barometer, Ski Timer and PC. Each main mode displays a banner screen telling you which mode you are entering. After 1 second the banner screen is automatically replaced by the main mode screen.
Press MODE to switch between the 4 main modes.
| MODE BANNER | MAIN MODE | |
| CLOCK |  |  |
| ALTI-BARO |  | 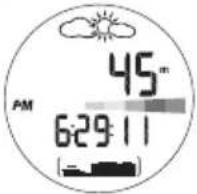 |
| SKI TIMER |  | 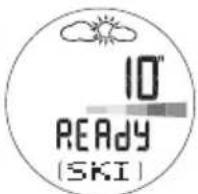 |
| PC | 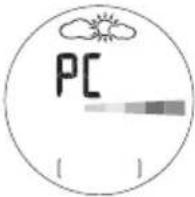 | 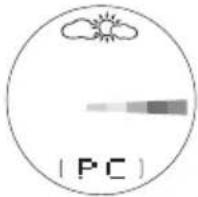 |
USING THE CLOCK
SET THE CLOCK/CALENDAR/MEASUREMENT UNITS
The real-time clock is the default display for the watch.
To set the clock:
![24h [SET]](/content/2026/03/428423/images/7d607c4360d5ae6e5252216e4b63f90c9c1a4aab227a100861fd93d25785d875.jpg)
- Press MODE to switch to Clock Mode.
- Press and hold SET until the first setting flashes.
- Press + or - to change the setting. Hold to speed through the options. Press SET to confirm the setting and move on to the next one.
- Repeat step 3 to change other settings for this mode.
The order of the clock settings is:
• 12 / 24 hour clock format
• Hour
- Minute
• Year
• DD:MM or MM:DD date format
• Month
• Day
• Temperature unit - °C / °F
• Altitude unit - metres / feet
• Pressure unit - inHg / hPa
NOTE The clock is programmed with a 96-year auto-calendar, which means you do not need to reset the day and date each month.
NOTE The temperature, distance and pressure units you set in the Clock Mode will apply to all modes.
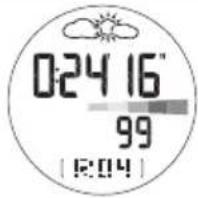
VIEW CLOCK DISPLAYS
Within the Clock Mode there are 8 different screen displays. To switch between them:
- Press MODE to navigate to the Clock Mode.
- Press SELECT to scroll through the different clock screen displays.
| Clock with Date Clock with Clock with Seconds | Altitude | |
 |  |  |
| Clock with Sea Clock with Local Clock with UV Pressure Pressure Index | ||
 |  |  |
Clock with Ski Clock with Timer Temperature
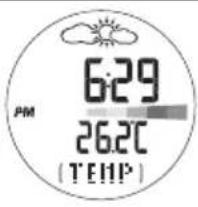
NOTE When wearing the watch, the temperature measured could be affected by body heat. To acquire an accurate temperature reading, remove the watch from your wrist and wait for about 15 minutes before taking the reading.
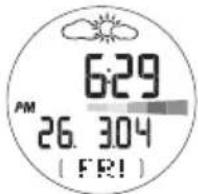
SET THE DAILY ALARM / TIME ZONE
From any of the 8 clock screen displays you can set the:
• Daily Alarm - When activated the alarm will go off daily at the set time
- Time Zone Offset - Offsets the time setting when you are in a different time zone (+ / - 23 hours)
- Press FUNC to select daily alarm or time zone.
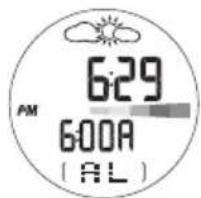
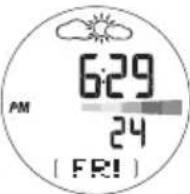
![6:29 PM 26.304 [ FRI ]](/content/2026/03/428423/images/4757ff1b718e4543d5b6aaf5cad608fce90455b692a1a2b9f2322d8759a63bfd.jpg)
- Press and hold SET to enter setting mode.
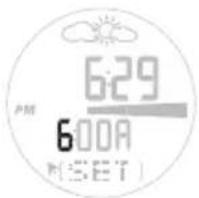
![OHR [SET]](/content/2026/03/428423/images/7316cc7a152c1c6aa3db3da8a180afe2b7e56868cf525fc14472045cc720b3be.jpg)
- Press + or - to change the setting. (Press and hold to speed through the options.)
- Press SET to confirm the setting. Once the setting is complete the display will return to the previous clock display screen.
TURN THE ALARM SOUND OFF
The alarm will sound for 1 minute. Press any key to turn the alarm sound OFF. The alarm will automatically reset itself unless you deactivate it.
ACTIVATE / DEACTIVATE THE ALARM
Press MODE to navigate to Clock Mode. Press SET, then press + to activate or deactivate the alarm.▶ shows when the alarm is activated.
USING THE ALTIMETER-BAROMETER
ABOUT THE ALTIMETER-BAROMETER
The watch is equipped with an intelligent barometer that determines altitude by the built-in sensor with the advanced Baro-compensation technology. The sensor can also distinguish the differences between pressure caused by the changes in physical altitudes and pressure caused by weather conditions. This smart distinction eliminates discrepancies and makes the altimeter reading more accurate than most of the average devices available on the market.
The altimeter measures altitude in either metres or feet and can store and recall the:
• Maximum / minimum altitudes attained during your trip
- Total accumulated maximum / minimum altitudes attained during your trip
• Maximum ascending / maximum descending speeds Current vertical speed
• Maximum / minimum altitude alert (sounds an alarm when exceeded)
SET THE ALTITUDE
To set the altitude:
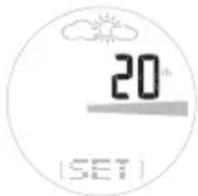
- Press MODE to switch to Alti-Baro Mode.
- Press and hold SET until the first setting flashes.
- Press + or - to change the setting, or press and hold to speed through the options. Press SET to confirm the setting.
To effectively set the altimeter you need to know the correct altitude. To do this:
- Obtain a topographical map; find your location and its related altitude reading.
OR
- Set the sea level pressure on your watch.
IMPORTANT
- This unit employs a semiconductor pressure sensor that could be affected by temperature change. While taking the altitude measurement, ensure that the unit is not exposed to sudden temperature changes.
- It is recommended to calibrate the altitude or sea level pressure regularly to maintain the accuracy of the watch. To re-calibrate the watch you simply set the current altitude or sea level. (See “Set the Altitude” or “Sea Level” section.)
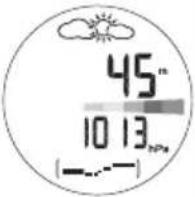
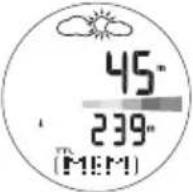
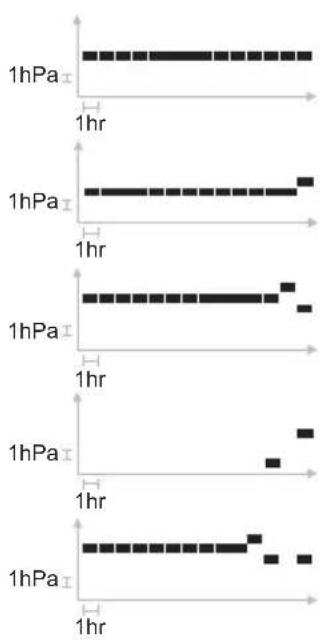
ALTITUDE BAR CHART
The altitude bar chart at the bottom of the display shows the altitude history. It consists of 7 rows and 14 columns.
The latest reading is entered in the right hand column and always at the height of the 4th row. Therefore, all the other readings will adjust their position to reflect the latest reading.

bar
| Time | Value | |------|-------| | 1min | 20m |NOTE 1 row = 20m (20m = 65.6ft) 1 column = 1 min
Look at your watch to see what your current altitude level is, then look at the bar chart to see the changes in altitude. See the table below for how to read the bar chart in more detail.
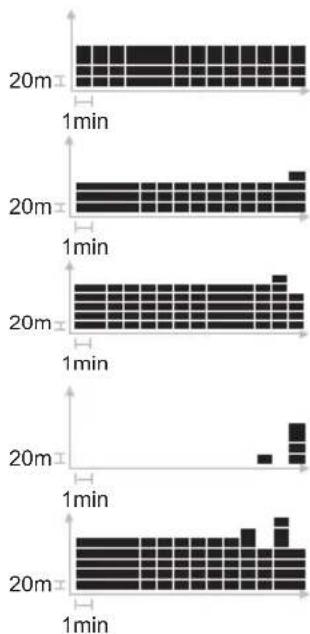
- Altitude level 400m. User walking on a flat road
- Altitude level 420m. (Increase of 20m)
- Altitude level 380m. (Decrease of 40m)
- Altitude level 480m. (Increase of 100m)
- Altitude level 380m. (Decrease of 100m)
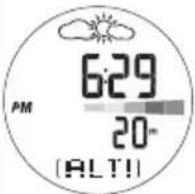
VIEW ALTITUDE DISPLAYS
Within the Altimeter-Barometer Mode there are 6 different altitude screen displays. To switch between them:
- Press MODE to navigate to the Alti-Baro Mode.
- Press SELECT to scroll through the different altitude screen displays.
| Altitude with Clock | Altitude with Sea Pressure Pressure | Altitude with Local |
 |  |  |
| Altitude with UVI Altitude with Ski Altitude with Timer Temperature | ||
 |  |  |
ADDITIONAL ALTITUDE FEATURES
From any of the 6 altitude screen displays, press FUNC to scroll through the following screens:
| Max / Min Altitude T | Total Max / Min Current Altitude Speed | Vertical |
 |  |  |
| Max Ascending or Descending Speed | Altitude Alarm Setting | Sea Level Setting |
 |  |  |
Weather Icon Setting
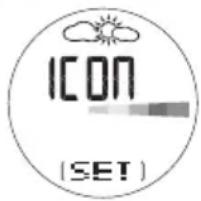
For further information on these features see the relevant section heading below.
MAX / MIN ALTITUDE
This screen shows the highest or lowest point you have reached so far in relation to your watch's permanent altitude setting.
- Press + to toggle between max and min altitude.
- Press and hold SET to make the max or min altitude your current height reading.
TOTAL ACCUMULATED MAX / MIN ALTITUDE
This screen shows the total distance you have ascended or descended; that is, every incline is added together or 'accumulated', and likewise every decline is added and 'accumulated', to give a total.
- Press + to toggle between total max and min altitude.
- Press and hold SET to clear the reading.
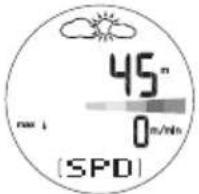
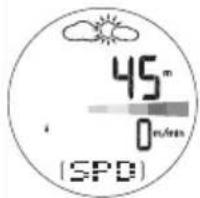
VERTICAL SPEED
This screen shows how fast you are currently climbing.
MAX ASCENDING / DESCENDING SPEED
This screen shows the fastest speed you have ascended or descended.
- Press + to toggle between the max up or down speed.
- Press and hold SET to clear the reading.
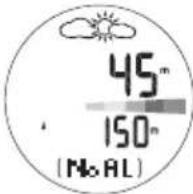
ALTITUDE ALARM
The ascending or descending altitude alarm will be turned on when the set altitude is reached during an ascent or descent respectively.
- Press + to activate (or deactivate) the altitude alarm.
- Press and hold SET to enter setting mode.
- Press + or - to change the setting.
- Press SET to confirm.
Press any key to stop the alarm sound. If the set value is reached again, the alarm will be re-activated.
NOTE Setting the altitude affects the sea level pressure.
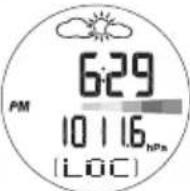
SEA LEVEL
For an accurate reading, you must first set the sea level to calibrate the watch. Once the sea level pressure is calibrated, the altitude will automatically calibrate to the reference altitude using the built-in auto-calibration function.
Information on the current sea level pressure can be found in newspapers, local news and radio reports, or on the Internet.
- Press and hold SET to enter the sea level setting mode.
- Press + or - to change the setting.
- Press SET to confirm.
NOTE It is necessary to re-calibrate the sea level pressure or altitude if the product is placed in a pressurised cabinet such as an aeroplane.
WEATHER FORECAST
This product forecasts the weather for the next 12 to 24 hours within a 30-50 km (19-31 mile) radius. The weather forecast is based on barometric pressure trend readings.
| SUNNY PARTLY CLOUDY CLOUDY | Y RAINY | ||
NOTE If the watch is subjected to fluctuating altitude levels the weather forecast may disappear. Simply stay at the same altitude for 5 minutes and the weather forecast will reappear.
- Press and hold SET to enter weather forecast setting mode.
- Press + or - to change the setting.
- Press SET to confirm.
NOTE The manufacturer is not responsible for any inconveniences caused by faulty weather forecast.
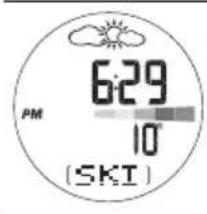
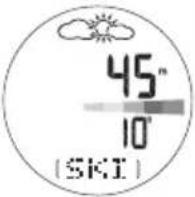
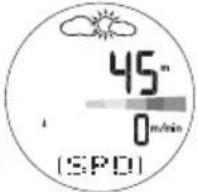
USING THE SKI TIMER
ABOUT THE SKI TIMER
SKI TIMER
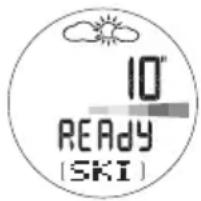
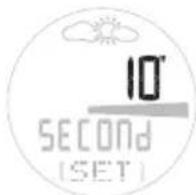
The ski timer has a user-selectable countdown timer - the default setting is 10 seconds.
When the countdown timer has reached zero, it will beep and automatically start to count up in ski timer. This function is particularly useful when you are getting ready to do a timed run but need a few seconds before the count up timer starts to put on your gloves and get ready to ski.
AUTO-RELOAD
You can set the timer to automatically reload when you reach a pre-set altitude. Therefore, when you get back to the top of a run all you have to do is press ST to activate the countdown timer.
To activate this function, you must turn it ON and set the altitude reload height. The altitude reload height is relative to the base-level height that you set in the auto-stop feature.
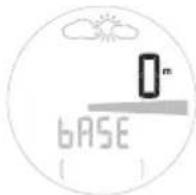
AUTO-STOP
You can set the timer to automatically stop when you go below a pre-set altitude. This means that when you are timing a run you do not have to stop the timer manually.
To activate this function, turn it ON and set the base level as shown in the "Set the Auto-Stop" section below.
SET THE SKI TIMER
To set the ski timer:
- Press MODE to navigate to Ski Timer Mode. The last countdown time will display on the screen.
Either:
- Press ST / SP to start and stop the countdown timer. Or:
- Press and hold SET to enter a new countdown time.
- Use + or - to change the setting.
- Press SET to confirm.
SET THE AUTO-STOP
To set auto-stop:
- Press MODE to navigate to Ski Timer Mode.
- Press and hold SET. Then press SET until you reach the screen below.

-
Use + or - to turn the auto-stop ON.
-
Press and hold SET to enter base level setting option.
- Use + or - to change the setting and press SET to confirm.
To quickly change the auto-stop base level when the auto-stop function is ON:
- Reload the ski timer.
-
Press and hold SELECT to automatically make your current altitude level become your base level reading.
-
To fine-tune the base level, press + or -. Press SET to confirm.
SET THE AUTO-RELOAD
To set auto-reload:
-
Press MODE to navigate to Ski Timer Mode.
-
Press and hold SET. Then press SET until you reach the screen below.

-
Use + or - to turn the auto-reload ON.
-
Press and hold SET to enter the reload altitude offset setting option. Use + or - to change the setting and press SET to confirm.
The countdown timer advises you of the countdown status with a series of beeps.
| COUNTDOWN TIME SOUND ALERT | |
| Last 5 secs 1 short beep each sec | |
| 0 sec 1 long beep | |
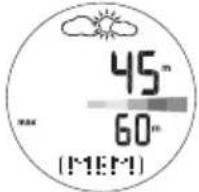
RECORD AND VIEW RUNS
The watch records up to 50 runs. The time, altitude variance and average speed is measured for each recording.
NOTE The watch automatically records a run when you use the countdown timer.
NOTE The word DIST is used on the screen display to represent altitude variance (see screen display below).
To view a run record:
- Press MODE to navigate to Ski Timer Mode.
- Press FUNC to scroll through the different run measurements.
| Time Altitude Average | ||
| Variance Speed | ||
 | 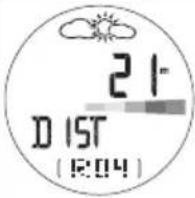 | 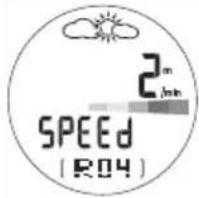 |
- Press + or - to view different runs.
To delete your last record or all records:
- Press and hold FUNC while viewing records.
- Press SET to select DEL 'ONE' (to delete your last record), or 'ALL'.
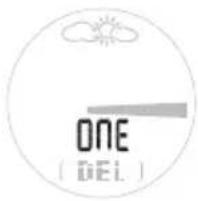
- Press and hold SET to confirm deletion.
NOTE When the memory is full, the first memory recorded will automatically be deleted.
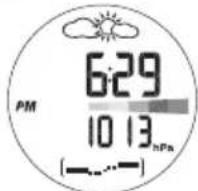
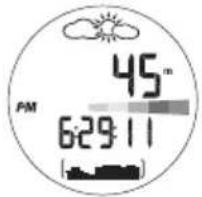
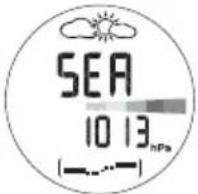
SEA LEVEL PRESSURE DISPLAY
The sea level history can be viewed as a measurement reading in hPa / inHg or as a line chart. It consists of 7 rows and 14 columns.
The latest reading is entered in the right hand column and always at the height of the 4th row. Therefore, all the other readings will adjust their position to reflect the latest reading.
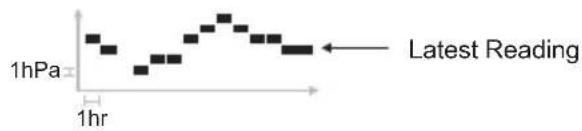
NOTE 1hPa = 0.02953inHg
Look at your watch to see what your sea level pressure is, then look at the line chart to see the changes in pressure. See the table below for how to read the line chart in more detail.
line
| Time | 1hPa | | ---- | ---- | | 1hr | 1hPa | | 1hr | 1hPa | | 1hr | 1hPa | | 1hr | 1hPa | | 1hr | 1hPa | | 1hr | 1hPa | | 1hr | 1hPa | | 1hr | 1hPa | | 1hr | 1hPa | | 1hr | 1hPa |-
Sea pressure level 5hPa.
-
Sea pressure level 6 hPa. (Increase of 1hPa)
-
Sea pressure level 4 hPa. (Decrease of 2hPa)
-
Sea pressure level 9 hPa. (Increase of 5hPa)
-
Sea pressure level 4 hPa. (Decrease of 5hPa)
NOTE The local pressure reading and sea level pressure reading will be updated every 2 seconds and hourly respectively.
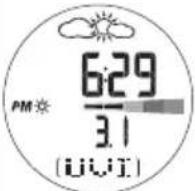
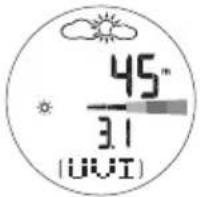
UV-B MEASUREMENT
The UV feature measures the level of Ultra-Violet Light and converts it into the bar chart readings detailed below.
To quickly view the UV Index bar chart, press the UV button.
How to read the UV Index bar chart:
| COLOUR UV INDEX MEANING | |
| Green 1-2 Low - apply sunscreen | |
| Yellow 3-5 Moderate - wear protective clothing | |
| Orange 6-7 High - wear sunglasses & protective clothing | |
| Red 8-10 Very high - avoid the sun between 10 am and 4 pm | |
| Purple <11 Extreme - very strong rays stay indoors |
NOTE The UVI reading is updated every 60 seconds.
NOTE Make sure your watch is pointing to the sun to get the most accurate UV-B reading.
IMPORTANT
The World Health Organisation advises the following precautions should be taken when exposing yourself to the sun:
Limit time in the midday sun - The sun's UV rays are the strongest between 10 am and 4 pm. To the extent possible, limit exposure to the sun during these hours.
Wear protective clothing - A hat with a wide brim offers good sun protection for your eyes, ears, face, and the back or your neck. Sunglasses that provide 99 to 100% UV-A and UV-B protection will greatly reduce eye damage from sun exposure. Tightly woven, loose fitting clothes will provide additional protection from the sun.
Use sunscreen - Apply a broad-spectrum sunscreen of minimum SPF 15+ liberally and re-apply every two hours. "Source — World Health Organization (www.who.org)"
TOUR MODE
TOUR MEMORY
The tour mode allows you to record and store local pressure, temperature and altitude data. The watch memory records skiing time, altitude variance and vertical speed. Both the Tour and watch memory can then be downloaded onto your PC. Up to 99 TOURs can be recorded and stored to the PC software. From the PC you can generate reports, compare results, and track performance across training events. For example, a tour memory PC report can comprise of:
• Tour number (1-99)
• Total tour duration
• Net tour duration (without breaks)
- Min / max altitude
- Ascending / descending distance
A skiing PC report can comprise of:
• Total time, min / max time
• Total distance, min / max distance
• Average speed, min / max speed
Model total recording time available
RA103 / RA183 - 480 min (8 hours)
Default sampling time for readings in TOUR Mode is every 5 seconds. To increase the gap between samplings, and thus increase the memory capacity, you can adjust this setting through the PC software.
NOTE The information from a TOUR can only be viewed through the PC software.
ACTIVATE TOUR MODE
For best results, perform these steps immediately before you begin your trip.
- Simultaneously press FUNC / SET and MODE. The TOUR END screen will display.
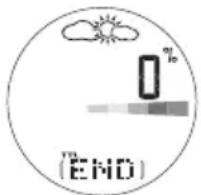
- Press and hold FUNC / SET for two seconds. The TOUR number (T1, T2, etc.) will show at the bottom of the display. You are now recording information. The percentage (%) at the top indicates the total used memory.
- To stop the TOUR, press and hold FUNC / SET for 2 seconds. END will show at the bottom of the display. The Tour data will be stopped.
- To begin another TOUR, press and hold FUNC / SET for 2 seconds. The new TOUR number (T3, etc.) will show at the bottom of the display. You are recording information again.
- Press MODE to return to the clock display.
NOTE Used watch memory is given as a percentage. It is recommended that you download information to your PC and clear all TOUR memories when this figure approaches 100%. When the used memory hits 100% it will no longer record, and any future readings will not be recorded.
RECORD MARKERS IN TOUR MODE
The marker function is used to mark a particular position during a TOUR. To place a marker, press and hold SELECT / - when the TOUR Mode is in use. The marker will only be shown in the PC data, once it has been downloaded from the watch.
PAUSE TOUR MODE
- If you are not already in TOUR Mode, simultaneously press FUNC / SET and MODE. The TOUR number will display. The percentage (%) at the top indicates the total used memory.
- Press FUNC / SET. REST shows at the bottom of the display.

- Press ST / SP to turn the rest on (paused) or off (recording).
DEACTIVATE TOUR MODE
For best results, perform these steps immediately after you end your trip.
- Simultaneously press FUNC / SET and MODE.
- The TOUR number will display. The percentage (%) at the top indicates the total used memory.
- Press and hold FUNC / SET for two seconds. This ENDS the TOUR recording session.
- Press MODE to return to the clock display.
CLEAR ALL TOUR MEMORIES
For best results, perform these steps after you download TOUR information to the PC software.
Either:
- Download the information to your PC (the TOUR will be automatically cleared).
Or:
- Deactivate the TOUR Mode. With the END screen shown, press the FUNC/SET button. CLR shows at the bottom of the display.
- Press and hold FUNC/ SET until donE shows at the bottom of the display.
- Press FUNC/SET again to display 0% and confirm all data has been cleared.
- Press MODE to return to the CLOCK display.
PC KIT (OPTIONAL ITEM - SOLD SEPARATELY)
The watch is compatible with a PC Kit that includes a USB connector cable and CD-ROM for downloading information to a personal computer.
Full instructions for using the software are provided in the help menu and can be viewed once you have installed the CD-ROM.
NOTE The PC Kit for the RA103 / RA183 series Outbreaker watch is sold separately. Contact the retailer or our website (www.oregonscientific.com) for more information about the AD103 PC Kit.
The PC Kit enables you to store and recall most of the information that is collected by the Outbreaker watch. This allows you to free up the watch memory for recording more information, while preserving the training records that are most important to you. For example, with the PC Kit you can specify which information you want to record in TOUR Mode: By limiting what is recorded, you can keep longer records. This can be useful if you wish to monitor your performance during an extended period such as a two-day hike, where only temperature, pressure and altitude are of concern, and vertical variance is important to you. Full details of the watch's memory capacity are given in the TOUR MEMORY section.
You can also use the PC Hook-up Kit to set values on the watch through the PC. A full list of options is given at the end of this section.
SET UP FOR PC MODE
To use the features of the PC Mode, you will need the PC Kit (includes USB connector cable and the installation software CD-ROM), and a PC or laptop computer.
- Install the software using the CD-ROM (first-time use only). The process is automatic, and requires you to respond to self-explanatory prompts. Once the software is installed, an Oregon Scientific icon will be placed on your desktop.
- Plug in the USB connector cable.
- Switch the watch to PC Mode.
USING THE SOFTWARE
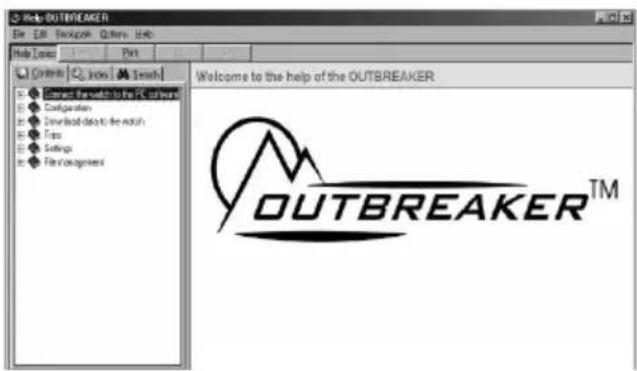
Double-click on the Oregon Scientific icon. Once the software opens, click on Help for information about the function you require.

PC MODE OPTIONS
You can perform the following tasks by using the CD-ROM software supplied.
ACCESS / RECALL CHANGE WATCH INFORMATION ON THE PC SETTINGS ON THE PC
• All information recorded in
TOUR Mode, including time, or a manual setting)
temperature and altitude. • Current sea-level
(Provided this data has pressure
been selected in "Data • Weather icon
should be stored" in the • TOUR Mode data
"Configuration menu" - recording and download see software help menu) options
- Back up / import and • Sampling rate (1 second export data and up)
- Define user data • Unit settings (Metric or
- Display graphical chart Imperial and print table
- Ski run data
- Date and time (set to PC
NOTE To send all selected settings and preferences to the watch select "Transfer configuration" in the "communication" sub-menu (PC software).
DOWNLOAD DATA
Follow these procedures to download data:
- After installing the CD-ROM click the "Oregon Scientific" icon on your PC.
- In the main menu, select "Communication".
- Connect the USB connector cable.
- Press MODE until you reach PC Mode.
- Clip the cable onto the watch. Make sure that pins are matched and secured.
- Select "Connect" in the "Communication" sub-menu of the PC software.
- You will see an arrow mark on the watch, and "download in progress" on your PC.
- Select "Read Trip Data" in the "Communication" submenu, then follow the on screen instructions.
- Select "Format" to process the data arrangement.
- Download is now complete. Select desired graphical report.
NOTE See the PC Kit (AD103) User Manual for further information.
BACKLIGHT
To turn the backlight ON for 5 seconds:
- Press 🔗.
- Press any other key while the light is on and it will extend the light time by another 5 seconds.
NOTE The backlight does not work when the low battery is shown and will return to normal once the batteries are replaced.
KEYPAD LOCK
To turn the keypad lock ON or OFF:
- Press and hold 📄 for 2 seconds to toggle between ON and OFF. When it is set to ON the 🔊 icon will appear on the display.
SPECIFICATIONS
| TYPE DESCRIPTION | |
| CLOCK | |
| Time format 12 hr / 24 hr | |
| Date format DD / MM or MM | / DD |
| Year format | 2004 - 2099 (auto-calendar) |
| Alarm Daily alarm | |
| SKI TIMER | |
| User-selectable countdown timer | 99 secs |
| Stopwatch / run 9:59:59 (hr:min:sec) / up to 50 runs | |
| UV INDEX | |
| Index level 0-25 | |
| Resolution 0.1 | |
| THERMOMETER | |
| Measuring range | -10°C to 60°C (14°F to 140°F) |
| Resolution | 0.1°C / 0.2°F |
| ALTIMETER | |
| Altitude display range -400 to 9000 m(-1312 to 29520 ft) | |
| Altitude setting -400 to 9000 m(-1312 to 29520 ft) | |
| Resolution 1 m / 3 ft | |
| BAROMETER | |
| Local air pressure display 300 to 1100 hPa /range 8.86 to 32.48 inHg | |
| Local air pressure 1 hPa / 0 resolution | 01 inHg |
| Sea level pressure display 9 | 00 to 1100 hPa /26.58 to 32.48 inHg |
| Sea level pressure setting 9 | 00 to 1100 hPa /26.58 to 32.48 inHg |
| Sea level pressure resolution | 1 hPa / 0.01 inHg |
| Weather forecast indication | Sunny, partly cloudy,cloudy and rainy |
| POWER | |
| Watch | 1 x CR2032 3V lithium battery |
| OPERATING ENVIRONMENT | |
| Operation temperature | -10°C to 60°C (14°F to 140°F) |
| Storage temperature | -20°C to 70°C (-4°F to 158°F) |
| Water resistant | 50 m / 164 ft (RA103) |
| 30 m / 98 ft (RA183) | |
WARNINGS AND CARE INSTRUCTIONS
To ensure you receive the maximum benefit from using this product, please observe the following guidelines:
- Clean the product with a soft, slightly moistened cloth. Do not use abrasive or corrosive cleaning agents, such as gasoline, chlorine, perfume, alcohol, hair spray, etc., as these may cause damage.
- Avoid pressing the keys with wet fingers, under water, or in heavy rain, as this may allow water to gain entry into the electrical circuitry.
- Do not subject the product to excessive force, shock, dust, temperature changes, or humidity. Never expose the product to direct sunlight for extended periods. Such treatment may result in malfunction.
- Do not tamper with the internal components. Doing so will terminate the product warranty and may cause damage. The main unit contains no user-serviceable parts.
- Do not touch the exposed electronic circuitry, as there is a danger of electric shock.
-
Do not scratch hard objects against the LCD display as this may cause damage.
• Take precautions when handling all battery types. -
Remove the batteries whenever you are planning to store the product for a long period of time.
- When replacing batteries, use new batteries as specified in this user manual.
- Do not use in hot water.
- When disposing of this product, do so in accordance with your local waste disposal regulations.
ABOUT OREGON SCIENTIFIC
Visit our website (www.oregonscientific.com) to learn more about Oregon Scientific products such as digital cameras; MP3 players; children's electronic learning products and games; projection clocks; health and fitness gear; weather stations; and digital and conference phones. The website also includes contact information for our customer care department in case you need to reach us, as well as frequently asked questions and customer downloads.
We hope you will find all the information you need on our website, however if you're in the US and would like to contact the Oregon Scientific Customer Care department directly, please visit: www2.oregonscientific.com/service/support
OR
Call 1-800-853-8883.
For international enquiries, please visit: www2.oregonscientific.com/about/international/default.asp

SCIENTIFIC
Outbreaker Mountain-Ski / Outbreaker Mountain-Ski Medium
Model: RA103 / RA183
USER MANUAL
© 2005 Oregon Scientific. All rights reserved.
086-003705-023
Outbreaker Mountain-Ski / Outbreaker
Mountain-Ski Medium
Modell: RA103/RA183
BEDIENUNGSANLEITUNG
INHALT
Einleitung 2
natural_image
Close-up of a mechanical component with a circular dial and a curved arrow, no visible text or symbols.
natural_image
Close-up of a smartwatch with a circular dial and indicator lights (no readable text or symbols)bar
| Time (min) | Bar Value | |---|---| | 20m | 20 | | 1min | 1 | | 20m | 20 | | 1min | 20 | | 20m | 20 | | 1min | 1 | | 20m | 20 | | 1min | 3 | | 20m | 20 | | 1min | 4 | | 20m | 20 | | 1min | 5 | | 20m | 20 | | 1min | 6 | | 20m | 20 | | 1min | 7 | | 20m | 20 | | 1min | 8 | | 20m | 20 | | 1min | 9 | | 20m | 20 | | 1min | 10 | | 20m | 20 | | 1min | 11 | | 20m | 20 | | 1min | 12 | | 20m | 20 | | 1min | 13 | | 20m | 20 | | 1min | 14 | | 20m | 20 | | 1min | 15 | | 20m | 20 | | 1min | 16 | | 20m | 20 | | 1min | 17 | | 20m | 20 | | 1min | 18 | | 20m | 20 | | 1min | 19 | | 20m | 20 | | 1min | 20 | | 20m | 3 | | 1min | 4 | | 20m | 5 | | 1min | 6 | | 20m | 7 | | 1min | 8 | | 20m | 9 | | 1min | 10 | | 20m | 11 | | 1min | 12 | | 20m | 13 | | 1min | 14 | | 20m | 15 | | 1min | 16 | | 20m | 17 | | 1min | 18 | | 20m | 19 | | 1min | 20 | | 20m | 30 | | 1min | 35 | | 20m | 40 | | 1min | 45 | | 20m | 50 | | 1min | 55 | | 20m | 60 | | 1min | 65 | | 20m | 70 | | 1min | 75 | | 20m | 80 | | 1min | 85 | | 20m | 90 | | 1min | 95 | | 20m | 100 | | 1min | 105 | | 20m | 110 | | 1min | 115 | | 20m | 120 | | 1min | 125 | | 20m | 130 | | 1min | 135 | | 20m | 140 | | 1min | 145 | | 20m | 150 | | 1min | 155 | | 20m | 160 | | 1min | 165 | | 20m | 170 | | 1min | 175 | | 20m | 180 | | 1min | 185 | | 20m | 190 | | 1min | 195 | | 20m | 200 | | 1min | -5 | | -3.5 (approx.) | -4.5 (approx.) | | -3.7 (approx.) | -4.7 (approx.) | | -3.9 (approx.) | -4.9 (approx.) | | -4.1 (approx.) | -5.1 (approx.) | | -4.3 (approx.) | -5.3 (approx.) | | -4.5 (approx.) | -5.5 (approx.) | | -4.7 (approx.) | -5.7 (approx.) | | -4.9 (approx.) | -5.9 (approx.) | | -5.1 (approx.) | -6.1 (approx.) | | -5.3 (approx.) | -6.3 (approx.) | | -5.5 (approx.) | -6.5 (approx.) | | -5.7 (approx.) | -6.7 (approx.) | | -5.9 (approx.) | -6.9 (approx.) | | -6.1 (approx.) | -7.1 (approx.) | | -6.3 (approx.) | -7.3 (approx.) | | -6.5 (approx.) | -7.5 (approx.) | | -6.7 (approx.) | -7.7 (approx.) | | -6.9 (approx.) | -7.9 (approx.) | | -7.1 (approx.) | -8.1 (approx.) | | -7.3 (approx.) | -8.3 (approx.) | | -7.5 (approx.) | -8.5 (approx.) | | -7.7 (approx.) | -8.7 (approx.) | | -7.9 (approx.) | -8.9 (approx.) | | -8.1 (approx.) | -9.1 (approx.) | | -8.3 (approx.) | -9.3 (approx.) | | -8.5 (approx.) | -9.5 (approx.) | | -8.7 (approx.) | -9.7 (approx.) | | -8.9 (approx.) | -9.9 (approx.) | | -9.1 (approx.) | -10.1 (approx.) | | -9.3 (approx.) | -10.3 (approx.) | | -9.5 (approx.) | -10.5 (approx.) | | -9.7 (approx.) | -10.7 (approx.) | | -9.9 (approx.) | -10.9 (approx.) | | -10.1 (approx.) | -11.1 (approx.) | | -10.3 (approx.) | -11.3 (approx.) | | -10.5 (approx.) | -11.5 (approx.) | | -10.7 (approx.) | -11.7 (approx.) | | -10.9 (approx.) | -11.9 (approx.) | | -11.1 (approx.) | -12.1 (approx.) | | -11.3 (approx.) | -12.3 (approx.) | | -11.5 (approx.) | -12.5 (approx.) | | -11.7 (approx.) | -12.7 (approx.) | | -11.9 (approx.) | -12.9 (approx.) | | -12.1 (approx.) | -13.1 (approx.) | | -12.3 (approx.) | -13.3 (approx.) | | -12.5 (approx.) | -13.5 (approx.) | | -12.7 (approx.) | -13.7 (approx.) | | -12.9 (approx.) | -13.9 (approx.) | | -13.1 (approx.) | -14.1 (approx.) | | -13.3 (approx.) | -14.3 (approx.) | | -13.5 (approx.) | -14.5 (approx.) | | -13.7 (approx.) | -14.7 (approx.) | | -13.9 (approx.) | -14.9 (approx.) | | -14.1 (approx.) | -15.1 (approx.) | | -14.3 (approx.) | -15.3 (approx.) | | -14.5 (approx.) | -15.5 (approx.) | | -14.7 (approx.) | -15.7 (approx.) | | -14.9 (approx.) | -15.9 (approx.) | | -15.1 (approx.) | -16.1 (approx.) | | -15.3 (approx.) | -16.3 (approx.) | | -15.5 (approx.) | -16.5 (approx.) | | -15.7 (approx.) | -16.7 (approx.) | | -15.9 (approx.) | -16.9 (approx.) | | -16.1 (approx.) | -17.1 (approx.) | | -16.3 (approx.) | -17.3 (approx.) | | -16.5 (approx.) | -17.5 (approx.) | | -16.7 (approx.) | -17.7 (approx.) | | -16.9 (approx.) | -17.9 (approx.) | | -17.1 (approx.) | -18.1 (approx.) | | -17.3 (approx.) | -18.3 (approx.) | | -17.5 (approx.) | -18.5 (approx.) | | -17.7 (approx.) | -18.7 (approx.) | | -17.9 (approx.) | -18.9 (approx.) | | -18.1 (approx.) | -19.1 (approx.) | | -18.3 (approx.) | -19.3 (approx.) | | -18.5 (approx.) | -19.5 (approx.) | | -18.7 (approx.) | -19.7 (approx.) | | -18.9 (approx.) | -20 | The data is presented in a table format with the same columns as follows: The table contains three rows of bars representing the bar values for each row, and the corresponding bar values are the same as the first row and last row for each row.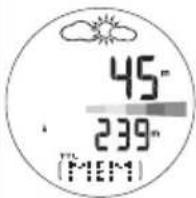
natural_image
Close-up of a mechanical component with a circular dial and a curved arrow, no visible text or symbols
natural_image
Close-up of a white electronic device with a circular button and plus symbol (no readable text or symbols)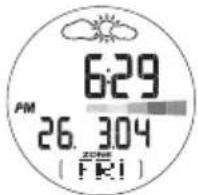
PARA ACCEDER AL PROGRAMA
OPCIONES DEL MODO PC
natural_image
Close-up of a mechanical component with a circular dial and a curved arrow, no visible text or symbols.
natural_image
Close-up of a smartwatch with a circular dial and plus button (no readable text or symbols)OPTIONS DU MODE PC
natural_image
Close-up of a mechanical component with a circular dial and a curved arrow, no visible text or symbols
natural_image
Close-up of a smartwatch with a circular dial and plus button (no readable text or symbols)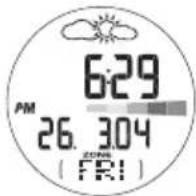
NOTA 1 riga = 20m (20m = 65.6ft)
1 colonna =1 min
NOTA 1hPa = 0.02953inHg
natural_image
Close-up of a mechanical component with a circular dial and a curved arrow, no visible text or symbols
natural_image
Close-up of a wristwatch with a circular dial and plus button, no visible text or symbolsOPTIES VAN DE PC-MODUS
natural_image
Close-up of a mechanical component with a circular dial and a curved arrow, no visible text or symbols
natural_image
Close-up of a white electronic device with a circular button and indicator lights (no readable text or symbols)
"Fonte — World Health Organization (OMS) (www.who.org)"
MODO TOUR
MEMÓRIA TOUR
OPÇÕES DO MODO PC
Warnings and Care Instructions 24
Om Oregon Scientific 24
INTRODUKTION
natural_image
Close-up of a mechanical component with a circular dial and a curved arrow, no visible text or symbols.
natural_image
Close-up of a wristwatch with a circular dial and plus button (no readable text or symbols)