
GP108 - Sports smartwatch OREGON SCIENTIFIC - Free user manual and instructions
Find the device manual for free GP108 OREGON SCIENTIFIC in PDF.
| Product type | GPS sports smartwatch |
| Model | GP108 |
| Brand | Oregon Scientific |
| Power supply | 1 UM3 (AA) 1.5 V battery |
| Display | LCD screen with touch backlight |
| Main functions | GPS speed and distance, stopwatch, lap counter, 99-lap memory, backlight, splash resistance |
| Measured speed range | 0 to 150 km/h or mph |
| Measured distance range | 0 to 9999 km / miles |
| Maximum number of laps in memory | 99 |
| GPS reception | Built-in, manual search, time synchronization by satellite |
| Water resistance | Splash resistant only |
| Operating temperature | -10 °C to 50 °C (14 °F to 120 °F) |
| Storage temperature | -15 °C to 70 °C (1 °F to 158 °F) |
| Maintenance and cleaning | Soft cloth, warm water and mild soap after each session. Do not use abrasive or corrosive products. |
| Safety | Do not disassemble, do not tamper with internal components, handle batteries with care, do not expose to excessive force or humidity |
| Included accessories | AA battery installed, strap |
| RTT&E compatibility countries | All European countries, Switzerland and Norway |
Frequently Asked Questions - GP108 OREGON SCIENTIFIC
User questions about GP108 OREGON SCIENTIFIC
0 question about this device. Answer the ones you know or ask your own.
Ask a new question about this device
Download the instructions for your Sports smartwatch in PDF format for free! Find your manual GP108 - OREGON SCIENTIFIC and take your electronic device back in hand. On this page are published all the documents necessary for the use of your device. GP108 by OREGON SCIENTIFIC.
USER MANUAL GP108 OREGON SCIENTIFIC
GPS Speed and Distance Monitor
Model: GP108
USER MANUAL
INDEX
Introduction ......2
Overview ......2
Front view ......2
Back view – battery compartment ....3
LCD screen .... 3
Getting started 3
Navigating through the options ....4
Key press prompts ....4
Modes ....4
Setting mode ....4
GPS 5
Start exercise ....5
Pause, resume / stop 6
Displays 6
Memory mode 6
Displays ....7
Clear records ....7
Backlight 8
Battery replacement 8
Water resistance 8
Specifications 8
Precautions 8
About Oregon Scientific 9
EU declaration of conformity 9
INTRODUCTION
Thank you for selecting the Oregon Scientific ^TM GPS speed and distance monitor (GP108). The GP108 uses GPS technology to detect your current position as you exercise. By constantly updating real time position, the GP108 instantaneously displays the total distance travelled, the current speed as well as determining the average and maximum speed reached for each exercise session or individual lap.
With a breathable strap and slim curved form, the GP108 was designed to be portable and an integral part of your exercise regime.
IMPORTANT
- The measurement functions built into the GP108 are not meant to substitute professional measurement or industrial precision devices. Values produced by this device should be considered as reasonable representations only.
- Oregon Scientific ^TM assumes no responsibility for any loss, or any claims by third parties that may arise through the use of this device.
OVERVIEW
FRONT VIEW
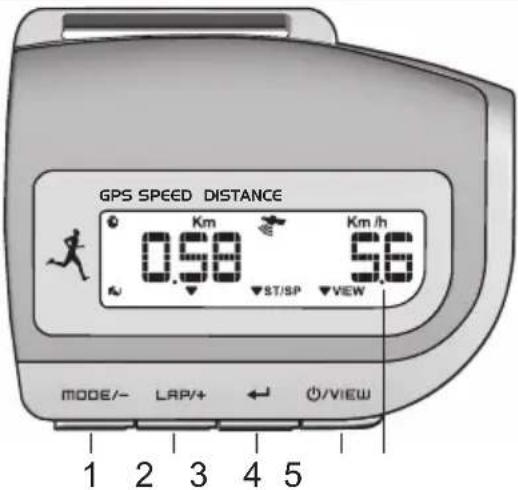
- MODE/-: toggle between modes; decrease value of the setting; toggle setting option; return to previous screen
- LAP/+: increase value of the setting; toggle setting options; record lap; toggle displays in memory mode
- ←: start / stop stopwatch; initiate / stop search for GPS signal; confirm setting
- ⏻/VIEW : turn unit on / off; toggle exercise displays
- Tap on lens: turn on backlight
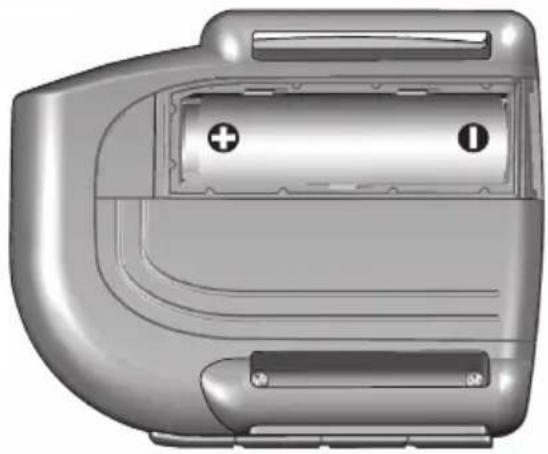
BACK VIEW – BATTERY COMPARTMENT
natural_image
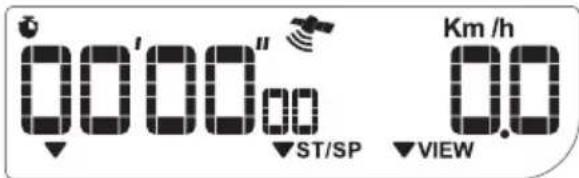
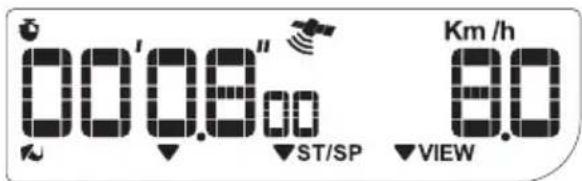
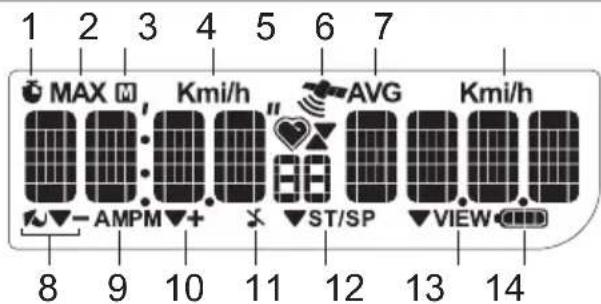
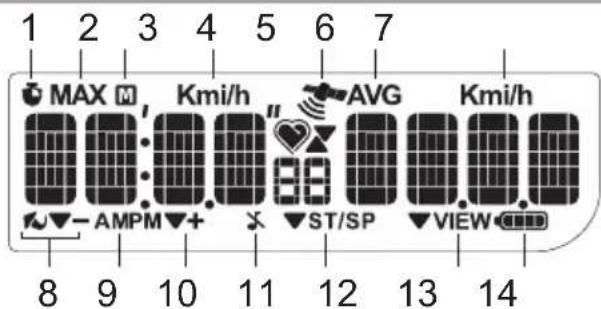
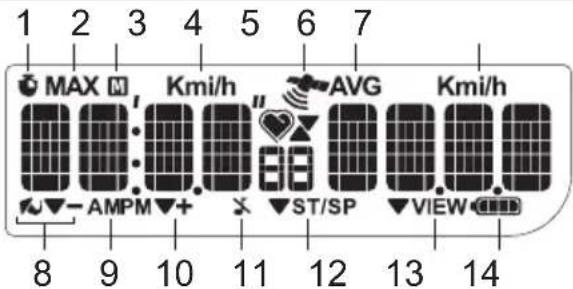
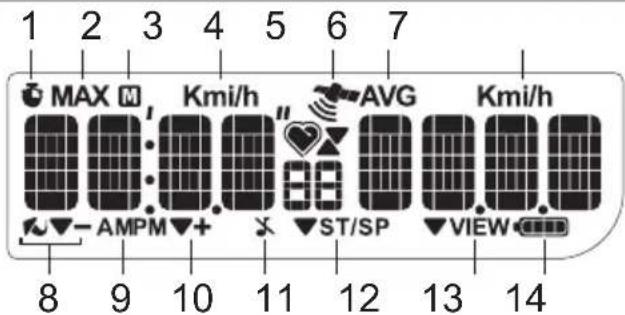
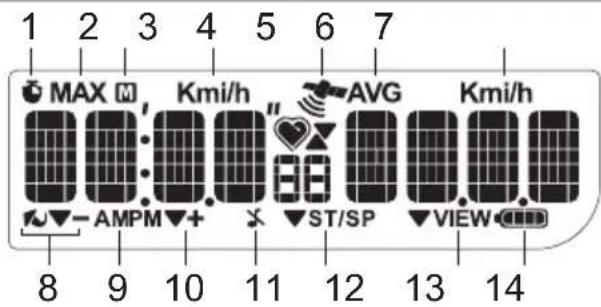
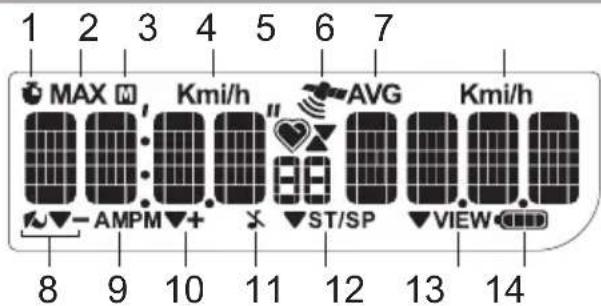
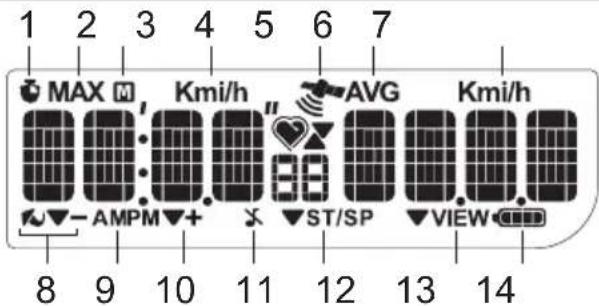
3D rendering of a mechanical component with labeled parts (no text or symbols visible)LCD SCREEN
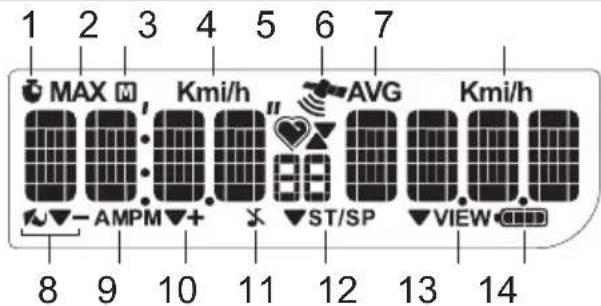
- stopwatch running
-
MAX: maximum speed and distance is displayed
-
: memory mode is displayed
- Kmi/h: distance / speed units, relates to digits shown directly below
- : GPS signal reception indicator
- AVG: average speed or distance is displayed
- Kmi/h: distance / speed units, relates to digits shown directly below
- .Key press prompt. Press MODE/-
- AM/PM: 12 hour format
- ▼: Key press prompt. Press LAP/+
- ♘ : key tone deactivated
- ▼ST/SP : Key press prompt. Press ←
- VIEW: Key press prompt. Press ⏻/VIEW
- battery power indicator
GETTING STARTED
Press and hold ⏻/VIEW until LCD display is activated.
NOTE If the device is being activated for the first time or after battery change, the unit will automatically enter setting mode and prompt you to do initial set up. (Go directly to 'Setting mode' section, step 2).
IMPORTANT
- Remember to set the device after every battery replacement or reset.
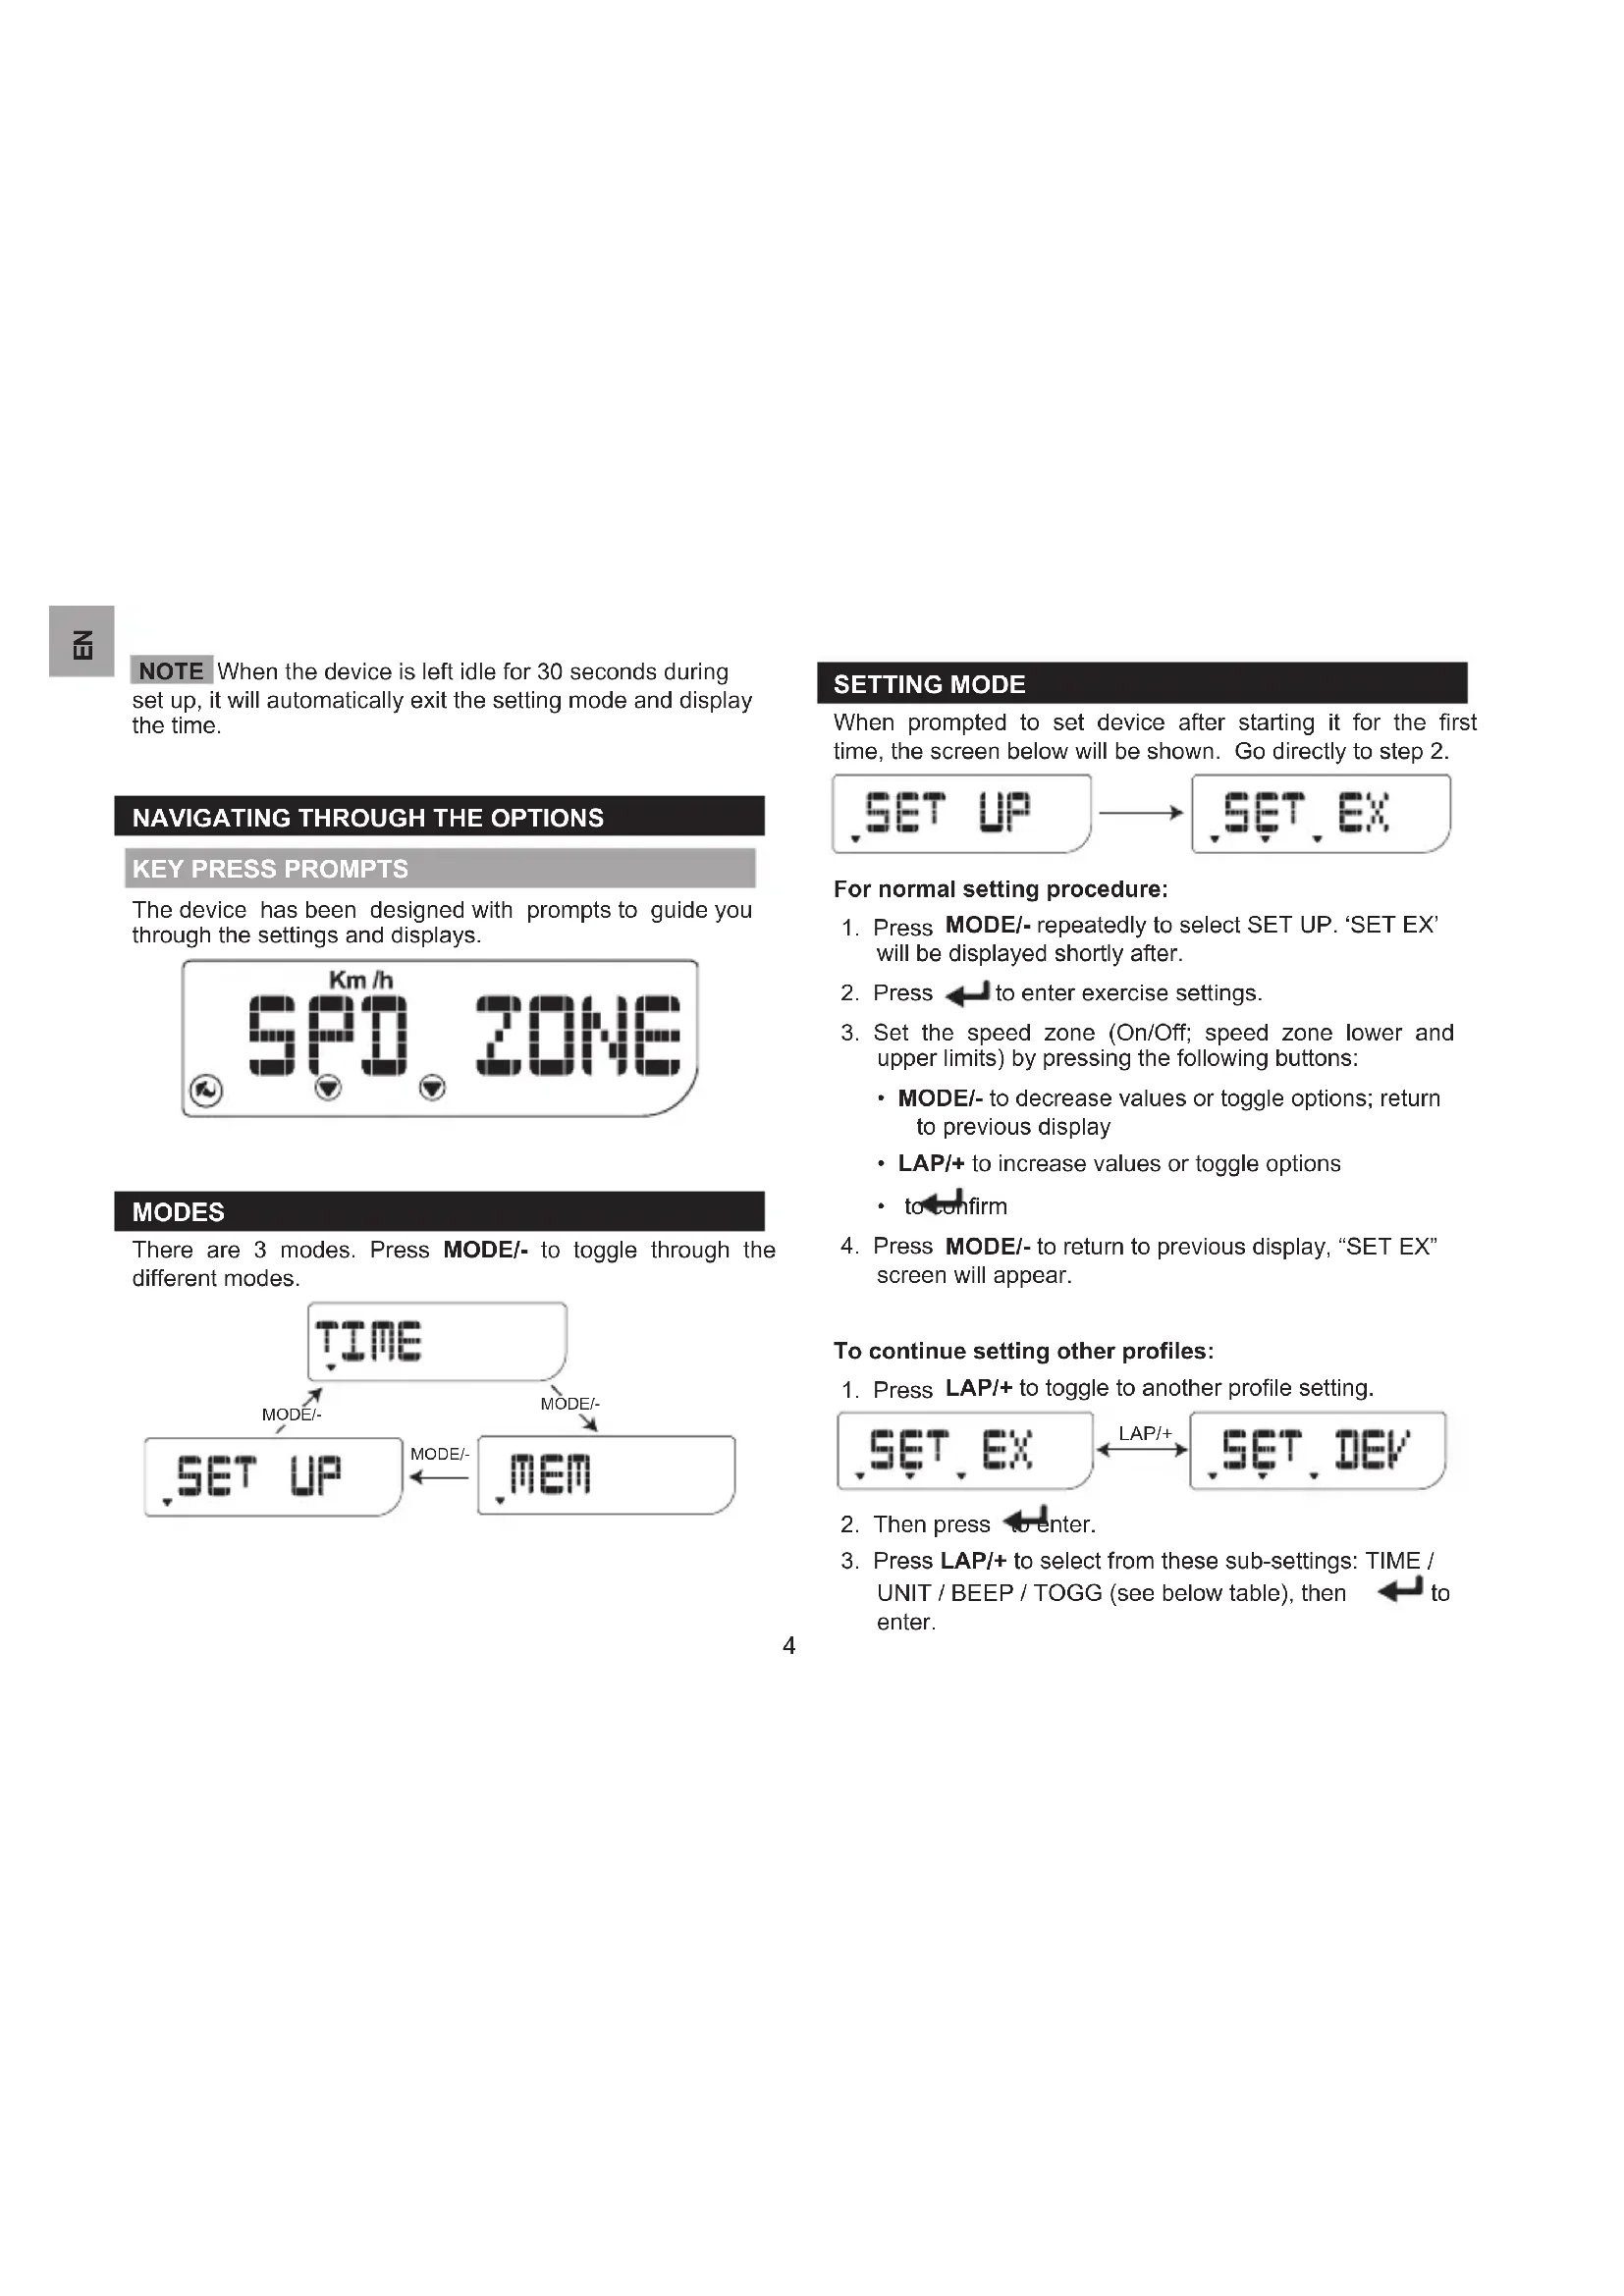
NOTE When the device is left idle for 30 seconds during set up, it will automatically exit the setting mode and display the time.
NAVIGATING THROUGH THE OPTIONS
KEY PRESS PROMPTS
The device has been designed with prompts to guide you through the settings and displays.

MODES
There are 3 modes. Press MODE/- to toggle through the different modes.

flowchart
graph TD
    A["TIME"] -->|MODE/-| B["SET UP"]
    A -->|MODE/-| C["MEM"]
    B <--> C
SETTING MODE
When prompted to set device after starting it for the first time, the screen below will be shown. Go directly to step 2.

flowchart
graph LR
    A["SET UP"] --> B["SET EX"]
For normal setting procedure:
- Press MODE/- repeatedly to select SET UP. 'SET EX' will be displayed shortly after.
- Press ← to enter exercise settings.
- Set the speed zone (On/Off; speed zone lower and upper limits) by pressing the following buttons:
- MODE/- to decrease values or toggle options; return to previous display
- LAP/+ to increase values or toggle options
• to confirm - Press MODE/- to return to previous display, "SET EX" screen will appear.
To continue setting other profiles:
- Press LAP/+ to toggle to another profile setting.

flowchart
graph LR
    A["SET, EX"] <-->|LAP/+| B["SET, DEV"]
- Then press to enter.
-
Press LAP/+ to select from these sub-settings: TIME / UNIT / BEEP / TOGG (see below table), then ← to enter.
-
Press the following buttons:
-
MODE/- to decrease values or toggle options
-
LAP/+ to increase values or toggle options
• to confirm and exit -
Continue setting all options by repeating steps 3-4.
| Sub-settings Setting options | |
| TIME* | Calendar format (day-month or month-day)Hour format (12/24 hours)Time zone offset (+/- 23) |
| UNIT Measurement unit | |
| BEEP On / Off | |
| TOGG | On / Off(enable display to auto toggle during exercise) |
* Time data is received from GPS satellite.
GPS
TIP Go outdoors and move to an open area for best GPS signal quality. Stand still when device searches for GPS signal.
To manually search for GPS signal, press ← when time or 'GPS GO' is displayed.


and “----” will flash during search.
The signal quality is as follows:
| Excellent signal quality | |
| Good signal quality | |
| Poor signal quality | |
| “No icon” No signal | |
GPS signal quality needs to be excellent or good to measure speed and distance.
If 'NO GPS' is displayed or signal quality is poor, press again to force another signal search.
This unit receives the time from GPS satellite ensuring its accuracy. Search for a GPS signal each time unit is turned on to receive the GPS time.
START EXERCISE
Once GPS has been found, press to start measuring speed and distance travelled.
To take laps: press LAP/+
TIP You can view the time while exercising. Press MODE/- to view time.
PAUSE, RESUME / STOP
If you need to take a break during exercise, press
Choose either to:
- resume exercise by pressing
or - stop exercise and save data by pressing MODE/-.

DISPLAYS
To toggle between displays during exercise: press ⏻/VIEW.
TIP If toggle function has been enabled (refer to "Setting mode" section), the below 2 screens will automatically toggle.
Exercise time Current speed
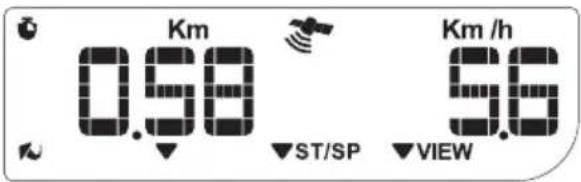
Distance travelled Current speed
MEMORY MODE
- Press MODE/- repeatedly to select "MEM". After 2 seconds, display will show the time and date of the most recent exercise session recorded or "NO MEM" if there is no data.
- Press LAP/+ to navigate to desired record.
- Press ←, "VIEW SUM" will be displayed.
- Press LAP/+ to navigate to the type of records to be displayed, "VIEW SUM" (summary) or "VIEW LAP" (individual lap), then press to confirm selection.
- Extra step for "VIEW LAP" – press LAP/+ to select lap number then ← to view.
- Press LAP/+ to toggle through screens
After viewing, press MODE/- until "VIEW SUM" or "VIEW LAP" is displayed.
Repeat steps 4-5 to select the other memory display option for that record.
NOTE Option of viewing individual lap records can only be selected if laps were taken for that exercise record.
DISPLAYS
Record summary:
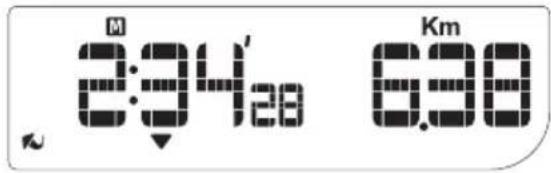
Total exercise time Total distance
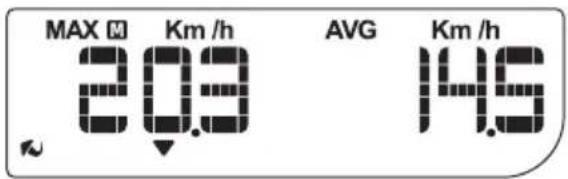
Maximum speed Average speed
Individual lap information:
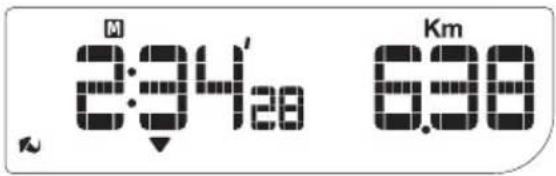
Lap time Distance

Maximum speed Average speed
CLEAR RECORDS
This device can contain data for up to 99 laps.
The device only allows for all data to be deleted.
To delete memory:
- Press MODE/- repeatedly to select "MEM".
- Press LAP/+ repeatedly until "MEM DEL?" is displayed.
- Press ← to confirm.

flowchart
graph LR
    A["MEM DEL7"] --> B["DONE"]
DONE indicates the records have been cleared.
When starting an exercise and memory is full, "MEM FULL" will be displayed followed by "MEM DEL?".
- Press to delete all records.
OR
- Press MODE/- to ignore and start an exercise without recording data for it.
BACKLIGHT
To activate backlight: tap on lens.
Tap on lens again or press any button to extend backlight for another 3 seconds.
NOTE The backlight function will not operate when there is only 1 segment remaining in this icon 📄
BATTERY REPLACEMENT
The GP108 uses 1 x AA battery which has already been installed.
If the battery power of the unit is low (2 or less remaining segments) ▶ promptly replace the battery to ensure continuous operation of GPS and other functions.
To replace battery:
- Slide open the battery compartment cover.
- Remove the old battery and insert a new battery.
- Replace battery compartment cover.
WATER RESISTANCE
The GP108 is splash proof only.
SPECIFICATIONS
| Real time clock | 12/24 hour with hour, minute |
| Speed 0-150 km/h or mph | |
| Distance 0-9999 km / miles | |
| Maximum lap count 99 | |
| Power 1x UM3 (AA) 1.5V battery | |
| Operating temperature | -10 °C to 50 °C(14 °F to 120 °F) |
| Storage temperature | -15°C to 70 °C(1 °F to 158 °F) |
PRECAUTIONS
To ensure you use your product correctly and safely, read these warnings and the entire user manual before using the product:
- Use a soft, slightly moistened cloth. Do not use abrasive or corrosive cleaning agents, as these may cause damage. Use luke warm water and mild soap to clean the unit thoroughly after each training session. Never use the products in hot water or store them when wet.
- Do not subject the product to excessive force, shock, dust, temperature changes, or humidity. Never expose the product to direct sunlight for extended periods. Such treatment may result in malfunction.
-
Do not tamper with the internal components. Doing so will terminate the product warranty and may cause damage. The main unit contains no user-serviceable parts.
-
Do not scratch hard objects against the LCD display as this may cause damage.
• Take precautions when handling all battery types. - Remove the batteries whenever you are planning to store the product for a long period of time.
- When replacing batteries, use new batteries as specified in this user manual.
- The product is a precision instrument. Never attempt to take this device apart. Contact the retailer or our customer service department if the product requires servicing.
- Do not touch the exposed electronic circuitry, as there is a danger of electric shock.
- Check all major functions if the device has not been used for a long time. Maintain regular internal testing and cleaning of your device. Have your watch serviced by an approved service center annually.
- When disposing of this product, ensure it is collected separately for special treatment and not as normal household waste.
- Due to printing limitations, the displays shown in this manual may differ from the actual display.
- The contents of this manual may not be reproduced without the permission of the manufacturer.
NOTE The technical specifications for this product and the contents of the user manual are subject to change without notice.
NOTE Features and accessories will not be available in all countries. For more information, please contact your local retailer.
ABOUT OREGON SCIENTIFIC
Visit our website (http://us.oregonscientific.com) to learn more about Oregon Scientific products.
If you're in the US and would like to contact our Customer Care department directly, please visit:
www2.oregonscientific.com/service/support.asp
For international inquiries, please visit: www2.oregonscientific.com/about/international.asp
EU DECLARATION OF CONFORMITY
Hereby, Oregon Scientific, declares that this GPS Speed and Distance Monitor (model: GP108) is in compliance with the essential requirements and other relevant provisions of Directive 1999/5/EC. A copy of the signed and dated Declaration of Conformity is available on request via our Oregon Scientific Customer Service.


COUNTRIES RTTE APPROVAL COMPLIED
All EU countries,S
and Norway N
witzerland

natural_image
3D rendering of a car front panel with battery and indicator lights (no text or symbols)LCD-BILDSCHIRM
flowchart
graph LR
    A["SET UP"] --> B["SET EX"]
Rundenzeit
Distanz

flowchart
graph LR
    A["MEM DEL7"] -->|←| B["DONE"]
natural_image
3D rendering of a mechanical component with labeled ports (no text or symbols visible)PANTALLA LCD
flowchart
graph LR
    A["SET UP"] --> B["SET EX"]
flowchart
graph LR
    A["MEM DEL7"] --> B["DONE"]
Au commencement ....3
natural_image
3D rendered mechanical component with no visible text or symbolsECRAN LCD
flowchart
graph LR
    A["SET UP"] --> B["SET EX"]
EUROPE – DÉCLARATION DE CONFORMITÉ
natural_image
3D rendered diagram of a mechanical component with labeled parts (no text or symbols)DISPLAY LCD
Training beginnen ....6
Specifications ....8
Waarschuwingen 9
Over Oregon Scientific ....9
natural_image
3D rendered diagram of a mechanical component with labeled parts (no text or symbols)LCD-SCHERM
flowchart
graph LR
    A["SET UP"] --> B["SET EX"]
Voor normale instellingsprocedure:
1 segment over is in dit pictogram
BATTERIJ VERVANGEN
natural_image
3D rendered diagram of a car front panel with labeled buttons (+ and 1) and no visible text or symbolsTELA LCD
flowchart
graph LR
    A["SET UP"] --> B["SET EX"]
flowchart
graph LR
    A["MEM DEL?"] --> B["DONE"]
natural_image
3D rendered diagram of a mechanical component with labeled parts (no text or symbols)LCD DISPLAY
flowchart
graph LR
    A["SET, EX"] <-->|LAP/+| B["SET, DEV"]
- GPS Speed and Distance Monitor
- Model: GP108
- USER MANUAL
- INDEX
- INTRODUCTION
- IMPORTANT
- OVERVIEW
- GETTING STARTED
- NAVIGATING THROUGH THE OPTIONS
- KEY PRESS PROMPTS
- MODES
- SETTING MODE
- For normal setting procedure:
- To continue setting other profiles:
- GPS
- START EXERCISE
- PAUSE, RESUME / STOP
- Choose either to:
- DISPLAYS
- MEMORY MODE
- CLEAR RECORDS
- To delete memory:
- BACKLIGHT
- BATTERY REPLACEMENT
- To replace battery:
- WATER RESISTANCE
- PRECAUTIONS
- ABOUT OREGON SCIENTIFIC
- EU DECLARATION OF CONFORMITY
- COUNTRIES RTTE APPROVAL COMPLIED
- EUROPE – DÉCLARATION DE CONFORMITÉ
- Voor normale instellingsprocedure:
- BATTERIJ VERVANGEN
Brand : OREGON SCIENTIFIC
Model : GP108
Category : Sports smartwatch