ST6 Duo ecologic - Irrigation timer Kärcher - Free user manual and instructions
Find the device manual for free ST6 Duo ecologic Kärcher in PDF.

| Product Type | Water Timer |
| Brand | Kärcher |
| Model | ST6 Duo ecologic |
| Power Supply | 9V battery (type 6LR61 / Alkaline) |
| Number of Water Outlets | 2 independent |
| Operating Pressure | 0.1 - 1.0 MPa (1 - 10 bar) |
| Max. Supply Temperature | 35 °C |
| Ambient Temperature | +5 to +60 °C |
| Radio Frequency | 868.1 MHz |
| Max. Radio Range | 100 m |
| Main Functions | Programmed watering, controlled by humidity sensor, manual watering, ecological function (delay 1-7 days) |
| Sensors | 1 or 2 depending on delivery, wireless |
| Display | Screen with icons |
| Maintenance | Replace batteries and sensor pad once a year |
| Cleaning | Clean the pre-filter if clogged |
| Safety | Do not use in drinking water supply, do not submerge in water, do not use rechargeable batteries |
| Winter Storage | Drain water, remove batteries, store dry and frost-free |
| Warranty | According to country conditions, does not cover plant damage |
| Spare Parts | Available at dealer or Kärcher subsidiary |
| Use | Domestic only |
| Materials | Recyclable packaging, used appliance to be recycled |
Frequently Asked Questions - ST6 Duo ecologic Kärcher
User questions about ST6 Duo ecologic Kärcher
0 question about this device. Answer the ones you know or ask your own.
Ask a new question about this device
Download the instructions for your Irrigation timer in PDF format for free! Find your manual ST6 Duo ecologic - Kärcher and take your electronic device back in hand. On this page are published all the documents necessary for the use of your device. ST6 Duo ecologic by Kärcher.
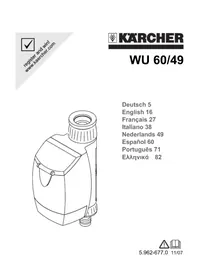
USER MANUAL ST6 Duo ecologic Kärcher
SensoTimer ST6 ecologic SensoTimer ST6 Duo ecologic

Deutsch 4
English 11
Francais 18
Italiano 25
Nederlandst32
Espanol 39
Portugués 46
Dansk 53
Norsk 60
Svenska 67
Suomi 74
Eληνικα 81
Magyar 89
Reglsterandwin


Inhaltsverzeichnis
Safety instructions. EN 2
Description EN2
General information on the oper
ation EN3
Further functions EN 5
Implanting the sensor. EN 6
Maintenance and care . . . . EN 6
Technical specifications EN 6
Troubleshooting EN 7
General notes
Dear Customer,

Please read and comply with these original instructions prior
to the initial operation of your appliance and store them for later use or subsequent owners.
Proper use
This appliance has been designed for use in private households and is not intended for commercial use.
This appliance is designed to be connected to a water tap and automatically regulates the water flow in irrigation systems.
The manufacturer is not responsible for any damages that may occur on account of improper use or wrong operations.
Environmental protection

The packaging material can be recycled. Please do not place the packag
ing into the ordinary refuse for disposal, but arrange for the proper recycling.

Old appliances contain valuable materials that can be recycled. Please arrange for the proper recycling of old
appliances. Please dispose your old appliances using appropriate collection systems.
Notes about the ingredients (REACH)
You will find current information about the ingredients at:
www.kaercher.com/REACH
Customer Service
Our KÄRCHER branch will be pleased to help you further in the case of questions or faults.
(See address on the reverse)
Ordering spare parts and special attachments
At the end of the operating instructions you will find a selected list of spare parts that are often required.
You can procure the spare parts and the attachments from your dealer or your KARCHER branch office.
Warranty
The terms of the guarantee applicable in each country have been published by our respective national distributors. We will repair possible faults on your unit free of charge within the warranty period, insofar as the faults are caused by material defects or defective workmanship. Guarantee claims should be addressed to your dealer or the nearest authorized customer service centre, and supported by documentary evidence of purchase.
This warranty relates only to the device, not to damages on plants.
Output variants / information
These operating instructions are available as print variant (included in the scope of delivery) and as a more detailed web variant.
Further information as a video tutorial via the QR code and at:
www.kaercher.com
Safety instructions
This appliance is not intended for use by persons with limited physical, sensory or mental capacities or lacking experience and/or skills, unless such persons are accompanied and supervised by a person in charge of their safety or they have received precise instructions on the use of this appliance and have understood the resulting risks.
Children may only use this appliance if they are over the age of 8 and supervised by a person in charge of their safety, or if they have received instructions on the use of this appliance and have understood the resulting risks.
Children must not play with this appliance.
Supervise children to prevent them from playing with the appliance.
- Cleaning and user maintenance must not be performed by children without supervision.
- Keep packaging film away from children - risk of suffocation!
Do not use the irrigation device in drinking water systems.
Only operate the irrigation device with untreated, clear fresh water with a temperature of max. 35^
Only install the device outside.
- Never submerge the irrigation device in water.
Check the irrigation device for damages prior to each use and stop using it if there are visual damages.
Only mount irrigation device in a vertical position.
Do not use sealant or lubrication to connect the irrigation device to the water tap.
Do not pull on the attached hose.
Do not install the irrigation device near heat sources (max. ambient temperature 60^ ).
Caution
Only use 9V batteries (type 6LR61 / Alkaline).
Do not use rechargeable batteries.
- Do not install the irrigation device in areas where condensation water may be generated, as this may damage the battery.
- Do not install the irrigation device near powered devices.
WARNING
The appliance must not be used in connection with explosive or flammable substances or chemicals.
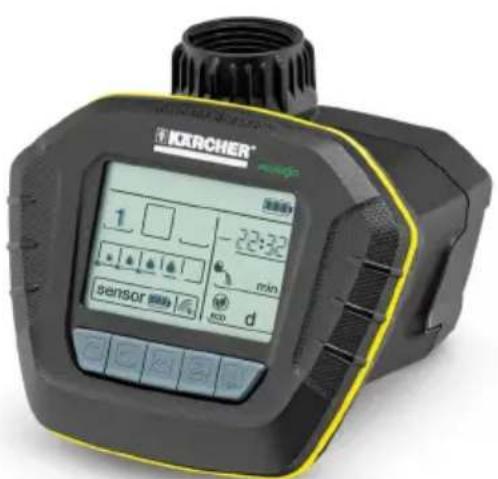
Description
Function
The device controls the watering either depending on the degree of moisture of the ground or in a time-controlled manner. For this purpose, the sensors implanted in the ground issue the current soil moisture to the control unit via radio. Time-controlled operation is possible without a sensor. Depending on the scope of delivery, the appliance is equipped with 1 or 2 sensors. The following values can be set on the control unit for the two independent water outlets:
The tripping limit for the irrigation.
Two different times for the time of irrigation.
The irrigation duration.
The irrigation delay.
Manual irrigation.
As soon as the degree of moisture falls below the tripping limit set on the control unit, the irrigation is started at the next time of irrigation.
If the device was taught for time control, it waters independent of the degree of moisture of the ground at the preset times.
In this case, the moisture tripping limit at the control unit can not be set.
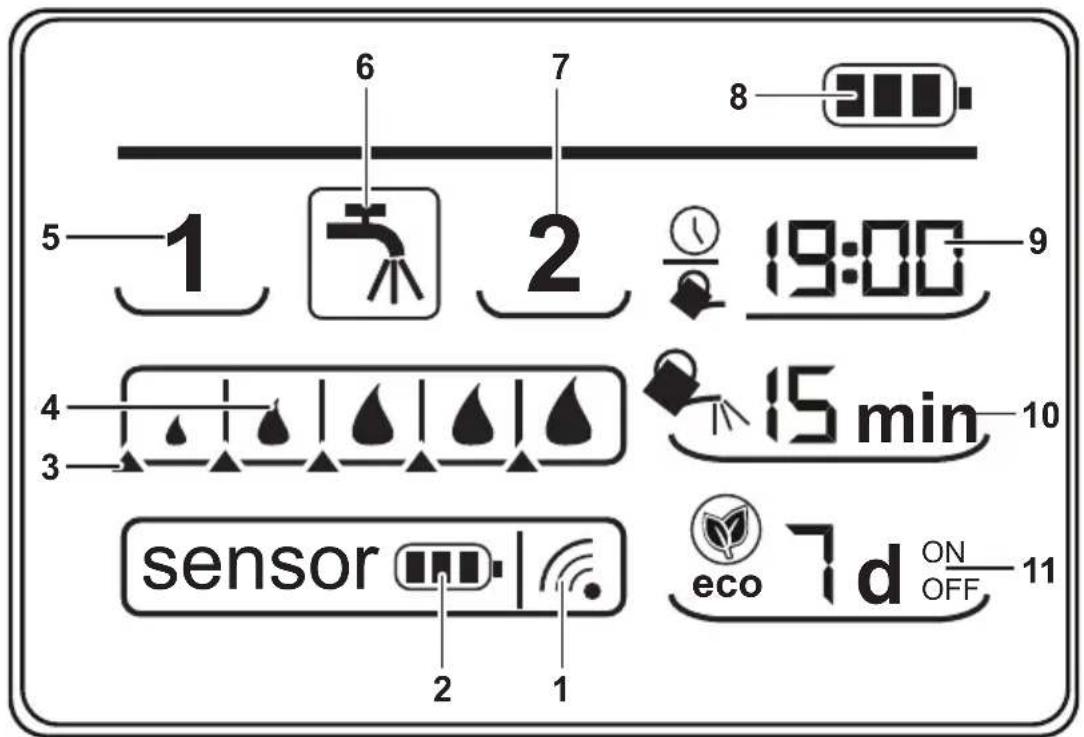
Description of the display
Illustrations on Page 2
1 Radio signal and field strength
2 Battery status sensor
3 Tripping limit soil moisture
4 Measured soil moisture
5 Sensor 1 / water outlet 1
6 Irrigation / manual irrigation
7 Sensor 2 / water outlet 2^
8 Battery status control unit
9 Time / time of irrigation
10 Irrigation duration
11 Irrigation delay (eco!ogic function)
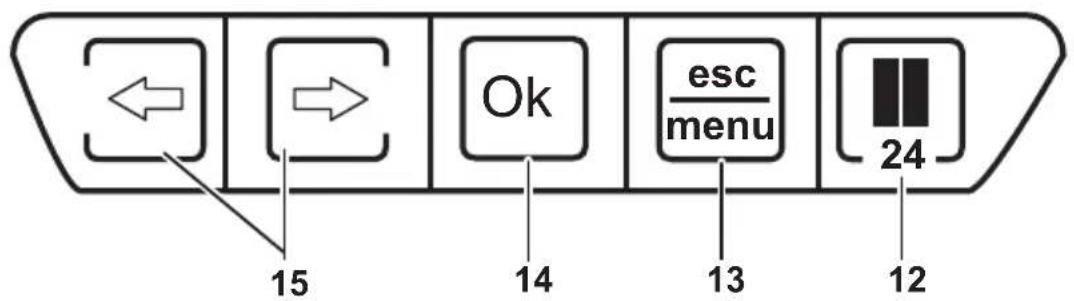
12 Break button and setting of the time
13 menu / esc button
14 OK button
15 Arrow keys
depending on model
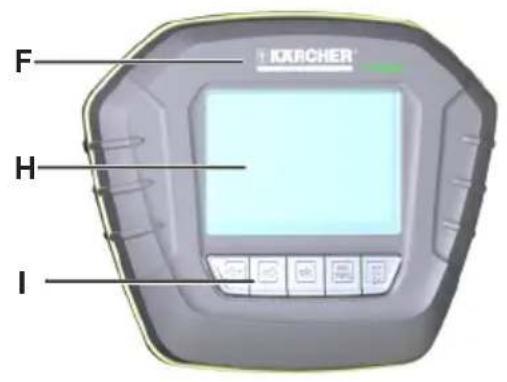
Description of the Appliance
When unpacking the product, make sure that no accessories are missing and that none of the package contents have been damaged. If you detect any transport damages please contact your dealer.
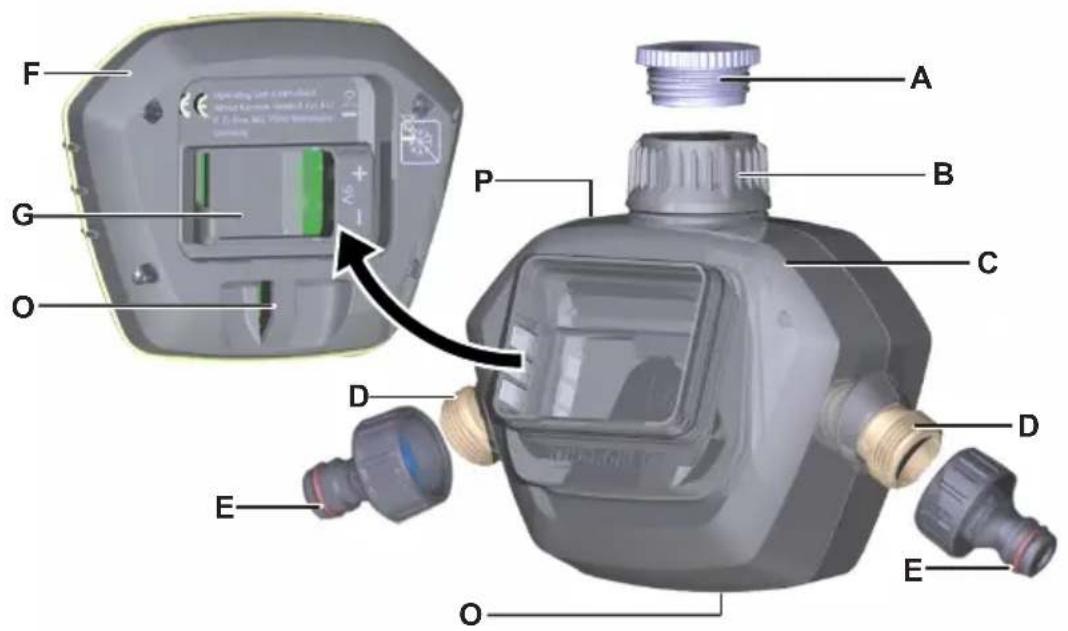
Illustrations on Page 3
A G 3/4 reducer
B G1 water connection with pre-filter
C Top part of the casing for two-channel appliance
DG 3/4 hose connection
E Tap connection adapter
F Control unit
G Battery compartment
H Display
I Keypad
J Sensor 1
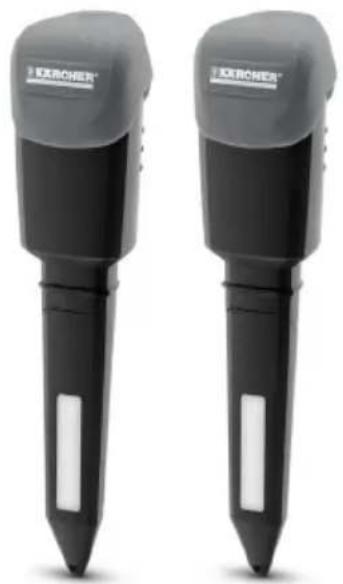
K Sensor 2^
L Sensor cap
M Cover sensor pad
N Sensor pad
O Eyelet for theft protection
P Notches for wall mounting
Q Top part of the casing for single-channel appliance (rear view)
depending on model
General information on the operation
Basic functions of the enter keys
- Flashing values are changed by means of the arrow keys.
OK button completes an entry and switches to the next entry field. It also completes the entry in the last entry field and then switches into the automatic mode. - esc button discards an entry and switches to the previous entry field or exits the entry at the first field and switches into the automatic mode.
If no button is pressed for 30 seconds, the appliance returns to the automatic mode.
During the initial startup, it can individually be selected for each water outlet how it is to be operated:
In order to get to the automatic mode, at least 1 sensor must be used or the device must be taught for time control. Otherwise the water outlets for automatic watering are inactive.
Sensor-controlled
The sensor is taught during the 60-second countdown, i.e. the radio signal is detected automatically.
Time-controlled
The teaching process of the sensor is cancelled with the esc/menu button during the 60-second countdown. In this case, the moisture tripping limit at the control unit can not be set.
■ Locked / inactive
The 60-second countdown passes completely without the recognition of the sensor or the esc/menu button being pushed, then the water outlet is inactive. After deactivation of water outlet 1, the countdown for outlet 2 can be enabled with the OK button.
Preparation control unit
Note: The predefined order during commissioning must be strictly observed. Otherwise it is not guaranteed that the sensor is correctly registered with the control unit. Assistance for the operating procedure is provided by the accompanying quick start.
Note: The battery is not included in the scope of delivery.
Figure 1, 2
Insert the battery into the battery compartment in the correct position (+ / - marking).
As soon as the battery is inserted, the display, after a short self-test, changes directly into the settings mode for the current time. The hours of the time display are flashing.
Figure 3
Set hours.
Press the OK button and set minutes.
Confirm the setting of the minutes by pressing the OK button.
Note: From now on, the receiver waits for the radio signal of the sensor for teaching. During this time, the radio signal is flashing and the seconds countdown is counted down.
Important: In order to establish the radio contact between the receiver and the sensor, the sensor battery must be inserted within 60 seconds.
Preparation / teaching sensor 1
CAUTION
The moisture absorption of the sensor pad can be impaired by grease or oil on the surface. Do not touch or wipe the sensor pad with greasy/oily hands/rags.
Figure 4
Remove the sensor cap of the sensor.
Connect the battery with the battery clip. The connected battery is reinserted in the casing with the battery clip going in first.
Close the sensor by means of the sensor cap.
Figure 5
Contact radio signal.
As soon as the contact of the radio signal is established, the symbol for the radio signal appears permanently. It is now guided through the setup sequence (preset value for moisture, times, etc.).
Figure 6
Sensor 1 was detected successfully.
Note: The operating mode is specified and saved during the teaching process. A change of the operating mode (e.g. from sensor control to time control) is only possible by a new teaching process after a reset.
Irrigation settings of water outlet 1
Figure 7
Set the tripping limit for the soil moisture.
Note: Setting is only possible in the sensor-controlled operation, not in the time-controlled operation.
Drops show the measured soil moisture, the adjustable triangles show the tripping limit. As soon as the measured soil moisture falls below the tripping limit, the irrigation starts automatically at the next set time.
Figure 8.1, 8.2
Set the irrigation time for mornings and evenings.
Per day 2 times can be set at which the irrigation starts if the measured soil moisture is below the tripping limit. With "----" the irrigation time can be deactivated.
Figure 9
Set the irrigation duration.
The irrigation duration per irrigation cycle can be set between 1 - 90 minutes. With "--" the irrigation duration is deactivated.
Figure 10
Set the irrigation delay.
The irrigation can be delayed for 1 - 7 days; this stimulates the root development of the plants. Moreover, it saves water if it rains during the delay days. With setting
"-d" this function is deactivated.
Preparation / teaching sensor 2*
- depending on model
Figure 11
The setting process of sensor 2 starts automatically after the watering setting of water outlet 1. If the water outlet 1 remains inactive, teaching of the water outlet 2 must be enabled by pressing the OK button. The seconds countdown starts for water outlet 2. Teaching of sensor 2 is equivalent to sensor 1.
Note: In order to change the operating mode of an outlet or to add a sensor, the teaching process must be restarted.
Remove the batteries from both sensors and the control unit.
Reinsert the battery in the control unit. As soon as the symbols appear on the display, press the OK button until the time on the display is flashing.
Reset the time and start the teaching process of sensor 1, then of sensor 2.
Irrigation settings of water outlet 2
Identical with "irrigation settings of water outlet 1".
Further functions
Changing the settings of the water outlets
The menu button activates the settings mode.
Arrow keys select the water outlet to be set, OK button starts the adjustment cycle.
The settings remain saved even without battery supply.
Manual irrigation of the water outlets
Valves can be opened manually:
The menu button activates the settings mode.
Use the arrow keys to select the tap and confirm your selection with the OK button.
The valves are opened/closed by repeatedly pressing the arrow keys.
The esc button terminates the manual irrigation and switches back into the automatic mode.
Quick access manual watering
Can be activated in every mode (automatic watering and 24h-function).
Hold the left arrow key down for at least 3 seconds in order to open the left valve manually. Depending on the scope of delivery, the same procedure with the right arrow key applies to open the right valve.
The valve is open.
Press the left/right arrow key briefly in order to close the opened valve or to open it again. If both valves are closed, the device automatically returns to the previous mode after 30 seconds.
Terminate the manual watering by means of the OK button or esc/menu button. The valve is closed and switches back into the automatic mode.
Failure safety function
If the valve unit loses contact to a sensor (no signal as, for example, the sensor battery is empty), the watering is time-controlled.
Note
ECO delay days are considered.
Advantage: Guarantee of continuous watering, plants do not dry out.
Implanting the sensor
Figure A1
The sensor surface must have contact with the soil. For this purpose, the sensor is inserted in the loose ground like a plant and the soil is pressed around it.
Do not step or hammer on the sensor.
Figure A2
Implant the sensor directly in the irrigation area and ensure that the sensor is not located in a sink or elevation.
Maintenance and care
Maintenance
Figure 2, 4, B
Recommendation: Replace the batteries of the control unit and the sensor as well as the sensor pad annually.
Storage
Completely drain all water from the irrigation device.
Remove the batteries from the sensor and the control unit.
Store the irrigation device at a dry and frost-proof location.
Technical specifications
| Operating pressure 0,1 - | 1,0 (1 - 10) | MPa (bar) |
| Max. feed temperature | 35 °C | |
| Ambient temperature +5 | -> +60 °C | |
| Frequency 868,1 MHz | ||
| Radio range (max.) 100 | m | |
| Battery type 9V (6LR61 | / Alkaline) | |
Subject to technical modifications!
Troubleshooting
| Fault Cause Remedy | ||
| The irrigation does not take place in spite of the programming. | Water tap is closed. Open tap. | |
| Pre-filter clogged. Clean prefilter. | ||
| Valve does not open /close. | When the control unit is removed, the valve cannot open / close. | Install the control unit on the top part of the casing. |
| No display indication of the irrigation times, O:FFis indicated instead. | Battery empty or contacts oxidised. | Insert a new 9V battery (type 6LR61 / Alkaline) or clean contacts. |
| Radio signal, battery symbol and moisture value of the sensor are not indicated. | No radio communication be-tween the control unit and the sensor.The device is in its failure safety function. | Reduce the distance between the control unit and the sensor and check the sensor battery. The sen-sor is reconnected with the control unit after the battery replacement by pressing the OK button. The de-vice re-establishes the radio contact after 30 minutes the latest. |
| Tap and water symbol as well as the indication E:RR are flashing simultaneously. | Valve error. Insert new battey; if the error recurs, the appliance is defective. |
Table des matieres
Consignes generales . FR 1
www.kaercher.com/REACH
Service après-vente
www.kaercher.com/REACH
Servizio assistenza
www.kaercher.com/REACH
Klantenservice
www.kaercher.com/REACH
www.kaercher.com/REACH
Servico de assistencia的技术ica
www.kaercher.com/REACH
Kundeservice
Forberedelse / programming "Sensor 1"
△FORSIGTIG
Forberedelse / programming "Sensor 2^* "
www.kaercher.com/REACH
Kundetjeneste
Vare KARCHER-avdelinger hjelper deg gjerne ved feil uller om du har sporsmal. (Se adresspe baksiden)
Stille inn vanningsforsinkelse.
Vanningen kan forsinkes 1 - 7 dager, sik at rotdannelsen for plantene stimuleres. Dessuten spares det vann dersom det regner i Iopet avforsinkelsesdagene.Ved innstillingen"-d" deaktiveres funksjonen.
www.kaercher.com/REACH
Kundservice
www.kaercher.com/REACH
Asiakaspalvelu
www.kaercher.com/REACH
www.kaercher.com/REACH
Szerviz
http://www.kaercher.com/dealersearch

71364 Winnenden (Germany)
Tel.: +49 7195 14-0
Fax: +49 7195 14-2212