WU 6049 Automatic - Irrigation timer Kärcher - Free user manual and instructions
Find the device manual for free WU 6049 Automatic Kärcher in PDF.

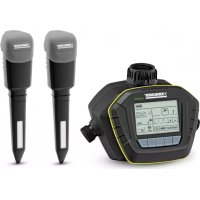
| Product type | Automatic watering timer |
| Brand | Kärcher |
| Model | WU 6049 Automatic |
| Power supply | 9 V battery (type 6LR61 / Alkaline) |
| Operating pressure | 0.1 - 1 MPa (1 - 10 bar) |
| Supply temperature (max.) | 30 °C |
| Ambient temperature | +1 to +60 °C |
| Water connection | G 3/4 with filter seal |
| Main functions | Programming of watering duration and frequency, manual watering, delayed start, temporary deactivation |
| Adjustable watering duration | Minutes (e.g., 30 min) |
| Adjustable watering frequency | Every 8 or 12 hours, or every 1 to 7 days |
| Display | Screen with symbols (program on/off, low battery, duration, frequency) |
| Controls | OK and MAN/SEL buttons |
| Usage | Outdoor, clear untreated fresh water |
| Maintenance and cleaning | Regularly clean the filter seal, replace battery before each season |
| Safety | Do not use on drinking water network, max temperature 30°C, splash-proof, do not immerse in water |
| Warranty | According to distributor conditions, contact retailer with proof of purchase |
| Weight | Approx. 320 g (estimated) |
| Dimensions (L x W x H) | Approx. 12 x 9 x 15 cm (estimated) |
Frequently Asked Questions - WU 6049 Automatic Kärcher
User questions about WU 6049 Automatic Kärcher
0 question about this device. Answer the ones you know or ask your own.
Ask a new question about this device
Download the instructions for your Irrigation timer in PDF format for free! Find your manual WU 6049 Automatic - Kärcher and take your electronic device back in hand. On this page are published all the documents necessary for the use of your device. WU 6049 Automatic by Kärcher.
USER MANUAL WU 6049 Automatic Kärcher
register and win! www.kaercher.com

KÄRCHER
WU 60/49
natural_image
Line drawing of a mechanical device with no visible text or symbolsDeutsch 5
English 16
Français 27
Italiano 38
Nederlands 49
Español 60
Português 71
Ελληνικά 82


5.962-677.0 11/07
natural_image
Illustration of an open book with grid pages and a curved arrow indicating rotation (no text or symbols)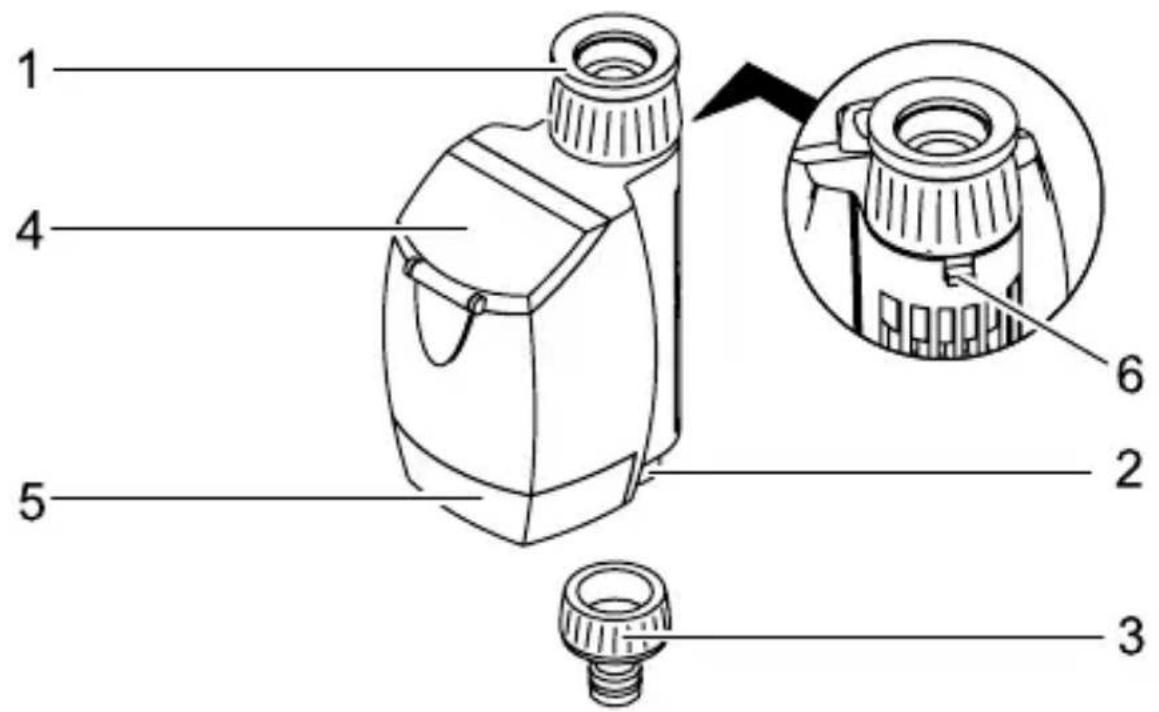
3
natural_image
Illustration of an open book with a grid layout and an arrow indicating rotation (no text or symbols)Gerätebeschreibung
Please read and comply with these instructions prior to the initial operation of your appliance. Retain these operating instructions for future reference or for subsequent possessors.
Proper use
- This appliance has been designed for use in private households and is not intended for commercial use.
- This device is designed to be connected to a water tap and automatically regulates the water flow in irrigation systems.
Environmental protection
The packaging material can be recycled. Please do not place the packaging into the ordinary refuse for disposal, but arrange for the proper recycling.
Old appliances contain valuable materials that can be recycled. Please arrange for the proper recycling of old appliances. Batteries and accumulators contain substances that must not enter the environment. Please dispose of your old appliances, batteries and accumulators using appropriate collection systems.
Warranty
The terms of the guarantee that is applicable in each country have been published by our respective national distributors. Any fault that occurs with your appliance during the guarantee period will be repaired free of charge, provided that it has been caused by a material or manufacturing defect. Guarantee claims should be addressed to your dealer or the nearest authorized customer service depot, and supported by documentary evidence of purchase.
Safety instructions
Caution
■ Do not use the irrigation device in drinking water systems.
■ Only operate the irrigation device with untreated, clear fresh water at a temperature of max. 30 °C.
■ Only install the device outside.
■ Protect the irrigation device from water spray from the bottom and never submerge in water.
- Check the irrigation device for damages prior to each use and stop using it if there are visual damages.
■ Only mount irrigation device in a vertical position.
■ Do not use sealant or lubrication to connect the irrigation device to the water tap.
■ Do not pull on the attached hose.
■ Only use 9V batteries (type 6LR61 / Alkaline).
■ Do not use rechargeable batteries.
■ Do not install the irrigation device in areas where condensation water may be generated, as this may damage the battery.
■ Do not install the irrigation device near heat sources (max. ambient temperature 60^ C).
■ Do not install the irrigation device near powered devices.

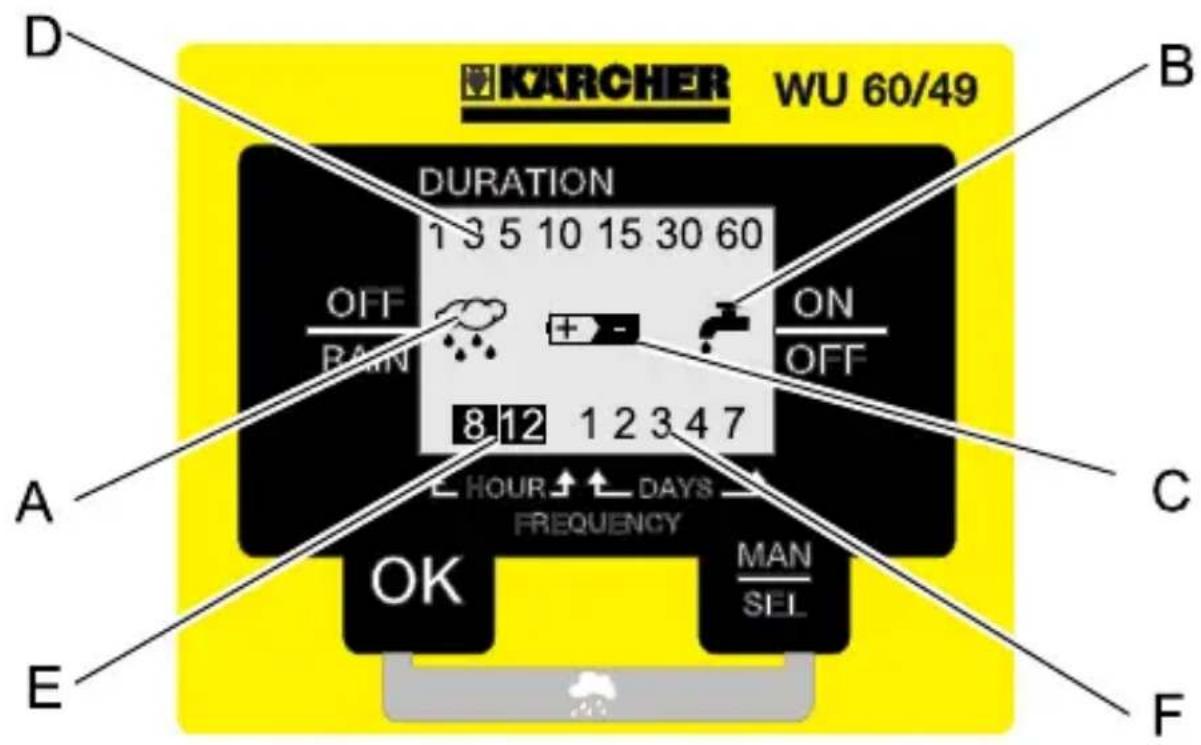
Symbols on the display
A Irrigation programme deactivated
The saved irrigation programme has been interrupted. There will be no programme-controlled irrigation.
B Irrigation activated
The valve of the irrigation device is open. There will be a programme-controlled irrigation.
C Battery depleted
If this symbol is displayed, the battery must be replaced.
D Irrigation duration
Displays the adjustable/adjusted irrigation duration in minutes (e.g. 30 minutes).
E Irrigation frequency (HOUR)
Shows the adjustable/adjusted irrigation frequency in hours (e.g. every 8 hours).
F Irrigation frequency (DAYS)
Shows the adjustable/adjusted irrigation frequency in days (e.g. every 2 days).
Before Startup
→ Use a coin to open the cover for battery compartment.
→ Insert a 9V battery (type 6LR61 / Alkaline).
All symbols on the display will illuminate for 1 second, the irrigation device is now ready to be programmed.
→ Close the battery compartment cover.
→ Screw the coupling element onto the hose connection.
→ Slide the latch down to unlock the swivel mechanism.
→ Hold the irrigation device to the casing and screw the water connection onto the water tap.
Caution
Never connect the irrigation device to the water tap without using the supplied filter gasket.
→ For an optimal attachment of the irrigation device, slide the latch upwards to lock the swiveling mechanism and carefully rotate the irrigation device approx. 1/4 turn.
Note: Do not overtighten.
→ Slide the latch down to unlock the swivel mechanism and align the irrigation device.
Note: Align the irrigation device so that the control panel can be accessed comfortably.
Start up
Note: The subsequent programme steps must be performed consecutively, you cannot retrieve a specific programme step.
By confirming the selection of the respective programme step using [OK], the next programming step will be called up automatically.
Press the [OK] key for five seconds to return to the beginning of the programming sequence.
Selected adjustments in the programming step are displayed by flashing numbers.
Setting the irrigation duration
→ Use the [MAN / SEL] key to select the irrigation duration and confirm the selection using [OK] (preset irrigation duration is 30 minutes).
Setting the irrigation frequency
→ Press the [MAN / SEL] key to select the irrigation frequency (e.g.: every 8 or 12 hours, or every day, every 2, 3, 4 or 7 days).
Activate delayed start
Note: If the selected irrigation frequency is not confirmed within 60 seconds via the [OK] key, the start (delayed by 8 hours) will automatically be activated. The irrigation process will begin 8 hours after the programming time.
Activate immediate start
→ Confirm the selected irrigation frequency using [OK]. The irrigation process will begin immediately.
Reset programming (Reset)
In order to correct an entry or to delete a preset programme
→ Press [OK] for 5 seconds.
All symbols on the display will illuminate for 1 second, the irrigation device is now ready to be programmed.
Operation
Programme-controlled irrigation
The irrigation will take place automatically as per the preset programme (e.g. every 2 days for 60 minutes each).
Note: If the battery is depleted, the irrigation programme will be interrupted automatically. If the irrigation device is to be used over longer periods without supervision, you should insert a new battery.
Deactivate irrigation programme
→ Press the [OK] and [MAN / SEL] keys simultaneously for at least 3 seconds.
The display will show the symbol for the deactivated irrigation device.
Activate irrigation programme
→ Press the [OK] and [MAN / SEL] keys simultaneously for at least 3 seconds.
The symbol for the deactivated irrigation programme will disappear from the display.
22 English
Manual irrigation
The irrigation device can be started manually at any time; the preset programmes will not be affected by this.
Start manual irrigation
→ Press [MAN / SEL] key for 3 seconds.
The irrigation process will start, the display will show the symbol for the activated irrigation device.
Note: After 60 minutes, the irrigation process will end automatically.
Stop manual irrigation
→ Press [MAN / SEL] key for 3 seconds.
The irrigation process will terminate, the symbol for the activated irrigation device will disappear from the display.
Finish operation
At the end of the irrigation season
→ Turn off tap.
→ Remove the irrigation device from the water tap and the water hose.
→ Activate manual irrigation to drain the remaining water from the irrigation device.
→ Remove the battery.
Maintenance and care
Clean the filter gasket
→ Regularly remove the filter gasket from the water connection and rinse under running water.
Change the battery
Prior to each irrigation season
→ Insert a new 9V battery (type 6LR61 / Alkaline).
Note: The safety unit of the irrigation device will automatically close the valve if the battery is depleted.
If the "battery depleted" symbol appears on the display, the irrigation programme or an active irrigation process was interrupted. If the battery is replaced with 10 seconds, the set programme will be saved and reactivated upon the insertion of the new battery.
Maintenance
The appliance is maintenance-free.
Storage
→ Completely drain all water from the irrigation device.
→ Remove the battery.
→ Store the irrigation device at a dry and frost-free location.
Troubleshooting
| Fault Cause Remedy | ||
| Display does not turn on. | Battery depleted. Insert a new 9V battery (type 6LR61 / Alkaline). | |
| Battery contacts oxi-dized. | Clean the con-tacts. | |
| Display completely or partially dark. | Ambient temperatures too high. | Protect the irriga-tion device from high tempera-tures. |
| The irrigation does not take place in spite of the pro-gramming. | Water tap is closed. Open tap. | |
| Battery depleted. Insert a new 9V battery (type 6LR61 / Alkaline). | ||
| Battery contacts oxi-dized. | Clean the con-tacts. | |
| Filter gaskets blocked. C | Clean the filter gasket. | |
| The irrigation process was terminated manually (the symbol for the deactivated irrigation will appear on the display). | Activate irrigation programme. | |
| Leakage at the water connection. | Filter gasket defective. | Replace the filter gasket. |
| The water connection at the water tap has become loose. | Reconnect the water connection. | |
Our Kärcher branch will be pleased to help you further in the case of questions or faults. See address on the reverse.
Specifications
| Operating pressure 0,1 - 1 (1 - 10) MPa (bar) | ||
| Max. feed temperature 30 °C | ||
| Ambient temperature +1 -> +60 °C | ||
| Battery type 9V (6LR61 / Alkaline) | ||
Subject to technical modifications!
Cher client,