
HP2041 - Drill MAKITA - Free user manual and instructions
Find the device manual for free HP2041 MAKITA in PDF.

| Product type | Hammer drill |
| Brand | Makita |
| Model | HP2041 |
| Dimensions (L × w × h) | 364 mm (overall length) |
| Net weight | 2.3 kg |
| Power supply | Single-phase, voltage according to rating plate (e.g., 230 V) |
| Double insulation | Yes |
| No-load speed (variable) | 0 – 950 min⁻¹ (low), 0 – 2900 min⁻¹ (high) |
| Impact rate | 0 – 12,400 min⁻¹ (low), 0 – 37,700 min⁻¹ (high) |
| Max. drilling capacity – Concrete | 20 mm (high) |
| Max. drilling capacity – Steel | 8 mm (high), 13 mm (low) |
| Max. drilling capacity – Wood | 25 mm (high), 40 mm (low) |
| Chuck | Keyless chuck (model HP2041) |
| Number of speeds | 2 (speed selector) |
| Rotation reverse | Yes |
| Operating mode | Rotation only or rotation with hammer |
| Side handle | Yes (360° adjustable) |
| Depth rod | Included, adjustable |
| Variable speed trigger | Yes, with lock button |
| Accessories included | Side handle, depth rod, chuck key (depending on model), blow bulb, drill bits (depending on model) |
| Maintenance | Clean ventilation slots regularly |
| Spare parts and repairability | Parts available from Makita service centers |
| Sound level (LpA) | 94 dB(A) (uncertainty K=3 dB(A)) |
| Vibration (hammer drilling) | ah = 8.5 m/s² (K=1.5 m/s²) |
| Vibration (metal drilling) | ah = 3.0 m/s² (K=1.5 m/s²) |
Frequently Asked Questions - HP2041 MAKITA
User questions about HP2041 MAKITA
0 question about this device. Answer the ones you know or ask your own.
Ask a new question about this device
Download the instructions for your Drill in PDF format for free! Find your manual HP2041 - MAKITA and take your electronic device back in hand. On this page are published all the documents necessary for the use of your device. HP2041 by MAKITA.
USER MANUAL HP2041 MAKITA
GB 2-Speed Hammer Drill Instruction Manual
F Perceuse à percussion à 2 vitesses Manuel d'instructions
D 2-Gang Schlagbohrmaschine Betriebsanleitung
I 2 Velocità trapano a percussione Istruzioni per l'uso
NL 2 Snelheden slagboormachine Gebruiksaanwijzing
E 2 Velocidad taladro percutor Manual de instructaciones
P Berbequim percutor com 2 velocidades Manual de instruções
DK 2-Gears slagboremaskine Brugsanvisning
S 2-Hastighets slagborrmaskin Bruksanvisning
N Slagboremaskin med to hastigheter Bruksanvisning
SF 2-Nopeuksinen vasaraporakone Kayttöohje
GR Σφuρoτρùnavo 2 Taxutηrωv
O8nyiec xpnoewc
HP2040
HP2041
HP2042


1
2
3
4
5
6
7
2
8
10
9
Symbols
The followings show the symbols used for the tool. Be sure that you understand their meaning before use.
Symboles
- Due to our continuing program of research and development, the specifications herein are subject to change without notice.
Note: Specifications may differ from country to country.
Power supply
The tool should be connected only to a power supply of the same voltage as indicated on the nameplate, and can only be operated on single-phase AC supply. They are double-insulated in accordance with European Standard and can, therefore, also be used from sockets without earth wire.
Safety hints
For your own safety, please refer to enclosed safety instructions.
SPECIFIC SAFETY RULES
GEB003-2
DO NOT let comfort or familiarity with product (gained from repeated use) replace strict adherence to hammer drill safety rules. If you use this power tool unsafely or incorrectly, you can suffer serious personal injury.
- Wear ear protectors with impact drills. Exposure to noise can cause hearing loss.
- Use auxiliary handles supplied with the tool. Loss of control can cause personal injury.
- Hold power tools by insulated gripping surfaces when performing an operation where the cutting tool may contact hidden wiring or its own cord.
Contact with a "live" wire will make exposed metal parts of the tool "live" and shock the operator.
- Always be sure you have a firm footing.
Be sure no one is below when using the tool in high locations.
- Hold the tool firmly with both hands.
- Keep hands away from rotating parts.
-
Do not leave the tool running. Operate the tool only when hand-held.
-
Do not touch the bit or the workpiece immediately after operation; they may be extremely hot and could burn your skin.
- Some material contains chemicals which may be toxic. Take caution to prevent dust inhalation and skin contact. Follow material supplier safety data.
SAVE THESE INSTRUCTIONS.
WARNING:
MISUSE or failure to follow the safety rules stated in this instruction manual may cause serious personal injury.
OPERATING INSTRUCTIONS
Important:
Always be sure that the tool is switched off and unplugged before installing or removing the side grip, bit or other accessories.
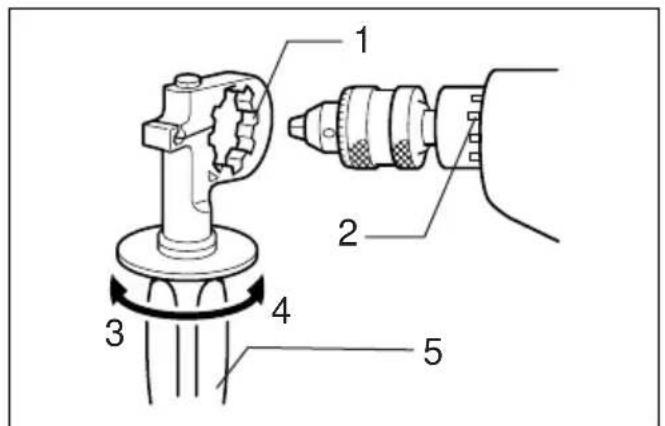
Side grip (auxiliary handle) (Fig. 1)
Always use the side grip to ensure operating safety. Install the side grip so that the teeth on the grip fit in between the protrusions on the tool barrel. Then tighten the grip by turning clockwise at the desired position. It may be swung 360^ so as to be secured at any position.
Installing or removing drill bit
For HP2040 and HP2042 (Fig. 2)
To install the bit, place it in the chuck as far as it will go. Tighten the chuck by hand. Place the chuck key in each of the three holes and tighten clockwise. Be sure to tighten all three chuck holes evenly.
To remove the bit, turn the chuck key counterclockwise in just one hole, then loosen the chuck by hand.
After using the chuck key, be sure to return it to the original position.
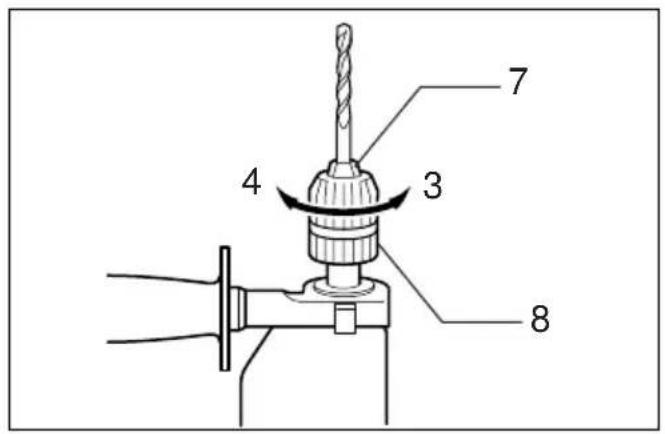
For HP2041 (Fig. 3)
Hold the ring and turn the sleeve counterclockwise to open the chuck jaws. Place the bit in the chuck as far as it will go. Hold the ring firmly and turn the sleeve clockwise until the chuck is tightened with a little click. After the click, always tighten the chuck additionally to prevent accidental loosening during operation.
To remove the bit, hold the ring and turn the sleeve counterclockwise.
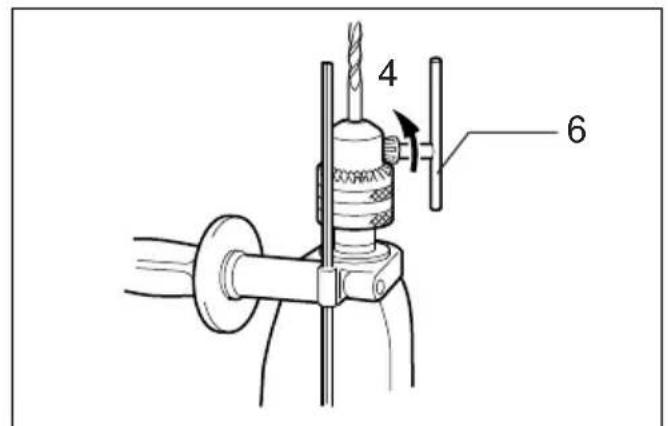
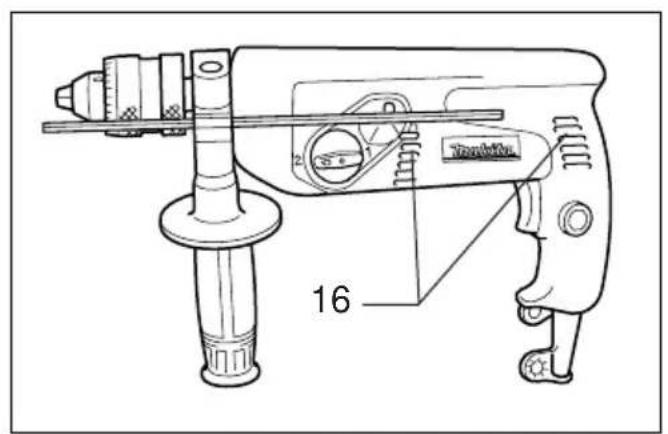
Depth gauge (Fig.4)
The depth gauge is convenient for drilling holes of uniform depth. Loosen the side grip and insert the depth gauge into the hole in the side grip. Adjust the depth gauge to the desired depth and tighten the side grip.
NOTE:
The depth gauge cannot be used at the position where the depth gauge strikes against the gear housing.
Switch action (Fig.5)
CAUTION:
Before plugging in the tool, always check to see that the switch trigger actuates properly and returns to the "OFF" position when released.
For HP2040 and HP2041
To start the tool, simply pull the trigger. Tool speed is increased by increasing pressure on the trigger. Release the trigger to stop. For continuous operation, pull the trigger and then push in the lock button. To stop the tool from the locked position, pull the trigger fully, then release it.
For HP2042
To start the tool, simply pull the trigger. Release the trigger to stop. For continuous operation, pull the trigger and then push in the lock button. To stop the tool from the locked position, pull the trigger fully, then release it.
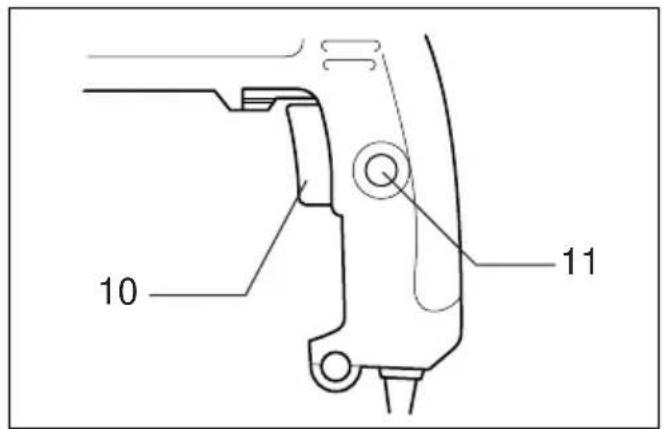
Reversing switch action (Fig. 6)
For HP2040 and HP2041
CAUTION:
- Always check the direction of rotation before operation.
- Use the reversing switch only after the tool comes to a complete stop. Changing the direction of rotation before the tool stops may damage the tool.
This tool has a reversing switch to change the direction of rotation. Move the reversing switch lever to the position for clockwise rotation or the position for counterclockwise rotation.
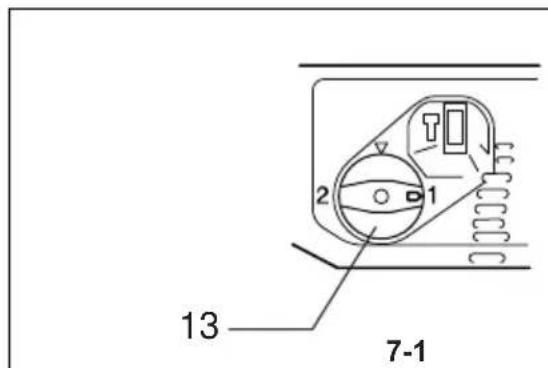
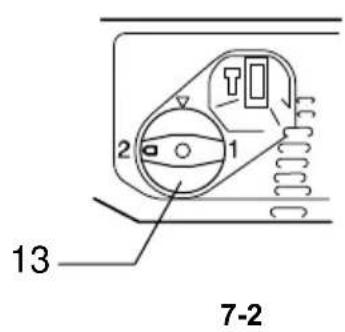
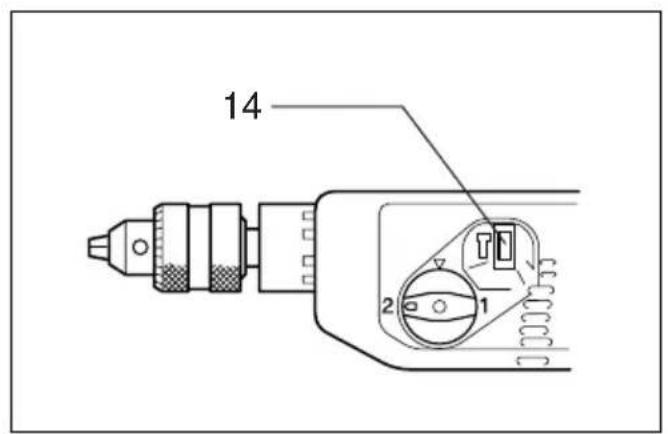
Speed change (Fig.7)
Two rpm ranges can be preselected with the speed change knob.
For low speed, turn the knob so that the pointer on the knob points to the number 1 marked on the tool body. (Fig.7-1)
For high speed, turn the knob so that the pointer points to the number 2. (Fig. 7-2)
If the knob is not turned smoothly, turn the chuck slightly in either direction and then turn the knob again.
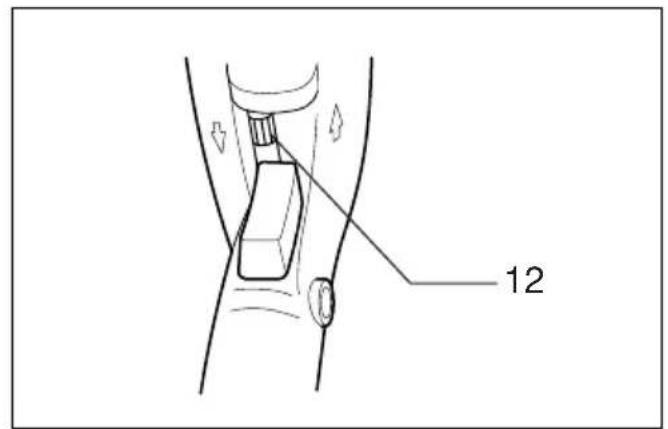
Selecting action mode (Fig.8)
This tool has an action mode change button. For rotation only, depress the button from the side with symbol. For rotation with hammering, depress the button from the side with symbol.
CAUTION:
Always depress the button all the way to your desired mode position. If you operate the tool with the button positioned half-way between the mode symbols, the tool may be damaged.
Operation
- Hammer drilling operation
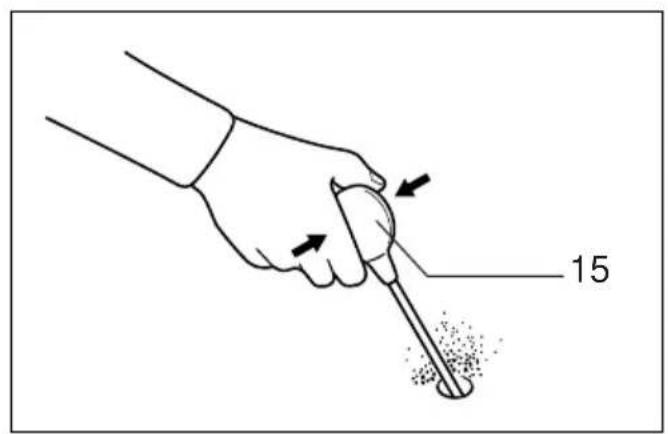
When drilling in concrete, granite, tile, etc., depress the action mode change button from the side with symbol to use "rotation with hammering" action. Be sure to use a tungsten-cabide tipped bit. Do not apply more pressure when the hole becomes clogged with chips or particles. Instead, run the tool at an idle, then remove the bit partially from the hole. By repeating this several times, the hole will be cleaned out.
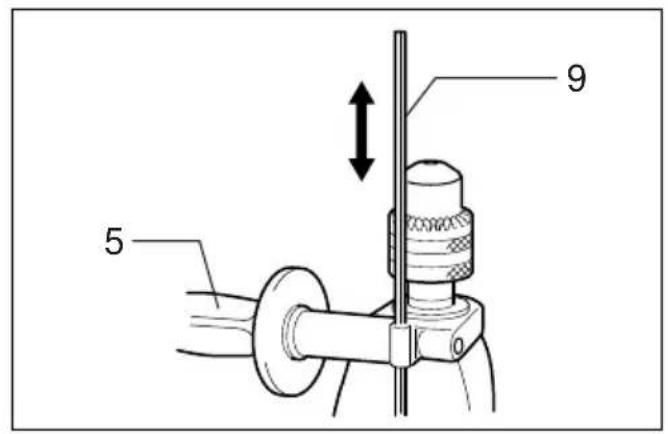
After drilling the hole, use the blow-out bulb to clean the dust out of the hole. (Fig.9)
2. Drilling operation
When drilling in wood, metal or plastic materials, depress the action mode change button from the side with symbol to use "rotation only" action.
- Drilling in wood
When drilling in wood, best results are obtained with wood drills equipped with a guide screw. The guide screw makes drilling easier by pulling the bit into the workpiece.
- Drilling in metal
To prevent the bit from slipping when starting a hole, make an indentation with a centerpunch and hammer at the point to be drilled. Place the point of the bit in the indentation and start drilling.
Use a cutting lubricant when drilling metals. The exceptions are iron and brass which should be drilled dry.
CAUTION:
- Pressing excessively on the tool will not speed up the drilling. In fact, this excessive pressure will only serve to damage the tip of your bit, decrease the tool performance and shorten the service life of the tool.
- There is a tremendous twisting force exerted on the tool/bit at the time of hole breakthrough. Hold the tool firmly and exert care when the bit begins to break through the workpiece.
- A stuck bit can be removed simply by setting the reversing switch to reverse rotation in order to back out. However, the tool may back out abruptly if you do not hold it firmly.
- Always secure small workpieces in a vise or similar hold-down device.
MAINTENANCE
CAUTION:
Always be sure that the tool is switched off and unplugged before carrying out any work on the tool.
Cleaning vent holes (Fig. 10)
Periodically clean the vent holes to prevent them from being clogged with dust, dirt or the like.
To maintain product safety and reliability, repairs, maintenance or adjustment should be carried out by a Makita Authorized Service Center.
ACCESSIONS
CAUTION:
- These accessories or attachments are recommended for use with your Makita tool specified in this manual. The use of any other accessories or attachments might present a risk of injury to persons. Only use accessory or attachment for its stated purpose.
If you need any assistance for more details regarding these accessories, ask your local Makita service center.
- Carrying case
- Depth gauge
- Chuck key
- Blow-out bulb
Hole saw 79 mm and 95 mm - Safety goggle
Tungsten-carbide tipped bit
"M" stands for max. drilling depth. - Phillips bit (For HP2040 and HP2041)
- Slotted bit (For HP2040 and HP2041)
Descriptif
- Rotation et percussion
EC-DECLARATION OF CONFORMITY
Model; HP2040, HP2041, HP2042
We declare under our sole responsibility that this product is in compliance with the following standards of standardized documents,
EN60745, EN55014, EN61000
in accordance with Council Directives, 2004/108/EC and 98/37/EC.
FRANÇAISE
DECLARATION DE CONFORMITE CE
Modello; HP2040, HP2041, HP2042
Responsible manufacturer: Produtlore responsable:
Authorized Representative in Europe:
Michigan Drive, Tongwell, Milton Keynes, Bucks MK15 8JD, ENGLAND
PORTUGUES
DECLARACAO DE CONFORMIDADE DA CE
Modelo; HP2040, HP2041, HP2042
Declaramos sob inteira responsabilité que este produit obedece às seguides normas de documents normalizados,
EN60745, EN55014, EN61000
de accordo com as directivas 2004/108/CE e 98/37/CE do Conselho.
DANSK
EU-DEKLARATION OM KONFORMITET
Model; HP2040, HP2041, HP2042
Malli; HP2040, HP2041, HP2042
Michigan Drive, Tongwell, Milton Keynes, Bucks MK15 8JD, ENGLAND
ENGLISH
For European countries only
Noise
The typical A-weighted noise level determined according to EN60745-2-1:
Sound pressure level (LpA) : 94 dB (A)
Sound power level (LwA): 105 dB (A)
Uncertainty (K): 3 dB (A)
Wear ear protection.
Vibration
The vibration total value (tri-axial vector sum) determined according to EN60745-2-1:
Work mode: impact drilling into concrete
Vibration emission (a,d); 8,5 m/s
Uncertainty (K): 1.5m / s^2
Work mode:drilling into metal
Vibration emission (a,d); 3,0 m/s
Uncertainty (K): 1.5m / s^2
FRANÇAISE
Vibrationsemission (a,D): 3,0 m/s²
Móvo yia xwpe tnc Eupwnns
Oopubos
To tuniok A einnieo v o u 0opou

- GB 2-Speed Hammer Drill Instruction Manual
- Symbols
- Symboles
- Power supply
- Safety hints
- SPECIFIC SAFETY RULES
- SAVE THESE INSTRUCTIONS.
- WARNING:
- OPERATING INSTRUCTIONS
- Side grip (auxiliary handle) (Fig. 1)
- Installing or removing drill bit
- For HP2040 and HP2042 (Fig. 2)
- For HP2041 (Fig. 3)
- Depth gauge (Fig.4)
- NOTE:
- Switch action (Fig.5)
- CAUTION:
- For HP2040 and HP2041
- For HP2042
- Reversing switch action (Fig. 6)
- Speed change (Fig.7)
- Selecting action mode (Fig.8)
- Operation
- Drilling operation
- MAINTENANCE
- Cleaning vent holes (Fig. 10)
- ACCESSIONS
- EC-DECLARATION OF CONFORMITY
- FRANÇAISE
- DECLARATION DE CONFORMITE CE
- PORTUGUES
- DECLARACAO DE CONFORMIDADE DA CE
- DANSK
- EU-DEKLARATION OM KONFORMITET
- ENGLISH
- For European countries only
- Noise
- Wear ear protection.
- Vibration
- Móvo yia xwpe tnc Eupwnns
- Oopubos
Brand : MAKITA
Model : HP2041
Category : Drill