
OmniLink TMH6000IVDT - Printer EPSON - Free user manual and instructions
Find the device manual for free OmniLink TMH6000IVDT EPSON in PDF.
| Product Type | Multifunction thermal printer for point of sale |
| Brand | Epson |
| Model | OmniLink TM-H6000IV DT |
| Format | Roll and slip thermal printer |
| Dimensions (approx.) | 210 x 160 x 140 mm (width x depth x height) |
| Net weight (approx.) | 3.0 kg |
| Power supply | External AC adapter (24 V DC, not specified) |
| Power consumption | Operating: approx. 50 W; standby: approx. 5 W |
| Available interfaces | USB, USB+Power, Ethernet, Serial (RS-232), Parallel (IEEE 1284), customer display connector, cash drawer connector |
| Paper type | Thermal roll, slip, endorsement (with endorsement printer option) |
| Printing functions | Print on roll, slip, endorsement; MICR printing (optional) |
| Ribbon | EPSON ERC-32 ribbon cartridge (standard), ERC-43 (for endorsement printer) |
| Control panel | LEDs: power, error, paper, slip; buttons: paper feed, release |
| Maintenance and cleaning | Clean the casing with a soft cloth; thermal head: every 3 months with isopropyl alcohol; MICR head: once a year with special cleaning sheet |
| Safety | Unplug immediately if smoke or odor; do not open or repair yourself; do not use flammable aerosols; thermal head hot after printing |
| Spare parts and repairability | Ribbon and paper roll are consumables; thermal head and MICR are replaceable by an authorized technician |
| Warranty | Standard manufacturer's warranty; contact a Seiko Epson authorized service center |
| Applications | Printing receipts, checks, tickets; compatible with cash register systems and self-service kiosks |
Frequently Asked Questions - OmniLink TMH6000IVDT EPSON
User questions about OmniLink TMH6000IVDT EPSON
0 question about this device. Answer the ones you know or ask your own.
Ask a new question about this device
Download the instructions for your Printer in PDF format for free! Find your manual OmniLink TMH6000IVDT - EPSON and take your electronic device back in hand. On this page are published all the documents necessary for the use of your device. OmniLink TMH6000IVDT by EPSON.
USER MANUAL OmniLink TMH6000IVDT EPSON
| Printing method Receipt: The thermal line | ||
| Slip/Endorsement*1: 9-pin serial impact dot matrix | ||
| MICR*1 recognition method | Magnetic bias | |
| Paper dimensions | Receipt | 79.5 ± 0.5 × 83 mm {3.1 ± 0.02 × 3.3"} |
| Slip | 68 ~ 230 × 68 ~ 297 mm {2.7 ~ 9.1 × 2.7 ~ 11.7"} (W × L) | |
| Paper thickness Slip (single ply): 0.09 ~ 0.22 mm {0.0035 ~ 0.0087"} | ||
| Inked ribbon Slip: ERC-32, Endorsement *1: ERC-43 | ||
| Interface (compatible) | Serial (RS-232)/Parallel (IEEE 1284)/Ethernet (10BASE-T/100BASE-TX)/Wireless LAN (IEEE 802.11b)/USB (Compliance: USB 2.0, Communication speed: Full-speed (12 Mbps))/USB Plus Power (Communication speed: Full-speed (12 Mbps)) | |
| Supply voltage*2 | DC + 24 V ± 7% | |
| Temperature Operating: 5 to 45°C {41 to 113°F} Storage: -10 to 50°C {14 to 122°F}, except for paper | ||
| Humidity Operating: 10 to 90% RH Storage: 10 to 90% RH, except for paper | ||
| Overall dimensions 181 × 186 × 278 mm {7.13 × 7.32 × 10.94"} (H × W × D) | ||
| Weight (mass) Approx. 4.4 kg {9.7 lb} | ||
Mbps: megabits per second
1: Factory installed options
2: Be sure to use a safety-standard's-applied power source that meets the following specifications. Rated output: 24 V/2.0 A or more, Maximum output: 240 VA or less
English
Targeted Models and Features
This manual applies to the following models of the TM-H6000IV. If your printer is equipped with a MICR reader (factory installed option), the printer can read MICR characters.
Standard model: Can print on the face of roll/slip paper.
Models with endorsement printers (factory installed option) can print also on the back of slip paper.
Validation model: Can print on the face of roll/slip/validation paper.
Illustrations
All of the illustrations are at the beginning of this manual. They may be different from your printer in appearance, depending on your printer model. See the list below for the meaning of the numbers in the illustrations.
- Roll paper cover
- Receipt unit
- Front cover
- Power switch
- Manual cutter
- Connector cover 18. Knob
- Control panel
-
Serial Interface connector
-
Ethernet connector
- Parallel interface connector
- USB Plus Power connector
- Customer display connector
-
Drawer kick-out connector
-
Power supply connector
- USB connector
- Cable hook
- Thermal head
- Pin
Restriction of Use
When this product is used for applications requiring high reliability/safety, such as transportation devices related to aviation, rail, marine, automotive, etc.; disaster prevention devices; various safety devices, etc.; or functional/precision devices, etc.; you should use this product only after giving consideration to including fail-safes and redundancies into your design to maintain safety and total system reliability. Because this product was not intended for use in applications requiring extremely high reliability/safety, such as aerospace equipment, main communication equipment, nuclear power control equipment, or medical equipment related to direct medical care, etc., please make your own judgment on this product's suitability after a full evaluation.
Caution
All rights reserved. No part of this publication may be reproduced, stored in a retrieval system, or transmitted in any form or by any means, electronic, mechanical, photocopying, recording, or otherwise, without the prior written permission of Seiko Epson Corporation. No patent liability is assumed with respect to the use of the information contained herein. While every precaution has been taken in the preparation of this book, Seiko Epson Corporation assumes no responsibility for errors or omissions. Neither is any liability assumed for damages resulting from the use of the information contained herein. Neither Seiko Epson Corporation nor its affiliates shall be liable to the purchaser of this product or third parties for damages, losses, costs, or expenses incurred by purchaser or third parties as a result of: accident, misuse, or abuse of this product or unauthorized modifications, repairs, or alterations to this product, or (excluding the U.S.) failure to strictly comply with Seiko Epson Corporation's operating and maintenance instructions.
Seiko Epson Corporation shall not be liable against any damages or problems arising from the use of any options or any consumable products other than those designated as Original Epson Products or Epson Approved Products by Seiko Epson Corporation.
EPSON is a registered trademark of Seiko Epson Corporation. Exceed Your Vision is a registered trademark or trademark of Seiko Epson Corporation. All other trademarks are the property of their respective owners and used for identification purpose only.
NOTICE: The contents of this manual are subject to change without notice.
© Seiko Epson Corporation 2014. All rights reserved.
Purpose of This Manual
This manual provides information describing basic operations to operators of the TM-H6000IV to enable safe and correct use of the printer.
Important Safety Information
This section presents important information intended to ensure safe and effective use of this product. Read this section carefully and store it in an accessible location.
Key to Symbols
The symbols in this manual are identified by their level of importance, as defined below. Read the following carefully before handling the product.
WARNING:
Warnings must be followed carefully to avoid serious bodily injury.
CAUTION:
Cautions must be observed to avoid minor injury to yourself, damage to your equipment, or loss of data.

Note:
Notes have important information and useful tips on the operation of your equipment.
Safety Precautions
WARNING:
Shut down your equipment immediately if it produces smoke, a strange odor, or unusual noise. Continued use may lead to fire. Immediately unplug the equipment and contact your dealer or a Seiko Epson service center for advice.
Never attempt to repair this product yourself. Improper repair work can be dangerous.
Never disassemble or modify this product. Tampering with this product may result in injury or fire.
Be sure to use the specified power source. Connection to an improper power source may cause fire.
Do not allow foreign matter to fall into the equipment. Penetration by foreign objects may lead to fire.
If water or other liquid spills into this equipment, unplug the AC cable immediately, and then contact your dealer or a Seiko Epson service center for advice. Continued usage may lead to fire.
Do not use aerosol sprayers containing flammable gas inside or around this product. Doing so may cause fire.
CAUTION:
Do not connect cables in ways other than those mentioned in this manual. Different connections may cause equipment damage and burning.
Be sure to set this equipment on a firm, stable, horizontal surface. Product may break or cause injury if it falls.
Do not use in locations subject to high humidity or dust levels. Excessive humidity and dust may cause equipment damage or fire.
Do not place heavy objects on top of this product. Never stand or lean on this product. Equipment may fall or collapse, causing breakage and possible injury. Take care not to injure your fingers on the manual cutter
- When you remove printed paper
- When you perform other operations, such as loading/replacing roll paper
To ensure safety, unplug this product before leaving it unused for an extended period.
Do not connect a telephone line to the drawer kick-out connector or the display module connector; otherwise the printer and the telephone line may be damaged.
Caution Label
The caution label on the product indicates the following precaution.

CAUTION:
Do not touch the thermal head because it can be very hot after printing.
Usage Notes
Install the printer horizontally.
Make sure cords and foreign objects are not caught in the printer.
Do not open the covers during printing or autocutting.
Make sure that the printer is not subjected to any impact or vibration.
Do not put any food or drink on the printer case.
To prevent a paper jam, do not prevent paper from being ejected from the paper exit, and do not pull the paper being ejected.
Downloading Drivers, Utilities, and Manuals
Further product information is written in the TM-H6000IV Technical Reference Guide.
Drivers, utilities, and manuals can be downloaded from one of the following URLs.
For customers in North America, go to the following web site: http://www.epsonexpert.com/ and follow the on-screen instructions.
For customers in other countries, go to the following web site: http://download.epson-biz.com/?service=pos
Part Names
For the printer part names, see illustration A.
Control Panel
(Power) LED
On when the printer is on.
Error LED
On when the printer is offline after an error, such as paper out or roll paper cover open. Off when the printer operates normally. Flashes when an error occurs.
Paper LED
On when the roll paper is near its end.
Flashes when waiting for test printing on the roll paper.
Slip LED
On when the printer is in slip paper mode. Off when the printer is in roll paper mode. Flashes when the printer is waiting for slip paper to be inserted/removed.
Feed button
This button feeds paper.
Release button
This button releases the retained paper.
Power Switch and Power Switch Cover
Use the power switch on the front of the printer to turn the printer on and off.
The enclosed power switch cover ensures that the power switch is not pressed accidentally. To install the cover, see illustration C.
You can turn on and off the power switch by inserting a sharp-pointed object in the holes in the power switch cover.
To detach the cover, use a sharp-pointed object.
WARNING:
If an accident occurs with the power switch cover attached, unplug the AC cable immediately. Continued use may cause fire or shock.
Setting up the Printer

Note:
For models with the MICR reader, do not place the printer near any magnetic fields to avoid decreasing the MICR recognition rate. Especially, when you install the printer near the display device, check the recognition rate of the MICR reader.
To set up the printer, follow the steps below.
- Unpacking (See "Unpacking" on page 10.)
- Connecting the cables (See "Connecting the Cables" on page 10.)
- Installing the connector cover (See "Installing and Removing the Connector Cover" on page 10.)
- Installing the ribbon cartridge (See "Installing and Replacing the Ribbon Cartridge" on page 11.)
- Installing the roll paper (See "Installing and Replacing the Roll Paper" on page 11.)
- Operation check with test print (See "Test Printing" on page 12.)
Unpacking
Check whether the following items are included. If any item is damaged, contact your dealer.
□Printer
Thermal roll paper (for operation check)
Ribbon cartridge (ERC-32)
Ribbon cartridge (ERC-43)
Connector cover
Power switch cover
□AC adapter *2
□AC cable *2
User's manual (this manual)
*1: Only for models with endorsement printers
*2: May not be included depending on the printer model.
Connecting the Cables
CAUTION:
For a serial interface, use a null modem cable.
For a parallel interface, use an IEEE 1284 cable.
For a USB interface, do not turn on the printer before installing the printer driver.

Note:
Available interfaces vary by the printer model. For the positions and shapes of the connectors, see illustration B.
The customer display is available only when using a serial interface or USB interface located at the position shown as 15 in illustration B.
- Make sure the power switch is off.
- Connect the AC cable to the printer.
- Connect each interface cable to the printer. When using the USB interface, fix the USB cable with the cable hook to prevent the USB cable from coming off. (See illustration D.)
- Connect the interface cable to the computer.
- Insert the AC cable plug into a power outlet.
Installing and Removing the Connector Cover
To install the included connector cover, follow the steps below.
- Align 2 projections on the top of the connector cover (indicated as a in illustration E) with holes in the back of the printer.
- Push the connector cover forward so that the projections at the bottom of the printer (indicated as b in illustration E) fit properly in the holes in both sides of the connector cover.
To remove the connector cover, push both sides of the cover inward to remove the holes in both sides of the cover from the projections at the bottom of the printer (indicated as b in illustration E).
Installing and Replacing the Ribbon Cartridge

Note:
Use the EPSON ERC-32 ribbon cartridge.
- Turn on the printer.
- Open the front cover using the tabs on both sides of the front cover. (See illustration F.)
- Remove the used ribbon cartridge, if there is one.
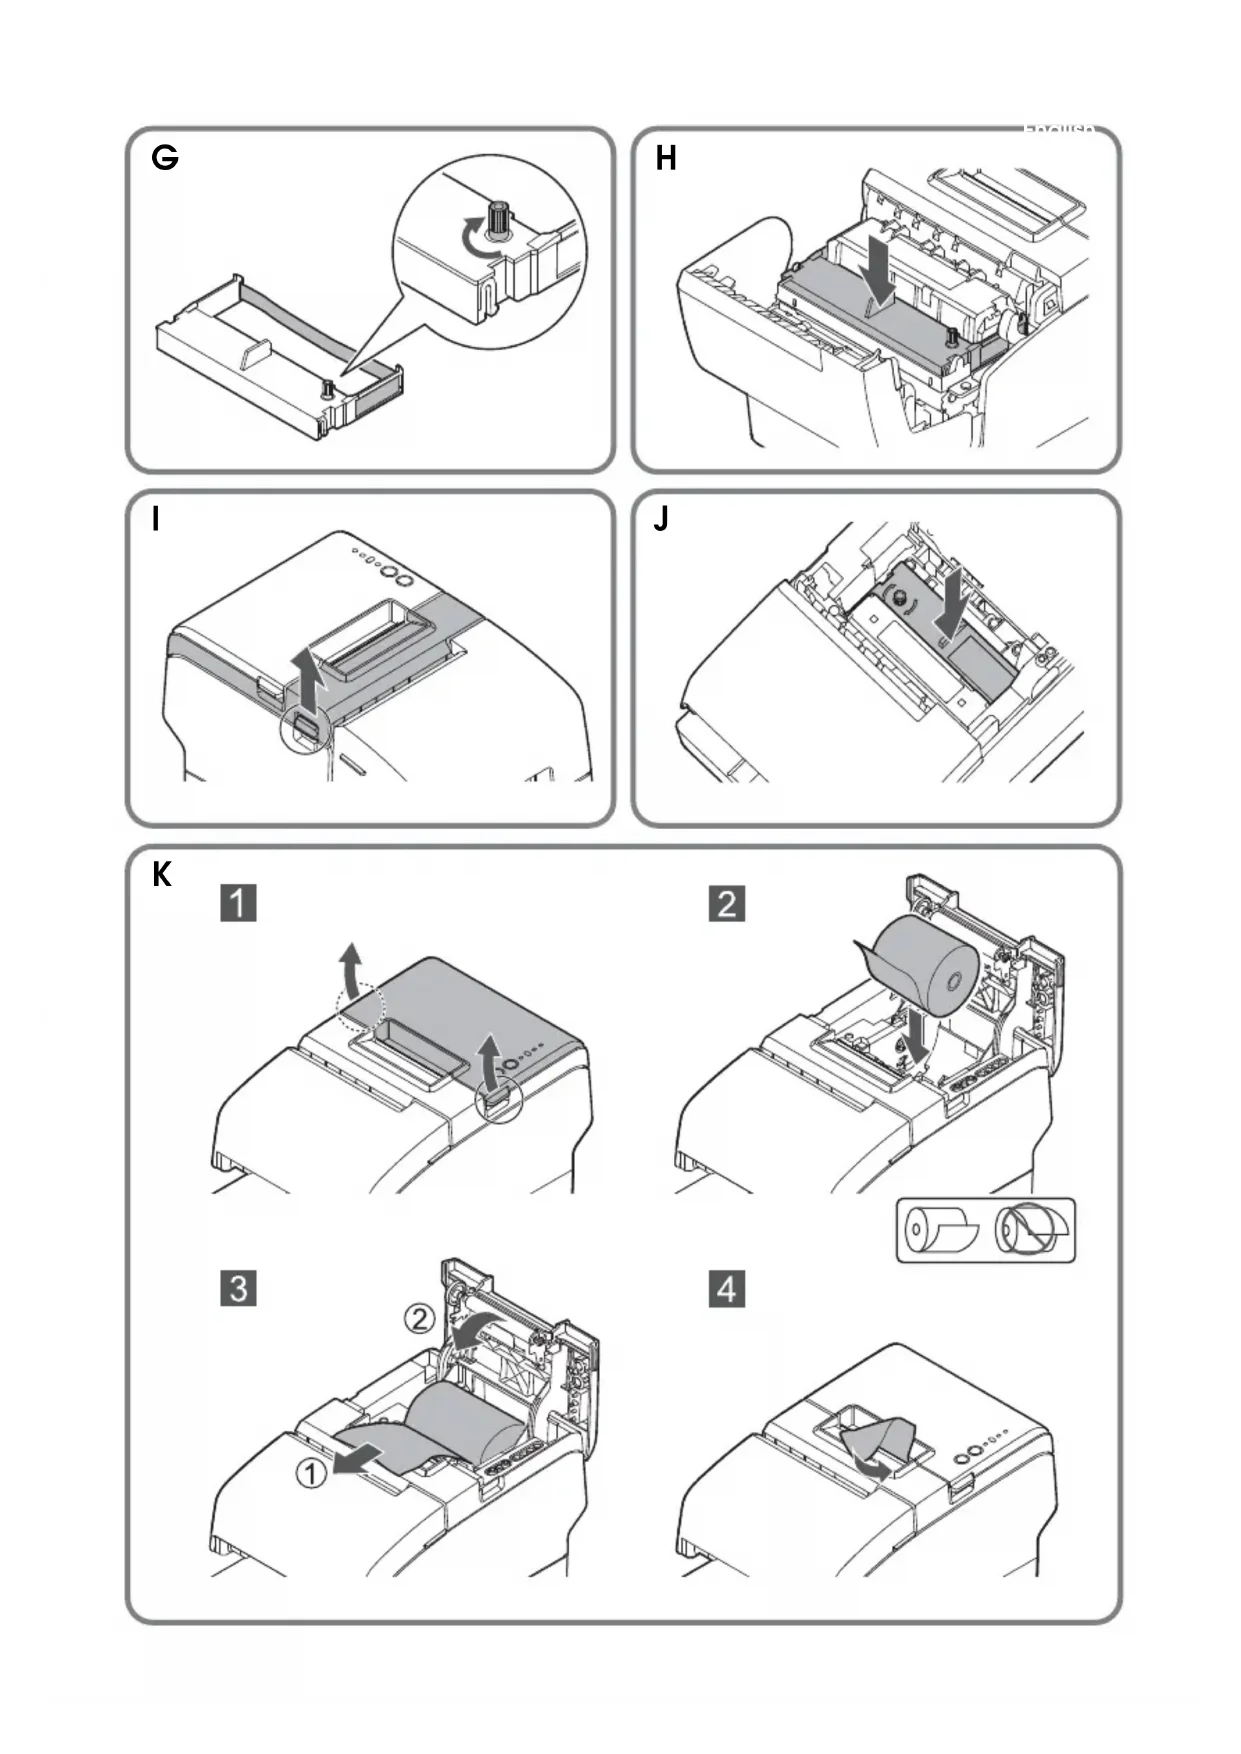
- Turn the knob on the ribbon cartridge a little in the direction of the arrow marked on the cartridge to remove any slack in the ribbon. (See illustration G.)
CAUTION:
Make sure to note the direction of the arrow marked on the ribbon cartridge when turning the knob. If it is turned in the reverse direction, the cartridge may be damaged.
- Insert a new ribbon cartridge until it clicks into place. (See illustration H.)
- Turn the knob on the cartridge in the marked direction again to remove any slack in the ribbon.
- Close the front cover.
Installing and Replacing the Ribbon Cartridge for Endorsement Printing
If your printer is equipped with an endorsement printer, endorsement printing on slip paper is available.
Follow the steps below to install/replace the ribbon cartridge for the endorsement printer.

Note:
Use the EPSON ERC-43 ribbon cartridge for the endorsement printer.
- Turn on the printer.
- Pull the lever on the left side of the receipt unit to open the receipt unit. (See illustration I.)
- Follow steps 3 to 6 in "Installing and Replacing the Ribbon Cartridge" on page 11 to install the ribbon cartridge. (See illustration J.)
- Close the receipt unit.
Loading Paper
CAUTION:
Be sure to use the specified roll paper.
Do not insert any paper that has clips or staples. This may cause paper jams and damage.
Make sure the slip/validation paper is flat, without curls, folds, or wrinkles.

Note:
Use personal checks of 12 cm 4.7'' long or more.
Installing and Replacing the Roll Paper
Follow the steps below to install/replace the roll paper. (See illustration K.)
-
Turn on the printer.
-
Open the roll paper cover using the tabs on both sides of the roll paper cover.
- Remove the used roll paper core, if there is one, and insert the roll paper in the correct direction.
- Pull out some paper, and close the roll paper cover.
- Tear off the paper with the manual cutter.
Inserting Slip Paper
When printing on slip paper, follow the steps below to insert the paper. (See illustration L.)
If your printer is equipped with a MICR reader, MICR reading is available by inserting the check paper so that the MICR characters on the paper are on the right side.
- Turn on the printer.
- Insert the paper face up with the right paper edge against the right side of the paper guide, and insert it as far as it will go.
- Insert the paper straight until the top edge of the paper touches the stopper.
- When the printer starts feeding the paper, release it immediately.
- Pull the ejected paper straight up out of the printer.
Inserting Validation Paper
If your printer is a validation model, insert the paper in the same way as normal slip paper (See "Inserting Slip Paper.") or follow the steps below. (See illustrationM.)
- Turn on the printer.
- Insert the paper with the right paper edge against the right side of the paper guide at the printer top, and insert it as far as it will go.
- Insert the paper straight down until the bottom edge of the paper touches the stopper.
- When the printer starts feeding the paper, release it immediately.
- Pull the ejected paper straight up out of the printer.
Test Printing
After the printer setup or when the printer is not operating correctly, you can check the printer operation with test printing. If the printer performs pattern printing following the steps below, the printer is operating normally.
Test Printing on Roll Paper
Make sure all the covers are closed, and while pressing the Feed button, turn on the printer. After the printer prints its status and the Paper LED flashes, press the Feed button again to restart the test printing.
Test Printing on Slip Paper
Make sure all the covers are closed, and while pressing the Release button, turn on the printer. After the Slip LED flashes, insert the slip paper. If your printer is equipped with the endorsement printer, the printer prints both sides of the paper.
Both types of test printing are completed when " completed" is printed.
Cleaning
Cleaning the Printer Case
Be sure to turn off the printer, and wipe the dirt off the printer case with a dry cloth or a damp cloth.
CAUTION:
Never clean the product with alcohol, benzine, thinner, or other such solvents.
Doing so may damage or break the parts made of plastic and rubber.
Cleaning the Thermal Head
Epson recommends cleaning the thermal head periodically (generally every 3 months) to maintain receipt print quality.
CAUTION:
The thermal head can be very hot after printing. Be careful not to touch it, and let it cool before you clean it.
Do not damage the thermal head by touching it with your fingers or any hard object.
Turn off the printer, open the roll paper cover, and clean the thermal elements of the thermal head with a cotton swab moistened with an alcohol solvent (ethanol or IPA). (See illustration N.)
Cleaning the MICR Head
If your printer is equipped with a MICR reader, when the MICR head becomes dirty, the printer cannot read MICR characters normally.
Approximately every year, clean the MICR head with the following or an equivalent commercially available cleaning sheet:
KIC Products "Waffle Technology" MICR cleaning card
CAUTION:
Be sure not to use an adhesive cleaning sheet.
Be sure that the cleaning sheet is inserted with the correct side up and in the correct direction.
Use a cleaning sheet only one time; then discard it.
- Make sure the roll paper is installed correctly and the printer is turned off.
- Open the roll paper cover.
- While holding down the RELEASE button, turn the power back on.
- Press the RELEASE button 7 times; then close the roll paper cover.
- After the printer prints "RECOGNITION MODE Please set check." on the roll paper and the SLIP LED flashes, insert the cleaning sheet like standard slip paper.
- Pull the ejected paper straight up out of the printer.
- Turn off the printer to exit the cleaning mode.
Troubleshooting
Error LED is on or flashing
□ Printing stops if the head overheats and resumes automatically when it cools.
Make sure that all the covers are properly closed.
The autocutter blade may be locked. For a minor lock, the autocutter blade automatically returns to the correct position. Otherwise, move it to the correct position referring to "The roll paper cover will not open (the autocutter blade is locked)."
When a paper jam occurs, remove the jammed paper referring to "Paper jam occurs."
Turn the printer off, and after 10 seconds, turn it back on.
The roll paper cover will not open (the autocutter blade is locked)
Follow the steps below to return the autocutter blade to the correct position.
- Turn off the printer.
- Pull the lever on the left side of the receipt unit to open the receipt unit. (See illustration I.)
- Turn the knob of the autocutter blade in the direction of the arrow until you see a pin in the opening of the frame, as shown in illustration O.
Paper jam occurs


CAUTION:
Do not touch the thermal head, because it can be very hot after printing. Let it cool before you remove the jammed paper.
When the roll paper is jammed
- Turn off the printer.
- Open the roll paper cover using the tabs on both sides of the roll paper cover.
- Remove the jammed paper.
When the slip paper is jammed
- Turn off the printer.
- Open the front cover using the tabs on both sides of the front cover. (See illustration F.)
- Open the front carriage unit using the lever at the right of the front carriage unit. (See illustration P.)
- Remove the jammed paper.
Français
Voyant (alimentation)
KIC Products "Waffle Technology" MICR cleaning card
ATTENTION:
KIC Products "Waffle Technology" MICR cleaning card
VORSICHT:
KIC Products "Waffle Technology" MICR cleaning card

LET OP:
KIC Products "Waffle Technology" MICR cleaning card

ATTENZIONE:
KIC Products "Waffle Technology" MICR cleaning card
CUIDADO:
KIC Products "Waffle Technology" MICR cleaning card
IMPORTANT:
KIC Products "Waffletechnology" MICR cleaning card
! DIKKAT:
© Seiko Epson Corporation 2014. Alle rettigheder forbeholds.
Knappen Indfor (Feed)
Papir indfores med donne knap.
Knappen Frigør (Release)
Rensning after termohovedet
KIC Products "Waffle Technology" MICR cleaning card

FORSIGTIG:
Vapauta (Release)-painike
© Seiko Epson Corporation 2014. Allerettigheter reservert.
Sette inn valideringspapir
KICs "Waffle Technology" MICR cleaning card
FORSIKTIG:
© Seiko Epson Corporation 2014. Alla rattigheter reserverade.
Inmatnings (Feed)-knapp
Denna knapp matar in papper.
Frigörings (Release)-knapp
KIC-produkter "Waffle technology" MICR cleaning card
VARNING:
Indikator LED Papir (Paper)
Tlacitko Posun (Feed)
Waffletechnology MICR cleaning card" od spolecnosti KIC Products

UPOZORNENI:
BaJIHdaIHHaMoDCJIb:MOKeT NcTaTaB Ha IOBCpxHOCTn pyJOHOH/INCTOBO6yMaTH H 6JHaIKOB BaJIHdaIIHH.
IJIJIocTpaun
Bcc HIOCTpaHn HaxoTcB HaayIc DaHHoro pyKOBOCTBa. OH Moryr OTHnAaTbCra OT BHeIHcRO BHa II pInHTcpa B 3aBHcHMOCTH OT moJIH. O6O3NaueHne HnCeI Ha HIOCTpaHnx IIpNBedeHO HHKe.
- Kpbuika pyloha 6ymarH
- YcTpoiCTBO DnI neuAtn YekOB
- IpepeHry KpbIkwka
- BbIKJIouaTeIb IITaHIN
- Puynoi pe3ak
- Kpbiuka coeHHTbHOro pa3bema
-
NaHelen ynpablenen
-
Pa3bem nocneIOBATEbHOro INHTepceia
- Pa3bem cetn Ethernet
- Pa3bem npapannelbHoro nHTeppeuca
- Pa3bEM USB Plus Power
- Pa3bemДЯВБиЕнeroДиСпляe
-
Pa3bEmДЯ BbITaJIKNBaHnЯUka
-
Pa3beM IITaHnA
- Pa3bem USB
- KaebnbHykpoK
- Tepmoneyuatauoua rOJIOBka
- Rykoytka
- WtncfT
OrpaHnueHHoe npImeHeHne
EcHn DaHHoe H3dHe HcIOb3yETc B ycIOBHX, Tpe6yIOHNx 06ecneChn BBICOKO ypOBHa HeckHOCT/6eONACHOCTH, Hapmep, COBMeCTIO Cpa3HINbIMN ycPOCTBaMH HA ABHAnHOITOM, KcIe3HOLOPOKIIOM, BOIHOM, ABTOMoBHbIMT PAcIETOPE H.; ABAPHHbIMN ycPOCTBaMH OTBOEINHRA; pa3HINbIMN ycPOCTBaMH 06ceeeHn 6eONACIOCTH T.; YIKHNOAHTbHM/ IIpeHHOHBMn ycPOCTBaMH H.,HCIOIB3OBaTB 3TO H3DEIHC CNEyET TOJIbKO IOCE paccMOTpeHHM MEp IIO o6ecneHIO OTKAOyToHbOCTH H pe3cPbHPoBAHH, Yo6bI 06ceeyHb 6eONACIOCTb H aIEKHOCT bCtEmbB INEOIOM. IocKoTky DAHHOC H3TeHn He IIpeHHa3NaHEHO JIIPHMEnHn BycIOBHX, Tpe6yIOHNX 06ceeeHn Ype3BbYauHIO BBICOKO ypOBHa HAEKHOCT/H6eONACIOCTH, HAIHPmEP, BcoHTaHHn C aBNAKOCMIueCKHM 06OpyIOBAHHem, 06OpyIOBAHHem MaHCTpaJIbHOI CB3H, B cHTeMAX yIpABJeHHa ATOMHBM NTEKTPoCTaHHMn HTH C McIIINHICKM 06OpyIOBAHHem, HcIOJIb3YcEMbIM HcIOCPcETBeHHO DJIeNeHHa PAHHeTTOB, H.,PiHMITE CO6CTBEHIIOE peIIIEHE OTIOCHTEbHO B3MOKHOCTH HcIOb3OBAHHa DAIHO TIOJIHO IOE KOIE NOCE BCCCTOPOHII EOIENK.
PpeDynpexKeHne
Bce npaba 3aunuHb. Bocpon3BeHHe, xpaehnbe H chtme IONcKaHfOpMaHn HpeaHa KaokJIN6o qactn HactOHTero
DOKyMeHTA B KAKoi-JIHO 0fOpme H n CIOIOB3OBAHHE KAKHX-JIHO 3JIeKTPOHbIX, MEXAHueCKHX, fOTOKOHNPOBAHBIX,
3aHHCbNAIOIHx Hn Hn HbIX cpeCTB 6e3 pIeBaHPteJIbIOHO IIcMbENIOHO pa3peIIeHnKopnpaHn Seiko Epson He ONYcKaIOTcR
H3ROTOBHTB He Heecet HNKAKo OTBETCTBEHHOCTH 3a HApYIIeHn IATEHTBIX ppAB CCBN C HIOLOB3OBAHHE CoepKaIIeHcB
HACTOIEM DOKyMeHTE HhOPMaHn. HecmToPn HA To, TTO H3ROTOBtB Ib PnHnBCEBOHMHe MePb IpEOCTOPOKHOCTH IIpH
NOITROBKe IACTOIeTO DOKyMeTTA, KopnpaHn Seiko Epson He Iecet INKAKo OTBETCTBEHHOCTH 3a OHIO6Kn HIn IPOYCKn.
Kpome TO, H3ROTOBHTB He Heecet HNKAKo OTBETCTBEHHOCTH 3a yIeP6, IIpHHHeHHB B pe3yJIbTate HCIOIB3OBAHn
HHOFOPMAHn, KOTOPa 3decBoepKHTC.
Hn KopnpaHn Seiko Epson, Hn ee OTdJeHn He HecyT OTBETCTBEHHOCTH IpeE NOKyIaTeIeM DaHHORo H3DeJIHn TpeTBei
ctopoHOH 3a yIeP6, NoTepH, pacxoIb Hn Hn 3aTpTaB, IIOHeeHHble IOKYIaTeIeM HIn TpeTBei CTopoHOB BCJIeCTBHe: HechactHO
ClyuaH, HeIPabHbHOro IIpMHHeHn Hn HapUWeHHpeKHMa 3KCIiyataAHn H3DeJIHn, a TaKke HecaHKUHOHOPOBAHHO
MOHhKAUnn, peMOHTa Hn H3MeHHeN H3DeJIHn HIn (3a HckIOueHHem CIUA) Heco6IOeHHB TOHOCTH HHCTpyKUnn
kopnpaHn Seiko Epson IO OKIIUYATAUHN HIn o6clyKHBAAHIO.
Kopnopauiu Seiko Epson He Hecet OTBcTBeHHOCTH 3a KaKHe-JIb6o y6bIKH INI Ipo6JIeMbl, BO3HNKaIOUne B CBA3N C HIOJB3OBAHHE JIO6bIX IOIOIHHTeJIbHbIX ycTOH CTB IN KOMIOHEHTOB INI JIO6bIX paCXOJyEMbIX MATEpHaIOB, KpOME Tx, KOtOpBle pKOMcHIOBaHbI KopnpaHnei Seiko Epson B KaueCTBE oprHHaJIbHOINI POdyKIIHH KOMIIaHH Epson INI B KaueCTBE IPOdyKIIHH, OIO6peHHoi KOMIIaHHe Epson.
EPSON ABJIEcT 3apeHCTPpOBaHHbM TOBapHBIM 3HaKOM KOpopauuH Seiko Epson Corporation. Exceed Your Vision ABJIEcT 3apeHCTPpOBaHHbIM TOBapHBIM 3HaKOM HIN TOBapHBIM 3HaKOM KOpopauuH Seiko Epson Corporation. Bce ocTaJIbHbc TOBapHBic 3HaKH JBIHOITc CO6CTBEHHOCBJIOHX COOTBeTCTBYIOHN X BIAJEJIbE H CNOJIb3yOTcTOJIbKO C IeJIbHO HHeHTHΦHKaHH. BHIMAHHE!CoepKaHHe 3TORO pykoBDCTBA MOKeT 6bIb H3MeHeo 6e3 H3BeIIeHH.
© 2014 Seiko Epson Corporation. Bce npaba 3aunneHbI.
Lelb daHnoo pykoobcmea
JaHHoe pyKOBOCTBO COJIepKHT OINCAHHe OCHOBHbIX DeIcTBn IJIa OIIepaTopoB TM-H6000IV, YTO6bI OBeCIIeHTb 6e3OIIacHOe N IpaBNJbHOe HcIOJIb3OBAHne IprHTEpa.
Baxnay uHopmaua no oecneuHuo 6e3oNaChocmu
B 3TOM pa3IeJIe coIepKHTcR BaXHra HnΦopMaIIH, cIIOco6CTByOIIa o6ecIeueHHIO 6e30IacHO r H 3ΦΦeKTHBHO r HCIOJIb3OBAHr OINcSbIBaEMo IpoDyKuH. BHNMaTeJIbHO IpoUHTte 3OT pa3IeJI r XpaHInTE HHCTpyKUnr IO o6ecIeueHHIO 6e30IacHOCTN B IOCTyIHOM MceTe.
YcIIOEHbIe 06O3HaueHua
Pa3JIHbIMn ycIOBbIMn 6Oo3HaueHHaMn B TeKCTe HaCTOIIeTO pyKOBOCTBa
6o3Haayetc HOpMaunpa3JInHO CTeIeHN BaXHOCTN (CM. IIpNBdeEHbIe HIXKe
oipeJeHH). BHNMaTeJIbHo YHTaTe IpeIyIpeKJeHH N IIpHMeHaHH IpeI
TpaHCNoPTnOBkO, IOKJIIOUeHHem H NCIOJB3OBaHHem IPOdyKUnn.
I PENEYNPEXJEHNE
HecobnodHepekeMeHdauui no3a2oNoKOM «PPEyIPEXKeEHNE» Moxem npueecmu K mJxekblm mpaemam.
BHIMAHHE!
Hecobnodenepe pekomendaui no3a2oNOBKOM «BHNMAHNE!» moxem npueecmu Kmpaamam, noepexdehuo obopydoaHua unu nompe daHbix.
IIpuMeyane
Ipumueanua codepocam baichyuo uhdopmauuo u noie3hle coebbl no 9kniyyamauu obopydoabaun.
Mepbl npedocmopoxhocmu
I PEPENPPEKDEHNE
Ecn npu uonb3oahuu bawezo obopydoaunr 803hukhem dbim, HnpuebHbui 3anax unu Heobbyhui wym, hemedneHno 6bkIouhme ezo. Ezo daNBHeUwee uonb3oahue moxem npueecmu K nokapy. Cpa3y je omcoedunme obopydoaune om cemu u obpamumecb 3a pekomehdaucmau k mop2oBOMy npedcmaumnU 130omobumner unu e uehmp mexHuueckzo obcnykueaunr obopydoaunr Komnauu Seiko Epson.
Huko2da He nbimaumecb camocmoenbHo pemohmuobam 3mo obopydohaue. HenpaunbHoe bInonHeue pemohma Moxem npubecmu K 803HuKHOeHUo onachoc cumyaquu.
Hukoza He pa3bupaume obopydobaHue u He u3MeHnme e20 KOhcmpykuu.
HeymeJe o6paueHue c obopydoaHuem MoKem npueecMu K mpaemam unu noxapy.
Ponb3yimec monko yka3aHHbIM ucmouHKOM 3neKmpOnumahur. NodcoeduneHue
obopydoaHua K HnnpabunbHomU ucmouHky 3neKmpOnumahur MoKem npueecMu K noxapy.
He donyckaume nonadaHua nocmopOHux npedMemoe Eymphb obopydoaHua.
NonadaHue 6 obopydoaHue nocmopOHux npedmemoe moxem npuecmu K noxapy. B cnyuae nonadahnue bHympb obopydoaHua bOdbu uuu kaou-Ju6o dpzoukudocmu HemeDlenho omcoedunume om cemu npoob 3neKmponumauha obopydoaHua u dbpamumecb 3a pekomehdaucmau K mop2oBOMy npedcmaubemno u3aomobumena unu e uehnp obcnjxueaHua obopydoaHua komanhu Seiko Epson. Ppodoxheue ucnoIb3oBaHua obopydoaHua moxem npuecmu K noxapy.
He ucnno3yume bHympu daHNO2o u3denu unu pRdom c HUM a3pO30NbHbIe paCnblumenu, codepkaue o2Heonachbu 2a3. Mo moMoxem npubecmu K noxapy.
BHIMAHHE!
Iodknouaume kabenu monbko 8 coombemcmeuu c uHcmpykuuMu, npueedeHHbIMU e 3mom pykoobcmbe. Dpyoe noknuehue kabeneu moKem npueecmu K noepejdehuu u 6ocnnameHeuO obopydoaHua.
YcmaHaBnueaume obopydoaHue moIbko Ha ycmouuBoU, mbepoou 2OpuzOnMaJIbHOu noeepxHocMu. PadeHue obopydoaHua MoKem npueecmu K e2o NOJOMKe UUN K HAnecHuO mpaM nepcoHaNo.
He ucnonb3yume obopydoaHue 6 nomeueHuX c bicokou baxnocmbu uu 3anbileHHocmbu 8o3dyxa. 4pe3mepna 8naxHoCmb uU 3anbileHHocmb Moaym npueecmu K noepexdeHuO uu 8ocnnameHeHuO obopydoaHua.
He nomeuaume Ha obopydoaHue mxeIbe npedMembl. Huko2da He cmaabaume Ha obopydoaHue u He onupaumecb Ha hezo. ObopydoaHue moxem ynacmb unu cnomambcra; e oboux cnyaax 603moXHO hAneceHue mpaBm nepcoHany.
Cmapaumecb He npaHmb naIbUbi pyHybIM pe3akOM,
- 6bIHMaay bMyaay c omneyamaHHbIM codepkHaueM;
- ebinoHra dpyue deucmeur, makue kak ycmaHOka Unu 3aMeHa pynoHa 6ymau.
B ueJx oecneueHua 6e3oNaChocmu omcoedunme obopydoaHue om cemu, eJn OHO He 6ydem uonolb3oabmbcra e meueHue dnumenbHOO bpeMeHu.
He noeknouaume meenefohnyo luHIO K pa3bemy dner bimankubahura uu npa3bemy eheuneto dcnnner. B npomuehOM cnuyae npunmep u meefoHHa JUNHua mOzym 6bimb noepkdehl.-
KhoNka pa3Xamur (Release)
3ra KhoIIka IIO3BOJIaTe pa3KaTb 6yMaIy, 3aKaTyIO POJHKaMn.
Bbiknoyamenb numaHua u Kpbiuka bcknoyameJnumaHua
JIЯ BKJIIOUeHnI H BbIKJIIOUeHnI IIpHHTepa HCIOJIb3yIte BBIKJIIOUaTeJIb IITaHHa Ha IcpeJHcI NaHcJIH IIpHHTepa.
BxOJIaB KOMIIeKT KpbIIka BbIKIHOaTeJI INHTAHN HCKIIIOaCT CJIyauHoe HaKaTHe BbIKJIIOHaTeJI. IJI yCTaHOBKN KpbIIKN CM. HJIIOCTpaIHNO C.
Bb MoKcTe BkJIOuAtb N BbIKJIOUaTb IHTaHHe, BCTaBJIa B OTBepCTHa Ka KpbIIke BbIKJIOUaTeJIa IHTaHHa 3aOCTpeHHbI IIpeImeT.
YTO6bI CHaTb KpbIuKy, TaKKe BOcIOJIb3yITecb 3aOCTpeHHbIM IpeDMetOM.
I PEPENPPEKDEHNE
Ecn npu 3Kcnpnyamauu obopydoaHua c ycmahoeHHou Kpbikou bIKnuamena Numahue BO3Hukhem abapuHna cumyaua, HemedneHNO omKnIOUme Kaebn Numahue om cemu. PpOdoXHeue UcNoB3oBaHua obopydoaHua moXem npueecmu K noXapuy unu K nopaxeHuO 3NeKmpuueckum mOKOM.
Iodaomovka npuHmepa

Ipumeanue
Ira modeei co cumbibaouum ycmpoicmbom MICR: ne ycmanaueaume npunme 6 30ax deucmbua Maumnbix noe 60 u36eKanue cunckenru cmenu paonosabaunia MICR. Ipoeepaune cmeneb pacno3naananu caumbibaouezo ycmpoicmba MICR, ocoebno, ecn npunme ycmahobien pradom c ducnieem.
JIa IOJrTOBKn IIpHHTepa BbIIOJIHHTe cJeIyIOUee.
-
PacnakOBka (CM. "PacnakOBka" Ha cTp. 145.)
-
_ДКЛIOЕНС Ka6eJIe (CM. "TIOKJIIOHHe Ka6eJIe" Ha cTp. 145.)
- YcTaHOBka KpbIIIKn CoeINHHTeJIbHOro pa3beMa (CM. "YcTaHOBka H cHrTHe KpbIIIKn coeINHHTeJIbHOro pa3beMa" Ha cTp. 146.)
- YcTaHOBka JeHToUHO KarTpHJka (CM. "YcTaHOBKn H 3aMeHa JIeHTOHO KarTpHJka" Ha cTp. 146.)
- YcTaHOBka pyJIOHa 6yMaHn (CM. "YcTaHOBka H 3aMeHa pyJIOHa 6yMaHn" Ha cTp. 147.)
- Поберка работыс помошью Тecтоов пчати (См. "Тecтовая пчать" настp. 148.)
PacnaKo6ka
IpoBepbTe, BXOJrT JIN B KOMIIJEKT CJIeIyIOIIHe 3JIeMeHTbI. EcJH KaKoJ-JIn6o 3JIeMeHT HJIM MaTePHaJI IOBpeKdEh, o6paTHTEcB K TOPROBOMy aReHTy, y KOTOPORO Bbl IprHO6peJIN IIpHHTeP.
□Пннтep
TeMpOpyIOH 6yMaTHI (JIIa IIPOBepKn pa60TbI)
JIeHTOuHbI KApTpHJxK (ERC-32)
JIeHTOuHbI KApTpHJx (ERC-43)*1
KpbHka coeHHHTeJbHOro pa3bema
KpbIIka BBIKJHOaTeJI INTaHn
AaIep IJIa cETn IpeMeHHoro ToKa*2
Ka6eJIb IITaHnI *2
PyKOBOCTBO IOJIb3OBaTeJIa (daHHoe pyKOBOCTBO)
^*1 : ToIbKO dIy MoDeIeU c 6ByXcmOpOnuM neYamaIoUuM ycpmOcM6oM
*2: Moicem he 6xodumb 6 komniekm 8 3a6ucuMocmu om Modeiu npunmepa.
IodKJIIOHue Ka6eNeu

BHIMAHHE!
Ecnu mpe6yemc nocneoaeamEnbHbU uHmepdeuc, uCnoB3yume «HynbMoEmHbU» Ka6enb.
Ecnu mpe6yemcnapaannenbHbuihunmepceuc,ucnoJb3yume ka6enb IEEE 1284. Ecnu Heobxodum USB-unmepceuc,He bKnUoaume npunmepdo okohuaun ycmahosku dpaubepa npunmepa.

Iipumeyanue
Jocmynhble uHmepfeicb6 omuaomc6 3abucumocmu om modeiu. Pacnoiocehe u fopmy pa3bem06 cm. na uuocmpaauu B.
Bneuui duonieu moe noodknoummb molbko c nomouubio nocieoabeaibn020 unmepeeca uu USB-unmepeeca, pacnoioxcene pa3bemob komopbx o6o3nae no Ka 15 na uiocmpauuu B.
- Y6eHTecb, yTO IpnHTepe BbIKIOueH.
- o_Icoe_IIHHTe K npHtepy Ka6eJIb IHTaHHJ.
- ΠодсоeДИHHTe K IprHHTepy Bce Heo6xOДHMbIe HHTepfpeChIbe Ka6eJIH. Iprn HCIOJIb3OBaHH USB-HHTepfpeIc3aKpeIIte USB-Ka6eJIb c IOMOIIbIO Ka6eJIbHOrO KpIOKa BO H36eKaHHe erO BbIIaIeHnI. (Cm. ИЛПИОТрацИN O D.)
- IooieHHTe HHTepeHcHbIKa6eJIK KOMIbIOTepy.
- BcTaBBte BnJky Ka6eJIy IHTaHHB pO3eTKy.
YcmaHoBa u cHmue KpbIwku coeduHumeJIbHOzo pa3beMa
Дя установки BXODЯпь B KOMIIJIeKT KpbHINK coeHHHTeJbHOrO pa3beMa DeIcTByIteВ cIyIyIOIIeM IopRJIke.
- CoBMeCTHTe 2 BbICTyIIa B BepXHei YacTH KpbIINKn COeINHHTeJIbHOrO pa3beMa (O6O3HaueHbI KaK a Ha HJIIOcTpaIIHH E) c OTBepCTHmN B 3aJHei YacTH IIpHHTepa.
- CIBHbTe KpbHky coeHHHTeJbHO rpa3bema BHepeI, YTO6bIBBCTyIIb I HnKHeJ uactn IIpHHTepa (o603HaueHbI KaK b Ha HJIIOcTpaHn E) BOJIN B OTBepCTHn IO 06eHM cToPOHAM KpbHkN.
JIЯ ChRTHЯ KpbIshKn CoeINHHTeJbHOrO pa3bema COXMMte KpbIshKy c 06eHX CTOpOH, YTO6bl BbICTyIIb B HIXKHeJ YaCTn IIpHHTepa BblJIn H3 OTBepCTHn IIO 06eHM CTOpOHAM KpbIshKn (O6O3HaueHb KaK b Ha NJIIOcTpaunH E).
YcmaHO6ku u 3ameHa JeHmOyHo2o Kapmpudka

Ipumeanue
Hcnolb3yume nenmouhbu kapmpudoc EPSON ERC-32.
- BkJIIOuHTe npHHTep.
- OTKpoIte IepeHIO KpbIIHKy c IOMOIIbIO Na3OB c KaJIOB cTOpOHbI KpbIIKN. (Cm. HJIIOCTpaIIO F.)
- BbHbTe HcIOJIb3OBAHHbI JeHTOHHbI KaPTpHJx, ecJIn OH yCTaHOBJeH.
- CJIeRka IOBepHHTe pyKoTky Ha JIeHTOuHOM KapTpHJKe B HApPaBJIeHHN, yKa3aHHOM CTpeJIkoH Ha KapTpHJKe, YTO6bI ycTpHaHTb IpoBncaHHe JIeHTbI. (CM. HJIIOCTpaUH O G.)

BHIMAHHE!
Ipu epaueenu pu koryku obaameleho yumbbaume hapaeeneue, yka3aHnoe cmpekou ha nehmouhcm Kapmudxke. Ecnu epaamby pky npomboonoloxHom hapaeenehu, moxho noepedumb kapmu dxk.
- BcTaBbTe HObIJIeHTOuHbI KApTpHJxO IIeJyKa. (Cm. HJIIOCTpaIIHIO H.)
- ПовернITE рукову на Kapтprине в указаHHOM напразьгеляе pa3,чTOбы yctpaHTb пobиcaHne jiEHTbl.
- 3akpoIte IpeepHIOIO KpbHkUy.
YcmaHO6ka u 3aMeHa JeHmOuHo2o KapmuDja dJa deyXcmOpOHnei neyuamu
EcJH IIpHHTep oCHaIeH IByXCTOpOHHM IeYaTAIOIHMM yCTPOINCTBOM, BO3MOJHa IByXCTOpOHHЯ IeYaTb Ha JInCTOBOI 6yMaIe.
BbIOJIHnTe BbIeYka3aHHbIe IaRn IJIy yCTaHOBKn/3aMeHbI JeHTOuHOro KapTpNJa IJIa DByxcTOPOHHe IeuaTH.

IIpumeanue
Iy cxopoune neyamaoue ycmpoucma ucnno3yme Ienmouh b kapmpudk EPSON ERC-43.
- BkHouHTe npHTep.
2.ПOTAHHTe 3a pyHar Ha JIeBOH CTOpOHe yCTpOIHCTBa IJIЯ IIeHaTH YeKOB, YTO6bI oTKpbITb erO. (CM. HJIJIIOCTpaunio I.) - BbIOJIHnTe IHa rnc 3 no 6 B pa3JeIe"YcTaHOBKn H 3aMeHa JIeHTOuHOro KApTpNJa" Ha ctp. 146, YTO6bl yCTaHOBnTb JIeHTOuHbI KApTpNJx. (Cm. NJIIOcTpaunH J.)
- 3akpoTe yctpoIcTBO JJIa NeaTH YeKOB.
3a2py3ka 6ymazu
BHIMAHHE!
Ponb3yumecbo monbko yka3aHHou pynoHHou 6yma2oU.
He ecmabnme bymayco ckobamu unu ckpknamu. 3mo moxem cmamb npuho 3aedanura bymazu nopekdehu.
Y6eumecb, ymo nucmo8a 6ymaa/eaunadauOHhbi 6baHK rernjomc po6hmu, 63ckpyuehaHua, 3a2uboe u cknadoK.
IIpuMeuHue
Hcnno3yime nepconaaibhe ueku dunou 12 cm (4,7douma) uiu boeie.
YcmaHOeKa u 3aMeHa pyNoHa 6yMa2u
IycaHOBKN/3aMeHbI pyJIOHa 6ymarN BbIIIOJIHNTe cJeNyOUIHe Iiar. (Cm. HJIIOCTpaIIIO K.)
- BkHouHTe npHTep.
- OTKpoIte KpbIuKy pyJIOHa 6yMaHc IIOMOUbIO Na3OB c KaJIOH cTOPOHbI KpbIuKN.
- BbIbTe cepJeHHK HcNoJIb3OBaHHOro pyJIOHa 6yMaH, ecJIN OH 6bJI yCTaHOJIeH, IN BcTaBBte pyJIOH 6yMaH IIpaBNIbHOcSTOPHOH.
- HEMHoro BbTTHHe 6yMaRy, IocIe Yero 3aKpOHTe KpbIIky pyJIOHa 6ymarH.
- OToPbHTe 6yMaIg c IOMOuBIO pyHOro pe3aKa.
YcmaHOeKa Iucmoeou 6yma2u
IJIa IeuaH Ha JInCTOBoB 6yMaRe BbIIIOJIHNTe CJIeIyIOUHe IIIaH, YTO6bI BCTaBNb 6yMaRy. (Cm. HJIIOcTpaunu L.)
EcJIN npHnTep ochaieh cHTbBAIOHM yctpoiCTBOM MICR, BO3MOxHO MICR cHTbBAHne IpN ycTaHOBKe 6yMaH INJI YeKOBbIX KHHKeK TaK, YTO6bl CmMBOJIbI MICR HaxOJIINcB cnpaba.
- BkHouHTe npHTep.
- BcTaBbTe 6yMaRy KaK MoXHO JaJIbIe JInIeBOH cTOpOHO BBepx. IpaBbI KpaI 6yMaH IIpH 3TOM IOJKeH KacaTbCg IpaBOH cTOpOHb HauPabJIHOIIeJ DJIa 6yMaH.
- BcTaBJIaIe 6yMaIgY, Ioka BePxHnI cK paI He KocHeTcR yIopa.
- Korla npHtep 3aXBaTH6yMaIg, HeMeJIeHHO OTIycHTte ee.
- BbITaHNTe BbIiEJIiyO 6yMaRy H3 IIpHHTepa IIpMaO BBepx.
YcmaHObKaBaNuDaauOHHbIX 6NaHkoB
EcJH IIpHHTep ABJIeTcB aJIHaIIHOHHo MOJeJIbIO, BCTaBBTe 6yMaIg YAk Ke KaK IN CTaHdApTHyIO JInCTOBYIO 6yMaIg (CM. "YcTaHOBka JInCTOBoI 6yMaIg." ) HIN BBIOJIHNTE HIXKeIppHBeDEHHbIe IlaH. (CM. HJIIOCTpaIHIIO M.)
- BkJIIOHTe npHtep.
- BcTaBbTe 6yMaIg KaK MoJHO daJIbIe. IpaBbI KpaI 6yMaIg IIpH 3TOM IOJIkeH KacatbCg IpaBOi CTOpOHi HAnPabJIaIOIIeI IIa 6yMaIg BVepXHeI YacTH IIpHTepa.
- BctabJIaIte 6yMaIgByBHH3, Ioka BepxHn ee HxKnn KpaI He KOcHcTcYIopa.
- Korla IIpHHTep 3axBaTHT 6yMaIy, HeMeJIeHHO OTIIyCTHTe ee.
- BbITaHHTe BbIiEduyIO 6ymary H3 npHHTepa IpMaO BBepx.
Tecmoь neyamb
IocJIe HacTpoKn IIpHHTepa IIN IIpN ycIOBHN, IIpHHTep He pa6oTaET HaJIeKaIIHM O6pa3OM, MoJHO IIPOBePHTb eTO pa6Otu C IOMOIIbHO TcCTOBOH IIeHaTH. EcJIn IIpHHTep BbIIOJIHReT IIeAHTb Ia6JIOHa COJIaCHO HIXKeIIpHBEdEHHbIM IlaRAM, OH pa6oTaET HOpMaJIbHO.
KIC Products "Waffle Technology" MICR cleaning card
BHIMAHHE!
3anpeuamcucnonb3oabmbKnekuohuaouuuiucm.
Ouuaouu nucm Heoxbodmo ecmaenb npaunbHOc mopohou bepx u npaunbHOM HnpaeneHu.
Ouuaouu lacm moxho uonb306amb molbo oduh pa3. 3ame m eo hyxho ymuunupoeamb.
- Y6eHrTeCb, yTO pyJIOH 6yMaH BCTaBJIeH npaBnJIbHO, a pIHrEp BbIKJIOueH.
- OtkpoIte KpbIIky pyJIOha 6yMaHn.
- YdepknBaHaKaToi KHOIIka pa3KaTna (Release), BKJIOHTe IITaHne.
- Haxmnte KhoIka pa3kaTHa (Releae) 7 pa3, 3aTeM 3akpoTte KpbHky pyJIOHa 6ymarH.
- KOrIa IIpHInTeP OTIIeYaTaEHa pyJIOHHo6bymare pa3y «**RECOGNITION MODE** Please set check> H NaHT MnRaTb CBeTOHOHbI HnIKaTOp JInCTOBOb 6bymar (Slip), BcTaBbTe OUnIIaOIIHJIncT KaK cTaHJaPTHyIO JInCTOBYIO bMyar.
- BbITaHHTe BbIeIiIyIO 6ymary H3 npHtepa nprMo BBepx.
- YTo6bI BbInTH n3 peKHMa OCHcKN, BbIKJIIOHTe IIpHHTep.
YcmpaHHe HEnoJaDoK
CBeToIIOHbI HnIkaTOp OIIIN6KN (Error) rOpHT HJIMMnIaET
Ieayb IIpekpaIIaetcI Ipr IIpeIepBe IIeayataIOIIeI ROIOBKn I aBTOMaTHueCKN BO3O6HOBJIaETcII OOCJIe IOCTaTOUHOrO ee OXJaXKeHHJ.
Y6eINTecb, YTO BCE KpbHINIIOTHO 3aKpbITbl.
JIe3BHe aBTOMaTHUeCKOTo pe3aKa MoKet 6bITb 3a6IOKHpOBaHO. IIpH He3HaHTeJIbHOI 6IOKHPOBKe Jle3BHe aBTOMaTHUeCKOTo pe3aKa aBTOMaTHUeCKN BO3BpaIIaTcR B IIpaBnJIbHOe IIOJIOKeHHe. B IIpoTHBHom cIyae IIpeEiBHHte eRO B IIpaBnJIbHOe IIOJIOKeHne corIacHo pa3JeJa "KpbIIka pyJIOHa 6ymarH He OTKpbIBaecTcR (JIe3BHe aBTOMaTHUeCKOTo pe3aKa 3a6IOKHpOBaHO).
Pn 3aeHaHH 6yMaHn BbHbTe ee coIJaCHO pa3JeJa "Bo3HKnIO 3aeHaHne 6yMaHn."
BbIKJIOHTe IIpHHTep Ha 10 cKyH, 3aTeM cHOba BKJIIOHTe eRO.
KpbHka pyJIOHa 6yMaHn He oTKpbIbAeTcra (Je3BHe aBTOMaTHueckoro pe3aKa 3a6JIOKnpoBaHo)
BbIOJIHHTe HnKeYka3aHHbIe IHaI, YTObI BepHyTb Jle3BHe aBTOMaTHueCKOro pe3aKa B npabHJIbHOe NOJIOKeHne.
- BbIKJIHOHTe IIpHHTep.
- IOTaHHTe 3a pbIar Ha JIeBOI cTOpOHe yCTpOiCTBa IJIy IIeHaTH YeKOB, YTO6bI OTKpbITb erO. (CM. HJIJIIOCTpaunHO I.)
- BpaaIte pykoTky Je3Bna ABtOMaTHueCKoro pe3aKa B HaIIpaBJIeHHn, yKa3aHHOM cTeJIKO, IIoka He yBnIte IITHΦT B OTBepCTHN paMy, KaK IIOKa3aHO Ha HJIIOCTpauHH O.
B03HnKJIO 3aedanHe 6ymarH

BHIMAHHE!
He kacaimecb mepmoneyamaioue 20no6ku, maK KaK HenocpeodcmbeHNO noCne neyuamu OHa MoXem 6bimb cunbHO Haapemoi. Neped mem, KaK bIHumamb 3aMmyo 6bymay, daume 20no6ke ocmbimb.
3aedahue pynoHou 6ymazu
- BbIKJIIOUHTe IIpHHTep.
- OTKpoIte KpbIIIKy pyloHa byMaH c IIOMOIIbIO IIa3OB c KaJIOI cTOPOHbI KpbIIIKN.
- BbHbTe 3aMyrTyO 6ymaRy.
3aedahue nucmooeo 6ymazu
- BbIKJIIOHTe npHtep.
- OTKpoIte IepeIIOIO KpbIISKy c IIOMOIbIO Na3OB c KaJIOB CTOpOHbI KpbIISKN. (CM. HJIIOCTpaIIO F.)
- OTKpoIte IpeEHNH IpeEaHOuN 6JIOK c NOMObIO pbUraB erO npaBOJ qactH. (CM. HJIIOCTpaHIO P.)
- BbHbTe 3aMaTyIO 6yMaIy.
JzoooIg 4uuaaoll 0yogall
()MICR 1T-M-H6000IV aIbIaIbIaIbIaIbIaIbIaIbIaIbIaIbIaIbIaIbIaIbIaIbIaIbIaIbIaIbIaIbIaIbIaIbIaIbIaIbIaIbIaIbIaIbIaIbIaIbIaIbI
3gjgjgl aagc gacglls
3 1
y
a
a aal l 100 g aal g aal g aal g aal g aal g aal g aal g aal g
aagll jll g oogall pil y lloe aolol aalg
JUJI JOGo .14 aLuaaal aagoloo 8 3g jai eBz .1
USB J0g .15 9
16 10
J 17 Jy USB Jj J0g .11 JJIe.4
JooJI.18 1000 Joo.12 gJgJI.5
19 1JlJr! J0go.13 6
Soll 8ogl.7
p1u2wU 0g
a a a a a a a a a a a a a a a a a a a a a a a a a a a a a a a a a a a a a a a a a a a a a a a a a a a a a a a a a a a
Jolall paaill yieeaiiaaiaia 1e Sall g, eil aaiai aaii aaii ai
4
J 1 J 1 J 1 J 1 J 1 J 1 J 1 J 1 J 1 J 1 J 1 J 1 J 1
.
:
.0000000000000000000000000000000000
4.3 1
a
:ab>
jai jia jia jia o a iag dao clogdo ic bdoall g
aJg ablol
:
a a a a a a a a a a a a a a a a a a a a a a a a a a a a a a a a
1 1
.3jGall JgoadSeiko Epson aS jdlal all jy
y
y
Jg jn nn nnnn nn nnnnnnnnnnnnnnnnnnnnnnnnnnnnnnnnnnnnnnnnnnnnnnnnnnnnnnnnnnnnnnnnnnnnnnnnnnnnnnnnnnnnnnnnnnnnnnnnnnnnn
J 1
Jg j 1 Jg Jg Jg Jg Jg Jg Jg Jg Jg Jg Jg Jg Jg Jg Jg Jg Jg Jg
y
4
a a a a a a a a a a a a a a a a a a a a a a a a a
a1 = 1,a2 = 9
i 1
Ab gàù 立 J( 0,4)
aagblll lglg aegblln aiee eae e ae eae eae
bawj j. gaii 110 111 111 111 111 111 111 111 111 111
aaioo 00000000000000000000000000000000000000000000
gss gblal pldo 2000 y
1,2,3,4 1,2,3,4 1,2,3,4
gai jilu jiu jiu jiu ci uus yue
.1j 1 j 1 j 1 j 1 j 1 j 1 j 1 j 1 j 1 j 1 j 1 j 1 j 1 j 1 j 1 j 1 j 1 j 1 j 1 j 1 j 1 j 1 j 1 j 1 j 1 j 1 j 1 j 1 j 1 j 1 j 1 j 1 j 1 j 1 j
aaii 100000000000000000000000000000000000000000000
4111 0
.
:
aIbll 10 aIw JgSj JgJy Sj rall wJll ssolly
pIi
.
.
1
.1j1g 1000y
.4a11 4e e g a r g pae b g
4
Jz
TM-H6000IV 1
.
y
.1a 100
1.1ufo 10go 15 pduwol alwalauaal aagul ually
IEEE 1284 J5 pJzol aJgai I ggl
aalbll jzoo sji jia aai bll Jzoo yusb agol aill
:ab
Bgill Jswll gJ Lxogall JkWg zgo aR.aaIbll Jygdglg jgll lgl 15jss go loS gagll f oogol USB aglg gl aluulwll aggll pluswll ic bao Juaell aLw s
B
.1
.2
JLJUUBJUULKLSUBB.USBaJgJgJgJgJgJgJgJgJgJgJgJgJgJgJgJgJgJgJgJgJgJgJgJgJgJgJgJgJgJgJgJgJgJgJgJgJgJg
(D) USBJ b
.
.5
Jogall 1b6 jg
.01 1
EJgJLJIaIlogJlL)IogJIeJgJgJgJgJgJgJgJgJgJgJgJgJgJgJgJgJgJgJgJgJgJgJgJgJgJgJgJgJgJgJgJgJgJgJgJgJgJgJg
.
1 2
J 1000 J5
y
. 1I I I I I I I I I I I I I I I I I I I I I I I I I I I I I
- .2
- .
.4
.5
g
g" 1) (2)
(M)
- .
jJgogg jgglglll 10n nn nnnn nn nnnn nn nnnn nn nnnn nn nnnn nn nnnn nn nnnn nn nnnn nn nnnn nn nnnn nn nnnn nn nnnn nn nnnn nn nnnn nn nnnn nn nnnn nn nnnn nn nnnn nn nnnn nn nnnn nn nnnn nn nnnn nn nnnn nn nnnn nn nnnn nn nannn nn nnnn nn nnnn nn nnnn nn nnnn nn nnnn nn nnnn nn nnnn nn nnnn nn nnnn nn nnnn nn nnnn nn nnnn nn nnnn nn nnnn nn nnnn nn nnnn nn nnnn nn nnnn nn nnnn nn nnnn nn nnnn nn nnnn nn
Lg0 15g
.3
.4
.5
a
Jbawg aabll Joo no gaoa Jkaaabll Joo y lae g aabll
Jk 102
g j 1
aBb. (Feed) 1 j 1g a
.(Feed)(Paper)
#
(Release) jj 15
paaablll. (Slip)
.
a a a a a a a a a a a a a a a a a a a a a a a a a a a
.(N).(Jgj)UgJgJgJgJgJgJgJgJgJgJgJgJgJgJgJgJgJgJgJgJgJgJgJgJgJgJgJgJgJgJgJgJgJgJgJgJg
MICR
a 1
MICR
IgKlo gJyI yIyIyIyIyIyIyIyIyIyIyIyIyIyIyIyIyIyIyIyIyIy
jgwwj0
KIC "Waffle Technology" MICR cleaning card
4
aoy aobg pduo 5
1gio ydi j: bdd 0o19 ojo ddoill 89 pdo
- (3) Na 时 Na 时 Na 时 Na 时
.3
.4
念 念 RECOGNITION MODE **Please set check." 5
.(SLIP)
- 7.
(Error)
.0yloie fllal 1g wJr Jr j 0j 0e 0e 0e
2000J5
LaiIgblalbll OoJy, bssuBqU Aaun.aae yIaIgblalbll OoJy
aJ 156 j" 4! Jlalal gogol l k y. g .
.(aalz ylaIbIg)
"..gll wjol" gll jlll lglw jlll wjol
0 10 10
(aalfo ()
.
1.
JxIgJ).JyIddoggJyIddoggJyIyI yIyI yIyI yIyI yIyI yIyI yIyI yIyI yIyI yIyI yIyI yIyI yIyI yIyI yIyI yIyI yIyI yIyI yIyI yIyI yIyI yIyI yIyI yIyI y
(I
J 3
0g
g
:
.
ggl 1
- .2
3.
#
Jl) .olal lal jn Jg 15 0d oogj gag a bdoa yolol
1.
(F
.2
.3
(P
4.
- English
- Targeted Models and Features
- Illustrations
- Restriction of Use
- Caution
- Purpose of This Manual
- Important Safety Information
- Key to Symbols
- WARNING:
- CAUTION:
- Note:
- Safety Precautions
- Caution Label
- Usage Notes
- Downloading Drivers, Utilities, and Manuals
- Part Names
- Control Panel
- (Power) LED
- Error LED
- Paper LED
- Slip LED
- Feed button
- Release button
- Power Switch and Power Switch Cover
- WARNING:
- Setting up the Printer
- Unpacking
- Connecting the Cables
- Installing and Removing the Connector Cover
- Installing and Replacing the Ribbon Cartridge
- Installing and Replacing the Ribbon Cartridge for Endorsement Printing
- Loading Paper
- Installing and Replacing the Roll Paper
- Inserting Slip Paper
- Inserting Validation Paper
- Test Printing
- Test Printing on Roll Paper
- Test Printing on Slip Paper
- Cleaning
- Cleaning the Printer Case
- Cleaning the Thermal Head
- Cleaning the MICR Head
- Troubleshooting
- Error LED is on or flashing
- The roll paper cover will not open (the autocutter blade is locked)
- Paper jam occurs
- When the roll paper is jammed
- When the slip paper is jammed
- Français
- Voyant (alimentation)
- ATTENTION:
- VORSICHT:
- LET OP:
- ATTENZIONE:
- CUIDADO:
- IMPORTANT:
- ! DIKKAT:
- Knappen Indfor (Feed)
- Knappen Frigør (Release)
- Rensning after termohovedet
- FORSIGTIG:
- Vapauta (Release)-painike
- Sette inn valideringspapir
- FORSIKTIG:
- Inmatnings (Feed)-knapp
- Frigörings (Release)-knapp
- VARNING:
- Indikator LED Papir (Paper)
- Tlacitko Posun (Feed)
- UPOZORNENI:
- IJIJIocTpaun
- OrpaHnueHHoe npImeHeHne
- PpeDynpexKeHne
- Lelb daHnoo pykoobcmea
- Baxnay uHopmaua no oecneuHuo 6e3oNaChocmu
- YcIIOEHbIe 06O3HaueHua
- I PENEYNPEXJEHNE
- BHIMAHHE!
- IIpuMeyane
- Mepbl npedocmopoxhocmu
- I PEPENPPEKDEHNE
- KhoNka pa3Xamur (Release)
- Bbiknoyamenb numaHua u Kpbiuka bcknoyameJnumaHua
- Iodaomovka npuHmepa
- Ipumeanue
- PacnaKo6ka
- IodKJIIOHue Ka6eNeu
- Iipumeyanue
- YcmaHoBa u cHmue KpbIwku coeduHumeJIbHOzo pa3beMa
- YcmaHO6ku u 3ameHa JeHmOyHo2o Kapmpudka
- YcmaHO6ka u 3aMeHa JeHmOuHo2o KapmuDja dJa deyXcmOpOHnei neyuamu
- IIpumeanue
- 3a2py3ka 6ymazu
- IIpuMeuHue
- YcmaHOeKa u 3aMeHa pyNoHa 6yMa2u
- YcmaHOeKa Iucmoeou 6yma2u
- YcmaHObKaBaNuDaauOHHbIX 6NaHkoB
- Tecmoь neyamb
- YcmpaHHe HEnoJaDoK
- CBeToIIOHbI HnIkaTOp OIIIN6KN (Error) rOpHT HJIMMnIaET
- KpbHka pyJIOHa 6yMaHn He oTKpbIbAeTcra (Je3BHe aBTOMaTHueckoro pe3aKa 3a6JIOKnpoBaHo)
- B03HnKJIO 3aedanHe 6ymarH
- 3aedahue pynoHou 6ymazu
- 3aedahue nucmooeo 6ymazu
- JzoooIg 4uuaaoll 0yogall
- a
- p1u2wU 0g
- 4
- g
- g j 1
- #
- (Error)
- (aalfo ()
Brand : EPSON
Model : OmniLink TMH6000IVDT
Category : Printer