
BM 1000S - Baby monitor BABYFON - Free user manual and instructions
Find the device manual for free BM 1000S BABYFON in PDF.

| Brand | Babyfon |
| Model | BM 1000S |
| Product type | Baby monitor / Two-way radio |
| Number of channels | 8 (446.0 - 446.1 MHz) |
| Number of subcodes (CTCSS) | 38 |
| Maximum range | Up to 1 km (in open field) |
| Power supply | 4 NiMH AAA rechargeable batteries (provided) or 4 AAA batteries, 5V/200mA mains adapter |
| Battery life | Up to 24 hours depending on use |
| Key features | VOX (hands-free), range control, key lock, additional microphone, belt clip, wall mount |
| Display | LCD with indicators for channel, subcode, volume, battery status, VOX, range |
| Transmitter / Receiver | Both units can be configured as transmitter or receiver, or in PMR mode |
| Package contents | 2 Babyfons, 2 mains adapters, 8 AAA rechargeable batteries, 1 additional microphone, manual, warranty card |
| Cleaning and maintenance | Dry or slightly damp cloth, no abrasive products |
| Safety | Minimum distance of 1 m between transmitter and child; do not leave within baby's reach; do not use for medical monitoring |
| Warranty | 24 months from date of purchase |
Frequently Asked Questions - BM 1000S BABYFON
User questions about BM 1000S BABYFON
0 question about this device. Answer the ones you know or ask your own.
Ask a new question about this device
Download the instructions for your Baby monitor in PDF format for free! Find your manual BM 1000S - BABYFON and take your electronic device back in hand. On this page are published all the documents necessary for the use of your device. BM 1000S by BABYFON.
USER MANUAL BM 1000S BABYFON
A1 Monitorate Monitoring
A2 Sprechtaste [taik]
Monitorate (monitor)
2 Overview of operating elements and indicators 22
3 Security precautions 23
3.1 General 23
3.2 Intended purpose 23
3.3 Electro-smog in children's rooms 23
3.4 Protecting the devices 23
3.5 Using the plug-in charger 24
3.6 Battery packs and batteries 24
4 Setting up components / function test 24
4.1 Power supply 24
4.2 Switching on and basic setting 25
4.3 Function test 25
5 Adjusting the devices for operation 25
5.1 Reset function 25
5.2 Setting the application 25
5.3 Setting the channel and subcode 26
5.4 Keylock 27
5.5 Transmitter (baby) 27
5.6 Receiver (parents) 2B
5.7 Radio device (PMR) 2B
6 Power supply
6.1 Battery pack status indicator 31
6.2 Charging the battery packs 31
6.3 Operation with the plug-in charger 32
6.4 Battery operation 32
7 Range of the devices 32
8 Troubleshooting 32
8.1 Reset function 32
8.2 Malfunctions 33
8.3 Table of malfunctions 33
9 Contents and technical data 34
9.1 Contents 34
9.2 Technical data 34
9.3 Licence 34
10 Warranty 34
20
GB

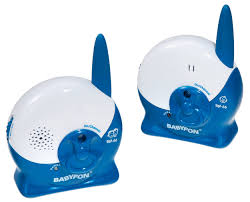
1 Introducing your new BABYFON® BM 1000 S
With your new BABYFON ® BM 1000 S you have chosen a quality product fromVIVANCO which can be used as both a Babyfond and a radio device.
Strictly speaking, the BABYFON BM 1000 S is a radio device with the additional features of a Babyfion. It therefore has a wider range of possible uses than comparable devices. This means that it also offers various applications, e.g. when the child has grown out of the 'supervision age'.
You can rely on the support provided by your new Babyfun and always hear your baby, no matter where you are in your home.
N.B.: As the BABYFON® BM 1000 S is a radio frequency device, certain settings on both devices must be absolutely identical to ensure that the transmitter and receiver can communicate with each other. Please refer in particular to chapter 5.3 "Setting the channel and subcode".
The BABYFON ⑥ BM 1000 S provides the following functions:
446 MHz transmission frequency / 8 channels
Unlike other products of this kind, the BABYFEN BM 1000 S operates on a radiolitelephony frequency. This eliminates interference from other radio devices FM headphones, FM switches or garage door openers. In addition, B channels enable you to avoid other disturbances.
Under optimal circumstances, a range up to 1 kilometre can be reached.
Subcode (CTCSS)
The additional CTCSS coding (substrate) suppresses unwanted information or noise. 3B substrates are available.
Acoustic range control
When the acoustic range is activated a warning tone tolls you that you are leaving the reception range. This warning tone stops automatically when you are back within the reception range.
Hands-free function (VOX)
The BABYFON BV 1000 S has a hands-free function (VDX) which activates the device automatically when a voice is heard.
Variable response sensitivity
To ensure optimal adaptation to your living conditions and ambient noise you can determine when the BABYFON® BM 1000 S switches itself on and transmits. When using the additional microphone the response sensitivity can also be varied
Keylock
The keylock prevents accidental adjustments to settings and thereby further increases the functional security of the device.
Battery pack charge function
The BABYON ⑥ BM 1000 S is equipped with an integrated battery pack charge function for the gentle charging of environment-friendlyely nickel-metal hydride battery peaks.
Battery pack status display
A symbol in the receiver display and a warning tone indicate that the battery packs need charging.

Additional microphone
The additional microphone with its own sensitivity setting enables optimal positioning
Belt clip / wall mounting
The BABYFON 念 BM 1000 S is fitted with a practical belt clip. Using a screw or hook
you can also use the belt clip as a practical wall mounting
2 Overview of operating elements and indicators
A Transmitter/receiver
B Display
C Additional microphone
DAG adapter / plug-in channel
E Rechargeable AAA battery packs
A Transmitter/receiver
A1Monitor button (monitor)
A2 Tails button talki
A3 Transmission and reception antenna
Mg/Off button
A5 Display
AS Mode button (MODE)
A7Selection butions (DOWN/UP)
A8 Confirmation button [OK]
A9 Speaker
A10 Microphone
A11 Belt slip
A12 Battery pack compartment
A13 Connection for additional microphone Micro
A14 Connector socket for plug-in chaper (DC 6V)
A15 Control lamp for plug-in charger
B Display
B1 Transmitter mode [baby]
B2 Receiver mode (parents)
B3 Range alarm
B4 Call tone
B5 Roger signal
36Keylock
B7 Indicator for battery pack status
BB Indicator for - Transmitter sensitivity setting
- Receiver volume setting
B9 Subcode
B10 Channel indicator
B11 Hands-free function (VUX)
B12 PMF mode
B13 Transmission indicator
B14 Reception indicator
C Additional microphone
C1Volume control
C2 Attachment dip
C3 Microphone
C4 Plug for connection to Babyfon

3 Security precautions
3.1 General
Before using the device for the first time, read these instructions carefully and keep them in a safe place for future reference.
Under no circumstances is the BABYFON 假 BM 1000 S a substitute for personal supervision.
If the device can no longer be used, consult your local waste disposal organisation regarding correct disposal measures.
If you pass on the device to a third party, please include the instructions.
3.2. Intended purpose
The BABYTON® RM 1000 S was developed to transfer voice signals / sounds made by children. Signal tones, e.g. from breathing or heart tone monitoring equipment, cannot be transmitted!
Use of the BABYFON ⑧ BM1000 S cannot replace, but only support the personal supervision of a child or person in need of care. We point out that we do not accept any responsibility whatsoever not covered by legal guarantee regulations. This applies in particular to this Babyfion being used for medical purposes for which it is not intended. The device is designed for private use.
3.3 Electro-smog in children's rooms
Due to the low radiation level there is no risk to your child's health as a result of electro-smog, according to current knowledge.
We nevertheless recommend that you keep a safety distance of at least 1 metre between your baby and the BABYFON ⑥ BM 1000 S. The functionality of the BABYFON ⑥ BM 1000 S is not impaired by the safety distance!
- Never place the transmitter inside the child's cot or playpen. The original Babyfon is equipped with a voice control feature that allows the device to transmit only when your child actually makes a sound. Therefore the BABYFON® BM 1000 S transmits only when required and not permanently. This sensible function prevents superfluous electro-smog. When using plug-in chargers (AC adapters) you can minimise low-frequency magnetic fields by keeping a distance of 1 to 2 metres between the wall socket and the child's cot. If you wish to minimise electro-smog further in the child's room, Babyfon recommends battery pack operation of the transmitter and receiver. This ensures that there will be no risk of electro-smog from the BABYFON® BM 1000 S for your child.
3.4 Protecting the devices
When the devices are running they need sufficient air supply.
If you use batteries, remove them if the devices are not used for a long period as they could otherwise leak.
Switch off the devices after use.
Protect electronic devices from moisture.
The devices must under no circumstances come into contact with liquids. Therefore make sure that they are not submerged under water and that no liquid gets inside the casing.
Protect electronic devices from temperatures above 40^ . Therefore do not leave your BABYFON® BM 1000 S in strong sunlight and never place it on hot plates or close to other heat sources.
Always check before use that your BABYFON ① BM 1000 S functions correctly (see 4 "Setting up components / function test").
Defective devices must not be used.
Never carry out repairs yourself, contact your dealer if the need arises.

- Never use caustic detergents to clean the devices as these could damage the plastic surfaces.
Clean the devices with a dry or slightly moist cloth.
3.5 Using the plug-in charger
Connect the device only to a correctly installed mains socket with voltage which corresponds to that given on the nameplate of the plug-in charger.
Make sure that connecting cable is not positioned so that people could trip over it.
Make sure that the connecting cable is not pinched, crushed or stretched. When using an adapter or an extension cable, make sure that these comply with valid safety regulations. The maximum current given must not be exceeded.
- Continuous operation with the plug-in charger may damage your battery packs.
- After charging the battery packs, disconnect the plug-in charger from the BABYFON® BM 1000 S.
3.6 Battery packs and batteries
- Keep battery packs and batteries away from children.
Do not try to charge used, non-rechargeable batteries.
Batteries and battery packs must not be thrown away with domestic rubbish. As a consumer you are legally obliged to return used batteries/battery packs, regardless of whether or not they contain harmful substances. You can hand them in at your nearest collection point or wherever batteries/battery packs of the kind concerned are sold. We also take back batteries/battery packs free of charge. If you wish to return your old batteries to us, please send them marked 'Used!' to the following address:
Vivanco GmbH, Ewige Weide 17, D-22926 Ahrensburg
4. Setting up components / function test
N.B.: Before inserting the battery packs supplied or connecting to the mains power supply, switch off the devices.
Note: To protect the display A5 from scratching during the manufacturing process a transparent film is attached. Remove this film.
4.1 Power supply
To insert or replace the battery packs.
- To insert and remove the battery packs the device should always be switched off and disconnected from the plug-in charger D. To switch off, press the On/Off button A4 for approx. 2 seconds.
- Slide the lid of the battery pack compartment A12 down.
- Place the 4 supplied battery packs in the battery pack compartment.
N.B.: Battery packs must be inserted with their plus and minus poles (+/-) positioned exactly as marked on the bottom of the battery pack co
Note: New battery packs must first be charged for at least 15 hours with the device switched off before they are ready to function. The charging of battery packs is described in Chapter 6.2 'Charging the battery packs'.
4. Slide the lid back up until it clicks into place.

4.2 Switching on and basic setting
- Press the On/Off button A4 for approx. 2 seconds. The devices are now switched on and the display A5 lights up briefly. Then the basic display appears. In this basic setting the devices function as normal radio devices.
- Check that the same channel indicator B10 example: '01' appears on both devices. The same submodule B9 example: '01' must also be set on both devices.
N.B.: In all operating modes the transmitter and receiver can only communicate if
these two settings are identical on both devices. To change these settings, please read Chapter 5.3 "Setting the channel and subcode".
4.3 Function test
Ideally, the function test should be conducted by two people:
1. Press the On/Off button A4 for approx. 2 seconds, thereby switching on both devices. If there is a loud whistling noise the two devices are standing too close together.
2. Take one of the devices into another room.
3. Press the Talk button A2 on the transmitter and speak into the microphone A10. The transmission symbol B13 indicates that transmission is taking place. The reception symbol B14 appears in the display on the receiver and the spoken text is transmitted. If the receiver cannot hear anything, check the individual points in Chapter B 'Troubleshooting'.
5 Adjusting the devices for operation
Note: Before adjusting the devices to suit your requirements it is often advisable to perform a reset. This resets all settings to the default setting, ensuring that you have a safe basis to begin making your setting adjustments. New devices already have the default settings.
5.1 Reset function
- Switch off the device by pressing the On/Off button A4 for approx. 2 seconds
- Disconnect the AC adapter D, but leave the battery packs inside the device.
- Press the 'UP' A7, 'MODE' A6 and 'Talk' A2 buttons simultaneously
- Switch the device back on while continuing to hold the buttons down.
- As soon as all the values are displayed simultaneously in the display AS, release the buttons.
- Confirm the reset by pressing any button. The device switches itself off again. All memories are now erased and reset to the default setting.
5.2 Setting the application
The BABYFON® BM 1000 S allows you use each individual device either as a Babyfon or as a radio device (PMR). Despite this scope it is easy to set the required application by making just a few adjustments. The following table shows you the different application and combination possibilities offered by your Babyfon:
To use as a Babyfon, activate one of these two variants
| Device 1 Device 2 Transmitter Receiver Function | |
| Babylon without range control | |
| Babylon with range control | |

To use as a normal radio device (PMR), activate this variant
| Device 1 Device 2 Transmitter/Transmitter/ receiver receiver Function |
PMR radio device (walkie-talkie)
To set the selected menu item on a device, proceed as follows:
1. Switch on the devices by pressing the On/Off button A4 for approx. 2 seconds.
2. Press the Mode button Ab and hold it down
3. Using the Selection buttons iDOWN/UP A? you can now select the appropriate menu item.
| Transmitter (baby) | |
| Receiver (parents) | |
| Receiver (parents) with range control | |
| Radio device (PMR) |
- Then release the Mode button A6 and you will see the corresponding symbol in the display. The selected menu item is now activated.


Make sure that the transmitter and the receiver have the same setting for the channel and the subscode (see Chapter 5.3 "Setting the channel and subscode").
Example of channel and subcode setting
5.3 Setting the channel and subcode
N.B.: The transmitter and receiver can only communicate if the channel and security code are identical on both devices. By combining 8 channels with 38 subcodes you have numerous possibilities to prevent interference.
Setting the channel
You have a choice of 8 channels. Each channel is allocated a particular frequency in the radio frequency range. If there is too much interference on the selected channel, select another one, making sure that you select the same channel for both devices.
Setting the personal security code
You have the option of using 38 different subcodes (CTCSS Continuous Tone Code Squelch System) for each transmission channel. This enables you to protect yourself against the reception of external radio transmissions on the same channel. If you can hear external radio signals or interference on the set channel, select another subcode to prevent this. You can also switch off the subcode (00) to hear all transmissions on the set channel.

5.4 Keylock
- Switch on the devices. To do so, press the On/Off button A4 for approx. 2 seconds. The display A5 lights up briefly and the symbols appear.
- Press the mode button (MODE) A6 once. The channel indicator B10 begins to flash 3. Set the required channel 0 - 8 using the selection buttons (DOWN/UP) A7.
- Confirm the setting by pressing the mode button (MODE) A6. At the same time you exit the setting mode and skip to the setting of the subcode.
- The indicator for the subcode B9 begins to flash.
- Using the selection buttons IDOWN/UP1A7, set the required subsode [00-38].
- Confirm the subcode by pressing the confirmation button (OK) A8 and exit the setting.
5.5 Transmitter (baby)
When the keylock is activated all the keys are locked. The settings can now no longer be changed, e.g. if a child gets hold of the device and plays with it or if you carry the device in your pocket. This prevents operating errors.
1. To switch on the keylock, press the confirmation button (OK) A8 for approx. 3 seconds until the keylock symbol B6 appears in the display.
2. To switch off the keylock, press the confirmation button (OK) A6 for approx. 3 seconds until the keylock symbol B6 disappears again.


This function sets the BABYFON ® BV1000 S as the transmitter and transmits the sounds made by your child. To set this function, see 5.2 "Setting the application". To avoid disturbing the child the speaker is deactivated in this setting.
Hands-free function (VOX)
The transmitter is fitted with a hands-free function (VOX) which is activated automatically in this setting. This means that the transmitter (baby) does not begin to transmit until a certain minimum noise level is reached, e.g. when your child shouts or cries. This has several advantages:
no transmission radiation in standby mode
no constant noise level in the receiver
power-saving
Setting the response sensitivity
With the response sensitivity you set the volume at which the transmitter is activated and begins to transmit sound to the receiver. There are several settings available. Find the best setting by trial and error.
Press the selection buttons IDOWN/UPJ A7 to adjust the response sensitivity. In the display the sensitivity indicator B8 shows the current setting.
On the transmitter the transmission indicator B13 lights when the device is activated and transmitting.
Using the additional microphone
An additional microphone is included in the set. You can use it in the transmitter setting, it provides the following benefits as you can place the microphone closer to the baby: higher sensitivity, therefore less background noise.
improved bandits-free function
Improved transmission quality
response sensitivity can be more finely adjusted
Connect the plug C4 of the additional microphone included to the socket A13 of the device set as the transmitter.
Attach the microphone C3 by the clip C2 and the Velcro strap to the cut so that the microphone is pointing towards the baby.
N.B. Make sure the microphone is attached where the baby cannot reach it.

When connected, the device automatically sets itself to the middle sensitivity level. Now adjust the sensitivity of the microphone using the volume control C1. You can find the ideal setting by trial and error.
5.6 Receiver (parents)


5.7 Radio device (PMB)

In this setting the BABYON BV 1000 S receives the sounds transmitted by the transmitter. If the transmitter function is activated on one of the devices, the receiver function with or without range control must be activated on the other device. To set this function, see 5.2 "Setting the application".
Receiver with range control
If this function has been selected [see b.2 "Setting the application)], range control is activated in addition to the normal receiver function. Range control triggers a warning in the receiver if the transmitter and the receiver are too far apart or if there is interference. This gives you the assurance that proper transmission is possible. If the permissible range is exceeded the range alarm B3 and the background lighting flesh in the display and a warning tone can be heard.
Setting the volume
You can set the receiver volume at one of several levels. Find the best level by trial and error. Press the selection buttons [DOWN/AUP] A7 to set the volume. The indicator BB shows you which volume level you have set.
Channel and subcode scan
You have the possibility to scan for a channel or a subcode on which transmission is to take place. This function stops automatically when it registers reception. If you know the channel but not the subcode to which you have set the transmitter, you can start a subcode scan.
Press the "UP" button A7 for approx. 3 seconds, then the subcode scan starts. It stops automatically at the subcode at which a transmission takes place. If there is no transmission it continues to scan until it finds one. You can interrupt this function by pressing the confirmation button (OK) A8.
If you know the subcode but not the channel to which you have set the transmitter, you can start a channel scan.
Press the "DOWN" button A7 for approx. 3 seconds, then the channel scan starts. It stops automatically at the channel at which a transmission takes place. If there is no transmission it continues to scan until it finds one. You can interrupt this function by pressing the confirmation button (OK) A8
Your BABYFON ⑨ 1000 S is not only a Babyfyon, as it offers more application possibilities than other baby monitoring devices. When the baby has outgrown the "supervision age", the device can be used for a variety of other applications. Used as a radio device or walkie-talkie, voice transmission and reception can take place alternately in both directions. Both devices must be set to the radio device (PMR) function (see 5.2 "Setting the application")
Make sure that the transmitter and the receiver have the same setting for the channel and the subcode (see Chapter 5.3 "Setting the channel and subcode").
Transmitting and receiving
In its function as a radio device (PMRF) you can both speak and hear with the BABYFON. BWM1000 S.
To transmit, press the Talk button A2 and speak into the device. The transmission indicator B13 appears in the display. While you are holding the button down, the receiver hears your voice and the reception indicator B14 appears. You then release the button and end the transmission.


If the person with the receiver wants to reply, he also presses the Talk button A2. The transmission indicator B13 on the transmitter and the reception indicator B14 on the receiver display the transmission.
Only one device can transmit at a time. For the other device to reply, the Talk button A2 must be released!
The basic function of the radio device is now available to you. To set it to your personal preferences you can make or change the following settings:
| Hands-free function (VOX) | |
| Call tone | |
| Roger signal | |
| ON OF Battery pack alarm | |
| ON OF Button tone |
Hands-free function (VOX)
Your BABYFON ⑤ BV 1000 S is equipped with a so-called VOX function that automatically switches the device to transmission when someone speaks into the microphone A10.
-
Switch the devices up. To do so, press the On/Off button A4 for approx. 2 seconds. The display A5 lights up briefly and the symbols appear.
-
Press the mode button (MODE) AS repeatedly until the hands-free function (VOX) symbol appears and the selection flashes.
-
You can set the response sensitivity using the 'UP' and 'DOWN' buttons A7. The more sensitive the setting, the quieter the sounds can be at which the transmitter automatically begins to transmit.
0 - hands-free function (VOX) is off
1 - low response sensitivity
2 - medium response sensitivity
3 - maximum response sensitivity
- Press the confirmation button OK) AB to confirm your selection.
If you want to use the additional microphone C, the response sensitivity sets itself automatically to level 2 following connection of the microphone. You can set the response sensitivity using the volume control C1 on the additional microphone. With the additional microphone F connected you can only speak transmit but not receive the other device.
To do so, disconnect the microphone from your device.
The hands-free function (VOX) is not recommended if there is loud background noise such as traffic or a strong wind. It could then be permanently activated and the receiver cannot reply.
Call tone
You have a choice of five different call tones.
- Switch the devices on. To do so, press the On/Off button A4 for approx. 2 seconds. The display A5 lights up briefly and the symbols appear.

- Press the mode button (MODE) A8 repeatedly until the call tone symbol B4 appears and the display flashes.
3 You can select the different call tones using the 'UP' and 'DOWN' buttons A/ and hear them at the same time. - Press the confirmation button (OK) AB to confirm your selection.
Roger signal
The Roger signal is transmitted when the transmission is ended. It tells the receiver that he can reply. With the BABYFON® BM 1000 S you can have the Roger signal switched on or off.
1. Switch the devices on. To do so, press the On/Off button A4 for approx. 2 seconds. The Display A5 lights up briefly and the symbols appear.
2. Press the mode button (MODE) & repeatedly until the Roger signal symbol B5 appears and the display flashes.
3. You can switch the Roger signal on (on) or off (off) using the "UP" and "DOWN" buttons A7.
4. Press the confirmation button (OK) A8 to confirm your selection.
Battery pack alarm
The BABYFON ® BM 1000 S is equipped with a battery pack alarm that emits a warning tone when the battery packs or batteries no longer guarantee normal operation.
1. Switch the devices on. To do so, press the On/Off button A4 for approx. 2 seconds. The display A5 lights up briefly and the symbols appear.
2. Press the mode button (MODE) AS repeatedly until the battery pack alarm symbol appears and the display flashes.
3 You can switch the battery pack alarm on (on) or off (off) using the "UP" and "DOWN" buttons A7.
4. Press the confirmation button (OK) AB to confirm your selection.
Button tone
The button tone setting activates audible confirmation that a button has been pressed 1. Switch the devices on. To do so, press the On/Off button A4 for approx. 2 seconds. The display A5 lights up briefly and the symbols appear.
2. Press the mode button (MODE) A6 repeatedly until the button tone symbol appears and the display flashes.
3. You can switch the button tone on (on) or off (off) using the "UP" and "DOWN" buttons A7. 4. Press the confirmation button OKI AB to confirm your selection.
Call function (CALL)
With the call function (CALL) you can transmit a signal to the receiver with the same channel and subcode. This tells the receiver that he is being called. To send the signal automatically, press the confirmation button (CK) AB during normal operation.
Monitor button (monitor)
The monitor button (monitor) A1 switches off the noise suppression which the BABYFON ⑧ RBM1000 S has to prevent loud noise. The subcode is also cancelled. This means that as long as the monitor button (monitor) A1 is pressed, very weak reception signals or signals with a different subcode can be received on this channel.
Channel and subcode scan
You have the possibility to scan for a channel or a subcode on which transmission is to take place. This function stops automatically when it registers reception. If you know the channel but not the subcode to which you have set the transmitter, you can start a subcode scan.

Press the "UP" button A7 for approx. 3 seconds, then the subcode scan starts. It stops automatically at the subcode at which a transmission takes place. If there is no t transmission it continues to scan until it finds one. You can interrupt this function by pressing the confirmation button IOK) A8.
If you know the subcode but not the channel to which you have set the transmitter, you can start a channel scan.
Press the "DOWN" button A7 for approx. 3 seconds, then the channel scan starts. It stops automatically at the channel at which a transmission takes place. If there is no transmission it continues to scan until it finds one. You can interrupt this function by pressing the confirmation button OK) A8.
6 Power supply
6.1 Battery pack status indicator


6.2 Charging the battery packs
The battery pack status indicator B7 indicates how full the battery packs are or, if batteries are used, how full these are:
Battery packs/batteries full (3 bars)
The batteries or battery packs are full or nearly full, allowing operation for several hours Battery packs/batteries 2/3 full (2 bars)
The batteries are partially emptied, but still allow normal operation.
Battery packs/batteries 1/3 full (1 bar)
The batteries are almost empty. Now is the time to replace the batteries or recharge the battery packs.
Battery packs/batteries empty
When the batteries or battery packs are empty the last status bar disappears and the battery pack status indicator 87 begins to flash. The device also emits a warning tone. Proper operation is no longer possible and the device switches itself off automatically after a few seconds.
-
Switch off the devices. To do so, press the On/OFF button A4 for approx. 2 second
-
Insert the small plug on the cable of the AC adapter D into the connection socket for the plug-in charger ICD 6W1A14 of the device concerned.
- Plug the AC adapter D into a mains socket with voltage that corresponds to that given on the charger's nameplate. The control lamp for the plug-in charger A15 lights up, indicating that power is online and charging begins.
- When the battery packs are fully charged, disconnect the AC adapter D from the device.
When charging the battery packs, please observe the following:
N.B.: New battery packs must be charged for at least 15 hours without interruption
before use to ensure that they reach their full capacity. The devices must remained switched off.
- The battery pack charging time varies according to the type of battery pack used. The battery packs supplied need approx. 12 hours before they are fully charged.
With the devices switched on, charging time depends very much on the operating mode. It may be two to three times longer than the charging time required when the devices are switched off.
Using the battery packs included with the set, operation of approx. 24 hours is possible. This may vary depending on the operation mode.
Continuous operation with the AC adapter and battery packs for several days could damage the battery packs.

6.3 Operation with the plug-in charger
N.B. When using batteries the plug-in charger must not be connected under any circumstances as this could cause the batteries to overheat and thereby damage the device.
Please note: The radio frequencies used with your BABYFON ® BM 1000 S are legally permissible only if the device is used on a mobile basis. As the law states that the device is no longer considered to be mobile when it is connected to the plug-in charger during operation, this is not permitted. Continuous operation with the plug-in charger would be technically possible, but the battery packs could be damaged by permanent charging.
6.4 Battery operation
N.B.: When using batteries the plug-in charger must not be connected under any circumstances as this could cause the batteries to overheat and thereby damage the device.
Instead of the batteries supplied you can also use AAA type batteries.
longer operating time than with battery packs;
greater range as batteries emit higher voltage then battery packs.
Disadvantages
higher operating costs as they are not rechargeable;
unkind to the environment as they are not reusable.
7 Range of the devices
In view of the physical diffusion characteristics of radio waves, you will have to determine the range of your BABYTON® BM 1000 S in your surroundings by trial and error. In optimal conditions, the range is up to 1,000 metres. However, the actual range depends very much on local conditions, e.g. location of the transmitter, type of building or atmospheric conditions. The range may also be reduced if you enclose the receiver in your hands.
The spreading of radio waves can be physically influenced only to a slight degree, with the result that there are places in the house or garden where radio contact does not take place although the transmitter and the receiver are only a few metres apart (in a straight line). Due to the numerous factors influencing FM products it is not possible to give a 'range guarantees'. However, you should be able to move around freely with your BABYFON® BM 1000 S within the house/apartment. You can easily determine the range in your surroundings by placing a radio in front of the BABYFON® BM 1000 S transmitter. When you can heat the transmission clearly, move around with the receiver in the area where you have perfect functionality.
8 Troubleshooting
8.1 Reset function
You can reset the BABYFON BV 1000 S to the default setting if you have lost track of the settings.
This allows subsequent function control (see chapter 4 "Setting up components / function test" on page 5) and rules out malfunction. The following function steps are the same for both devices and must be performed for both devices:
- Switch off the device by pressing the On/Off button A4 for approx. 2 seconds

8.2 Malfunctions
- Disconnect the AC adaptor D, but leave the battery packs inside the device.
- Press the 'UP' A7, 'MODE' A6 and 'Talk' A2 buttons simultaneously
- Switch the device back on while continuing to hold the buttons down.
- As soon as all the values are displayed simultaneously in the display A5, release the buttons.
- Confirm the reset by pressing any button. The device switches itself off again. All memories are now erased and reset to the default setting.
Should your BABYTON® BM 1000 S not function correctly, please proceed in the following order:
- Using the following table, try to find and correct the fault
- Read the relevant section of these instructions carefully.
- Look on the Internet at www.babylon.com to see if the fault and its correction are described there.
- Consult your specialist dealer
8.3 Table of malfunctions
| Problem | Possible cause | Solution |
| Display unclear or hard to read | Protective film is still on the display | Remove the protective film from the display |
| No display | Battery packs are inserted incorrectly | Insert the battery packs according to the symbols on the bottom of the battery pack compartment |
| Battery packs are too weak | Change the battery packs (see 6.2 "Changing the battery pack") | |
| No transmission/no sound | Channel and subcode are set of differently on the two devices | Correct the setting (see 5.3 "Setting the channel and subcode") |
| Transmitter does not switch automatically to transmission | Increase the response sensitivity (see "Setting the response sensitivity" under 5.5 "Transmitter [batter]" | |
| Devices are outside the range | Reduce the distance between the devices | |
| Transmitter is not by the baby or too far away | Reduce the distance of the transmitter to the baby, keeping the minimum distance of 1 metre | |
| Batteries are empty | If you are using batteries, replace them | |
| Low range | See 7 "Range of the devices" | |
| There is interference in the transmission or external voices can be heard | Unfavourable selection of channel and/or security code | Change the another channel or select another security code (see 5.3 "Setting the channel and subcode") |
| Loud boeping and whistling | Feedback because the distance between the devices is too small | Increase the distance between the devices or reduce the volume on the receiver (see 5.3 "Receiver [harards]" |
| Battery packs are no longer charged | The AC acquirer D is not connected to the mains supply | Check the mains connection |
| The plug of the AC adaptor D is not correctly connected to device | Insert the plug correctly in to the "Connection socket for the plug-in charger [DC BV]" A14 | |
| The battery packs have reached the end of their service life | Replace the battery packs | |
| The battery packs have been used far too long in the AC adaptor D and are now老化 | Replace the battery packs | |
| Babyfar transmits every little sound | Response sensitivity is set too high | Reduce the response sensitivity (see "Setting the response sensitivity" under 5.5 "Transmitter [baby]" |
GB

9 Contents and technical data
9.1 Contents
2xBABYFON 品 BM1000S.
2x AC adapters.
Rechargeable battery packs (AAA).
1x additional microphone.
operatingsinstructions
Warranty pass
9.2 Technical data
No. of channels: 8
Frequenies 446.0 to 446.1 MHz
Power supply: 4 NiMH battery packs (included)
or 4 NiCd battery packs
or 4 AAA batteries
Battery pack charge: AC adapter AC/DC 6 Volt/200mA
Transmission output: max. 100 mW
9.3 Licence
(0682)
This Vivanco FM product conforms with the European R&TTE directive for FM systems in
non-harmonised frequency ranges. These systems can be sold and operated in the
following countries
Germany, France, the Netherlands, Belgium, Spain, Portugal, Italy, Switzerland, Austria
Finland, Norway, Sweden, Denmark
Operation is not permitted in all countries not named
The declaration of conformity is included at the end of this manual.
10 Warranty
The original BABYFON® BM 1000 S is subject to a strict quality inspection in order to guarantee maximum functionality. However, a technical defect can never be entirely ruled out. Should a claim nevertheless arise, you will immediately receive a replacement for your defective device from your specialist dealer, provided that the following points are observed:
The warranty period is 24 months from the date of purchase.
Only original accessories have been used.
The enclosed warranty card must have been completed fully by your specialist dealer
and a copy of the purchase receipt must be included with the warranty card.
The set must be complete as described in this instruction manual.
Only if the above points are observed can the device be exchanged immediately by your specialist dealer.
If the above points are not observed, Vivanco will naturally honour a warranty of 24
months from the date of purchase in accordance with legal warranty requirements.
Please then send your set to the following address:
Vivanco Service, Ewige Woide 17, D-22926 Ahrensburg
The following are not covered by any form of warranty:
devices tampered with by non-authorised persons
damage caused by improper handling of the devices, failure to observe the
instructions or damage caused by leaking batteries.
As a quality product the BABYFON 品 BM 1000 S naturally meets all national and
European licence regulations in the licensed countries.
34
35
GB

Technical data subject to alteration. Babyton® is a registered trademark of Vivanco Germany.
101203
F
BABYFON
BM 1000S
1Votre nouveau BABYFON 念 BM 1000 S se presente 37
Observe attention to the charge of the accus.
A2 tecla de haber (talk)
E Accumulator ministilo (AAA)
A1 Taste monitor monitor
A2 Taste microlono (alk)
Taste monitor (monitor)
o 4 accumulator NiCd
o 4 pile micro stilo (AAA)
A2 sprocktocts (talk)
A3 zend- en pnyanspantenne
A4 aan-jitttocts
A5 display
A5programmatoots(MDDE)
A7kezetaetn/DOWNUP
A8 hevestingstaels (OK)
A9 luidsprekei
A10 microfoon
A11 riemclip
A12batteriyak
Monitorets (monitor)
A1 Tarkailunappain (monitor)
A2 Puhenappain talki
A3 Laniets-ja vastaanottoantenni
A4 Paalic/pois-painiko
A5 Naytbo
A6 Ohjelmanappain (MODE)
A7 Valintanappaimet (DOWN,UP)
A8 Valvistusnpain (OK)
A9 Kovalaninen
A10 Mikrofoni
A11 Vopidike
A12 Akkulokerm
A13 Lisamikrofon liitanti Imicrol
A14 Pistokelatauslaittcon Linin (DC 6V)
5.4 Nappainlukko (Keylock)
- Kytckal klotter caoie, Poincaré tete variet cato/pe/po-poinkette Aa 2, solumn im jpn. Navitt AS laotie heken in nakvyn Imsvstvlt symboloit.
- Painaka a chielmanappintA6 kerran, KanayanaytB10 yllkuu.
- Valitkaa valintanappaimilla [UOWN/UP]A7 haluttu kanava [G-8].
- Vahvistakaa saat o painarnalla ohjelmanappinta (MODE) A6. Poistute
samanakasesti saatotilasta ja paadyte alkoodin aseukseen - Morkbin nayb 89 akia vkkua. 6.VolvoeupstasreimpiuUWUUUUUU AUHauy uukoei CCL 381
- Vahistaka alikooi nainema vahevistusipakint (OKI AB i goitukaa sädla:
Tarkailunappain (monitor)
Taaundet 446.0-446.1 MHz
Viransyoto: 4 NiMH-akka (mukana)
tai 4 NiCd-akkua
tai 4 misro-paria (AAA)
Akkulataus: Pistokevorkkolaite, AC/DC 5 voltia / 200 mA
Lahstesteho: maks, 100 mW
9.3 Hyväksyntä
(0682)
A1 Monitorknapp (monitor)
A2 Tallnapp (talk)
B1 Sardarens drifart his hamet
B2 Mottagarens driftart hcs foraldrarnal
B3 Rackvidslam
B4 Anrospston
B5 Klarsignal
B6 Knapolas
B7 Indikator for batteristatus
BB Display for - konslichetsinstalling for sandaren
instalnng ay liudstykan hos mottagaren
B9 Personlig sakerhetskod
B10 Kanaldisplay
B11 Roststymningsfungkion (VDX)
B12PMR-
B13 Sandingsindikator
B14 Mottapiningsindikator
C Extramikrofon
C1 Volynprodage
C2 Fstklamma
C3 Mikrofex
C4 Kontakt for anslutining till Babyfon


EC-Declaration of Conformity
Hersteller / Verantwortliche Person:
Manufacturer / responsible person
Adress / Address
Peter Zahari
VIVANCO GmbH
Ewige Weide 15
22926 Ahrensburg / Germany
Eriart, dess das Produk / Declares that the product:
Typ/type:
BM 1000S
Model / model
215/16054
Verwendungszweck:
Radio Equipment for the use in the private land mobile radio
Intended use
Sy (Article 3.1 a of the RATTE Directive)
angewandte Norm(en)
EN6095012:2001
appled standard(s)
Electromagnetic compatibility (Article 3.1.b of the R&TTE Directive)
Efficient use of the radio frequency spectrum (Article 3.2 of the R&TTE Directive)
Place and date of the declaration of conformity
Peter Zahan
(Name In Druckschmitt)
Name is block (name)


- Monitorate (monitor)
- Setting up components / function test 24
- Adjusting the devices for operation 25
- Power supply
- Range of the devices 32
- Introducing your new BABYFON® BM 1000 S
- N.B.: As the BABYFON® BM 1000 S is a radio frequency device, certain settings on both devices must be absolutely identical to ensure that the transmitter and receiver can communicate with each other. Please refer in particular to chapter 5.3 "Setting the channel and subcode".
- The BABYFON ⑥ BM 1000 S provides the following functions:
- MHz transmission frequency / 8 channels
- Subcode (CTCSS)
- Acoustic range control
- Hands-free function (VOX)
- Variable response sensitivity
- Keylock
- Battery pack charge function
- Battery pack status display
- Additional microphone
- Belt clip / wall mounting
- Overview of operating elements and indicators
- A Transmitter/receiver
- B Display
- C Additional microphone
- Security precautions
- General
- Intended purpose
- Electro-smog in children's rooms
- Protecting the devices
- Using the plug-in charger
- Battery packs and batteries
- Setting up components / function test
- N.B.: Before inserting the battery packs supplied or connecting to the mains power supply, switch off the devices.
- Power supply
- N.B.: Battery packs must be inserted with their plus and minus poles (+/-) positioned exactly as marked on the bottom of the battery pack co
- Switching on and basic setting
- N.B.: In all operating modes the transmitter and receiver can only communicate if
- these two settings are identical on both devices. To change these settings, please read Chapter 5.3 "Setting the channel and subcode".
- Function test
- Adjusting the devices for operation
- Reset function
- Setting the application
- To use as a normal radio device (PMR), activate this variant
- Setting the channel and subcode
- Setting the channel
- Setting the personal security code
- Keylock
- Transmitter (baby)
- Setting the response sensitivity
- Using the additional microphone
- Receiver (parents)
- Radio device (PMB)
- Receiver with range control
- Setting the volume
- Channel and subcode scan
- Make sure that the transmitter and the receiver have the same setting for the channel and the subcode (see Chapter 5.3 "Setting the channel and subcode").
- Transmitting and receiving
- Only one device can transmit at a time. For the other device to reply, the Talk button A2 must be released!
- The hands-free function (VOX) is not recommended if there is loud background noise such as traffic or a strong wind. It could then be permanently activated and the receiver cannot reply.
- Call tone
- Roger signal
- Battery pack alarm
- Button tone
- Call function (CALL)
- Monitor button (monitor)
- Battery pack status indicator
- Charging the battery packs
- N.B.: New battery packs must be charged for at least 15 hours without interruption
- before use to ensure that they reach their full capacity. The devices must remained switched off.
- Operation with the plug-in charger
- N.B. When using batteries the plug-in charger must not be connected under any circumstances as this could cause the batteries to overheat and thereby damage the device.
- Battery operation
- N.B.: When using batteries the plug-in charger must not be connected under any circumstances as this could cause the batteries to overheat and thereby damage the device.
- Range of the devices
- Troubleshooting
- Reset function
- Malfunctions
- Contents and technical data
- Contents
- Technical data
- Licence
- (0682)
- Warranty
- BM 1000S
- Taste monitor (monitor)
- Monitorets (monitor)
- Nappainlukko (Keylock)
- Tarkailunappain (monitor)
- Hyväksyntä
- C Extramikrofon
- EC-Declaration of Conformity
Brand : BABYFON
Model : BM 1000S
Category : Baby monitor