
LU9915 - Projector BENQ - Free user manual and instructions
Find the device manual for free LU9915 BENQ in PDF.
| Product Type | DLP Projector |
| Native Resolution | WUXGA (1920 x 1200) |
| Brightness | 10,000 Lumens |
| Aspect Ratio | 16:10 |
| Light Source | Laser |
| Power Consumption | 1290W (100V) / 1215W (240V) |
| Power Supply | 100-240V AC, 50/60Hz |
| Dimensions (W x D x H) | 583 x 500 x 211 mm |
| Weight | 28 kg (without lens) |
| Operating Temperature | 0°C to 40°C |
| Projection System | Single 0.67" DMD DLP chip |
| Connectivity | HDBaseT/LAN, DVI-D, HDMI, DisplayPort, 3G-SDI, VGA, BNC, RS-232, Trigger, Wired Remote |
| Interchangeable Lenses | Yes (8 models available) |
| Lens Shift | Vertical -3% to +7%, Horizontal -5% to +5% (depending on lens) |
| Remote ID Function | Yes (01 to 99) |
| Security | Kensington lock, security screw |
| Ventilation | Free space required around the projector |
| Cleaning | Clean the exterior with a soft dry cloth |
| Spare Parts | Optional lenses available |
| Warranty | Refer to the manual for details |
Frequently Asked Questions - LU9915 BENQ
User questions about LU9915 BENQ
0 question about this device. Answer the ones you know or ask your own.
Ask a new question about this device
Download the instructions for your Projector in PDF format for free! Find your manual LU9915 - BENQ and take your electronic device back in hand. On this page are published all the documents necessary for the use of your device. LU9915 by BENQ.
USER MANUAL LU9915 BENQ
Ventilation illustration 3
Exhaust vent requirements 3
Voltage switcher 4
Caution during installation 4
Product information 5
Packing contents 5
Projection specifications 5
Terminals 6
Remote control. 7
Remote control ID setting. 7
Installation 8
Lens specifications 8
Projection table. 9
Lens shift.
Installation positioning 12
Dimensions 13
Cabinet dimensions 13
Ceiling mount hole dimensions. 13
Ceiling mount dimensions (CMG6) 14
Optional lens dimensions 15
LED indication 16
Please visit below website for latest version of User Manual / Installation Guide.
http://business-display.benq.com/
Notice
Ventilation illustration
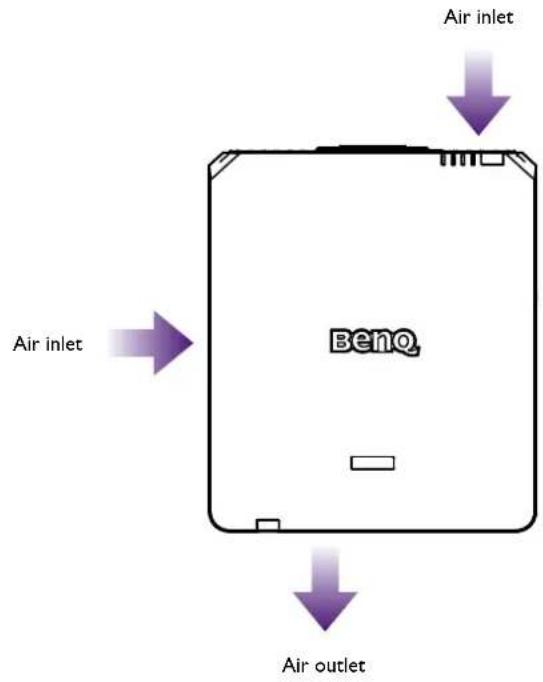
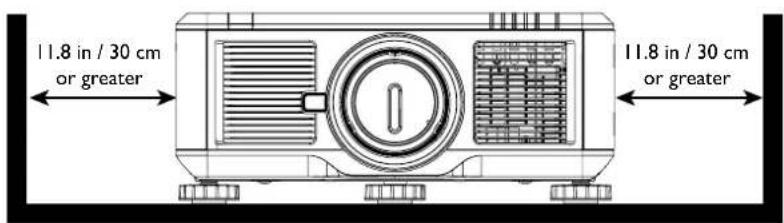
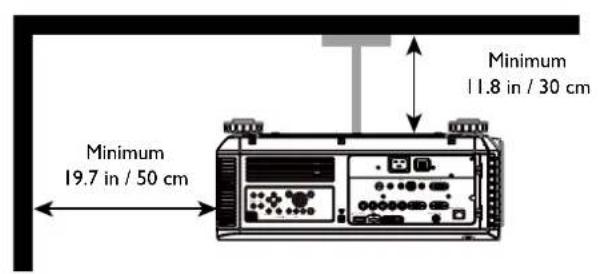
Exhaust vent requirements
For proper ventilation of the projector, make sure to leave some space around the projector as shown in the illustration below:


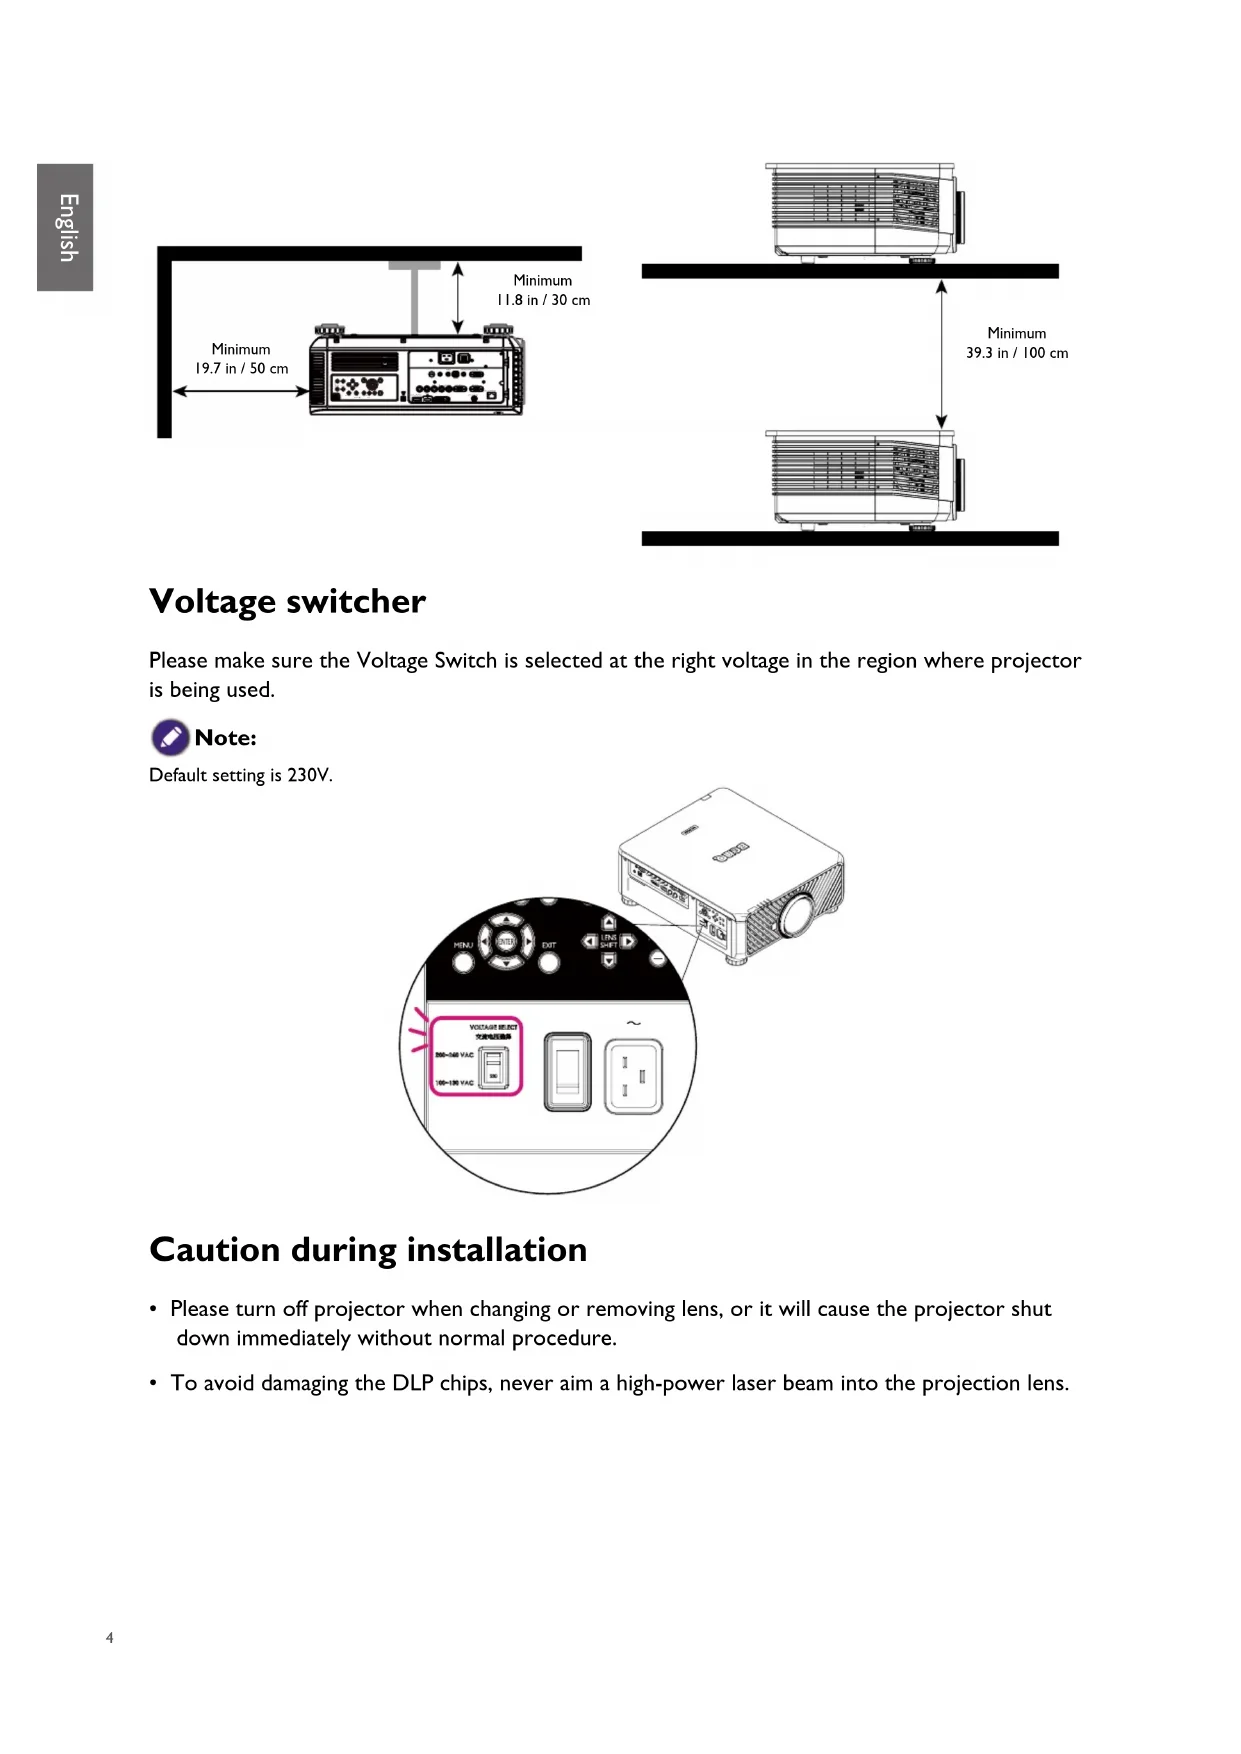
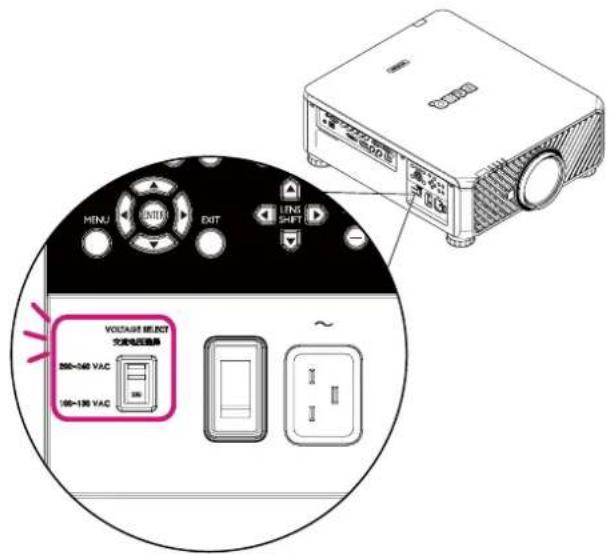
Voltage switcher
Please make sure the Voltage Switch is selected at the right voltage in the region where projector is being used.

Note:
Default setting is 230V
Caution during installation
- Please turn off projector when changing or removing lens, or it will cause the projector shut down immediately without normal procedure.
- To avoid damaging the DLP chips, never aim a high-power laser beam into the projection lens.
Product information
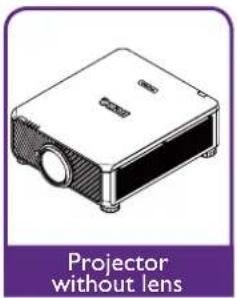
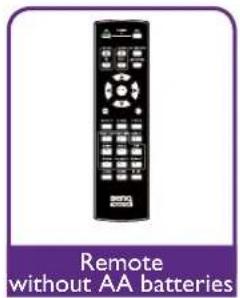
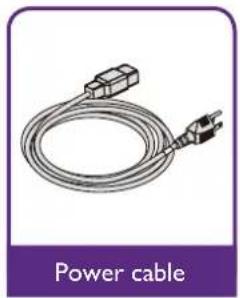
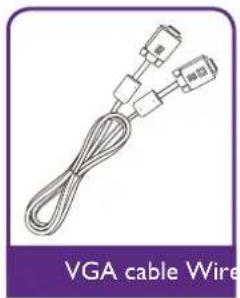
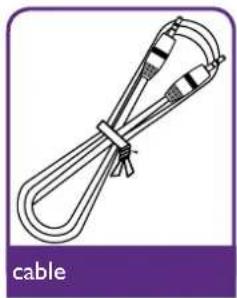
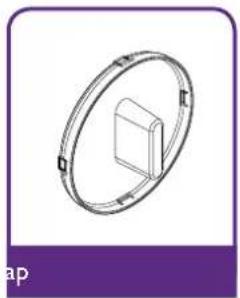
Packing contents
Carefully unpack and verify that you have the items below. Some of the items may not be available depending on your region of purchase. Please check with your place of purchase.

Projector specifications
| Specifications | 5 |
| Projection system DLP | Single 0.67 WUXGA DMD Chip |
| Native resolution WU | XGA (1920 x 1200) |
| Brightness 10,000 Lumens | |
| Aspect ratio 16:10 | |
| Light source Laser Light Source | |
| Power consumption 1290W@100V, 1215W@240V | |
| Dimensions 583mm (L) x 500mm (W) x 211mm (H) | |
| Weight 28kg / 61.7 lbs (Lens excluded) | |
| Operation Temperature 32°F to 104°F (0°C to 40°C) | |

Note:
- Brightness is supplied by standard lens. The value will vary depending on lenses being installed.
- Brightness output will vary depending on each unit and actual usage.
- Please visit the local website from http://www.benq.com for the latest User Manual.
Terminals
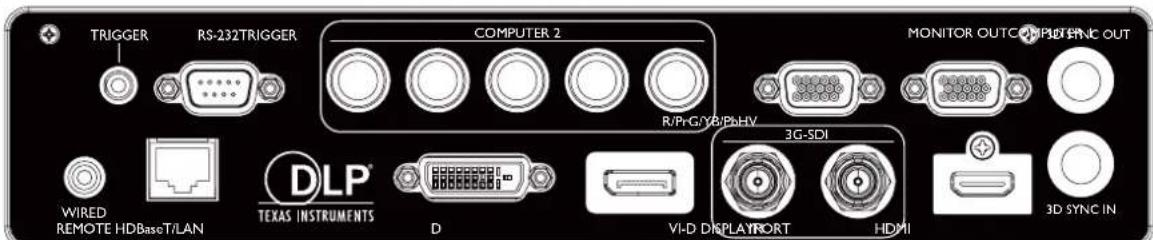
HDBaseT/LAN
For connection to RJ45 Cat5/Cat6 Ethernet cable to input uncompressed high-definition video (HD), control signals.
- 3D Sync Out
Connection to 3D IR sync signal transmitter.
- 3D Sync In
Connection to 3D sync signal input.
DVI-D
Connection to DVI-D source.
HDMI
Connection to HDMI source.
- DisplayPort
Connection to device or PC featuring DisplayPort.
3G-SDI
Connection to 3G-SDI source.
Computer I
15-pin VGA port for connection to RGB, component HD source, or PC.
Computer 2 (V, H, B/Pb, G/Y, R/Pr)
Connection to RGB or YPbPr/YCbCr output signal with BNC type input terminal.
Monitor Out
Connection to other display equipment for concurrent playback display.
RS-232
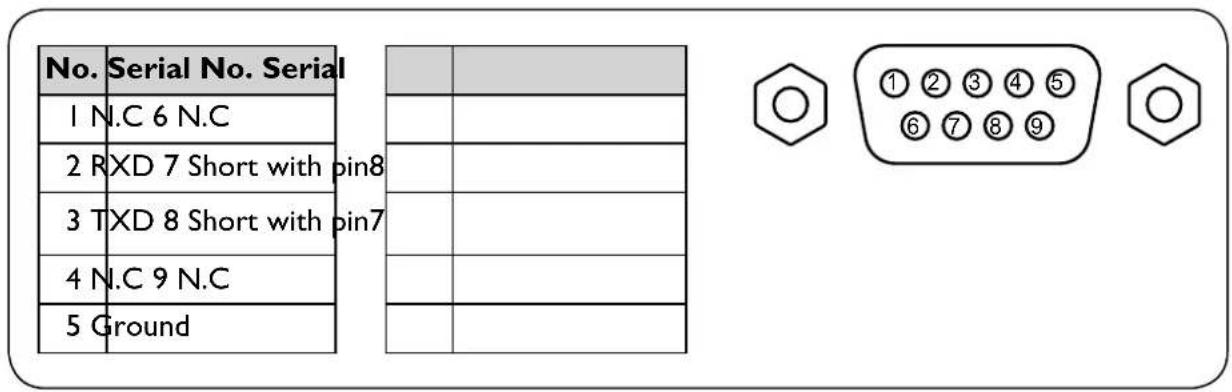
Standard 9-pin D-sub interface for connection to PC control system and projector maintenance.
- TRIGGER
3.5mm mini earphone jack, employs 350mA display relay to provide 12(+/-1.5)V output and short circuit protection.
Wired Remote
Connection to input Niles or Xantech compatible IR repeater system.

Note:
Make sure the port is valid before inserting a wired remote controller. The remote controller may be damaged in case of an invalid port, e.g. a wired remote controller is connected to trigger output.
Remote control
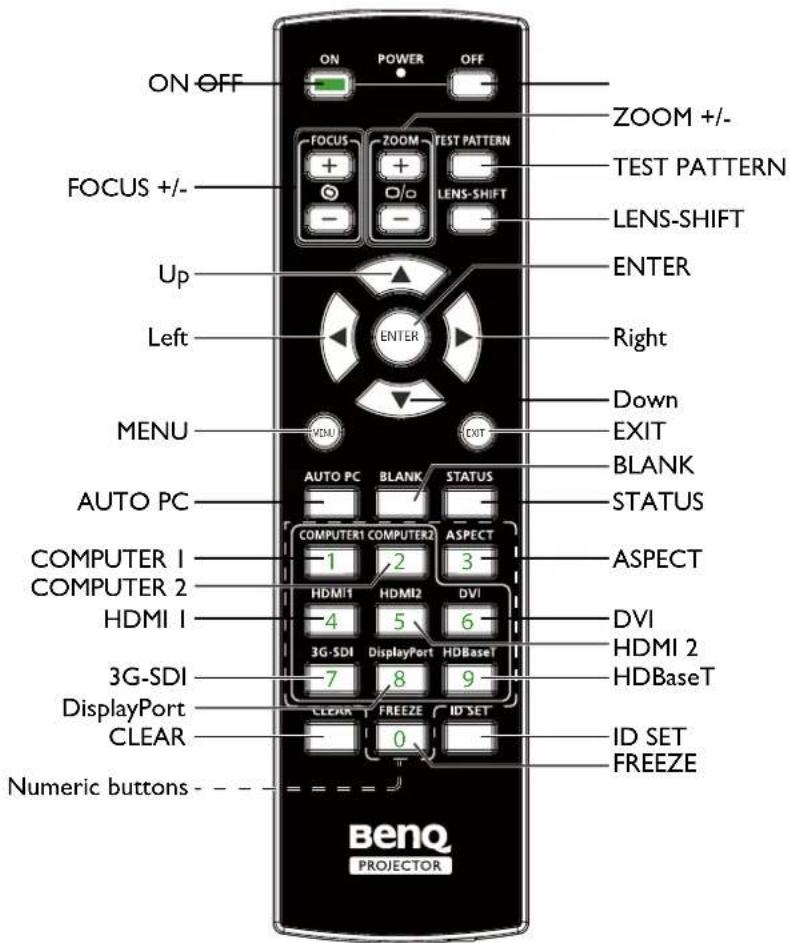
Remote control ID setting
You can set the remote control ID to control the specific projector.
Please set projector ID (from 01 to 99) by using the OSD menus. After setup different ID, the remote control will only control the matched projector.
Press ID SET + MENU keys together for 5 seconds, the remote control backlight will flash one time, then into the ID Set mode.
Again click ID SET + MENU keys for 5 seconds (backlight will flash 1 time) to release ID SET Mode.
After into the ID Set Mode, press ID SET key for 3 seconds.
The remote control LED light will flash and backlight will light. In the meantime, press number to set the remote control ID.
For example, for setting remote control ID to "01", please press 0 key for 1 second (LED light will flash 3 times then back light off), then press 1 key for 1 second (LED light flash 3 times then backlight off).
For setting remote control ID to "19", please press I key for I second, then press 9 key for I second.
Installation
Lens specifications
| Model Name | Lens Type | BenQ Part Number | Optical spec Th | row Ratio Zoo | m Ratio Weight* |
| LS1ST4 | Ultra Short Throw | 5J.JCY37.002 F=2.0, f=5.64 mm 0.38:1 Fixed 2,710g | |||
| LS1ST3 Wide fix 5J.JAM37.011 F=1.85, f=11.6mm 0.76:1 Fixed 910g | |||||
| LS1ST2 Ultra Wide 5J.JAM37.061 | F=1.96~2.3, f=11.3~14.1mm | 0.75~0.93:1 1.25:1 1,280g | |||
| LS1ST1 Wide Zoom 5J.JAM37.021 | F=1.85~2.5, f=18.7~26.5mm | 1.25~1.79:1 1.41:1 1,090g | |||
| LS1SD Standard 5J.JAM37.001 | F=1.7~1.9, f=26~34mm | 1.73~2.27:1 1.3:1 820g | |||
| LS1LT1 | Semi Long | 5J.JAM37.051 | F=1.86~2.48, f=32.9~54.2mm | 2.22~3.67:1 1.65:1 950g | |
| LS1LT2 | Long Zoom1 | 5J.JAM37.031 | F=1.85~2.41, f=52.8~79.1mm | 3.58~5.38:1 1.5:1 1,020g | |
| LS1LT3 | Long Zoom2 | 5J.JAM37.041 | F=1.85~2.48, f=78.5~121.9mm | 5.31~8.26:1 1.55:1 1,350g | |

Note:
The values listed in the table above are average and may vary by model.
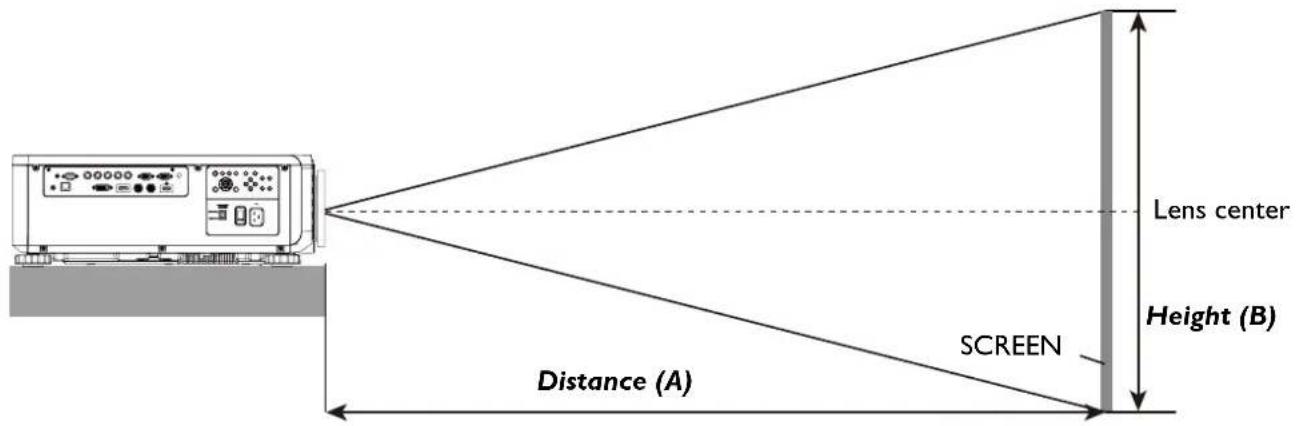
Projection table
Wide Fix Lens, Wide Zoom Lens, STD Lens, Semi Long Zoom I, Long Zoom I Lens, Long Zoom 2 Lens, Ultra Wide Zoom Lens
LU9915
| Screen Size | JAM37.021 5J.JAM37.001 5J.JAM37.051 | |||||||||||||||||||
| Wide Fix Lens | Wide Zoom Lens STD Lens Semi | ong Zoom1 | ||||||||||||||||||
| Diagonal Width Height (B) Distance (A) | ||||||||||||||||||||
| Fixed Wide | Tele Wide Tele | Wide Tele | ||||||||||||||||||
| (inch) | m) | (inch) | (m) | (inch) | (m) | (inch) | (m) | (inch) | (m) | (inch) | (m) | (inch) | (m) | |||||||
| 40 | 1.02 | 34 | 0.86 | 21 | 0.54 | 25.1 | 0.64 | 41.4 | 1.05 | 59.9 | 1.52 | 57.2 | 1.45 | 75.8 | 1.93 | 73.6 | 1.87 | 124.1 | 3.15 | |
| 50 | 1.27 | 42 | 1.08 | 26 | 0.67 | 31.8 | 0.81 | 52.3 | 1.33 | 75.4 | 1.92 | 72.1 | 1.83 | 95.5 | 2.42 | 92.9 | 2.36 | 155.9 | 3.96 | |
| 60 | 1.52 | 51 | 1.29 | 32 | 0.81 | 38.5 | 0.98 | 63.1 | 1.60 | 90.9 | 2.31 | 87.1 | 2.21 | 115.1 | 2.92 | 112.1 | 2.85 | 187.8 | 4.77 | |
| 80 | 2.03 | 68 | 1.72 | 42 | 1.08 | 52.0 | 1.32 | 84.9 | 2.16 | 121.8 | 3.09 | 117.0 | 2.97 | 154.3 | 3.92 | 150.5 | 3.82 | 251.4 | 6.39 | |
| 100 | 2.54 | 85 | 2.15 | 53 | 1.35 | 65.5 | 1.66 | 106.6 | 2.71 | 152.7 | 3.88 | 147.0 | 3.73 | 193.5 | 4.92 | 188.9 | 4.80 | 315.0 | 8.00 | |
| 120 | 3.05 | 102 | 2.58 | 64 | 1.62 | 78.9 | 2.01 | 128.4 | 3.26 | 183.6 | 4.66 | 176.9 | 4.49 | 232.8 | 5.91 | 227.6 | 5.78 | 378.6 | 9.62 | |
| 150 | 3.81 | 127 | 3.23 | 79 | 2.02 | 99.1 | 2.52 | 161.0 | 4.09 | 230.0 | 5.84 | 221.8 | 5.63 | 291.6 | 7.41 | 285.0 | 7.24 | 474.1 | 12.04 | |
| 180 | 4.57 | 153 | 3.88 | 95 | 2.42 | 119.3 | 3.03 | 193.6 | 4.92 | 276.4 | 7.02 | 266.7 | 6.77 | 350.5 | 8.90 | 342.6 | 8.70 | 569.5 | 14.47 | |
| 200 | 5.08 | 170 | 4.31 | 106 | 2.69 | 132.8 | 3.37 | 215.3 | 5.47 | 307.3 | 7.81 | 296.6 | 7.53 | 389.7 | 9.90 | 381.0 | 9.68 | 633.1 | 16.08 | |
| 300 | 7.62 | 254 | 6.46 | 159 | 4.04 | 200.1 | 5.08 | 324.0 | 8.23 | 461.9 | 11.73 | 446.3 | 11.34 | 585.9 | 14.9 | 573.2 | 14.56 | 951.2 | 24.16 | |
| 400 | 10.16 | 339 | 8.62 | 212 | 5.38 | 267.4 | 6.79 | 432.7 | 10.99 | 616.6 | 15.66 | 595.9 | 15.14 | 782.3 | 19.87 | 765.3 | 19.44 | 1269.7 | 32.25 | |
| 500 | 12.70 | 424 | 10.77 | 265 | 6.73 | 334.8 | 8.50 | 541.5 | 13.75 | 771.2 | 19.59 | 745.6 | 18.94 | 978.3 | 24.85 | 957.4 | 24.32 | 1587.8 | 40.33 | |
| Screen Size | 5J.JAM37.031 | 5J.JAM37.041 | 5J.JAM37.061 | ||||||||||||||
| Long Zoom 1 Lens | Long zoom 2 Lens | Ultra Wide zoom Lens | |||||||||||||||
| Diagonal Width Height (B) | Distance (A) | ||||||||||||||||
| Wide | Tele | Wide | Tele Wide | Tele | |||||||||||||
| (inch) | m) | (inch) | (m) | (inch) | (m) | (inch) | (m) | (inch) | (m) | (inch) | (m) | ||||||
| 40 | 1.02 | 34 | 0.86 | 21 | 0.54 | 118.7 | 3.01 | 181.0 | 4.60 | 173.9 | 4.42 | 277.7 | 7.05 | 24.5 | 0.62 | 31.1 | 0.79 |
| 50 | 1.27 | 42 | 1.08 | 26 | 0.67 | 149.7 | 3.80 | 227.6 | 5.78 | 220.2 | 5.59 | 350.0 | 8.89 | 31.1 | 0.79 | 39.2 | 1.00 |
| 60 | 1.52 | 51 | 1.29 | 32 | 0.81 | 180.7 | 4.59 | 274.1 | 6.96 | 266.6 | 6.77 | 422.3 | 10.73 | 37.6 | 0.96 | 47.4 | 1.20 |
| 80 | 2.03 | 68 | 1.72 | 42 | 1.08 | 242.7 | 6.16 | 367.3 | 9.33 | 359.4 | 9.13 | 567.0 | 14.40 | 50.8 | 1.29 | 63.8 | 1.62 |
| 100 | 2.54 | 85 | 2.15 | 53 | 1.35 | 304.3 | 7.73 | 460.4 | 11.70 | 452.1 | 11.48 | 711.6 | 18.07 | 63.9 | 1.62 | 80.2 | 2.04 |
| 120 | 3.05 | 102 | 2.58 | 64 | 1.62 | 366.7 | 9.31 | 553.6 | 14.06 | 544.9 | 13.84 | 856.2 | 21.75 | 77.1 | 1.96 | 96.6 | 2.45 |
| 150 | 3.81 | 127 | 3.23 | 79 | 2.02 | 459.4 | 11.67 | 693.3 | 17.61 | 684.0 | 17.37 | 1073.1 | 27.26 | 96.8 | 2.46 | 121.1 | 3.08 |
| 180 | 4.57 | 153 | 3.88 | 95 | 2.42 | 552.4 | 14.03 | 833.0 | 21.16 | 823.1 | 20.91 | 1290.1 | 32.77 | 116.5 | 2.96 | 145.7 | 3.70 |
| 200 | 5.08 | 170 | 4.31 | 106 | 2.69 | 614.7 | 15.6 | 926.4 | 23.53 | 915.9 | 23.26 | 1434.7 | 36.44 | 129.7 | 3.29 | 162.1 | 4.12 |
| 300 | 7.62 | 254 | 6.46 | 159 | 4.04 | 924.0 | 23.47 | 1392.1 | 35.36 | 1379.6 | 35.04 | 2157.8 | 54.81 | 195.4 | 4.96 | 244.0 | 6.20 |
| 400 | 10.16 | 339 | 8.62 | 212 | 5.38 | 1233.9 | 31.34 | 1857.9 | 47.19 | 1843.3 | 46.82 | 2880.9 | 73.18 | 261.2 | 6.63 | 325.9 | 8.28 |
| 500 | 12.70 | 424 | 10.77 | 265 | 6.73 | 1543.7 | 39.21 | 2323.6 | 59.02 | 2307.1 | 58.60 | 3604.0 | 91.54 | 326.9 | 8.30 | 407.7 | 10.36 |
Ultra Short Reflection
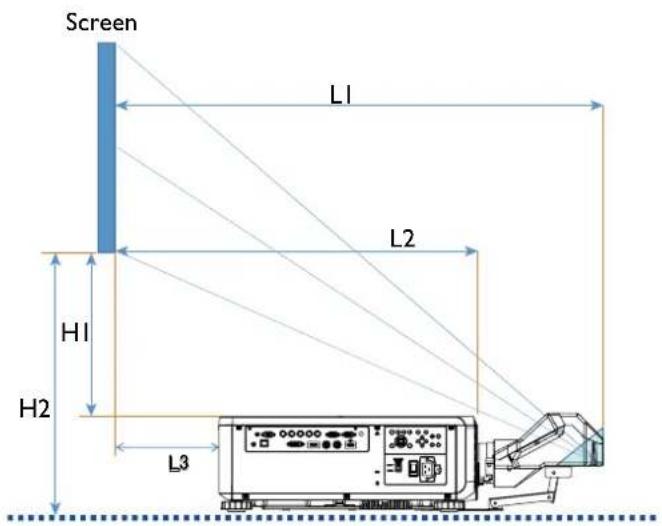
LI: Screen to the point of mirror
L2: Screen to projector front
L3: Screen to project back
H1: Screen bottom to projector top side
H2: Screen bottom to projector bottom
| Screen size | ||||||||||||||
| Ultra Short Reflection | ||||||||||||||
| Diagonal Width | Height H1 | H2 L1 | L2 | L3 | ||||||||||
| inch mm | inch mm | inch mm | inch mm | inch mm | inch mm inch | mm inch mm | ||||||||
| 100 25 | 40 85 | 2166 | 53 1355 | 19 485 | 28 | 701 33 | 849 22 | 564 -1 | -24 | |||||
| 120 30 | 48 102 | 2599 | 64 1627 | 23 596 | 32 | 812 39 | 1000 | 28 715 | 5 127 | |||||
| 150 38 | 10 128 | 3247 | 80 2032 | 30 763 | 39 | 979 48 | 1227 | 37 942 | 14 354 | |||||
| 200 50 | 80 170 | 4330 | 107 271 | 1 41 1041 | 49 1257 | 63 | 1606 52 | 1321 29 | 733 | |||||
| 250 63 | 50 213 | 54 | 15 133 | 339 | 1 52 1320 | 60 | 1536 78 | 1984 67 | 1111 | |||||
| 300 76 | 20 256 | 6500 | 160 407 | 1 63 1598 | 71 | 1814 | 93 2362 | 82 | 2077 59 | 1489 | ||||
| 350 88 | 90 299 | 7535 | 187 475 | 2 74 1877 | 82 | 2093 | 108 2741 | 97 | 2456 74 | 1868 | ||||

Note:
For more visualized instructions, please go to BenQ calculator website http://projectorcalculator.beng.com/.
- Precise installation is preferred to be done by professionals. Contact your dealer for more information.
- When UST lens is installed to the projector, it is recommended to loosen the screw on the support kit and make the arm movable before adjustment.
- The User Manual for UST Lens installation is available from local BenQ website.
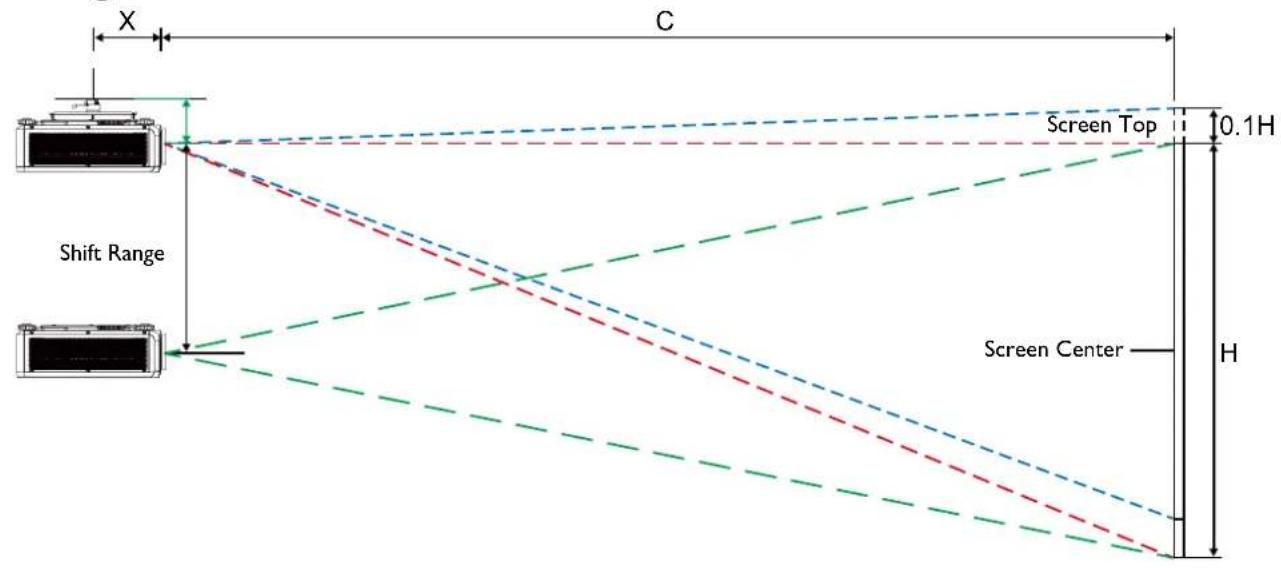
Lens shift
Lens shift adjustable range
The adjustable range for lens shift is tabulated below and subject to the conditions listed.
| Model Name | Lens Type BenQ Part Number Lens Shift | Range |
| LS1ST4 Ultra | Short Throw 5J.JCY37.001 | -3% ~ +7% Vertical; -5% ~ +5% Horizontal (Central position at 56.5%) |
| LS1ST3 Wide | fix 5J.JAM37.011 NA | |
| LS1ST2 Ultra | Wide 5J.JAM37.061 | 0 ~ +50% Vertical; -6.7% ~ +6.7% Horizontal |
| LS1ST1 Wide | Zoom 5J.JAM37.021 | 0 ~ +50% Vertical; -10% ~ +10% Horizontal |
| LS1SD Standard | 5J.JAM37.001 0 ~ +50% Vertical; -10% | ~ +10% Horizontal |
| LS1LT1 Semi | Long 5J.JAM37.051 | 0 ~ +50% Vertical; -10% ~ +10% Horizontal |
| LS1LT2 Long | Zoom1 5J.JAM37.03 | 1 0 ~ +50% Vertical; -10% ~ +10% Horizontal |
| LS1LT3 Long | Zoom2 5J.JAM37.04 | 1 0 ~ +50% Vertical; -10% ~ +10% Horizontal |

Note:
The drawings above apply to the standard lens only.
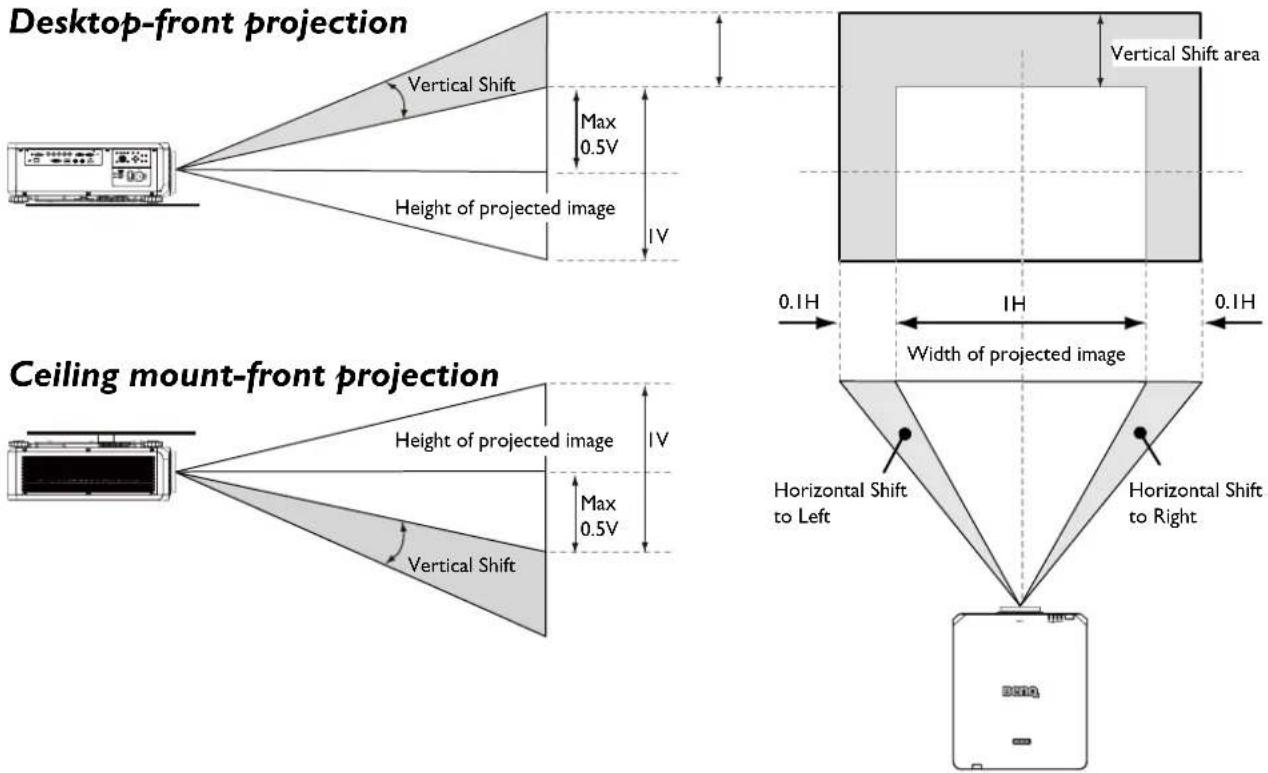
Installation positioning
Ceiling mount installation

Desktop installation

Note:
Lens Shift function is not available to LSIST3 (Fixed Lens). This lens should be used for "zero degree"/"no-offset" applications. See below:

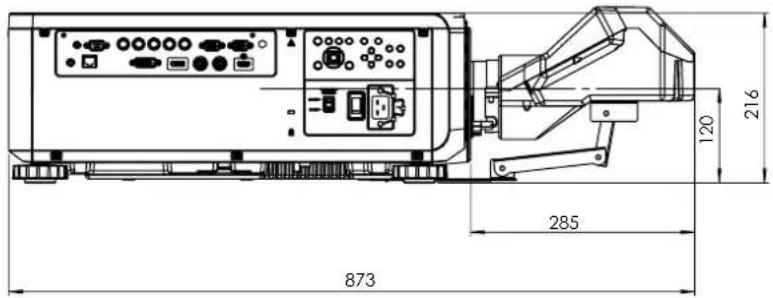
Dimensions
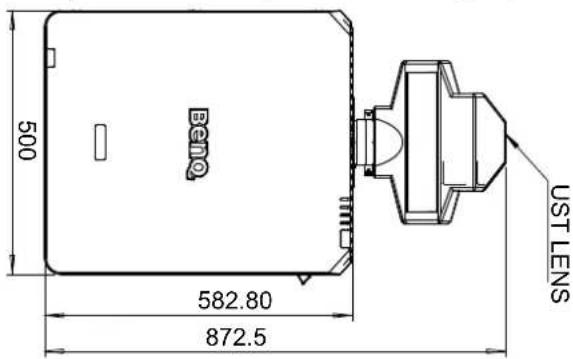
Cabinet dimensions
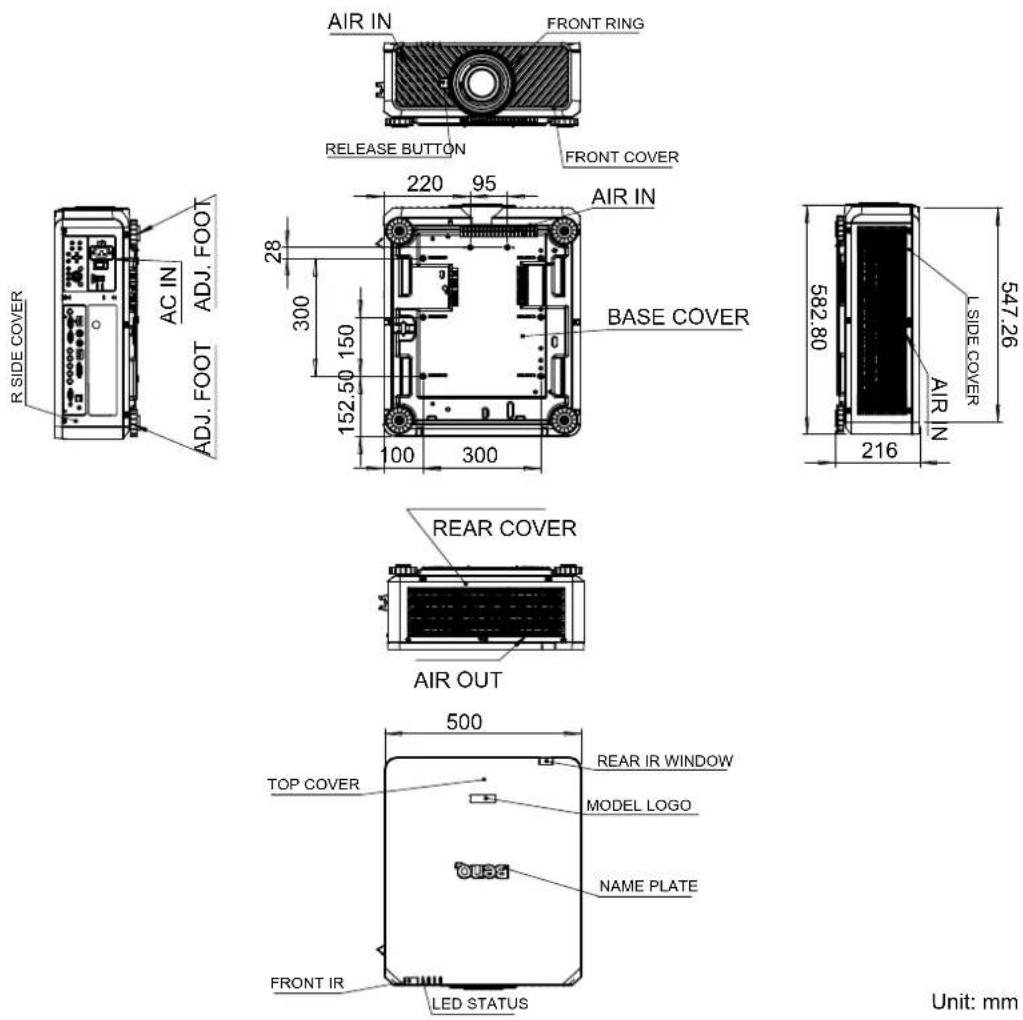
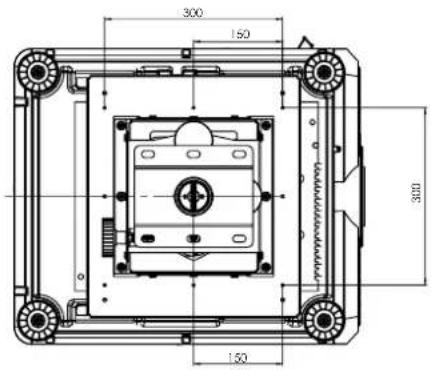
Ceiling mount hole dimensions

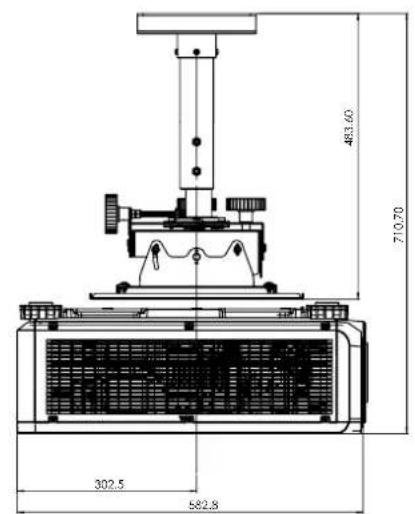
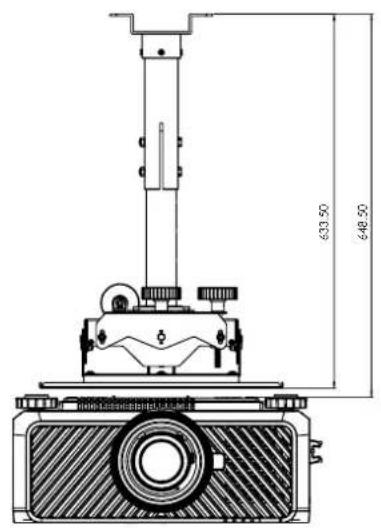
Ceiling mount dimensions (CMG6)

Optional lens dimensions
Optional Lens (UST: LSIST4) Optional Lens (WIDE FIX: LSIST3)
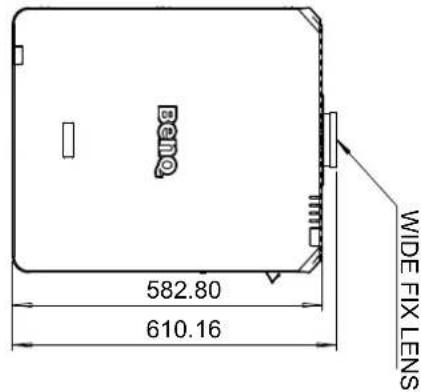
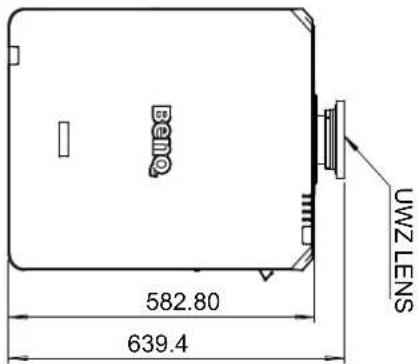
Optional Lens (UWZ: LSIST2)
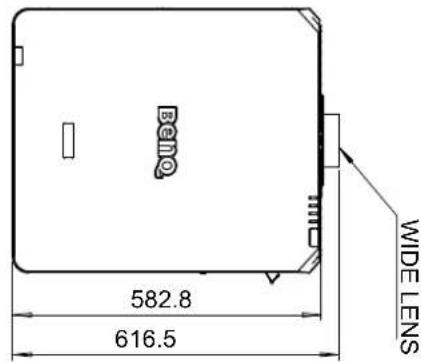
Optional Lens (WIDE: LSISTI)
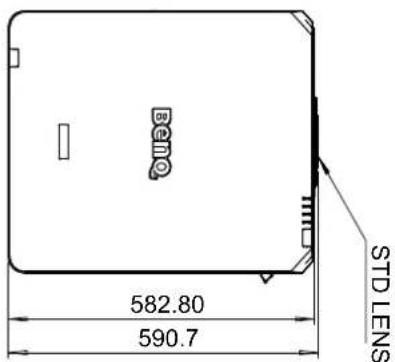
Optional Lens (STD: LSISD)

Optional Lens (SEMI:LSILT1)
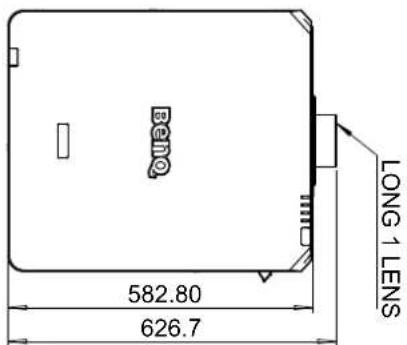
Optional Lens (LONG1:LSILT2)
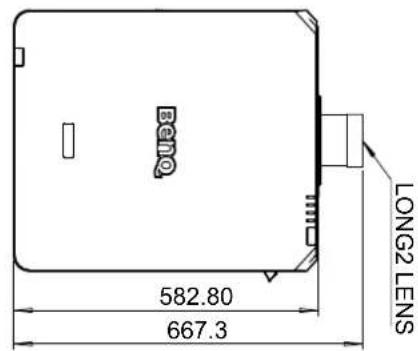
Optional Lens (LONG2:LSILT3)
LED indication
Indicator messages
Several indicator messages are used by the projector to alert users about problems with setup or system error. The LEDs on top cover of the projector illustrated below.
TEMP
LIGHT
SOURCE
STATUS
POWER
TEMPLED
| LED display Projector status | Operation tips | ||
| Off Normal status | |||
| Flashing Red Over | temperature error | Contact with your nearest authorized dealer or service center. | |
LIGHT SOURCE LED
| LED display Projector status | Operation tips | ||
| Off Light source is off | |||
| Flashing | Green Projector | is turning on | |
| Red (Cycles of 6) | Light source is end-of-life Please call the local service center. | ||
| On | Red Light source | problem Please call the local service center. | |
| Green Light source is on | |||
STATUS LED indicator
| LED display Projector status | Operation tips | ||
| Close Normal | |||
| Flashing | Red (once) Safety switch error | Please check whether the top cover is well assembled or lens is well installed or not. If the problem persists, call the local service center. | |
| Red (quadruple) | Fan error Call the local service center. | ||
| Lights up Red System error Call the local service center. | |||
POWER LED indicator
| LED display Projector status | Operation tips | ||
| Close AC power turned off Check | AC power source and power on the projector. | ||
| Flashing | Green | Ready to power on the projector | Wait until the projector starts projecting. |
| Orange | The projector is cooling down | ||
| Lights up | Red Standby mode | To power on the projector, press the ON key on the remote controller or the Power key on the control panel. | |
| Green Projector | powered on | ||
Table des matieres
Avis 19
RIOELEDIgikipkoHkoRaii3KJ.
LanZiIeHsiJxJyHnHbWvHnAraFepaNaaHofmEeHnHnHnHnHnHnHnHnHnHnHnHnHnHnHnHnHnHnHnHnHnHnHnHnHnHnHnHnHnHnHnHnHnHnHnHnHnHnHnHnHnHnHnHnHnHnHnHnHnHnH
RS232 pin assignment
RS232 Command Table
| Function Type | Description ASCII | ||
| Power | Write Power On <CR>*pow=on#<CR> | ||
| Write Power off <CR>*pow=off#<CR> | |||
| Read Power Status <CR>*pow=?#<CR> | |||
| Source Selection | Write COMPUTER YPbPr <CR>*sour=RGB#<CR> | ||
| Write COMPUTER 2/YPbPr2 <CR>*sour=RGB2#<CR> | |||
| Write DVI-D <CR>*sour=dvid#<CR> | |||
| Write HDMI <CR>*sour=hdmi#<CR> | |||
| Write DisplayPort <CR>*sour=dp#<CR> | |||
| Write 3G-SDI <CR>*sour=sdi#<CR> | |||
| Write HDBaseT <CR>*sour=hdbaset#<CR> | |||
| Read Current source <CR>*sour=?#<CR> | |||
| Picture Mode | Write Presentation <CR>*appmod=preset#<CR> | ||
| Write Bright <CR>*appmod=bright#<CR> | |||
| Write Cinema <CR>*appmod=cine#<CR> | |||
| Write DICOM SIM <CR>*appmod=dicom#<CR> | |||
| Write Vivid <CR>*appmod=vivid#<CR> | |||
| Read Picture Mode <CR>*appmod=?#<CR> | |||
| Picture Settings | Write Contrast + <CR>*con=+#<CR> | ||
| Write Contrast - <CR>*con=-##<CR> | |||
| Read Contrast value <CR>*con=?#<CR> | |||
| Write Brightness + <CR>*bri=+#<CR> | |||
| Write Brightness - <CR>*bri=-##<CR> | |||
| Read Brightness value <CR>*bri?#<CR> | |||
| Write Color + <CR>*color=+#<CR> | |||
| Write Color - <CR>*color=-##<CR> | |||
| Read Color value <CR>*color=+#<CR> | |||
| Write Hue + <CR>*hue=+#<CR> | |||
| Write Hue - <CR>*hue=-##<CR> | |||
| Read Hue value <CR>*hue=+#<CR> | |||
| Write Sharpness + <CR>*sharp=+#<CR> | |||
| Write Sharpness - <CR>*sharp=-##<CR> | |||
| Read Sharpness value <CR>*sharp=/#<CR> | |||
| Write Gamma 1.0 <CR>*gm=10#<CR> | |||
| Write Gamma 1.8 <CR>*gm=18#<CR> | |||
| Write Gamma 2.0 <CR>*gm=20#<CR> | |||
| Write Gamma 2.2 <CR>*gm=22#<CR> | |||
| Write Gamma 2.35 <CR>*gm=235#<CR> | |||
| Write Gamma 2.5 <CR>*gm=25#<CR> | |||
| Write Gamma BenQ <CR>*gm=benq#<CR> | |||
| Read Gamma Status <CR>*gm=?#<CR> | |||
| Write Noise Reduction + <CR>*nr=+#<CR> | |||
| Write Noise Reduction - <CR>*nr=-##<CR> | |||
| Read Noise Reduction value <CR>*nr=?#<CR> | |||
| Write Overscan Of <CR>*ov=off#<CR> | |||
| Write Overscan Crop <CR>*ov=crop#<CR> | |||
| Write Overscan Zoom <CR>*ov=zoom#<CR> | |||
| Read Overscan Status <CR>*ov=?#<CR> | |||
| Write Reset picture settings <CR>*picture=reset#<CR> | |||
| Write Digital Zoom In <CR>*zoom #<CR> | |||
| Write Digital Zoom out <CR>*zoom D#<CR> | |||
| Write Digital Pan right <CR>*zoom P=+##<CR> | |||
| Write Digital Pan left <CR>*zoom P=-##<CR> | |||
| Write Digital Pan value <CR>*zoomP=?# | |||
| Write Digital Scan up <CR>*zoomS=+#<CR> | |||
| Write Digital Scan down <CR>*zoomS=-#<CR> | |||
| Write Digital Scan value <CR>*zoomS=?# | |||
| Write Digital Zoom Reset <CR>*zoomD=reset# | |||
| Write Auto PC (Resync current source) <CR>*auto# | |||
| Write Color Temperature-Warmer <CR>*ct=warmer# | |||
| Write Color Temperature-Warm <CR>*ct=warm# | |||
| Write Color Temperature-Normal <CR>*ct=normal# | |||
| Write Color Temperature-Cool <CR>*ct=cool# | |||
| Write Color Temperature-lamp native <CR>*ct=native# | |||
| Read Color Temperature Status <CR>*ct=?# | |||
| Picture Settings : Color Adjustment | Write Color Red Offset + <CR>*roffset=+#<CR> | ||
| Write Color Red Offset - <CR>*roffset=.-#<CR> | |||
| Read Color Red Offset value <CR>*roffset=##<CR> | |||
| Write Color Green Offset + <CR>*goffse=+##<CR> | |||
| Write Color Green Offset - <CR>*goffse=##<CR> | |||
| Read Color Green Offset value <CR>*goffse=##<CR> | |||
| Write Color Blue Offset + <CR>*boffset=+##<CR> | |||
| Write Color Blue Offset - <CR>*boffset=.-#<CR> | |||
| Read Color Blue Offset value <CR>*boffset=##<CR> | |||
| Write Color Red Gain + <CR>*rgain=+##<CR> | |||
| Write Color Red Gain - <CR>*rgain=##<CR> | |||
| Read Color Red Gain value <CR>*rgain=##<CR> | |||
| Write Color Green Gain + <CR>*ggain=+##<CR> | |||
| Write Color Green Gain - <CR>*ggain=##<CR> | |||
| Read Color Green Gain value <CR>*ggain=##<CR> | |||
| Write Color Blue Gain + <CR>*bgain=+##<CR> | |||
| Write Color Blue Gain - <CR>*bgain=-##<CR> | |||
| Read Color Blue Gain value <CR>*bgain=##<CR> | |||
| Picture Settings : Hue | Write Hue Red + <CR>*huer=+##<CR> | ||
| Write Hue Red - <CR>*huer=##<CR> | |||
| Read Hue Red value <CR>*huer=##<CR> | |||
| Write Hue Green + <CR>*hueg=+##<CR> | |||
| Write Hue Green - <CR>*hueg=##<CR> | |||
| Read Hue Green value <CR>*hueg=##<CR> | |||
| Write Hue Blue + <CR>*hueb=+##<CR> | |||
| Write Hue Blue - <CR>*hueb=##<CR> | |||
| Read Hue Blue value <CR>*hueb=##<CR> | |||
| Write Hue Cyan + <CR>*huec=+##<CR> | |||
| Write Hue Cyan - <CR>*huec=##<CR> | |||
| Function Type | Description ASCI | ||
| Read Hue Cyan value | <CR>*huec=?# | ||
| Write Hue Magenta + <CR>*huem=+# | |||
| Write Hue Magenta - <CR>*huem=-# | |||
| Read Hue Magenta value <CR>*huem=? | |||
| Write Hue Yellow - <CR>*huey=+# | |||
| Write Hue Yellow - <CR>*huey=-# | |||
| Read Hue Yellow value <CR>*huey?# | |||
| Picture Settings : Saturation | Write Saturation Red + <CR>*satr=+# | ||
| Write Saturation Red - <CR>*satr=-# | |||
| Read Saturation Red value <CR>*satr=?# | |||
| Write Saturation Green + <CR>*satg=+# | |||
| Write Saturation Green - <CR>*satg=-# | |||
| Read Saturation Green value <CR>*satg=? | |||
| Write Saturation Blue + <CR>*satb=+# | |||
| Write Saturation Blue - <CR>*satb=-# | |||
| Read Saturation Blue value <CR>*satb=? | |||
| Write Saturation Cyan + <CR>*satc=+# | |||
| Write Saturation Cyan - <CR>*satc=-# | |||
| Read Saturation Cyan value <CR>*satc=? | |||
| Write Saturation Magenta + <CR>*satm=+# | |||
| Write Saturation Magenta - <CR>*satm=-# | |||
| Read Saturation Magenta value <CR>*satm=? | |||
| Write Saturation Yellow + <CR>*saty=+# | |||
| Write Saturation Yellow - <CR>*saty=-# | |||
| Read Saturation Yellow value <CR>*saty=? | |||
| Picture Settings : Gain | Write Gain Red + <CR>*gainr=+# | ||
| Write Gain Red - <CR>*gainr=-# | |||
| Read Gain Red value <CR>*gainr=+# | |||
| Write Gain Green - <CR>*gaing=+# | |||
| Write Gain Green - <CR>*gaing=-# | |||
| Read Gain Green value <CR>*gaing=?# | |||
| Write Gain Blue + <CR>*gainb=+# | |||
| Write Gain Blue - <CR>*gainb=-# | |||
| Read Gain Blue value <CR>*gainb=+# | |||
| Write Gain Cyan + <CR>*gainc=+# | |||
| Write Gain Cyan - <CR>*gainc=-# | |||
| Read Gain Cyan value <CR>*gainc=+# | |||
| Write Gain Magenta + <CR>*gainm=+# | |||
| Write Gain Magenta - <CR>*gainm=-# | |||
| Read Gain Magenta value <CR>*gainm=+# | |||
| Write Gain Yellow + <CR>*gainy=+# | |||
| Write Gain Yellow - <CR>*gainy=-#<CR> | |||
| Read Gain Yellow vallue <CR>*gainy=?#<CR> | |||
| Picture Settings : White Balance | Write White balancé Red + <CR>*wbr=+#<CR> | ||
| Write White balancé Red - <CR>*wbr=-#<CR> | |||
| Read White balancé Red value <CR>*wbr=?#<CR> | |||
| Write White balancé Green + <CR>*wbg=+#<CR> | |||
| Write White balancé Green - <CR>*wbg=-#<CR> | |||
| Read White balancé Green value <CR>*wbg?#<CR> | |||
| Write White balancé Blue + <CR>*wbb=+#<CR> | |||
| Write White balancé Blue - <CR>*wbb=-#<CR> | |||
| Read White balancé Blue value <CR>*wbb=?#<CR> | |||
| Display | Write Aspect 4:3 <CR>*asp=4:3#<CR> | ||
| Write Aspect 16:9 <CR>*asp=1 6:9#<CR> | |||
| Write Aspect 16:10 <CR>*asp=1 6:10#<CR> | |||
| Write Aspect Source <CR>*asp=AUTO#<CR> | |||
| Write Aspect Unscaled <CR>*asp=REAL#<CR> | |||
| Write Aspect Theaterscope <CR>*asp=THEA#<CR> | |||
| Write Aspect 5:4 <CR>*asp=5:4#<CR> | |||
| Write Aspect 1.88 <CR>*asp=1 88#<CR> | |||
| Write Aspect 2.35 <CR>*asp=2 35#<CR> | |||
| Read Aspect Status <CR>*asp=?#<CR> | |||
| Write V Position + <CR>*vpos=+#<CR> | |||
| Write V Position - <CR>*vpos=-#<CR> | |||
| Read Current V Position <CR>*vpos=?#<CR> | |||
| Write H Position + <CR>*hpos=+#<CR> | |||
| Write H Position - <CR>*hpos=-#<CR> | |||
| Read Current H Position <CR>*hpos=?#<CR> | |||
| Write Phase + <CR>*phase=+#<CR> | |||
| Write Phase - <CR>*phase=-#<CR> | |||
| Read Current Phase <CR>*phase=##<CR> | |||
| Write Tracking + <CR>*tracking=+#<CR> | |||
| Write Tracking - <CR>*tracking=-#<CR> | |||
| Read Current Tracking <CR>*tracking=?"#<CR> | |||
| Write Sync level + <CR>*synclev=+#<CR> | |||
| Write Sync level - <CR>*synclev=-#<CR> | |||
| Read Current Sync level <CR>*synclev=?"#<CR> | |||
| Write Color space Auto <CR>*cs=auo#<CR> | |||
| Write Color space YPbPr <CR>*cs=yp#<CR> | |||
| Write Color space YCbCr <CR>*cs=yc#<CR> | |||
| Write Color space RGB-PC <CR>*cs=rgb#p#<CR> | |||
| Write Color space RGB-Video <CR>*cs=rgb#v#<CR> | |||
| Read Current color | space <CR>*cs=?# | ||
| Write Reset display | *display=reset# | ||
| Display : 3D &PIP | Write 3D Sync Off | *3d=off# | |
| Write 3D Auto | *3d=auto# | ||
| Write 3D Sync Side | by Side <CR>*3d=sbs# | ||
| Write 3D Sync Top | Bottom <CR>*3d=tb# | ||
| Write 3D Sync Frame | Sequential <CR>*3d=fs# | ||
| Write 3D inverter disable <CR>*3d=da# | |||
| Write 3D inverter | *3d=iv# | ||
| Read 3D Sync Status | *3d?# | ||
| Read 3D DLP Link On <CR>*dlplink=on# | |||
| Read 3D DLP Link Off <CR>*dlplink=off# | |||
| Read 3D DLP Link Status <CR>*dlplink?# | |||
| Read 3D Sync reference <CR>*3dsync?# | |||
| Write PIP mode Or | *pip=on# | ||
| Write PIP mode Of | *pip=off# | ||
| Write PIP HDMI | *psour=hdmi# | ||
| Write PIP DVI-D | *psour=dvid# | ||
| Write PIP COMPUTER | *psour=RGB# | ||
| Write PIP COMPUTER | *psour=RGB2# | ||
| Write PIP DisplayPort | *psour=dp# | ||
| Write PIP 3G-SDI | *psour=sdii# | ||
| Write PIP HDBaseT | *psour=hdbaset# | ||
| Read Current PIP source | *psour?# | ||
| Write PIP position | Top Left <CR>*pippos=tl# | ||
| Write PIP position | Top Right <CR>*pippos=tr# | ||
| Write PIP position | Bottom Left <CR>*pippos=bl# | ||
| Write PIP position | Bottom Right <CR>*pippos=br# | ||
| Write PIP position | PBP <CR>*pippos=pbp# | ||
| Read Current PIP position | *pippos?# | ||
| Setup | Write Set language | *lang=EN# | |
| Write Set language | *lang=FR# | ||
| Write Set language | *lang=P# | ||
| Write Set language | *lang=GE# | ||
| Write Set language | *lang=PO# | ||
| Write Set language | *lang=C# | ||
| Write Set language | *lang=A# | ||
| Write Set language | *lang=KO# | ||
| Write Set language | *lang=$W# | ||
| Write Set language | to Russian*lang=RU#<CR> | ||
| Write Set language | to Italian*lang=IT#<CR> | ||
| Read Language status | *lang=?#<CR> | ||
| Write Projection Position-Front Table | *pp=FT#<CR> | ||
| Write Projection Position-Rear Table | *pp=RE#<CR> | ||
| Write Projection Position-Rear Ceiling | *pp=RC#<CR> | ||
| Write Projection Position-Front Ceiling | *pp=FC#<CR> | ||
| Write Projection Position-Freetilt | *pp=TF#<CR> | ||
| Read Projection Position Status | *pp=?#<CR> | ||
| Write Quick auto search on | *QAS=on#<CR> | ||
| Write Quick auto search off | *QAS=off#<CR> | ||
| Read Quick auto search status | *QAS=?#<CR> | ||
| Write Set test pattern Off | *tp=off#<CR> | ||
| Write Set test pattern White | *tp=white#<CR> | ||
| Write Set test pattern Black | *tp=black#<CR> | ||
| Write Set test pattern Red | *tp=red#<CR> | ||
| Write Set test pattern Green | *tp=green#<CR> | ||
| Write Set test pattern Blue | *tp=blue#<CR> | ||
| Write Set test pattern Checkerboard | *tp=checker#<CR> | ||
| Write Set test pattern CrossHatch | *tp=crosshatch#<CR> | ||
| Write Set test pattern V Burst | *tp=vburst#<CR> | ||
| Write Set test pattern H Burst | *tp=hburst#<CR> | ||
| Write Set test pattern ColorBar | *tp=colorbar#<CR> | ||
| Read Get test pattern status | *tp=?#<CR> | ||
| Write Reset Setup | *setup=reset#<CR> | ||
| Light Settings (laser) | Write Laser power | Normal mode | *lampn=Inor#<CR> |
| Write Laser power | Eco mode | *lampn=eco#<CR> | |
| Write Laser power | Custom mode | *lampn=cust#<CR> | |
| Read Get laser power mode | *lampn?#<CR> | ||
| Write Custom power level + | *lamppl=+#<CR> | ||
| Write Custom power level - | *lamppl=-#<CR> | ||
| Write Custom power level | *lampc pl=0 value#<CR> | ||
| Read Custom power level ? | *lampc pl=?#<CR> | ||
| Write High Altitude mode on | *Hightitude=on#<CR> | ||
| Write High Altitude mode off | *Hightitude=off#<CR> | ||
| Write High Altitude mode auto | *Highaltitude=auto#<CR> | ||
| Read High Altitude mode status | *High altitude?#<CR> | ||
| Function Type | Description ASCII | ||
| Warping | Write Set Active Warp to Keystone*warp=key*one# | ||
| Write Set Active Warp to 4 Corners*warp=4corners# | |||
| Write Set Active Warp to Rotation*warp=rotationon# | |||
| Write Set Active Warp to Pin/Barrel*warp=pinbarrel# | |||
| Read Active Warp Status*warp=?# | |||
| Write Warp Reset*warp=reset# | |||
| Write Keystone-Horizontal Decrease*hkeyst=-# | |||
| Write Keystone-Horizontal Increase*hkeyst=+# | |||
| Read Keystone-Horizontal Status*hkeyst=?# | |||
| Write Keystone-Vertical Decrease*vkeyst=-# | |||
| Write Keystone-Vertical Increase*vkeyst=+# | |||
| Read Keystone-Vertical Status*vkeyst=?# | |||
| Write Rotation Decrease*rot=-# | |||
| Write Rotation Increase*rot=+# | |||
| Read Rotation Status*rot=?# | |||
| Write Horizontal Pin/Barrel Decrease*hpina=-# | |||
| Write Horizontal Pin/Barrel Increase*hpina=+# | |||
| Read Horizontal Pin/Barrel Status*hpina=## | |||
| Write Vertical Pin/Barrel Decrease*vpina=-# | |||
| Write Vertical Pin/Barrel Increase*vpina=+# | |||
| Read Vertical Pin/Barrel Status*vpina=## | |||
| Write 4 Corners Top-Left-X Decrease*4ctlx=-# | |||
| Write 4 Corners Top-Left-X Increase*4ctlx=+# | |||
| Read 4 Corners Top-Left-X Status*4ctlx=?# | |||
| Write 4 Corners Top-Left-Y Decrease*4ctly=-# | |||
| Write 4 Corners Top-Left-Y Increase*4ctly=+# | |||
| Read 4 Corners Top-Left-Y Status*4ctly=?# | |||
| Write 4 Corners Top-Right-X Decrease*4ctrx=-# | |||
| Write 4 Corners Top-Right-X Increase*4ctrx=+# | |||
| Read 4 Corners Top-Right-X Status*4ctrx=## | |||
| Write 4 Corners Top-Right-Y Decrease*4ctry=-# | |||
| Write 4 Corners Top-Right-Y Increase*4ctry=+# | |||
| Read 4 Corners Top-Right-Y Status*4ctry=?# | |||
| Write 4 Corners Bottom-Left-X Decrease | |||
| Write 4 Corners Bottom-Left-X Increase*4cblx=+# | |||
| Read 4 Corners Bottom-Left-X Status*4cblx=## | |||
| Write 4 Corners Bottom-Left-Y Decrease | |||
| Write 4 Corners Bottom-Left-Y Increase*4cbly=+# | |||
| Read 4 Corners Bottom-Left-Y Status*4cbly=## | |||
| Function Type | Description ASCI | ||
| Write 4 Corners Bottom-Right-X Decrease | |||
| Write 4 Corners Bottom-Right-X Increase | |||
| Read 4 Corners Bottom-Right-X Status <CR>*4cbrx?# | |||
| Write 4 Corners Bottom-Right-Y Decrease | |||
| Write 4 Corners Bottom-Right-Y Increase | |||
| Read 4 Corners Bottom-Right-Y Status <CR>*4cbry?# | |||
| Write Surface Fit Left Decrease <CR>*surfitl=-# | |||
| Write Surface Fit Left Increase <CR>*surfitl=+# | |||
| Read Surface Fit Left Status <CR>*surfitl?# | |||
| Write Surface Fit Right Decrease <CR>*surfitr=-# | |||
| Write Surface Fit Right Increase <CR>*surfitr=+# | |||
| Read Surface Fit Right Status <CR>*surfitr?# | |||
| Write Surface Fit Top Decrease <CR>*surfitt=-# | |||
| Write Surface Fit Top Increase <CR>*surfitt=+# | |||
| Read Surface Fit Top Status <CR>*surfitt?# | |||
| Write Surface Fit Bottom Decrease <CR>*surfitb=-# | |||
| Write Surface Fit Bottom Increase <CR>*surfitb=+# | |||
| Read Surface Fit Bottom Status <CR>*surfitb?# | |||
| Blanking | Write Blanking Reset <CR>*bnk=reset# | ||
| Write Blanking Top Decrease <CR>*bnkt=## | |||
| Write Blanking Top Increase <CR>*bnkt=+# | |||
| Read Blanking Top Status <CR>*bnkt=?# | |||
| Write Blanking Bottom Decrease <CR>*bnkb=-# | |||
| Write Blanking Bottom Increase <CR>*bnkb=+# | |||
| Read Blanking Bottom Status <CR>*bnkb=?# | |||
| Write Blanking Left Decrease <CR>*bnkl=## | |||
| Write Blanking Left Increase <CR>*bnkl=+# | |||
| Read Blanking Left Status <CR>*bnkl?# | |||
| Write Blanking Right Decrease <CR>*bnkr=-# | |||
| Write Blanking Right Increase <CR>*bnkr=+# | |||
| Read Blanking Right Status <CR>*bnkr?# | |||
| Function Type | Description ASCI | ||
| Edge Blending | Write Edge Blending On <CR>*eb=on#<CR> | ||
| Write Edge Blending Off <CR>*eb=off#<CR> | |||
| Read Edge Blending Status <CR>*eb=?#<CR> | |||
| Write Edge Blending Reset <CR>*eb=reset#<CR> | |||
| Write Edge Blending adjust lines On <CR>*ebadl=on#<CR> | |||
| Write Edge Blending adjust lines Off <CR>*ebadl=off#<CR> | |||
| Read Edge Blending adjust lines Status <CR>*ebadl?#<CR> | |||
| Write Edge Blending White Level Top Decrease | <CR>*ebwt=-#<CR> | ||
| Write Edge Blending White Level Top Increase | <CR>*ebwt=+#<CR> | ||
| Read Edge Blending White Level Top Status | <CR>*ebwt?#<CR> | ||
| Write Edge Blending White Level Bottom Decrease | <CR>*ebwb=-#<CR> | ||
| Write Edge Blending White Level Bottom Increase | <CR>*ebwb=+#<CR> | ||
| Read Edge Blending White Level Bottom Status | <CR>*ebwb?#<CR> | ||
| Write Edge Blending White Level Left Decrease | <CR>*ebwl=-#<CR> | ||
| Write Edge Blending White Level Left Increase | <CR>*ebwl=+#<CR> | ||
| Read Edge Blending White Level Left Status | <CR>*ebwl?#<CR> | ||
| Write Edge Blending White Level Right Decrease | <CR>*ebwr=-#<CR> | ||
| Write Edge Blending White Level Right Increase | <CR>*ebwr=+#<CR> | ||
| Read Edge Blending White Level Right Status | <CR>*ebwr?#<CR> | ||
| Write Edge Blending Black Level Top Decrease | <CR>*ebbt=-#<CR> | ||
| Write Edge Blending Black Level Top Increase | <CR>*ebbt=+#<CR> | ||
| Read Edge Blending Black Level Top Status | <CR>*ebbt?#<CR> | ||
| Write Edge Blending Black Level Bottom Decrease | <CR>*ebbb=-#<CR> | ||
| Write Edge Blending Black Level Bottom Increase | <CR>*ebbb=+#<CR> | ||
| Read Edge Blending Black Level Bottom Status | <CR>*ebbb?#<CR> | ||
| Write Edge Blending Black Level Left Decrease | <CR>*ebbl=-#<CR> | ||
| Write Edge Blending Black Level Left Increase | <CR>*ebbl=+#<CR> | ||
| Read Edge Blending Black Level Left Status | <CR>*ebbl?#<CR> | ||
| Write Edge Blending Black Level Right Decrease | <CR>*ebbr=-#<CR> | ||
| Write Edge Blending Black Level Right Increase | <CR>*ebbr=+#<CR> | ||
| Read Edge Blending | Black Level Right Status | ||
| Write Edge Blending | Black Level All color Decrease | ||
| Write Edge Blending | Black Level All color Increase | ||
| Read Edge Blending | Black Level All color Status | ||
| Write Edge Blending | Black Level Red Decrease | ||
| Write Edge Blending | Black Level Red Increase | ||
| Read Edge Blending | Black Level Red Status | ||
| Write Edge Blending | Black Level Green Decrease | ||
| Write Edge Blending | Black Level Green Increase | ||
| Read Edge Blending | Black Level Green Status | ||
| Write Edge Blending | Black Level Blue Decrease | ||
| Write Edge Blending | Black Level Blue Increase | ||
| Read Edge Blending | Black Level Blue Status | ||
| System | Write Standby Settings-Network on | =on#<CR> | |
| Write Standby Settings-Network off | =off#<CR> | ||
| Read Standby Settings-Network Status | =?#<CR> | ||
| Write Auto Power Off-on | ?#<CR> | ||
| Write Auto Power Off-off | ?#<CR> | ||
| Read Auto Power Off-Status | ?#<CR> | ||
| Write Direct Power On-on | ?#<CR> | ||
| Write Direct Power On-off | ?#<CR> | ||
| Read Direct Power On-Status | ?#<CR> | ||
| Write Set background to Logo | ?#<CR> | ||
| Write Set background to Black | ?#<CR> | ||
| Write Set background to Blue | ?#<CR> | ||
| Write Set background to White | ?#<CR> | ||
| Read Get background status | ?#<CR> | ||
| Write Startup logo off | ?#<CR>*start1go=off#<CR> | ||
| Write Startup logo on | ?#<CR>*start1go=on#<CR> | ||
| Write Get startup logo status | ?#<CR>*start1go=wuxga#<CR> | ||
| Write Select EDID WUXGA | ?#<CR>*edid=wuxga#<CR> | ||
| Write Select EDID 1080P | ?#<CR> | ||
| Read Get EDID selection | ?#<CR>*edid=?#<CR> | ||
| Write Trigger on | ?#<CR>*trigge=on#<CR> | ||
| Write Trigger off | ?#<CR>*trigge=off#<CR> | ||
| Function Type | Description ASCII | ||
| Read Trigger status | |||
| Write Dynamic black k on | |||
| Write Dynamic black off | |||
| Read Dynamic black status | |||
| Write Factory reset | |||
| Write System reset | |||
| Information | Read Get Model Name | ||
| Read Get Serial Number | |||
| Read Get F/W Version | |||
| Read Get BQ F/W Version | |||
| Read Get Active source | |||
| Read Get Pixel clock | |||
| Read Get Signal format | |||
| Read Get H refresh rate | |||
| Read Get V refresh rate | |||
| Read Laser Hour | |||
| Miscellaneous | Write Blank On | ||
| Write Blank Off | |||
| Read Blank Status | |||
| Write Freeze On | |||
| Write Freeze Off | |||
| Read Freeze Status | |||
| Write Menu On | |||
| Write Menu Off | |||
| Read Menu Status | |||
| Write Up | |||
| Write Down | |||
| Write Right | |||
| Write Left | |||
| Write Enter | |||
| Write Remote Set | |||
| Read Remote Set Status | |||
| Miscellaneous | Read Error Code | ||
| Write Serial Number code1 | |||
| Read Serial Number Query | |||
| Write Lens Shift Up | |||
| Write Lens Shift Down | |||
| Write Lens Shift Left | |||
| Write Lens Shift Right | |||
| Write Lens Focus Plus | |||
| Write Lens Focus Minus | |||
| Miscellaneous | Write Lens Zoom Plus <CR>*zoom=+#<CR> | ||
| Write Lens Zoom Minus <CR>*zoom=-#<CR> | |||
| Write Lens load memory 1 <CR>*lensload=m1#<CR> | |||
| Write Lens load memory 2 <CR>*lensload=m2#<CR> | |||
| Write Lens load memory 3 <CR>*lensload=m3#<CR> | |||
| Write Lens load memory 4 <CR>*lensload=m4#<CR> | |||
| Write Lens load memory 5 <CR>*lensload=m5#<CR> | |||
| Write Lens load memory 6 <CR>*lensload=m6#<CR> | |||
| Write Lens load memory 7 <CR>*lensload=m7#<CR> | |||
| Write Lens load memory 8 <CR>*lensload=m8#<CR> | |||
| Write Lens load memory 9 <CR>*lensload=m9#<CR> | |||
| Write Lens load memory 10 <CR>*lensload=m10#<CR> | |||
| Read Read Lens memory status <CR>*lensload=?#<CR> | |||
| Write Lens save memory 1 <CR>*lenssave=m1#<CR> | |||
| Write Lens save memory 2 <CR>*lenssave=m2#<CR> | |||
| Write Lens save memory 3 <CR>*lenssave=m3#<CR> | |||
| Write Lens save memory 4 <CR>*lenssave=m4#<CR> | |||
| Write Lens save memory 5 <CR>*lenssave=m5#<CR> | |||
| Write Lens save memory 6 <CR>*lenssave=m6#<CR> | |||
| Write Lens save memory 7 <CR>*lenssave=m7#<CR> | |||
| Write Lens save memory 8 <CR>*lenssave=m8#<CR> | |||
| Write Lens save memory 9 <CR>*lenssave=m9#<CR> | |||
| Write Lens save memory 10 <CR>*lenssave=m10#<CR> | |||
| Write Reset Lens to center <CR>*lensreset=center#<CR> | |||
| Light Source Control | Read Lamp Hour <CR>*Itim=?#<CR> | ||
| Write Lamp hour reset <CR>*Itim=reset#<CR> | |||
| Read Total machine hour (power on time) Query | <CR>*tmhour=?#<CR> |

Note:
RS-232 Baud rate: 9600
- Product information 5
- Installation 8
- Dimensions 13
- LED indication 16
- Notice
- Ventilation illustration
- Exhaust vent requirements
- Voltage switcher
- Note:
- Caution during installation
- Product information
- Packing contents
- Projector specifications
- Terminals
- HDBaseT/LAN
- - 3D Sync Out
- - 3D Sync In
- DVI-D
- HDMI
- - DisplayPort
- 3G-SDI
- Computer I
- Computer 2 (V, H, B/Pb, G/Y, R/Pr)
- Monitor Out
- RS-232
- - TRIGGER
- Wired Remote
- Remote control
- Remote control ID setting
- Installation
- Projection table
- Ultra Short Reflection
- Lens shift
- Lens shift adjustable range
- Installation positioning
- Dimensions
- Cabinet dimensions
- Ceiling mount hole dimensions
- Ceiling mount dimensions (CMG6)
- Optional lens dimensions
- LED indication
- Indicator messages
- POWER LED indicator
- Table des matieres
- Avis 19
- RS232 pin assignment
- RS232 Command Table
Brand : BENQ
Model : LU9915
Category : Projector