
LK970 - Projector BENQ - Free user manual and instructions
Find the device manual for free LK970 BENQ in PDF.
| Product type | DLP projector |
| Brand | BenQ |
| Model | LK970 |
| Display technology | DMD 1-chip |
| Native resolution | UHD 4K (3840 x 2160) |
| Light source | Laser diode |
| Brightness | 5,000 lumens |
| Power consumption | 595 W (max) ; < 0.5 W (standby) |
| Power supply | 100 - 240 V AC, 50/60 Hz |
| Dimensions (W x H x D) | 470.7 mm x 224.9 mm x 564.7 mm |
| Weight | 19.20 kg |
| Screen size (diagonal) | 40 to 500 inches |
| Native aspect ratio | 16:9 |
| Connectivity | HDMI (x2), HDBaseT, VGA, RS232, LAN, USB-A, USB Mini-B, 12V Trigger, IR In, Monitor Out |
| Ceiling mount | Possible (M6 screws, professional installation required) |
| Laser class | Class 3R (North America) / Class 1 (other regions) |
| Maintenance | Clean the lens with a soft dry cloth |
| Repairability | Have it serviced by a qualified technician |
| Included accessories | Remote control, batteries, installation guide, power cord, cable ties, rubber cap |
Frequently Asked Questions - LK970 BENQ
User questions about LK970 BENQ
0 question about this device. Answer the ones you know or ask your own.
Ask a new question about this device
Download the instructions for your Projector in PDF format for free! Find your manual LK970 - BENQ and take your electronic device back in hand. On this page are published all the documents necessary for the use of your device. LK970 by BENQ.
USER MANUAL LK970 BENQ
Important safety instructions 4
Notice 6
Laser notice 6
Cooling notice 6
Product information.. 7
Shipping contents 7
Specifications 7
Terminals 7
Remote control 8
Installation 9
Projection dimensions 9
Adjusting the projector position 10
Using the cable tie set
Using the lens rubber cap
Projection dimensions 12
RS232 command 13
RS232 pin assignment 13
Please visit below website for latest version of User Manual / Installation Guide.
http://business-display.benq.com/
Important safety instructions
Your projector is designed and tested to meet the latest standards for safety of information technology equipment. However, to ensure safe use of this product, it is important that you follow the instructions mentioned in the user manual / installation guide and marked on the product.
- Please read the user manual / installation guide before you operate your projector. Save it for future reference.
- Do not look straight at the projector lens during operation. The intense light beam may damage your eyes.
- Refer servicing to qualified service personnel.
- Always open the lens shutter (if any) or remove the lens cap (if any) when the projector light source is on.
- The light source becomes extremely hot during operation.
- In some countries, the line voltage is NOT stable. This projector is designed to operate safely within a mains voltage between 100 to 240 volts AC, but could fail if power cuts or surges of ± 10 volts occur. In areas where the mains voltage may fluctuate or cut out, it is recommended that you connect your projector through a power stabilizer, surge protector or uninterruptible power supply (UPS).
- Do not block the projection lens with any objects when the projector is under operation as this could cause the objects to become heated and deformed or even cause a fire. To temporarily turn off the light source, use the blank function.
- Do not operate light sources beyond the rated light source life.
- Do not place this product on an unstable cart, stand, or table. The product may fall, sustaining serious damage.
- Do not attempt to disassemble this projector. There are dangerous high voltages inside which may cause death if you should come into contact with live parts.
Under no circumstances should you ever undo or remove any other covers. Refer servicing only to suitably qualified professional service personnel.
I I. Do not block the ventilation holes.
- Do not place this projector on a blanket, bedding or any other soft surface.
- Do not cover this projector with a cloth or any other item.
- Do not place inflammables near the projector.
If the ventilation holes are seriously obstructed, overheating inside the projector may result in a fire.
- Do not stand the projector on end vertically. Doing so may cause the projector to fall over, causing injury or resulting in damage to the projector.
- Do not step on the projector or place any objects upon it. Besides probable physical damage to the projector, doing so may result in accidents and possible injury.
- When the projector is under operation, you may sense some heated air and odor from its ventilation grill. It is a normal phenomenon and not a product defect.
- Do not place liquids near or on the projector. Liquids spilled into the projector may cause it to fail. If the projector does become wet, disconnect it from the power supply's power outlet and call BenQ to have the projector serviced.
- This apparatus must be earthed.
-
Do not place this projector in any of the following environments.
-
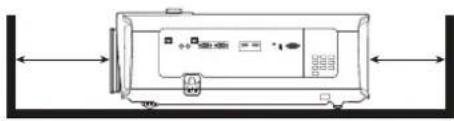
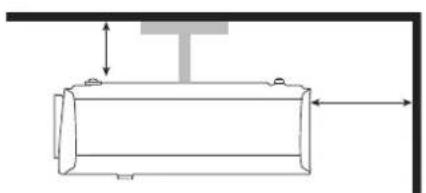
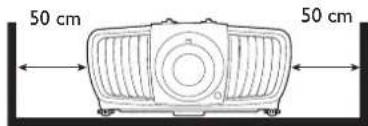
Space that is poorly ventilated or confined. Allow at least 50 cm clearance from walls and free flow of air around the projector.
- Locations where temperatures may become excessively high, such as the inside of a car with all windows rolled up.
- Locations where excessive humidity, dust, or cigarette smoke may contaminate optical components, shorten the projector's life span and darken the image.
- Locations near fire alarms
- Locations with an ambient temperature above 40^ / 104^
- Locations where the altitudes are higher than 3000m (10000 feet).
Risk Group 2
I. According to the classification of photobiological safety of light sources and light source systems, this product is Risk Group 2, IEC 62471-5:2015.
2. Possibly hazardous optical radiation emitted from this product.
3. Do not stare at operating light source. May be harmful to the eyes.
4. As with any bright source, do not stare into the direct beam.

The projector's light source unit uses a laser.
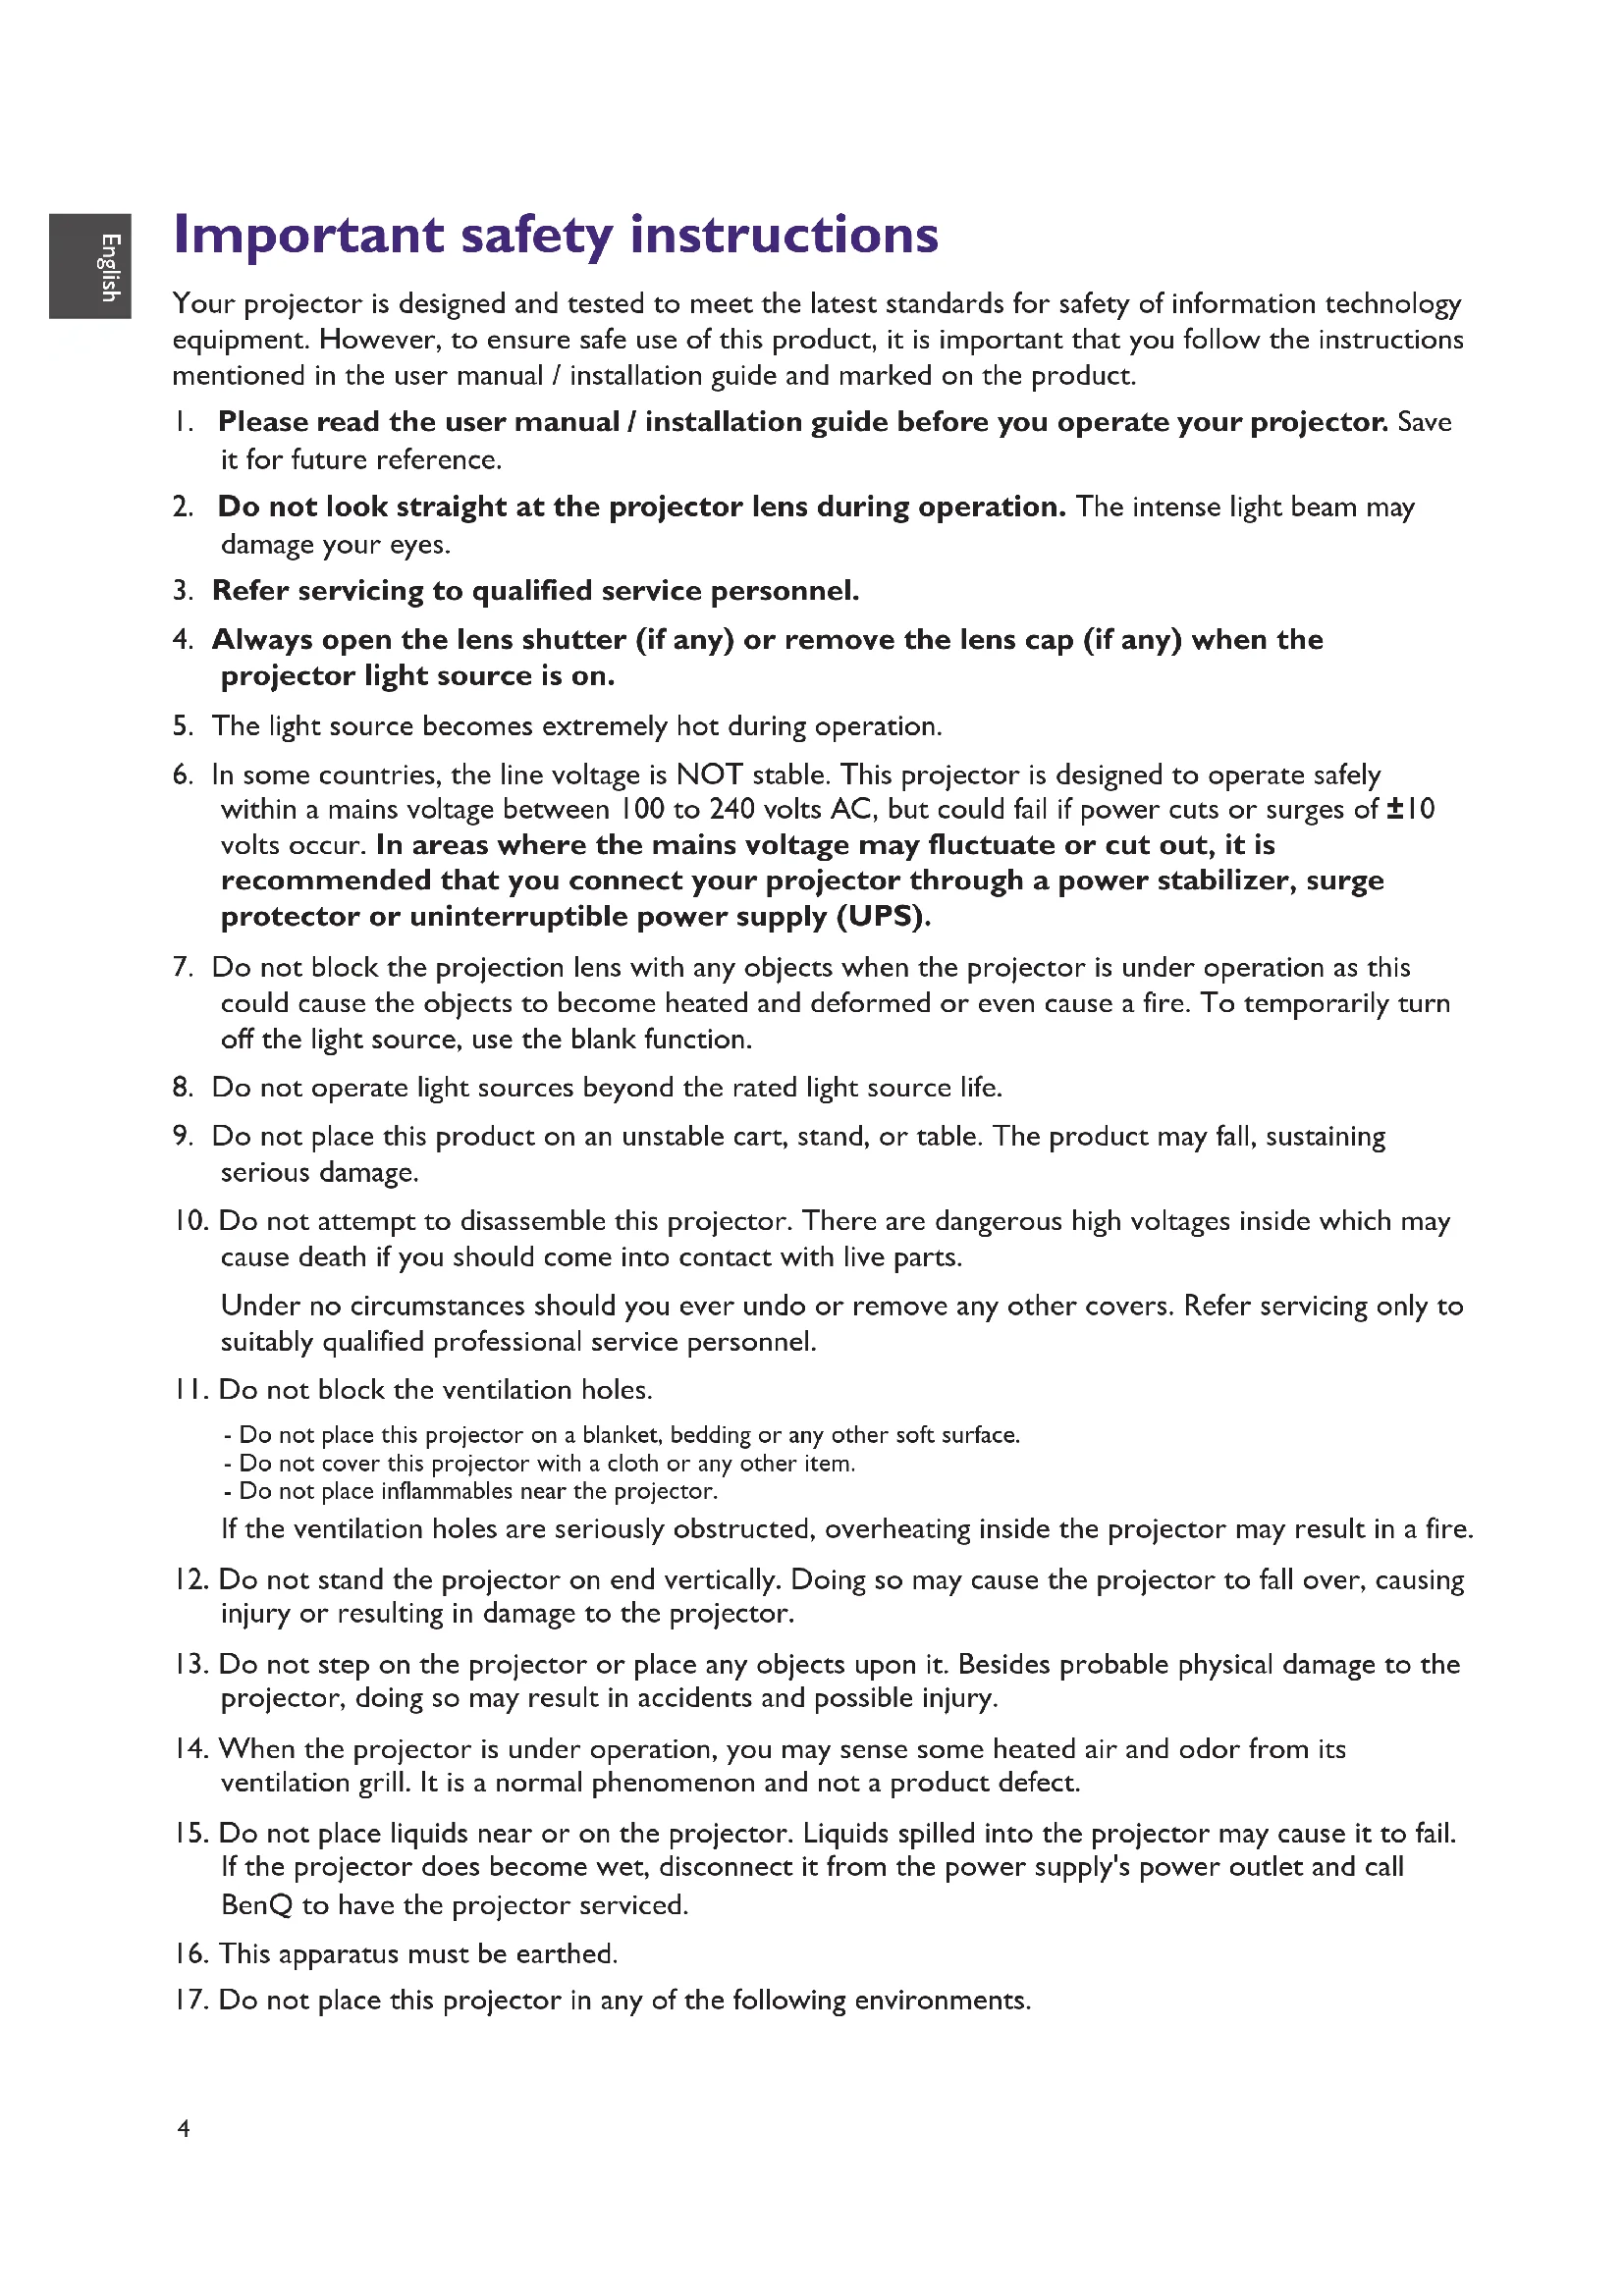
Laser Caution
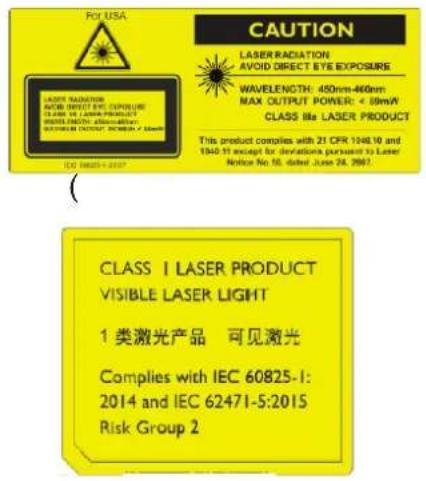
(For China and other regions) This product belongs to CLASS I laser product and complies with IEC 60825-1:2014.
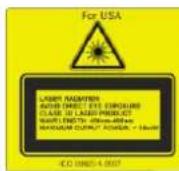
(For north America) This product belongs to CLASS 3R laser product and complies with IEC 60825-1:2007.
LASER RADIATION, DO NOT STARE INTO BEAM,CLASS 3R LASER PRODUCT.
Notice
Laser notice
This symbol indicates that there is a potential hazard of eye exposure to laser radiation unless the instructions are closely followed.
CLASS 3R LASER PRODUCT
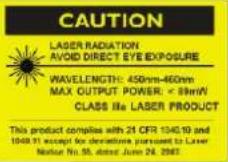
This Laser Product is designated as Class 3R during all procedures of operation. LASER LIGHT - AVOID DIRECT EYE EXPOSURE.
Do not point laser or allow laser light to be directed or reflected toward other people or reflective objects.
Direct or scattered light can be hazardous to eyes and skin.
There is a potential hazard of eye exposure to laser radiation if the included instructions are not followed.
Caution - use of controls or adjustments or performance of procedures other than those specified herein may result in hazardous radiation exposure.
LASER Parameters
Wavelength 450nm - 460nm (Blue)
Mode of operation Pulsed, due to frame rate
Pulse width 1.05ms
Pulse repetition rate 120Hz
Maximum laser energy 0.582mJ
Total internal power >100w
Apparent source size >10mm, at lens stop
Divergence >100 mil Radian
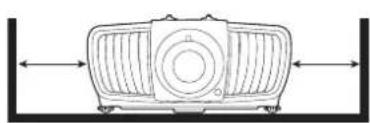
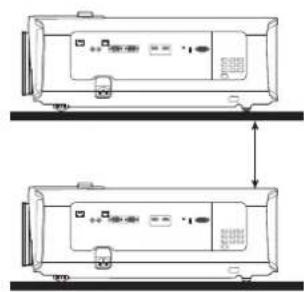
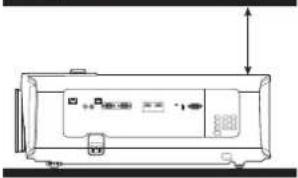
Cooling notice

Ventilation
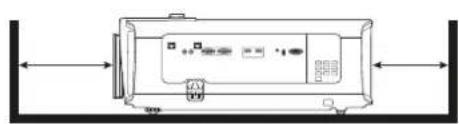
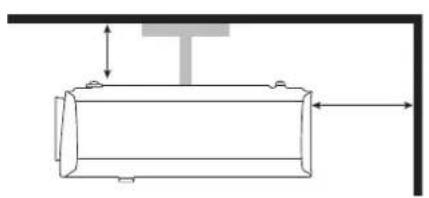
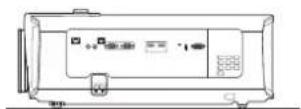
Caution for installation
For proper ventilation of the projector, make sure to leave some space around the projector as shown in the illustration below:
- Table - Table
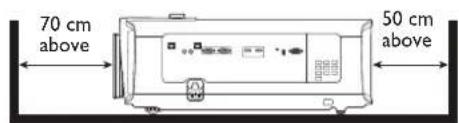
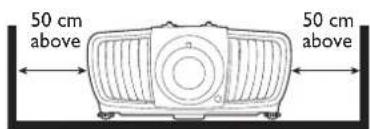
- Ceiling • Stacking
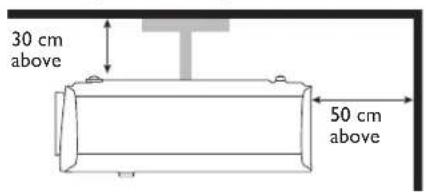
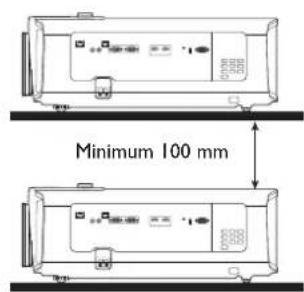
Avoid using the projector in a poorly ventilated or confined space.
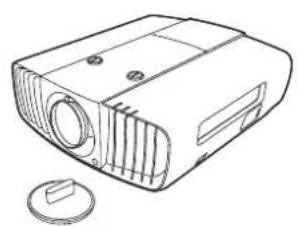
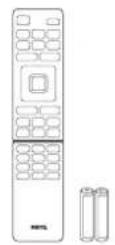
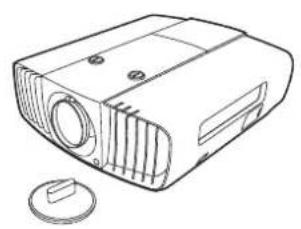
Product information Shipping contents
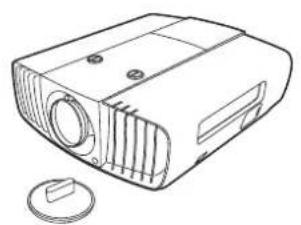
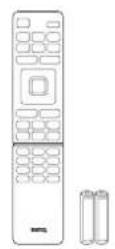

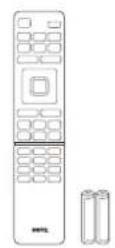
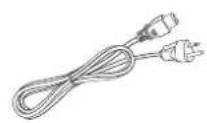
Projector Remote control with batteries Installation guide
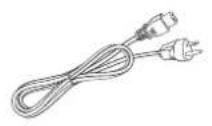

Power cord Cable tie set x 2 Rubber cap
Specifications
| Display system I-CHIP DMD | |
| Resolution 2716 (H) × 1528 | (V) 4K UHD 3840X2160 on screen |
| Light source Laser diode | |
| Brightness 5000 Lumens | |
| Power consumption 595 W | (Max); < 0.5 W (Standby) |
| Dimensions 470.7 mm (W) × 224.9 mm (H) × 564.7 mm (D) | |
| Weight 19.20 Kg (42.3 lbs) | |
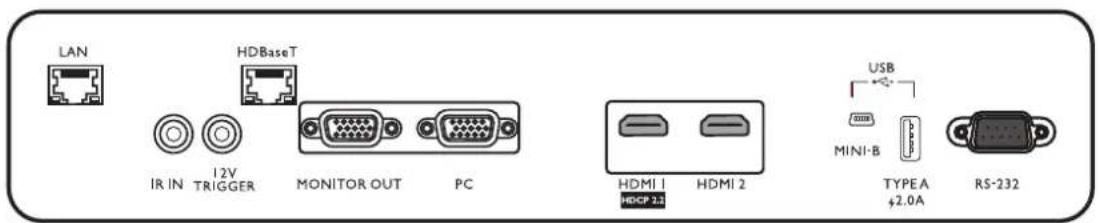
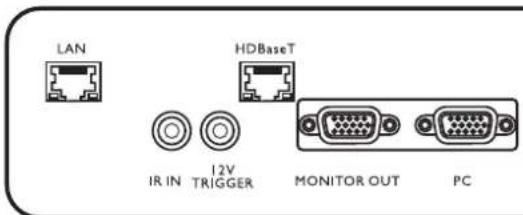
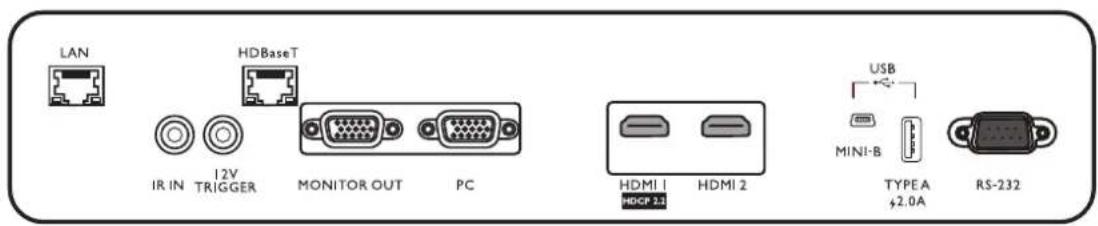
Terminals
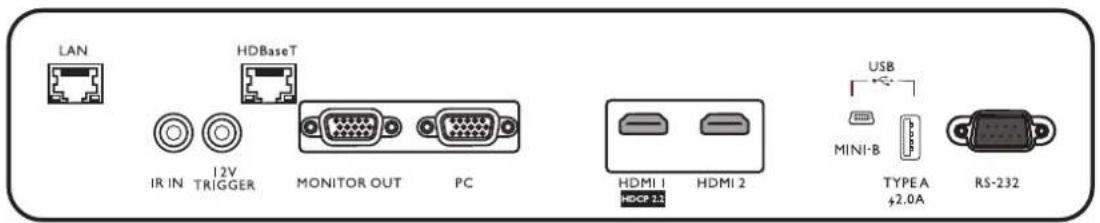
LAN
For connection to RJ45 Cat5/Cat6 Ethernet cable to control the projector through a network.
·IR IN
For use with an IR extender cable to ensure better signal reception from the remote control.
12V TRIGGER
Trigger external devices such as an electric screen or light control, etc.
HDBaseT
For connection to RJ45 Cat5/Cat6 cable to input uncompressed high-definition video (HD).
- MONITOR OUT
Connection to other display equipment for concurrent playback display.
PC
15-pin VGA port for connection to RGB source or PC.
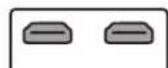
HDMI I
Connection to HDMI (4K) source.
HDMI 2
Connection to HDMI source.
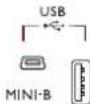
- USB MINI-B
For firmware upgrade only.
- USB TYPE A
Support 5V/2A output.
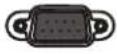
RS232
Standard 9-pin D-sub interface for connection to PC control system and projector maintenance.
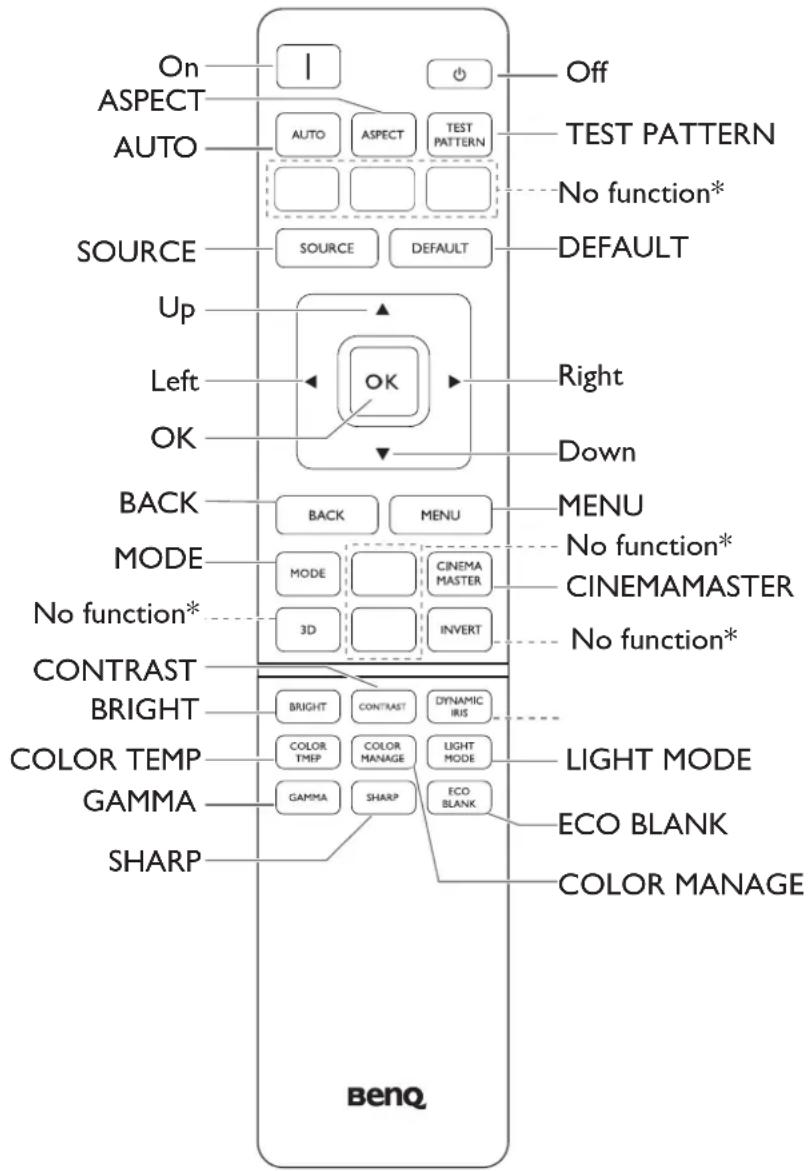
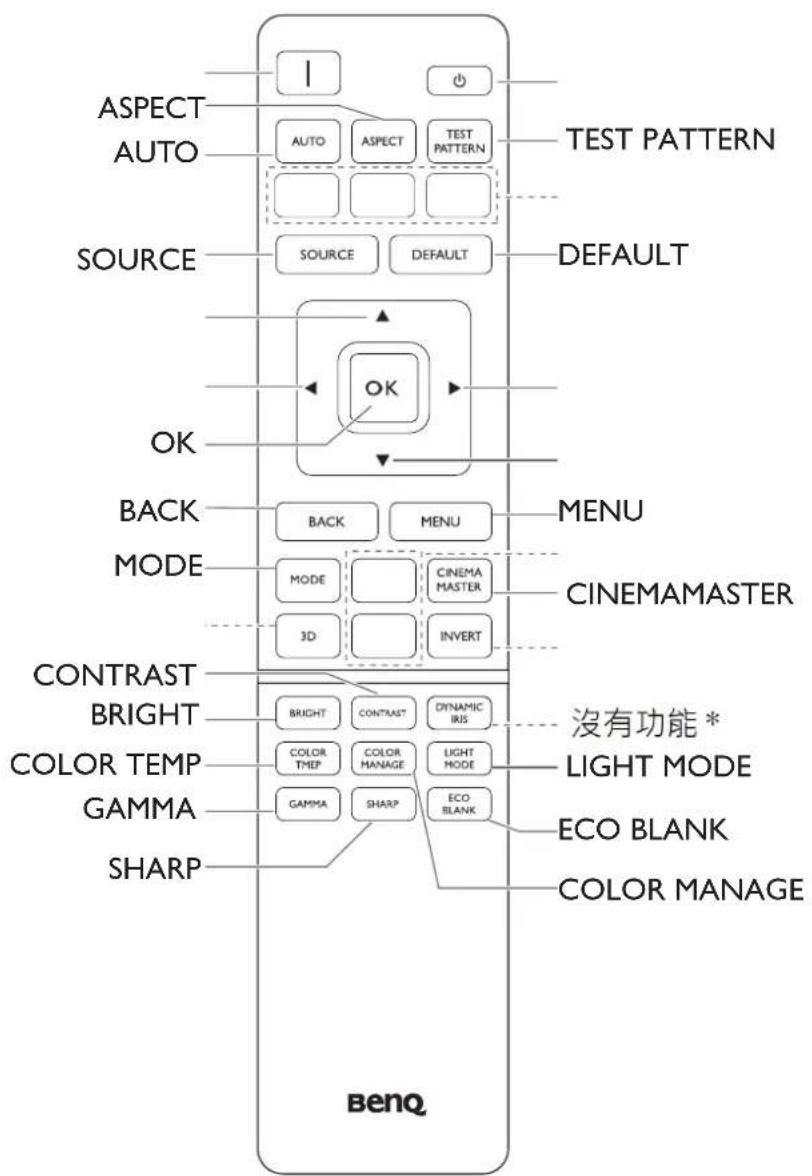
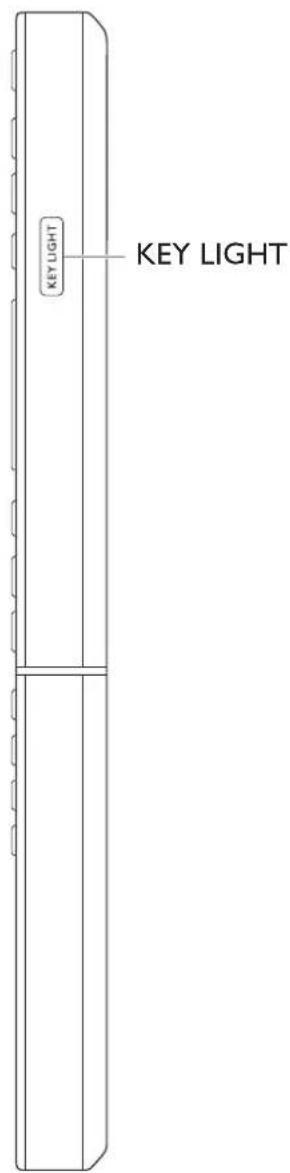
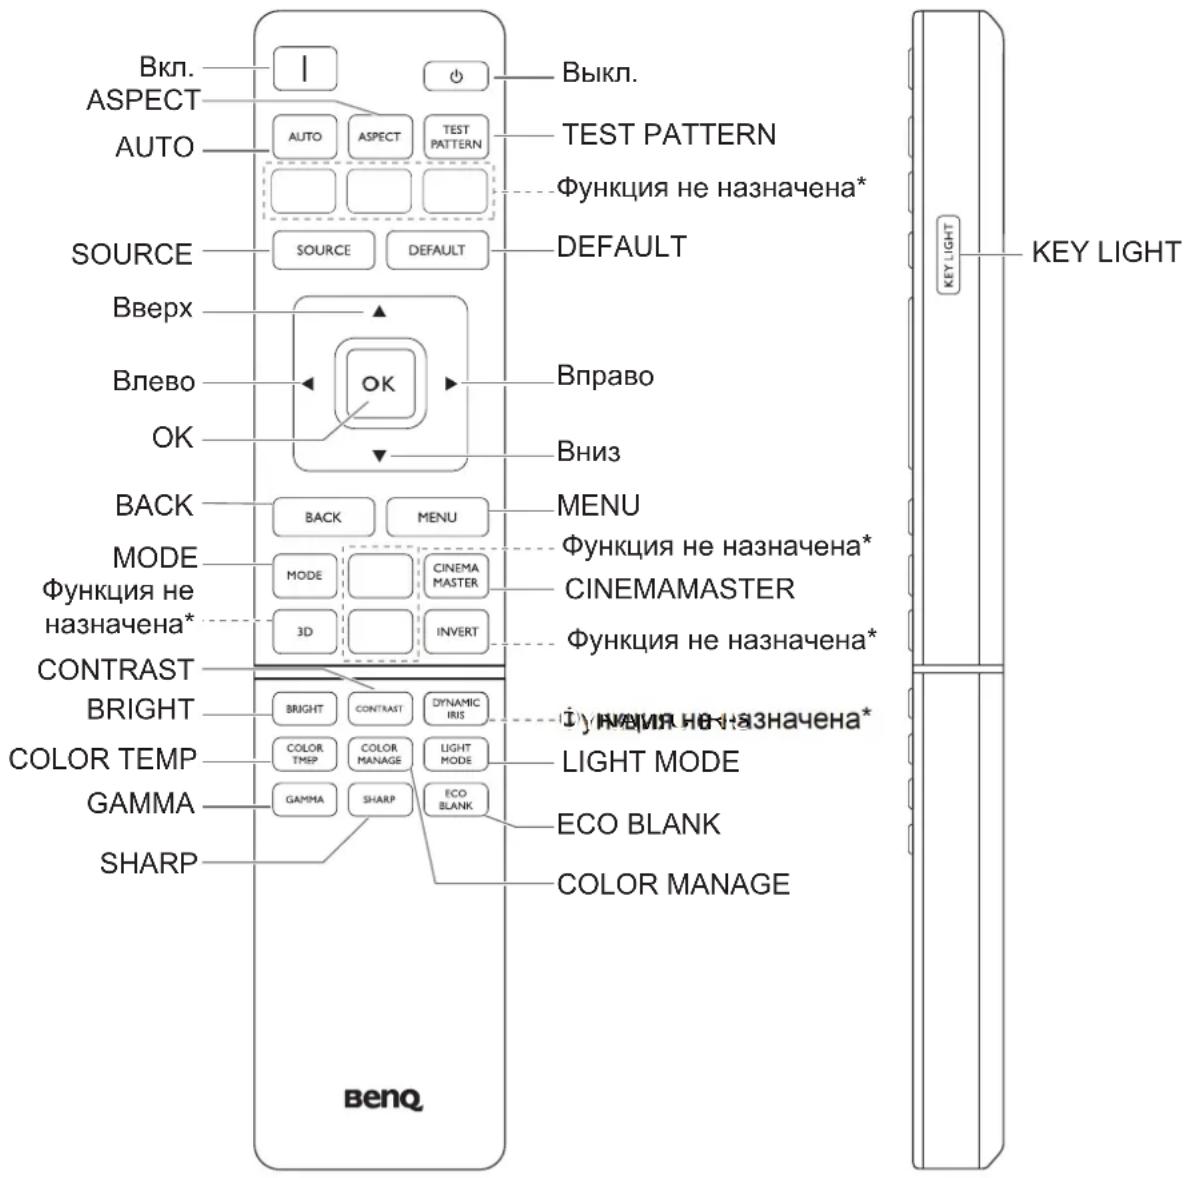
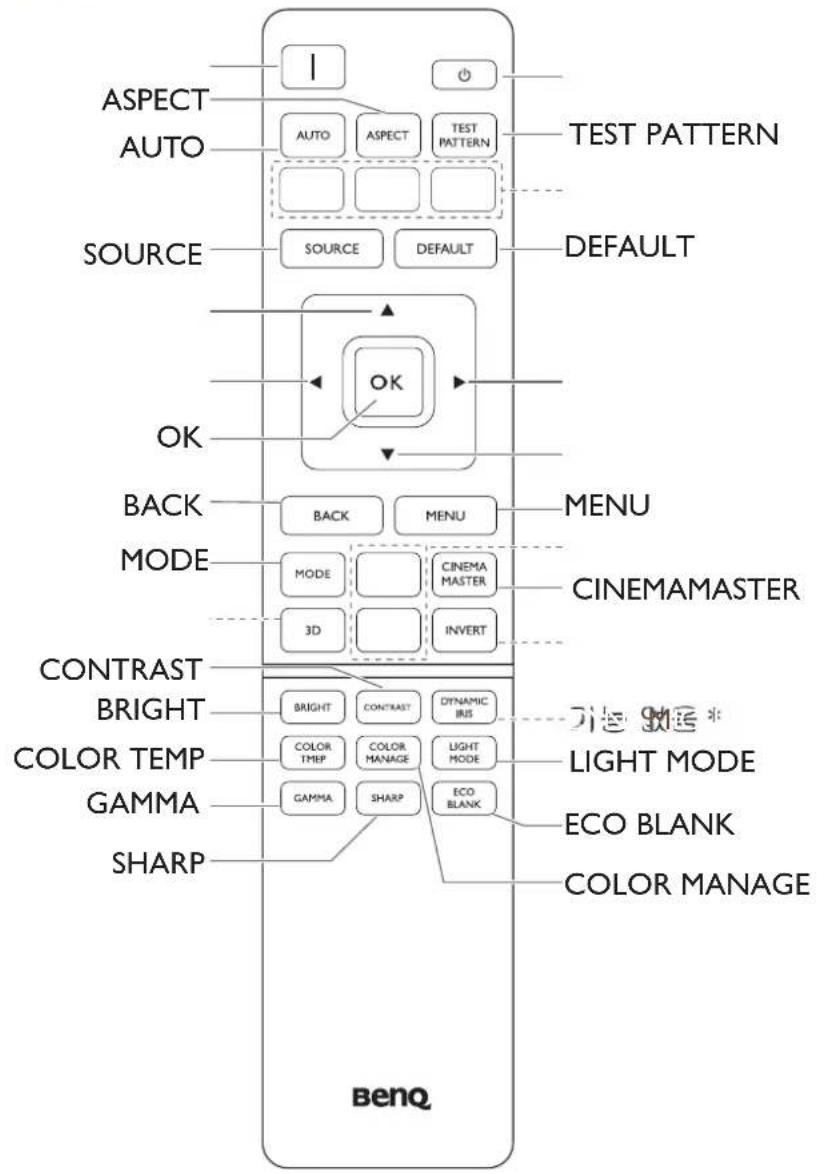
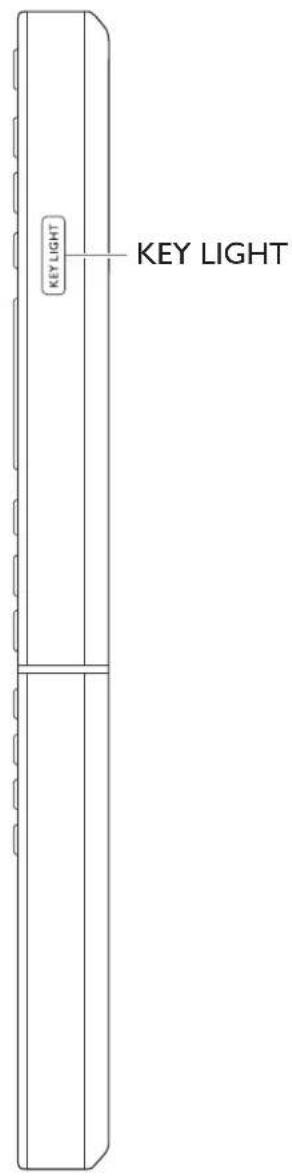
Remote control
Installation
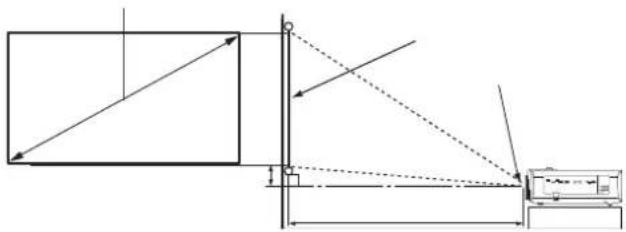
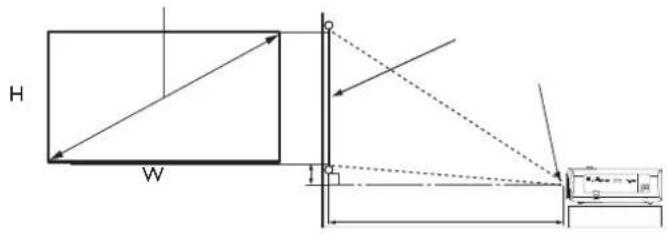
Projection dimensions
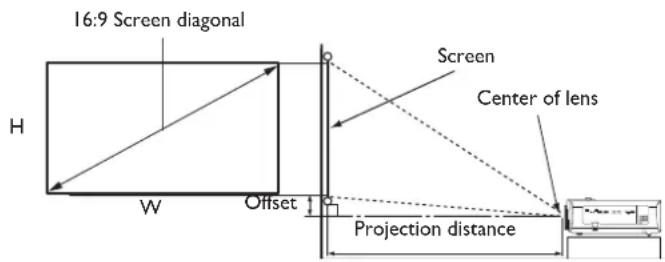
- The screen aspect ratio is 16:9 and the projected picture is in a 16:9 aspect ratio
| Screen size Distance from | screen (mm) | Offset (mm)Di | |||||
| W o(n) m/min. | H (mm) zoom) | Min length | Average | Max length | |||
| Inch mm (max. zoom) | |||||||
| 40 | 1016 | 886 | 498 | 1222 | 1505 17 | 89 50 | |
| 50 | 1270 | 1107 | 623 | 1528 | 1882 22 | 36 62 | |
| 60 | 1524 | 1328 | 747 | 1833 | 2258 26 | 83 75 | |
| 80 | 2032 | 1771 | 996 | 2444 | 3011 | 3578 | |
| 90 | 2286 | 1992 | 1121 | 2750 | 3387 | 4025 | 112 |
| 100 | 2540 | 2214 | 1245 | 3055 | 3763 | 4472 | 125 |
| 110 | 2794 | 2435 | 1370 | 3361 | 4140 | 4919 | 137 |
| 120 | 3048 | 2657 | 1494 | 3666 | 4516 | 5366 | 149 |
| 130 | 3302 | 2878 | 1619 | 3972 | 4893 | 5813 | 162 |
| 140 | 3556 | 3099 | 1743 | 4277 | 5269 | 6261 | 174 |
| 150 | 3810 | 3321 | 1868 | 4583 | 5645 | 6708 | 187 |
| 160 | 4064 | 3542 | 1992 | 4888 | 6022 | 7155 | 199 |
| 170 | 4318 | 3763 | 2117 | 5194 | 6398 | 7602 | 212 |
| 180 | 4572 | 3985 | 2241 | 5499 | 6774 | 8049 | 224 |
| 190 | 4826 | 4206 | 2366 | 5805 | 7151 | 8497 | 237 |
| 200 | 5080 | 4428 | 2491 | 6110 | 7527 | 8944 | 249 |
| 250 | 6350 | 5535 | 3113 | 7638 | 9409 | 11180 | |
| 300 | 7620 | 6641 | 3736 | 9165 | 11290 | 13416 | |
| 350 | 8890 | 7748 | 4358 | 10693 | 13172 | 15652 | |
| 400 | 10160 | 8855 | 4981 | 12220 | 15054 | 17888 | |
| 500 | 12700 | 11069 | 6226 | 15275 | 18817 | 22359 | |
aagonal

All measurements are approximate and may vary from the actual sizes.
BenQ recommends that if you intend to permanently install the projector, you should physically test the projection size and distance using the actual projector in situ before you permanently install it, so as to make allowance for this projector's optical characteristics. This will help you determine the exact mounting position so that it best suits your installation location.

- Ceiling installation must be done by a qualified professional. Contact your dealer for more information. It is not recommended you install the projector yourself.
- Only use the projector on a solid, level surface. Serious injury and damage can occur if the projector is dropped.
- Do not use the projector in an environment where extreme temperature occurs. The projector must be used at temperatures between 32 degrees Fahrenheit (0 degrees Celsius) and 104 degrees Fahrenheit (40 degrees Celsius).
- Screen damage will occur if the projector is exposed to moisture, dust or smoke.
- Do not cover the vents on the projector. Proper ventilation is required to dissipate heat. Damage to the projector will occur if the vents are covered.
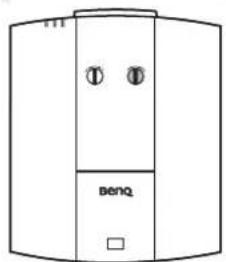
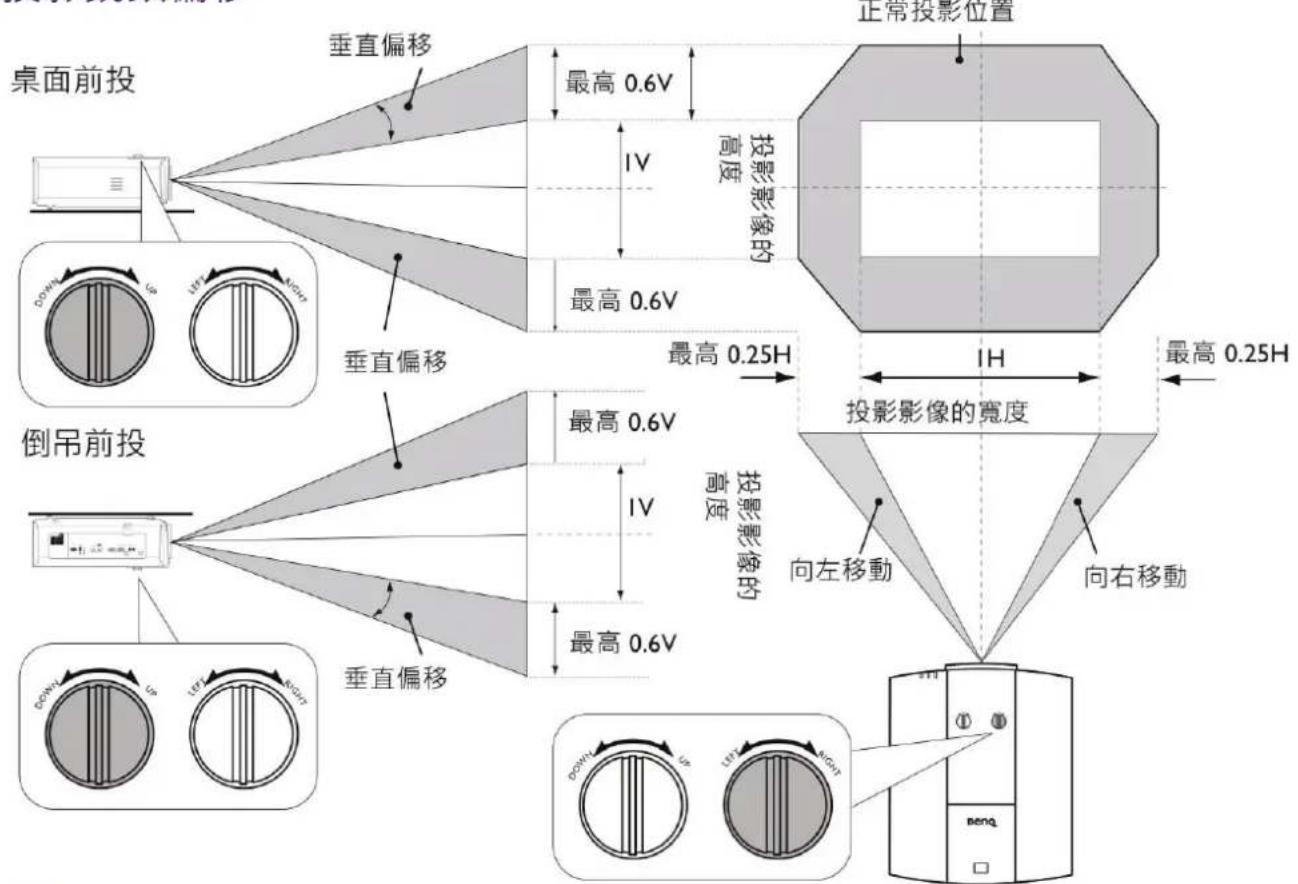
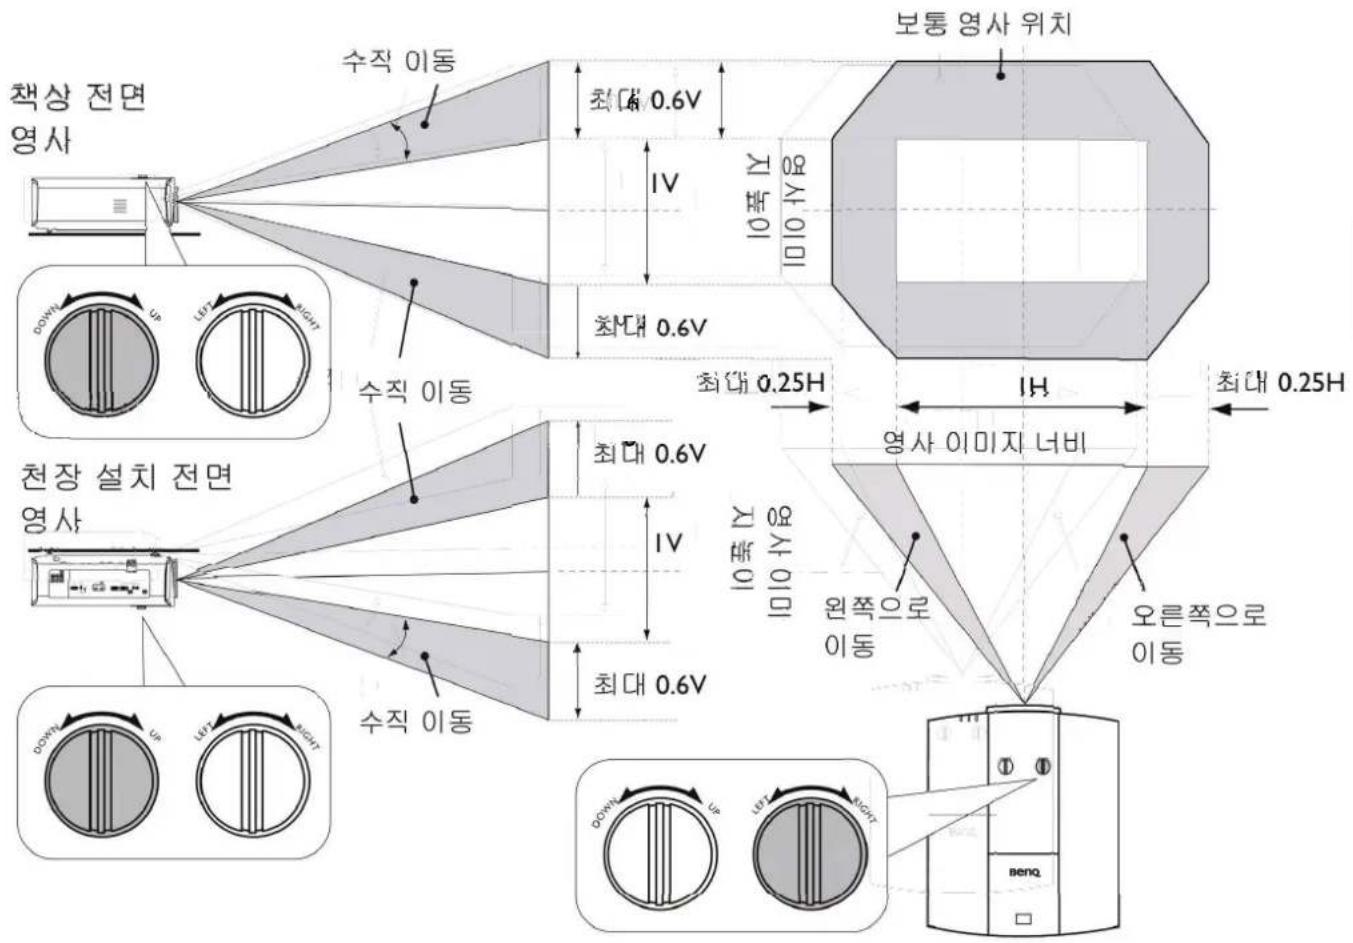
Adjusting the projector position
Shifting the projection lens


- Please stop turning the adjustment knob when you hear a clicking sound indicating that the knob has reached its limit. Over-turning the knob may cause damage.
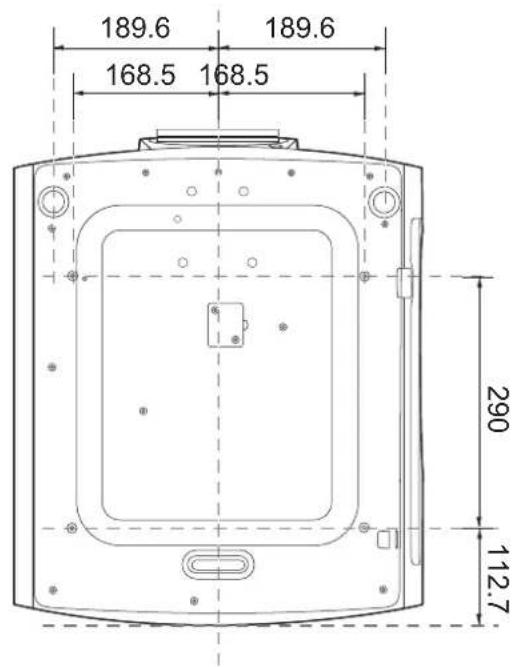
Ceiling mount installation diagram

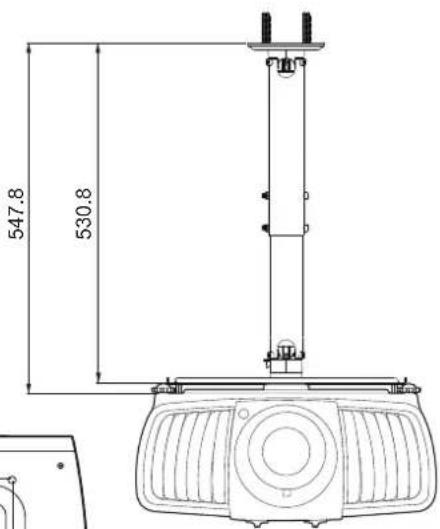
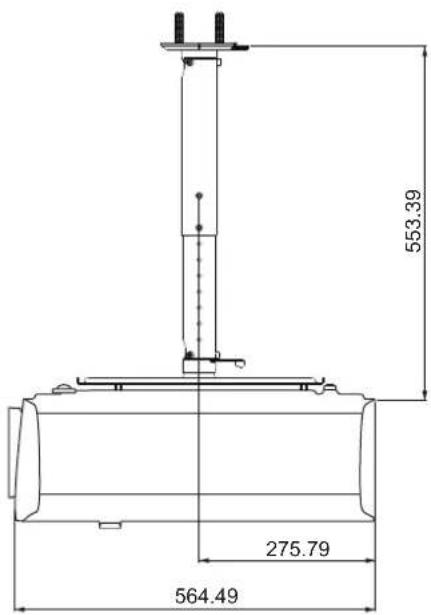

Ceiling mount screw: M6
(Max L = 25 mm; Min L = 20 mm)
Unit: mm
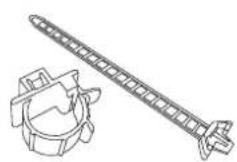
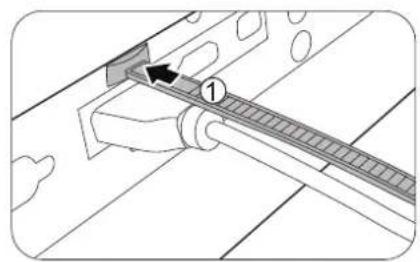
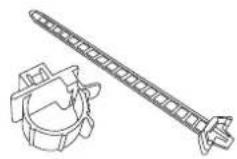
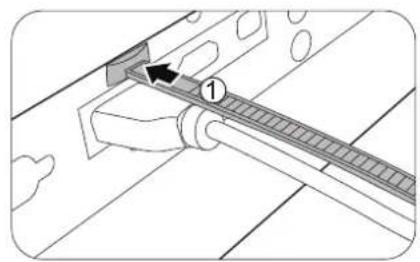
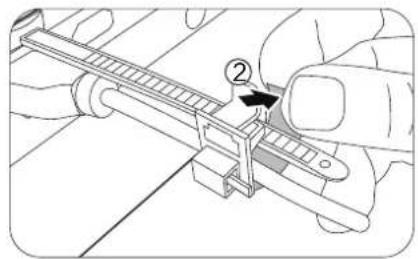
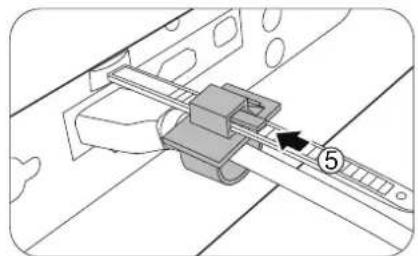
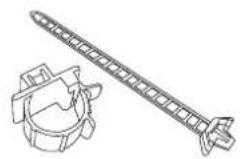
Using the cable tie set
The cable tie set helps prevent a cable plug from falling out of the connecting port. It contains the following parts.

To use the cable tie set:
- Firmly plug a cable to a correct port on the projector. Insert the cable tie head to the cable tie hole right above the connecting port. Note that the cable tie cannot be removed from the hole once it is inserted.
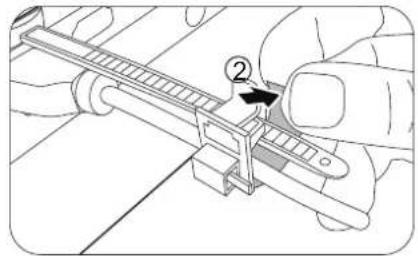
- Take the cable tie ratchet. Slightly open the ratchet to surround the connecting cable.
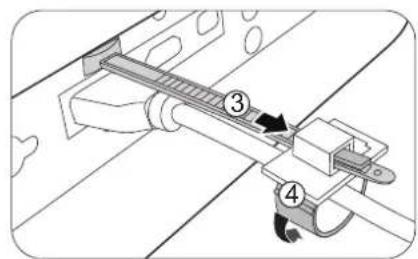
- Insert the end of the cable tie to the cable tie ratchet as illustrated.
- Close the cable tie ratchet by pressing its tab.
- Move the cable tie ratchet along with the cable tie to the end of the cable plug.
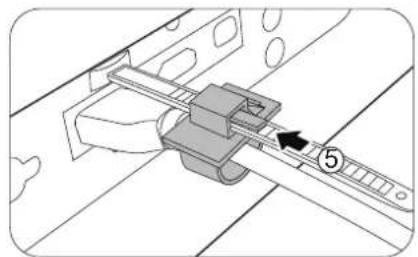
The cable tie installation is done.
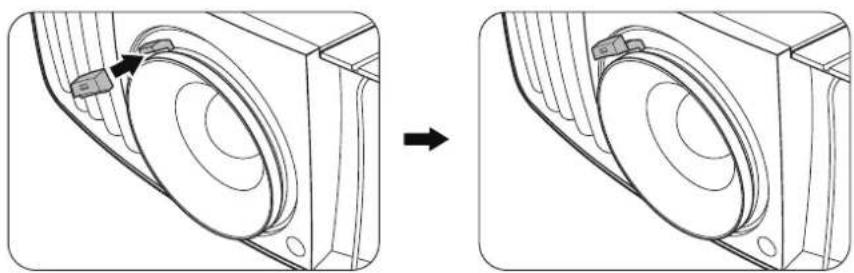
Using the lens rubber cap
When the projector is installed or mounted in any way other than a horizontal position, use the rubber cap to keep the zoom ring from rotating due to its own weight. After the focus and zoom rings are adjusted, follow the illustrations to insert the rubber cap to keep them in position.
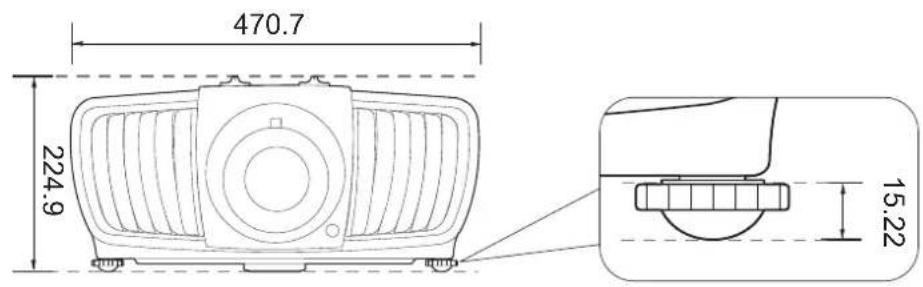
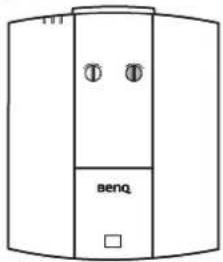
Projector dimensions
470.7 mm (W) × 224.9 mm (H) × 564.7 mm (D)

Unit: mm
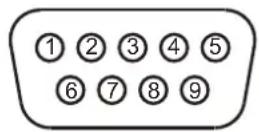
RS232 command
RS232 pin assignment
| No. | Serial No. | Serial |
| 1 | NC 6 NC | |
| 2 | RX 7 RTSZ | |
| 3 | TX 8 CTSZ | |
| 4 | NC 9 NC | |
| 5 | GND |


| Function Type | Operation ASCII | ||
| Power | Write Power On | ||
| Write Power off | |||
| Read | Power Status | ||
| Source Selection | Write COMPUTER/YPbPr | ||
| Write HDMI | |||
| Write HDMI 2 | |||
| Write HDBaseT | |||
| Read | Current source | ||
| Write Presentation | |||
| Write sRGB | |||
| Write Bright | |||
| Write Cinema | |||
| Write DICOM | |||
| Write User1 | |||
| Write User2 | |||
| Write ISF Day | |||
| Write ISF Night | |||
| Read | Picture Mode | ||
| Picture Setting | Write Contrast + | ||
| Write Contrast - | |||
| Read | Contrast value | ||
| Write Brightness + | |||
| Write Brightness - | |||
| Read | Brightness value | ||
| Write Color + | |||
| Write Color - | |||
| Read | Color value | ||
| Write Sharpness + | |||
| Write Sharpness - | |||
| Read | Sharpness value | ||
| Write Color Temperature-Warm | |||
| Write Color Temperature-Normal | |||
| Write Color Temperature-Cool | |||
| Write | Color Temperature-lamp native | ||
| Read | Color Temperature Status | ||
| Write Aspect 4:3 | |||
| Write Aspect 16:9 | |||
| Write Aspect 2.35:1 | |||
| Write Aspect Auto | |||
| Read | Aspect Status | ||
| Write Auto | |||
| Function Type | Operation ASCII | ||
| Operation Settings | Write Projection Position-Front Table <CR>*pp=FT#<CR> | ||
| Write Projection Position-Rear Table <CR>*pp=RE#<CR> | |||
| Write Projection Position-Rear Ceiling <CR>*pp=RC#<CR> | |||
| Write Projection Position-Front Ceiling <CR>*pp=FC#<CR> | |||
| Write Quick auto search <CR>*QAS=on#<CR> | |||
| Write Quick auto search <CR>*QAS=off#<CR> | |||
| Read Quick auto search status <CR>*QAS=?#<CR> | |||
| Read Projection Position Status <CR>*pp=?#<CR> | |||
| Write Direct Power On-on <CR>*directpower=on#<CR> | |||
| Write Direct Power On-off <CR>*directpower=off#<CR> | |||
| Read Direct Power On-Status <CR>*directpower=?#<CR> | |||
| Write Standby Settings-Network on <CR>*standbynet=on#<CR> | |||
| Write Standby Settings-Network off <CR>*standbynet=off#<CR> | |||
| Read Standby Settings-Network Status <CR>*standbynet=?#<CR> | |||
| Lamp Control | Read Lamp Hour <CR>*ltim=?#<CR> | ||
| Write Normal mode <CR}*lampm=Inor#<CR> | |||
| Write Eco mode <CR}*lampm=eco#<CR> | |||
| Write Dimming mode <CR}*lampm=dimming#<CR> | |||
| Write Custom mode <CR}*lampm=custom#<CR> | |||
| Write Light level for custom mode <CR}*lampcustom=value#<CR> | |||
| Read Light level status for custom mode <CR}*lampcustom=?#<CR> | |||
| Read Lamp Mode Status <CR}*lampm=?#<CR> | |||
| Miscellaneous | Read Model Name <CR>*modelname=?#<CR> | ||
| Write Blank On <CR>*blank=on#<CR> | |||
| Write Blank Off <CR>*blank=off#<CR> | |||
| Read Blank Status <CR>*blank=?#<CR> | |||
| Write Menu On <CR>*menu=on#<CR> | |||
| Write Menu Off <CR>*menu=off#<CR> | |||
| Write Up <CR>*up#<CR> | |||
| Write Down <CR>*down#<CR> | |||
| Write Right <CR>*right#<CR> | |||
| Write Left <CR>*left#<CR> | |||
| Write Enter <CR>*enter#<CR> | |||
| Write AMX Device Discovery-on <CR>*amxdd=on#<CR> | |||
| Write AMX Device Discovery-off <CR>*amxdd=off#<CR> | |||
| Read AMX Device Discovery Status <CR>*amxdd=?#<CR> | |||
| Read Mac Address <CR>*macaddr=?#<CR> | |||
| Write High Altitude mode on <CR>*Highaltitude=on#<CR> | |||
| Write High Altitude mode off <CR>*Highaltitude=off#<CR> | |||
| Read High Altitude mode status <CR>*Highaltitude=?#<CR> | |||
http://business-display.benq.com/

RG2

CLASS I LASER PRODUCT
VISIBLE LASER LIGHT
1类激光产品 可见激光
Complies with IEC 60825-1
2014 and IEC 62471-5:2015
Risk Group 2
(中國)

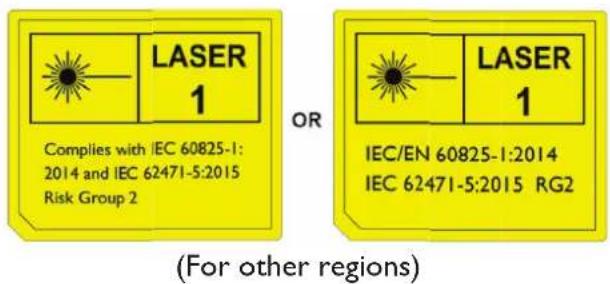
LASER
1
Complies with IEC 60825-1:
2014 and IEC 62471-5:2015
Risk Group 2
或

LASER
1
IEC/EN 60825-1:2014
IEC 62471-5:2015 RG2


1.05 ms
120 Hz
0.582 mJ


| I-CHIP DMD | |
| 2716 (H) × 1528 (V) | |
LAN
12V TRIGGER
HDBaseT
-
IR IN
-
MONITOR OUT
HDMI 2
PC
- USB MINI-B
HDMI I
- USB TYPE A
RS232

| 40 1016 | 886 498 | 1222 1505 17 | 89 50 | ||||
| 50 1270 | 1107 623 | 1528 1882 22 | 36 62 | ||||
| 60 1524 | 1328 747 | 1833 2258 26 | 83 75 | ||||
| 80 2032 | 1771 996 | 2444 | 3011 | 3578 | 100 | ||
| 90 | 2286 | 1992 | 1121 | 2750 | 3387 | 4025 | 112 |
| 100 | 2540 | 2214 | 1245 | 3055 | 3763 | 4472 | 125 |
| 110 | 2794 | 2435 | 1370 | 3361 | 4140 | 4919 | 137 |
| 120 | 3048 | 2657 | 1494 | 3666 | 4516 | 5366 | 149 |
| 130 | 3302 | 2878 | 1619 | 3972 | 4893 | 5813 | 162 |
| 140 | 3556 | 3099 | 1743 | 4277 | 5269 | 6261 | 174 |
| 150 | 3810 | 3321 | 1868 | 4583 | 5645 | 6708 | 187 |
| 160 | 4064 | 3542 | 1992 | 4888 | 6022 | 7155 | 199 |
| 170 | 4318 | 3763 | 2117 | 5194 | 6398 | 7602 | 212 |
| 180 | 4572 | 3985 | 2241 | 5499 | 6774 | 8049 | 224 |
| 190 | 4826 | 4206 | 2366 | 5805 | 7151 | 8497 | 237 |
| 200 | 5080 | 4428 | 2491 | 6110 | 7527 | 8944 | 249 |
| 250 6350 | 5535 | 3113 | 7638 9409 | 11180 | 311 | ||
| 300 7620 | 6641 | 3736 | 9165 | 11290 | 13416 | 374 | |
| 350 8890 | 7748 | 4358 | 10693 | 13172 | 15652 | 436 | |
| 400 10160 | 8855 | 4981 | 12220 | 15054 | 17888 | 498 | |
| 500 12700 | 11069 | 6226 | 15275 | 18817 | 22359 | 623 | |


調整投影機位置
投影鏡頭偏移
RAYONNEMENT LASER, NE PAS REGARDER LE RAYON, PRODUIT LASER DE CLASSE 3R.
PRODUIT LASER DE CLASSE 3R
KLASSE 3R LASERPRODUKT
Peso 19,20 Kg (42,3 lbs)
Terminali
HDMI1 HMI2
TYPEA 2.0A
RS-232
LAN
(Max. L = 25 mm; Min. L = 20 mm)
Unità: mm
Uso del ferma cavi
JI3EPHOE YCTPOICTBO KJACCA 3R
3To Ia3epHoe ycTpoiCTBO CkOHcTpyuPoBAHO B COOTBeTCTBnC Tpe6oBaHnMaKlacca 3R dIpa6oTbI BO BCex peKImax.
JIa3EPHbIi CBET - HE HANPABJIAITE IPRMO B ITa3A.
He napanpaBnayTe na3ep n He donyckaTte nonaDAnHna npMaO rnn OtpaKeHHoro Ta3epHO CBeTa Ha dpYnx IIOeN Nn Ha OtpaKaUoNe ppeMeTbI.
PpMaOn nIpaaccceHHbI CBETMOKET npuHHTb Bpe rna3am N KOKe.
HecobnOHeHne npBedeHHbIX 3decb nHCTpyKcI MOKeT npNBecTN K NOBpeXdEHNIO rna3 n3-3a nonadaHn B HNX Ia3epHOro n3nyeHn.
BnMaHne! HapuSeHne onncaHHbIX 3decb npaBnI n nopAdka ynpaBHeHnI nperyIpOBKn MoKET NOBeprHyTb NOpb3OBaTeJI ONaCHOMy paAnoAKTNBHOMy o6nyeHIO.
IapametpbI JIA3EPA
POnDepKnBaet BbIXoJ 5B/2A.
RS232
CTaHdapTHbI 9-KoHTaKTHbI nHTeppeic Tnna D-sub IIN NOkJIIOUeHnK CnCTeMe ynpabNeHnI K n ynpabNeHnI npoeKTopom.
NynbT Ny

(MaKc. L = 25 MM; MnH. L = 20 MM)
EduHnua n3MepeHHa:MM
IcnoIb3OBaHne KOMnJIeKTa Ka6eJbHOJ CTJXKN
KoMnIeKr Ka6eNbHOJ C7RkN NOMORAET IpeDOTBpaNTb BbInaJeHne Ka6eNbHoro UTeKepa n3 coEdNHtBJHO rpo pa3bema. OH COCTOIT n3 cIeMyuixx uactei.

Iopraokncnonb3OBaHnKOMnneKtaKa6eBHOCTAAKKN:
1.ПNotHO BCTaBbTe WTEKepe Ka6eJIa B COOTBeTCTByUOu pa3bEm npoeKToPa. BCTaBbTe rOIOBky Ka6eJIbHOI CTJXKN B OTBepCTne Ka6eJIbHOI C7RKKn HENOCPeIcTBeHNOHa ND CoEINHITeJIbHbIM pa3bEMOM.YyTInTe, YTO NocNe TOrO,Kak Ka6eJIbHra CTJXKa 6yDeT BCTaBJIeHa B OTBepCTne, ee Henb3a 6yDet n3BNeYb.
2.Bo3bMNTe 3aMOK Ka6eJbHOJ CTJKKn. HEmHOrO OTKpOIne 3aMOK, YTO6bl OH 06XBaTIN CoEINHInTeJbHbI Ka6eJIb.
- BCTaBbTe KOHeu Ka6eJbHOI CTaKKN B 3AMOK Ka6eJbHOI CTaKKN, KAK NOKa3aHO.
- 3aKpoITe 3aMOK Ka6eIbHOJ CTaKKN, HAdaBvB erO IanKy.

- CdINbTe 3aMOK Ka6eJbHOI CTJXKN BDOJIb Ka6eJbHOI CTJXKN K KOHcy WTEKePa Ka6eJIA.
YcTaHOBka Ka6eNbHOn CTJXKN 3aBepSeHa.
Complies with IEC 60825-1: 2014 and IEC 62471-5:2015
Risk Group 2
LASER 1
Complies with IEC 60825-1: 2014 and IEC 62471-5:2015 Risk Group 2
L
LASER 1
IEC/EN 60825-1:2014
IEC 62471-5:2015 RG2
卫
ReI

1.05ms
120Hz
0.582mJ
100w
部
号
我


#
經濟報
新


人
| I-CHIP DMD | |
| 2716 (H) x 1528 (V) | |
| 470.7 mm (W) x 224.9 mm (H) x 564.7 mm (D) | |
| 19.20 Kg (42.3 lbs) |
#
LAN
12V TRIGGER
HDBaseT
-
IR IN
-
MONITOR OUT
HDMI 2
PC
-
USB MINI-B
-
USB TYPE A
HDMI
RS232

世志
电影王
| 스트리 쿰기 | 스트리과 힘어지 기ris | 오트심 | |||||
| 내용품 | |||||||
| 翘翘翘翘 | 明陞 | ||||||
| inuit | mm | 翘翘翘翘 | 翘翘翘翘 | ||||
| 40 1016 | 886 498 | 1222 1505 17 | 89 50 | ||||
| 50 1270 | 1107 623 | 1528 1882 22 | 36 62 | ||||
| 60 1524 | 1328 | 747 | 1833 2258 26 | 83 75 | |||
| 80 2032 | 1771 | 996 | 2444 | 3011 | 3578 | 100 | |
| 90 2286 | 1992 | 1121 | 2750 | 3387 4025 | 112 | ||
| 100 2540 | 2214 | 1245 | 3055 | 3763 4472 | 125 | ||
| 110 | 2794 | 2435 | 1370 | 3361 | 4140 | 4919 | 137 |
| 120 3048 | 2657 | 1494 | 3666 | 4516 5366 | 149 | ||
| 130 3302 | 2878 | 1619 | 3972 | 4893 5813 | 162 | ||
| 140 3556 | 3099 | 1743 | 4277 | 5269 6261 | 174 | ||
| 150 3810 | 3321 | 1868 | 4583 | 5645 6708 | 187 | ||
| 160 4064 | 3542 | 1992 | 4888 | 6022 7155 | 199 | ||
| 170 4318 | 3763 | 2117 | 5194 | 6398 7602 | 212 | ||
| 180 4572 | 3985 | 2241 | 5499 | 6774 8049 | 224 | ||
| 190 4826 | 4206 | 2366 | 5805 | 7151 8497 | 237 | ||
| 200 | 5080 | 4428 | 2491 | 6110 | 7527 | 8944 | 249 |
| 250 6350 | 5535 | 3113 | 7638 9409 | 11180 | 311 | ||
| 300 7620 | 6641 | 3736 | 9165 | 11290 | 13416 | 374 | |
| 350 8890 | 7748 | 4358 | 10693 | 13172 | 15652 | 436 | |
| 400 | 10160 | 8855 | 4981 | 12220 | 15054 | 17888 | 498 |
| 500 | 12700 | 11069 | 6226 | 15275 | 18817 | 22359 | 623 |


F
© 2017 BenQ Corporation.
All rights reserved. Rights of modification reserved.
3DU01.001
P/N:4J.HH401.001
- Important safety instructions 4
- Notice 6
- Product information.. 7
- Installation 9
- Projection dimensions 12
- RS232 command 13
- Important safety instructions
- Risk Group 2
- Laser Caution
- Notice
- Laser notice
- CLASS 3R LASER PRODUCT
- LASER Parameters
- Cooling notice
- Caution for installation
- Product information Shipping contents
- Specifications
- Terminals
- LAN
- ·IR IN
- 12V TRIGGER
- HDBaseT
- - MONITOR OUT
- PC
- HDMI I
- HDMI 2
- - USB MINI-B
- - USB TYPE A
- RS232
- Remote control
- Installation
- Projection dimensions
- Adjusting the projector position
- Shifting the projection lens
- Ceiling mount installation diagram
- Using the cable tie set
- Using the lens rubber cap
- Projector dimensions
- RS232 command
- RS232 pin assignment
- (中國)
- 或
- 調整投影機位置
- 投影鏡頭偏移
- PRODUIT LASER DE CLASSE 3R
- KLASSE 3R LASERPRODUKT
- Terminali
- Uso del ferma cavi
- JI3EPHOE YCTPOICTBO KJACCA 3R
- IapametpbI JIA3EPA
- IcnoIb3OBaHne KOMnJIeKTa Ka6eJbHOJ CTJXKN
- 部
- 号
- 我
- #
- 經濟報
- 新
- 世志
- 电影王
Brand : BENQ
Model : LK970
Category : Projector