
HB 602 - Hedge trimmers ATIKA - Free user manual and instructions
Find the device manual for free HB 602 ATIKA in PDF.
| Product Type | Gasoline Hedge Trimmer |
| Brand | ATIKA |
| Model | HB 602 |
| Category | Hedge Trimmers |
| Usage | Non-professional (home and garden) |
| Engine | 2-stroke, 25.4 cm³, 0.75 kW (7500 rpm) |
| Fuel | Gasoline/oil mixture 40:1 (unleaded, octane rating ≥91 RON) |
| Tank Capacity | 0.45 L |
| Blade Length | 600 mm |
| Cutting Length | 550 mm |
| Cutting Width | 28 mm |
| Cutting Speed | 1950 cuts/min |
| Weight (empty tank) | Approximately 6.3 kg |
| Sound pressure level (at ear) | 87.6 dB(A) (K=3 dB(A)) |
| Guaranteed sound power level | 112 dB(A) |
| Vibrations (front handle) | 3.225 m/s² (K=1.5 m/s²) |
| Vibrations (rear handle) | 4.128 m/s² (K=1.5 m/s²) |
| Ignition | Electronic |
| Spark plug | Torch L8RTF or equivalent (electrode gap 0.6-0.7 mm) |
| Idle speed | 3000 rpm |
| Speed with cutting device | Min. 3750 rpm |
| Transmission lubrication | Every 25 hours (suitable grease, e.g. SHELL ALVANIA RL3) |
| Air filter | Clean every 25 hours, more often in dusty environment |
| Delivery contents | Tool bag, blade guard, mixing bottle, manual |
Frequently Asked Questions - HB 602 ATIKA
User questions about HB 602 ATIKA
0 question about this device. Answer the ones you know or ask your own.
Ask a new question about this device
Download the instructions for your Hedge trimmers in PDF format for free! Find your manual HB 602 - ATIKA and take your electronic device back in hand. On this page are published all the documents necessary for the use of your device. HB 602 by ATIKA.
USER MANUAL HB 602 ATIKA
Original instructions
No(S-No.): 17304 → HB 60-2
No(S-No.): 17311 HB 72-2
EC Declaration of Conformity 16
Extent of delivery 16
Symbols original operating manual 16
Symbols machine 17
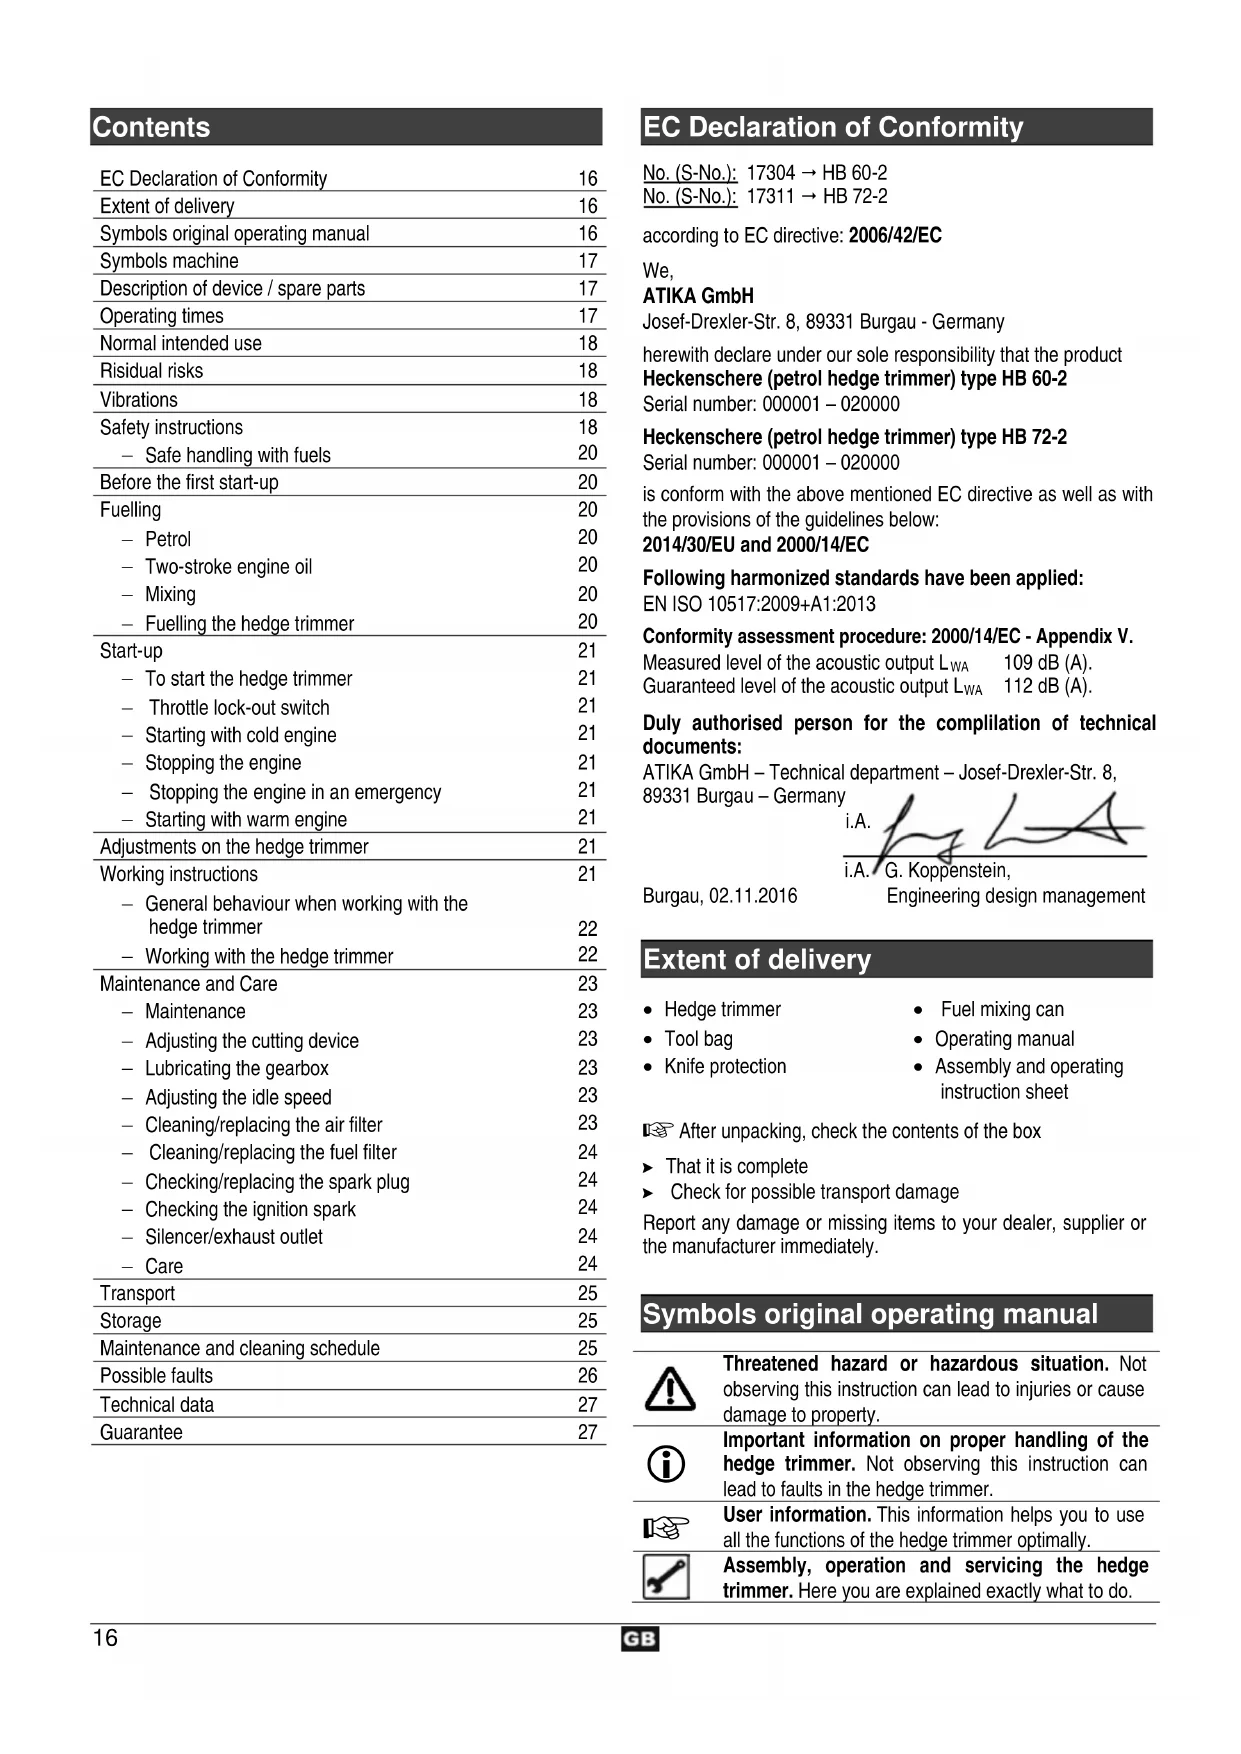
Description of device / spare parts 17
Operating times 17
Normal intended use 18
Residual risks 18
Vibrations 18
Safety instructions 18
- Safe handling with fuels 20
Before the first start-up 20
Fuelling 20
-Petrol 20
- Two-stroke engine oil 20
- Mixing 20
-Fuelling the hedge trimmer 20
Start-up 21
- To start the hedge trimmer 21
Throttle lock-out switch 21 - Starting with cold engine 21
- Stopping the engine 21
- Stopping the engine in an emergency 21
- Starting with warm engine 21
Adjustments on the hedge trimmer 21
Working instructions 21
General behaviour when working with the hedge trimmer 22
- Working with the hedge trimmer 22
Maintenance and Care 23
- Maintenance 23
- Adjusting the cutting device 23
Lubricating the gearbox 23 - Adjusting the idle speed 23
- Cleaning/replacing the air filter 23
- Cleaning/replacing the fuel filter 24
- Checking/replacing the spark plug 24
- Checking the ignition spark 24
- Silencer/exhaust outlet 24
-Care 24
Transport 25
Storage 25
Maintenance and cleaning schedule 25
Possible faults 26
Technical data 27
Guarantee 27
EC Declaration of Conformity
No. (S-No.): 17304 → HB 60-2
No. (S-No.): 17311 → HB 72-2
according to EC directive: 2006/42/EC
We,
ATIKA GmbH
Josef-Drexler-Str. 8, 89331 Burgau - Germany
herewith declare under our sole responsibility that the product Heckenschere (petrol hedge trimmer) type HB 60-2
Serial number: 000001 - 020000
Heckenschere (petrol hedge trimmer) type HB 72-2
Serial number: 000001 - 020000
is conform with the above mentioned EC directive as well as with the provisions of the guidelines below:
2014/30/EU and 2000/14/EC
Following harmonized standards have been applied:
EN ISO 10517:2009+A1:2013
Conformity assessment procedure: 2000/14/EC - Appendix V.
Measured level of the acoustic output LwA 109 dB (A).
Guaranteed level of the acoustic output L_WA 112 dB (A).
Duly authorised person for the compilation of technical documents:
ATIKA GmbH - Technical department - Josef-Drexler-Str. 8,
89331 Burgau - Germany

Burgau, 02.11.2016
Engineering design management
Extent of delivery
Hedge trimmer
- Tool bag
Knife protection
- Fuel mixing can
- Operating manual
Assembly and operating instruction sheet
After unpacking, check the contents of the box
That it is complete
Check for possible transport damage
Report any damage or missing items to your dealer, supplier or the manufacturer immediately.
Symbols original operating manual
Threatened hazard or hazardous situation. Not observing this instruction can lead to injuries or cause damage to property.
Important information on proper handling of the hedge trimmer. Not observing this instruction can lead to faults in the hedge trimmer.
User information. This information helps you to use all the functions of the hedge trimmer optimally.
Assembly, operation and servicing the hedge trimmer. Here you are explained exactly what to do.
2 3
m = 311
Please refer to the attached assembly and operating instruction sheet for references to figure numbers in the text.
Symbols machine
| Warning! This device may cause serious injury. | Carefully read operator's manual before handling the machine. |
| Petrol and oil are a fire hazard and can explode. Smoking and open fire and smoke are prohibited. | Do not expose to rain. Protect against humidity. |
| Wear eye protection | Wear ear protection. |
| Wear protective gloves. | Wear safety shoes. |
| Choke position for "cold start" | Choke position for "warm start and working" |
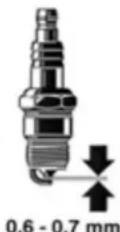
| Stop the engine and disconnect the spark plug connector before performing cleaning, maintenance or repair work. | Risk of carbon monoxide poisoning. Do not start or operate the engine in closed rooms even if doors and windows are open. |
| Warning of hot surfaces. Danger of burning! Do not touch hot engine parts. Such parts may remain hot for a short time even after the machine has been stopped. | Keep bystanders as well as pets and domestic animals away from the danger zone. Safety distance at least 15 m. |
| This product complies with European regulations specifically applicable to it. | |
Description of device / spare parts


| Pos. | Order-No. | Denomination |
| 1 | Throttle lock-out switch | |
| 2 | ON / OFF-switch | |
| 3 | Rear handle | |
| 4 | Handle unlocking device | |
| 5 | Throttle trigger | |
| 6 | Silencer | |
| 7 | 364360 | Fuel filter |
| 8 | 364365 | Fuel tank cap |
| 9 | Cranking handle | |
| 10 | 364377 | Cover with cranking rope and handle |
| 11 | 364374 | Front handhold |
| 12 | Hand guard | |
| 13 | 364227 | Protective cap HB 60-2 (w/o fig.) |
| 13 | 364353 | Protective cap HB 72-2 |
| 14 | Cutting device HB 60-2 (w/o fig.) | |
| 14 | Cutting device HB 72-2 | |
| 15 | Spark plug connector | |
| 16 | 385841 | Spark plug |
| 17 | Fixing screw | |
| 18 | 364375 | Air filter cover |
| 19 | Outlet (exhaust) | |
| 20 | Choke | |
| 21 | 364370 | Air filter |
| 22 | Fuel pump | |
| 23 | 364378 | Cover for silencer |
| 24 | 364357 | Tool bag |
| 25 | 364282 | Spark plug socket spanner |
| 26 | 364225 | Fuel mixing can |
| 27 | 364380 | Safety label |
| 28 | Open-end wrench size 8/10 | |
| 29 | Allen key size 3 | |
| 30 | Allen key size 4 | |
| 31 | Allen key size 5 | |
| 32 | Screw driver | |
| 33 | Grease filling plug | |
| 34 | 364379 | Cover for spark plug |
| 35 | Bumper HB 72-2 |
Operating times
Before initiating the device please observe the provisions pertaining to corresponding laws (regional provisions) for the noise control.
Normal intended use
- The hedge trimmer is only suitable for the private use in the house and hobby garden.
- As hedge shears for the private house and hobby garden are considered such devices that are not applied in public facilities, parks, and sports facilities as well as in the agriculture and silviculture.
The device shall not be used for cutting grass, grass borders or in order to chop for composting. Otherwise, there is a risk of injury. - The intended usage also includes compliance with the operating, servicing and repair conditions prescribed by the manufacturer and following the safety instructions included in the instructions.
- The relevant accident prevention regulations for the operation as well as the other generally acknowledged occupational medicine and safety rules must be complied with.
- Any other use is deemed not to be intended use. The manufacturer is not liable for any type of damage resulting from this: the user bears the sole risk.
- Unauthorized modifications to the hedge trimmer preclude any liability of the manufacturer for resulting damages of any kind.
- The machine may only be equipped, used and serviced by persons who are familiar with it and have been instructed on the hazards. Repair work may only be performed by us or authorized service centres.
- The machine may not be used in a potentially explosive environment or be exposed to rain.
Metallic parts (wires etc.) have unconditionally to be removed from the material to be cut.
Persons under the age of 18 must not operate the device.
Children must never use the device.
Residual risks
Even if used properly, residual risks can exist even if the relevant safety regulations are complied with due to the design determined by the intended purpose.
Residual risks can be minimised if the "Safety instructions" and the "Intended usage" as well as the whole of the operating instructions are observed.
Observing these instructions, and taking proper care, will reduce the risk of personal injury or damage to the equipment.
- Injury by catapulted parts.
- Breaking or catapulting of knife pieces.
- Carbon monoxide poisoning when using the device in closed or poorly ventilated rooms.
- Burning when touching hot parts.
- Impairment of hearing when working on the machine for longer periods of time without ear protection.
-
This device generates an electromagnetic field during operation. Such a field may affect active or passive medical implants under certain circumstances. To reduce the risk of serious injuries we recommend persons who carry medical implants to consult their doctor and the manufacturer of the medical implant before operating this device.
-
Health impairment resulting from exposure to hand arm vibration if the machine is used too long or is not properly guided and maintained.
In addition, in spite of all the precautionary measures taken, non-obvious residual risks can still exist.
Vibrations
front handle ahv,eq = 3.225 m/s²
rear handle ahv,eq = 4.128 m/s²
Measuring uncertainty K = 1.5m / s^2
The indicated vibration emission level has been measured according to a standardised test method and can be used to compare tools.
It can also be used for an initial estimate of exposure.
Warning!
The vibration emission level can differ from the indicated value during actual use of the tool depending on the manner of usage. It is necessary to define safety measures to protect the operator that are based on an estimate of exposure at the actual conditions of usage (for this, all parts of the operation cycle have to be considered, e.g. times during which the tool is cut off and times during which it is switched on but runs in no-load mode).
Safety instructions

This hedge trimmer can cause serious injuries. Carefully read the instructions on how to handle, prepare, service, start and stop this hedge trimmer. Familiarize yourself with all controls and the proper operating of this hedge trimmer.

Before starting this device, read and keep to the following advice. Also observe the preventive regulations of your professional association and the safety provisions applicable in the respective country, in order to protect yourself and others from possible injury.

Keep these security advices (operating instructions) always together with the hedge trimmer.

The hedge trimmer shall only be operated by persons with sufficient experience.

Give or lend the hedge trimmer only to persons who are familiar with the hedge trimmer and its operation. Give always the operating instruction to take with them.

Repair works on the device must be carried out by the manufacturer or by companies appointed by the manufacturer respectively.
Primary users
Persons working for the first time with the hedge trimmer must obtain a practical instruction to the use of the hedge trimmer and the operator protection equipment by an experienced operating person.
-
Be attentive. Be careful what you do. Behave sensibly when working. Do not use the device when you are tired or under the influence of drugs, alcohol or medicaments. One moment of carelessness when using the device can result in serious injuries.
-
Make yourself familiar with the equipment before using it, by reading and understanding the operating instructions. Insufficiently informed operators may put at risk their own and the health of other persons.
- Do not use the machine for unsuitable purposes (see "Normal intended use").
- Avoid abnormal posture. Provide a safe standing position and keep at any time the balance.
-
Wear suitable work clothes:
-
Do not wear loose-fitting clothes or jewellery; they can catch in moving parts.
Gloves and slip-proof shoes
Hairnet in case of long hair -
Wear protective clothing:
ear protection
protective goggles or face protection
protective gloves
- safety boots
certificated hardhat in situations where injuries to the head must be expected.
We recommend to wear a leg protection and a safety jacket.
- Keep your workplace in an orderly condition! Untidiness can result in accidents.
Take into consideration environmental influences:
- Do not expose the hedge trimmer to rain.
- Do not use the hedge trimmer in a damp or wet environment.
- Delay the work in case of disadvantageous weather (rain, snow, ice, wind) - increased risk of accidents!
- Provide for good illumination.
-
Do not use the hedge trimmer near inflammable liquids or gases.
-
Familiarize yourself with your environment and pay attention to possible dangers which you may not be able to hear because of the motor noise.
- Never leave the hedge trimmer unattended.
- For breaks the hedge trimmer has to be put down in such a manner that no person will be endangered. Assure the hedge trimmer against unauthorised access.
Persons under the age of 18 must not operate the device. - Keep other persons away.
- The operator is responsible for accidents or risks which occur to other persons or their properties.
- The operator is responsible to third persons within the area of operations.
- Keep children away.
- Do not allow other persons, especially children, to touch the tool or motor.
Keep them away from your working area.
- Avoid to use this machine when persons are close to you, in particular children.
- Do not use a blunt, broken or otherwise damaged cutting device.
- Always make sure that the hedge trimmer is properly positioned in one of the specified working positions before starting the motor.
- Be sure that the cutting device already moves before you start cutting.
Take special care when operating close to overhead cables. -
Do not overload the machine! You work better and safer in the given performance range.
-
Only operate the machine with complete and correctly attached safety equipment and do not alter anything on the machine that could impair the safety.
- Do not modify the device or parts of the device respectively.
- Do not use any knives which do not comply with the indicated characteristics of this instruction manual.
The use of other tools and other accessories can signify a risk of injury for you.
- 16 17 Stop the machine and remove the spark plug connector from the spark plug when
the hedge trimmer had contact with soil,
stones, nails or other foreign substances
checking the device for damages
- carrying out repair works
maintenance and cleaning
- carrying out servicing and repair works, removal of faults (including blocking of knives) (See "Possible faults").
- transport and storage
- leaving the hedge trimmer (also for short-term interruptions)
- Allow the machine to cool down before checking, adjusting, it, etc.
-
Maintain your hedge trimmer with care:
-
Keep your tools sharp and clean in order to be able to work better and safer.
-
Keep handles dry and free of oil and grease.
Follow the maintenance instructions. -
Check the machine for possible damage:
Before continuing to use the machine, the protective devices must be inspected to ensure that they work perfectly and with their intended function.
- Check whether the movable parts function perfectly and do not stick or whether the parts are damaged. All parts must be correctly installed and fulfil all conditions to ensure perfect operation of the hedge trimmer.
Damaged guards and parts must be properly repaired or exchanged by a recognized, specialist workshop; insofar as nothing else is stated in the instructions for use.
- Damaged or illegible safety labels should be replaced immediately.
- Do not allow any tool key to be plugged in!
Before switching on, check always that wrenches and adjusting tools are removed. Before switching on, check always that wrenches and adjusting tools are removed.
- Store unused equipment in a dry, locked place out of the reach of children.
- Do not repair the device unless you are qualified for such kind of work.
Do not carry out repair operations on the machine other than those described in section "Maintenance and care" but contact the manufacturer or authorized customer service centres.
Repairs to other parts of the machine must be carried out by the manufacturer or one of his customer service points.
Use only original spare parts. Accidents can arise for the user through the use of other spare parts. The manufacturer is not liable for any damage or injury resulting from such action.
Safe handling with fuels

Fuels and fuel vapours are inflammable and may cause serious injury on the skin or when inhaled. Therefore be careful and provide sufficient ventilation when handling with fuels.
- Never remove the tank cap and fuel when the engine is running or is still hot.
- Stop the engine and allow the device to cool down before fuelling it.
- Do not smoke and avoid open flames when fuelling.
- Wear gloves when fuelling.
Fuel only outdoors (risk of explosion). - Avoid spilling of fuel or oil. Clean the hedge trimmer immediately when you have spilled fuel or oil. Change your clothes immediately when you have spilled fuel or oil on them.
Make sure that no fuel can come into the soil. - Carefully close the tank cap after fuelling and check that it does not get loose during operation.
- Check that there is no leakage on the tank cap and fuel lines. If there are leaks this device may not be started.
If fuel is spilled, do not try to start the engine. Instead remove the device of the petrol polluted area before start.
Always drain the tank only outdoors. - Only transport and store fuels in containers approved and identified for this.
- Keep children away from fuels.
- Do not handle and store fuels close to combustible and highly inflammable materials as well as sparks and open flames.
- Go away at least three metres from the fuelling place to start the device.
- To reduce the fire risk keep the motor and silencer free from cutting remainders, leaves and lubricants.
Before the first start-up
The hedge trimmer is supplied without fuel.
Fuel the hedge trimmer as described under "Fuelling".
Fuelling
This device is operated by a mixture from petrol (unleaded) and two-stroke engine oil.

Utmost care is required when handling fuel and oil. Keep away smoke and open flames (risk of explosion).
Petrol
Petrol: Octane number at least 91 ROZ unleaded
- Do not fill in leaded petrol, diesel or other non-approved fuels.
- Do not use petrol having a smaller octane number than 91 ROZ. This may lead to severe engine damages due to increased engine temperatures.
If you frequently operate the device at high speeds, you should use petrol with a higher octane number.
- The use of unleaded petrol is recommended for environment protection reasons.
Two-stroke engine oil:
acc. to JASO FC or ISO EGD specifications
Do not use
- four-stroke oil or two-stroke oil for water-cooled outboard engines,
- mixtures ready for use from petrol stations.
Mixing
Ratio of mixture: 40:1
| Petrol | Two-stroke engine oil 2.5% (40:1) |
| 1 litres | 25 ml |
| 2 litres | 50 ml |
| 5 litres | 125 ml |
| 10 litres | 250 ml |
- Measure the oil quantity accurately as a small deviation of it has a large effect on the ratio of mixture in particular for small fuel quantities.
- Do not change the ratio of mixture. This will lead to more residues of combustion, a higher fuel consumption, a decrease of output or damages to the engine.
Mix petrol and oil in the supplied fuel mixing can (26).
- At first fill in half the quantity of petrol to be mixed.
- Then fill in the total amount of oil.
- Shake the fuel mixture.
-
Fill in the remaining quantity of petrol.
-
Fuels have only a limited shelf-life, they are subject to ageing. Outdated fuels and fuel mixtures may result in starting problems. Therefore, mix only that quantity of fuel which you can use within a month.
- Only store fuels in containers approved and identified for this. Keep fuel containers in a dry and safe area.
- Make sure that fuel containers are kept out of the reach for children.
Fuelling the hedge trimmer

- Stop the engine and allow it to cool down.
- Wear protective gloves.
- Avoid eye and skin contact.
-
Strictly follow the instructions under "Safe handling with fuels".
-
Fuel only the hedge trimmer outdoors.
- Clean the area around the filler neck. Contamination in the tank may result in malfunction.
- Shake the container once more before pouring the fuel mixture into the tank.
-
Carefully open the tank cap (8) to allow possible overpressure to relax.
-
Carefully fill the fuel mixture up to the lower edge of the filler neck.
- Close the tank cap.
Check that the tank cap is tight. - Clean the tank cap and the area around it.
- Check the tank and the fuel lines for leaks.
- 2 Operate the fuel pump (22) if required.
- Before starting the engine go away at least three metres from the fuelling place.
Start-up

Caution! Prior to starting the machine learn how to put it out of action in emergency cases.

You may not start to operate the machine until you have read these operating instructions, observed all the instructions given and completely and properly assembled the machine!
- 4 Make sure that the ON/OFF switch (2), the throttle lock-out switch (1) and the throttle trigger (5) function perfectly.
- This hedge trimmer is only allowed to be started after it is completely assembled.
- Support the hedge trimmer when starting and hold it firmly. Make sure that the cutting device can move freely.
To start the hedge trimmer:
- Keep a safe distance to flammable materials.
- Have a safe standing position.
- Place the hedge trimmer on the ground in front of you, with the cutting device showing away from your body.
- 3 Put the right foot tip in the rear handle (3).
- Hold the front handle (11) with your left hand.
Throttle lock-out switch
6
- Hold the front handle (11) with one hand.
- Hold the hedge trimmer on its rear handle (3) with the other hand and press the throttle lock-out switch (1).
- Press the throttle trigger (5).
- The cutting device will start moving.
If you release the throttle trigger, the cutting device will stop and the engine will idle. If the cutting device runs in spite of non-pressed throttle trigger, you have to reduce the idle speed. (See "Maintenance".)

Starting with cold engine
- Firmsly press on the fuel pump (22) several times until petrol (gasoline)/foam is visible in the priming pump.
- 5 Pull the choke lever (20) to
- 4 Push the ON/OFF switch (2) to the position "I".
- Grasp the cranking handle (9) and slowly pull the cranking rope until a resistance is felt. Then, pull quickly and firmly.

Do not fully pull out the cranking rope and slowly guide the cranking handle back to make sure that the cranking rope is correctly wound up.
eat this operation until the engine starts.

5 When the engine starts push the choke lever (20) to

then, fully press the throttle lever (5).
- Release the throttle trigger.
- Allow the device to warm up for approx. 1 minute before starting the work.

Stopping the engine
4
- Release the throttle trigger (5). Wait until the engine idles.
- Slide the ON/OFF switch (2) to the position "O".

Stopping the engine in an emergency
Slide the ON/OFF switch (2) to the position "O".

Starting with warm engine
Start the machine as described under "Starting with cold engine",
but leave the choke lever (20) in the operating position
Adjustments on the hedge trimmer

Adjusting the rear handle (3).
To make working with the hedge trimmer easier it is possible to choose one of the 5 working positions of the rear handle.

When adjusting, the throttle trigger (5) can not be pressed.
7
- Use your left hand to hold the hedge trimmer on its front handle (11).
- Pull the handle unlocking device backwards (4).
- Turn the handle to your desired position.
- Release the handle unlocking device. Make sure that the unlocking device engages again and that the handle is secured.
Working instructions

Carry out the following checks before starting and regularly during working with the hedge trimmer:
Is the hedge trimmer assembled completely and properly?
Check also that all nuts and screws are tightened.
Screws on the cutting device: See "Maintenance and care".
Is the hedge trimmer in good and safe condition?
Do all safety devices properly work?
Is the fuel tank filled?
Is the cutting device undamaged and sharpened?
Are engine and silencer free from deposits, leaves or emerging lubricants? (risk of fire)
Is handhold clean and dry - free of oil, grease and resin?
Is workplace free of risks to stumble?
Do you wear the required protective equipment?
Did you read and understand all advices?
Is the throttle trigger easy-running and functioning?
Does the ON/OFF switch properly work?
Does the cutting device always stop in idle mode? If the cutting device moves during idling the idle speed must be reduced (see "Adjusting the idle speed").
Check that the gearbox is sufficiently lubricated (see "Maintenance and care").
General behaviour when working with the hedge trimmer
- Never work alone. Another person should stay close enough to hear calls for help.
- Keep children, bystanders and animals at a distance (15m min.) from your working area.
- Do not work on snow, ice or other slippery ground - slip hazard.
- Do not work under insufficient light conditions (e.g. fog, rain, snow flurry or twilight).
- Scare animals off the hedge before starting to cut in order to prevent them from being injured.
- Provide for a safe and cleaned workplace. Remove from the working area objects which might be thrown off.
- Avoid abnormal posture. Keep at any time the balance. Do not work with the upper part of the body leaned forward.
Operate the hedge trimmer only with safe standing position. - Stop the hedge trimmer when moving to another work place.
- Keep hands and feet away from the cutting device when it moves.
- Hold the hedge trimmer so that you do not inhale exhaust gases. Do not work in closed rooms.
- Do not use the hedge trimmer to pick up or remove wood pieces or other objects.
- Remove unconditionally any foreign objects out of the hedge (e.g. wires) as these can damage the knives of the hedge trimmer.
Hold the hedge trimmer always firmly with both hands, left hand on the front handhold (11) and right hand on the rear handhold (3).
If you release the throttle trigger the cutting device will after-run for a short time (free wheeling effect).
Start trimming with the cutting device moving. - Never touch the cutting device with your hands during operation.
Never work
with stretched arms
on hardly accessible places
too far bent forward
- Never work with the hedge trimmer above shoulder height.
-
Never get in contact with the running cutting device with metallic fences or the ground.
-
Stop the engine and allow the machine to come to a stop when
the cutting tool hits a foreign object,
- abnormal operating noise is noticed,
the machine causes abnormal vibration.
Then, pull off the spark plug connector from the spark plug and take the following actions:
- check the machine for damages,
- check for loose parts and tighten them if necessary,
-
replace damaged parts by equivalent parts or have them repaired.
-
Stop the engine and pull the spark plug connector:
to remove jammed material,
to eliminate faults,
- for work breaks,
before leaving the hedge trimmer,
before checking the hedge trimmer,
before adjusting the working position of cutting device
-
Do not place a hot hedge trimmer in dry grass or onto inflammable objects.
Before starting your work make sure that: -
no other persons or animals stay within the working area,
you can always step back without any barriers, - your standing area is free from foreign objects, brushwood and branches,
you have always a secure standing position.
Working with the hedge trimmer

Hold the hedge trimmer with both hands on a safe distance from the body.
- The maximal diameter to cut depends on the wood's type, age, moisture and hardness.
Therefore cut very thick branches using branch shears to your desired length before trimming the hedge.
- 89 Due to its double sided knives the hedge trimmer can be guided forward and backward or by oscillating movements from one to another side.
- At first cut the sides of the hedge and then the upper edge.
Cut the hedge from the bottom up.
Cut the hedge in trapezium shape. This prevents the lower hedge area from growing bare due to insufficient light. - Stretch a guide over the complete length of the hedge when you want to shorten the upper edge of the hedge evenly.
- Trim in several passes if you have to cut down a large portion of the hedge.
Best time for hedge trimming:
Leaved hedge:
June and October
Conifer hedge:
April and August
Quickly growing hedge:
from May and then every 6 weeks
- Pay attention to breeding birds in the hedge. If so, put off hedge trimming or leave this area out.

any case pay attention to all safety instructions.
Maintenance and Care

Before each maintenance and cleaning work
- Stop the engine.
- Wait until the cutting device does not longer move.
- Stop the engine and pull off the spark plug connector (with the exception of idle speed adjustment).
- allow the device to cool down

Do not carry out maintenance work close to open flames. Risk of fire.
Maintenance and repair work other than those described in this chapter is only allowed to be carried out by service staff.
For maintaining and cleaning, removed security devices must unconditionally be mounted properly and proved again.
Use only original parts. Other parts can result in unexpected damages and injuries.
Maintenance

In order to aviod possible injuries wear gloves.
To guarantee a long and reliable usage of the hedge trimmer carry out the following maintenance works regularly.
Check the hedge trimmer for obvious defects such as
- loose fastening elements
- worn or damaged components
- deformed, broken or damaged cutting device
leaks from the fuel tank cap or fuel lines
Check the hedge trimmer after each application for
- wear and tear, in particular sliding play of the cutting device
- correct assembly and faultless covers and protective devices.
Necessary repair or maintenance operations have to be carried out before the usage of the hedge trimmer.

Adjusting the cutting device
Readjust the sliding play if cut material is clamped between the blades or the play has increased due to normal wearing of the cutting device after a longer period of use.
To obtain good cutting results the free motion between the blades and the sword must be correctly adjusted.
#
For this proceed as follows:
- Loosen the nuts (A) on the top surface of the cutting device.
- Slightly tighten the screws (B) on the underside (if required loosen them previously).
- Turn the screw back anticlockwisely by a quarter up to a half turn.
- Use a allen key (30) to hold the screw and firmly tighten the nuts.
The sliding play is correctly adjusted if the washer under the screw head can just be freely moved back and forth by hand.
- Lubricate the cutting device using environmental-compatible lubricating oil.
If the play is too small, this may cause a great extent of heating and thus damage to the device.

Lubricating the gearbox
12
Lubricate the gearbox every 25 operating hours.
- Put the grease gun onto the grease filling plug (33). The grease filling plug is located at the gearbox (on the bottom of the hedge trimmer).
- Force some grease into the zerk fitting.
1 Do not fully fill the gearbox. Grease expands due to heat generated during operation there is the risk of damages to seals and grease leakage when the gearbox is fully filled with grease.
Use SHELL ALVANIA RL3, for example, or an equivalent grease brand.

Adjusting the idle speed
The carburetor is factory-set to the correct idle speed so that the correct fuel-air mixture is fed to the engine.
The idle speed is correctly adjusted when the engine runs smoothly in every position. It should be a clear difference to the speed at which the cutting device begins to move. Also the cutting device may not move when the choke is put to
In the cases below the carburetor (idle speed) has to be corrected:
- The cutting device continues to move at idle speed (idle speed too high).
Erratic running or lack of acceleration (idle speed too low) - Adjustment to weather conditions and temperatures

An incorrect carburetor adjustment results in severe engine damages. Do not continue working with the machine in such a condition.
Do not continue working with the hedge trimmer in such a condition.

Cleaning / replacing the air filter
14
Clean the air filter (21) from dust and dirt on a regular basis to prevent
- starting problems,
carburettor faults,
loss of output, - worn engine parts
too high fuel consumption.
Clean the air filter every 8 operating hours, or more frequently in dusty environments.
- Put the choke (20) to N to prevent dirt particles from coming into the carburettor.
-
13 Loosen the fixing screw (17) and remove the air filter cover (18).
-
Remove the air filter (21).
- Wash the air filter in a luke warm soapy solution.
Do not blow out dirt particles, otherwise there is a risk of eye injury.
- Clean the air filter interior using a brush.
- Allow the air filter to dry well and reinsert it.
- Re-mount the air filter cover.
Never operate the machine without air filter. Dust and dirt can enter the engine and cause damages to the machine.
Replace the air filter on a regular basis.
Damaged air filters must be replaced without delay.
Cleaning/replacing the fuel filter
15
Check the fuel filter (7) if required. A contaminated fuel filter restricts the fuel supply.
Open the tank cap (8) and pull the fuel filter through the opening using a wire hook.
Slight contamination:
Pull the fuel filter from the fuel line and clean it in petroleum ether.
Bad contamination:
Replace the fuel filter.
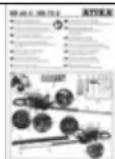
Checking / replacing the spark plug


Do not touch the spark plug (16) or the spark plug connector (15) when the engine runs. High voltage!
Risk of burning on the hot engine. Wear protective gloves.
Check the spark plug and the spark gap on a regular basis.
For this proceed as follows:
- 16 Loosen the screws (C) and remove the cover (34).
- Pull the spark plug connector from the spark plug.
- Remove the spark plug using the supplied spark plug wrench (25).
The spark gap must be 0.6 to 0.7mm
Clean the spark plug when it is contaminated.
Install the spark plug in reverse order.
Do not overtighten the spark plug.
Used spark plug: 1/8 - 1/4 turn
New spark plug: 1/2 turn
A loose spark plug may overheat and damage the engine.
① Tightening the spark plug too firmly may damage the thread in the cylinder head.
Replace the spark plug:
- every 100 hours or each season (whichever case comes first)
when the insulating body is damaged, - when the electrodes show excessive erosion,
when the electrodes show excessive dirt or oil.
Use the following spark plug type:
Torch L7T or L8RTF, LD L7T or L8RTF, NGK BPMR7A, Bosch WSR6F, Champion RCJ7Y
Checking the ignition spark
- Remove the spark plug.
- 密 Firmly put the spark plug connector (15) on the spark plug (16) again.
- Insert the spark plug socket spanner through the body opening. The spark plug socket spanner must have contact to the engine housing (metal).
Do not insert the spark plug socket spanner in the spark plug hole.
- Use an insulated pair of tongs to press the spark plug against the spark plug socket spanner (25) (away from the spark plug hole).
- Slide the ON/OFF switch to the position "I".
Pull the cranking rope.
If there is no spark visible between the electrodes, the spark plug may be defective.
Silencer / exhaust outlet
- 20 Loosen the screws (D) and remove the cover (23).
- Check the tight seat of the screws (E) on the silencer (6) on a regular basis.
If they are loose, tighten them hand-tight.
Do not retighten the silencer screws when the engine is hot.
3. Clean the exhaust outlet (19) on a regular basis.
Care
Clean the hedge trimmer thoroughly after each application so that the faultless function is kept.

Wear protective gloves when cleaning the cutting device.
Clean the case with a soft brush or a dry cloth.
Water, solvents and polishing agents shall not be applied.
Check that the ventilation slots for the motor cooling are free (risk of overheating).
To minimise the risk of fire make sure that the engine and silencer are free from dirt, leaves or emerging lubricant.
Clean the cutting device on a regular basis using a brush or a cloth.
① Never clean the knives with water (Risk of corrosion!)
Clean and oil all moving parts regularly.
① Never use any grease!
Use for instance environmentally acceptable spray oil.
Transport
To transport the device stop the engine and wait until the cutting device does not longer move. Attach the protective cover.
- Carry the device with the front handle.
- When transporting the device within a car put it in the boot or on a separate loading area. Secure the hedge trimmer against tipping over, damages and fuel spillage.
Storage
- Store unused devices with attached protective cover in a dry, locked place out of the reach of children.
Always store the machine in places where gasoline vapour cannot come into contact with open flames or sparks (e. g. not close to a stove, oven or water heater with pilot light).
Always allow the device to cool down before storing. - To extend the service life of the hedge trimmer and guarantee smooth operation, before storing for a longer period:
thoroughly clean the device
treat all movable parts with an environmentally friendly oil Never use any grease!
Slide the protective cover on the cutting device.
Remove the spark plug connector.
Remove the spark plug. Then fill a little amount of engine oil (approx. 5-10 ml) into the cylinder. Slowly pull out the cranking rope handle to distribute the oil. Re-mount the spark plug.
Before any use of the device you have to remove and clean the spark plug.
Empty the fuel tank completely.
Always drain the tank only outdoors.
Dispose of remaining fuel in an environmentally compatible manner.
Operatethe engine until the carburettor is empty.
Check the machine for perfect condition to ensure a safe use of it after a longer period of storage.
Maintenance and cleaning schedule
| Maintenance work | Before each use | After each use | Every 8 hours | Every 25 hours | Every 100 hours | If required / damaged | Each season |
| Fuelling | ■ | ■ | |||||
| Lubricate the gearbox | ■ | ||||||
| Check the cutting blade | ■ | ■ | |||||
| Replace the cutting blade | ■ | ||||||
| Replace the thread knife | |||||||
| Throttle trigger / throttle lock-out switch / ON/OFF switch - Functional test | ■ | ||||||
| Throttle trigger / throttle lock-out switch / ON/OFF switch - Have it replaced | ■ | ||||||
| Cranking rope - Functional test | ■ | ||||||
| Cranking rope Have it replaced | ■ | ||||||
| Check the fuel tank cap - Replace | ■ | ||||||
| ■ | |||||||
| Clean fuel filling filter | ■ | ■ | |||||
| Clean the fuel filter | ■ | ■ | |||||
| Replace air filter | ■ | ||||||
| Cleaning the air filter | ■ | ■ | |||||
| Replace air filter | ■ | ||||||
| Spark plug Check the spark plug connector | ■ | ■ | |||||
| Replace the spark plug | ■ | ■ | ■ | ||||
| Clean the silencer | ■ | ■ | |||||
| Check the carburettor in idle speed (cutting device may not move) - Have this adjusted | ■ | ■ | |||||
| ■ | |||||||
| Check the machine | ■ | ■ | |||||
| Clean the machine | ■ | ■ | |||||
| Replace the safety label | ■ |
Possible faults

Before each fault elimination:
- Stop the engine.
- Wait until the cutting device does not longer move.
- Remove the spark plug connector.
Wear gloves.
| Fault | Possible cause | Remedy |
| Hedge trimmer does not work. | ·No fuel supply | ·Check the fuel quantity |
| ·Fuel old or contaminated | ·Drain the fuel into a container outdoors. Fill the tank with fresh and clean fuel. | |
| ·Fault in the fuel line | ·Check the fuel line for kinks or damages | |
| ·Fuel filter clogged | ·Clean/replace the fuel filter | |
| ·Spark plug sooted or defective | ·Clean or replace the spark plug | |
| ·Incorrect electrode gap | ·Adjust the electrode gap | |
| ·Spark plug connector not placed on. | ·Place on the spark plug connector. | |
| ·Carburetor soiled, incorrectly adjusted or defective | ·Contact the customer service. | |
| ·Engine flooded | ·Screw off, clean and dry the spark plug. Then pull the cranking rope several times and reinstall the spark plug. | |
| ·Cranking mechanism defective | ·Contact the customer service. | |
| ·Engine defective. | ·Contact the customer service. | |
| ·Internal fault | ·Contact the customer service. | |
| Hedge trimmer cuts with interruptions | ·Fuel old or contaminated. | ·Drain the fuel into a container outdoors. Fill the tank with fresh and clean fuel. |
| ·Spark plug sooted | ·Clean or replace the spark plug. Check the spark plug connector. | |
| ·Carburetor incorrectly adjusted | ·Contact the customer service. | |
| ·Internal fault. | ·Contact the customer service. | |
| ·ON/OFF switch defective. | ·Contact the customer service. | |
| Engine is running, cutting device does not move | ·Cutting device blocked | ·Stop the engine and remove the object |
| ·Internal fault. | ·Contact the customer service | |
| ·Clutch defective | ·Contact the customer service | |
| Decreasing engine power | ·Incorrect fuel composition | ·Fuel according to the operating instructions |
| ·Incorrect position of the choke lever | ·Put the choke lever to | |
| ·Air filter contaminated. | ·Clean/replace the air filter. | |
| ·Spark plug sooted | ·Clean the spark plug | |
| ·Incorrect electrode gap | ·Adjust the electrode gap | |
| ·Silencer blocked | ·Contact the customer service. | |
| ·Carburetor soiled or incorrectly adjusted | ·Contact the customer service. | |
| Cutting device gets hot | ·Missing lubrication → friction | ·Oil the cutting device |
| ·Not enough play | ·Adjust the sliding play | |
| ·Cutting blades are blunt | ·Have the cutting device sharpened | |
| Smoke | ·Incorrect fuel composition | ·Fuel according to the operating instructions |
| ·Carburetor soiled, incorrectly adjusted or defective | ·Contact the customer service. |
In case of further faults or inquiries please contact your local dealer.
Technical data
Guarantee
| Type | HB 60-2 | HB 72-2 |
| Model | HB 60-2 | HB 72-2 |
| Year of construction | see last page | see last page |
| Max. engine output at a certain speed | 0.75 kW (7500 min-1) | 0.75 kW (7500 min-1) |
| Cubic capacity | 25.4 cm3 | 25.4 cm3 |
| No-load speed no | 3000 min-1 | 3000 min-1 |
| Engine speed | 7500 min-1 | 7500 min-1 |
| Engine speed with running cutting device | min. 3750 min-1 | min. 3750 min-1 |
| Ignition system | electronic ignition | electronic ignition |
| Spark plug | Torch L8RTF or equivalent | Torch L8RTF or equivalent |
| Spark gap | 0.6 - 0.7 mm | 0.6 - 0.7 mm |
| Fuel tank capacity | 0.45 l | 0.45 l |
| Ratio of mixture (fuel/two-stroke oil) | 40:1 | 40:1 |
| Hand arm vibration | front handle ahv,eq = 3.225 m/s2rear handle ahv,eq = 4.128 m/s2 | front handle ahv,eq = 3.225 m/s2rear handle ahv,eq = 4.128 m/s2 |
| Measuring uncertainty | K = 1.5 m/s2 | K = 1.5 m/s2 |
| Length og sword | 600 mm | 800 mm |
| Cutting length | 550 mm | 720 mm |
| Cutting thickness | 28 mm | 28 mm |
| Cutting speed | 1950 cuts/min | 1950 cuts/min |
| Weight (tank empty) | approx. 6.3 kg | approx. 6.5 kg |
| Sound pressure level LPA at the workplace (according to regulation 2000/14/EC) | 87.6 dB (A); K = 3 dB (A) | 87.6 dB (A); K = 3 dB (A) |
| Sound power level LwA (according to regulation 2000/14/EC) | measured sound power level 109 dB (A); K = 1.99 dB (A) guaranteed sound power level 112 dB (A) | measured sound power level 109 dB (A); K = 1.99 dB (A) guaranteed sound power level 112 dB (A) |
Please observe the enclosed terms of guarantee.
Technical modifications reserved.
Sommaire
Vibrations main-bras
Bn6paunn (Bn6paunn Ha nlaHTa npkata) 43
Bezonacha pa6oTa 44
-Be3oNaCHO6opabeHecMOToPHnroPnBa 45
Ppei nbpBnny nyc 45
3apekdahe 45
-6eH3nH 46
- ByTaKTOBO MOTOPHO MacNo 46
- CmecBaHe 46
3apeKdaHe c 6eH3nHa HOXucaTa 3a XNB nIeT 46
Iyckahe B ekcnloatau 46
- Nyckahe Ha HOxuata 3a JnB nIeT
- BnOKIpOBkata Ha loCTa 3a dpoceHnHa ta knana 47
-Пуckaанepn cTydenдвигател 47
CnnpaHe Ha Dniratena 47
CnpaHe Ha DnBraTeI npn abapn 47 - Pnyckahe npn TOnbI DBrIaTeI 47
PerynnpaHa Hoxuata 3a XNB PNeT 47
Yka3aHnna 3pa6oTa 47
- O6uO NOBEdHne npa6oTa c HoxncaTa 3a XNB PNET 48
- Pa60Ta c HoxKuata 3a XnB nIeT 48
Texnuecko o6cnykBaHe n noDpBxKka 49
- TexNuecka noDpBjKka 49
-ФИКСИРанеHa peжшоTo yCtpoiCTBO 49 - Cma3BaHe Ha peDyKTopa 49
— PerynnpaHe Ha o6opotne Ha npa3eH xoJ 50
IOncTbHe n CmHa Ha Bb3DyHnHa cInTbp 50
-Почнстваи И смяна Ha 6eH3nHOBnAФЛТьр 50
Да ce npOBepn 3anaNTenHaTa CBeu,peCn.Дa ce cMeHn 50 - Dacce npoBepn 3anaJIteJIHaTa nckpa 51
- Wymo3aIyIuITeI/ OTrbop 3a I3BexKdahe 51
-Подрьжka 51
TpaHcnpT 51
CbXpaHHe 51
ПланзаТexнчecкаддрьжka 52
Bb3MOxHn Heu3npaBHOCTn 53
TexHnueckn daHHN 54
Tapaanzna 54
Дeкnapaця 3a cьOTBeTCTBnE cьгласно HopMnte Ha БрoneиСКаТа obuHocT
No. (S-No.): 17304 → HB 60-2
No. (S-No.): 17311 HB 72-2
cbIpaCHO DnpeKtNbata Ha EO: 2006/42 EO
C HactoToHne,
ATIKA GmbH
Josef-Drexler-Str. 8, 89331 Burgau - Germany
dKnapnpame Ha cBcO OTROBOPHOCT,Ye npOdyKTbT
Heckenschere (6eH3nHOBa HOXnua 3a XnB nneT) Tn HB 60-2
CepneH Homep: 000001-020000
Heckenschere (6eH3nHOBA HOXmua 3a XNB PnTe) TnH B72-2
CepneH Homep: 000001-020000
CbOTBeTCTBa Ha pa3nope6Bnte Ha ropeNOCOeHNTe DnpeKtNBn Ha EC n Ha pa3nope6Bnte Ha cIeHNTe DOIbJIHNTeJIHn DnpeKtNBn: 2014/30/EC u 2000/14/EO
PpIIOXeHN ca cIeHnTE xapMOHn3npaHn CTaHdApTn:
EN ISO 10517:2009+A1:2013
npoueypa 3a ouehBaHe Ha cBoTBeTcTBHeTo: 2000/14/ EO - npJIOxKeHne V
U3MepeHO HNBO Ha CnnaTa Ha 3Byka LwA 109 dB (A).
TapaHTnpaHO HnBO Ha CnNaTa Ha 3ByKa LwA 112 dB (A).
Пьномошнк 3a CBCTABЯHe Ha TeXHnueckaTa DOKymeHTaIGN:
JaHaTa CToHocT Ha Bn6paCmTe MoKe Da ce N3NoJ3Ba 3a NbPBOHaayHa OeHka Ha N3NaRaHeTo Ha Bn6paCm.
PpeDynpexkdeHne:
CTOINHOCTTa Ha Bn6paunTe no BpeMe Ha DeiCTBnTEHATA yNtpeBa HA INCTpyMeHT MoKe Da ce pa3JIuHa BA OT daHeHATA CTOINHOCT B 3aBnCmOcT OT BnDa N HauHa Ha yNtpeBa Ha INCTpyMeHT.
Tp6Ba Da ce onpeDenr 3aunTHmepKn 3a 3aunTa Ha 06cnykBaUTo Nue, KOnto Ce OCHOBaBt Ha oueHKata Ha 1n3JaRaHeTo Ha Bn6paunn Pn DeHCTBnTeHNITE ycIOBnHa yNtpe6a (TyK Tp6Ba Da ce B3emat PneBDnqactHTe OT pa6OTnua Kkbl, HAnpMep BpeMeTo, B KOETnHCTpyMeH e 1N3KNUoyeh, n TOBa, B KOETO Toe BkNoueH, Ho pa6OTn 6e3 HaTOBapBaHe).
Bezonaacha pa60ta

Hoxuata 3a JN B nT MoKe da npedn3BnKa cepno3HN HapaHBaHn! IpoyeTe BnMaTeJHo yka3AHnTa 3a npabInHa ynTope6a, 3a noDroTOBka, peMOHT, cTAPtnpaHe n CnnpaHe Ha HOxuata 3a JN B nT. 3ano3HaIte Ce C BCnuK perynpaun qactn n C npabInHata yNoTope6a Ha HOxuata 3a JN B nTet.

IpeDn nycKaHe B DeiCTBne Ha TOBa N3deJIne npOyeTe H cna3BaHte CNeHnTe yKa3aHn, KaKTo H BaNnDHnTe 3a CbOTBeTHata CtpaHa pa3nopeDn NO 6e3onacHocT, 3a Da IpeDnA3nTe Ce6e cn n DpyrInTe OT Bb3MOxHN HapaHraHn.

CbxaHbAte HNCTpyKunTe 3a 6e30nacHOCT (pbkoBOcTBOTo 3a EKCnNoatau) BUNaHn 3aeDHO C HOxuata 3a KIN PJIET.

Hoxnata 3a kiv nIeT moKe da ce o6cnykBa cAmO ot Iuca CdoCTaTBueH ONIT.

IaBaIte IIN 3aMaIte HOxNcTa 3a JXNB PJIeT CaMO Ha Iuca, KOnTO ca 3aNo3HaTu C HOxNcTa 3a JXNB PJIeT N HauHb HA pa6Ota C HeJ. 3aeHc C HeJ DaBaIte BnHaIn N pBkoBOdCTBTo 3a O6CnyKbaHe.

PemontpaHTo Ha ypeDa Tp8Ba Da ce N3BbPwBa OT npOn3BOdnteJI nn Of nPmN, nOcoyeHn OT Hero.
- PbpBn non3BaTeI
To3n, KOto 1e pa6oTn 3a nbpBn nTc HOxNtcaTa 3a JXNBnET, Tp8Ba Da 6bJe npakTuYeCKn HnCTpyKtnpaH 3a pa6oTa C HOxNtcaTa 3a XNB PNeT n O6OpyDbaHeTo 3a liuHa 3aunTA OT ONHTEN OpeaTOP.
-БьдeTe BHNMaTeJIHn. BHIMaBaIte KaKBo npaBnte. IopXoxJaIe pa3ymHo KbM pa6OtaT. He n3noJ3BaIte ypeDa, aKO cTe yMOpeHn nII nCTe NOB BnIaHMeTo Ha HapKOTnU, aIKoXoJ nII MeINkAmEHTN. MOMENTO HeBHNMaHHe npu n3noJ3BaHe Ha ypeDa MoKe da DoBeDe Do cepNo3Hn HapaHЯBaHn.
Ipeynynoptep6a ce 3ano3HaTe cypea c nOmoUta Ha pBkoBOndBOTo 3a eknloataua. HeoctatbHNO HΦopMnpaHnTe onepaTopn MORAT Da HABpeT Ype3 HnppaBnHa ynoptep6a Ha cebe cn Ha npu nnca.
He n3non3BaIte ypea 3a ceHn, 3a konTo ToH He e npedHa3HaueH (BnKTe "YnoTpe6a no npedHa3HaueHne").
I36raBae HeHOpMaJIHO NOIOXeHHe Ha TJIOTO. Ocnrypete cTa6nHa CToiKa N BbB BCEKn eDIn MOMENT noIdbpaTe paBHOBeCne. ToBa BaKn Hai-BeYe, KOraTO n3IOJ3BaTe CTeNEHK Nnn CTbJIbN.
Hocete noDxOaIso pa6oTHo 06neKIO:
- HeШиpopо obлесно Или украшени, Te Morat Да 6ьдат зхванати OT повьнкие сementsн
- pBkABnIuO6yBN, KOnTO ca yCToUHbHa XNb3raHe
-Мрека 3a Kocata npn Dblra Koca
HoceteIuHHnpedna3HcpeDCTBa:
- 3aunnta 3a cnlya
3aunTHNOOINNA INN 3aunTa3aJIuTeTO
pa60THn pbKaBnu - npedna3Hn 06yBkn
-
N3NITaHa 3aunTHa KACKa B CNTyaUN, B KONTO mMa ONaCHOCT OT HapaHbAHe Ha rnaBata.
-
IpnopbUvBme da ce Hocn 3aunTa 3a KpaKaTa n npedna3Ho je.
IopbpaBnTa Bn oBlaCT nopeH! IInncataHa peM MoKe Da DoBeDe Do 3NoNOnyKn.
BHHMABaTe 3a Bb3deIcTBnTa Ha OKoNHaTa cpea:
He n3naarate ypeHa nIbXk.
- He n3noI3BaIte ypeDa BBB BnaJHa mIIMoKpa 3aObukanla cpeDa.
- OToJoxTe pa6oTaT npn He6JIarOpnIaTHo BpeMe (DbXd, Chr, JneI, BAtbp) - NOBUNeHa OnaCHOCT OT 3JIOJIoYkn!
Iorpnjkece3aDobpoocBeTneHne.
- He n3noJ3BaIe ypea B 6n3oCT do roPMn TeHocTn nn rA3OBe.
3aNo3HaIte ce c 06ctaHObKaTa HAOKOIO N BHMAbaIte 3a eBcHTyaJIHn ONaCHOCTN, KOnTO eBcHTyaJIHn He MoKeTe Na Cyete npadn UyMa OT MOTopa.
He ocTabaIte ypeDa HnKora 6e3 Ha3Op.
B noYbKIne octabTte HOXuTa 3a XnB nIe Taka, Ye da Hma onachoc 3a Hkoro. OcnrypeTe HOXuTa 3a XnB nIe Cpeuy Hepa3peWeH DoCTbn.
- Nla noid 18 roDHH HMaT npaBo da o6cnyXbTaypeda.
-ДрьжтЕдpyгптЕлпанстpena.
- Iotpe6nteIaTe 3a 3JIOJNYKn IN ONaCHOCTN, KOUTO Bb3HnKBaT CnprMo DpyrN JINuA NIN CnprMo TxAHa CO6CTBEHOCT.
- IInuTeTo, obcnykBaAio ypeDa, Hocn OTROBOPHOCT no OTHoWeHne Ha TpeTn IIna, HAMnpaun Ce B o6cerHa pa6ota Ha MaunHata.
-ДрьхтedesцанactpaHa.
He pa3pewabaiTe dpyr nIuca, hai-Beue deua, da nunat HnCTpyMeHTa nn DnBraTaeJ. PbxTe rHactpaHa OT Baunpa60Te yAcTBK.
- Ynotpe6aTa Ha MaunHaTa Tpa6Ba Da ce n36raBa, KOrato B 6nn3ocT mA xopa, Ppei BCnUKO deua.
Ipei Da ce cTaptnpa DnBraTeJIa TBNHa Ce yBepBaHte, ye Hoxuata 3a XNB PJIeT Ce HAMnpa HAnEHXHO B eJHa OT onpeJeHeHte pa6OTHN I03nU.
He n3noJ3BaIte 3aTbIeHO, n3KpNBeHO nJIu NOBpeHOpexKeIoo yCTpoIcTBO.
3aNochete da pexkete, eDba KOrato peXeOTo yCTpOHTBO TpBHe.
BnHMaHHe npu Na3eMHn eJeKtpueeKn Ka6eJI.
He npetobapbaTe MaunHata! Bne pa6oTne no-dO6pe nno-6e30nacHO 3aadaenHata oIbact Ha MOUHOCTTA.
- 3nno3BaIte ypea eHCTBeHO C nBnH N KOpeKTHO MOHTnpaHn PpeNa3H CbOpBXeHn N pOmeHnTe HnO NO MaunHaTa, KoTo 6n MoTIO Da HAMn 6e3oNaCHOCTTa.
He n3MeHnTe ypeDa, cboTBeTHo YacHTne Ha ypeDa.
He n3no3BaIe pejkeu yctpoiCTBO, KoETo He otroBapnHa npaAMetpnte B HAcTOrAto pBkoBOdCTBO 3aekCnloataun.
Uynotpe6bata Ha npyHn HNCTpyMeHTn N dpyn npHaJnHexKHOCTMOKe Da npedCTaBJIbBa 3a Bac onaCHOCT OT HapaHBAhe.
16 17 N3KJIIOUeTe MaUNHaTa N3DbpnaIte IeNcena npi:
- KoHTaKT Ha ypeDa c KaMbHN, pIPOHn IIN dpyrN CyKdN TeNa npOBepTe, daJIypeBt e NOBpeDeH.
- pemOHTH pa60TN
pa6oTn no nOaPbXkKaTa nNouCTBaHTo
OTCTpaHraBaHe Ha HEn3nPaBHOCTN (KbM Tx Cnada CbIoo N 6IIOknpaHeto Ha peKeIto yCTpoiCTBO) (BIX Bb3MOKNI NOpeiN)
TpaHcnpT n CbXpaHeHne
HanyckaHe Ha MaunHaTa (cbio npKpaTkoBpeMeHH npeKbcBaHe)
OCTaBeteMaunHata Da ce OxJaN npEi DaЯ npoBepTe,HaCtponTe N.T.H.
- PoiDJIbprkaIte ypeDa rpnKIIIBO:
- PoiIbpxaIte HNCTpyMeHTnTe OCTPN NHCn, 3a da MoKete Da pa60TnTe NO-dO6pe n No-CnrypHo.
IodbpxaIte pkoXbaTKnte cyxn n He3ambpceHn c Macno ngpec.
CneBbte yka3aHnra 3a noDpBjKa.
PpOBepeMaunHaTa3aEBeHTyAINHnNOBpeN:
- Ppei nO-HaTaBbHa yNtpe6a Ha ypea cIeBa da 6bDat npOBepHn PpeIpa3Hnte yCTpoiCTBa nO tHOWeHne Ha TxHOTo 6e3ynpueHo DeIcTBHe, Cbo6pa3Ho PpeHa3HaueHneTo IM.
-Поберетe,дали движшiteчactn pa6otЯT 6e3ynpeuho n He 3aJxdaT nIi DaI NMa IOBpeHn Yactn. BcNkn Yactn Tpr6Ba Da ca MoHTnpaHn npabINHO nDa OTRObaprT Ha BCNUK yCNOBnA, 3a da OcnIrpyrt 6e3ynpeuHaTa pa6ota Ha TpnoHa
IobpeHHe 3aunTHn ycTPOcTBa n uactn Tp6Ba da 6bDat peMOHTnpaH npabINHO OT JInueH3npaH CneuaJIn3npaH cepBn3 INN CMeHEH, aKO B pKOBODCTBOTo 3a o6CnUyKBaHe He e nocOeHO dpYro.
IobpeHHeTe Hn HeeETnBn JneEHKn C yka3aHna 3a 6e3oNaCHOCT Tp6Ba Da ce CMeHrT.
He octabrte HNCTpyMeHTaHn KNoOBe B MaunHaTa! PpeIN BKIOUbaHe BNHaI npOBepBaTe, daJI N ca MaxHaTn KNOOBeTe INHCTpyMeHTe 3a HAcTpOka.
- YpeiN, KOnTo He ce NOn3BaT cbXpaHraBaiTe B cyxo, 3aKlIOHeHO NOMEUeHne, N3BbH O6cera Ha deua.
He n3bpuBaIte peMOHTn Ha MaunHaTa, OCBEN aKO HMaTe 6pa3OBAHne 3a TOBa.

He npednpneMaTe npyrrpeMOHTnHa MaunHata OCBeh onucaHnte B rnaBata,TexHuecko obcnykBahe n noDpBxKa" a ce obbPheTe dIpeKTHO KbM npOn3BOIDNTeJI, CbOTBETHO KbM KOMNETEHTRNCEPBUN3.

PemOHn Ha dpyr nuactn Ha MaunHaTa Tpa6Ba da 6bDat n3BbpWbAHN OT npOn3BOdnteJIpeCn.OT HAKOOT HeOBNTe cIyKb 3a KIneHTn.

Ja ce n3non3BaT cAmO opuHaHn pe3epBn qactn. NocpeIcTBOM n3non3BaHeTo Ha npyIn pe3epBn qactn IN dpyn pnuHaJnxKHOCTN MORaT Da Bb3HNKHAT 3JNONyKn 3a notpe6nteJra. 3a npoN3TuHaaTeOT TOBA uetn npOn3BOIDNTJrT He HOCN OTROBOPHOCT:
Бezonachoборавес мOTOPнгориBa


TogNBATAI ROPNBHNTe nap ca orHeonacn m MORa Tda npedN3BnKaT TeKKn yBpeXdHaHn np BAnBaHe n Bbpxy Koxata. Nopadn Ta3n npuHa np6 bopabeHTo C ropNo Tp6Ba Da ce DeNCTBa MHORo BHMaTeJIHO n da Ce N3BbpWBA Do6po npOBeTpRaHe.
Hikora He maxaTe kanaKata Ha pe3epBoapa nIe HdoINBaTe 6eH3nH, DOKATO DBIRATEJrT pa6OTn IIN e Haropeuhen.
- Ppei3aepkdahe Ha ypea c ropnBO n3KnIycheTe Dnrgatena n octabete ypeda da ce oxna.
- Prn 3apeXdaHTo C roPbBO He Tp6Ba Da ce pyuN I da ce n36ra O TBOpEN np03opeU.
- Ppi 3apekdahe c ropnBO HocTe pbkauu.
3apeKdaiTe cAmo Ha OTkpTu. (B3pNUBOOnaCHOCT).
BHHIMaBaIte 3a TOBa, da He pa3cHbAte rOpNBO nIM macNo. NocTeTe ypeDa BeHara, aKO cTe pa3neM rOpNBO nIM MacNo. CMeHete o6JIeKlToCn BeHara, KOrato cTe pa3cHnA1r rOpNBO nIM MacNo Bbpxy Hero.
- 06bpehe BHMaHne Ha TOBa, Da He nona da ropnBO B noybaT.
3aTbopeTe KIIOUaIKKaTa Ha pe3epBOapa OTHOBBHNMaTeJIHO cIeI 3apeKJaHeTo I O6bPHeTe BHNMaHne HaTOBa, Ta Da He ce OCBO6OJn NO BpeMe HaekCIIIOaTaunra.
- O6bpeTe BHMaHHe Ha ToBa, KaNaUKaTa Ha pe3epBoapa n 6eH3nHOBnTE npOBoHNuI Da ca yNtBTHEn. Ako Te He ca yNtBTHEn, He 6uBa Da NyckaTe ypeDa B ekCnloatauia.
Ako ce pa3nee ropnBO, He ce onntBaTe da cTaptnpate Dbratela. BmecTo TOBa npEn cTapTa ypeBt Tp6Ba da ce MAXHe OT 3ambpceHata C6eH3IN NOBbpxHOCT.
- ɪnːpɑaʒhɛte peʒeːpɒbɑpɑc mɑːHoʊTkɒpɪtɔ.
TpaHcnpTnpaIte n CbXpaHraBaIte rOpBbTa eDINHCTBeHO B dOnyctmMn N 06o3HaueHn 3a TOBa pe3epBoapn.
-ДрьхтЕдцаТдалчOT ropNBata.
He TpaHcnpOpTnpaIte n CbXpaHraBaTe roPbTa B 6n3OCT do ropmN nn JneCHO Bb3PiameHmN BeueCTBa KaKTo N NCKPN NN OTKpNT PnAmBk.
3a nyckaheTo Ha ypea ce OTdaneyeTe Ha MNHmym TpM Metpa OT MCTOTO Ha 3apekdahe.
3a HamaJIraBaHe Ha onaCHOCTTa OT noXap -dpBXTe DBnIaTeJIy aYcIpyxa NocHCTeHr OT OCTaTbUr OT pR3aHTo, nIcTa n Cma3OuHm MaTePnAIn!
Ppei nbpBnnyck
Hoxuata 3a xNB nNET He ce doctabra nblna c ropnbacmec. HanbHHe Te ypeDa, KaKTo e onncAoB "3apeXdaHe".
3apexkdahe
① YpeIbT ce ekCnIIOaTnpa Cbc Cmec OT 6eH3HH (6e30JIOBEN) IN DByTaKTOBO DBNrAteHNO MacNo.

Ipn pa6oTa c 6eH3nH e Heo6xOJIMO NOBnSeHO BnMaHne. HeOnyCTmM ca nyweHTo n OTKpHTnTOrb (OnaCHOCT OT EKcNIO3n).
6eH3nH:
OKtaHOBO YNCNO MNHmAlHo 91 ROZ,6e3oJIOBHO
He 3apejdaTe cIbIpbXaU ONoBO 6eH3nH, nI3eN nn Dpyr HeDOnyCTmM rOpBa.
He n3noJ3BaIte 6eH3nH C OKTaHOBO YncIIO NO-MaJIko OT 91 ROZ. Toba MoKe Da DoBeE Do TeXKn NOBpeN Ha DBrarTeT NocpeDCTBOM NOBUnEHN TempeAtpN Ha DBrarTeT.
Ako pa6oHTe npOdbJxHKeTEnHO BpeMe B o6IacTTa Ha BnCOKTe 6OpOTn, 6n Tp8BaJIo Da n3IOJ3BaIte 6eH3nH C NO-BnCOKO OKTaHOBO YNCIO.
OTIeHaToyKaHaOna3BaHeHaOKoHata cpea ce npenopbUba H3NOJ3BaHeTO Ha6e3OIOBEn 6EH3nH.
BytakoBO MToPOHO MacNo:
cbrnacho cncnphikaunraTa JASOFCnn ISO EGD
He n3no3BaIte
- Macna 3a YetnpuN NIN DByTaKTOBn N3BbH6OpDOBNBnraTeJN 3a IOnkN C BOHO OXJaXDaHe.
- rTObA cMEc OT 6eH3nHOCTaHcIM.
CmecBaHe
CboTHoWeHne Ha CmecBaHe 40:1
BbB BCnKn Cnyaun Cna3BaTe BCnKu yka3aHn 3a 6e30nacHOCT.
TexHnuecko o6cIyXBaHe n noDpBxKa

PpeB BcKa TexHuecka NoDpBxKa N nouchTbaHe
- N3KIIOyTe DBNraTeTnA
-ИЗчakайтepexeцOTOустpoICTBOda cnpe - N3dbpnaTe uekepa Ha 3anaJnteHaTa CBeue (ocBEN npn HacTpoKnte Ha npa3eh XoD)
- OctaBeTe ypeDa n3CTnHe.

He n3BpBaIe DeHocTn no noApbXkata B 6n3oCT do OTKpNT nnambK. OnachocT ot noxap!
Pa60Tu no TexHnueckata NODpBxka n NOuNCTBaHeto, pa3nUHn OT ONICAHTE B HAcTOru pa3deJ, MORa T da ce 13BbPWBat cAmO OT cepBn3a.
3aHTHe npncocobHnKoTo ca cBaIeHn C ceN 13BbPbBAHe Ha TexHneCKa NOpdpBXKa n NouCTBaHe, Tp6Ba Da 6bDat OTHOBn HAnEHXo MOHTnpaHn IpoBepeHn. Da ce n3No3BaT CaMo OpunHaJIHn Yactn. Dpyr NaCTMorat Da npEn3BVKat HenpeDbUdIMN NOBpeDn HapaHraBaHHa.
TexHnuecka noDpBxka

Hocete 3aunTHn pKaBnU, 3a da n36erHete Bb3MOxHN HapaHraBaHH.
3a da ce rapaHTnpoIbJIxHTeJHO nHaJeXdHO
n3noI3BaHe Ha ypeDa, npOBexJaTe peIOBHO TexHuecka
noIdpbKka.
PpOBepaBte BepnKHaTa pe3aUka 3a OeBnHn HeoCTaTbU
- xna6abn 3akpenBaHn
I3HOcEH NIN NOBpeHn YactN
ObHaTO,ChyHEno HINIOBpeDeHO pExeU yCTpoIcTBO
npoBepeT nIbTHOCCTHa KaIOUaJIkata Ha pe3epBoapa I roPUBHHTe Tpb6oPBOOuN.
CneBcKa ynoTpe6a npOBepBaIte HOKnIaTa 3a JINB nIeT 3a
- n3HocBaHe, Hau-Beue xJa6nHa Ha peXeIooYcTPOIcTBO.
- npabnHO MOHTnpaHn N3npaBn Kaanu nn 3auTHn npncno6JeHH.
Heo6xOdMnTe peMOHTn uH npBoTn no TexHueckaTa nOaPbXka Tp8Ba Da ce npOBexdA t PpeDn yNoTpe6aTa Ha ypeDa.

He npodyxBaIte nIe He 3dyBaTe 3aMbpCraBaIte YactnCi, CbIeCTByBa ONaCHOCT OT HapaHyaHna Ha OHTe!
- NocTeTe BbTpEshHTo npocTpaHCTBO Ha Bb3dUshnHa Hntbp C yetKa.
- OctaBeTe Bb3dUwHnA Fmntbp Da n3cbxHe do6pe n ro NOCTaBeTe OTHOBO.
- MoHTnpaIte OTHOBKaIaKa Ha Bb3dUwHnIΦnITbP.
Hikora He pa6oTeTe c MaunHaTa 6e3 Bb3dyuWeH mntbp. IpaXbT n 3ambpcBaHnraTa MOrat Da DOCTnHAT B DnIgATEJr N da PnNHNrT NOBpeDn Ha MaunHaTa.
CmeHnTe peoBHO Bb3dyuHnHn HnTbp.
IIOBpeHb3dyuHnΦHtpn Tp8ba da 6bdaT CMeHEN BeHaRa.

Почuctвае И Смяна Ha 6eH3nHOBnФнтbp
15
Ipy Huyka npOBepraBaTe 6eH3nHOBna 7. 3ambpceHNr 6eH3nHO B3npenrTCTBa NOCTbNBAHeTO Ha ROPNBOTO.
OTbopete kanaKaTa Ha pe3epBoapa (8) n 3dbpnaTe 6eHnHOBnФnTbp c TeNeHa KyKa npes OTbopa.
JeKO 3aMbpcBaHe
13BaTe 6eH3INOBnBnФnTbpOTROPNBnTp6oPBOD nOuNCTeΦnTbpaB NOHCtBaU 6eH3nH
→CNHNO3aMbpcBaHe
CMEHeTe 6eH3nHOBnA qntbP

Да ce npOBepn 3aapanTeHaTa CBeu, pecn. Да ce CMeHn

16 He nnaTe 3anaNTenHaTa CBeu (16) nn
uekepa Ha 3anaNTenHaTa CBeu (15),doKaTo
dBnraTeTpaOtn. Bucko HanpeXeHne!
Onachoct ot n3raphe npn ropeu DNBraTeJ. Hocete 3aunTHn pbkauu.
PpOBepaBae peoBHO 3anaJIteHnHaTa CBeU pa3CTOHNHeTo Ha eNEKTPoDnte.
3a ceIa npoeDnpaiTe no cneHnHaHH:
- 16 Pa3BnIte 6oJIToBeTe (C) n MaxHeTe KaNaka (34).
- 17 N3BaTe ΣeCena Ha 3anaJIteJIHaTa CBeu,OT 3anaJIteJIHaTa CBeU.
- 18 Pa3BbPteTe 3aNaNTeJIHaTa CBeUc DOCTaBeHnKlOu 3a 3aNaNTeJIHn CBeUn (25).
Pa3cTOrHHeTo Mekdy eNeKtpoDnTe Tp6Ba Da Bb3JIn3a Ha 0,6do 0,7.
IounCTBaTe 3anaJInteJIHata CBeU, KOrato e 3aMbpcHeA.
MoHTnpaTe 3anaHnTeJHaTa CBeu B O6paTHa nocoka.
He 3aBnHTBaIte 3anaJIITeIHHaTa CBeU npeKaJIeHO 3dpaBO.
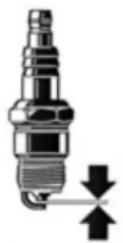
0.6-0.7mm
H3noJ3BaHa 3anaIteHa CBeue; 1/8 - 1/4 o6opot
HOBA 3anaJIHTeJIHa CBeU:1/2O6OpOT
Xna6aBata 3anaJIntHa CBeue MoKe Da nperpee N da nobpeDn DBrTaTeN.
I IpekaJIeHTo 3aTgAHe Ha 3aIIaIInTeJIHaTa CBeU MoKe Da nOBpeDn pe36bata B UININHApOBaTa rnaBa.
CmeHete 3anaJIHTeJIHaTa CBeU:
- Na BCEKn 100 Yaca NIN 1x roDNIHNO (B 3aBNCIMOCT OTOBa, KOI cnYau HAcTBn HaH-Hanpei)
Korato IN3OJInpaUTo TJIO e NOBpeDeHO
- npn cnien hOBrnapHa eNekTpoDnte
- npn CINHO 3aMbpeHn NIN OMaCJIeHN eNeKToPOni
N3no3BaIte cJeHnTe 3anaJIteHN CBeu:
Torch L7T Ии L8RTF, LD L7T Ии L8RTF, NGK BPMR7A, Bosch WSR6F, Champion RCJ7Y
Da ce npOBepn 3anaJIteJHaTa nckpa
- 18 Pa3BnHTeTe 3anaIITeJIHATA CBeU.
- 19 BkIIOHe Te Iekepa Ha 3aIaNITeJIHaTa CBeU (15) OTHOB B 3aIaNITeJIHaTa CBeU (16).
- 19 BkapaTe KIOva 3a 3anaIteHata CBeu npes OTbopa Ha Kopnyca. UekepbT Ha 3anaIteHata CBeu Tp8Ba Da IMA KOHTaKT C Kopnyca Ha DBnraTeT (MeTa).
He BkapBaIte KJIoua 3a 3anaJInteHaTa CBeuB OTBOPa Ha CBeuTa.
- 19 HatncheTe 3anaNTeJIHaTa CBeu c n3OJupaHn Kneu KbM KIOUa Ha 3anaNTeHNHaTa CBeu (25) (He B 6IIN3OCT Do OTBopa Ha CBeuTa).
- NocTaBete npeBknIOuBaTeJIa 3a BKJI-N3KJI B noIooKeHne , I"
19 DpbHHeTe CTapTOBTo Bbxke.
AkoMexdy eNeKtpoIte He ce BnKda NcKpa, 3anaNTeINHATA CBeU MOKeJa e DepeKTHa.
√ Wymo3arnyuHTeI/ OTBop 3a n3BexJaHe
- 20 Pa3BnIte 6oJIToBeTe (D) n MaxHeTe KaIaka (23).
- 21 Пюовявайе рedingн, ддп He ca ce pa3xla6ии ВИNTOBeTe (E) Ha aycnyxa (6).
Ako ca pa3xaabeHn, rna3aTeHHeTe c pbka.
He 3aBnHTBaIte DOITbJIHNTeJIHO BnHTOBETe Ha Wymo3aflnyuTIEL, KOrato DBrIgATEJIrTe I ropeu.
3. PeDobHO nouHCTBaIe OTBopa 3a OTBeKdAhe (19).
Iopdpbxxka
IouncBaIte ypea rpnKnBO cnei BcKa ynoTpe6a, 3a da ce 3ana3n 6eynpeHaTa fynkun.

Pn noHCTBaHe Ha pExeIooTo yCTpoIcTBO HocTe 3aHTn pKabuIcI
→ПочесТва对接КорпунсMekaЧеткAnIIn cyxA Kbpna.
He 6nBa Da ce n3noJ3BaT Boda, paTBOpHTeN I noIpaun npenapatn.
→ BnHmAbaTe BeHTnauOHHnTe npope3n Da 6bDaT Cbo6oHN 3a OxJaHe Ha MOTopa (OnaCHOCT OT nperepaBe).
3a da ce HamaHn onachocTta OT noXap, BHMaBaIte DBrIaTeJIaT n aycnyxbT da Ca NOuchTeHn OT OTlaRaHn, Wyma nn N3Jra3bN Ma3OueH MaTePnaI.
PeIIOBHO IOUHCTBaItepeXeIooYcTPOINCTBO C YeTKa IIN C Kbpna.
Hikora He nouchTbaIe peKeIcTo yctpoIcTBO c BOda
→OnachocTOTKopo3nI!
→ПоунctBaIteи cma3BaIte peIOBHO BCnHKn DBNKeuN ce YaCTN.
Hukora He n3non3BaIte rpec!
3no3BaTe eKoOnuHcMoNcNo.
TpaHcnopt
3a TpaHcnpTnpaHe Ha ypeDa n3KnIOyeTe dBnraTeJ, n3yakaiTe pexeOTo yCTpoiCtBO da cnpe MoHTnpaTe 3aunTaHa HOka.
Hocete ypeda 3a npedhata pkoxbatka. Pn TOBa dpkTe pekeoTO ycTpoiCTBO Ha3a, a HaropeuHnaycnyx daJeue OT TJIOTO.
- TpaHcnpTnpaIte ypeBa MNC caMo B 6araXnka nIb B otDeIHa IIOo3 a TpaHcnpTnpaHe. PpToBa OcnHypeTe ypeDa npotIB npeOpbUaHe, nobpei N n3TuHaHe Ha rOpuBO.
CbXpaHHeHne
- Ypeinte, KOnTo He ce n3nO13BaT, CbXpaHraBaIte C NOCTaBeHa 3aUHTa Ha HOKOBTe Ha cyxo, 3aTBopeHO MRCTO, HeDOCTbNHO 3a Deua.
CbxpahBaIte ypeTaT, KbTeTo 6eH3INHOBtTe nap He MORat Da BJIa3AT B KOHTaKT C OTKpNT OfBn INN NCKPN (HAnpIMep Do KOTIOH, NeUka INN 6oJnep 3a TOnla BOda c NOCTOReH IJaMbK). - Прети сьханене Виharи ocTaBraIte ypeda da ce oxlaeni.
-ObpHHe BHMaHne npEni No-tpoIbJXHTeHcBxpaHeHHe Ha cNeHTo, 3a Da yDbJXHTe JKBOTA Ha MaunHaTa N da rapaHTnPate necho o6cIyKBaHe:
HanpaBete OCHOBNO NOYNCBaHe.
TpeTnpaIte BcNkIN DBNKeuCe YacTn C MacNo, KOeTo e 6e3BpeJHO 3a OKoJHaTa cpeJa.
Hikora He n3noJ3BaIe Tpec!
NocTabeTe 3aHITata Ha HOka Ha peXeIOTO yCTpOInCTBO. MaxHeTe uekepa Ha 3aHaJIInTeINHaTa CBeU.
Pa3BnHTe 3anaNTenHaTa CBeU. CJeI TOBa HaneiTe BcuiHbpa MaIKo MOTOPHO MacNo (OKOIO 5 -10 ml). BaBNO dpbHHe Te DpbXkata Ha BxKeTo, 3a da pa3nPepEnTe MacNoto. OTHOB NOCTaBeTe 3anaNTenHaTa CBeU.
I Ipei n cneBbAa ynoTpe6a Ha ypeHa Tp8Ba Da pa3BbPTnTe H noHcTnTe 3aNaHrHeHaTa CBeu.
IV3npa3Hete n3zIPO pe3epBOapa c roPbBOTo.
1 N3npa3HepeepBoapa cmo Ha OTkpntO.
I 3xBbPnTe OCTaHaNoTO rOpBO CnopeI npedncaHnTa (6e3 Da BpeNte Ha OKoJHaTa cpe).
N3npa3HeTe Kap6ypatopa.
Поберете 6e3ypneHOTo cBcTOrHHe Ha ypea, 3a da ce rapaHTnpa HAnEJxNHO n3nO3BaHe Ha ypea cNeI IO-npOdbNxHTeJIHO cbXpaHEnHe.
Yeptex 3a noDpBxKaTa n NOuNCTBaHETO
C. (S-No.): 17304 → HB 60-2
C. (S-No.: 17311 HB 72-2
Sz. (S-No.): 17304 → HB 60-2
Sz. (S-No.): 17311 → HB 72-2
Br. (S-No.): 17304 → HB 60-2
Br. (S-No.): 17311 HB 72-2
Bosch WSR6F, Champion RCJ7Y

N. (S-No.): 17304 → HB 60-2
N. (S-No.: 17311 HB 72-2
NGK BPMR7A, Bosch WSR6F, Champion RCJ7Y

No (S-No.): 17304 → HB 60-2
No(S-No.): 17311→HB72-2
Torch L7T of L8RTF, LD L7T of L8RTF, NGK BPMR7A, Bosch WSR6F, Champion RCJ7Y

Ontstekingsvonk controleren
conform Directivei UE: 2006/42/UE
Prin prezenta noi
ATIKA GmbH
Josef-Drexler-Str. 8, 89331 Burgau - Germany
Conformity assessment procedure:
2000/14/UE - Appendix V.
Torch L7T tau L8RTF, LD L7T tau L8RTF, NGK BPMR7A, Bosch WSR6F, Champion RCJ7Y

Verificarea scanteii de aprindere
C.(S-No.): 17304 → HB 60-2
C. (S-No.: 17311 HB 72-2
podla smernice ES: 2006/42/ES
Prehlasujeme
ATIKA GmbH
Josef-Drexler-Str. 8, 89331 Burgau - Germany
St. (S-No.): 17304 → HB 60-2
St. (S-No.): 17311 HB 72-2
v skladu z direktivo: 2006/42/ES
2014/30/EU in 2000/14/ES.
Uporabljeni so bili naslednjih harmonizirani standardi:
EN ISO 10517:2009+A1:2013
Postopek za ugotavljanje skladnosti: 2000/14/ES - Dodatek V.
Torch L7T ali L8RTF, LD L7T ali L8RTF, NGK BPMR7A, Bosch WSR6F, Champion RCJ7Y

Preverjanje zigalne iskre
No (S-No.): 17304 → HB 60-2
No (S-No.): 17311 HB 72-2
AB-Kriterleri 2006/42 AB kapsaminca
Burada
ATIKA GmbH
Josef-Drexler-Str. 8, 89331 Burgau - Germany
Torch L7T veya L8RTF, LD L7T veya L8RTF, NGK BPMR7A, Bosch WSR6F, Champion RCJ7Y

- EC Declaration of Conformity
- ATIKA GmbH
- Heckenschere (petrol hedge trimmer) type HB 72-2
- 2014/30/EU and 2000/14/EC
- Extent of delivery
- Symbols original operating manual
- Description of device / spare parts
- Operating times
- Normal intended use
- Residual risks
- Vibrations
- Warning!
- Safety instructions
- Primary users
- Safe handling with fuels
- Before the first start-up
- Fuelling
- Petrol
- Petrol: Octane number at least 91 ROZ unleaded
- Two-stroke engine oil:
- acc. to JASO FC or ISO EGD specifications
- Do not use
- Mixing
- Mix petrol and oil in the supplied fuel mixing can (26).
- Fuelling the hedge trimmer
- Start-up
- To start the hedge trimmer:
- Throttle lock-out switch
- 6
- Starting with cold engine
- Stopping the engine
- 4
- Stopping the engine in an emergency
- Starting with warm engine
- Adjustments on the hedge trimmer
- 7
- Working instructions
- General behaviour when working with the hedge trimmer
- Working with the hedge trimmer
- Hold the hedge trimmer with both hands on a safe distance from the body.
- any case pay attention to all safety instructions.
- Maintenance and Care
- Maintenance
- Adjusting the cutting device
- #
- Lubricating the gearbox
- 12
- Adjusting the idle speed
- Cleaning / replacing the air filter
- 14
- Cleaning/replacing the fuel filter
- 15
- Checking / replacing the spark plug
- Replace the spark plug:
- Use the following spark plug type:
- Checking the ignition spark
- Silencer / exhaust outlet
- Care
- Transport
- Storage
- Possible faults
- Before each fault elimination:
- Sommaire
- Дeкnapaця 3a cьOTBeTCTBnE cьгласно HopMnte Ha БрoneиСКаТа obuHocT
- Heckenschere (6eH3nHOBa HOXnua 3a XnB nneT) Tn HB 60-2
- Heckenschere (6eH3nHOBA HOXmua 3a XNB PnTe) TnH B72-2
- PpIIOXeHN ca cIeHnTE xapMOHn3npaHn CTaHdApTn:
- npoueypa 3a ouehBaHe Ha cBoTBeTcTBHeTo: 2000/14/ EO - npJIOxKeHne V
- Пьномошнк 3a CBCTABЯHe Ha TeXHnueckaTa DOKymeHTaIGN:
- PpeDynpexkdeHne:
- Bezonaacha pa60ta
- Бezonachoборавес мOTOPнгориBa
- Ppei nbpBnnyck
- 3apexkdahe
- 6eH3nH:
- OKtaHOBO YNCNO MNHmAlHo 91 ROZ,6e3oJIOBHO
- BytakoBO MToPOHO MacNo:
- cbrnacho cncnphikaunraTa JASOFCnn ISO EGD
- CmecBaHe
- TexHnuecko o6cIyXBaHe n noDpBxKa
- TexHnuecka noDpBxka
- CmeHete 3anaJIHTeJIHaTa CBeU:
- N3no3BaIte cJeHnTe 3anaJIteHN CBeu:
- Da ce npOBepn 3anaJIteJHaTa nckpa
- √ Wymo3arnyuHTeI/ OTBop 3a n3BexJaHe
- Iopdpbxxka
- TpaHcnopt
- CbXpaHHeHne
- Ontstekingsvonk controleren
- Verificarea scanteii de aprindere
- Preverjanje zigalne iskre
Brand : ATIKA
Model : HB 602
Category : Hedge trimmers