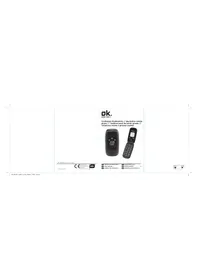
OMP 80 - Smartphone OK - Free user manual and instructions
Find the device manual for free OMP 80 OK in PDF.

| Product Type | Smartphone (mobile phone with large buttons) |
| Brand | OK |
| Model | OMP 80 |
| GSM Standard | 900/1800 MHz, dual band |
| Dimensions (L × W × H) | 115 × 50 × 15 mm |
| Weight | 85 g (with battery) |
| Battery | Lithium-ion, 3.7 V / 800 mAh, removable |
| Talk time | Up to 4 hours |
| Standby time | Up to 200 hours (about 8 days) |
| Display | Color display (size not specified) |
| Connectivity | Bluetooth, Micro USB, 3.5mm headphone jack |
| Storage | SIM card (1), memory card (microSD) |
| Main functions | Calls, SMS, phonebook, alarm, calendar, calculator, file manager, LED flashlight, SOS |
| Maintenance | Clean with a damp cloth, do not use solvents |
| Safety | Do not expose to water, do not open, use only the provided charger |
| Spare parts and repairability | Removable battery, LED not replaceable, no user repair |
| Power supply (charger) | Input: 100-240 V, 50/60 Hz, 0.3 A; Output: 5.0 V, 500 mA |
| Box contents | Phone, battery, charger, Micro USB cable, charging dock, earphones, manual |
Frequently Asked Questions - OMP 80 OK
User questions about OMP 80 OK
0 question about this device. Answer the ones you know or ask your own.
Ask a new question about this device
Download the instructions for your Smartphone in PDF format for free! Find your manual OMP 80 - OK and take your electronic device back in hand. On this page are published all the documents necessary for the use of your device. OMP 80 by OK.
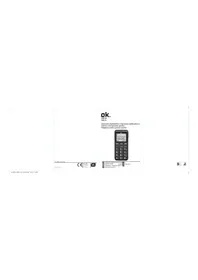
USER MANUAL OMP 80 OK
1.View
2.Send SMS
3. Send MMS
4. Call
5. Edit
6. Delete
7. Copy
8. Send business card
9. Mark Several
10. Caller groups
11. Settings
Thanks for your purchase of an ok. product. Please read this manual carefully and keep it for future reference.
IMPORTANT SAFETY INSTRUCTIONS. READ CAREFULLY AND KEEP FOR FUTURE REFERENCE.
- Read this user guide carefully before first use. It contains important safety information as well as instructions for the use and care of the device. Save the guide for later reference and include it with the device when transferring it to a third party.
- To avoid dangerous situations, do not use device for any purpose other than those described in the instructions. Improper use is dangerous and voids the warranty.
- This product is not intended to be used by persons (including children) with reduced physical, sensory or mental abilities or lack of experience and / or lack of knowledge unless they are supervised by a person responsible for their safety or have received instructions on how to use the product.
- Children should be supervised to ensure that they do not play with the product.
- The product shall not be exposed to dripping or splashing and no objects filled with liquids, such as vases, shall be placed on the product.
- Care should be taken so that no objects or liquids enter the enclosure through openings.
- No naked flame sources, such as lighted candles, should be placed on the product.
- Only use the provided adaptor.
- The adaptor power plug is used as the disconnect device; the disconnect device shall remain readily operable. To completely disconnect the power input, disconnect the adaptor power plug.
10.
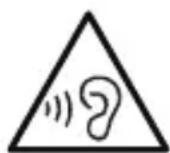
DANGER! Excessive sound pressure from earphones and headphones can cause hearing loss. If you listen to loud music for a long time, your hearing may be impaired. Set to a moderate volume.
EN
- Caution! There is danger of explosion from improper replacement of the battery. Replace battery only with the same or equivalent type of battery.
- Never expose rechargeable batteries to excessive heat (e.g. bright sun, fire), and never throw them into fire. The rechargeable batteries could explode.
- Never damage the rechargeable battery. Damaging the casing of the rechargeable battery might cause an explosion or a fire!
- Never short-circuit the contacts of the rechargeable battery. Do not throw the rechargeable battery or the product into fire. There is a danger of fire and explosion!
- Charge the rechargeable battery regularly, even if you are not using the product. Due to the rechargeable battery technology being used, you do not need to discharge the rechargeable battery first.
- Never charge the rechargeable battery of the product unattended.
- Remove the batteries from the product before disposal.
- Use only under normal room conditions (temperature and humidity).
- The product is intended to be used in moderate climates only. Do not use in tropical or very humid climates.
- Do not move the product from cold into warm environments and vice versa. Condensation can damage the product and electric components.
- The use of accessories and parts not specifically recommended by the manufacturer may cause injuries or damages and will result in forfeiture of the warranty.
- Do not touch, press or rub the surface of the product with sharp or hard objects
- To reduce the risk of fire or electric shock, do not expose the device to rain or humidity.
- Make sure no objects or liquids penetrate through openings into the housing.
- Never immerse electric parts of the product in water or other liquids while cleaning or using it. Never place the product under running water.
-
Do not place the product in the vicinity of devices producing strong magnetic fields (for example motors, loudspeakers, transformers).
-
Do not expose the product to direct sunlight, humidity, dirt, hot light sources or strong magnetic fields. Do not expose the product to high temperatures and strong vibrations and avoid high mechanical stress
- If the product shows damages, do not use it any longer and have it repaired by a qualified technician, or contact our customer service department. Do not disassemble the product, and do not try to repair it yourself.
- Attention! In the event of a malfunction as a result of electrostatic discharge and momentary electrical surges, unplug the appliance and plug it in again or remove the batteries and install it again.
- LED's are not replaceable.
- Attention! Please do not look directly into the light emanating from the LED. Do not point the LED light directly into the eyes.
INTENDED USE
This product is only suitable for making and receiving calls within a mobile phone network. Any other use can lead to damage to the product or personal injury.
EN
40
COMPONENTS
A. Loudspeaker
B. Volume rocker
C. Display
D. Up/Down rocker key
E. Menu / OK (Confirm) / Change / Select key
F. Call answering key
G. Numeric keypad
H. Strap eyelet
I. Micro USB charging socket/data transfer
J. Microphone
K. Earphone socket
L. Charging contact
M. Micro USB charging cable
N. Micro USB charging socket, charger
O. Charging base
P. End call key
Q. Names key (Telephone book)/Back/Ready
R. On/Off torch
S. LED
T. Battery
U. Battery compartment
V. SIM card slot
W. Memory card slot
X. Loudspeaker
Y. SOS button
Z. Cover on the back
DISPLAYSyBOLS
| Network's signal strength | |
| Battery's charging status | |
| New SMS | |
| Alarm set and activated | |
| Sound activated | |
| Ringtone deactivated | |
| SOS | Emergency function activated |
BEFORE FIRST TIME USE
Remove the product and accessories carefully from the original packaging. It is recommended to keep the original packaging for storage. If you wish to dispose of the original packaging, please observe applicable legal provisions. Should you have any questions regarding proper disposal, contact your local waste management center.
Inspect the delivery contents for completeness and damages. Should the delivery contents be incomplete or damaged, contact your sales outlet immediately.
Before it is used for the first time your mobile phone must be assembled and the battery must be fully charged. Follow the directions in the following section in that regard.
INSERTING THE SIM CARD AND THE BATTERY
1 Remove the cover from the back. Slide a SIM card (1) into the appropriate slot. If you wish, slide a memory card (2) into the appropriate slot. Insert the battery provided. Make sure that the contacts are located on the correct side.
CHARGING THE BATTERY
2 Connect the charger and the plug-in power supply unit with the USB cable. Connect the supply unit to an outlet. Insert the mobile phone into the charger. Alternatively, you can also connect the micro USB charging plug directly to the micro USB socket.
Please note: Before the device is used for the first time, the battery must be charged for 8 hours. The average charging time of an empty battery amounts to 2.5 hours.
OPERATION
Switching it Off/On
Hold the Hang Up key down for approx. 3 seconds, in order to switch the mobile phone on or off.
Call and Hang up key
4 Accepting a call
In order to accept an incoming call, press the Call key
Declining / Ending a call
In order to decline an incoming call, or to end a conversation, press the Hang Up key.
Calling
Enter the number with the number keys and press the Call key
Volume
5 You can change the talk volume during the telephone call by means of the volume rocker switch.
LED
6 Turn the LED on/off with the On/Off switch.
Locking keys

- Press the Names key and then immediately press the # key in order to lock the keypad.
- If the keypad is locked, press the Names key and then immediately press the # key in order to unlock the keypad If the display is switched off, press any key before hand in order to activate the display.
Caution! If the keypad is locked, only emergency calls can be made with the numbers 110 and 112.
SOS function
The telephone is equipped with an emergency call function. Up to 5 personal phone numbers can be entered for an automatic emergency call process.
Please note: It is not permitted to enter the numbers of public entities such as police stations, fire stations or rescue control centres here. This is a question of a purely "private" emergency call.
- Press on the SOS key for 3 seconds in order to trigger the emergency call.
- The alarm will sound on the mobile phone and the first number entered on the list will be called. If the call is accepted, the mobile phone will turn on the hands-free mode and you can talk to the people that you have called. The emergency procedure will then be discontinued.
- If a call is not accepted within one minute, the next number on the list will be dialled and so on until the last number on the list is called. This procedure will be continued three times for each number. If a call is accepted, the emergency procedure will stop.
- If no connection is established, an alarm will sound on the telephone for an hour and the owner information will be displayed.
- You can interrupt the emergency call function at any time by pressing the Hang Up key.
Emergency (SOS) setting
Open the Menu and select Settings > SOS > OK.
- Select SOS button to activate/deactivate the Emergency (SOS) function.
-
Select SOS contacts and press OK. Select an entry and press OK. Select From Phonebook to insert an entry from the telephone book, or select New number to enter a telephone number by hand.
-
Select Settings SMS and switch the transmission of an emergency SMS (in addition to the calls) on or off.
-
Select Edit SMS and enter the text for the emergency SMS.
-
Select SOS Volume and press OK. The volume of the emergency alarm can be set here.
- Select User information and press OK. Press Edit and enter information about yourself and your state of health (e.g. blood group, allergies, immunizations etc.). This information could be useful to helpers in the event of an emergency.
- Select Help and press OK. You will see an informational document about how the emergency call function works.
Configuring menu settings
The menu can be called up by pressing the Menu key. To navigate, press the rocker (up/down) key up or down.
In order to select a menu item, press the OK key. The following items can be selected below:
Phonebook
- Messages (SMS messages)
Call center
ImageViewer
- Settings
Services
Alarm
- Organizer
PHONEBOOK
Selecting a contact
- Enter a name in the search field by means of the number keys in order to search for it. Alternatively, you can also switch through all of the entries with the up/down rocker key.
- If you find the desired contact, press the call key to make a call.
- For further options, press the Option... key (Options).
- Under the Options subheading further items are available to you:
1.View
2.Send SMS
3.Send MMS
4. Call
5. Edit
6. Delete
7. Copy
8. Send business card
9. Mark Several
10. Caller groups
11. Settings
To navigate, press the (up/down) rocker key up or down and choose the desired action with the Select key. Follow the instructions on the display.
Adding/editing a contact
- To add a new contact press the up/down key until To Add new contact appears in the display. Confirm this with the Option... key and follow the instructions on adding a contact on the display
- To edit an existing contact press the up/down rocker until To Add a New Contact appears in the display. Confirm with the Option... key and follow the editing instructions on the display.
MESSAGE
Under this menu item you can compose and display messages among other thing and edit and send saved messages, etc.
New
- Select this menu item in order to write a message.
- You can enter a telephone number or select a contact from the telephone book to send the message.
Inbox
- You can see all received SMS messages.
- Select one and follow the editing instructions on the display to open it. By pressing the Options key further actions will be made available such as answering via SMS/MMS, calling senders, forwarding etc. Follow the instructions on the display for this.
Drafts
Messages that were created but not sent are saved here. You can send a message from here or edit or delete it, etc.
Outbox
Messages that were created but not sent are saved here. You can send a message from here or edit or delete it, etc.
Sent messages
Sent messages are saved here. You can forward or delete a message, etc.
Templates
Under this menu item you'll find common phrases that you can send out unaltered or edited.
Settings
You can configure various settings, e.g. Preferential Saving of messages on SIM or phone memory, etc. Follow the instructions on the display for this. Follow the instructions on the display in each case. To navigate, confirm and cancel use the up/down rocker key and the keys to confirm (OK) and cancel (Back).
Voicemail server
This service should be supported by network service operator, if you want to use it, please make sure already opened both call transfer and receive SMS features.
CALLCENTER
The following items can be selected under this menu heading:
Journal
The following items are here:
- Missed: Shows the list of missed (unanswered) calls.
- Dialled: List of dialled calls.
- Received: List of incoming calls.
- Delete logs: Delete all related calls here according to personal preference.
- Timers: Display conversation time for last call and total conversation time for dialled calls and received calls.
Follow the instructions on the display in each case. To navigate, confirm and cancel use the up/down rocker key and the keys to confirm (OK) and cancel (Back).
Call settings
You can configure various settings
- Call waiting: Setting behaviour if there is a further call during a conversation: Choose Activated if the second call should be signalled by an alert tone in your receiver.
- Call transfer: You can switch on immediate forwarding for calls.
- Call barring: Setting up blocking for outgoing and incoming calls. The password that is to be entered in each case depends on the network provider. You can change it to a personal password
- Advanced: Setting of auto redial and call time reminders Follow the instructions on the display in each case. To navigate, confirm and cancel use the up/down rocker key and the keys to confirm (OK) and cancel (Back).
EN
48
IMAGEVIEWER
Under this menu heading you can view images. Follow the instructions on the display for this.
SETTINGS
The following items can be selected under this menu heading:
Phone
You can configure various settings.
- Time and date: entering the time and date and specifying the date format
- On/Off schedule: Setting of an automatic On/Off time for the phone
- Language: Selecting the menu language.
- Display: Setting the background image, switching Animation Display and Time and Date Display on and off.
- Shortcuts
- Flight mode: Switches on flight mode (transmission of signals is disabled).
- Misc. settings: configure the settings on the illuminated display.
Follow the instructions on the display in each case. To navigate, confirm and cancel use the up/down rocker key and the keys to confirm (OK) and cancel (Back).
SOS
In the event of an emergency (SOS), follow the instructions in the section on Emergency (SOS) Setting.
Network
You can set the network service operator by manual or automatic.
Security
-
SIM: You can enable/disable the request for a SIM PIN when the phone is switched on.
-
Phone: If locking is activated, when the phone is switched on the password will be requested (1122 as delivered)
-
Auto keypad lock: The keys will be locked after the set time has elapsed.
Follow the instructions on the display in each case. To navigate, confirm and cancel use the up/down rocker key and the keys to confirm (OK) and cancel (Back).
CONNECTIVITY
Bluetooth
The mobile phone supports Bluetooth function. You can use Bluetooth wireless technology to set wireless connection with other compatible devices, including mobile phones, computers, headsets, in-car accessories etc.
Reception range
The maximum effective reception range between devices is 10 meters line of sight when the battery is fully charged. Any obstacle, wall, metal or human body that is located between the Bluetooth devices will reduce the reception range. As the battery voltage level drops, the reception power will drop. Fully charge or place your Bluetooth device closer to other devices for best reception quality.
Pairing
Go to "My Device" and locate other bluetooth device. Once your phone finds the other device, enter the pairing code when required to link the devices.
Power: Activate the bluetooth function.
- Visibility: After this option is activated, other peripheral devices supporting Bluetooth wireless technology can see your device and its name via search.
- My Device: After entering this option, you will see the Bluetooth devices compatible with the mobile phone.
- Search audio device: With this function, you can search for audio devices. For other devices, enter My Devices to search.
My name: Edit the name of the device here.
- Advanced: Enter this menu to have corresponding settings.
Data account
You can manual edit network profiles parameters to use MMS and WAP.
Restore settings
You can restore the factory settings of your telephone. To do so you have to enter the mobile phone's password. This was set to 1122 in the factory. Follow the instructions on the display. Use the up/down rocker key to navigate, confirm and cancel and the keys to confirm (OK) and to cancel (Back).
Profiles
You can save different profiles (specific ringtone settings based on the user or the environment) that you can quickly change, if necessary.
Follow the instructions on the display. To navigate, confirm and cancel use the up/down rocker key and the keys to confirm (OK) and cancel (Back).
SERVICES
SIM Toolkit depends on the services of your network operator.
ALARM
You can set 2 different alarm times and alarms can sound once, everyday or only on specific days.
Follow the instructions on the display. To navigate, confirm and cancel use the up/down rocker key and the keys to confirm (OK) and cancel (Back).
ORGANIZER
The following items can be selected under this menu heading:
- Calendar: Opens the calendar.
- Tasks: Adding or deleting task reminders
- Calculator: Opens the pocket calculator.
- File Manager: Opens the mobile telephone's directory.
Follow the instructions on the display. To navigate, confirm and cancel use the up/down rocker key and the keys to confirm (OK) and cancel (Back).
HANDSFREE
8 Connect the earphones with microphone to the earphone jack. You can chat handsfree via the earphone set.
CLEANING AND CARE
Warning! When cleaning, never use solvents or abrasive materials, hard brushes, metallic or sharp objects. Solvents are harmful to human health and can attack plastic parts, while abrasive cleaning mechanisms and tools may scratch the surface(s).
Clean the product's exterior surfaces with a slightly damp cloth and then dry them thoroughly. Make sure that no water enters the product interior (for example, through the switch).
TECHNICAL DATA
GSM Standard : 900/1800, dualband
Battery : Lithium ion, 3.7 V / 800 mAh
Max. talk time : 4 hrs.
Period of availability: 200 hrs.
USB connection : Micro USB
Headphone connection : 3.5-mm jack connection
Measurements: 115 × 50 × 15 ~mm
Weight: 85g (with battery)
Plug-in network supply and charger
(ASUC30e-050050)
Prim./sec. nominal voltage Input: 100 - 240V 50 / 60Hz 0.3 A
Output: 5.0V = - 500mA
Protection class : II
DISPOSAL

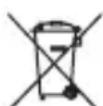
The crossed-out wheeled bin logo requires the separate collection of waste electric and electronic equipment (WEEE). Electric and electronic equipment may contain dangerous and hazardous substances. Do not dispose of this appliance as unsorted municipal waste. Return it to a designated collection point for the recycling of WEEE. By doing so, you will help to conserve resources and protect the environment. Contact your retailer or local authorities for more information.
Please dispose of batteries in an environmentally friendly manner. Do not put batteries into the household waste. Please use the return and collection systems in your community or contact the dealer where you purchased the product.
ENHORABUENA
1.View
2. Send SMS
3. Send MMS
4. Call
5. Edit
6. Delete
7. Copy
8. Send business card
9. Mark Several
10. Caller groups
11. Settings
1.View
2. Send SMS
3. Send MMS
4. Call
5. Edit
6. Delete
7. Copy
8. Send business card
9. Mark Several
10. Caller groups
11. Settings
1.View
2. Send SMS
3. Send MMS
4. Call
5. Edit
6. Delete
7. Copy
8. Send business card
9. Mark Several
10. Caller groups
11. Settings
You can configure various settings
is in conformity with the following directives:
Subsidiary of Media-Saturn Group