PTK 14 EDT - Stapler BOSCH - Free user manual and instructions
Find the device manual for free PTK 14 EDT BOSCH in PDF.

Frequently Asked Questions - PTK 14 EDT BOSCH
User questions about PTK 14 EDT BOSCH
0 question about this device. Answer the ones you know or ask your own.
Ask a new question about this device
Download the instructions for your Stapler in PDF format for free! Find your manual PTK 14 EDT - BOSCH and take your electronic device back in hand. On this page are published all the documents necessary for the use of your device. PTK 14 EDT by BOSCH.
USER MANUAL PTK 14 EDT BOSCH
OBI_BUCH-1439-003. book Page 1 Thursday, Novembcr 19, 2013 9:36 AM
WEU WEU
Robert Bosch Power Tools GmbH
70538 Stuttgart
GERMANY
www.bosch-pt.com
160992A1XJ(2014.07)PS/69WEU

PTK 14 EDT
Executive Vice President
Engineering
Helmut Heinzelmann
Head of Product Certification
PT/ETM9

Robert Bosch Power Tools GmbH
70538 Stuttgart,GERMANY
Stuttgart, 01.01.2017
Montage
Weichholz (Kiefer) 2-4
Hartholz (Buche) 4-6
Spanplatten 4-6
Tischlerplatte 4-5
Arbeitshinweise
General Power Tool SafetyWarnings
WARNING
Read all safety warnings and all instructions. Failure to follow the warn
and instructions may result in electric shock, fire and/or serious injury.
Save all warnings and instructions for future reference.
The term "power tool" in the warnings refers to your mains-operated (corded) power tool or battery-operated (cordless) power tool.
Work area safety
- Keep work area clean and well lit. Cluttered or dark areas invite accidents.
Do not operate power tools in explosive atmospheres, such as in the presence of flammable liquids, gases or dust. Power tools create sparks which may ignite the dust or fumes. - Keep children and bystanders away while operating a power tool. Distractions can cause you to lose control.
Electrical safety
Power tool plugs must match the outlet. Never modify the plug in any way. Do not use any adapter plugs with earthed (grounded) power tools. Unmodified plugs and matching outlets will reduce risk of electric shock.
- Avoid body contact with earthed or grounded surfaces, such as pipes, radiators, ranges and refrigerators.
There is an increased risk of electric shock if your body is earthed or grounded.
Do not expose power tools to rain or wet conditions.
Water entering a power tool will increase the risk of electric shock.
Do not abuse the cord. Never use the cord for carrying, pulling or unplugging the power tool. Keep cord away from heat, oil, sharp edges and moving parts. Damaged or entangled cords increase the risk of electric shock.
When operating a power tool outdoors, use an extension cord suitable for outdoor use. Use of a cord suitable for outdoor use reduces the risk of electric shock.
If operating a power tool in a damp location is unavoidable, use a residual current device (RCD) protected supply. Use of an RCD reduces the risk of electric shock.
Personal safety
Stay alert, watch what you are doing and use common sense when operating a power tool. Do not use a power tool while you are tired or under the influence of drugs, alcohol or medication. A moment of inattention while operating power tools may result in serious personal injury.
Use personal protective equipment. Always wear eye protection. Protective equipment such as dust mask, non-skid safety shoes, hard hat, or hearing protection used for appropriate conditions will reduce personal injuries.

10|English
Prevent unintentional starting. Ensure the switch is in the off-position before connecting to power source and/or battery pack, picking up or carrying the tool. Carrying power tools with your finger on the switch or energising power tools that have the switch on invites accidents.
- Remove any adjusting key or wrench before turning the power tool on. A wrench or a key left attached to a rotating part of the power tool may result in personal injury.
Do not overreach. Keep proper footing and balance at all times. This enables better control of the power tool in unexpected situations.
Dress properly. Do not wear loose clothing or jewellery. Keep your hair, clothing and gloves away from moving parts. Loose clothes, jewellery or long hair can be caught in moving parts.
If devices are provided for the connection of dust extraction and collection facilities, ensure these are connected and properly used. Use of dust collection can reduce dust-related hazards.
Power tool use and care
Do not force the power tool. Use the correct power tool for your application. The correct power tool will do the job better and safer at the rate for which it was designed.
Do not use the power tool if the switch does not turn it on and off. Any power tool that cannot be controlled with the switch is dangerous and must be repaired.
- Disconnect the plug from the power source and/or the battery pack from the power tool before making any adjustments, changing accessories, or storing power tools. Such preventive safety measures reduce the risk of starting the power tool accidentally.
- Store idle power tools out of the reach of children and do not allow persons unfamiliar with the power tool or these instructions to operate the power tool. Power tools are dangerous in the hands of untrained users.
- Maintain power tools. Check for misalignment or binding of moving parts, breakage of parts and any other condition that may affect the power tool's operation. If damaged, have the power tool repaired before use. Many accidents are caused by poorly maintained power tools.
- Keep cutting tools sharp and clean. Properly maintained cutting tools with sharp cutting edges are less likely to bind and are easier to control.
- Use the power tool, accessories and tool bits etc. in accordance with these instructions, taking into account the working conditions and the work to be performed. Use of the power tool for operations different from those intended could result in a hazardous situation.
Service
Have your power tool serviced by a qualified repair person using only identical replacement parts. This will ensure that the safety of the power tool is maintained.
SafetyWarnings for Tackers
Always assume that the tool contains fasteners. Careless handling of the tacker can result in unexpected firing of fasteners and personal injury.
Do not point the tool towards yourself or anyone nearby. Unexpected triggering will discharge the fastener causing an injury.
- Do not actuate the tool unless the tool is placed firmly against the workpiece. If the tool is not in contact with the workpiece, the fastener may be deflected away from your target.
- Disconnect the tool from the power source when the fastener jams in the tool. While removing a jammed fastener, the tacker may be accidentally activated if it is plugged in.
Use caution while removing a jammed fastener. The mechanism may be under compression and the fastener may be forcefully discharged while attempting to free a jammed condition.
Do not use this tacker for fastening electrical cables. It is not designed for electric cable installation and may damage the insulation of electric cables thereby causing electric shock or fire hazards.
Use appropriate detectors to determine if utility lines are hidden in the work area or call the local utility company for assistance. Contact with electric lines can lead to fire and electric shock. Damaging a gas line can lead to explosion. Penetrating a water line causes property damage.
Secure the workpiece. A workpiece clamped with clamping devices or in a vice is held more secure than by hand.
Products sold in GB only: Your product is fitted with a BS 1363/A approved electric plug with internal fuse (ASTA approved to BS 1362).
If the plug is not suitable for your socket outlets, it should be cut off and an appropriate plug fitted in its place by an authorised customer service agent. The replacement plug should have the same fuse rating as the original plug.
The severed plug must be disposed of to avoid a possible shock hazard and should never be inserted into a mains socket elsewhere.
Products sold in AUS and NZ only: Use a residual current device (RCD) with a rated residual current of 30mA or less.
Product Description and Specifications

Read all safety warnings and all instructions. Failure to follow the warnings and instructions may result in electric shock, fire and/or serious injury.
Intended Use
The machine is intended for tackling of cardboard, insulating material, fabric, foils, leather and similar materials on surfaces of wood or materials similar to wood. The machine is not suitable for the attachment of wall and ceiling panelling.
English | 11
Product Features
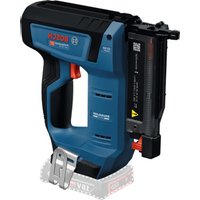
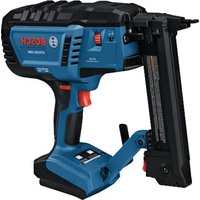
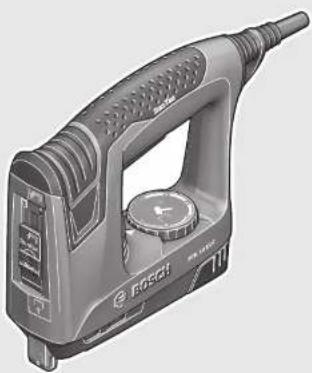
The numbering of the product features refers to the illustration of the machine on the graphics page.
1 Tacker head
2 Selector switch for DuoTac-Automatic
3 Handle
4 Trigger
5 Thumbwheel for hammer-force preselection
6 Magazine release button
7 Refill indicator
8 Staple strip*
9 Magazine
10 Nail strip*
*Accessories shown or described are not part of the standard delivery scope of the product. A complete overview of accessories can be found in our accessories program.
Technical Data
Tacker PTK 14 EDT
| Article number | 0 603 265 5.. | |
| Impact rate | min-1 | |
| Intermittent operation (S2) | min 10 | |
| Fastener | ||
| - St a p l e s t r i p | Type 53 | |
| - W i d t h | mm | 11,4 |
| - L e n g t h | mm | 6-14 |
| Fastener | ||
| - N a i l s t r i p | mm | Type 48 |
| - L e n g t h | mm | 14 |
| Magazine capacity, max. | 100 | |
| Weight according to EPTA-Procedure 01:2014 | kg 1,1 | |
| Protection class | ☐/II | |
| The values given are valid for a nominal voltage [U] of 230 V. For differ-ent voltages and models for specific countries, these values can vary. | ||
Noise/Vibration Information
Sound emission values determined according to EN 60745-2-16.
Typically the A-weighted noise levels of the product are: Sound pressure level 84 dB(A);Sound power level 95 dB(A). Uncertainty K = 3 dB.
Wear hearing protection!
Vibration total values a_h and uncertainty K determined according to EN 60745:
a_h = 7,5m / s^2,K = 1,5m / s^2
The vibration level given in this information sheet has been measured in accordance with a standardised test given in EN 60745 and may be used to compare one tool with another. It may be used for a preliminary assessment of exposure. The declared vibration emission level represents the main applications of the tool. However if the tool is used for different applications, with different accessories or insertion tools or is poorly maintained, the vibration emission may differ. This may significantly increase the exposure level over the total working period.
An estimation of the level of exposure to vibration should also take into account the times when the tool is switched off or when it is running but not actually doing the job. This may significantly reduce the exposure level over the total working period.
Identify additional safety measures to protect the operator from the effects of vibration such as: maintain the tool and the accessories, keep the hands warm, organisation of work patterns.
Declaration of Conformity
C
We declare under our sole responsibility that the product described under "Technical Data" is in conformity with all relevant provisions of the directives 2011/65/EU, 2014/30/EU, 2006/42/EC including their amendments and complies with the following standards: EN 60745+1, EN 60745+2+16, EN 50581.
Technical file (2006/42/EC) at:
Robert Bosch Power Tools GmbH, PT/ETM9,
70538 Stuttgart,GERMANY
Henk Becker
Executive Vice President
Engineering
Helmut Heinzelmann
Head of Product Certification
PT/ETM9

i.v. k = m _____
Robert Bosch Power Tools GmbH
70538 Stuttgart,GERMANY
Stuttgart, 01.01.2017
Assembly
Loading the Magazine (see figures A1 - A2)
Before any work on the machine itself, pull the mains plug.
Use only original Bosch accessories. The precision parts of the power tool, such as the magazine, the striker and the shot duct, are matched to Bosch staples and nails. Other manufacturers use other steel qualities and sizes.
- Turn the power tool around.
- Press release buttons 6 and pull out the magazine 9 toward the rear.
- Insert the staple strip 8 or the nail strip 10. Hold the tacker at a slight angle when inserting the nail strip 10, so that the nails face against the sidewall.
- Insert the magazine 9 again until it engages.
Do not exert any force when opening, loading and inserting the magazine.
Operation
Starting Operation
Observe correct mains voltage! The voltage of the power source must agree with the voltage specified on the nameplate of the machine. Power tools marked with 230V can also be operated with 220V .
12 | English
The trigger lock, which is connected with the movable tacker head 1, prevents unintentional shot actuation when the trigger 4 is inadvertently pressed.
To save energy, only switch the power tool on when using it.
Starting and Stopping (Single actuation)
- At first, firmly place the tacker head 1 against the workpiece until it is pushed in a few millimeters. Afterwards, briefly press the trigger 4 and then release again.
Starting and Stopping (Contact actuation)
- For rapid working, keep the trigger 4 pressed. Position the machine and press the tacker head 1 firmly against the workpiece until the shot is actuated. After the shot, move the tacker to the next location and press the tacker head 1 firmly onto the workpiece again.
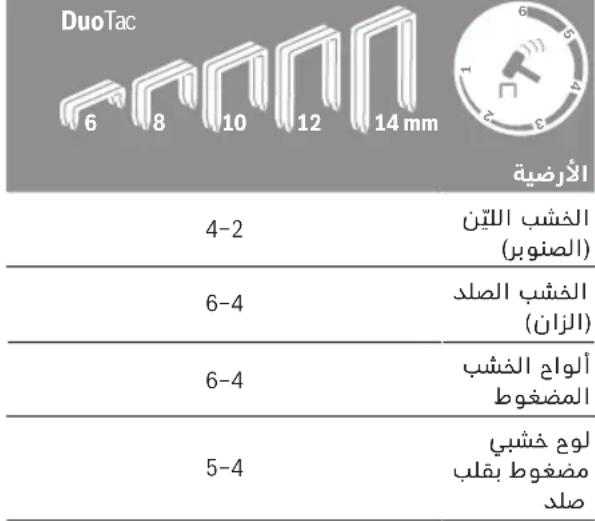
DuoTac-Automatic
In DuoTac-Automatic mode, 2 staples are fastened at the same time. The double staple thickness increases the tear strength of thin materials, such as fabrics or foils.
The DuoTac function is not possible for processing nails.
- To process 2 staples at the same time, push the DuoTac-Automatic selector switch 2 up. To process a single staple or one nail, push the DuoTac-Automatic selector switch 2 down.
Hammer-force Preselection
With the thumbwheel for hammer-force preselection 5, it is possible to preselect the required hammer force in steps.
The required hammer force depends on the length of the staples or nails, and on the strength of the material.
When processing 2 staples (DuoTac function), the hammer-force preselection must be selected approx. one step higher with thumbwheel 5.
Note: Always test the selected hammer force on scrap material first. The optimum hammer-force setting can be determined only by trial and error.
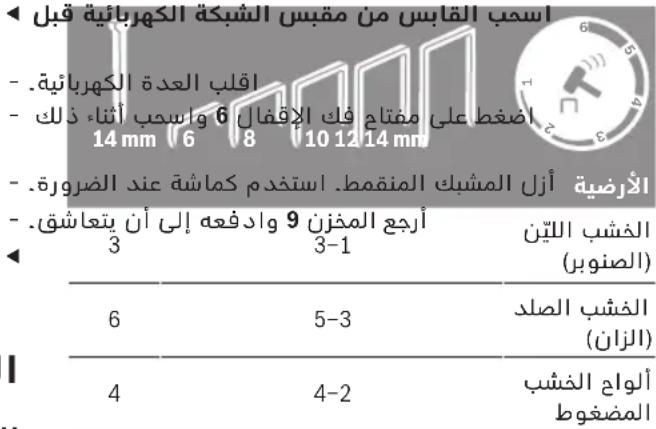
The data in the following table are recommended values.
Setting range of the thumbwheel 5
| Structural Material | 681 12 14 mm | 14 mm |
| Softwood (Pine) | 1-3 3 | |
| Hardwood (Beech) | 3-5 6 | |
| Particle Board 2-4 4 | ||
| Wood core plywood | 2-4 4 |
| Structural Material | DuoTac | |||
| 6 | 8 | 10 | 12 | |
| Softwood (Pine) | 2-4 | |||
| Hardwood (Beech) | 4-6 | |||
| Particle Board 4-6 | ||||
| Wood core plywood | 4-5 | |||
Working Advice
This machine is not suitable for working with 19mm staples. Therefore, do not use the machine to fasten ceiling panelling with profiled wood or grooves.
Avoid blank shots in order to reduce the wear of the impact striker. After finishing your work, set the hammer force with the thumbwheel for hammer-force preselection 5 to a low value, in order to relieve the tension spring.
The power tool is designed for short-time duty and will heat up during continuous operation. Performance will decrease the more the tool heats up. Duty rating S2 denotes short-time duty with a maximum operating duration of 10 mins under constant load. Switch the power tool off after this time and leave it to cool down.
Removing jammed staples
Before any work on the machine itself, pull the mains plug.
- Turn the power tool around.
Press release buttons 6 and pull out the magazine 9 toward the rear.
- Remove the jammed staple. For this, use a pair of pliers, if required.
- Insert the magazine 9 again until it engages.
- Load the magazine in good time. If the staple strip is too short, this may cause staples to jam.
Maintenance and Service
Maintenance and Cleaning
Before any work on the machine itself, pull the mains plug.
For safe and proper working, always keep the machine and ventilation slots clean.
If the replacement of the supply cord is necessary, this has to be done by Bosch or an authorized Bosch service agent in order to avoid a safety hazard.
After-sales Service and Application Service
In all correspondence and spare parts order, please always include the 10-digit article number given on the type plate of the machine.
Français | 13
Our after-sales service responds to your questions concerning maintenance and repair of your product as well as spare parts. Exploded views and information on spare parts can also be found under:
www.bosch-pt.com
Bosch's application service team will gladly answer questions concerning our products and their accessories.
Great Britain
Robert Bosch Ltd. (B.S.C.)
P.O.Box 98
Broadwater Park
North Orbital Road
Denham
Uxbridge
UB95HJ
At www.bosch-pt.co.uk you can order spare parts or arrange the collection of a product in need of servicing or repair.
Tel. Service: (0844) 7360109
E-Mail: boschservicecentre@bosch.com
Ireland
Origo Ltd.
Unit 23 Magna Drive
Magna Business Park
City West
Dublin 24
Tel. Service: (01) 4666700
Fax: (01) 4666888
Australia, New Zealand and Pacific Islands
Robert Bosch Australia Pty. Ltd.
Power Tools
Locked Bag 66
Clayton South VIC 3169
Customer Contact Center
Inside Australia:
Phone: (01300) 307044
Fax: (01300) 307045
Inside New Zealand:
Phone: (0800) 543353
Fax: (0800) 428570
Outside AU and NZ:
Phone: +61 3 95415555
www.bosch.com.au
Republic of South Africa
Customer service
Hotline: (011) 6519600
Gauteng - BSC Service Centre
35 Roper Street, New Centre
Johannesburg
Tel.: (011) 4939375
Fax: (011) 4930126
E-Mail: bsctools@icon.co.za
KZN - BSC Service Centre
Unit E, Almar Centre
143 Crompton Street
Pinetown
Tel.: (031) 7012120
Fax: (031) 7012446
E-Mail: bsc.dur@za.bosch.com
Western Cape - BSC Service Centre
Democracy Way, Prosperity Park
Milnerton
Tel.: (021) 5512577
Fax: (021) 5513223
E-Mail: bsc@zsd.co.za
Bosch Headquarters
Midrand, Gauteng
Tel.: (011) 6519600
Fax: (011) 6519880
E-Mail: rbsa-hq.pts@za.bosch.com
Disposal
The machine, accessories and packaging should be sorted for environmental-friendly recycling.
Do not dispose of power tools into household waste!
Only for EC countries:
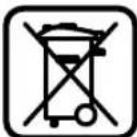
According to the European Directive 2012/19/EU for Waste Electrical and Electronic Equipment and its implementation into national right, power tools that are no longer usable must be collected separately and disposed of in an environmentally correct manner.
Subject to change without notice.
Français
Executive Vice President Engineering
Head of Product Certification
PT/ETM9

Robert Bosch Power Tools GmbH
70538 Stuttgart,GERMANY
Stuttgart, 01.01.2017
Montage
Robert Bosch (France) S.A.S.
Executive Vice President
Head of Product Certification
Engineering
PT/ETM9

Robert Bosch Power Tools GmbH
70538 Stuttgart,GERMANY
Stuttgart, 01.01.2017
Montaje
Executive Vice President Engineering
Helmut Heinzelmann
Head of Product Certification
PT/ETM9

Robert Bosch Power Tools GmbH
70538 Stuttgart,GERMANY
Stuttgart, 01.01.2017
Montagem
Carregar o carregrador (veja figuras A1 - A2)
Graffatrice PTK 14 EDT
Executive Vice President
Engineering
Helmut Heinzelmann
Head of Product Certification
PT/ETM9

Robert Bosch Power Tools GmbH
70538 Stuttgart,GERMANY
Stuttgart, 01.01.2017
Montaggio
$$ a _ {n} = 7, 5 m / s ^ {2}, K = 1, 5 m / s ^ {2}. $$
Executive Vice President Engineering
Helmut Heinzelmann
Head of Product Certification
PT/ETM9

Robert Bosch Power Tools GmbH
70538 Stuttgart,GERMANY
Stuttgart, 01.01.2017
Montage
Henk Becker Helmut Heinzelmann
Executive Vice President Head of Product Certification
Engineering PT/ETM9

Robert Bosch Power Tools GmbH
70538 Stuttgart,GERMANY
Stuttgart, 01.01.2017
Montering
Magasin fyldes op (se Fig. A1 - A2)
Hardt trae (bog) 3-56
Spanplader 2-44
Lamelplade 2-44
DuoTac

Underground
Bldt tae
(fyretrae)
2-4
Hardt tae (bog) 4-6
Spanplader 4-6
Lamelplade 4-5
Svenska|39
Arbejsvejledning
Bosch Service Center
Telegrafvej 3
2750 Ballerup
Pá www.bosch-pt.dkk kander online bestilles reservedele erler oprettes en reparations ordre.
TIf. Service Center: 44898855
Fax: 44898755
E-Mail: vaerktoej@dk.bosch.com
Bortskaffelse
Executive Vice President Engineering
Helmut Heinzelmann
Head of Product Certification PT/ETM9

i. V. h = m_c
Robert Bosch Power Tools GmbH
70538 Stuttgart,GERMANY
Stuttgart, 01.01.2017
Montage
Bosch Service Center
Telegrafvej 3
2750 Ballerup
Danmark
Tel.: (08) 7501820 (inom Sverige)
Fax: (011) 187691
Avfallshantering
Henk Becker Helmut Heinzelmann
Executive Vice President Head of Product Certification
Engineering PT/ETM9

Robert Bosch Power Tools GmbH
70538 Stuttgart, GERMANY
Stuttgart, 01.01.2017
Montering
Executive Vice President
Engineering
Helmut Heinzelmann
Head of Product Certification
PT/ETM9

Robert Bosch Power Tools GmbH
70538 Stuttgart,GERMANY
Stuttgart, 01.01.2017
Asennus
O oipoc Hktpko epyaleo nou xpoaonoeiota otnpo 10000000000000000000000000000000000000000000000000000000000000000000000000000000000000000000000000000
Aoipalea oTo xwp epyiaic
AatnpceitotovtoeaouepayzcoeKaBapokai KaA qwtievo.Ataia nakotvecpiipoxecepyaiaicmuopei va onnynouv oe atuynata.
Mny epyacege me to nektpko epyaleio neepiaA lov onou unapxei kivduvoecpknnc, oto onoio unapxoueupkta uypa, aepia nokoe. Ta nektpka epya- leia dnioupvov anivnpoio o onioc mnopei va avapkeEe i n knovn t cavauuaiaei.
'Orav xnpaonoeite to nAektpko epyaaleo kpatate paKpia an' auto ta naiai Ka aaaa TuXov npaeupoiokoe va atopa. Se nepintwn anoonaans nns npooxnc oac mnopei va xaote rov eayxo tou unxavnatoC.
Hektpikn aopaaia
To qic Tou nAektpkuO epyaleoi npenei va Taipiae otny npia. Dev emtpenetaI e kavevav tponnetaTporntou pic. Mn xnpaonoeite npaaopootka qic oeuvbaoioe yieuveva nAektpkA epyaia. Aetaointra qic kal katalnae npizec peiwovuovtov kivduvo nAektonanEiac.
EAnvika|51
Anopeuyete Tny enapitou owpatoc oac me yiwpeve c enpaviec onoc owahvc, 0epmuata (kalo pep), kouivc npsiyeia. Otav to owa oac eiva wpevo auavetai okvduovc nektonnxiac.
Mnyekctete Ta mnxavnata ot npxhi n tv uypaia. H dieiaou nepu o eva nektpko epyaaleio auavei tov kivduvo nektonnIac.
Mn xnpaonoiieTo nAektpko kaawio yia va meta- fepeTe nvaavapntoaeTo nAektpko epyaaleio,nyia va ByaleTe To fic ano TnV npla. Kpatate To nAektpko Kaawio pakia ano uepboaikc oepkpaicc, koptepec akec kal/ ano kivnta eaptma.Tuxov xaalueva npeinayve naektpka kaawia auavouv tokvouvo nAektonaiTac.
'Orav epyae0e ^ eva nektpko epyaieo oto unatpo va xnpounoite kaiowia enmukuvoc (maalavtec) nou elvai katalaa kal yia xpnon oto unatpo.Hx npn kaawenmukuvanc katalawv ia unaiptiouc xupouc eaattwei tov kivduvo nektpponlaic.
Otav n xpiontou nektpikou epyaleiou o uypo nepiBaalov cival avanopeuktn, toe xponpmonouote evanpootatcutko diakontn diappoic (diakontn FI/RCD).Hxpionevocnpoatauteutikou diakontn diappoic ealattweitov kivduvo nektponlanxiac.
Aoapaa npoowwv
Na eioTe navTo npooekikoc/npooekikn,va divete npoooxoTOnv epyaiaou kavete kal va xeiipieote to npxavma je nepiokeyn. Mn xpoaonouoetepe ev aKeKtpko epyaleio otav cioTe koupaoevoc/koupaoevn oTav piokeote unTo v enpeia vapkwtkw,ovontpuoc h qapakw. Mta onmuia anpooeEia kat to xepiogtou naKtpkoepyaaleiou mopei va obnyae1 ae oba-pouc tpaumatouc.
Φopate evav katalannlo yiaac npoatautiko eoIa oko kal navtoe npoatautka yuaia.OTav opate evav katalannlo npoatautiko eoIaioo onwc maoka npoataiac anokov, avIOAoiNTkau unOohmuata aopaaleiac, npoatautiko kpaocn wtaotidec, avALoya me to ekatoTE epyaieo kal tn xpnoan tou, eAATTwetai o kivouoc tpaupatiuov.
Anopeuyete nvy aelntn ekkvno. Beaowte oTo nAektpko epyaleio exe anoceuxi npiv to ouvdeoe Tto nAektpko biktu no tnv npatapia kaohc kalnpv to npalaabete no metaapepe. Otav metapepeTe nAektpko epyaleio exovtc to daxtuaoac stdiakontn otav ouvdeae to unxavna me tyu npeuatoctav auTo elal akoun tn theon ON, tote dnmuoyeirai kivuvoc Tpaumatouw.
Apaipieite ano ta nektpka epyaia tuxov ouvapoo Lyneva epyaleia pOuionc klaedniv Oeote to nektpkoepyaeloe aeoupyla.Eva epyaleio kletoi ouvapuooynevo eva nepiortpepoevo tmuva evoc uxavnatoc mopei va onnyoei otpauatouoc.
Mny upekmuate toe auto oac. Povtizete yua tvn aoapai otao tou owpatoc ac kalatneite nvtore tyn ioopponia oac. Etai npoeite va eayefete kautepa to mnxavma oe nepimwaeic anpoosokntow neipotaewv.
Φopate kataaAaa evdupa. Mn popate qapdi pouxa n koogmuata.Kpatate ta aalia oac, ta pouxa ac kal ta yavta oac paoka ano kivoupeva eApntmuata.Xa- lapn evuaia, koogmuata n pakia paala mopei va emakov ot a kivoupeva eApntmuata.
Otau unapxei n duvarotnta ouvapmooynonc diaracew avappopnonc n oullaync okvnc, beauwthetae onautec elvaouvdepevece m to unxavnka kawc kal onxpanoioovtai oot. H xponn maac avappopnonc okovnc umopei va ealtoov kivduvo nou npokaleitai ano tn okovn.
EmieAicXeiipopocKai xponn nEeKtpkov epyaleiw
Mnu unepoortovete to naxavna. Xpnoiponeite yu tny ekaoote epyaia to naektpko epyaieou npooipietai y'autny.Mto katalnlo naektpko epyaiae npoyaepeyaceote kautepa kai aopalaotepa otny avapepoevnpieoxh toxuc.
Mn xnpouonoioge note eva unxavna nou exe xaalqnevo diaokont. Eva nekpiok epyaaleo nou dev mopelte naev va to geae aet ae letoupyia kai/n ektoc,letoupyiac eiv enikivduvo ka npenei va enokueaoste.
ByaleTo pic ano nV npla Ka/naapoeTe nV unata pi npiv dieayete OTO mXavnma pa onoaBnote epyaola puognc, npiv aAalaEe tva eApntma notav npoketar va diapualaEe/va anoNkeuae To mXavnma. Auta ta npoanmikapeTpa aopaleiac meiwovv to kivduvo ano tuxov aheantkknvon Tou Nktpkoepyaleiou
dauayete Ta nekpkaepyaleia nou de xnpaonote ipaia ano naia.Mny entpeye tn xpnoi tou mxaivmuoc ae atopaaou dev eival eokwpeva u auto hdev exouv diaaei tic napooec obnyie.Ta nekpkaepyaleia eiva enikivduva otav xnpaonoiovtai ano aneipapoaana.
Na nepinoleiote npoeektu ta nkeptko epyaieo. Eaeycte,av ta kivoupeva eapntmuata leitoupyouv auoya,xwpc va mloakapouv, h mwnoc exov onaoei n phapei tuxov eapntmuata ta onoi emnpcaouv topno aeitoupylaoc tou nkeptkoepyaelou. OoTe auta ta xalaoueva eapntmuata yia enokueu npv ta evaxponounoete. H kaoh ouvtpnon tow nkeptkow epyaew anotelei atria noaw atuxmuatov.
IatnpieTe Ta epyaIeia Konnc KoPtepa KaKaOpap. IpooeKtika ouvtnpmeva KontiKa epyaIeia apnyvovuv duokolotepa Ka odyouvtai eukolotepa.
XpnouonoieTe Taekpkaepyaiaea,ecaptmuata, napekopevaepyaiaeKTA.oupwvaMeTcapapouoecsobnyiec.Aaubave enionc unownac tckekotoe auv-0kec kalnu uno kteaeon epyaoia.HxpnouonoiOn Tuv nekpiakewepyaieiw yia epyaoiec nou dev npoBentovtai y'auta monei va bnioupyeietnikivuvckataaTa aeic.
Service
Awote to nAeKtpiO epyaleo oac yia entokeun ano api-ota eknaideupevo npooaniko kal pe yvnaovavtaaaktiKa. 'Eaepaaicete n diatponon tnc aopaleiac tou nXavmuotc.
52|EAnvukd
Ynobeixec aospaleiac yka kappwuká
Na unoloyite navtoe ot to naektpko epyaiao nepiexi dixala. O aveleoc xepiooc tou kappotikou mopei va odnyoei anvavnten ektceuon dixawkva tpaunaioteire.
Na un onpaedeuee me to nektpko epyaleo eoctov iio/tnv iia nda npaeupokoeva atopa. 2e nepintow an kat aao evepnooinoc th e ktoeutei eva dixa lo nou mopei va oac tpaumatie.
Na nEvpyoToeTo nAekpko epyaleo npv to akoumnoTe kala enavto uno katepyoia Teaxio. O'Atv To nAekpko epyaleio dev exei enapn me to uno katepyoia Teuxio To dixa lo mopei va ativaxtei ano tvu uno stepewon teoan.
Na diakontetntouvdeon tou nlektpkoepyaleiou todeltauo nvnatapiaotavtodeltaao opnvwoelpeo nlektpkoepyaleo.OTAV TO kappwtoki elvaouveb6evo mopei va evpyonoihei katadooctav a apaipeite to npnuovéodeltao.
Na ciote npooektikoc/npooektukjotav apapeite eva opynwmevo bixalo.To ouotma mnoepie va eivai oniaoevo kai to bixalo va ektoxeutei je opn otav npoanaeite va efoudetepwoete To ophvwa.
Mny xnpaonouoet auro to kappwntko yia va otepe woe tne ktpkocypupec. Dev eivai katalao yia tvnyekataotaon nkeptikovypaumov, mopei va npokalee iZnua ot npovwn twnv kepkiw kaawsiw kai va npokaleei etai nkeptponfia qivduvo npkayiac.
Xpoupoioite KAtaAAnAc avxveutkeoc ookuec yia va evtoniOeTe TuxoM opatec Tpoopobotkec ypaumec n ouBoualeute Tny tonki enxieipnon npoxic evepyietac.H enapn me nektpikce ypaumec mnpoei va onnynoei ae npkayia knaektonAia.Tuxov bAbn evoc ayoyou aepiou (ykaio) npoei va npokaolei ekpn. To punnmu evoc ubpoawhva npokaei uukec znuec.
AopaiieTo uno katepyaia Teayio. 'Eva uno katepyaia Teayio oukypaniTaI aopalotepa me ia biataeou- oipyncn me ia neyn npa me to xepoiac.
Tou npoiovtoc kal tnc loxuoc Tou

AaBaoTe oec tic unoeieic aoepaieiac kai tic obnyiec. Aaeiec katn tv npan twv uno- beew aopaleac kai wov oniyw mopei va npokaleouv nektponAnEia, npkayia /kai oapaoocraupatouoc.
XpohouwovcTovnpoipo
To unxavnu npooipetai yia To kappwma xaprovuv, movtikou uikou, upaupataw, Aemuv qullaw, depuaw kai napoivow uikuw endv w eulivec nnapoioe enipaveiec. To unxavnu dev eviakataaAnlo yia To oterpeu ma neevduoeuv toxw npopov.
Anekovicioeva otoxieia
H anapiuonTwv aneikovioevvw otoeiow avapepetai otnv aneikovion Tou nektpikou epaaleiou o aeia ypaipkov.
1 MUTN KAPWTKOU
2 DIAKOMC yia autoaioo Duotac
3Aaβn
4 Σκανδαλη
5 Püθμiən npoεmIoaync IoXoC kpoaOng
6 Anaopaiian ymuotnpa
7EvoeEynyepiaqatoc
8△eogn6xawv
9Tgmuotnpac
10 Kapipivw
*EapntmaTou anekovizovtai n nepiyapovtai dev nepieoxvta ot stavop oukeuaia. Ia tvn np katao y eapntnatw kota to npypapa eapntatw.
Texvika xapaaktnpioiKa
HλeKtpokapawtko PTK 14 EDT
EN60745+1,EN60745+2+16,EN50581
Texvikoc akeLoc (2006/42/EK) ano:
Robert Bosch Power Tools GmbH, PT/ETM9, 70538 Stuttgart, GERMANY
Henk Becker
Executive Vice President Engineering
Helmut Heinzelmann
Head of Product Certification PT/ETM9

Robert Bosch Power Tools GmbH
70538 Stuttgart,GERMANY
Stuttgart, 01.01.2017
SuvapuOaoynon
Fepiopa Tou yepiotnpa (Bene eikovec A1-A2)
ByaTeToPcAnoTnV npizApiv ano onouabHnoteepyaia oTo nAekptko epyaio.
Na xpaonoiote mvo yvnaeEapntmuata ano tvn Bosch. Ta eapntmuata akpiieac tou nektpkoou epyaole ou, onwc o yeiotaipac, to kaiotpo kai n knv, elva evapoviaeva me biyala kai kapia ano tvn Bosch. AALOI kataokeaatc xpaonoiuov diaopetikec noiotrec xlauba kai diaopopetikec diaotaeic.
-Γupiote avanoba to nλeKtpko εpyλεio.
IaHnTe Tny anaopaiion 6 kal apaipote To ymuotnpa 9 TaBwTAC TO npoc ta nio.
IepaTe n 8 n Tn 0Tav npvate n 10 va kaouinov ta kaptia nlaeopa.
Euvtnpnon kal Service
Suvtnponn kkaaapiaoos
ByaTeTo pIc ano TnV npia npiv ano onoiabnote epyaia oTo nAeKtpko epyaleio.
AtnPteTeTo nAekTpiK epyaaleo KaTc oxiapec aepi Oou kaBapec yva va mopeite va epyaege KaAka aopalw.
Mia tuxov avaykaia avikataaant Tou nkeptikou kaawbiou npenei va dieaxtheta ano tv Bosch h ano eva eouaofove katoeta Service Tc Bosch, yia va anoeutheta etai kahe δiakivduveuon tnc aopaleiac.
Service kalapoxn oupouawxipnonc
'Otav zntare diaaaepnikc nnpopopiec kaowkai otav npayyevete avtllakkti npetie va aapepete onwodhnoto 10piio apioeupertniou nou avypapetai otny nivakiokaatakeuaatn.
To Service anavta otic epwthoeic oac oxetikae nTv enokuei kaltnouvtnpon tou npoiovoc aKaohc yia ta katalnaa avtaaktka:
www.bosch-pt.com
H ouda napoxhc oubouaw tvc Bosch anavta euxapiotoc otepothoeic oac oxetikae ta npoiovta mac kal a vtaaaktka touc.
EAaa6a
Robert Bosch A.E.
Epxieac 37
19400Kopwnt-Athya
Tel.: 2105701270
Fax: 2105701283
www.bosch.com
www.bosch-pt.gr
ABZ Service A.E.
Tel.: 2105701380
Fax: 2105701607
Anoupon
Executive Vice President
Engineering
Helmut Heinzelmann
Head of Product Certification
PT/ETM9


Robert Bosch Power Tools GmbH
70538 Stuttgart,GERMANY
Stuttgart, 01.01.2017
Montaj
Bosch San. ve Tic. A.S.
Ahi Evran Cad. No:1 Kat:22
Polaris Plaza
80670 Maslak/Istanbul
Bosch Uzman Ekibi +90 (0212) 367 18 88
Isiklar LTD. STI.
Kizilay Cad. No: 16/C Seyhan
Adana
Tel.: 0322 3599710
Tel.: 0322 3591379
.1jJgSJI 0sJI Jc JcI
JUJI GJGj9 jdoJI
yIaI aOj. waiIgI gJiaIgI p9 1IaII baoi g uuui xagulu
ddIg dIJI
.ajjJgSJI oJSSI Joc Jc
gaaagaaa aasssssssssssssssssssssssssssssssssssssssssssssssssssssssssssssssssssssssssssssssssss
Jg 15
u u u u u u u u u u u u u u u u u u u u u u u u u u u u u u u u u u u u u u u u uu uuuu
pssw8jgug juJJdo
jIb a2 111111111111111111111111111111111111111111111111111
www.bosch-pt.com
aJy 1000000000000000000000000000000000000000000000000000000000000000000000000
aJyJgSJI oSJI no yalil
g gglg auljll lssl no sall i y
aalal lalil qbrn c aull adio aabp
.
la jai lalil g auiy jll lssl p j
:
2012/19/EU gjg jgiuagjg jglg jlgjglg jglg jglg jglg jglg jglg jglg jglg jglg jglg jglg jglg jglg jglg jglg jglg jglg jglg jglg jglg jglg jglg jglg jglg jglg jglg jglg jglg jglg jglg jglg jglg jglg jglg j
.
J
4 0
0dJ 00 JgU 1 gU UJIgUJgUJI gUJI gUJI gUJI
. 5 5 5 5 5 5 5 5 5 5 5 5 5 5 5 5 5 5 5 5 5 5 5 5 5 5 5
a. 0jol jll aassao ayu yll oal
oLJ oJI JALI OJg .Jauwll Jus w
oojol Jusill S2 Jusill egj u
aggl .bl Jauo go aog 10 gU sgsu oJy
. jgcg ojial oJy au
10 10oIa ojjg8 bIaI aooj p - 10 10oIaI aooj paii liJgai Jilao kaw ayw dai .JIJIJI JdJI Ic Joiuauai SiuW L .QwUy uJ Ue9 uJzal all g 9 uJzal all g
山
J
auiy!ayuysu 1 aai i aia jgssal uagaa gjll gaa yuysu sall uusw pni jksjgljlp 220 -lg9230
1 aasoll cbl bll 1a9 gai
.4 4 4 4 4 4 4 4 4 4 4 4 4 4 4 4 4 4 4 4 4 4 4 4 4 4 4 4 4 4 4 4 4 4 4 4 4 4 4 4 4 4 4 4
()g 1abg J
Jbgl aIyI 1aWsol jSj
Bol .JiaLg abal sa I pksy
dolp 4 sljj Lc
()
1 100 4 5i j! L i C b j L i E i S a
a b c l c 1 ayy sall a| b aol .g y w Jksw Jao
aay sall js. aalll gbl p u j | p kdy J
sfo 1 ayy sall a| b aolg l l u K aill Lc
p kdy Jkwl aabglc
Duo/1iJIJI JJIJI
/ulll uu 2) jkuu uus
gAauu 1s gally qaiu aglao sjj.Duo .acuaall uuuu nn no qujll
juS dic Duo /uuiu uu 1pduu uJ
.ouluu
Henk Becker Senior Vice President Engineering
Helmut Heinzelmann
Head of Product Certification
PT/ETM9
f B i.v. k = m
Robert Bosch Power Tools GmbH, 70538 Stuttgart, GERMANY
Stuttgart, 01.01.2017
uJU
(A1-A2 gJgJ)jJgJgJ
auijieJooJI Uoc 1
4 udd auiuJ
gIbXl oig g sllg jaiLs aayssy aJg 1g
ugaiall paaa. wg asjw golog luo 0
.5jUwlaog gg Ucgj ng
4 aoi lo oj dJ.
.
6 Jai 6 liao 1e elao lc bao 2Jai Ucalg9 jao
Jaaal JlasiwK
1gog gaoaIg jgljgl aJ 100000000000000000000000000000000000000000000000000000000000000000000
oJgssI J
auiuJl oJgW JI OgauJl jaiu .aubuaill pGwJl aao 0s gagll aayssll 1
U/Duo uJg2 2
59.4 Ua 3
sij 4
Laaoo gJl o9g bauol alc 5
jiaJI Jla] 6
duuul ufo 7
*uLoo aoj8
jJ9
*Joloo aojj 10
gjgall gllgllsuiicu jglil lbu!aai
gill liolj g aolJg!glilc agogall
aiaJI UuJI
| PTK 14 EDT | dd | |
| 0 603 265 5.. | الصفicit | |
| 30 | \( ^{1} \)-d-d-d-d-d-d-d-d-d-d-d-d-d-d-d-d-d-d-d-d-d-d-d-d-d-d-d-d-d-d-d-d-d-d-d-d-d-d-d-d-d-d-d-d-d-d-d-d-d-d-d-d-d-d-d-d-d-d-d-d-d-d-d-d-d-d-d-d-d-d-d-d-d-d-d-d-d-d-d-d-d-d-d-d-d-d-d-d-d-d-d-d-d-d-d-d-d-d-d-d-d- | \( ^{1} \)-d-d-d-d-d-d-d-d-d-d-d-d-d-d-d-d-d-d-d-d-d-d-d-d-d-d-d-d-d-d-d-d-d-d-d-d-d-d-d-d-d-d-d-d-d-d-d-d-d-d-d-d-d-d-d-d-d-d-d-d-d-d-d-d-d-d-d-d-d-d-d-d-d-d-d-d-d-d-d-d-d-d-d-d-d-d-d-d-d-d-d- |
| 10 | \( ^{1} \) | \( ^{1} \)-d-d-d-d-d-d-d-d-d-d-d-d-d-d-d-d-d-d-d-d-d-d-d-d-d-d-d-d-d-d-d-d-d-d-d-d-d-d-d-d-d-d-d-d-d-d-d-d-d-d-d-d-d-d-d-d-d-d-d-d-d-d-d-d-d-d-d-d-d-d-d-d-d-d-d-d-d-d-d-d-d-d-d-d-d-d-d-d-d-d-d |
| Type 53 | \( ^{1} \)-d-d-d-d-d-d-d-d-d-d-d-d-d-d-d-d-d-d-d-d-d-d-d-d-d-d-d-d-d-d-d-d-d-d-d-d-d-d-d-d-d-d-d-d-d-d-d-d-d-d-d-d-d-d-d-d-d-d-d-d-d-d-d-d-d-d-d-d-d-d-d-d-d-d-d-d-d-d-d-d-d-d-d-d-d-d-d-d-d-d-d d | |
| 11,4 | \( ^{1} \) | \( ^{1} \)-d-d-d-d-d-d-d-d-d-d-d-d-d-d-d-d-d-d-d-d-d-d-d-d-d-d-d-d-d-d-d-d-d-d-d-d-d-d-d-d-d-d-d-d-d-d-d-d-d-d-d-d-d-d-d-d-d-d-d-d-d-d-d-d-d-d-d-d-d-d-d-d-d-d-d-d-d-d-d-d-d-d-d- |
| 14-6 | \( ^{1} \) | \( ^{1} \)-d-d-d-d-d-d-d-d-d-d-d-d-d-d-d-d-d-d-d-d-d-d-d-d-d-d-d-d-d-d-d-d-d-d-d-d-d-d-d-d-d-d-d-d-d-d-d-d-d-d-d-d-d-d-d-d-d-d-d-d-d-d-d-d-d-d-d-d-d-d-d-d-d-d-d-d-d-d-d-d-d-d-d |
| Type 48 | \( ^{1} \) | \( ^{1} \)-d-d-d-d-d-d-d-d-d-d-d-d-d-d-d-d-d-d-d-d-d-d-d-d-d-d-d-d-d-d-d-d-d-d-d-d-d-d-d-d-d-d-d-d-d-d-d-d-d-d-d-d-d-d-d-d-d-d-d-d-d-d-d-d-d-d-d-d-d-d-d-d-d-d-d-d-d-d-d-d-d-d-d d |
| 14 | \( ^{1} \) | \( ^{1} \)-d-d-d-d-d-d-d-d-d-d-d-d-d-d-d-d-d-d-d-d-d-d-d-d-d-d-d-d-d-d-d-d-d-d-d-d-d-d-d-d-d-d-d-d-d-d-d-d-d-d-d-d-d-d-d-d-d-d-d-d-d-d-d-d-d-d-d-d-d-d-d-d-d-d-d-d-d-d-d-d-d-d d |
| 100 | \( ^{1} \)-d-d-d-d-d-d-d-d-d-d-d-d-d-d-d-d-d-d-d-d-d-d-d-d-d-d-d-d-d-d-d-d-d-d-d-d-d-d-d-d-d-d-d-d-d-d-d-d-d-d-d-d-d-d-d-d-d-d-d-d-d-d-d-d-d-d-d-d-d-d-d-d-d-d-d-d-d-d-d-d-d-d-d-d-d-d-d-d d | |
| 1,1 | \( ^{1} \) | \( ^{1} \)-d-d-d-d-d-d-d-d-d-d-d-d-d-d-d-d-d-d-d-d-d-d-d-d-d-d-d-d-d-d-d-d-d-d-d-d-d-d-d-d-d-d-d-d-d-d-d-d-d-d-d-d-d-d-d-d-d-d-d-d-d-d-d-d-d-d-d-d-d-d-d-d-d-d d |
| II/ \( \square \) | \( ^{1} \)-d-d-d-d-d-d-d-d-d-d-d-d-d-d-d-d-d-d-d-d-d-d-d-d-d-d-d-d-d-d-d-d-d-d-d-d-d-d-d-d d | |
g.1230 J [U] waiu ugeaua auiu yaiy 11juy g i juc qal laiy lo sic pai o glaii .aiueo nnay
UljjxIg aai jc Uloglo
:gjdl gajl gac 1sIgwsIg jba
JgJ JaaJgW gdoJ jI aS SlaW s oJ 2012/19/EU
:bwgj (2006/42/EC) j# Sjdo
Robert Bosch Power Tools GmbH, PT/ETM9
70538 Stuttgart,GERMANY
Henk Becker
Senior Vice President
Engineering
Helmut Heinzelmann
Head of Product Certification
PT/ETM9

Robert Bosch Power Tools GmbH,
70538 Stuttgart,GERMANY
Stuttgart, 01.01.2017
#
[5]
(A1-A2 μgωd gωgEgJ)
Jg jgl gj y Jg dig jplai j uu 1 1 1 1 1 1 1 1 1 1 1 1 1 1 1 1
Slaaw. sis olaow wg! 1o laio j I b
.0000000000000000000000000000000
g 15w g qw lao j l kai s lgj w
. siiS o o laiwi 5
.
19 1ojoa g 6s
.
K = 3 ~dB
!sis o slaiw | jia| wgj
JlJUwI gK Uba a g ah uWLaJ UJ Joo
:EN60745 品 gwho
K = 1,5m / s^2,a_h = 7,5m / s^2
gjJgaw JdSdSdJgaw
jIgJL EN60745 JlJilw jJl
oIawlJySyLgjyIaWJyIaO
yj yj j j j j j j j j j j j j j j j j j j j j j j j j j j j j j j j j j j j j j j j j j j j j j j j j j j j j j j j j j j j j j j j j j j j j j j j j j j j j j j j j j j j j j jjjjjjjjjjjjjjjjjjjjjjjjjjjjjjjjjjjjjjjj
aJLd aBg asjggo J .sis pso 1J Ld aBg Osw poos oJg dlwg lg g osjdsi Ujqsi dUw gAsij U,gwdoawl dsj jjiaobo JSL aBg ,swg awl ssi Cws dWg
4 g y sLg Ss oS aG yI dgsolss jI gosuS g yjl dawgs nJnWls JIs LgswuoldsjU CwJ .SsJlaJl gJyI ggl G yjisll JjI aWlguljlioljI q
4ggo uq g 10 g 10 agj s 1s
ds ssi ojla, jldg jgs nls gss wss
1 laiJ aJd jn J dLsAul g slglu sljf
1jI jn jg .sLg oLsW s Jn J. si Osi
Sjbaa y g slglu sljf Csw Sj k
g lalso y
j1oJlawl p
4 山 L _ 山 山 山 山 山
g gJLggaolss JaQsGdS JyjIJIJIJIaIabqAsuS CQnJiAam .SiJ IaB. dWuO uWl g ausw Scl .Nsi JSL aegw jI Jd SjIISI JIJIJIJI JI JLS CQJp 1sJgWJ
gdsj jg jg jj jgsj g jg jg jg jg jg jg jg jg jg jg jg jg jg jg jg jg jg jg jg jg jg jg jg jg jg jg jg jg jg jg jg jg jg jg jg jg jg jg
05wS[5g]
J. 15.25.35.45.55.65.75.85.95.10.11.12.13.14.15.16.17.18.19.20.21.22.23.24.25.26.27.28.29.30.31.32.33.34.35.36.37.38.39.40.41.42.43.44.45.46.47.48.49.50.51.52.53.54.55.56.57.58.59.60.61.62.63.64.65.66.67.68.69.70.71.72.73.74.75.76.77.78.79.80.81.82.83.84.85.86.87.88.89.90.91.92.93.94.95.96.97.98.99.100
A L dabB 59
L Lai 1jla dili. Jlui Jls jil oIa Jl OJd CwI Jsoo,swu dwi Jls daq
1jj1
J 1 J 1 J 1 J 1 J 1 J 1 J 1 J 1 J 1 J 1 J 1 J 1 J 1 J 1 J 1 J 1 J 1 J 1 J 1 J 1 J 1 J 1 J 1 J 1 J 1 J 1 J 1 J 1 J 1 J 1 J 1 J 1 J 1 J 1 J
Jg g Jg Jg Jg Jg Jg Jg Jg Jg Jg Jg Jg Jg Jg Jg Jg Jg Jg Jg Jg Jg Jg Jg Jg Jg Jg Jg Jg Jg Jg Jg Jg Jg Jg Jg Jg Jg Jg
gaj. jj gjjg jjjl jolkws jj1j jjssgwhjjjj1j1d