
Intuvia Active Line - Meter BOSCH - Free user manual and instructions
Find the device manual for free Intuvia Active Line BOSCH in PDF.
| Product type | Bike computer (on-board computer) |
| Brand | Bosch |
| Model | Intuvia Active Line |
| Weight | Approx. 0.15 kg |
| Internal battery | Li-ion 3.7 V, 240 mAh |
| Protection rating | IP54 (dust-proof and splash-proof) |
| Operating temperature | -5 °C to +40 °C |
| Storage temperature | -10 °C to +50 °C |
| Charging temperature | 0 °C to +40 °C |
| Max. USB charging current | 500 mA |
| USB charging voltage | 5 V |
| Display | LCD screen with text and icons |
| Main functions | Display of speed, distance, range, assistance level, lighting, walk assist, eShift (options) |
| Assistance levels | OFF, ECO, TOUR, SPORT, TURBO |
| Power supply | Via internal battery or via mount connected to the bike battery |
| Charging | Via the mount (bike battery) or USB port (micro-USB) |
| Mounting | Handlebar mount, removable with locking device |
| Care and cleaning | Clean with a slightly damp soft cloth, no cleaning agents |
| Safety | Do not use as a handle, do not get distracted, read warnings |
| Spare parts and repairability | Contact an authorized Bosch dealer for repairs |
| General information | Bosch eBike system, compatible with eShift (NuVinci, SRAM, Shimano) |
Frequently Asked Questions - Intuvia Active Line BOSCH
User questions about Intuvia Active Line BOSCH
0 question about this device. Answer the ones you know or ask your own.
Ask a new question about this device
Download the instructions for your Meter in PDF format for free! Find your manual Intuvia Active Line - BOSCH and take your electronic device back in hand. On this page are published all the documents necessary for the use of your device. Intuvia Active Line by BOSCH.
USER MANUAL Intuvia Active Line BOSCH
OBI_DOKU-52282-001Lin Page 1 Monday, April 11, 2016 4:39 PM
Active Line/Performance Line Active Line/Performance Line
Robert Bosch GmbH
BoscoBike Systems
72703 Reutlingen
GERMANY
www.bosch-ebike.com
1270020XBI(2016.04)T/110WEU
Intuvia
1270020906|1270020909

BOSCH
de Originalbetriebsanleitung
en Originalinstructions
fr Nolice orignals
es Marual original
nual original
it Iurzioni originali
Read all safety warnings and all instructions. Failure to follow the warnings and instructions may result in electric shock, fire and/or serious injury.
Save all safety warnings and instructions for future reference.
The term "battery pack" used in these operating instructions, irrespective of model, refers both to standard battery packs (battery packs with holder on the bike frame) and to rack-type battery packs (battery packs with holder in the rear rack/ carrier).
Do not use the on-board computer as a handle. Lifting the eBike up by the on-board computer can cause irreparable damage to the on-board computer.
Make sure to not be distracted by the display of the on-board computer. If you do not focus exclusively on the traffic, you risk being involved in an accident. If you want to make entries in your on-board computer other than switching the assistance level, stop and enter the appropriate data.
Read and observe the safety warnings and instructions in all operating instructions of the eBike system and in the operating instructions of your eBike.
Product Description and Specifications
Intended Use
The Intuvia on-board computer is designed to control Bosch eBike systems and display riding data.
Product Features
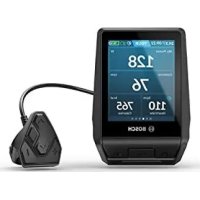
The numbering of the components shown refers to the illustrations on the graphic pages at the beginning of the manual. Individual illustrations in these operating instructions may differ slightly from the actual circumstances depending on the equipment of your eBike.
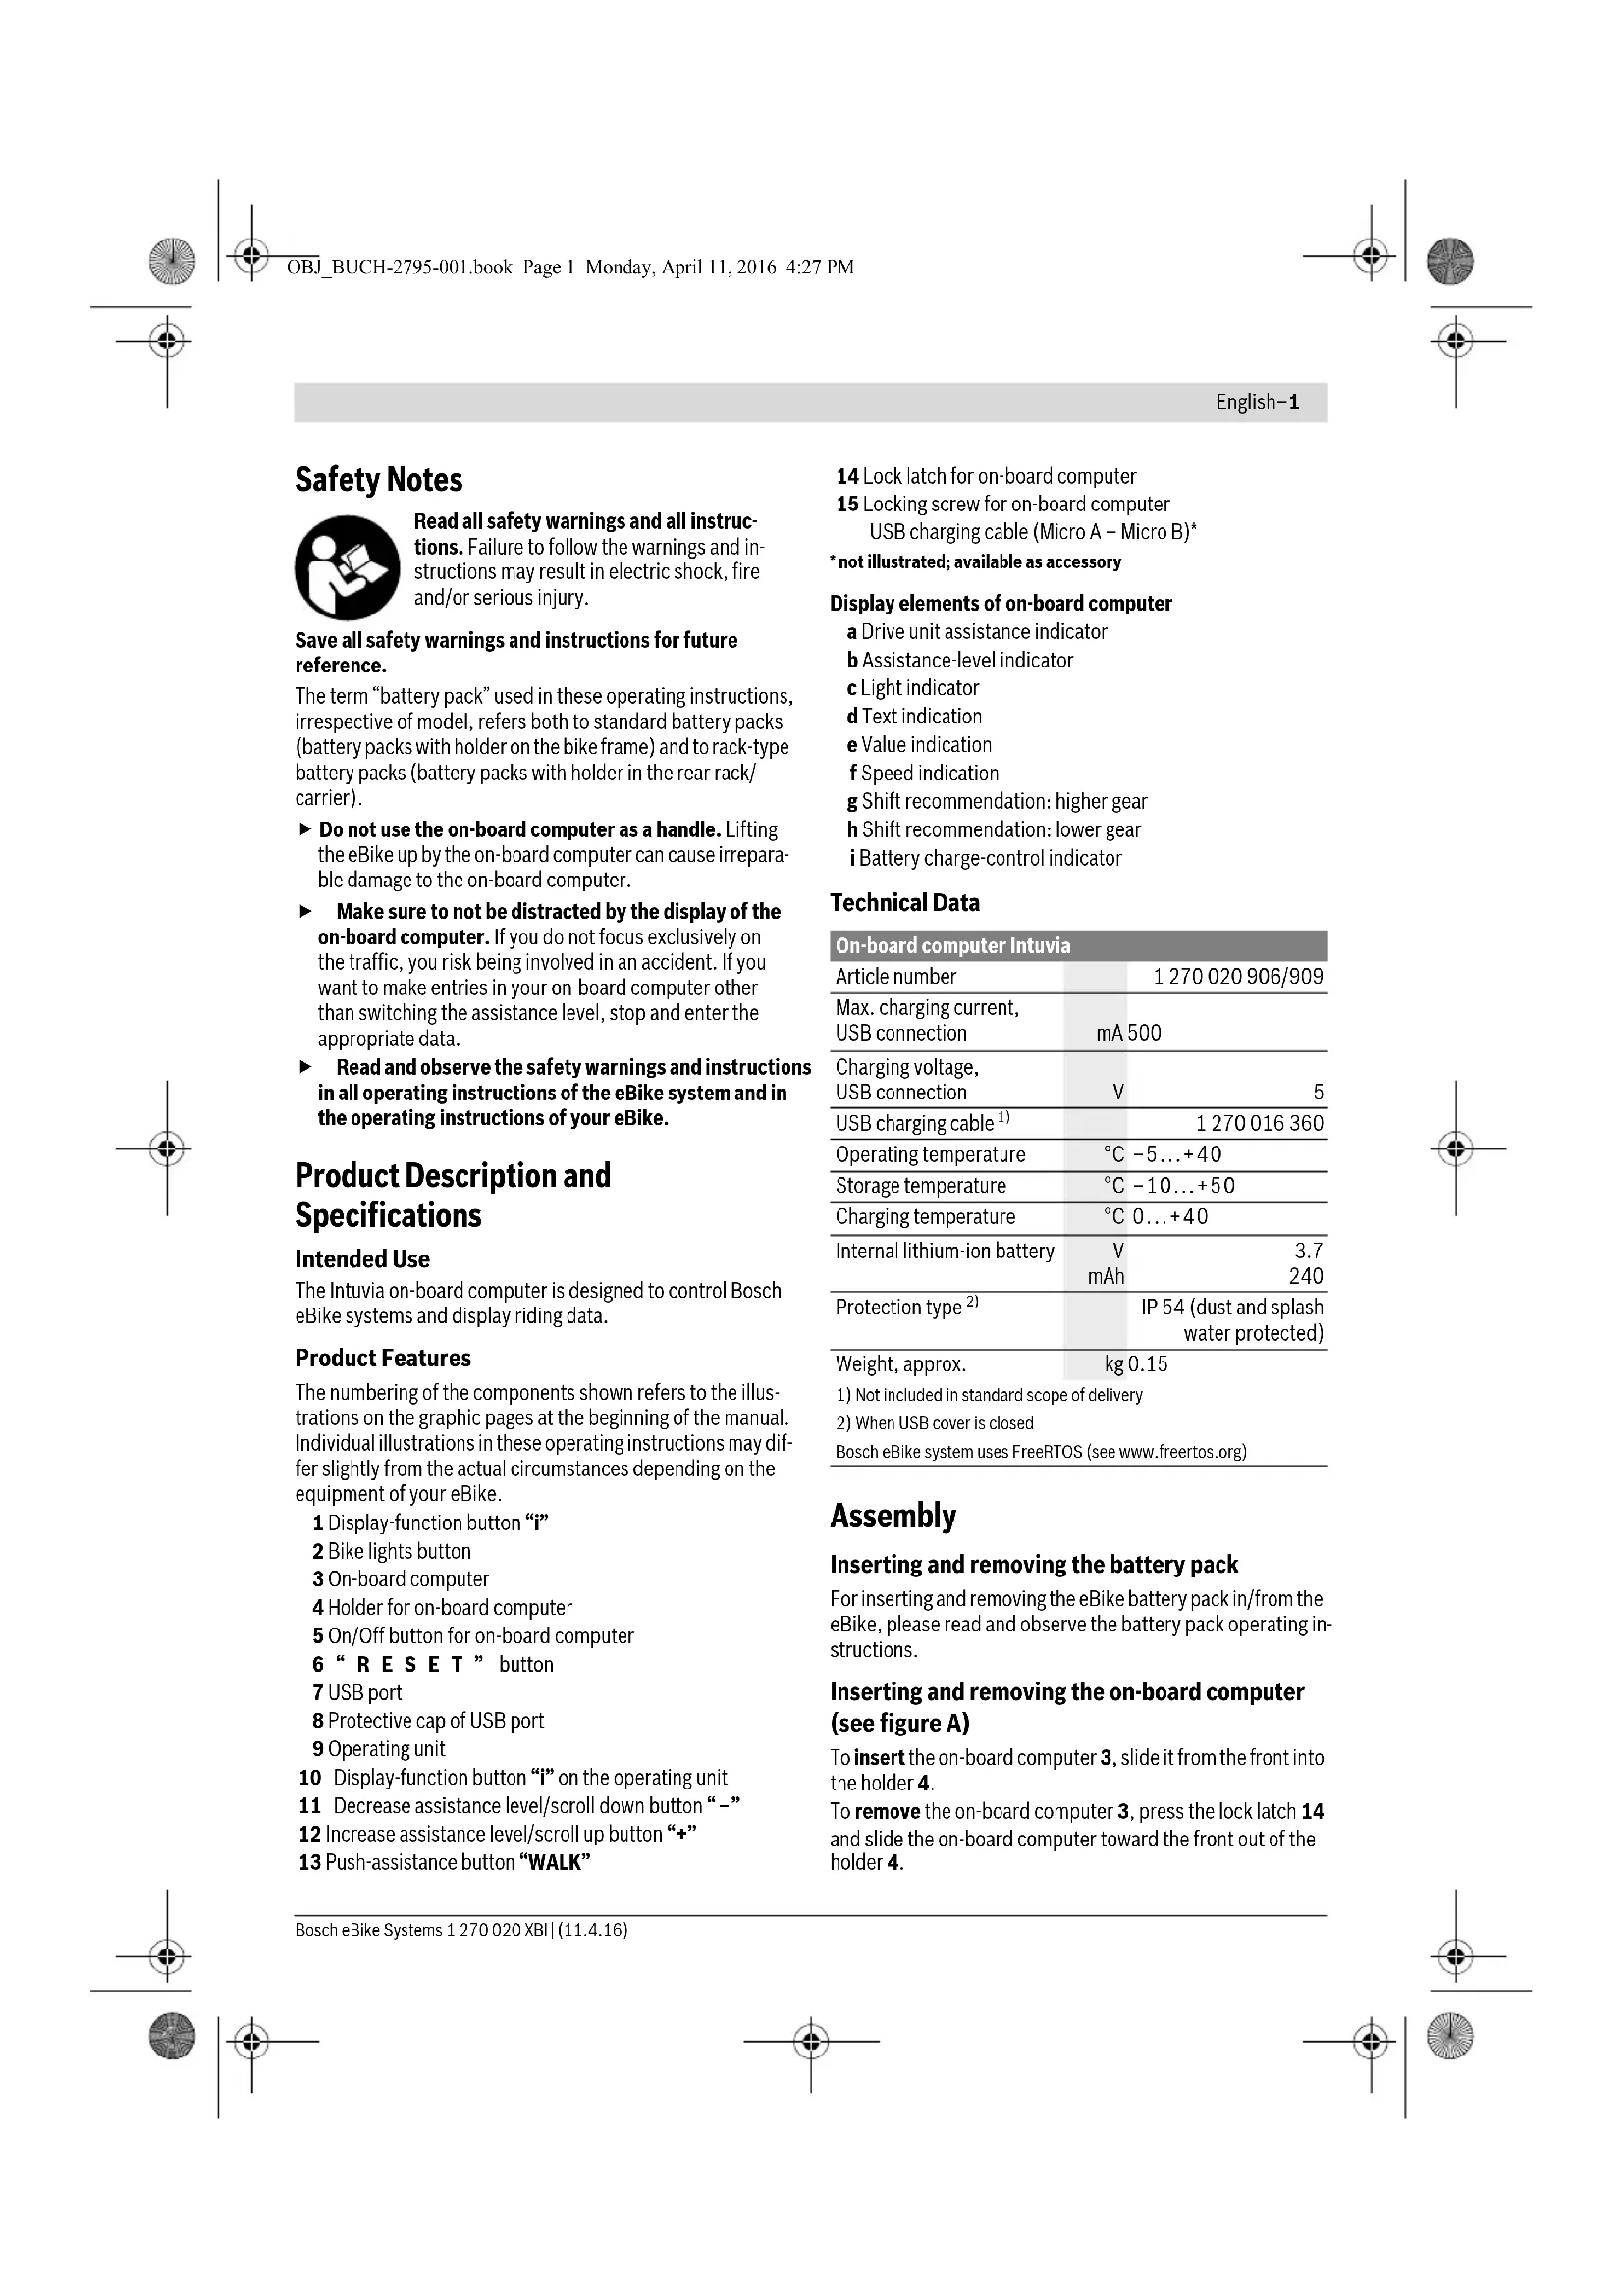
1 Display-function button "i"
2 Bike lights button
3 On-board computer
4 Holder for on-board computer
5 On/Off button for on-board computer
6“RESET” button
7 USB port
8 Protective cap of USB port
9 Operating unit
10 Display-function button "i" on the operating unit
11 Decrease assistance level/scroll down button“-”
12 Increase assistance level/scroll up button "+"
13 Push-assistance button "WALK"
14 Lock latch for on-board computer
15 Locking screw for on-board computer USB charging cable (Micro A - Micro B)*
- not illustrated; available as accessory
Display elements of on-board computer
a Drive unit assistance indicator
b Assistance-level indicator
c Light indicator
d Text indication
e Value indication
Speed indication
g Shift recommendation: higher gear
h Shift recommendation: lower gear
i Battery charge-control indicator
Technical Data
| On-board computer Intuvia | |
| Article number | 1270020906/909 |
| Max. charging current,USB connection | mA 500 |
| Charging voltage,USB connection | V 5 |
| USB charging cable1) | 1270016360 |
| Operating temperature | °C -5...+40 |
| Storage temperature | °C -10...+50 |
| Charging temperature | °C 0...+40 |
| Internal lithium-ion battery | V 3.7mAh |
| 240 | |
| Protection type2) | IP 54 (dust and splashwater protected) |
| Weight, approx. | kg 0.15 |
| 1) Not included in standard scope of delivery | |
| 2) When USB cover is closed | |
| Bosch eBike system uses FreeRTOS (see www.freertos.org) | |
Assembly
Inserting and removing the battery pack
For inserting and removing the eBike battery pack in/from the eBike, please read and observe the battery pack operating instructions.
Inserting and removing the on-board computer (see figure A)
To insert the on-board computer 3, slide it from the front into the holder 4.
To remove the on-board computer 3, press the lock latch 14 and slide the on-board computer toward the front out of the holder 4.
English-2
- Remove the on-board computer when you park the eBike.
It is possible to secure the on-board computer against removal in the holder. To do so, remove the holder 4 from the handlebar. Put the on-board computer in the holder. Screw the locking screw 15 (thread M3, 8 mm long) from below into the thread provided in the holder. Mount the holder back onto the handlebar.
Operation
Initial Operation
Requirements
The eBike system can only be activated when the following requirements are met:
- A sufficiently charged battery pack is inserted (see battery pack operating instructions).
- The on-board computer is properly inserted in the holder (see "Inserting and removing the on-board computer", page English-1).
- The speed sensor is connected properly (see drive unit operating instructions).
Switching the eBike System On/Off
Options for switching on the eBike system:
- If the on-board computer is already switched on when you insert it into the holder, then the eBike system will be switched on automatically.
- When the on-board computer and the eBike battery pack are inserted, briefly press the On/Off button 5 of the on-board computer.
- When the on-board computer is inserted, press the On/Off button of the eBike battery pack (see battery pack operating instructions).
The drive is activated as soon as you step on the pedals (except for in the push assistance function or in assistance level "OFF"). The motor output depends on the settings of the assistance level on the on-board computer. As soon as the system is activated, "Active Line/Performance Line" will appear briefly on the display.
As soon as you stop pedaling when in normal operation, or as soon as you have reached a speed of 25 / 45km / h the assistance from the eBike drive is switched off. The drive is automatically re-activated as soon you start pedaling again and the speed is below 25 / 45km / h .
Options for switching off the eBike system:
- Press the On/Off button 5 of the on-board computer.
- Switch the eBike battery pack off by its On/Off button (see battery pack operating instructions).
- Remove the on-board computer out of its holder.
If the eBike is not moved and no button is pressed on the on-board computer for 10 minutes, the eBike system will shut down automatically in order to save energy.
eShift (optional)
eShift is the integration of automatic gear shifting systems into the eBike system. To support the rider in the best way possible, the function indications and the basic settings menu have been adapted for the "eShift" function.
eShift with NuVinci H|Sync
The optimum gear for the respective speed is automatically set according to a pre-defined desired cadence. In manual mode you can choose between multiple gears.
In the "NuVinci Cadence" mode you can use the "−" or "+" button on the operating unit to increase or decrease the desired cadence. If you hold down the "−" or "+" button, the cadence will increase or decrease in steps of five. The desired cadence is shown on the display.
In the "NuVinci Gear" mode you can use the " - " or "+" button on the operating unit to switch back and forth between several defined transmission ratios. The engaged transmission ratio (gear) is shown on the display.
The gear hub of the SRAM DD3 Pulse works on a speed-dependent basis. Regardless of which gear is engaged on the derailleur gears, one of the three gears of the gear hub will automatically be engaged "G e a r : A u t o
The engaged gear will be shown briefly on the display whenever the gear of the gear hub is shifted.
If the eBike is brought to a standstill from a speed of more than 10km / h the system can automatically switch back to a set "Start gear". The "Start gear" can be set in the basic settings menu (see "Displaying/Adapting Basic Settings", page English-5).
In the "Gear" mode you can use the " - " or "+" button on the operating unit to switch back and forth between several defined transmission ratios. The engaged transmission ratio (gear) is shown on the display.
In the "Gear" manual mode, the system can also automatically switch back to a set "Start gear".
The drive unit recognises the gear shift and briefly reduces the motor assistance level as a result of it, which means the gear can also be shifted at any time under load or on a hill.
eShift with Shimano Di2
For Shimano eShift you use the Shimano control lever to shift gears.
The engaged gear will be shown briefly on the display whenever the gear of the gear hub is shifted.
The drive unit recognises the gear shift and briefly reduces the motor assistance level as a result of it, which means the gear can also be shifted at any time under load or on a hill.
If the eBike is brought to a standstill from a speed of more than 10km / h the system can automatically switch back to a set "Start gear". The "Start gear" can be set in the basic settings menu (see "Displaying/Adapting Basic Settings", page English-5).
Displays and configurations of the on-board computer
Energy supply of the on-board computer
If the on-board computer is in the holder 4, a sufficiently charged battery pack is inserted in the eBike and the eBike system is turned on, then the on-board computer is powered by the battery pack of the eBike.
If the on-board computer is removed from the holder 4, the energy is supplied via an internal battery pack. If the internal battery pack is weak when the on-board computer is switched on, "Attach to bike" will appear in text indication d for 3 s. The on-board computer will then turn off again.
To charge the internal battery pack, put the on-board computer back in the holder 4 (when a battery pack is inserted in the eBike). Switch the eBike battery pack on by its On/Off button (see battery pack operating instructions).
You can also charge the on-board computer via the USB port. Open the protective cap 8. Connect the USB port 7 of the onboard computer via a suitable USB cable to a standard USB charger or the USB port of a computer (5 V charging voltage, max. 500mA charging current). "USB connected" will appear in text indication d of the on-board computer.
Switching on/shutting down the on-board computer
To switch on the on-board computer, briefly press the On/Off button 5. The on-board computer can also be switched on when it is not inserted in the holder (if the internal battery pack is sufficiently charged).
To switch off the on-board computer, press the On/Off button 5.
If the on-board computer is not inserted in the holder, it automatically switches off after 1 minute to save energy if no button is pressed.
If you do not use your eBike for several weeks, remove the on-board computer from its holder. Store the onboard computer in a dry environment at room temperature. Regularly recharge the on-board computer's battery pack.
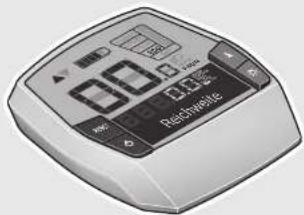
Battery Charge-control Indicator
The battery charge-control indicator i displays the charge level of the eBike battery pack, not that of the on-board computer's internal battery pack. The charge level of the eBike battery pack can also be checked on the LEDs of the battery pack itself.
On indicator i, each bar of the battery pack symbol is equivalent to a capacity of approx. 20%
The eBike battery pack is fully charged.
The eBike battery pack should be recharged.

The LEDs of the charge-control indicator on the battery pack extinguish. The capacity for assisting the drive has been used up, and assistance is gently switched off. The remaining capacity is made available for the lighting and the on-board computer. The indicator flashes.
The capacity of the eBike battery pack is enough for about 2 hours of lighting. This does not account for other consumers (e.g. automatic gearbox, charging external devices at the USB port).
If the on-board computer is removed from the holder 4, the last displayed battery charge level is saved.
If an eBike is operated with two battery packs, the battery charge-control indicator i displays the level of both battery packs.
If an eBike has two battery packs inserted into it and both battery packs are charged on the bike, the charging progress of both battery packs will be indicated on the display (the left-hand battery pack is being charged in the illustration). You can tell by the flashing indicator on the battery pack which of the two battery packs is being charged.
Setting the Assistance Level
On the operating unit 9 you can set how much the eBike drive assists you while pedalling. The assistance level can be changed at any time, even while cycling.
Note: For individual versions, it is possible that the assistance level is pre-set and cannot be changed. It is also possible that less assistance levels are available for selection than listed here.
The following assistance levels (max.) are available:
"OFF": The motor assistance is switched off, and the eBike can be moved as a normal bicycle only by pedalling. The push assistance cannot be activated in this assistance level
- "ECO": Effective assistance at maximum efficiency for maximum cruising range
- "TOUR": Uniform assistance, for touring with long cruising range
- "SPORT": Powerful assistance for sportive riding off road as well as for urban traffic
-TURBO: Maximum assistance, supporting highest cadence for sportive riding
To increase the assistance level, press the ^+ 12 button on the operating unit until the desired assistance level appears in the display b. To decrease the assistance level, press the button - 11.
The requested motor output is displayed in indicator a. The maximum motor output depends on the selected assistance level.
When the on-board computer is removed from the holder 4, the last indicated assistance level is stored; the motor-output indicator a remains empty.
English-4
Interaction of the eBike System with the Bicycle Gears
The bicycle gears should be used as with a normal bicycle, even with eBike motor assistance (please observe the operat ing instructions of your eBike).
Independent of the type of gearing, it is recommended to briefly interrupt the pedaling while changing gears. This makes changing gears easier and reduces the wear of the drive train.
By selecting the right gear, you can increase the speed and range with the same pedaling effort.
For this reason, follow the shift recommendations provided by indications g and h on your display. If indication g is displayed, you should shift to a higher gear with lower cadence. If indication h is displayed, you should select a lower gear with higher cadence.
Switching bike lights on/off
In the model in which the lighting is powered by the eBike system, the front and rear lights can be switched on and off at the same time via the on-board computer with button 2.
When the lighting is switched on "Lights on" appears and when the lighting is switched off "Lights off" appears for approx. 1 s in text indication d. The lighting symbol c is displayed when the light is on.
Switching the bike light on and off has no effect on the back lighting of the display.
Switching the Push-assistance mode On/Off
The push-assistance feature makes it easier to push the eBike. The speed in this function depends on the set gear and cannot exceed 6km / h (max.). The lower the set gear, the lower the speed in the push-assistance function (at full output).
The push-assistance function may only be used when pushing the eBike. Danger of injury when the wheels of the eBike do not have ground contact while using the pushassistance function.
To activate the push-assistance function, briefly press button "WALK" on your on-board computer. After activation, press button "+" within 3 s and keep it pressed. The eBike drive is switched on.
Note: The push assistance cannot be activated in the "OFF" assistance level.
The push assistance is switched off as soon as one of the following occurs:
you release button ^ 喜 + ^ 喜 12
- the wheels of the eBike are blocked (e.g. by actuating the brakes or impacting against an obstacle),
the speed exceeds 6km / h
Note: On some systems the push-assistance function can be started directly by pressing the "WALK" button.
Displays and configurations of the on-board computer
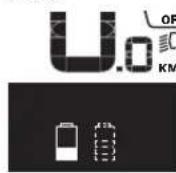
Speed and Distance Indication
The speed indication f always displays the current speed. The following functions are available in the function indication (combination of text indication d and value indication e):
- "Clock": Current time
"Max. speed": Maximum speed achieved since the last reset
"Avg.speed": Average speed achieved since the last reset
"Trip time": Trip time since the last reset
- "Range": Estimated range of the available battery-pack charge (for constant conditions such as assistance level, route profile, etc.)
- "Odometer": Display of the total distance travelled with the eBike (cannot be reset)
- "NuVinci Cadence/Gear": This menu item is displayed only in conjunction with a Nu Vinci H|Sync automatic transmission.
If you press the "i" button for longer than 1 s, you will access the NuVinci menu item from any menu item in the information menu.
To switch from the “N u V i n c i C a d e n c e ” mode
"NuVinci Gear" mode, press the "i" button for 1 s.
To switch from the "N u V i n c i G e a r" mode to the "N u V i n c i C a d e n c e" mode, all you have to do press the "i" button.
The default setting is “N u V i n c i C a d e n c e ” .

-Gear":This menu item appears only in conjunction with a Shimano DI2 gear hub. The currently engaged gear of the transmission is shown on the display. The newly engaged gear will be shown briefly on the display whenever the gear is shifted.
Gear: Auto": This menu item appears only in conjunction with an SRAM automatic transmission.
By pressing the "i" button for more than 1 s, you can switch back and forth between the "Gear: Auto" automatic mode and the "G e a r" manual mode.
If you are in first gear in manual mode, you can also press the " - 11 button to go to the "Gear: Auto" mode. By pressing the " - 11 button again, you can switch back to the manual mode. It is also possible to access the manual mode by pressing the +12 button.
"Trip distance": Distance covered since the last reset
To switch between display functions, press button "i" 1 on the on-board computer or button "i" 10 on the operating unit repeatedly until the required function is displayed.
To reset "Trip distance", "Trip time" and "Avg. speed", switch to any of the three functions and then press and hold the "RESET" button 6 until the indication is set to zero. This also resets the values of the other two functions.
To reset the "Max. speed", switch to this function and then press and hold the "RESET" button 6 until the indication is set to zero.
To reset "Range", switch to this function and then press the "RESET" 6 button until the display is reset to the value of the factory setting.
If the on-board computer is removed from the holder 4, all values of the features are saved and can still be displayed.
Displaying/Adapting Basic Settings
The basic settings can be displayed and changed regardless of whether the on-board computer is inserted in the holder 4 or not. Some settings are visible and changeable only when the operating computer is inserted. Some menu items may be missing depending on the equipment of your eBike.
To access the basic settings menu, press and hold the "RESET" button 6 and the "i" button 1 until "Configuration" is displayed in text indication d.
To switch between the basic settings, press button "i" 1 on the on-board computer repeatedly until the required basic setting is displayed. If the on-board computer is inserted in the holder 4, you can also press button "i" 10 on the operating unit.
To change the basic settings, press the On/Off button 5 next to indication - to reduce or scroll down, or the lighting button 2 next to indication ^ 十 to increase or scroll up. If the on-board computer is inserted in the holder 4, it is also possible to change using buttons - - ^ 一 1 1 and ^ 十 1 2 on the operating unit.
To exit the function and save a changed setting, press the "RESET" button 6 for 3 s.
The following basic settings are available:
- "Clock": The current time can be set here. Pressing and holding the setting buttons fast-forwards the setting speed.
- "Wheel circum. +": You can change this value pre-set by the manufacturer by ± 5% . This menu item is displayed only when the on-board computer is in the holder.
-
" - English +": You can change the language of the text indications. You can choose between German, English, French, Spanish, Italian, Portuguese, Swedish, Dutch and Danish.
-
"Unit km/mi +": The speed and distance can be displayed either in kilometres or miles.
- "Time format +": The time can be displayed either in the 12 hour or 24 hour format.
-Shift recom.on/off ^+ :You can switch the indication of a shift recommendation on and off. - "Power-on hours": Indicates the total travel duration with the eBike (not changeable).
-Gear calibration" (only NuVinci H)Sync): Here you can calibrate the continuously variable transmission. Confirm the calibration by pressing the "Bike lights" button. Then follow the instructions.
In the event of an error, it can also be necessary to perform calibration when riding. In this case, you also confirm the calibration by pressing the "Bike lights" button and then follow the instructions on the display. This menu item is displayed only when the on-board computer is in the holder. - "Start gear": The starting gear can be set here. The automatic shift-back function is switched off in the "--" position. This menu item is displayed only in connection with SRAM DD3 Pulse and Shimano Di2. This menu item is displayed only when the on-board computer is in the holder.
-Gear adjustment': This menu item can be used to perform fine adjustment of the Shimano Di2. The pre-defined adjustment range can be found in the operating instructions provided by the transmission manufacturer. Perform fine adjustment as soon as you hear unusual sounds coming from the transmission. This will prevent premature wear of the transmission and also avoid any impairments in gear shifting behaviour which could cause you to fall in adverse situations. This menu item is displayed only in conjunction with Shimano Di2. This menu item is displayed only when the on-board computer is in the holder.
"Displ.vx.x.x.x": This is the software version of the display. - "DU vx.x.x.x": This is the software version of the drive unit. This menu item is displayed only when the on-board computer is in the holder.
- "DU #xxxxxxxxxx": This is the serial number of the drive unit. This menu item is displayed only when the on-board computer is in the holder.
- "Service MM/YYYY": This menu item is displayed when the bike manufacturer has set a fixed service appointment.
Serv.xx km/mi: This menu item is displayed when the bike manufacturer has set a fixed service appointment after a certain mileage has been reached.
-Bat.vx.x.x.x":This is the software version of the battery pack.This menu item is displayed only when the on-board computer is in the holder. - "1. Bat.vx.x.x.x": When using 2 battery packs this is the software version of one of the battery packs. This menu item is displayed only when the on-board computer is in the holder.
English-6
- "2. Bat.vx.x.x.x": When using 2 battery packs this is the software version of the other battery pack. This menu item is displayed only when the on-board computer is in the holder.
Error Code Indication
The components of the eBike system are continuously and automatically monitored. When an error is detected, the respective error code is indicated in text indication d.
Press any button on the on-board computer 3 or on the operating unit 9 to return to the standard indication.
-Gear vx.x.x.x": This is the software version of the automatic transmission. This menu item is displayed only when the on-board computer is in the holder. This menu item is displayed only in conjunction with an automatic transmission.
Depending on the type of error, the drive unit is automatically shut off, if required. Continued travel without assistance from the drive unit is possible at any time. However, have the eBike checked before attempting new trips.
Have all repairs performed only by an authorised bike dealer.
Code Cause Corrective Measure
| 410 | One or more buttons of the on-board computer are blocked. | Check if any buttons are blocked, e.g. from dirt or debris. Clean the but-tons, if required. |
| 414 | Connection problem of the operating unit | Have connections and contacts checked. |
| 418 | One or more buttons of the operating unit are blocked. | Check if any buttons are blocked, e.g. from dirt or debris. Clean the but-tons, if required. |
| 419 | Configuration error | Restart the system. If the problem persists, contact your Bosch eBike dealer. |
| 422 | Connection problem of the drive unit | Have connections and contacts checked. |
| 423 | Connection problem of the eBike battery pack | Have connections and contacts checked. |
| 424 | Communication error among the components | Have connections and contacts checked. |
| 426 | Internal time-out error | Restart the system. If the problem persists, contact your Bosch eBike dealer. In this error status, it is not possible to display or adjust the wheel circumference in the basic settings menu. |
| 430 | Internal battery pack of the on-board computer is empty. | Charge the on-board computer (in the holder or via the USB port). |
| 431 | Software version error | Restart the system. If the problem persists, contact your Bosch eBike dealer. |
| 440 | Internal error of the drive unit | Restart the system. If the problem persists, contact your Bosch eBike dealer. |
| 450 | Internal software error | Restart the system. If the problem persists, contact your Bosch eBike dealer. |
| 460 | Error at USB connection | Remove the cable from the USB connection of the on-board computer. If the problem persists, contact your Bosch eBike dealer. |
| 490 | Internal error of the on-board computer | Have the on-board computer checked. |
| 500 | Internal error of the drive unit | Restart the system. If the problem persists, contact your Bosch eBike dealer. |
| 502 | Bike lighting error | Check the light and the associated wiring. Restart the system. If the prob lem persists, contact your Bosch eBike dealer. |
| 503 | Error of the speed sensor | Restart the system. If the problem persists, contact your Bosch eBike dealer. |
| 510 | Internal sensor error | Restart the system. If the problem persists, contact your Bosch eBike dealer. |
| 511 | Internal error of the drive unit | Restart the system. If the problem persists, contact your Bosch eBike dealer. |
1 270 020 XBI| (11.4.16) Bosch eBike Systems


English-7
| Code | Cause | Corrective Measure |
| 530 | Battery pack error | Switch off the eBike, remove the eBike battery pack and reinsert the eBike battery pack. Restart the system. If the problem persists, contact your Bosch eBike dealer. |
| 531 | Configuration error Restart the system. | If the problem persists, contact your Bosch eBike dealer. |
| 540 | Temperature error | The eBike is outside of the permissible temperature range. Switch off the eBike system and allow the drive unit to either cool down or heat up to the permissible temperature. Restart the system. If the problem persists, contact your Bosch eBike dealer. |
| 550 | An improper load was detected. | Remove load. Restart the system. If the problem persists, contact your Bosch eBike dealer. |
| 580 | Software version error Restart the system. | If the problem persists, contact your Bosch eBike dealer. |
| 591 | Authentication error | Switch off the eBike system. Remove the battery pack and reinsert it. Re-start the system. If the problem persists, contact your Bosch eBike dealer. |
| 592 | Incompatible component | Insert a compatible display. If the problem persists, contact your Bosch eBike dealer. |
| 593 | Configuration error Restart the system. | If the problem persists, contact your Bosch eBike dealer. |
| 595, 596 | Communication error | Check the wiring to the transmission and restart the system. If the problem persists, contact your Bosch eBike dealer. |
| 602 | Internal battery pack error while charging | Unplug the charger from the battery pack. Restart the eBike system. Plug the charger into the battery pack. If the problem persists, contact your Bosch eBike dealer. |
| 602 | Internal battery pack error | Restart the system. If the problem persists, contact your Bosch eBike dealer. |
| 603 | Internal battery pack error | Restart the system. If the problem persists, contact your Bosch eBike dealer. |
| 605 | Battery pack temperature error | The eBike is outside of the permissible temperature range. Switch off the eBike system and allow the drive unit to either cool down or heat up to the permissible temperature. Restart the system. If the problem persists, contact your Bosch eBike dealer. |
| 605 | Battery pack temperature error while charging | Unplug the charger from the battery pack. Allow the battery pack to cool. If the problem persists, contact your Bosch eBike dealer. |
| 606 | External battery pack error | Check the wiring. Restart the system. If the problem persists, contact your Bosch eBike dealer. |
| 610 | Battery pack voltage error | Restart the system. If the problem persists, contact your Bosch eBike dealer. |
| 620 | Charging error | Replace the charger. Contact your Bosch eBike dealer. |
| 640 | Internal battery pack error | Restart the system. If the problem persists, contact your Bosch eBike dealer. |
| 655 | Multiple battery pack errors | Switch off the eBike system. Remove the battery pack and reinsert it. Restart the system. If the problem persists, contact your Bosch eBike dealer. |
| 656 | Software version error | Contact your Bosch eBike dealer so that he can perform a software update. |
| 7xx | Transmission error | Please observe the operating instructions provided by the transmission manufacturer. |
| No display | Internal error of the on-board computer | Restart your eBike system by switching it off and back on. |

English-8
Power Supply of External Devices via USB Connection
With the USB connection, it is possible to operate and charge most devices whose power supply is possible via USB (e.g., various mobile phones).
Prerequisite for charging is that the on-board computer and a sufficiently charged battery pack are inserted in the eBike.
Open the protective cap 8 of the USB port on the on-board computer. Connect the USB connection of the external device to the USB port 7 on the on-board computer using the USB charging cable Micro A - Micro B (available from your Bosch eBike dealer).
Once the consumer has been disconnected, the USB connection must be sealed again carefully with the protective cap 8.
A USB connection is not a waterproof plug-in connection. When riding in the rain, an external device must not be connected and the USB connection must be completely sealed with the protective cap 8.
Maintenance and Service
Maintenance and Cleaning
Do not immerse any components, including the drive unit, in water or clean them with pressurised water.
Clean your on-board computer using a soft cloth dampened only with water. Do not use any detergents.
Have your eBike system checked by an expert at least once a year (including mechanical parts, up-to-dateness of system software).
The bicycle manufacturer or dealer may also base the service date on the distance travelled and/or a period of time. In this case, the on-board computer will show you every time it is switched on that the service date is due in the text indication d by displaying "Service" for 4 s.
For service or repairs on the eBike, please refer to an authorised bicycle dealer.
After-sales Service and Application Service
In case of questions concerning the eBike system and its components, please refer to an authorised Bosch eBike dealer.
For contact data of authorised Bosch eBike dealers, please refer to www.bosch-ebike.com
Transport
If you transport your eBike attached to the outside of your car, e.g. on a bike rack, remove the on-board computer and the eBike battery to avoid damaging them. (If the on-board computer cannot be fitted onto a bracket, it is not possible to remove it from the bicycle. In this case, the on-board computer may remain on the bicycle.)
The battery packs are subject to the Dangerous Goods Legislation requirements. Private users can transport undamaged battery packs by road without further requirements.
When being transported by commercial users or third parties (e.g. air transport or forwarding agency), special requirements on packaging and labelling must be observed (e.g. ADR regulations). If necessary, an expert for hazardous materials can be consulted when preparing the item for shipping.
In case of questions concerning transport of the battery packs, please refer to an authorised Bosch eBike dealer. The Bosch eBike dealers can also provide suitable transport packaging.
Disposal

The drive unit, on-board computer including operating unit, battery pack, speed sensor, accessories and packaging should be disposed of in an environmentally correct manner.
Do not dispose of eBikes and their components into household waste!
Only for EC countries:
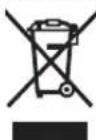
According to the European Guideline 2012/19/EU, electrical devices/tools that are no longer usable, and according to the European Guideline 2006/66/EC, defective or used battery packs/batteries, must be collected separately and disposed of in an environmentally correct manner.
The integrated battery pack in the on-board computer may only be removed for disposal. Opening the housing shell can destroy the on-board computer.
Please return battery packs and on-board computers that are no longer usable to an authorised bicycle dealer.
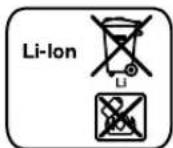
Li-ion:
Please observe the instructions in section "Transport", page English-8.
Subject to change without notice.
Français-1
Sousreservedemodifications.

Espanol-1
Endast for EU-lander:
"Active Line/Performance Line".
Tioeia evoicnc oov unoloyoiotn oxmuatoC (On-board computer)
aEvdeiEynoootnpieCtnmovadackvinnanc
bEvdsen Tou enneodou unotnpic
cEvcbfNΦwTiaou
D'EvoEiE N KcIeVou
E'EvocEnπμwv
F'EvobEnTaxuHETPOU
gΣótaon toxúntac; Meyalutepon toxúnta
h Suotaan taxtutnac: MkpoTeep taxtuTna
iEvocien katotaonc opionnc nataplac
TexvikaXapaktnploTik
HBohOeia 80nOnc anepeyoNoiTei, oMlc npouoiaTeI pia aTIO Tc akolouoc kataotaoic:
AeVEToTnKToa+12eUeepo,
-oi p06ec tou eBike μnlokapouv (π.x.με φρεναρμa η κτu-novtau navw oε εva μmδio),
-ηταχιτιηταξεπερνατα6χλ/ωρα.
Ynodei:2epeikaouatmaetaBnotheia0nncnnpoeiv aEekivnoaeaneuheiac,ataovtacto nAiktpro WALK.
EAAynvka-5
Evdeickaipuoipoeiouoayotn oxmuoc
Evdeieic taxumtac kai anootaic
TnV evbEiTou taXmuetpou f eipaviciTaI nVTOTe n TpeXou-aa TaXtnta.
TnV ev6eIgN aeIoupyiac (ovduaog ev6eIgN keiEvou d kai ev6eiNtiv e) ploKovTai oakouOec 1eIToupyieC yia emloyh:
-«Clock》(PoIot):Tpexouaωpa
«Max.speed(Méy. Taxutnα): Ano tv tελeutaia εηava-φρa énteuxθeioa μεγοιtn taxutnα
-Avg.speed(Mean taxuteta):Ano tv teaeuta enava-phiapeneuxeioa eon taxuteta
- «Triptime(Xpovocdiabopounc):Xpvocobnyonc ano TnV TEautaia enavaopa
Euvtnpnon kal Service
SuvtnpnaKaiKaapiaopoc
Ola ta eapnmuata oumepiaaBavovnc kntnc movdackiVnong dev enipentai va buoiotouv oto vepo naqapiotouvepeo unneon.
TAtovKaBapiaoToUOnoloyiOTHOxHpatocXpnaPnooiTe eva maIakO, eunioevo mvo vepo navi. Mn xpaonoiTe kaveva atoppunavtiko.
Apohto to ouotnma eBike to liyotepo ia opa to xpovva
eayBei texyika (ektoc twv aaww to mxaivko pock n evn
pepwon tou loyaiikou tou ouotnpatoc).
EnnAo o kataaekuaotn h o e npac tou noanatou nopel
ya Tnv nepounvia aepic va npae wc bao en vxaov ae
toupyiac kal/evva xovikobadtnma. 2e autn tnv neplwno
unoloyoiTNC oxmuatoc meta ankdeevpyonoinon taac deiXVEI Tn AnEtnnc nepounviac epic ontv evdeieh keiEvou d
ue S er v i c e yia 4 deutepoennna
Ia eepic n emokuec oTo eBike aneunvtheit napakawoe evav eoouioobntnevo eumopa tou no6nlaow.
Service ka npoxn oupouauw xpon
Ia olesic epwntoeoc oxetikae to ouomua eBike ka ta Eaaptmuataouaneuovthetae evav eoouiofoevo emopa no8nAatuw.
Stoixela eniokiovwlae efouaoobotmeuvw eunopov noaWu npopeite va pote otnv ioaeia6a www.bosch-ebike.com
EAAnvika-10
Mεταρορὰ
Otav metapepepe taoc to eBike ektoc tou autokvntouac,pi.navw oia oxapa anoekuov,apaipeote tv unoloyoiotxniatoc kauynnunatapia eBike,yva va anopuyete tuxov nuec.(Ounoloyiatoc oxnatoc,oi onolot dev mnpov va tonoetnouv naow o eva otpvya,dev mnpov va aqaipoeov and to nohAto.2e autn tvn nepinwnonepo ounoyiocxniatoc pa napapevei naww to nohAato.)
Oμnatapec unkeivtai otic anattnoeic nvc vopo0eolac yia emi kivnu npovta. O μn xalaouevec μnatapiec mnpoov va μe- tapepeoov oto dpómo anotov 1owtnxphonxwpláAaLnc npo- unofoecic.
Tnpooue to 6ikaiomega aalayov.
C E I
| de | EU-Konformitäserklarung Intuvia Sachnummer | Wir erklaren in alleiniger Verantwortung, dass die genannten Produkte allen einschlagigen Bestimmungen der nachfolgenden aufgeführten Richtlinien und Verordnungen entsprechen und mit folgenden Normen übereinstimmen. Technische Unterlagen bei: * |
| en | EU Declaration of Conformity Intuvia Article number | We declare under our sole responsibility that the stated products comply with all applicable provisions of the directives and regulations listed below and are in conformity with the following standards. Technical file at: * |
| fr | Déclaration de conformité UE Intuvia N° d'article | Nous déclarons sous notre propre responsabilité que les produits déscrits sont en conformité avec les directives, règlements normatifs et normes écuminés ci-dessous. Dossier technique auprès de: * |
| es | Déclaración de conformidad UE Intuvia N° de articulo | Declaramos bajo notre suspensa exclusiva responsabilité, que los produits nombrados cumplen con todas las dispositions correspondientes de las Directivas y los Reglandos Mentionados a continuación y está en conformidad con las作為 normas. Documentos tíricos de: * |
| pt | Déclaração de Conformidade CE Intuvia N.° do produit | Declaramos sobledge exclusiva responsabilité que os produits Mentionados cumprem todas as dispositions e os regulamentos indicados e está em conformidade com as seguides normas. Documentação técnica pertencente à: * |
| it | Dichiarazione di conformità UE Intuvia Codice prodotto | Dichiariamo molto la nostra pierna responsabilità che i prodotti indicate sono conformi a tutte le dispositions pertinenti delle Direttive e dei Regolamenti elencati di seguito, nonché alle seguenti Normative. Documentazione Tecnica presso: * |
| nl | EU-conformiteitsverklaring Intuvia Productnummer | Wij verklaren op eigener verantwoordelijkheid dat de genoemde producten voldoen aan alle desbetreffende bepalingen van de hierna genoemde richtlijnen en verordeningen en overeenstemmen met de volgende normen. Technisch dossier bij: * |
| da | EU-overensstammelseserklaering Intuvia Typenummer | Vi erklær someneansvarlige, at det beskreve Produkt er i overensstammelse med alle gändende bestemmelsei følgende direktiver og forordninger og opfylder følgende standarder. Tekniske bilag ved: * |
| sv | EU-konformitetsförklaring Intuvia Produktnummer | Vi f凶larar under eget ansvar att de námnda Produkterna uppfyller kraven i alla gällande bestämelse i de nedan angivna direktiven och Förordningarnas och att de stämmer överens med följande normer. Teknisk Dokumentation: * |
| no | EU-samsvarserklaring Intuvia Produktnummer | Vi erklær under eneansvar att de nevnte Produktene er i overensstammelse med alle relevante bestemmelsei direktivene og forordningene nedenfor og med følgende standarder. Teknisk dokumentasjon hos: * |
| fi | EU-vaatimustemukaisuusvakuutus Intuvia Tuotenumero | Vakutamme tāten, ettā mainitut tuotteet vastaavat kaikkia seuraavien direktivien ja asetusten asiaankuulvia vaatimuksaja ja ovat seuraavien standardien vaatimusten mukaisia. Tekniset asiakirjatat aatavana: * |
| el | Διλωη πιστόπτας EE Intuvia Αριθμος ευρεπρίου | Δηλωνομε με anokλεοικιμις μας εύθυνη, ὄτι τα αναφερόμενα προίντα αντιοιχουν σελες κις αγετικεδιαίεις ταιδέξεις τυν πο κατων αναφερόμενων σδημών και kανονιαμών και ταιζονται με τα ακόλουθα πρότιμα. Tekviika ἀγραφα στη: * |
| pl | Deklaracja zgodnosci UE Intuvia Numer katalogowy | Oświadczamy z peña opdowiedzialnoscią, ze niniejsze produkty opdowiadaj wszymtkim wymaganiom ponijeż wyszczególniych dyrektyw i Rozporzędźń, oraz ze są zgodne z nastepujacymi normami. Dokumentacja techniczná: * |

111
| cs | EU prohláseni o shodé Intuvia Objénací Čslo | Prohlásjume na vyhradní zodpovednost, ze uvedeny vyrobek spína vsechna príslúnsá ustanoveni niže uvedenych směrnica a nariadeni a je v souladu s nasledujícími normami: Technické podklady u:* |
| sk | EU vyhlásenie o zhode Intuvia Vecné Čslo | Vyhlasujeme na vyhradní zodpovednost, ze uvedeny vyrobek spína všetky prisluné ustanovenia nižsèu uvedenych smernic a nariadeni a je v súlade snas ldujú cim iormami: Technické podklady má spolocnost:* |
| hu | EU konformitàsi nyilatkozat Intuvia Čiékszám | Egyedūl feleloséggel kijelentjuk, hogy a megnevezett termékek megfelelnek az alábbiakban felsorolársa kerülô irányelvek és rendeleket valamennyi idevágó elófírsainak és megfelelnek a következő szabványoknak. Múszaki dokumentumok megörzési pontja:* |
| ro | Déclaratie de conformitate UE Intuvia Numàr de identificare | Declarém pe proprie raspundere cà produselementionate corespund tuturord disposizṭilor relevante ale directivelò si reglementärilor enumerate in celece ce urmeazà sì sunt in conformitate cu urmátoarele standarde. Documentatie tehnicićla:* |
| bg | EC déknapañna 3a cboTBeTCTBHe Intuvia KataIàOxEN HOMep | C nbIha OTROBOPHOC T NHE DeKnapriPame, Que noocouhnte pnoodyktno OTROBAPAT Na BCSKN BAVIDN H3N8CBAHNA IINPEKTHBNTe N pa3nopeβbteNo-DoNy H cboTBeTCTBa Na CLEDNITE CTAnDAPTN. Texhnicka Dokumentacija pri:* |
| sl | lzjava o skladnosti ES Intuvia Številka artikla | Izjavljamo pod izključno odgovornostjo, da je omenjen izdelek v skladu z vsemi relevantnimi dolocili direktiv in uredb ter ustreza naslednjim standardom. Technična dokumentacija pri:* |
| hr | EU izjava o sukladnosti Intuvia Kataloški br. | Pod punom odgovornóscu izjavlujemo da navedeni proizvodi odgovaraju swim relevantnimi odredbama direktiva i propisima navedenima u nastavku i da su sukladni sa sljedećim normama. Technička dokumentacija se moze dobiti kod:* |
| et | EL-vastavusdekaratsion Intuvia Tootenumber | Kinnitame ainuvastutajatena, et nimetud tooted vastavad järgnevalt loetletud direktiviide ja määruste kõikidele asjaomastele nõuetele ja on kooskolas järgmiste normidea. Technilised dokumendid saadaval:* |
| lv | Deklaracija par atbilstibu EK standartiem Intuvia Izstradājuma numurs | Mēs ar pilnu atbildibu pazipojam, ka šeit aplūkotie izstradājumi atbilst visiem tālik minētajās direktivās un rikojumos ietvertajām saistōsajām nostādnēm, kā āri sekojsiem standartiem. Techniskā dokumentācija no:* |
| lt | ES atitikties deklaracija Intuvia Gaminio numeris | Atsakingai pareiškiame, kad išvardty gaminiai atitinka visus privalomus Žemiu nurodytý direktyvy ir reglamentu reikalavimus ir šiups standartus. Techniné dokumentacija saugoma:* |
| Intuvia 1 270 020 | 903 1 270 020 906 1 270 020 909 | |
| 2014/30/EU EN 55022:2010 2011/65/EU EN 55024:2010 | ||
| BOSCH * Bosch eBike Systems 72703 Reutlingen GERMANY | ||
| Claus Fleischer Gunter Flinspach Senior Vice President Vice President PPA CE i.v. | ||
| Bosch eBike Systems, 72703 Reutlingen, GERMANY Reutlingen, 01.04.2016 |

- Active Line/Performance Line Active Line/Performance Line
- Robert Bosch GmbH
- www.bosch-ebike.com
- Intuvia
- BOSCH
- Save all safety warnings and instructions for future reference.
- Product Description and Specifications
- Intended Use
- Product Features
- Display elements of on-board computer
- Assembly
- Inserting and removing the battery pack
- Inserting and removing the on-board computer (see figure A)
- English-2
- - Remove the on-board computer when you park the eBike.
- Operation
- Initial Operation
- Requirements
- Switching the eBike System On/Off
- eShift (optional)
- eShift with NuVinci H|Sync
- eShift with Shimano Di2
- Displays and configurations of the on-board computer
- Energy supply of the on-board computer
- Switching on/shutting down the on-board computer
- Battery Charge-control Indicator
- Setting the Assistance Level
- English-4
- Interaction of the eBike System with the Bicycle Gears
- Switching bike lights on/off
- Switching the Push-assistance mode On/Off
- Speed and Distance Indication
- Displaying/Adapting Basic Settings
- English-6
- Error Code Indication
- Power Supply of External Devices via USB Connection
- Maintenance and Service
- Maintenance and Cleaning
- After-sales Service and Application Service
- Transport
- Disposal
- Only for EC countries:
- Li-ion:
- Espanol-1
- Endast for EU-lander:
- "Active Line/Performance Line".
- Tioeia evoicnc oov unoloyoiotn oxmuatoC (On-board computer)
- TexvikaXapaktnploTik
- EAAynvka-5
- Evdeickaipuoipoeiouoayotn oxmuoc
- Evdeieic taxumtac kai anootaic
- Euvtnpnon kal Service
- SuvtnpnaKaiKaapiaopoc
- Service ka npoxn oupouauw xpon
- Mεταρορὰ
- 111
Brand : BOSCH
Model : Intuvia Active Line
Category : Meter