BL 5040 - Blender GRUNDIG - Free user manual and instructions
Find the device manual for free BL 5040 GRUNDIG in PDF.
| Product type | Hand blender |
| Brand | Grundig |
| Model | BL 5040 |
| Power supply | 220-240 V ~, 50 Hz |
| Power | 400 W |
| Noise level | 80 dB(A) |
| Number of speeds | 2 (levels I and II) |
| Blade material | Stainless steel |
| Whisk material | Stainless steel |
| Functions | Blending, chopping, whisking |
| Maximum chopping capacity (meat) | 200 g |
| Maximum continuous usage time (blender/chopper) | 1 minute |
| Maximum continuous usage time (whisk) | 3 minutes |
| Included accessories | Hand blender, balloon whisk, chopper (bowl + lid + blade), measuring jug, wall mount with screws and dowels |
| Safety | Very sharp blades, do not immerse base, unplug before cleaning, use on stable surface |
| Cleaning of removable parts | Whisk, chopper bowl, blade and measuring jug are dishwasher safe; other parts hand wash |
| Repairability | Repair by dealer, authorized center or qualified person only |
| Certifications | CE, compliance with directives 2004/108/EC and 2006/95/EC |
Frequently Asked Questions - BL 5040 GRUNDIG
User questions about BL 5040 GRUNDIG
0 question about this device. Answer the ones you know or ask your own.
Ask a new question about this device
Download the instructions for your Blender in PDF format for free! Find your manual BL 5040 - GRUNDIG and take your electronic device back in hand. On this page are published all the documents necessary for the use of your device. BL 5040 by GRUNDIG.
USER MANUAL BL 5040 GRUNDIG
natural_image
Simple line drawing of a three-bladed mechanical component (no text or symbols)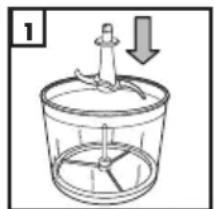
natural_image
Diagram of a mechanical device with a downward arrow indicating motion or force (no text or symbols present)Achtung
natural_image
Diagram of a food processor with a lid and base, showing a downward arrow indicating compression or reduction (no text or symbols present)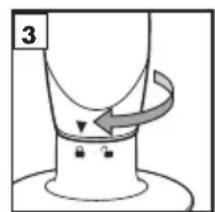
Hinweis
Please read this instruction manual thoroughly prior to using this appliance! Follow all safety instructions in order to avoid damages due to improper use!
Keep the instruction manual for future reference. Should this appliance be given to a third party, than this instruction manual must also be handed over.
■ The blades are very sharp! Handle the sharp blades with utmost care, especially during removing and cleaning, in order to avoid injuries.
■ Never clean the appliance with bare hands. Use always a brush.
- Do not touch any moving parts of the appliance. Do not attach or remove the parts until the unit comes to a full stop.
■ Always keep hair, clothing and any other utensils away from the appliance during operation in order to prevent injury and damages.
■ The appliance is intended for domestic use only.
- Check if the mains voltage on the rating label corresponds to your local mains supply. The only way to disconnect the appliance from the mains is to pull out the plug.
- Do not wrap the power cord around the appliance.
For additional protection, this appliance should be connected to a household faulty current protection switch with no more than 30 mA. Consult your electrician for advice.
- Do not immerse the appliance, power cord or power plug in water or in other liquids.
■ Always pull out the power plug before assembling the appliance, after using the appliance, before disassembling, before cleaning the appliance, before leaving the room or if a fault occurs. Do not disconnect the plug by pulling on the cord.
■ Prevent damage to the power cord by not squeezing, bending or rubbing it on sharp edges. Keep the cord away from hot surfaces and open flames.
- Do not use an extension cord with the appliance.
■ Never use the appliance if the power cord or the appliance is damaged.
- Our GRUNDIG Household Appliances meet applicable safety standards, thus if the appliance or power cord is damaged, it must be repaired or replaced by the dealer, a service centre or a similarly qualified and authorized service person to avoid any dangers. Faulty or unqualified repair work may cause danger and risks to the user.
- Do not dismantle the appliance under any circumstances. No warranty claims are accepted for damage caused by improper handling.
- Keep the appliance always out of the reach of children.
The appliance should not be used by the following persons, including children: those with limited physical, sensory or mental capabilities and also those with a lack of experience and knowledge. This does not apply to the latter if they were instructed in the use of the appliance or if they use it under the supervision of a person responsible for their safety. Children should always be supervised to ensure that they do not play with the appliance.
- Do not leave the appliance unattended as long as it is in use. Extreme caution is advised when the appliance is being used near children and people with limited physical, sensory or mental capabilities.
■ Before using of the appliance for first time, clean all parts which come into contact with food carefully. Please see details in the "Cleaning and Care" section.
■ Dry the appliance and all parts before connecting it to the mains supply and before attaching the accessories.
- Do not operate the appliance without the ingredients in the measuring beaker or chopper.
■ Never place the appliance, attachments, power cord or plug on hot surfaces such as gas burner, electric burner, heated oven or hot liquids and foods. Leave hot food and liquids cool down to min. 80°C or less, before operation.
■ Do not use the appliance for anything other than its intended use.
■ Never switch on the appliance for longer as you need to process the food.
■ Never use the appliance with damp or wet hands.
■ Operate the appliance with delivered parts only.
■ The appliance is constructed to process only common household quantities.
■ Do not use the appliance if the blades are damaged or show signs of wear.
■ Always use the appliance on a stable, flat, clean and dry surface.
■ Make sure that there is no danger that the power cord could be accidentally pulled or that someone could trip over it when the appliance is in use.
■ Position the appliance in such a way that the plug is always accessible.
A spatula may be used to remove the food from the measuring beaker or chopping bowl. To do this, the appliance must be switched off.
This appliance is not suitable for crushing ice or for dry or hard foods as the blades will become dull quickly.
■ Remove bones and stones from food to prevent the blades or the appliance from becoming damaged.
In order to reduce the risk of injury, never set the blades of the appliance onto the base, if the chopper is not sitting properly.
■ Make sure that the cover of the chopper is sitting properly before you switch on the appliance.
■ This appliance should not be in operation for longer than 15 seconds if it is not processing anything.
This appliance is intended for short periods of use and may not be used for longer than 1 minute (hand blender or chopper) or 3 minutes (whisk) at a time. After use, let the appliance cool down sufficiently.
AT A GLANCE
Dear Customer,
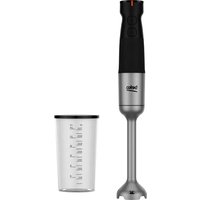
Congratulations on the purchase of your new GRUNDIG Hand Blender BL 5040.
Please read the following user notes carefully to ensure you can enjoy your quality product from GRUNDIG for many years to come.
Special features
The appliance is perfectly suitable for preparing of sauces, dips, soups, mayonnaise and baby food, as well as for mixing drinks and milkshakes, chopping of vegetables, culinary herbs, meat, fruits, nuts and cheese.
The GRUNDIG Hand Blender is equipped with;
■ Powerful 400 Watt motor.
■ High-quality stainless steel blender, blades and -balloon whisk attachment.
■ 900ml chopping bowl.
■ Multifunctional measuring beaker.
Maximum quantities and processing time
Refer to the table for the maximum quantities and processing time
| Ingredients | Maximum quantities | Processing time |
| Meat/fish 200 g | 10-15 seconds | |
| Herbs 20 g 20 seconds | ||
| Nuts 200 g 15 seconds | ||
| Cheese 150 g 15 seconds | ||
| Bread 1 slice | 20 seconds | |
| Eggs (hard-boiled) | 2 egg | 5 seconds |
| Onions (cut in 8 pieces) | 100 g 10 seconds |
AT A GLANCE
Controls, parts and accessories
See the illustration on page 3.
Controls and parts
A Hanging loop
B Power cord and plug
c On/Off button, level I
D On/Off button, level II
E Base unit
F Whisk holder
OPERATION
Preparation
Note
- Your Hand Blender has been designed for small quantities of food and should not be used for any other application.
1 Remove all packaging and sticker materials and dispose of them according to the applicable legal regulation.
2 Before using of the appliance for first time, clean parts which come into contact with food (See the "Cleaning and care" section).
3 Prepare the food in small pieces before using the appliance.
Blending
1 Put the food that you would like to puree or mix in the measuring beaker ☐ or in any other similar bowl.
2 Connect the base unit E to the blender G by putting the blender onto the base unit. Turn the base unit to the left.
Make sure the blender is properly attached to the base unit.
3 Insert the plug B into the wall socket.
4 Immerse the blender G in the measuring beaker I, where the ingredients to be blended are.
Note
To prevent the ingredients from splashing, do not press the On/Off button level I C and On/Off button level II D until the blender has been immersed in the ingredients.
5 Press and hold down the On/Off button level
14 ENGLISH
G Blender
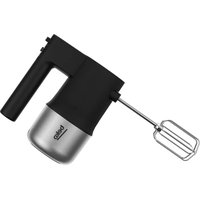
H Balloon whisk
Measuring beaker
J Chopper lid
K Chopping blade
L Chopping bowl
Accessories
M Wall mounting attachment
2 x screws
2 x dowels
| c.
- The appliance starts operating.
Notes
■ Always use the appliance on level I. If necessary, press and hold down the On/Off button level II D. Once you release the On/Off button level I C, the appliance switches off automatically.
- Do not use the appliance for longer than one minute at a time.
6 Move the appliance slowly up and down and in circles to blend the ingredients.
7 Release the On/Off button level I C or On/Off button level II D when you finish the process and disconnect the power plug from the socket.
8 Remove the mixture from the measuring beaker 1.
9 Disassemble the blender G from the base unit E by turning the base unit to the right and pulling it off.
Notes
- Do not overfill the measuring beaker or other similar bowl to prevent the mixture from overflowing. Smaller amounts can be processed easier.
If you would like to use the blender directly in the cooking pot, first take the cooking pot out off the stove to prevent the blender from overheating. - Do not operate the appliance continuously for more than 1 minute, in order to prevent overheating of the appliance.
■ Never switch on the appliance for longer as you need to process the food.
Chopping
Notes
- Do not chop extremely hard items such as coffee beans, ice cubes, nutmeg, grains and bones. Remove stalks from herbs, shells from nuts, bones, tendons and gristle from meat.
■ Prepare the food in small pieces (total max. 200 g).
1 Put the chopping bowl ☐ on a stable, flat, clean and dry surface.
2 Place the chopping blade K onto the spindle in the chopping bowl L.
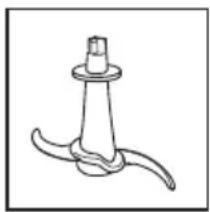
natural_image
Line drawing of a mechanical component with three curved blades and a central cylindrical shaft (no text or symbols)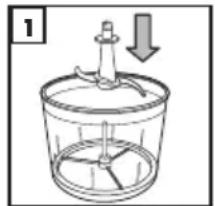
natural_image
Diagram of a mechanical device with a downward arrow indicating motion or force (no text or symbols)Caution
■ The chopping blade is very sharp, be careful while placing the chopping blade K. Do not touch the chopping blade with bare hands.
3 Place the ingredients in the chopping bowl L.
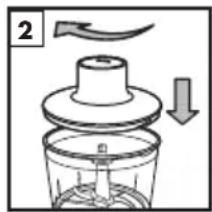
4 Put the chopper lid ☐ onto the chopping bowl ☐.
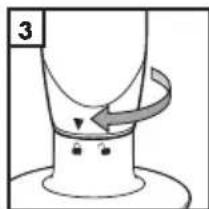
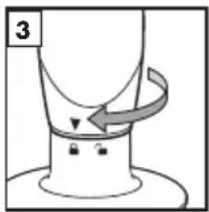
5 Put the base unit E onto the chopper lid J. Turn the base unit to the left so that it is firmly locked into place. Make sure the base unit is securely attached to the chopper unit.
natural_image
Simple line drawing of a mechanical component with a curved arrow indicating rotation (no text or symbols)Note
■ During operation always hold the chopping bowl with one hand to prevent falling over.
6 Insert the plug B into the wall socket.
7 Press and hold down the On/Off button level II D.
- The appliance starts operating.
Notes
- Do not use the chopper for longer than 1 minute at a time.
■ You will achieve the best results if you press the On/Off button, level II D intermittently.
8 Release the On/Off button level II ☐ when you finish the process and disconnect the power plug from the wall socket.
9 Disassemble the base unit E from the chopper lid J by turning the base unit to the right and pulling it off.
10 Take the chopper lid J off. Take the chopping blade K out of the chopping bowl L carefully prior to emptying the chopped food.
Note
If the chopper does not work or if the chopping blade K only turns slowly, first pull out the power plug B. Then take the base unit E and the chopper lid J off. Check the chopping bowl L to see if there is something blocking the chopping blade. Maybe you put too much hard food in the chopping bowl.
If the ingredients stick to the side of the chopping bowl L, a spatula may be used to remove the food from the chopping bowl. To do this, the appliance must be switched off.
- Do not operate the appliance continuously for more than 1 minute, in order to prevent overheating of the appliance.
Caution
- Do not touch the chopping blade with your bare hands. The chopping blade is very sharp.
Whisking
Notes
- You can use the balloon whisk H for whipping cream and beating eggs.
■ Never use more than 4 egg whites or 400 ml cream.
1 Put the balloon whisk H onto the whisk holder F until it clicks into place.
2 Connect the base unit E to the whisk holder F by putting the whisk holder onto the base unit. Turn the base unit to the left. Make sure that the whisk holder is securely attached into the base unit.
3 Put the ingredients that you would like to process in the measuring beaker 1 or in any other similar bowl.
4 Connect the power plug B into the wall socket.
5 Hold the balloon whisk H into the mixture to be processed.
6 Press and hold the On/Off button level I C or II D.
- The appliance starts operating.
7 Move the appliance slowly up and down and in circles to whisk the ingredients.
8 Release the On/Off button level I C or II D when you finish the process and disconnect the power plug from the wall socket.
9 Remove the mixture from the measuring beaker.
10 Disassemble the base unit E from the whisk holder F by turning the base unit to the right and pulling it off.
Note
- Do not operate the appliance for longer than 3 minutes at a time.
- Do not overfill the measuring beaker ^1 , or the similar bowl to prevent the mixture from overflowing. Smaller amounts can be processed easier.
If you would like to use the balloon whisk directly in the cooking pot, first take the cooking pot out off the stove to prevent the balloon whisk from overheating.
INFORMATION
Installing the wall mounting attachment
You can put your appliance to a practical place by mounting the wall mounting attachment.
1 Hold the wall mounting attachment M in the desired position on the wall. Mark the two drill holes. Drill the holes and insert the supplied dowels.
Caution
■ Make sure that you do not drill into electrical lines or water pipes!
2 Secure the wall mounting attachment M to the wall using the supplied screws and dowels.
3 You can place the base unit E on the wall mounting attachment M.
Note
The base unit can also be hung on a hook with the hanging loop A.
Cleaning and care
Caution
■ Never use petrol, solvents or abrasive cleaners, metal objects or hard brushes to clean the appliance.
- Do not touch the chopping blades with bare hands. The blades are very sharp. Use a brush!
■ Never put the base unit E or power cord in water or any other liquids and never hold them under running water.
1 Turn the appliance off and disconnect it from the wall socket.
2 Let the appliance cool down completely.
3 Use a damp soft cloth to clean the base unit E.
4 Immediately after using, clean the blender G, chopper lid J and whisk holder F with warm, soapy water and dry them thoroughly. Never submerge them in dishwater.
5 Only the following parts can be cleaned in dishwasher: balloon whisk H, chopping bowl L, chopping blade K and measuring beaker I.
Note
■ Before using or storing the appliance after cleaning, dry all parts carefully using a soft towel.
Storage
If you do not want to use the hand blender for a long period of time, please store it carefully. Make sure the appliance is unplugged and completely dry.
Store it in a cool, dry place.
Make sure the appliance is always kept out of reach of children.
Environmental note
This product has been made from high-quality material and parts, which can be reused and are also suitable for recycling.
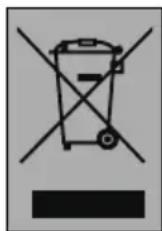
Therefore, do not dispose of the product along with normal household waste at the end of its service life. Take it to a collection point for the recycling of electrical and electronic equipment. This is indicated by this symbol on the
product, in the operating manual and on the packaging.
Please consult your local authorities to find out where the nearest collection point is.
Reusing and recycling of old appliances is an important contribution for protecting our environment.
Technical data

This product conforms to the European directives 2004/108/EC and 2006/95/EC
Power supply: 220 - 240 V\~, 50 Hz
Power: 400 W
Noise level: 80 dB(A)
Technical and design modifications reserved.
natural_image
Two-step diagram showing a kitchen knife and a container with liquid, no text or symbols present.Attention
Remarque
natural_image
Simple line drawing of a mechanical component with a cylindrical shaft and curved base (no text or symbols)
natural_image
Diagram of a mechanical device with a downward arrow indicating motion or force (no text or symbols present)Precaución
natural_image
Simple diagram of a mechanical or fluidic component with a curved arrow indicating rotation, no text or symbols present.Nota
natural_image
Simple line drawing of a mechanical component with a flanged base and central hub (no text or symbols)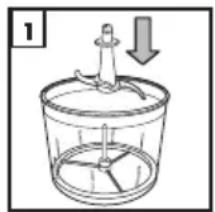
natural_image
Diagram of a mechanical device with a downward arrow indicating force or direction (no text or symbols present)Dikkat
natural_image
Diagram of a blender with a lid and arrow indicating process (no text or symbols)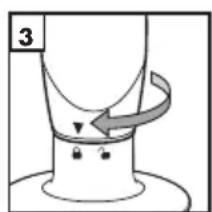
natural_image
Simple line drawing of a curved object with a rotation arrow, no text or symbols presentNot
natural_image
Two-step diagram showing a kitchen tool and a side view of a container with a downward arrow (no text or symbols)Forsiktig
Merk
natural_image
Line drawing of a mechanical component with curved blades and a central hub (no text or symbols)
natural_image
Diagram of a mechanical device with a downward arrow indicating motion (no text or symbols)Försiktigt
natural_image
Illustration of a blender with a lid and handle, showing a downward arrow indicating compression or reduction (no text or symbols)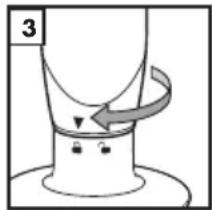
Notering
natural_image
Line drawing of a mechanical component with curved blades and a central shaft (no text or symbols)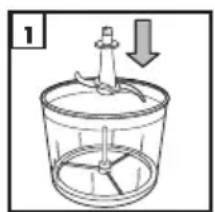
natural_image
Diagram of a mechanical device with a downward arrow indicating force or direction (no text or symbols present)Προσοχή
natural_image
Diagram of a mechanical or fluidic component with a curved arrow indicating rotation, no text or symbols presentΣημείωση
natural_image
Line drawing of a mechanical component with curved blades and a central hub (no text or symbols)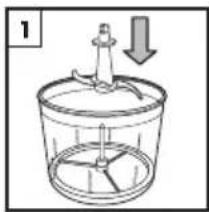
natural_image
Diagram of a mechanical device with a downward arrow indicating force or direction (no text or symbols present)Opgelet
natural_image
Diagram of a mechanical component with a curved arrow indicating rotation or movement (no text or symbols)Opmerking
natural_image
Line drawing of a mechanical component with three curved blades and a central hub (no text or symbols)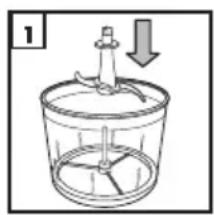
natural_image
Simple line drawing of a container with internal blades and a downward arrow, no text or symbols present.Attenzione
natural_image
Diagram of a blender with a curved arrow indicating motion, showing a drop in the base (no text or symbols)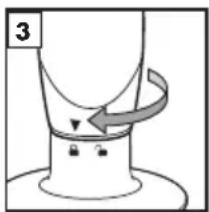
natural_image
Diagram of a mechanical component with a curved arrow indicating rotation, no text or symbols presentNota
natural_image
Line drawing of a conical mechanical component with three curved blades (no text or symbols)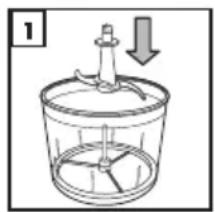
natural_image
Diagram of a mechanical device with a downward arrow indicating force or direction (no text or symbols present)Aviso
natural_image
Simple line drawing of a mechanical component with a curved arrow indicating rotation (no text or symbols)Nota
natural_image
Line drawing of a mechanical component with curved blades and a central hub (no text or symbols)
natural_image
Diagram of a mechanical device with a downward arrow indicating force or direction (no text or symbols present)Uwaga
natural_image
Diagram of a blender with a lid and base, showing a downward arrow indicating compression or disassembly (no text or symbols present)