
SM 7140 - Blender GRUNDIG - Free user manual and instructions
Find the device manual for free SM 7140 GRUNDIG in PDF.


| Product Type | Blender |
| Brand | Grundig |
| Model | SM 7140 |
| Dimensions (H x W x D) | Approx. 40 x 18 x 18 cm |
| Weight | Approx. 1.5 kg |
| Power Consumption | 700 W |
| Voltage / Frequency | 220-240 V / 50-60 Hz |
| Jug Capacity | 1.5 L |
| Jug Material | Glass |
| Blade Material | Stainless Steel |
| Speed Settings | 2 speeds + pulse |
| Control Type | Rotary knob |
| Safety Features | Non-slip feet, safety lock on jug |
| Dishwasher Safe Parts | Jug and lid |
| Cleaning Method | Wipe motor base with damp cloth; removable parts dishwasher safe |
| Warranty | 2 years |
| Repairability Index | 7.5 / 10 |
| Spare Parts Availability | Jug, blades, lid, gasket available from Grundig service |
| Accessories Included | Measuring cup, stirrer |
Frequently Asked Questions - SM 7140 GRUNDIG
User questions about SM 7140 GRUNDIG
0 question about this device. Answer the ones you know or ask your own.
Ask a new question about this device
Download the instructions for your Blender in PDF format for free! Find your manual SM 7140 - GRUNDIG and take your electronic device back in hand. On this page are published all the documents necessary for the use of your device. SM 7140 by GRUNDIG.
USER MANUAL SM 7140 GRUNDIG
SM 7140
Please read this guide first!
Dear Customer,
Thank you for choosing a GRUNDIG product. We would like you to achieve the optimal efficiency from this high quality product which has been manufactured with state of art technology. Please make sure you read and understand this guide and supplementary documentation fully before use and keep it as a reference. Include this guide with the unit if you hand it over to someone else. Observe all warnings and information herein and follow the instructions.
Symbols and their meanings
These symbols are used throughout this guide:

Important information and recommendations regarding the use of the appliance.

WARNING: Warnings on personal injury or property damage.

Suitable for contact with food.

Do not immerse the appliance, the power cord or the plug in water or in any other liquids.

Electric shock protection rating
1 Important safety and environmental instructions
This section contains safety instructions to prevent hazards that can result in injury or property damage.
Any warranty is void if these instructions are not followed.
1.1 General safety
This appliance complies with international safety standards. The appliance may be used by persons with limited physical, sensory, or mental capabilities, or persons with a lack of experience and knowledge, if they are supervised or have been given instructions on the safe use of the appliance and understand the hazards involved. Children shall not play with the appliance. If the supply cord is damaged, it must be replaced by the manufacturer, its service agent, or a similarly qualified person in order to avoid a hazard. Use only original parts or parts recommended by the manufacturer. Do not disassemble the appliance. Do not operate the appliance or its components
1 Important safety and environmental instructions
over or near hot surfaces, and do not place them on such surfaces.
- Do not use the appliance for hot meals.
- For safety reasons, the product will not operate if the lid is left open. Your mains power supply must match the information specified on the rating label.
- Do not use the appliance with an extension cord.
- Do not touch the plug of the appliance with damp or wet hands.
- Do not unplug the appliance by pulling on the cord.
- Switch off the appliance and disconnect it from the power supply before changing accessories or approaching parts that move during use.
- Serious injury may result from misuse when emptying the container, during cleaning, or when touching the chopping blade with bare hands. Handle the chopping blade carefully, holding it only by its plastic part.
- Never touch the blades while the appliance is in use. There is a risk of injury due to improper use.
1 Important safety and environmental instructions
After cleaning, before energizing or assembling the parts, dry the appliance and all of its parts. Do not immerse the appliance, the power cord, or the plug in water or any other liquid. If you keep the packaging materials, keep them out of the reach of children. Children must not use the device. Store the appliance and its electrical cord out of the reach of children. Always use the appliance on a stable, flat, clean, and dry surface. This appliance is intended for household and similar applications such as:
- staff kitchen areas in shops, offices, and other working environments;
- farm houses; by clients in hotels, motels, and other residential-type environments;
- bed and breakfast type environments
- Do not squeeze or bend the power cord and do not rub it on sharp edges in order to prevent any damage. Keep the cord away from hot surfaces and
1 Important safety and environmental instructions
open flames.
- Before using the appliance for the first time, clean all parts carefully which come into contact with food. Please see full details in the “Cleaning” section.
- Do not touch any moving parts of the appliance. Do not attach or remove the parts until the device comes to a complete stop.
- Be careful when handling the sharp cutting blades, emptying the bowl and during cleaning.
- Be careful if hot liquid is poured into blender as it can be ejected out of the appliance due to a sudden steaming. Always disconnect the appliance from the supply if it is left unattended and before assembling, disassembling or cleaning.
- CAUTION: In order to avoid a hazard due to inadvertent resetting of the thermal cut-out, this appliance must not be supplied through an external switching device, such as a timer, or connected to a circuit that is regularly switched on and off by the utility.
1 Important safety and environmental instructions
1.2 Compliance with the WEEE Regulations and Waste Disposal
This product complies with EU WEEE Directive (2012/19/EU). This product bears a classification symbol for waste electrical and electronic equipment (WEEE).

This symbol indicates that this product shall not be disposed with other household wastes at the end of its service life. Used device must be returned to official collection point for recycling of electrical and electronic devices. To find these collection systems please contact to your local authorities or retailer where the product was purchased. Each household performs important role in recovering and recycling of old appliance. Appropriate disposal of used appliance helps prevent potential negative consequences for the environment and human health.
1.3 Compliance with RoHS Directive
The product you have purchased complies with EU RoHS Directive (2011/65/EU). It does not contain harmful and prohibited materials specified in the Directive.
1.4 Packaging information

The product's packaging is made of recyclable materials, in accordance with national legislation. Do not dispose of packaging waste with household waste or other wastes; dispose of it at the packaging collection areas designated by local authorities.
1.4 What to do for energy saving
Before adding solid food to the appliance, cut it into small pieces as indicated in the manual. Follow the other instructions and durations specified in the manual. If applicable to the food being prepared, select lower speed levels. Turn off and unplug the appliance after use.
2 Your Blender
2.1 Overview

The values provided with the appliance or its accompanying documents are laboratory readings in accordance with the respective standards. These values may differ depending on use and ambient conditions.
2 Your Blender
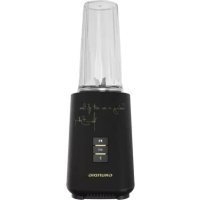
- Measuring cap
- Lid
- Jug
- Chopping blade
- Decorative ring
- Motor unit
- Speed adjustment button
- Non-slip base
- Cable wrap (under the appliance)
Technical data
Voltage: 220-240V~, 50-60Hz
Power: 800W
Insulation class: ||
The rights to make technical and design changes are reserved.
3 Operation
3.1 Intended use
The appliance is intended for home use only, it is not suitable for professional use.
The appliance is designed to chop small solid foods (e.g. onion, potato, carrot) and fruits (e.g. strawberries, banana).
3.2 First operation
Clean the parts of the appliance before the first use.
3.3 Start up

Place the appliance on a fixed and level surface.

To remove the jug (3) from the motor unit (6), turn it to the “♂” symbol and take it out. Place the jug (3) on a level surface, then turn and lift the lid (2) to the “♂” symbol and take it out.

Place the ingredients you would like to prepare in the jug (3) and close the lid (2).
3 Operation

- Do not operate the appliance empty or without a lid.
- Do not touch the blades with bare hands.
- For security reasons, the product will not operate if the lid is left open.

- In your fruit milk mixes (strawberry, banana, etc.), fill the milk up to a maximum of 1000 ml. Otherwise, overflows or leaks may occur during the process.
- Do not shred dried fruits such as almonds and hazelnuts with the device.
- You can process food at a maximum temperature of 60°C in the appliance.
- Do not insert any objects into the jug (3) while the appliance is operating.
- Use the measuring cap (1) port to add material to the jug during the mixing process.

Do not remove the material from the jug (3) before the chopping blade (4) stops completely.
3 Operation

Place the jug (3) upright on the motor unit (6), turn it to the "8" symbol to lock it in place.

Plug the appliance into the socket and start operating by selecting the speed level (7).

When mixing is complete, turn the speed adjustment knob (7) to the "0" position and remove the plug from the socket.
3.4 Crushing ice
- Add water to the jug (3) to break ice in the appliance.
• To process crushed ice, we recommend adding three quarters of ice and 15 ml of cold drinking water to the container.

3 Operation

After adding 15 ml of water into the jug (3), add 3/4 ice.

Plug the appliance to the socket and start operating by selecting the speed level (7).

To add more ice during operation, open the measuring cap (1) and add ice cubes.

When mixing is complete, turn the speed adjustment knob (7) to the "0" position and remove the plug from the socket.

To remove the jug (3) from the motor unit (6), turn it to the “♂” symbol and take it out. Place the jug (3) to a level surface and turn and lift the lid (2) turn it to the “♂” symbol and take it out.
3.5 "P" position
The process of 1-2 seconds operation in the position "P" on the speed adjustment button (7) is called "PULSE".
For high speed mixing with short strokes, keep the speed adjustment knob (7) in the "P" position. When you release the button, the speed adjustment knob (7) automatically returns to the "OFF" position and the device starts to stop.
3 Operation
3.6 Recipe
In order to obtain good chopping performance, the amount of food put into the chamber and the size of the food should be selected appropriately. Below is an example for carrots and similar vegetables. It can vary between food types; it is recommended to properly place the food in the chamber.
| FOOD TYPE SPEC WEIGHT SPEED TIME | ||||
| Carrot (apple, pear etc.) | Cut into 15mm*15mm*15mm | Carrot: 650g Water: 850g | High speed | 30s |
3.7 Tips for blending
- To add ice cubes to the mixes while the blender is running, dispose of one ice cube at a time by removing the measuring cap (1). To make the blender mix the ice properly, wait for a few seconds before adding the next ice cube.
- To add more food, remove the measuring cap (1) and insert the ingredients through the hole. Make sure the food is cut to a size of 2-5 cm to fit through the hole. Put back the cap (1) when you have finished adding ingredients.
- While blending solid food like raw vegetables, cooked or raw meat, and fruits, always cut these materials into pieces of 2-5 cm length before putting them in the jug (3). Do not put more than 2 units of such food at once in the blender. This will speed up the blending process and reduce the abrasion on the blender blades (8).
- Unless otherwise described in the recipe, always add the liquid ingredient in the jug (3) first.
- To blend a drink, put all ingredients in the jug (3) at once.
- Avoid over-blending. It is usually enough to blend for a few seconds.
- Over-blending turns food into mush.
4 Cleaning and maintenance
4.1 Cleaning
- Never use gasoline, solvents, abrasive cleaners, metal objects, or hard brushes to clean the appliance.
- Be careful when cleaning the chopping blades unit. The chopping blade (4) is sharp. Try not to hold it from the blade side and do not immerse it in water.
- Never clean the blades with bare hands.
- Clean the table blender after each use. Do not let any residual food dry on or in the blender. It will be harder to clean it if you do so.
- Do not use boiling water. The bearings of the blade assembly have a life-long lasting lubrication feature. Using boiling water damages these bearings and shortens the lifetime of the blender.

4 Cleaning and maintenance

Turn the appliance off and unplug it. Wait for the appliance to cool down.

Remove the jug (3) from the motor unit (6). Rinse with water to clean up large food residues that can pile up in the container.

Place the jug (3) in its place. Add warm water and 1 to 1 1/2 unit of liquid detergent and operate the blender in high speed for a few seconds.

You can wash the jug (3) and lids in the dish washer.

Unplug the appliance. Remove the jug (3) from the motor unit (6) and rinse it with water. If necessary, repeat the same steps.

Use a soft and damp cloth and a mild amount of cleaning agent to clean the motor unit (6).
4 Cleaning and maintenance
4.2 Storage
- If you do not intend to use the appliance for a long time, store it carefully.
- Unplug the appliance before storing.
- Store the appliance in a cool dry place.
- Store the appliance and its cord out of the reach of children.
4.3 Transport and shipping
- During transport and shipping, carry the appliance with its original packaging. The packaging of the appliance will protect the appliance against physical damage.
- Do not put heavy objects on the appliance or its packaging. Otherwise the appliance may be damaged.
- If the appliance is dropped, the appliance may not operate or permanent damage may occur.


SM 7140
RU


This symbol indicates that this product must not be disposed of with other household waste at the end of its working life. The used appliance must be returned to an official collection point for recycling of electrical and electronic devices. To find these collection systems, contact your local authorities or the retailer where the product was purchased. Each household plays an important role in the use and recycling of old appliances. Appropriate disposal of the used appliance helps prevent possible negative consequences for the environment and human health.
Compliance with the Directive on the restriction of the use of certain hazardous substances in electrical and electronic equipment (RoHS):
Place the appliance on a solid and flat surface.

To remove the jug (3) from the motor unit (6), turn it to the “ð” symbol and take it out. Place the jug (3) on a flat surface, turn and lift the lid (2), and turn it to the “ð” symbol and take it out.

Put the ingredients you want to prepare into the jug (3) and close the lid (2).
3 Operation

Plug the appliance into the power outlet and start it by selecting the speed level (7).

After adding 15 ml of water to the jug (3), add 3/4 ice.

Plug the appliance into the power outlet and start it by selecting the speed level (7).

Turn off the appliance and unplug it from the power outlet. Wait for the appliance to cool down.

Remove the jug (3) from the motor unit (6). Rinse it with water and clean off any large food deposits that may have accumulated in the container.

Place the jug (3) back in position. Add water and up to 1 ½ units of liquid detergent, and let the appliance run at high speed for a few seconds.

The jug (3) and lid can be washed in the dishwasher.

Unplug the appliance from the mains. Remove the jug (3) from the motor unit (6) and rinse it with water. If necessary, repeat the steps.

To clean the motor unit, use a small amount of cleaning agent and a soft damp cloth (6).


- PLEASE READ THIS GUIDE FIRST
- DEAR CUSTOMER
- SYMBOLS AND THEIR MEANINGS
- IMPORTANT SAFETY AND ENVIRONMENTAL INSTRUCTIONS
- GENERAL SAFETY
- COMPLIANCE WITH THE WEEE REGULATIONS AND WASTE DISPOSAL
- COMPLIANCE WITH ROHS DIRECTIVE
- PACKAGING INFORMATION
- WHAT TO DO FOR ENERGY SAVING
- YOUR BLENDER
- OVERVIEW
- TECHNICAL DATA
- INSULATION CLASS
- OPERATION
- INTENDED USE
- FIRST OPERATION
- START UP
- CRUSHING ICE
- P" POSITION
- RECIPE
- TIPS FOR BLENDING
- CLEANING AND MAINTENANCE
- CLEANING
- STORAGE
- TRANSPORT AND SHIPPING
- COMPLIANCE WITH THE DIRECTIVE ON THE RESTRICTION OF THE USE OF CERTAIN HAZARDOUS SUBSTANCES IN ELECTRICAL AND ELECTRONIC EQUIPMENT (ROHS)
Brand : GRUNDIG
Model : SM 7140
Category : Blender