HBA 81762 BX - Blender GRUNDIG - Free user manual and instructions
Find the device manual for free HBA 81762 BX GRUNDIG in PDF.

| Brand | Grundig |
| Model | HBA 81762 BX |
| Product type | Immersion blender |
| Power | 750 W |
| Supply voltage | 220-240 V ~, 50-60 Hz |
| Included accessories | Chopping blade, mini chopper (bowl + lid), whisk, whisk holder, measuring cup, non-slip base |
| Container material | Measuring cup, plastic for chopping bowl |
| Speeds | Variable speed control + Turbo function |
| Weight | Approx. 1.2 kg (with accessories) |
| Dimensions (L x W x H) | Approx. 7 x 7 x 40 cm (motor unit + shaft) |
| Cord length | Approx. 1.2 m |
| Intended use | Household use only |
| Main functions | Blending, chopping, whisking |
| Cleaning | Wipe motor unit with damp cloth; wash accessories in warm soapy water; do not immerse motor unit |
| Safety | Automatic stop when button is released; very sharp blades – handle with care |
| Maximum continuous operation time | 10 seconds (intermittent use recommended) |
| Warranty | Standard manufacturer warranty (refer to provided document) |
| Protection rating | Do not immerse |
| Repairability | Spare parts available via authorized service; only use original parts |
| Environmental information | WEEE compliant; recyclable packaging |
Frequently Asked Questions - HBA 81762 BX GRUNDIG
User questions about HBA 81762 BX GRUNDIG
0 question about this device. Answer the ones you know or ask your own.
Ask a new question about this device
Download the instructions for your Blender in PDF format for free! Find your manual HBA 81762 BX - GRUNDIG and take your electronic device back in hand. On this page are published all the documents necessary for the use of your device. HBA 81762 BX by GRUNDIG.
USER MANUAL HBA 81762 BX GRUNDIG
natural_image
Abstract black-and-white line drawing of a compass inside a circular frame (no text or symbols)HBA 81762 BX
EN / FR / IT / PL / SL / CS / SRB / SQ / MK / RO / AR
CONTENTS
| ENGLISH | 03-17 |
| FRANÇAIS | 18-32 |
| ITALIANO | 33-49 |
| POLSKI | 50-66 |
| SLOVENŠČINA | 67-81 |
| CZECH | 82-96 |
| СРБИН | 97-111 |
| SHQIPTARE | 112-126 |
| MAKEДОНСКИ | 127-146 |
| ROMÂNĂ | 147-163 |
| ARABIC | 164-179 |
Please read this guide first!
Dear Customer,
Thank you for choosing a BEKO product. We would like you to achieve the optimal efficiency from this high quality product which has been manufactured with state of the art technology. Please make sure you read and understand this guide and supplementary documentation fully before use and keep it as a reference. Include this guide with the unit if you hand it over to someone else. Observe all warnings and information herein and follow the instructions.
Symbols and their meanings
These symbols are used throughout this guide:

Important information and recommendations regarding the use of the appliance.

WARNING: Warnings on personal injury or property damage.
Do not dip into water.

Electric shock protection rating

This product has been manufactured at modern facilities respectful to the environment without harming nature.
1 Important safety and environmental instructions
This section contains safety instructions to prevent hazards that can result in injury or property damage.
Any warranty is void if these instructions are not followed.
1.1 General safety
•This appliance complies with international safety standards.
•Appliance may be used by persons with limited physical, perceptual or mental abilities or persons with a lack of experience and knowledge if they are supervised or given instructions on the operation of the appliance and any relevant risks they may be encountered. Children should not tamper with the device.
•This appliance cannot be used by children.
- Store the appliance and its electrical cord out of the reach of children.
- Do not use the appliance if the power cord, the appliance or the appliance blade is damaged. Contact authorized service.
1 Important safety and environmental instructions
- Use only original parts or parts recommended by the manufacturer.
- Do not disassemble the appliance.
-Your mains power supply shall be in align with the specified information on the type tag. - Do not use the appliance with an extension cord.
- Do not unplug the appliance by pulling on the cord.
- When it is left unattended, before attaching/detaching accessories, or before cleaning, wait for the moving parts to stop and unplug the power cord of the appliance.
- Do not touch the plug of the appliance while your hands are damp or wet.
- Do not use the appliance for hot meals.
- Use the appliance only with the rubber pad and glass bowl provided.
- Do not operate the appliance with its empty bowl.
•To avoid damaging the blades and the appliance, remove bones and seeds from foods.
1 Important safety and environmental instructions
•The appliance is not suitable for dry or hard foods that can cause the blades to become blunt in a short time.
- Follow all warnings to avoid injuries due to misuse.
- Serious injury may result from misuse when emptying the bowl, during cleaning and when touching the chopping blade with bare hands. Handle the chopping blade carefully, trying to hold it only by its plastic part.
•After cleaning, dry the appliance and all its components before connecting it to power and installing the components.
- Do not immerse the appliance, the power cord or the plug in water or in any other liquids.
- Do not operate the appliance or its components over or near hot surfaces or do not put on such surfaces.
- If you keep the packaging materials, keep them out of the reach of children.
1 Important safety and environmental instructions
1.2 Compliance with the WEEE Regulations and Waste Disposal
This product complies with EU WEEE Directive (2012/19/EU). This product bears a classification symbol for waste electrical and electronic equipment (WEEE).
natural_image
Simple line drawing of a trash bin with no text or symbolsThis symbol indicates that this product shall not be disposed with other household wastes at the end of its service life. Used device must be returned to offical collection point for recycling of electrical and electronic devices. To find these collection systems please contact to your local authorities or retailer where the product was purchased. Each household performs important role in recovering and recycling of old appliance. Appropriate disposal of used appliance helps prevent potential negative consequences for the environment and human health.
1.3 Packaging information

The product's packaging is made of recyclable materials, in accordance with the National Legislation. Do not dispose the packaging waste with the household waste or other wastes, dispose it to the packaging collection areas specified by local authorities.
1.4 What to do for energy saving
Follow the times recommended in the manual during use. Unplug the cord of appliance after use.
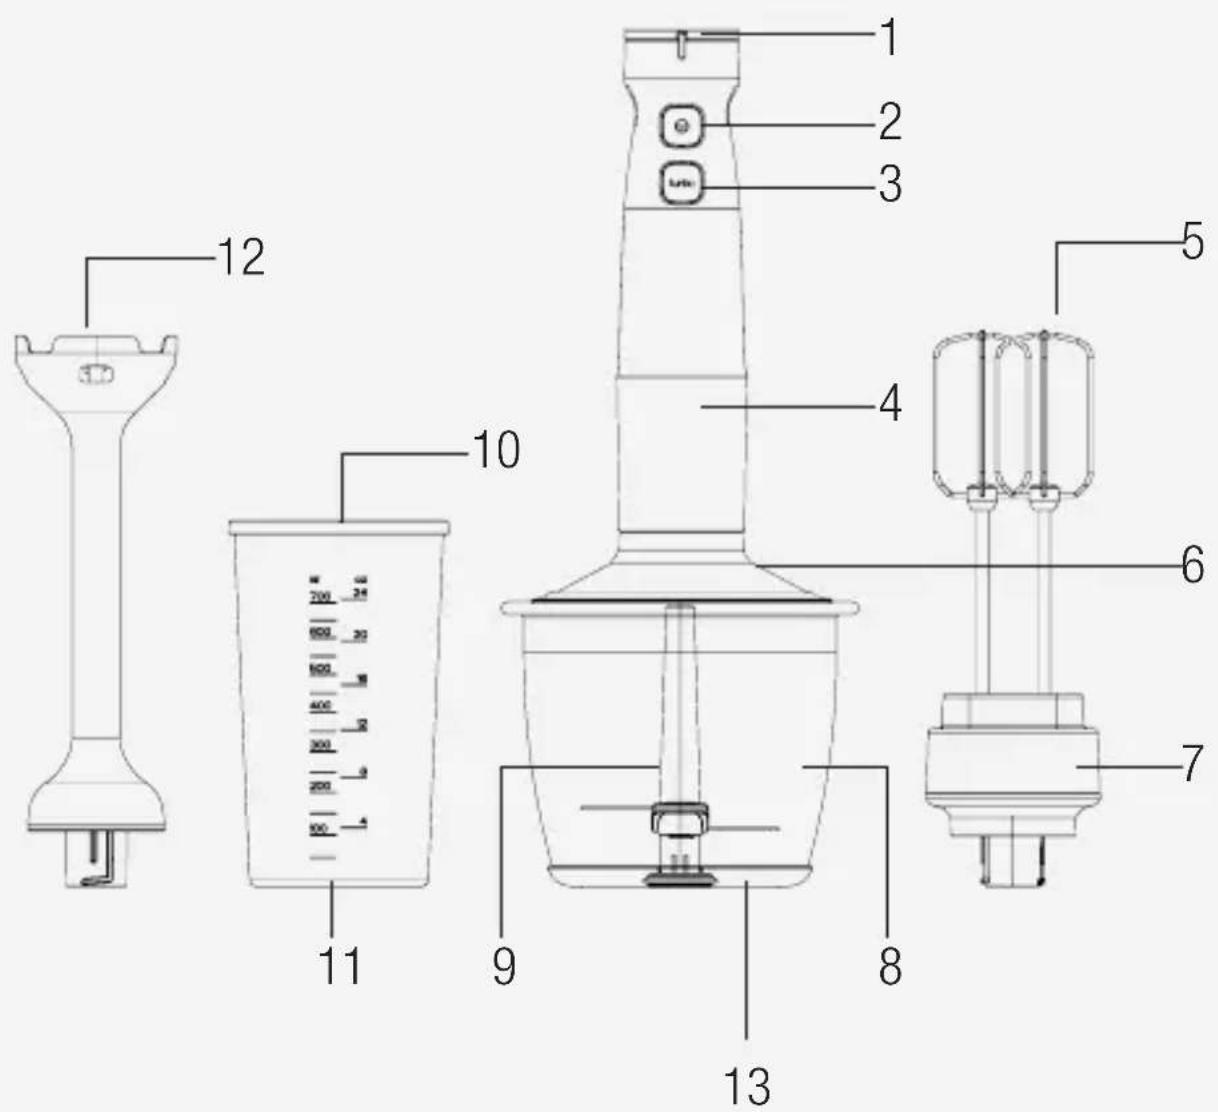
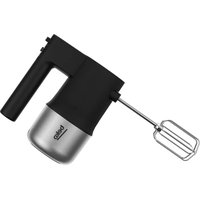
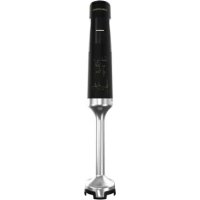
2 Your Hand Blender
2.1 Overview
- Speed adjustment button
- ON/OFF button
- Turbo button
- Motor unit
- Beater
- Chopping cover
- Beater holder
- Chopping bowl
- Chopping blade
- Scaled beaker
- Scaled beaker non-slip base
- Blending shaft
- Bowl non-slip base
Technical data
Voltage: 220-240 V\~, 50-60 Hz
Power: 750 W
The rights to make technical and design changes are reserved.
3 Operation
3.1 Intended use
The appliance is intended for home use only, it is not suitable for professional use.
The appliance is designed for crushing and beater small amounts of solid food only.
3.2 Maximum amounts and processing time
- Refer to the table for process times and maximum amounts
| Annexes Ingredients Operation time | ||
| Blenderaccessory | 150 g carrots (chopped as cubes of 1.5 cm) and 300 ml water | 20 second |
| Mini chopper 200 | g meat 20 second | |
| Beateraccessory | 4 eggs white 180 s. | |
3.3 First operation
- Clean the parts of the appliance before the first use (see 3.1).
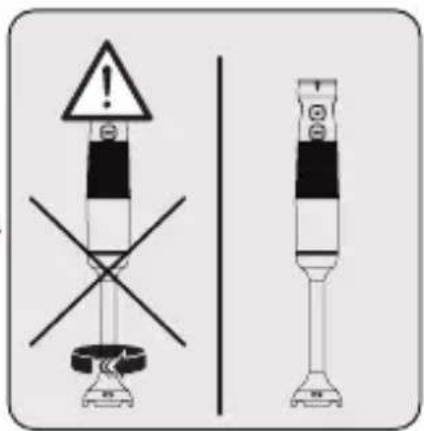
- Use the appliance in an upright position on a stable, flat, clean, dry and non-slip surface.

- You can use it until the process is completed by waiting a few seconds for continuous uses shorter than 10 seconds.
3 Operation
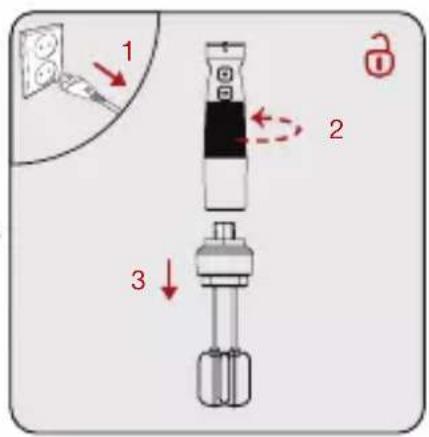
3.3 Mixing and chopping with blending shaft
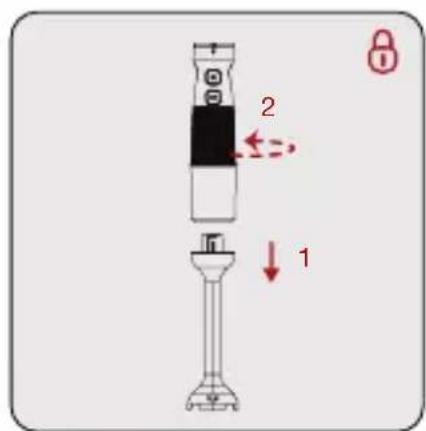
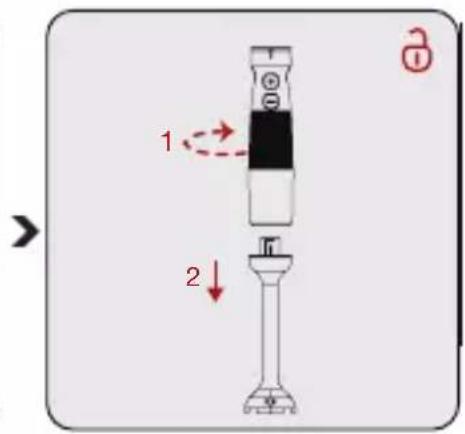
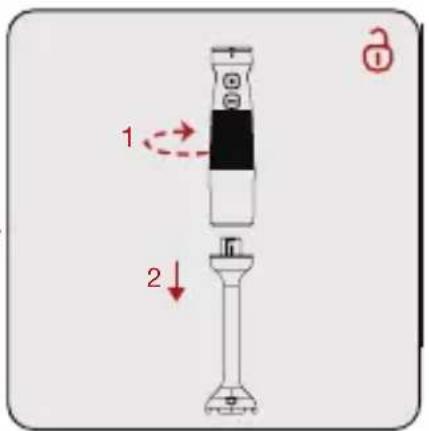
Attach the blending shaft (12) to the motor unit (4) by turning the end of the motor unit (4) “☐” counterclockwise.
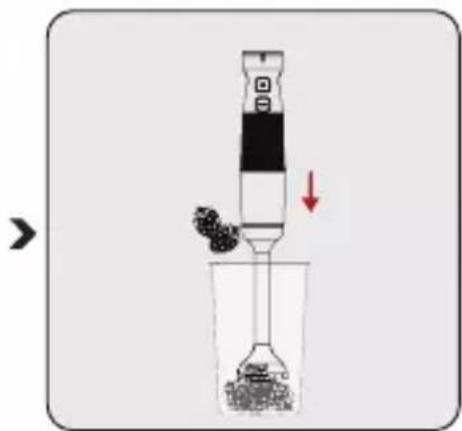
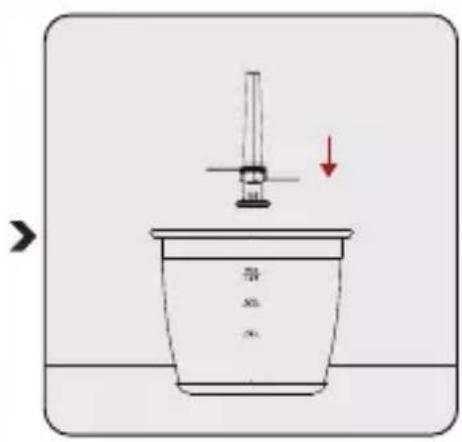
Put the ingredients (in small pieces) to be processed into the scale bowl (10) or the bowl that you will use and immerse the blending shaft (12) into the bowl.
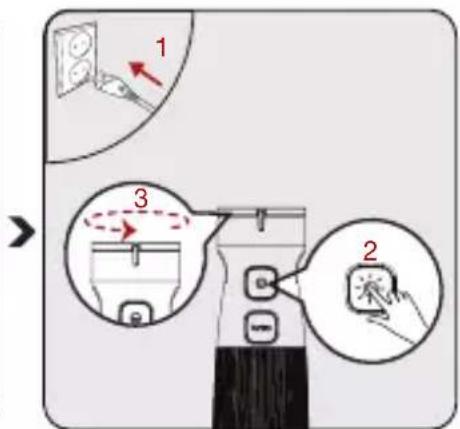
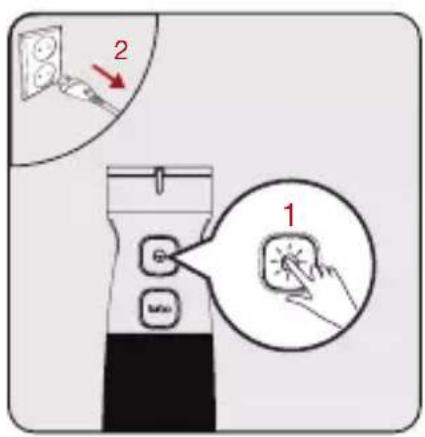
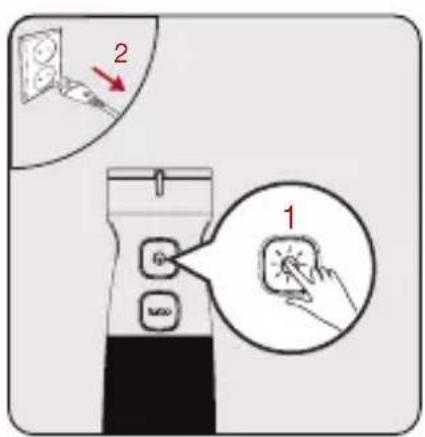
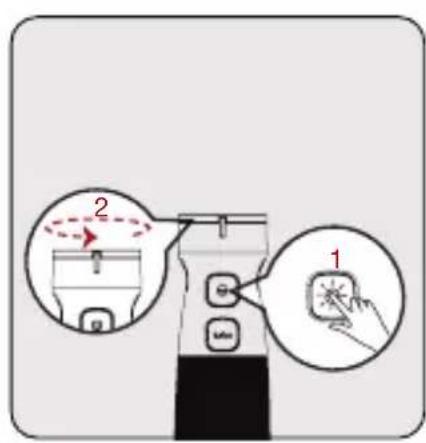
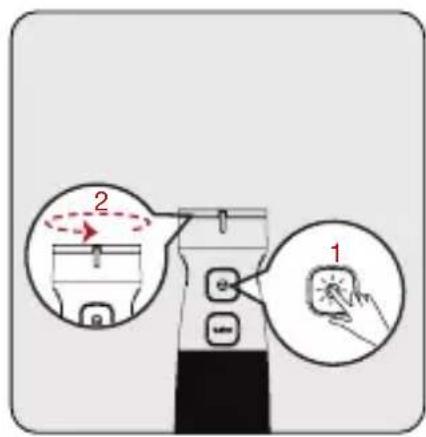
Plug in the appliance. Press the power button (2) and operate. Then adjust the speed by turning the speed adjustment button (1).
When process is complete, release the power button (2). Unplug the appliance.
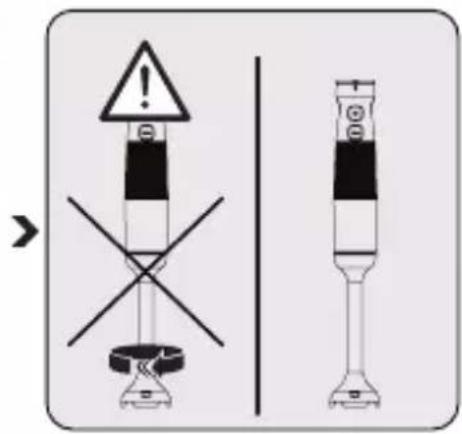
Wait for it to stop completely. Turn the blending shaft (12) clockwise “☐” to detach it from the motor unit (4).
3 Operation

- You may increase the speed by turning the speed adjustment button (1) step by step.
- Start to mix ingredients with a lower speed at first. When you start with higher speed, foods may splatter.
- Making light circular movements with the device during the procedure will provide a better result.

Do not touch the blades with bare hands.
3.4 Chopping

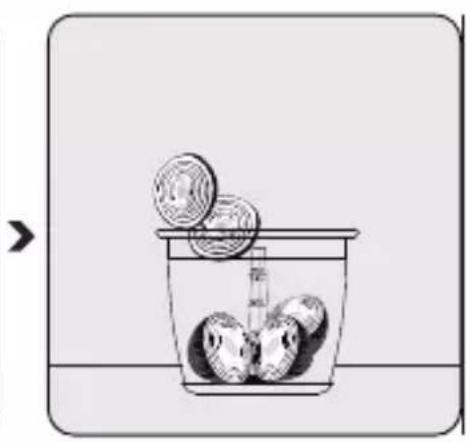
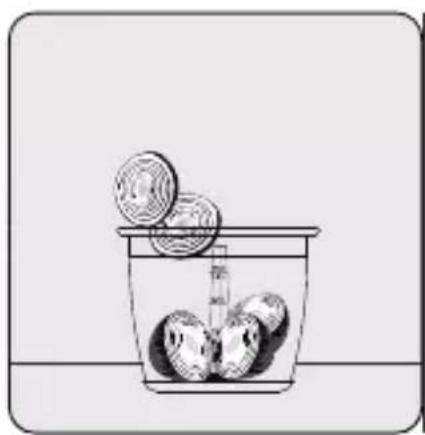
Put the chopping bowl (8) and non-slip base (11) onto a flat surface.
Place the chopping blade (9) to the fixed shaft in the chopping bowl.
natural_image
Simple line drawing of a container with three round objects and a pointer, no text or symbols presentPut the ingredients into the chopping bowl (8).

Do not operate the appliance unless the chopping cover (6) is not fully engaged.
3 Operation

- Do not crush extremely hard ingredients such as coffee beans, ice, coconut, cereals or bones. Remove the stems of the plants, the shell of the walnut, and the bone, nerve and cartilage of the meat.
- Cut the food into small parts.
• Always hold the chopping bowl with one hand to prevent it from tipping over during the process. - Do not use the appliance longer than 10 seconds continuously.
- Press the start button (2) intermittently for best results.
natural_image
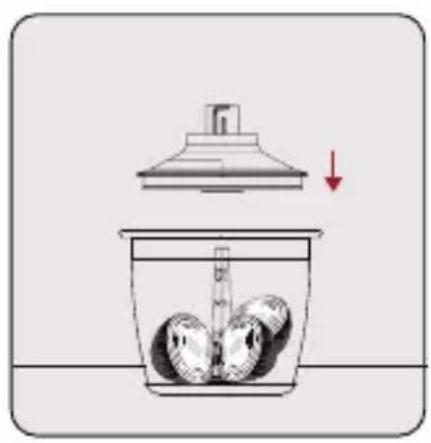
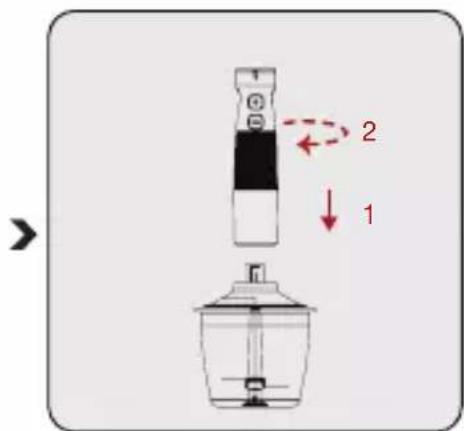
Illustration of a container with liquid and three round objects inside, topped with a lid and arrow indicating downward motion (no text or symbols)Place the chopping cover (6) onto the chopping bowl (8).
- Make sure that the tabs on the chopping cover (6) are securely locked onto the bowl.

Place the motor unit (4) onto the chopping cover (6).
- Make sure that the motor unit (4) is firmly locked onto the chopping cover.

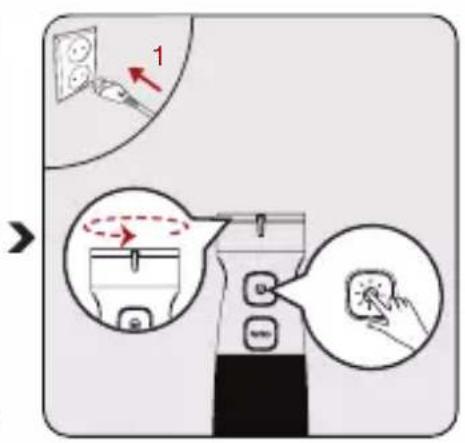
Plug in the appliance. Press the power button (2) and operate. Then adjust the speed by turning the speed adjustment buttons (1).
3 Operation

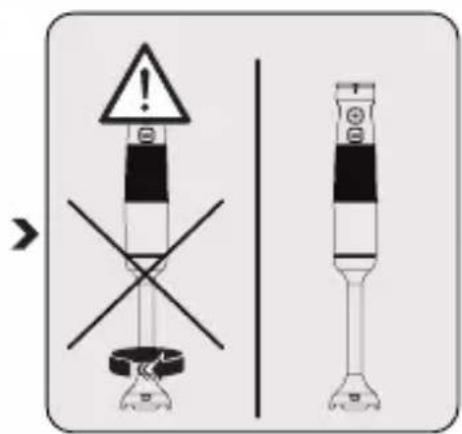
WARNING:
- Be careful when attaching the chopping blade (9) since it is very sharp. - Do not touch the chopping blade (9) with bare hands.
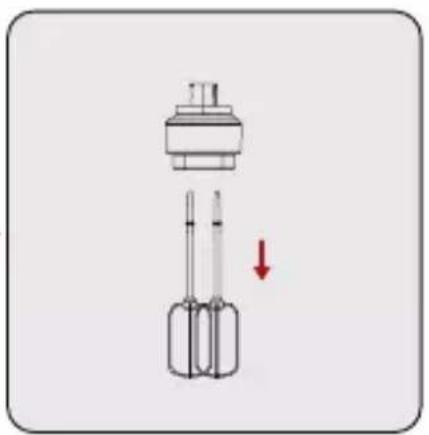
3.5 Beater

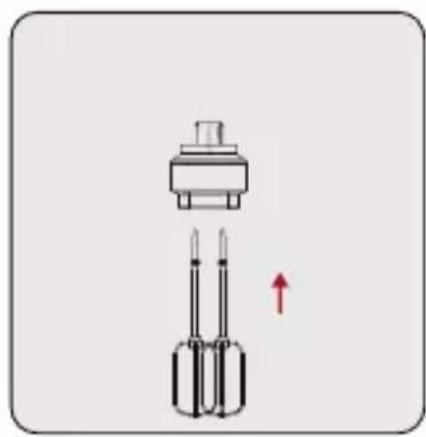
You may use beater accessory (5) for beater cream and eggs.
natural_image
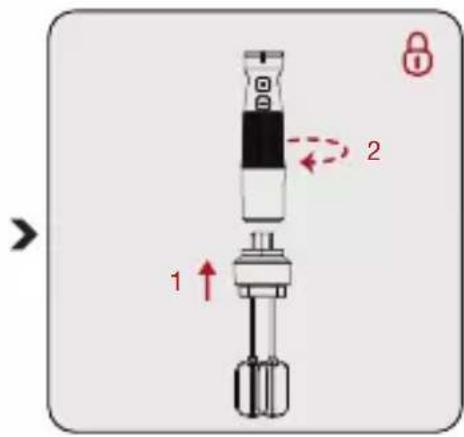
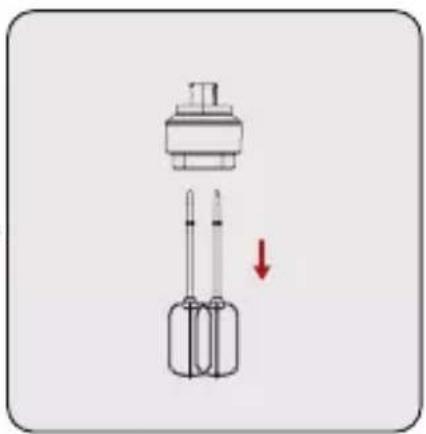
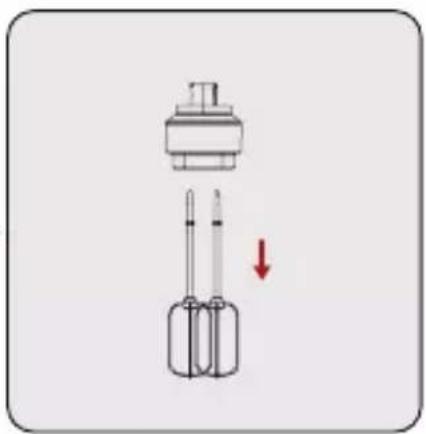
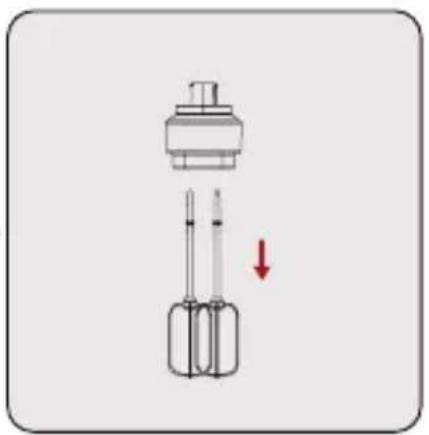
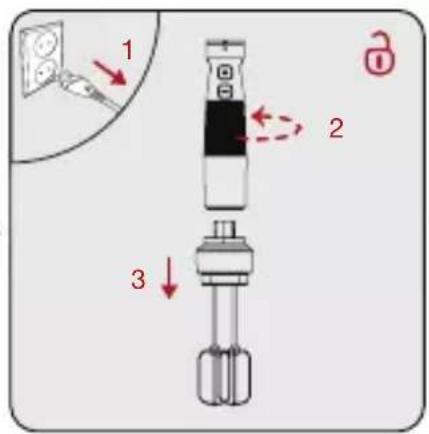
Diagram of a sensor or connector assembly with two pins and a top component, no text or symbols presentGently push the beater accessory tips (5) into the beater holder (7).

Attach the beater holder (7) into the motor unit (4) by turning counter clockwise “☐”.

Put the ingredients you want to process into the scaling cup (10) or similar bowl and plug the socket.
3 Operation
natural_image
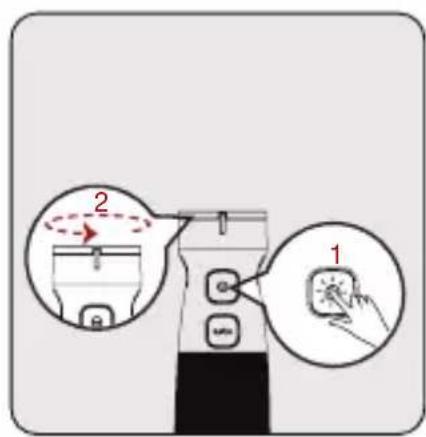
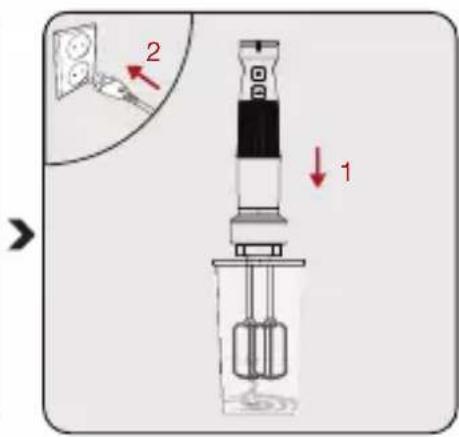
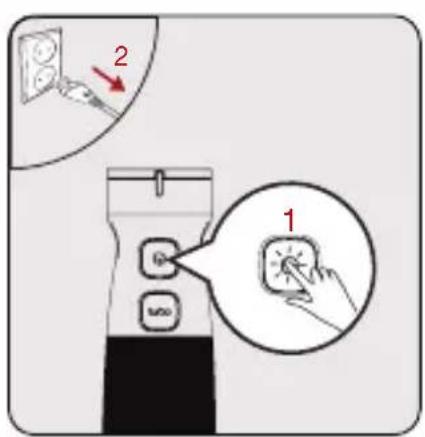
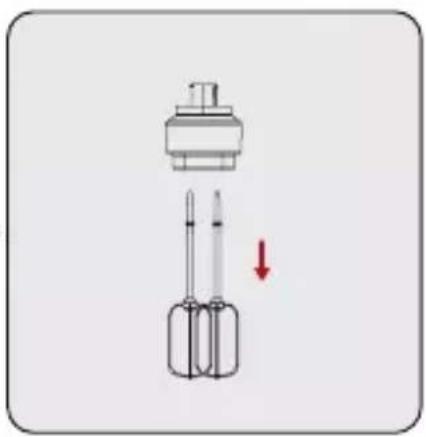
Diagram of a mechanical component with a downward arrow indicating force or direction (no text or symbols present)Press the power button (2) and operate. Then adjust the speed by turning the speed adjustment button (1). Start beater.
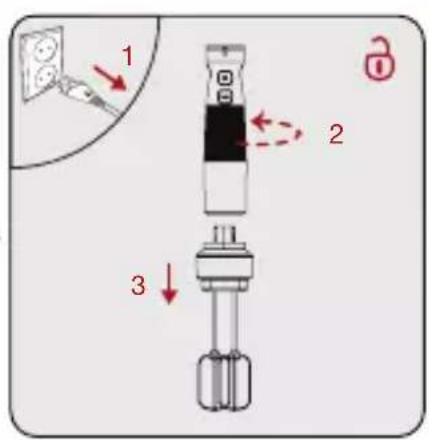
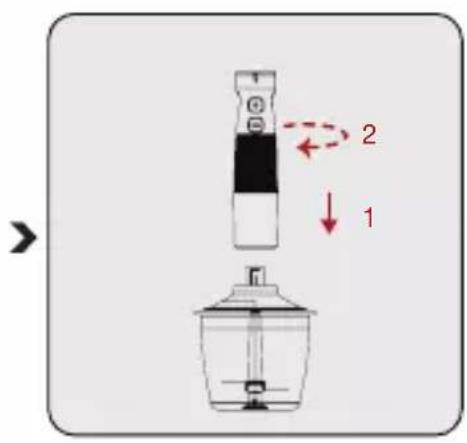
When completed, unplug it. Detach the motor unit, From beater holder (7) by turning it clockwise “☐”.
Gently pull out the beater accessory tips (5) from the beater holder (7).
4 Cleaning and maintenance
4.1 Cleaning

WARNING:
- Do not use benzene, solvents, abrasive cleaners, metal objects or hard brushes to clean the appliance.
- Do not touch the chopping blades (9) with bare hands. The blades are very sharp. Use a brush!
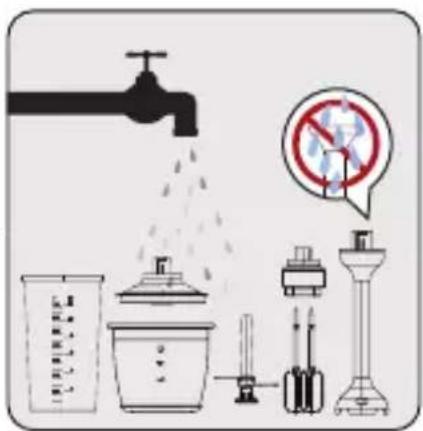
- Do not immerse the motor unit (4) or electrical cord into water or other liquids and never hold under the running water.
- Do not wash chopping blade and beater holder in the dishwasher.
- Do not immerse the inner part of chopping blade, motor unit (4) or electrical cord into water or other liquids.
natural_image
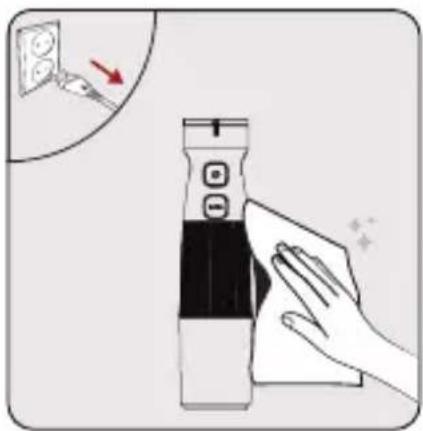
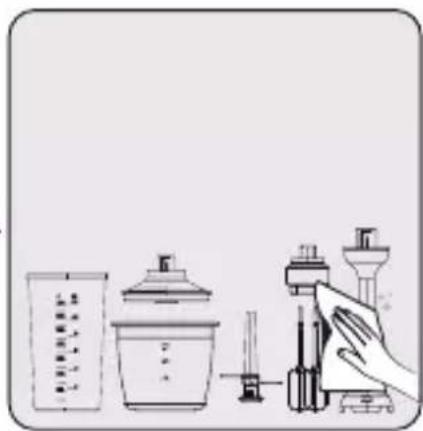
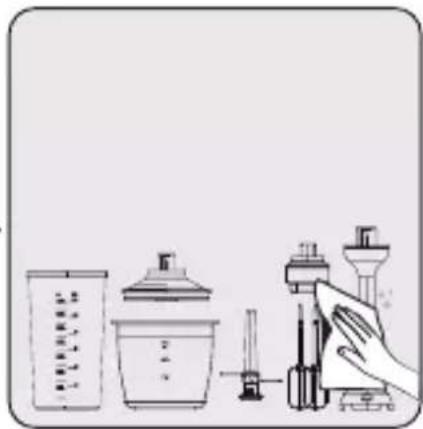
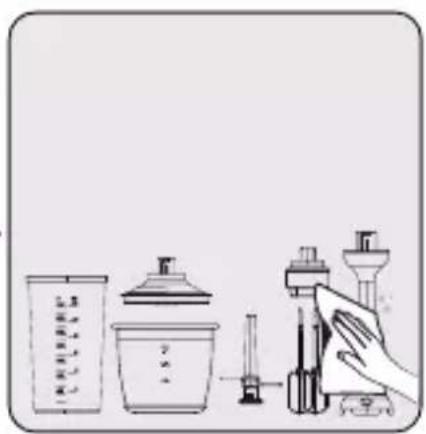
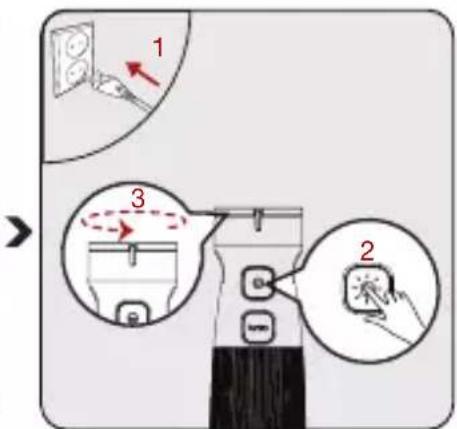
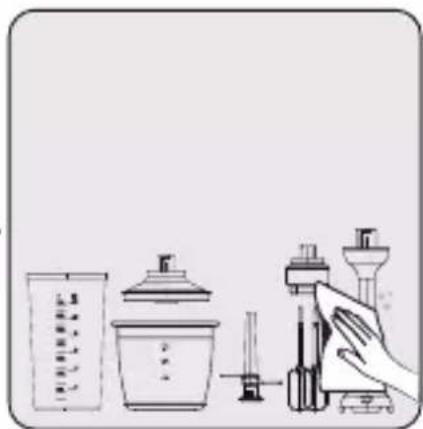
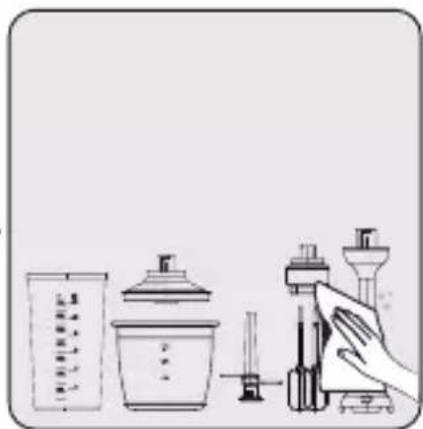
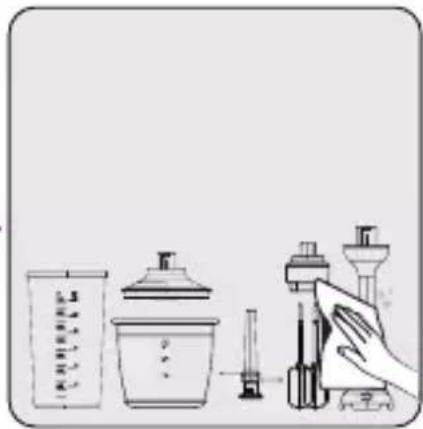
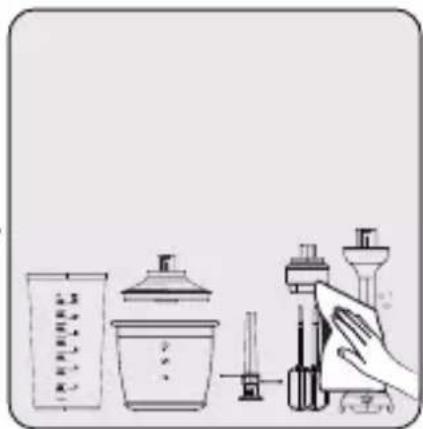
Illustration of a hand cleaning a device with a magnified inset showing a wall socket (no text or symbols)Unplug the appliance before cleaning. Make sure that all appliance components has stopped completely. Wipe the motor unit (4) of the appliance with a damp cloth.

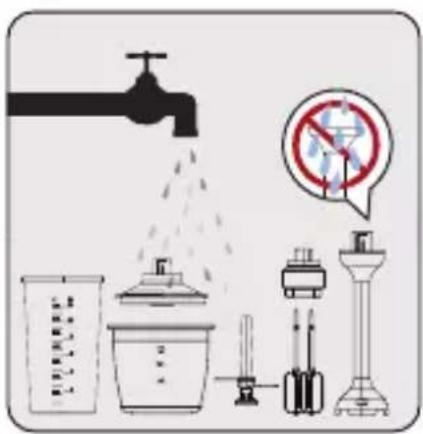
Immediately after using the appliance, clean the scale bowl (10), chopping cover (6), chopping bowl (8), beater (5), beater holder (7) with warm, soapy water.

natural_image
Illustration of laboratory glassware including a beaker, beaker with lid, and microscope (no text or symbols)Dry accessories thoroughly.
4 Cleaning and maintenance
4.2 Storage
- If you do not intend to use the appliance for a long time, store it carefully.
- Unplug the appliance before storing.
- Store the appliance in a cool dry place.
- Store the appliance and its cord out of the reach of children.
4.3 Transport and shipping
- During transport and shipping, carry the appliance with its original packaging. The packaging of the appliance will protect the appliance against physical damage.
- Do not put heavy objects on the appliance or its packaging. Otherwise the appliance may be damaged.
- If the appliance is dropped, the appliance may not operate or permanent damage may occur.
natural_image
Illustration of a laboratory instrument in a beaker with granular material, showing a downward arrow indicating motion (no text or symbols present)natural_image
Simple line drawing of a container with coins and fruit, no text or symbols presentnatural_image
Illustration of a container with three eggs inside, topped with a lid and a red arrow indicating downward motion (no text or symbols)natural_image
Diagram of a mechanical component with two pins and a top connector, showing an upward arrow (no text or symbols)natural_image
Diagram of a mechanical device with two pins and a top component, showing a red downward arrow (no text or symbols)natural_image
Illustration of a hand cleaning a digital device with a magnified inset showing a close-up of the device (no text or symbols present)
natural_image
Illustration of laboratory glassware including a beaker, beaker with lid, and a syringe connected to a funnel (no text or symbols)natural_image
Symbol of a trash bin crossing over a barrier, no text or numbers present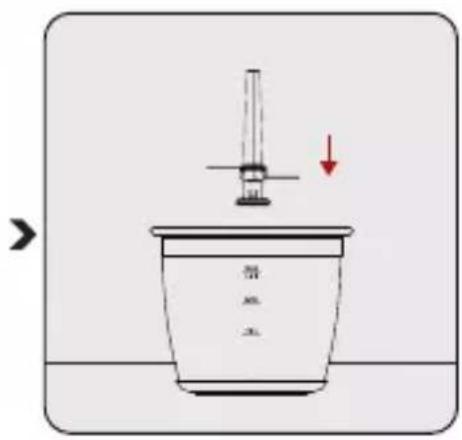

natural_image
Simple line drawing of a container with three round objects and a pointer, no text or symbols presentnatural_image
Illustration of a container with three eggs inside, topped with a lid and a downward arrow (no text or symbols)natural_image
Diagram of a sensor or connector assembly with two pins and a top component, no text or symbols presentnatural_image
Diagram of a mechanical device with a cylindrical component and two vertical rods, one downward with a red arrow indicating direction (no text or symbols)natural_image
Illustration of a hand cleaning a digital device with a magnified inset showing a wall-mounted switch (no text or symbols)
2 Blender ręczny
2.1 Instalacja
natural_image
Illustration of a laboratory instrument in a beaker with particles being added, showing a downward arrow (no text or symbols)natural_image
Simple line drawing of a container with coins and a submerged object, no text or symbols presentnatural_image
Illustration of a kitchen utensil with a lid and a downward arrow indicating a drop, containing three eggs inside a container (no text or symbols)natural_image
Diagram of a sensor or connector assembly with two pins and a top component, no text or symbols present

natural_image
Diagram of a mechanical component with a downward arrow indicating motion or force (no text or symbols)natural_image
Illustration of a hand cleaning a device with a magnified inset showing a wall socket (no text or symbols)natural_image
Illustration of laboratory equipment including a beaker, test tube, and pipette (no text or symbols)natural_image
Symbol of a trash bin crossed out by a diagonal line, with no text or numbers present.Sestavine vstavite (majhni koščki) v merilno posodo (10) ali posodo, ki jo želite uporabiti in potopite rezilo za sekljanje (12) v posodo.
Priklopite aparat. Pritisnite gumb za vklop (2) in zaženite. Nato nastavite hitrost z obračanjem gumba za nastavitev hitrosti (1).
Počakajte, da se popolno- ma ustavi.

Rezilo za sekljanje (12) zavrtite v smeri urinega kazalca “♂”, da ga ločite od enote z motorjem (4).
3 Delovanje

natural_image
Simple line drawing of a container with three round objects and a submerged object, no text or symbols present.Vstavite sestavine v posoda za sekljanje (8).

Ne uporabljajte naprave, dokler ni pokrov sekljalnika (6) popolnoma vpet.
3 Delovanje

natural_image
Illustration of a container with three round objects inside, topped with a lid and a red arrow indicating downward motion (no text or symbols)Namestite pokrov sekljalnika (6) na posoda za sekljanje (8).
- Prepričajte se, da so jezički na pokrovu sekljalnika (6) varno pritrjeni na posodo.
Priklopite aparat. Pritisnite gumb za vklop (2) in zaženite. Nato nastavite hitrost z obračanjem gumbov za nastavitev hitrosti (1).
3 Delovanje

OPOZORILO:
- Bodite previdni pri namestitvi rezila za sekljanje (9), ker je zelo ostro.
- Ne dotikajte se rezila za sekljanje (9) z golimi rokami.
3.5 Metlica

natural_image
Diagram of a sensor or connector assembly with two pins and a top component, no text or symbols presentNežno potisnite konice dodatka (5) v nosilec metlice (7).
Nosilec metlice (7) pritrdite na enoto z motorjem (4) tako, da vrtite v nasprotni smeri urinega kazalca “?”.

natural_image
Diagram of a mechanical component with a downward arrow indicating motion or force (no text or symbols present)Pritisnite gumb za vklop (2) in zaženite. Nato nastavite hitrost z obračanjem gumba za nastavitev hitrosti (1). Začnite mešati.
natural_image
Illustration of a hand cleaning a device with a magnified inset showing a wall socket (no text or symbols)Pred čiščenjem izključite na-pravo iz napajanja. Prepri-čajte se, da so se vsi sestav-ni deli naprave popolnoma ustavili. Obrišite enoto z motorjem (4) z vlažno krpo.


Takoj po uporabi operite merilno posodo (10), pokrov sekljalnika (6), posodo za sekljanje (8), metlico (5), nosilec metlice (7) s toplo vodo in detergentom.


natural_image
Illustration of laboratory glassware including a beaker, pipette, and microscope (no text or symbols)Dodatke temeljito osušite.
2 Váš tyčový mixér
2.1 Přehled


natural_image
Simple line drawing of a container with coins and three fruits, no text or symbols presentnatural_image
Illustration of a container with liquid and three eggs, topped with a lid and arrow indicating downward motion (no text or symbols)natural_image
Diagram of a mechanical component with two pins and a top connector, showing an upward arrow (no text or symbols)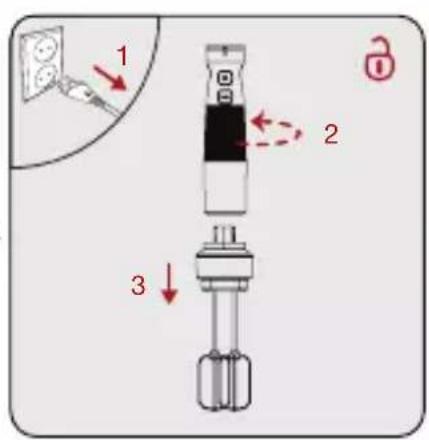

natural_image
Diagram of a mechanical component with a downward arrow indicating motion or force (no text or symbols)natural_image
Illustration of a hand cleaning a digital device with a magnified inset showing a close-up of the device (no text or symbols present)
natural_image
Illustration of laboratory glassware including a beaker, lid, and pipette with a hand operating a syringe (no text or symbols)natural_image
Symbol of a trash bin crossed out by a diagonal line, with no text or numbers present.Ovaj simbol označava da se ovaj proizvod ne sme odlagati zajedno s ostalim kućnim otpadom na kraju njegovog radnog veka. Korišćeni uređaj mora se vratiti na službeno mesto za sakupljanje za recikliranje električnih i elektronskih uređaja. Da biste pronašli ove sisteme za sakupljanje, obratite se lokalnim vlastima ili prodavcu gde je proizvod kupljen. Svako domaćinstvo ima važnu ulogu u vraćanju i recikliranju starih uređaja. Odgovarajuće odlaganje iskorišćenog aparata pomaže u sprečavanju potencijalnih negativnih posledica po životnu sredinu i zdravlje ljudi.
1.3 Informacije o pakovanju

Ambalaža proizvoda je napravljena od materijala koji mogu da se recikliraju, u skladu sa nacionalnim propisima o zaštiti životne sredine. Ambalažu ne odlažite sa kućnim otpadom ili drugim vrstama otpada već je odložite u sabirne centre za ambalažu koje su navele lokalne vlasti.
1.4 Kako se štedi energija
Tokom upotrebe poštujte vremena preporučena u priručniku. Nakon upotrebe, iskopčajte kabl uređaja.

2 Vaš ručni blender
2.1 Prikaz
- Dugme za prilagođavanje brzine
- Taster za UKLJUČIVANJE/ISKLJUČIVANJE
- Dugme za Turbo režim rada
- Jedinica motora
- Mutilica
- Poklopac za seckanje
- Držač mutilice
- Spremnik za seckanje
- Nožić za seckanje
- Posuda sa mernom skalom
- Posuda sa mernom skalom i neklizajućim dnom
- Nožić za seckanje
- Spremnik sa neklizajućim dnom
Tehnički podaci
Napon: 220-240 V\~, 50-60 Hz
Snaga: 750 W
Prava na tehničke i dizajnerske promene su zadržana.
3 Rad
3.1 Predviđena namena
Stavite sastojke (u komadićima) i obradite ih u posudi sa mernom skalom (10) ili posudi koju nameravate da koristite, a zatim uronite nožić za seckanje (12) u posudu.

Ukopčajte uređaj u struju. Pritisnite dugme za uključivanje (2) i krenite sa radom. Zatim podesite brzinu okretanjem dugmeta za podešavanje brzine (1).
Nakon obrade, otpustite dugme za uključivanje (2). Isključite uređaj iz struje.
natural_image
Simple line drawing of a container with three round objects and a submerged object, no text or symbols present.Stavite sastojke u spremnik za seckanje (8).

Ne upotrebljavajte uređaj ako poklopac za seckanje (6) nije čvrsto stavljen.
3 Rad

- Ne drobite vrlo tvrde sastojke kao što su zrna kafe, led, kokosov orah, žitarice ili kosti. Uklonite stabiljike sa biljaka, ljuske sa oraha, a kosti, žile i hrskavicu sa mesa.
- Namirnice režite na male komade.
- Uvek jednom rukom držite spremnik za seckanje da biste sprečili njeno prevrtanje tokom obrade.
- Uređaj nemojte da koristite duže od 10 sekundi bez prekida.
- Pritisnite dugme za pokretanje (2) isprekidano za najbolje rezultate.

natural_image
Illustration of a kitchen utensil with a lid and a downward arrow indicating a drop, containing three eggs inside a container (no text or symbols)Stavite poklopac za seckanje (6) na spremnik za seckanje (8).
- Proverite da li su jezičci poklopca za seckanje (6) čvrsto blokirani na spremniku.
Stavite kućište motora (4) na poklopac za seckanje (6).
- Proverite da li je kućište motora (4) čvrsto blokirano na poklopcu za seckanje.
Ukopčajte uređaj u struju. Pritisnite dugme za uključivanje (2) i krenite sa radom. Zatim podesite brzinu okretanjem dugmeta za podešavanje brzine (1).
3 Rad

UPOZORENJE:
- Pazite kod spajanja nožića za seckanje (9) jer je vrlo oštar. - Ne dodirujte nožić za seckanje (9) golim rukama.
3.5 Mutilica

natural_image
Diagram of a sensor or connector assembly with two pins and a top component, no text or symbols presentPažljivo pritisnite vrhove pribora za mućenje (5) u držač mutilice (7).

Spojite držač mutilice (7) u kućište motora (4) okretanjem u smeru suprotno kazaljci na satu “☐”.

Stavite željene sastojke u posudu sa mernom skalom (10) ili sličan spremnik i ukopčajte utikač.
3 Rad

natural_image
Diagram of a mechanical component with a downward arrow indicating motion or force (no text or symbols)Pritisnite dugme za uključivanje (2) i krenite sa radom. Zatim podesite brzinu okretanjem dugmeta za podešavanje brzine (1). Počnite mutiti.
Kada završite, iskopčajte ga. Odvojite kućište motora, Od držača mutilice (7) tako da okrećete u smeru kazaljke na satu “ ^1 .
Pažljivo izvucite vrhove pribora za mućenje (5) iz držača mutilice (7).
natural_image
Illustration of a hand cleaning a digital device with a magnified inset showing a close-up of the device (no text or symbols present)Izvucite utikač uređaja iz struje pre čišćenja. Proverite da li su se zaustavili svi delovi uređaja. Obrišite kućište motora (4) uređaja vlažnom krpom.

Odmah nakon upotrebe uređaja toplom sapunicom očistite posudu sa mernom skalom (10), poklopac za seckanje (6), spremnik za seckanje (8), mutilicu (5), držač mutilice (7).

natural_image
Illustration of laboratory glassware including a beaker, beaker with lid, and microscope with pipette (no text or symbols)Temeljito osušite pribor.
4.3 Transport i otprema
- Za vreme transporta i otpreme, uređaj nosite u originalnom pakovanju. Ambalaža uređaja ga štiti od fizičkih oštećenja.
- Nemojte stavljati teške predmete na uređaj ili njegovu ambalažu. U suprotnom, uređaj se može oštetiti.
- Ako uređaj padne, uređaj možda neće raditi ili može doći do trajnih oštećenja.
natural_image
Symbol of a trash bin crossed out by a diagonal line, with no text or numbers present.natural_image
Illustration of a laboratory brush in a beaker with particles being added, showing a downward arrow (no text or symbols)
natural_image
Simple line drawing of a container with coins and a submerged object, no text or symbols presentnatural_image
Illustration of a container with liquid and three eggs, topped with a lid and arrow indicating downward motion (no text or symbols)natural_image
Diagram of a sensor or connector assembly with two pins and a top component, no text or symbols present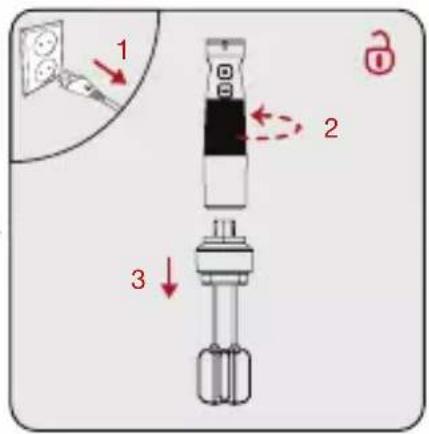
natural_image
Diagram of a mechanical component with a downward arrow indicating motion or force (no text or symbols)natural_image
Illustration of a hand cleaning a device with a magnified inset showing a switch (no text or symbols)natural_image
Illustration of laboratory glassware including a beaker, pipette, and microscope (no text or symbols)natural_image
Symbol of a trash bin crossed with a diagonal line, no text or numbers presentnatural_image
Diagram of a laboratory instrument in a beaker with particles, showing a downward arrow indicating motion (no text or symbols present)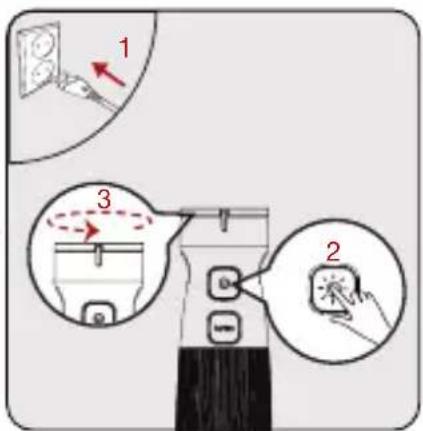
natural_image
Simple line drawing of a container with three round objects and a vertical rod, no text or symbols present.natural_image
Illustration of a container with three eggs inside and a lid above it, with a red arrow indicating downward motion (no text or symbols)natural_image
Diagram of a mechanical component with two pins and a top housing, showing an upward force arrow (no text or symbols)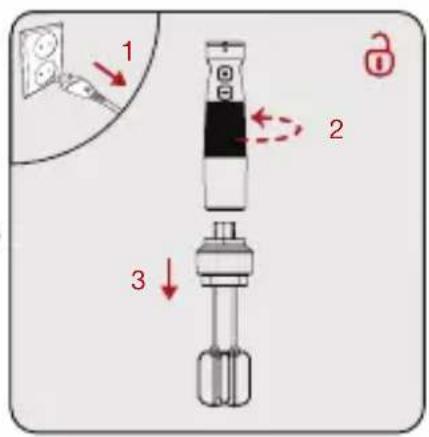
natural_image
Diagram of a mechanical device with a cylindrical component and two rods, showing a downward force indicated by a red arrow (no text or symbols present)natural_image
Illustration of a hand cleaning a device with a magnified inset showing a close-up of a wall socket (no text or symbols)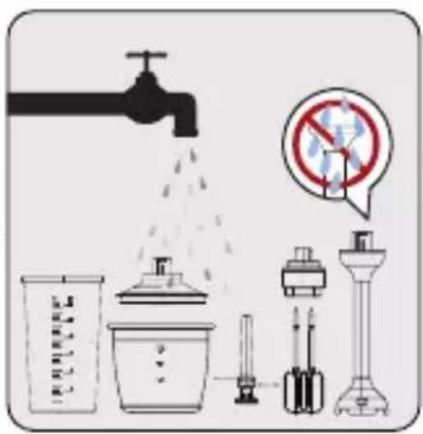
natural_image
Illustration of laboratory glassware including a beaker, lid, and pipette with a hand operating a syringe (no text or symbols)natural_image
Illustration of a laboratory instrument in a beaker with particles being added, showing a downward arrow (no text or symbols)natural_image
Simple line drawing of a container with three round objects and a vertical rod, no text or symbols present.natural_image
Illustration of a container with liquid and three objects inside, topped with a lid and arrow indicating downward motion (no text or symbols)natural_image
Diagram of a sensor or connector assembly with two pins and a top component, no text or symbols present

natural_image
Diagram of a mechanical component with a downward arrow indicating motion or force (no text or symbols)natural_image
Illustration of a hand cleaning a digital device with a magnified inset showing a wall socket (no text or symbols)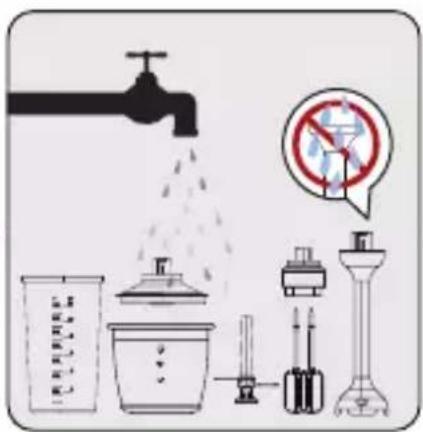
Uscati temeinic accesoriiile.
natural_image
Illustration of a hand cleaning a device with a cloth, showing a close-up of a wall socket and a red arrow (no text or symbols)natural_image
Illustration of laboratory glassware including a beaker, lid, and pipette with a hand operating a syringe (no text or symbols)جفف الملحقات جيدًا.
natural_image
Diagram of a mechanical component with a downward arrow indicating motion or force (no text or symbols)natural_image
Diagram of a sensor or connector assembly with two pins and a top component, showing an upward arrow (no text or symbols present)."
natural_image
Illustration of a container with liquid and three round objects inside, topped with a lid and arrow indicating downward motion (no text or symbols)natural_image
Simple line drawing of a container with coins and a submerged object, no text or symbols presentnatural_image
Diagram of a laboratory setup with a beaker containing granular material and a syringe, showing a downward arrow indicating a process (no text or symbols present)1-3 معلومات التغليف
natural_image
Simple line drawing of a compass inside a circle (no text or symbols)HBA 81762 BX
AR