HMM 81504 BX - Blender GRUNDIG - Free user manual and instructions
Find the device manual for free HMM 81504 BX GRUNDIG in PDF.

| Product type | Hand blender / mixer |
| Brand | Grundig |
| Model | HMM 81504 BX |
| Power supply | 220-240 V~, 50-60 Hz |
| Power | 500 W |
| Speeds | 4 levels + Turbo function |
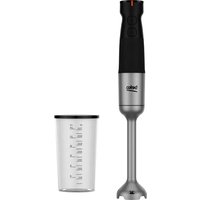
| Included accessories | 2 whisks, 2 spiral dough hooks |
| Max continuous use (whisks) | 10 minutes, then cool down 30 minutes |
| Max continuous use (dough hooks) | 5 minutes, then cool down 20 minutes |
| Turbo max continuous | 1 minute |
| Cleaning accessories | Dishwasher or soapy water |
| Cleaning motor unit | Damp cloth, do not immerse |
| Safety | Do not use for hot foods, remove bones and seeds |
| Use | Household use only |
| WEEE compliance | Yes |
Frequently Asked Questions - HMM 81504 BX GRUNDIG
User questions about HMM 81504 BX GRUNDIG
0 question about this device. Answer the ones you know or ask your own.
Ask a new question about this device
Download the instructions for your Blender in PDF format for free! Find your manual HMM 81504 BX - GRUNDIG and take your electronic device back in hand. On this page are published all the documents necessary for the use of your device. HMM 81504 BX by GRUNDIG.
USER MANUAL HMM 81504 BX GRUNDIG
natural_image
Stylized black-and-white icon of a flame or droplet above a crown (no text or symbols)HMM 81504 BX
EN / FR / IT / PL / SL / CS / SRB / SQ / MK / RO / AR
CONTENTS
| ENGLISH | 03-16 |
| FRANÇAIS | 17-31 |
| ITALIANO | 32-45 |
| POLSKI | 46-61 |
| SLOVENŠČINA | 62-75 |
| CZECH | 76-89 |
| СРБИН | 90-103 |
| SHQIPTARE | 104-117 |
| MAKEДОНСКИ | 118-133 |
| ROMÂNĂ | 134-149 |
| ARABIC | 150-163 |
Please read this guide first!
Dear Customer,
Thank you for choosing a BEKO product. We would like you to achieve the optimal efficiency from this high quality product which has been manufactured with state of the art technology. Please make sure you read and understand this guide and supplementary documentation fully before use and keep it as a reference. Include this guide with the unit if you hand it over to someone else. Observe all warnings and information herein and follow the instructions.
Symbols and their meanings
These symbols are used throughout this guide:

Important information and recommendations regarding the use of the appliance.

Warnings on personal injury or property damage.

Suitable for contact with food.
Do not immerse the appliance, the power cord or the plug in water or in any other liquids.

Electric shock protection rating

This product has been manufactured at modern facilities respectful to the environment without harming nature.
1 Important safety and environmental instructions
This section contains safety instructions to prevent hazards that can result in injury or property damage.
Any warranty is void if these instructions are not followed.
1.1 General safety
- This appliance complies with international safety standards.
- For the appliance to be used by persons with limited physical, emotional, or mental capacity or lacking knowledge and experience, such person must be supervised and have understood the instructions about the safe usage of the appliance and potential risks. Children should not tamper with the device. Cleaning and user maintenance operations should not be carried out by children.
•This appliance cannot be used by children.
- Store the appliance and its power cord out of the reach of children.
- Do not use the appliance if the power cord or the appliance is damaged. Contact authorized service.
1 Important safety and environmental instructions
- Unplug the appliance when it is left unattended, during attaching/removing accessories, and cleaning.
- Use only original parts or parts recommended by the manufacturer.
- Do not disassemble the appliance.
-Your mains power supply shall be in align with the specified information on the type tag. - Do not use the appliance with an extension cord.
- Do not unplug the appliance by pulling on the cord.
- Unplug the appliance before cleaning, disassembly, accessory fitting and wait until it is completely stopped.
- Do not touch the plug of the appliance while your hands are damp or wet.
- Do not use the appliance for hot foods.
•To avoid damage on the appliance, remove bones and seeds from foods.
•The appliance is not suitable for dry and hard foods.
1 Important safety and environmental instructions
•To prevent overheating, do not use the beaters function continuously for more than 10 minutes. Between each 10 minutes of use, leave the appliance to cooling for 30 minutes.
•To prevent overheating, do not use the beater function continuously for more than 5 minutes. Between each 5 minutes of use, leave the appliance to cooling for 20 minutes.
- Follow each instruction to prevent injuries caused by misuse.
•After cleaning, dry the appliance and every part before plugging in and attaching the parts.
- Do not immerse the appliance, the power cord or the plug in water or in any other liquids.
- Do not use the appliance or its parts on or near hot surfaces or put them on such surfaces.
- If you keep the packaging materials, keep them out of the reach of children.
•Always use the appliance on a stable, flat, clean and dry surface.
1 Important safety and environmental instructions
•This appliance is intended to be used in household and similar applications such as:
- staff kitchen areas in shops, offices and other working environments,
- farm houses, by clients in hotels, motels and other residential type environments,
-
bed and breakfast type environments
-
Do not squeeze or bend the power cord and do not rub in on sharp edges in order to prevent any damage. Keep the cord away from hot surfaces and open flames.
- Before using the appliance for the first time, clean all parts carefully which come into contact with food. Please see full details in the “Cleaning” section.
- Do not touch any moving parts of the appliance. Do not attach or remove the parts until the device comes to a complete stop.
1 Important safety and environmental instructions
1.2 Compliance with the WEEE Regulations and Waste Disposal
This product complies with EU WEEE Directive (2012/19/EU). This product bears a classification symbol for waste electrical and electronic equipment (WEEE).
natural_image
Simple line drawing of a trash bin with no text or symbolsThis symbol indicates that this product shall not be disposed with other household wastes at the end of its service life. Used device must be returned to offical collection point for recycling of electrical and electronic devices. To find these collection systems please contact to your local authorities or retailer where the product was purchased. Each household performs important role in recovering and recycling of old appliance. Appropriate disposal of used appliance helps prevent potential negative consequences for the environment and human health.
1.3 Packaging information

The product's packaging is made of recyclable materials, in accordance with the National Legislation. Do not dispose the packaging waste with the household waste or other wastes, dispose it to the packaging collection areas specified by local authorities.
1.4 What to do for energy saving
Follow the times recommended in the manual during use. Unplug the cord of appliance after use.
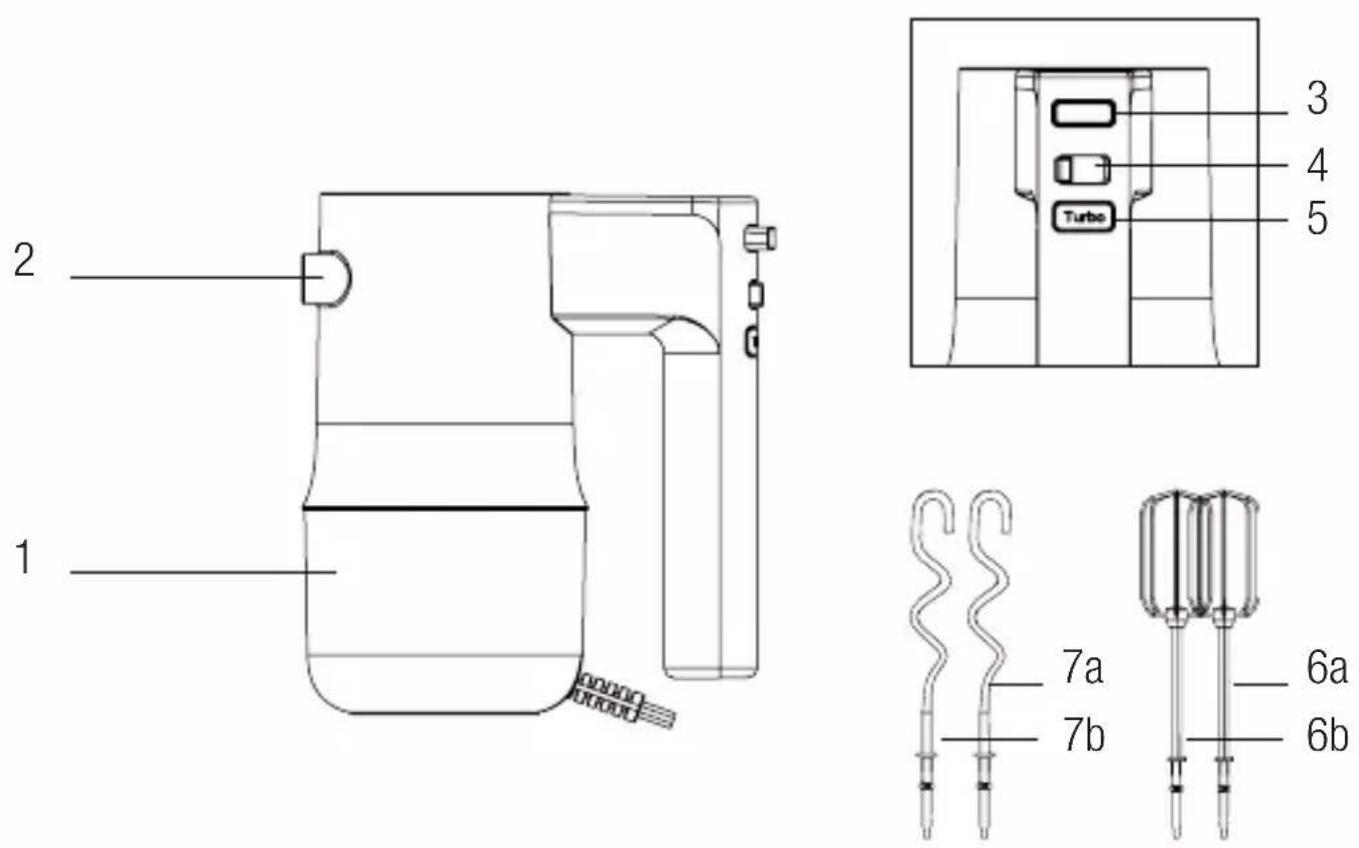
2 Your blender
2.1 Overview
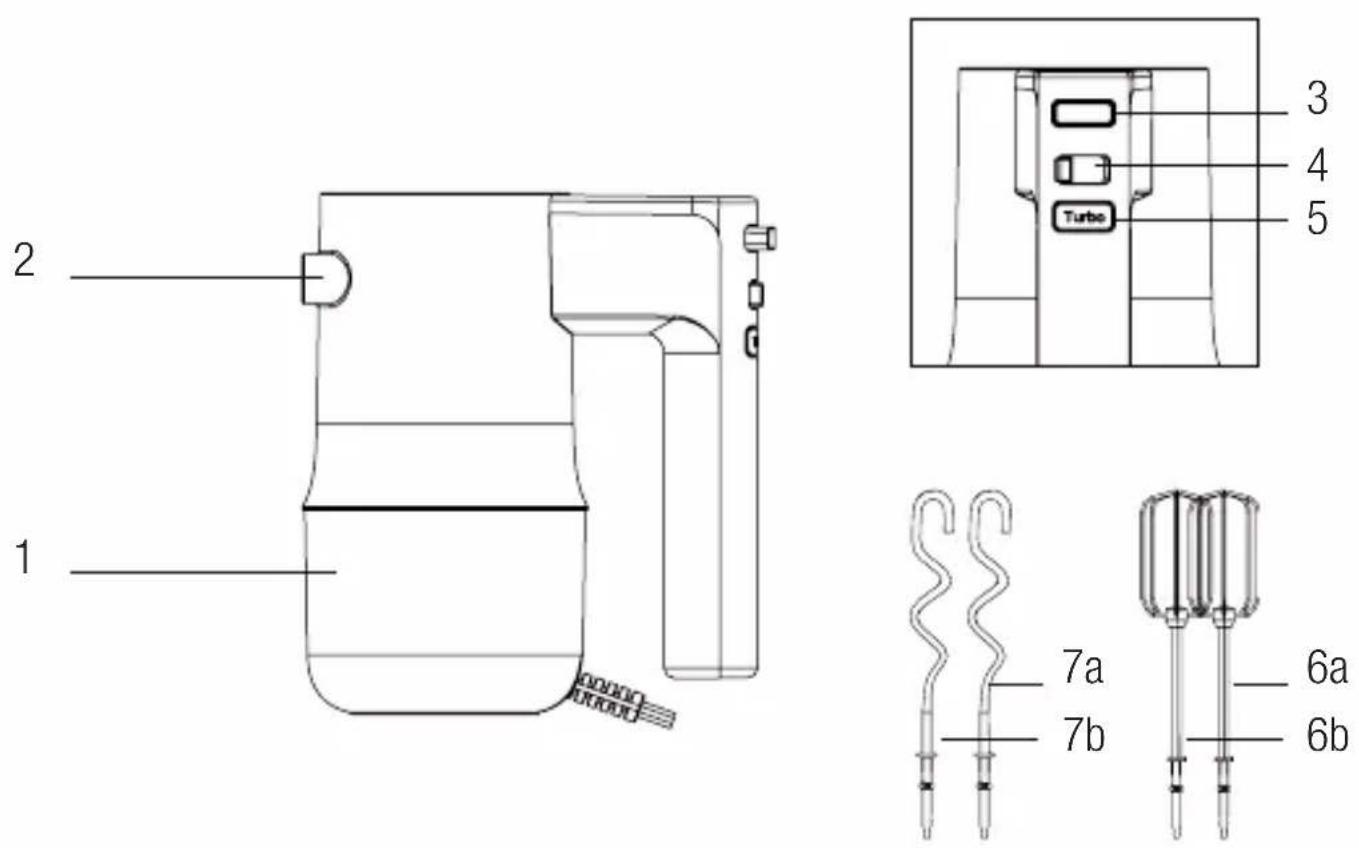
- Motor unit
- Accessory inlets
- Accessory release button
- Speed setting button
- TURBO button
- Beaters (6a/6b)
- Dough hooks (7a/7b)
2.2 Technical Data
Voltage: 220-240 V\~, 50-60 Hz Power: 500 W
The rights to make technical and design changes are reserved.
2 Operation
2.1 Intended use
The appliance is intended for home use only, it is not suitable for professional use.
2.2 First operation
Clean the parts of the appliance before the first use.
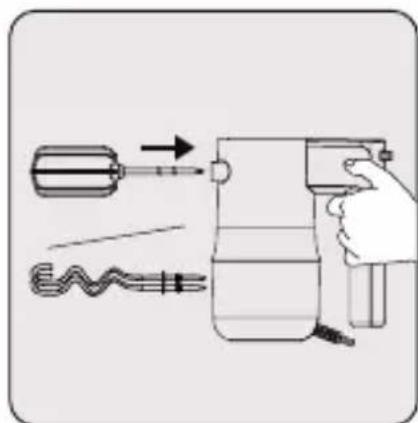
2.3 Beater / Mixer
natural_image
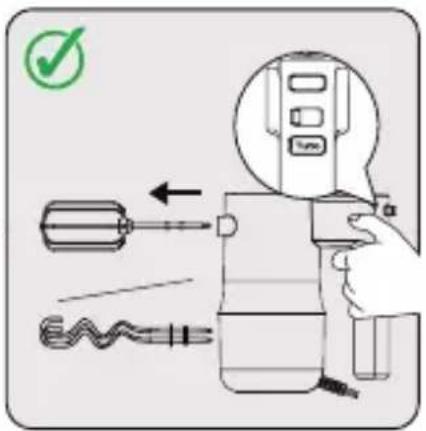
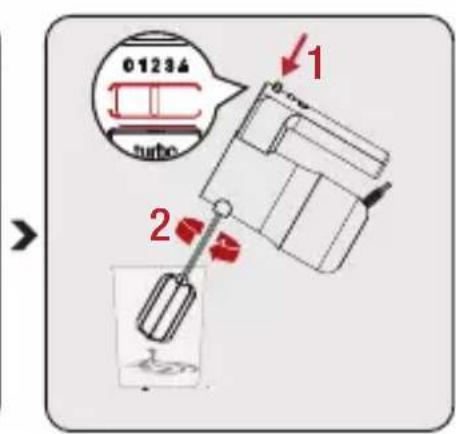
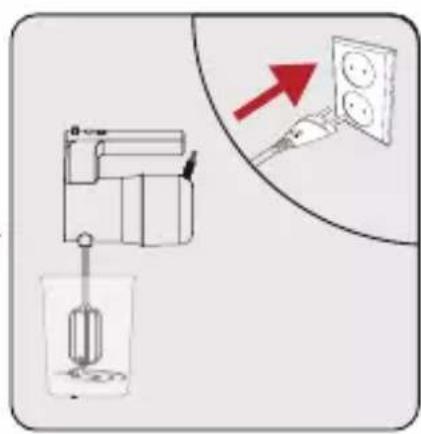
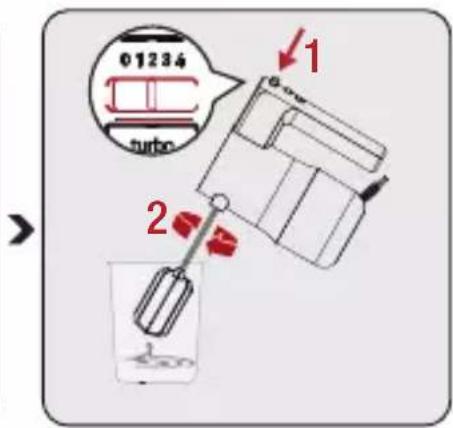
Illustration of a hand using a handheld device to interact with a spring-loaded tool (no text or symbols present)Insert beaters (6) or kneading hooks (7) into the inlets for beater (5) or kneading hook until they settle.
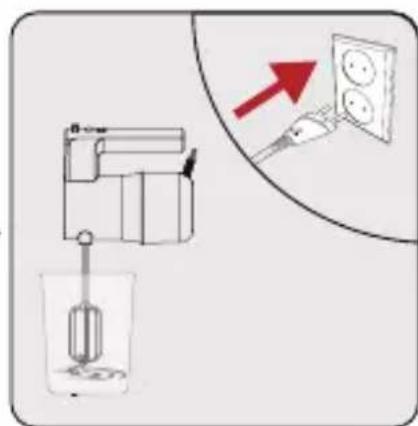
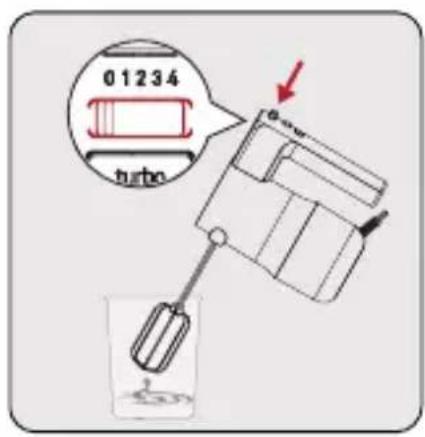
Plug in the power cord. Put the beaters (6) and the kneading hooks (7) into the batter before turning on the stick blender.
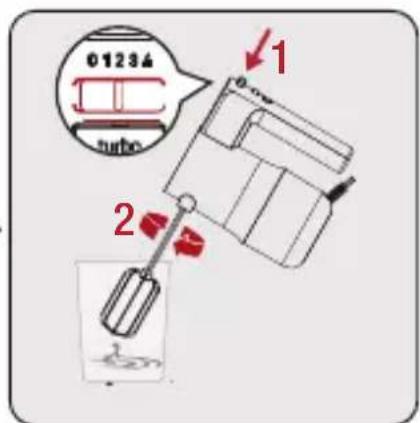
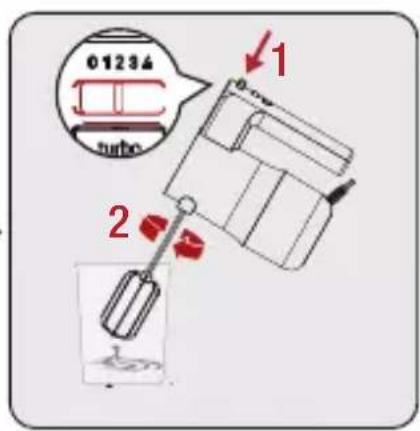
Speed setting is between 1 and 4. Increase the speed starting from level 1.

Do not use the beater and dough hooks together.

When mixing ingredients, start with a lower speed. Foods may spatter around if you start with high speed.
2 Operation
When the process is completed, leave the speed setting button at "0" position.

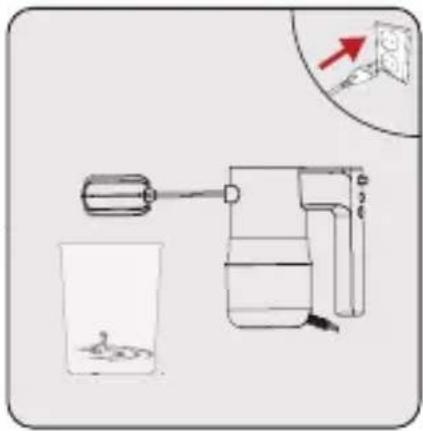
Wait until your appliance is completely stopped. Unplug and remove the beater/mixer accessories from the batter.

You can remove the beater and mixer accessories by pushing the accessory release button (3) when the power button is on "0" position.
2.3.1 Beaters

• Always use both beaters.
- Teflon coated containers may be scratched.
Use it to beat liquid ingredients like cake batter, sauce, soup.
2.3.2 Dough Hooks

• Always use both dough hooks.
- Teflon coated containers may be scratched.
- Use it for dough kneading.
2.4 TURBO button
Push and hold the TURBO button when you need sudden high speed, and unhold when you no longer need.
Do not use the TURBO feature for longer than 1 minute.
3 Recipes
Cake Recipe
Ingredients:
• 3 Eggs
- 150 g butter
- 150 g white sugar
- 150 g wheat flour
- 3 g dry yeast
Preparation:
Separate egg whites and yolks.
Pour the egg whites into a mixing bowl and attach the mixer accessory of your appliance. Beat the egg whites for 1 to 2.5 minutes on speed level 3.
Dice the butter into 20 mm pieces.
Add the butter, sugar, and egg yolks to the bowl and mix for 1 to 2.5 minutes on speed level 3.
In a different bowl mix the wheat flour and dry yeast. Add the dry ingredients to the egg mixture and beat for 1 to 2.5 minutes on speed 3.
Pour the batter into a cake pan and bake in a preheated 200^ oven until it's gold on top. Enjoy!
3 Recipes
Cookie Recipe
Ingredients:
• 1 egg
- 100 g butter, diced into 200 mm pieces
- 100 g oats
- 100 g honey
- 100 g wheat flour
- 20 g water
- 175 g chocolate chips
Preparation:
Beat the egg, honey and butter diced into 200 mm pieces on Turbo speed until creamy.
Add flour and water, mix for 1.5 to 2 minutes.
Finally, add the oats and chocolate chips, stir with a spoon.
Take 30 g (approximately 1 tablespoon) from your dough and shape into balls, and place them on an oven tray.
Bake in a preheated oven at 160 °C for 30 minutes or at 180 °C for 25 minutes. Enjoy!
3 Recipes
Bread Recipe
Ingredients:
- 350 g wheat flour
- 5 g salt
- 10 g white sugar
- 10 g butter
- 200 g water
- 3 g dry yeast
Preparation:
Mix flour, salt and sugar in a mixing bowl.
Add dry yeast, butter and water to the mixture.
Attach the dough hook and mix the ingredients for 10 to 15 seconds on speed level 1. Then, set the speed to 3 and continue mixing for 20 to 30 seconds.
Set the speed to 4 and continue mixing for 2,5 to 3,5 minutes.
Rest the dough on a 35^ C environment for 45 minutes.
Then, shape the dough to your preference and place on a baking tray. Bake it on a 180 °C preheated oven until it's golden on top. Enjoy!

Please do not knead food that contains more than 350 grams of flour in this appliance. More flour may cause overloading of the appliance.
4 Cleaning and maintenance
4.1 Cleaning

Do not use benzene, solvents, abrasive cleaners, metal objects or hard brushes to clean the appliance.
natural_image
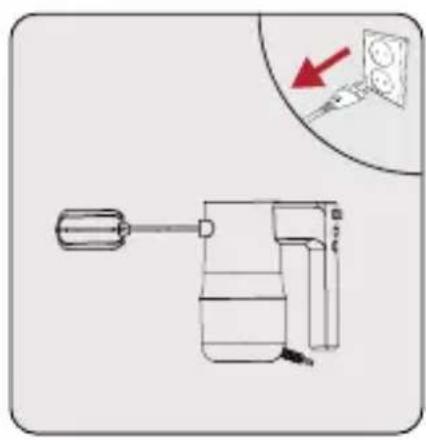
Diagram of a hand pump device with an inset showing a close-up of its tip and a red arrow pointing to the handle (no text or symbols present)Turn the appliance off and unplug it. Wait for the appliance to completely cool down.
natural_image
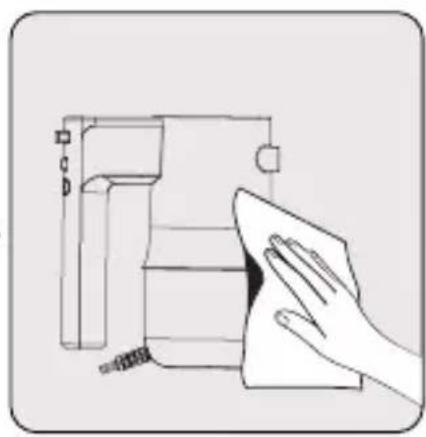
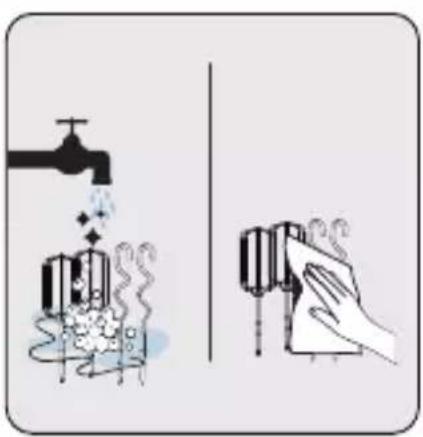
Line drawing of a hand cleaning a mechanical component with a cloth (no text or symbols)- Use a soft, damp cloth to clean the engine unit.
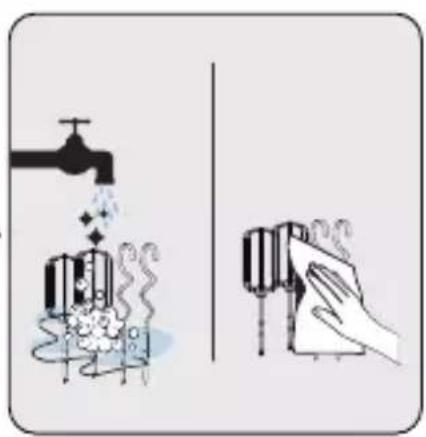
You may clean the beaters (6) and dough hooks using some dish washing soap and hot water or in dishwasher. Afterwards, completely dry each part.

Beaters and dough hooks are dishwasher-safe.
4 Cleaning and maintenance
4.2 Storage
- If you do not intend to use the appliance for a long time, store it carefully.
- Unplug the appliance before putting away.
- Store the appliance in a cool dry place.
- Store the appliance and its cord out of the reach of children.
4.3 Transport and shipping
- During transport and shipping, carry the appliance with its original packaging. The packaging of the appliance will protect the appliance against physical damage.
- Do not put heavy objects on the appliance or its packaging. Otherwise the appliance may be damaged.
- If the appliance is dropped, the appliance may not operate or permanent damage may occur.
natural_image
Illustration of a hand operating a handheld device with a tool and spring (no text or symbols)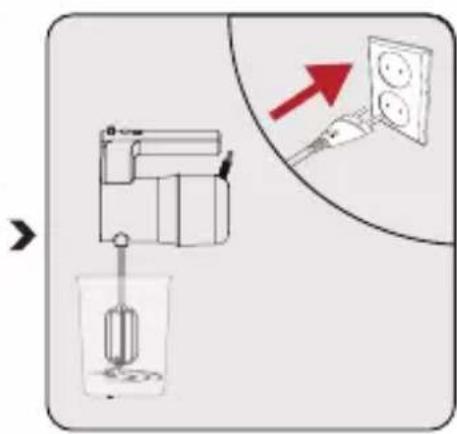
natural_image
Diagram of a hand tool with a magnified inset showing a red arrow pointing to a wall-mounted electrical outlet (no text or symbols present)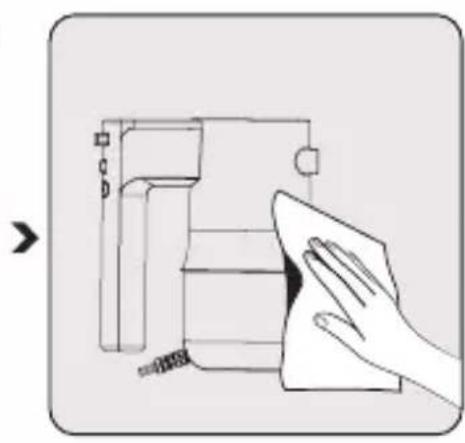
natural_image
Illustration of a hand cleaning a mechanical component with a cloth (no text or symbols)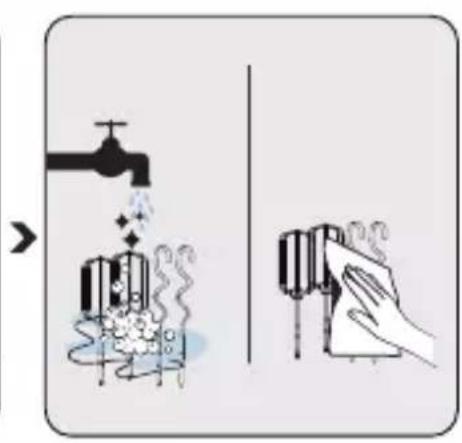
natural_image
Illustration of a hand operating a handheld device with a tool and spring, no text or symbols presentnatural_image
Line drawing of a mechanical device with a pull rod and handle, showing a close-up of its component (no text or symbols)natural_image
Illustration of a hand cleaning a mechanical component with a cloth (no text or symbols)natural_image
Illustration showing a faucet spraying water with bubbles and a hand cleaning a container (no text or symbols)natural_image
Symbol of a trash bin crossed with a diagonal line, no text or numbers presentnatural_image
Illustration of a hand operating a handheld device with a tool and cable (no text or symbols)natural_image
Diagram of a mechanical device with a lever and adjustment knob, no text or symbols presentnatural_image
Illustration of a hand cleaning a mechanical component with a cloth (no text or symbols)natural_image
Symbol of a waste bin crossed out by a diagonal line, with no text or numbers present.natural_image
Illustration of a hand operating a handheld device with a spring and tool, no text or symbols presentMetlice za stepanje (6) ali metlice za gnetenje (7) vsta-vite v vhode (5) za stepalnik ali za metlice za gnetenje, dokler se ne usedejo.

Počakajte, da se naprava popolnoma ustavi. Izključite iz napajanja in odstranite metlice za stepanje/metlice iz testa.


natural_image
Line drawing of a mechanical device with a lever and adjustment knob, shown in an inset (no text or symbols)natural_image
Illustration of a hand cleaning a mechanical component with a cloth (no text or symbols)natural_image
Illustration showing a faucet spraying water with bubbles and a hand cleaning a surface (no text or symbols)natural_image
Symbol of a trash bin crossed with a diagonal line, no text or numbers presentnatural_image
Illustration of a hand operating a handheld device with a tool and cable (no text or symbols)natural_image
Diagram of a hand pump device with a magnified inset showing a close-up of its internal components (no text or symbols present)natural_image
Line drawing of a hand cleaning a mechanical component with a cloth (no text or symbols)natural_image
Illustration showing a faucet spraying water with bubbles and a hand cleaning a surface (no text or symbols)natural_image
Symbol of a fuel pump crossed out by a diagonal line, with no text or labels present.Ovaj simbol označava da se ovaj proizvod ne sme odlagati zajedno s ostalim kućnim otpadom na kraju njegovog radnog veka. Korišćeni uređaj mora se vratiti na službeno mesto za sakupljanje za recikliranje električnih i elektronskih uređaja. Da biste pronašli ove sisteme za sakupljanje, obratite se lokalnim vlastima ili prodavcu gde je proizvod kupljen. Svako domaćinstvo ima važnu ulogu u vraćanju i recikliranju starih uređaja. Odgovarajuće odlaganje iskorišćenog aparata pomaže u sprečavanju potencijalnih negativnih posledica po životnu sredinu i zdravlje ljudi.
1.3 Informacije o pakovanju
Ambalaža proizvoda je napravljena od materijala koji mogu da se recikliraju, u skladu sa nacionalnim propisima o zaštiti životne sredine. Ambalažu ne odlăžite sa kućnim otpadom ili drugim vrstama otpada već je odložite u sabirne centre za ambalažu koje su navele lokalne vlasti.
1.4 Kako se štedi energija
Tokom upotrebe poštujte vremena preporučena u priručniku. Nakon upotrebe, iskopčajte kabl uređaja.
2 Vaš blender
2.1 Prikaz
- Jedinica motora
- Ulazi za dodatke
- Dugme za otpuštanje dodataka
- Dugme za podešavan uključivanja/isključivanja i brzine
- Dugme za funkciju TURBO
- Mutilice (6a/6b)
- Spiralne mutilice za mešenje testa (7a/7b)
2.2 Tehnički podaci
Napon: 220-240 V\~, 50-60 Hz
jSnaga: 500 W
Prava na tehničke i dizajnerske promene su zadržana.
2 Rad
2.1 Predviđena namena
natural_image
Illustration of a hand operating a handheld device with a tool and cable (no text or symbols)Ubacite mutilice (6) ili spirale za mešenje (7) u ulaze (5) za mutilice ili spirale za mešenje dok ih ne umetnete u odgovarajući položaj.
Priključite kabl za napajanje. Stavite mutilice (6) ili spirale za mešenje (7) u testo pre nego što uključite štapni blender.
Brzina se može podesiti između 1 i 4. Povećavajte brzinu počev od nivoa 1.

natural_image
Line drawing of a hand pump device with an inset showing a close-up of its tip (no text or symbols)natural_image
Line drawing of a hand cleaning a mechanical component with a cloth (no text or symbols)- Za čišćenje jedinice motora koristite samo mekanu, vlažnu krpu.
natural_image
Illustration showing a faucet spraying water with bubbles and a hand cleaning a surface (no text or symbols)Mutilice (6) i spirale za mešenje testa možete očistiti deterdžentom za pranje posuđa i vrućom vodom ili ih možete prati u mašini za pranje posuđa. Posle toga svaki deo potpuno osušite.

Mutilice i spirale za mešenje testa mogu se prati u mašini za pranje posuđa.
4.3 Transport i otprema
- Za vreme transporta i otpreme, uređaj nosite u originalnom pakovanju. Ambalaža uređaja ga štiti od fizičkih oštećenja.
- Nemojte stavljati teške predmete na uređaj ili njegovu ambalažu. U suprotnom, uređaj se može oštetiti.
- Ako uređaj padne, uređaj možda neće raditi ili može doći do trajnih oštećenja.
natural_image
Symbol of a trash bin crossed out by a diagonal line, with no text or numbers present.natural_image
Illustration of a hand operating a handheld device with a spring and tool, no text or symbols presentnatural_image
Line drawing of a hand pump device with an inset showing a close-up of its tip (no text or symbols)natural_image
Illustration of a hand cleaning a mechanical component with a cloth (no text or symbols)natural_image
Illustration showing a faucet spraying water onto a tank with steam rising, alongside a hand cleaning a container (no text or symbols)natural_image
Symbol of a waste bin crossed out by a diagonal line, with no text or numbers present.natural_image
Illustration of a hand using a handheld device to interact with a tool, showing motion arrows (no text or symbols)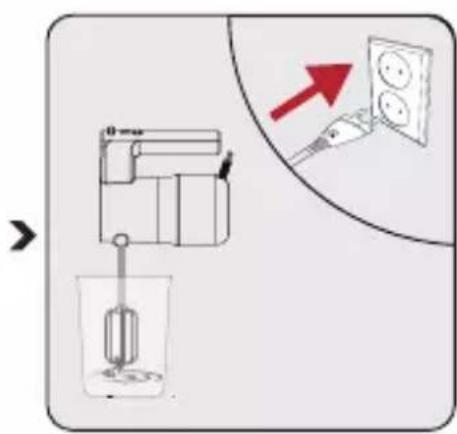
natural_image
Simple line drawing of a mechanical device with a beaker and a lever, no text or symbols present.natural_image
Diagram of a hand pump device with an inset showing a close-up of its internal components (no text or symbols present)natural_image
Line drawing of a hand cleaning a mechanical device with a cloth (no text or symbols)natural_image
Symbol of a waste bin crossed out by a diagonal line, with no text or numbers present.natural_image
Illustration of a hand using a handheld device to interact with a spring and cable (no text or symbols present)natural_image
Line drawing of a hand pump device with an inset showing a close-up of its tip (no text or symbols)natural_image
Illustration of a hand cleaning a mechanical component with a cloth (no text or symbols)natural_image
Illustration showing a faucet cleaning water with bubbles and a hand cleaning a surface (no text or symbols)natural_image
Diagram of a hand pump device with a magnified inset showing a close-up of its internal components (no text or symbols)natural_image
Illustration of a hand cleaning a mechanical component with a cloth (no text or symbols)natural_image
Illustration of a hand operating a handheld device with a spring and probe, showing motion arrows (no text or symbols)natural_image
Symbol of a device crossed out by a diagonal line, representing prohibition or exclusion (no text present)
1-3 معلومات التغليف
natural_image
Stylized black-and-white icon of a flame inside a crown (no text or symbols)HMM 81504 BX
AR