
Solida 4 - Slicer Ritter - Free user manual and instructions
Find the device manual for free Solida 4 Ritter in PDF.
| Product Type | Universal Slicer |
| Brand | Ritter |
| Model | Solida 4 |
| Power Supply | Mains 230 V, 50 Hz (see rating plate) |
| Cutting Thickness | 0 to 23 mm |
| Operating Modes | Short duration (pulse) and continuous mode (5 min max) |
| Blade | Stainless steel, removable |
| Receiving Tray | Yes, removable |
| Carriage | With food pusher, removable |
| Safety | Position 0 adjustment button to cover blade, automatic stop after power-off |
| Cleaning | Manual, not dishwasher safe, removable blade |
| Maintenance | Occasional lubrication with Ritter grease or petroleum jelly |
| Spare Parts Available | Optional smooth blade, maintenance grease |
| Warranty | 2 years manufacturer warranty |
| Usage | Household use only |
| Weight (approx.) | Approximately 4.5 kg |
| Dimensions (approx.) | 35 x 25 x 30 cm |
Frequently Asked Questions - Solida 4 Ritter
User questions about Solida 4 Ritter
0 question about this device. Answer the ones you know or ask your own.
Ask a new question about this device
Download the instructions for your Slicer in PDF format for free! Find your manual Solida 4 - Ritter and take your electronic device back in hand. On this page are published all the documents necessary for the use of your device. Solida 4 by Ritter.
USER MANUAL Solida 4 Ritter
GENERAL SAFETY INSTRUCTIONS
To avoid personal injury or damage to the appliance, please observe the following safety instructions:
- The food slicer is to be used for domestic purposes only and must not be used commercially.
- Never set the appliance down on hot surfaces or close to a naked flame.
- Use the accessories included in the delivery specification only.
- Use suitable extension cables only.
- Do not bend the power cord. Never wrap the cable around the appliance.
- Route the power cord so that it does not come into contact with hot or sharp-edged objects.
- Only start to use the appliance after it has been securely set up.
- Persons with reduced physical, sensory or intellectual capabilities or lacking in relevant experience and/or knowledge
may only use this appliance if they do so under supervision or have been instructed in the safe use of the appliance and understand the potential risks associated with its use.
- Do not allow children to play with the appliance.
- Always disconnect the appliance from the mains whenever it is to be left unsupervised, and also prior to assembly, dismantling and cleaning.
- This appliance must not be used by children. Keep the appliance and its connection cable out of reach of children.
- Only connect the appliance to a suitable AC power source that complies with the specifications on the type label.
- Never leave the appliance unattended while it is operating.
- Do not use it to cut frozen foods, hot foods, bones, food containing large stones, roast meats encased in netting or packaged foods!
- Never allow the appliance to run for more than 5 minutes at a time.
Risk of electric shock
- Always remove the power plug from the socket in the event of a malfunction, before cleaning and when the appliance is not in use. When doing so, pull on the plug and not on the cable.
- Never immerse the appliance in water. Never expose the appliance to rain or any other form of moisture. If the appliance falls into water, unplug the cable from the mains socket before removing the appliance from the water.
Have the appliance inspected at an authorized service location before using it again.
- Always ensure that your hands are completely dry before using the appliance. Do not use the appliance if it is wet or damp or while you are standing on a damp surface. Do not use the appliance outdoors.
- Stop using the appliance immediately if any parts are damaged and contact the ritter after-sales service.
- If the power cord is damaged, it must be replaced by the manufacturer, the manufacturer's after-sales service or a similarly qualified person to eliminate risk of personal injury.
Risk of injury
- This appliance must not be used without a slice carriage or a left-over holder, unless the size and shape of the food to be sliced means that these parts cannot be used.
- Before replacing accessories or add-on parts that move when operated, the appliance must be switched off and disconnected from the mains.
- The rotary blade is extremely sharp.
- Never touch the rotating blade when operating the appliance!
- Switch the appliance off before cleaning it; pull the power plug out of the socket and turn the slice thickness adjustment knob to the "0" position.
- The rotary blade will continue to run for a short time after being switched off.
Unfold the illustrations at the front and back of this manual.
Please read these instructions thoroughly before you start to use the appliance. Keep these operating instructions in a safe place and ensure that they are included with the appliance if passing it on to a third party.
Alternatively, the current operating instructions are available at www.ritterwerk.de.
INTENDED USE
The food slicer is used for the slicing of household foods.

The food slicer is suitable for contact with foodstuffs.
If the appliance is used for a purpose other than this, or if it is operated incorrectly, severe injuries may occur or the appliance may be damaged. All warranty and liability claims will be rendered null and void in this case.
BEFORE USING THE APPLIANCE FOR THE FIRST TIME
Preparation
Remove the appliance carefully from the packaging. Remove all packaging components and keep them in a safe place along with the packaging itself. Clean the appliance before allowing it to come into contact with any food (see CLEANING).
Setting up the appliance
- Set the appliance down on a flat, non-skid surface close to a mains socket.
A solida4 / inteso4
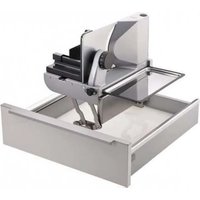
Slide the slice carriage (3) into the guide grooves on the appliance.
A sono5/sinus5
Using a small amount of force, push the slice carriage (3) vertically into the guide groove on the appliance until it audibly locks into place.
B Slide the left-over holder (2) onto the slice carriage's handle.
Unwind the power cord (8) to the length required from the cable compartment (9) under the appliance.
- Plug the cable into the socket.
SLICING
D Use the slice thickness adjustment knob (12) to set the required thickness.
Info:
The slice thickness adjustment scale is not a millimetre scale. For safety reasons, the "0" position is designed to cover the blade.
Place the food to be sliced onto the slice carriage (3). Use the left-over holder (2) to press it up against the stop plate (1).
F Protect your hands by always using the slice carriage and, where applicable, the left-over holder.
Exception: Excessively large foods to be sliced.
- Turn the appliance on using the switch (7). Two operating modes are available:
Intermittent operation (PositionII):
The rotary blade (13) runs as long as the switch is pressed and held down in this position.
Continuous operation (Positionl):
The rotary blade runs without the switch being pressed and held down until you move the switch to the "0" position.
Info:
Never use the appliance for more than a maximum of 5 minutes in continuous operation.
- With the appliance running, gently feed the food to be sliced into the path of the rotary blade.
- When finished slicing, wait until the rotary blade has come to a complete stop.
After each use, turn the slice thickness adjustment knob to the "0" position, in order to cover up the sharp rotating blade and to avoid any injuries.
CLEANING
Caution:
Switch the appliance off before cleaning it; pull the power plug out off the socket and turn the slice thickness adjustment knob (12) to the "0" position.
Clean the food slicer regularly to prevent the accumulation of food residue. The rotary blade must also be cleaned regularly as described below to prevent its surface from rusting.
Info:
Over time, an accumulation of food residue may cause damage to the surface of the rotary blade, causing it to rust.
Preparation
solida4 / inteso4
- Pull the slice tray (11) to the left and out of the appliance.
- Removing the left-over holder (2).
G solida4 / inteso4
Press the release button (4) and pull the slice carriage (3) off the appliance.
G sono5/sinus5
Pull the slice carriage (3) towards you and then lift it up and out of the guide groove
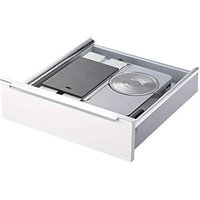
Removing the rotary blade:
Remove the blade cover (6).
Open the blade catch (5), by turning it in a clockwise direction.
- Remove the blade catch.
Take hold of the rotary blade (13) at its rotational centre and remove it.
Cleaning after each use
- Wipe down the housing and all removed parts, including the rotary blade, with a damp cloth.
Occasional cleaning
- Give all removed parts, including the rotary blade, a thorough wash in warm soapy water (not in the dishwasher!).
- Clean the housing behind the blade using a dry cloth/brush. Info:
Do not use any abrasive cleansers, sponges with rough surfaces or hard brushes.
- Dry all parts that you have washed.
- Grease the rotary blade's gear wheel with a little ritter maintenance grease (alternatively with a little Vaseline).
Assembling the appliance
- Carefully insert the rotary blade.
- Insert the blade catch.
- Close the blade catch by turning it in an anticlockwise direction.
- Mount the blade cover.
A solida4 / inteso4
Slide the slice carriage (3) into the guide grooves on the appliance.
A sono5 / sinus5
Using a small amount of force, push the slice carriage (3) vertically into the guide groove on the appliance until it audibly locks into place.
MAINTENANCE
Your food slicer is maintenance-free. However, we recommend that you occasionally apply a little extra ritter maintenance grease or Vaseline to the rails of the slice carriage to keep them lubricated and ensure that the carriage continues to move easily.
STORAGE
Keep the appliance out of the reach of children.
To store the cable, always use the cable compartment integrated into the appliance.
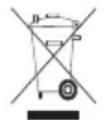
DISPOSAL OF WASTE ELECTRICAL AND ELECTRONICEQUIPMENT
This symbol indicates that this product must not be disposed of with unsorted municipal
waste. There is a separate (free) system for the collection and return of waste electrical and electronic equipment. For more information, please contact your local authority or the shop where you purchased the product. By ensuring that this product is disposed of correctly, you will help prevent potential negative consequences for the environment and human health and contribute to the conservation of natural resources.
REACH DIRECTIVE
A special, non-toothed rotary blade is also available for use with sliced meat, sausage and ham.
The original ritter maintenance grease is available for delivery for maintaining (regreasing) the food slicer.
SERVICE, REPAIRS AND SPARE PARTS
Please contact your local after-sales service for all service, repairs and spare parts issues. See www.ritterwerk.de
TECHNICAL DATA
The appliance complies with the CE specifications.
Mains voltage/power consumption: Refer to the type label on the underside of the appliance.
Slice thickness:
0 mm to approx. 23 mm
WARRANTY
This ritter appliance comes with a two-year manufacturer's warranty, starting with the date of purchase and in accordance with the EU warranty directives. Your legal warranty claims according to 437 ff. BGB (German Civil Code) remain unaffected by this regulation. The manufacturer warranty applies to all devices sold within the European Union. For details of the warranty conditions, see www.ritterwerk.de/warranty. In the event of a warranty claim or for servicing, the appliance must always be sent to the appropriate national customer service centre.
EXPLANATION OF SYMBOLS
Symbol Explanation

CE marking: The product complies with the applicable requirements of the European Union.
The product was put on the market after 13 August 2005. It must not be disposed of as normal domestic waste.
The crossed-out wheelie bin symbol indicates that separate collection is required.

Suitable for contact with foodstuffs

Protection class II equipment
INSTRUCTIONS DE SECURITE GENÉRALES
Onachoct OT TOKOB ydap
-При abarini,прази BCяко почистваши и korato урдьт не се плзва, винаги n3вж- дайтмржовя сeпсел OT Контakta. При тoba n3дьрп- Вайтza 3a сeпсela, a He 3a kaбela.
-
Hnkora He notanayte ypeDa BbB Boda. Hnkora He n3noJ3BaIte ypeDa npn DbXd nII npduRa BnaRa. Ako Bce npk ypeDbT Hnkora PaIHe BbB Boda, PbpBO n3DbpNaIte MpeKOBnA UeNcEi OT KOHTaKTa N TOraBa I3BaJeTe ypeDa OT BODaTa. Cpei ToBa ocTabeTe ypeBt Da 6bJe npOBepen B OToPn3nPaH cepBn3, ppei OTHOBO da pa6OTnte c Hero.
-
He n3noJ3BaITe ypeJa c BnaJHi pbIe. He ro n3noJ3BAIte, aKO e BnaJKeH nn MOKbp nn BnE cTOnTe BbPxy BnaJKeH noi. He n3noJ3BaITe ypeJa Ha OTKpITo.
-
Пи поведи на части OTypeда веднага пекра tepebaotataи ce CBbpxeTe cbccepBn3HaTa cnyx6a Ha ritter.
-Ako MpeKOBnT Ka6eI e IOBpeDeH,ToI Tp8Ba Da ce CMeHN OT pON3BOIDTeJI, HeROBaTa cepBn3Ha cJyX6a
NIIJIuca C NOO6Ha KBaJIINΦnKaUra, 3a Da ce n36eHnat ONaCHOCTN.
Onachoct ot HapaHЯBaHe
-To3n ypei He Tp6Ba Da ce
noJ3Ba 6e3 HappaBnaa
NoBbpxHOCT 3a Hap3BaHnI pOdyKT nIi DbpxKaU 3a
OCTaTbKa,OCBeH B CnyaNTe,
KOrato rOJIemHaTa nIi fOpMaTa Ha Hap3BaHnI pOdyKT
He N03BOJyBaT ynotpe6aTa
IM.
-Пре徳смянаТаHa пинадлжноCTи ИЛДОпьЛHNTeHLNчacterи,КоNTO ce DBNXKat pri npapobota,ypeBbT TpЯ6Ba daceИЗКЛЮЧиИ pa3eДИНNotmpeЖATA.
-ДИСКOBИТ HOЖЕ MHORO OCTьр.
F Na3eTe pBcTe Cn, KaTO BnHaHn N3NoJ3BaTe HAnpaBnaBa- uTa NOBbPxHOCT 3a Hapra3BaHnnpOdyKT n EBEHTyaIHo DbpxKaHa 3a OCTaTbKa.
N3KNHoueHne:MHOROTJAM Hapra3BaH npOdyKT.
- Bкнуete ypeda c npeBкнювateя (7).Mожete daH3bepeTe Mexdy Dba peKIMa Ha pa6ota:
KpaTkoBpeMeHen pexmHa pa6ota (no3nua II):
ДИСКOBИТ HOX (13) ce BbptN, DOKATO NpeBkHIOUbATEJIrT OCTaHe HATNCHaT B Ta3N NO3NcIa.
PpOdbIJIKHTeENpeXIMHa pa6ota (no3nua I):
ДиСКOBИТ HOX pa6OTn, 6e3 npeBKNIOyBaTeJIrT Da e 3aIbpxKaHHaTINCHaT, DOKATO HaTINCHeTe npeBKnIOyBaTeJIr B no3nUry ,0"
UHopmaua:
I3no38aume ypeda MaKcumym 5 MuHmu e npodbNxkumeen pexum Ha paBoma.
- Ppi pa6oTeu ypei npemecTBaIe Hapra3BaHnI npOdyKT CJIeKO nOdaBaHe KbM dNcKOBnHOx.
CneI npKIOUbaHe Ha p3aHTo N3aKaIte, DOKaTO INCKOBnT HOK CNpe HAnbNo.
CneI BcKa ynoTpe6a 3aBbP TaIte 6yToHa 3a perynipane Ha De6eHnHaTa Ha p3aHe B nO3nUra "0" 3a Da nokpneTe oCTPnA DnCKOB HOK N Da N36BerHeTe HapaHbAHn.
ПОЧИстBAHE
BHHMaHHe:
Ppei nouctBaHTo n3KIO- ueya, u3dbpnaTe MpekoBnI zencel OT KOHTaTa n 3aBbptTe 6yToHa 3a peryI npaHe Ha De6eINHaTa Ha pra3aHe (12) B no3nCn,0"
3a da He MoRaT da ce Ha6nBaT pa3BaJau nCe ocTaTbU, NouCTBaIte peoBHO yHBepcAHHype3a p3aHe. NsCKOBnT HOK cbIo Tp6Ba Da ce noCtBa peoBHO, KaTo e OnicaHo NOdony, 3a da ce 3ana3n HepbXdaemata My NobbpxHOCT.
HOpopMaua:
Cneu3eemno epeme ocmambucme om xpaumenu npodykmu mazd pa3aadam mamepuana ha duckobua hox u da doedam do noreama na pbxka.
IodrotOBka
solida4 / inteso4
-Издьрай Te Tabata 3a
cьбиране на НаряЗвину по-
dунт (11) налво ot урEDA.
- CbaIeTe IbPkaa 3a octTaTbKa (2).
G solida4 / inteso4
HaTnCHeTe 6yToHa 3a OCBO-6oxJaBaHe (4) nN3DbpnaIte HnPaBJIbAaTa NOBbPxHOCT 3a Hapra3BaHnI npOdyKT (3) OTypea.
G sono5/ sinus5
N3dbpnaTe HaprablaBaata NaobpxHOCT 3a Hapra3BaHnnpdyKT (3) KbM ce6e cn n cIeToba naOBdHHeTe HaRope OT HaprablaBaun JKe6
Pa3rno6eTe DnCKOBnHOX:
CbaIe Kanaka 3a Hoxa (6).
OTbopete 6noknpobkaTa 3a Hoxa (5), KATO 3aBbptnte no YacOBHKOBata CTpeIka.
-ИЗва对接е 6лOKировkaТа 3a HOЖа.
XbaHete DnCKOBnHOx (13) BueHTbpa Ha BbpTeHe n ro CBaIeTe.
CneBceKn npoec Ha pyaHe
-ИзбьршeteКорпуcaи BCNUCKCBaJIeHnЧАТN,ВКЛЮчNTeJIHOДИСКOBИНOK,СВЛАЖHA Kbрna.
OT Bpeme Ha Bpeme
-ПоунICTeTe OCHOBHO BCNUKIN CBaJIeHn YactN, BKJIIOUHTeJIHO DNCKOBn HOK, C TOnJa nPOMNBHa BOda (He B MInJHa MaUNHa).
-Почисте Корпуca 3ад НожаCBCСУХКьрпа/ЧЕТKA.
HOpmaua: He u3non3eaume abpa3ueHu npenapamu, 66u c apy6u no8bpXHocmu unu m6bpdu yemku.
- POncCyWeTe BCnUKN3nPaKHaTHuactN.
CmaKeTe 3b6HOTOKoJIHO Ha DNCKOBn HOX C MaJIKO CMA3Ka 3a NODpBxKHa H ritter (NJN NO n36Op C MaJIKO Ba3eINH).
Crno6BaHeHaypeda
BHIMATEJIHOIOCTaBeTeDnCKOBNHOXK.
- Пocтавete 6лokирвkaTa 3a HOxa.
- 3aTBOpTe 6nOKnPOBkata 3a HOka, KaTo Ra 3aBbPTnte O6paTHo Ha YacOBHnKOBaTa CTeJIka.
- NocTabete kanaka 3a Hoka.
A solida/ inteso
N36yTaIte HnpaBnaBaUaTa NOBbpxHOCT 3a HapraBaHnI npOdyKT (3) B HnpaBnaBaUu Jxne6 Bbpy ypeHa.
A sono ^5 / sinus
HaTnucheHa npabJbBaUaTa NOBbpxHOCT 3a Hapra3BaHnna npOyKT (3) c MaIko Cnla BeptnKaJIHo B HAppaBnBaUma JKe6 Ha ypeDa,doKaTo Cyete,Ye ce QnkCupa.
PbXKA
YHnBepcaHnIype3a p3aHe HЯMa HxJa OT NOdPbXka. Bce NaK Bi npenOpbVbame NohKaora Da CMa3BaTe DOnbNHTeJHo BODeHTo Ha HnPaBJIbBaUaTa NOBbPxHOCT 3a Hap83BaHn IPOdyKT C MaIKO CMa3Ka 3a NODpBxKa Ha ritter nII Ba3eJInH, 3a Da 3ana3ITE PnaBHn XoD.
CbXPAHEHNE
CbXpaHbAaTe ypeHa HeIOcTb- nEH 3a Deua.
3a npn6npaHe Ha Ka6eHa BnHaHn 3nON3BaIte BrpaTeHO T ypeDa OTdEJIeHne 3a CbXpaHHeHn Ha Ka6eHa.
N3XBbPJIaHE HA YIOTPEBBAHN EJEKTPUcECKN EJEKTPoHn UPeDN
CmBOnbT yka3Ba, Ye To3n npOyKT He Tpr6Ba Da 6bJe n3XBbpJH C HecOpTnpaHn 6ntoBN
OTnabu. CbuecTByBa OTdeHa (6e3nnaTHa) cncTeMa 3a cbbpae H Bpuahe Ha yNtpe6raHn eEeKtpueckn EeKTPoHNypei. 3a nobce HΦopmaunCe o6bPheTe KbM Baata OoHnHcKa aDMnHnCTpa- nKnBm TbproBCKn OBeKT, OT KOHTCte 3akynnn npOdykTa. Baata rpnka 3a npabnHoto N3XBpnaHe Ha npOdykTa DOnpHacr KaTO 3a HaMaJIraBaHe Ha Bb3MOxHn HeaTINBHN PocJeDCTBnBn Bbpxy npipodaTa N OBEwKOTo 3dpaBe, TaKa n 3a 3ana3BaHe Ha npipOdnHte pecypcn.
PERJAMEHT REACH
- HnKoIa He nO3BOJnTe yCTpoiCTBy pa6oTaTb 6ecnPepbIBHO 60JIe 5 MInHyT.
Onachoctb nopaxeHn3JIeKtpnuecknM TOKOM
-
BbHMaITe BnKy n3 po3eTKn npn HeNoJaKax B pa6Ote, neped KaJdoi OunchKoN i KOrda yCTpoiCTBO He NcnoJIb- 3yeTcra. Depxntecb npn 3Tom 3a BnKy, a He 3a shHyp.
-
HNKoIda He nOrgykaIte yCTPOIcTBO B BODy. HNKoIda He nOdBepraIte yCTPOIcTBO BO3DeIcTBnIO DOJdA INI INpyroB BlaXHO CpeDbI. EcIIyCTPOIcTBO BCE Je IONaIIO B BODy, BbIHbTe BNJIky IN3 PO3ETKN I TOJIbKO NOTOM BbITaUNTe yCTPOIcTBO IN3 BOdbI. PocNe 3TOrO pOBepbTe yCTPOIcTBO B CepBnCHOM ZeHTpe npexKe, Yem ChOBA NcNoJIb3OBaTb eRo.
-He nCnoJb3yIte yCTpoiCTBO, ecn y Bac BnaXHbIe pyKn. He nCnoJb3yIte yCTpoiCTBO np6oBWO BnaXHOCTN INne cCn BBI CTOnTe Ha BnaXHOM noLy.He nCnoJb3yIte yCTpoiCTBO Ha OTKpbITOM BO3dyxe.
-При повржденьи DeTaJIen yCTpoINCTBa cIeDyET HeMeДЛeHNO ppeKpaTb eRO IcNoJIb3OBaHne n O6paTNTbcra
B cepBnchbI ΚeHTp KOMnaHn ritter.
- Ecnn CeTeBOH shHyp NOBpeKDeH, OH DoJIKeH 6bITb 3aMeHEn Ipon3BOOnTeJIeM, erO cepBnCHbIM CnyX6aMn NJIu DpyrIM KBaINΦnCnPOBaHHbIM nepcoHaJOM, YTO6bl N36exKaTb ONaCHOCTN.
Onachoctb TpaBmbi
-3TO yCTPOIcTBO He MOKeT
HcNoJIb3OBaTbc8e3 HaIpaB
JIaHOuNX dIy pa3pe3aeMbIX
PpOdyKToB nII DepxaTeJIa
dIy OCTaTKOB, eCIn TOJbKO
BeIiHuHa I φOpMa pa3pe3aeMoro PpOdyKTa HE N03BOJIAOT
3TO CdEJaTb.
-ПередсменипринаджноcteиллзачacTeи,КOTOPbIe DBNIGAIOTCЯ ри pa6Ote,ycTpoiCTBOdoJXHO6bITb BbIKIQUHeHOnOTCOeDINHEHOOTcETn.
-ДИСКOBын HOЖ OЧЕНь OCTpbiN.
- Hn B Koem cnyae BO BpeMa pa60tby yctpoiCTBa He kacaI-TEcB DnCKOBORO HOka!
B OToaBnHbTe DepeKaTeIb IJIPOCTaTkoB (2)Ha 3axm HappaBIIHOUIX IJI pa3pe3aEmbIXnpOdyKTOB.
C Pa3MotaIte ceTeBOi Ka6eIb (8)Ha Tpe6yEmyIO dINHy n3 Ka6eJIeHaKoNITeJIa (9) NOJ yCTPOIcTBOM.
BcTaBbTe BnIky Bpo3eTky.
HAPE3KA
D UctaHOBITE XeJaemyTOIuHy OTe3aEmbIX YacteN C NOMOsbIO KOnecuKa DnpepynIpoBaHnToIuHHbI Hape3Kn (12).
Yka3aHue:
IpaduyupoeaHaHna uka mOnuHbI He reJeemc MuIImeMpoou ukaou. IonoKeHue 0> u3 coobpaxHe 6e3oNaChcmu onpeDeHeNo Ka nepeKpbImue Hoxa.
E IonoKnte pa3pe3aembIe npOdykTbHa HnPaBnaIOuNe (3). C nOMoCbIO DePKaTeIa OCTaTKOB (2) cIeKa HaxMNTe NO HApBaBHeHIO K yNOpHOI pAACTnHe (1).
F 3aunuaTe Baun pyKn B TO Bpem, KOrda Bbl nCnoB3yeTe HnpaBnaIOuane n depkaTeNb DnOCTaTKOB.
NcknoueHne: ouehb 6oBbWne pa3pe3aemblpe npOdykTbl.
- BkHouTe yCTpoiCTBO C nOMOsbIO BbIKNoUaTeIa (7).Ha BBb6Op cyueCTByeT Dba peXnMa pa60TbI:
KpaTkoBpeMeHHbI peKIM (noJoxeHne II):
ДИСКOBБИ HOX (13) DBBURAETC ДОТEX NOP, NOKA BbIKIQUaTeJIb OCTaETcRA HAXaTbIM B 3TOM ПОЛЖЕHIN.
PpOdoJXnTeJIbHbIpeKIM pa6oTbI (noLoKeHne I):
ДИСКOBБИ HOЖ ДВИRAEТСАdoTex nop, noka Bы He nepebeDeTe BbIKIQUaTeNb B noLoXKeHne «0». Yka3aHue:
Icnoj3yime ycmpoucmbo e npodoxumenbHom pexume paobmbaKcUMyM 5 MuHym.
- PpoBoOnTe pa3pe3aembIe npOdyKtbl npu paOToAoucEm ycTpoNCTBe C He6oJIbShm ycJIHnEMPOTNB DnCKOBOrO HOka.
- Pocne 3aBepWeHnpa3pe3a-HnnoDoxKdnte, noka dNCKOBbI HOX NOnHOCTbIO He OCTaHOBNTcR.
- Pocne KaKDoRo NcNoJIb3OBaHnI NOBepHInTe KOJecNKOdIpeRyIpOBaHnI TOIuINHbI Hape3Kn B NoJoxKeHne «0》,UTo6bl 3aKpbItb DnCKOBbI HOX IN36exKaTb TpaBM.
OuNCTKA
OctopoXHo:
IpepeOuNTKOBbIKNHOHTe YCTPOIcTB0,BbIHbTe BnIKy N3 PO3ETKNIOBepHITe KOJIeCNKO DnpeRyInpoBaHnToJUINHbI Hape3Kn(12)BnoLoKeHne 0
YTO6bI ppeoTbpaTnTB 3aCtpeBaHHe pa3JaRaIOUxXc8 ocTaKOB,peyJrphO BbINOJIHNe OChCTKy YHNBepcaBHo rpeKyuero yCTpoiCTBa.TakKe cJeDyET peyJrphO ChCTNb DnCKOBbI HOK, YTO6bI NCKHOuHTb BO3MOXHOCTb Kopp03nn.
Yka3aHue:
Ocmamku nuueebix npodykmoe Mozym uepe3 Hekomopoe epem 8o3deucmeobamb Ha Mamepuan ducko02o Hoxa u npubeecmu Iorelenu Kopp03uu.
IoproTOBka
solida4 / inteso4
- Bыдьньт e BЛeBO nOДоH ДЯ pa3pe3aEMbIX npOуКТВ (11) n3 yCTpoIcTBA.
- CHIMITE ČeρkaTeJIb ДЯ NOCTaTKOB (2).
G solida4 / inteso4
HaxmTe KhoNky De6nokpOba-Hnra (4) n CHmTe HnpaBJIIO-UIne (3)c yCTpoIcTba.
G sono5 / sinus5
NotaHnTe HnpaBnIoune (3) K ce6e nnoDnHMnTe nx BBepx n3 60Kobbix XeNo6kOB.
CHIMITE DCCKOBBI HOX:
CHIMITE KOKyx HOxa (6).
OTKpoTe npedoxpaHntB Ia Hoxa (5) B TO BpeM, KaK Bbl NobopauBaTe erO no YacOBoN cTpeKe.
-ИЗВЕКИТе пpeДОхрантЕль ДЯ HOKA.
Bo3bMITE DnCKOBbl HOK (13) NO CEHTpy BpaueHn I CHIMTeero.
Pocne kaxdo rope3aHn
- PpOtpnte BnaxHoJ caIpeTkoKopnyc, a TAKKe BCE CHrTbIe DeTaN, BKIOUaY dNCKOBiH OX.
PepnoDnuecka ouncTk
TuaTeBHO npOMoIte TenNoi BOOn (He B NocyDoomoeHoi MaUNHe) BCE CHrTbIe DeTaII, BKIOUaA DnCKOBbl HOK.
OuHCTNE KOpNc 3a HOXOM C NOMOUBC yxOJ caIΦeTKU INKCTN.
YKa3aHue:
Heucnonb3yume Hukakux yucmuaux cpedcme,ay6ku c wepoxoabmbu noeepxHo-cmmu unu keemkue ueMKU.
- PocyuNTe BCE BbIMbITble DeTANI.
- CmaKbTe 3y6aToe KOleco Ha DnCKOBOM HOKe He6oJbWM KOJNueCTBOM CMa3Kn ritter (nnn No Bb6opy He6oJbWM KOJNueCTBOM Ba3eJIHa).
CobepuTe yctpoNCTBO
- OctopoxHo yCTaHOBnTe DCKOBbI HOK.
- YctaHOBnTe npedeoxpaHNTeIb INa HOx.
3akpoTe npedoxpaHntelb Hoka, nobopaunba ero npotNB yacobOCTpeJIKN. - YctaHOBnTE KOKxH HOxa.
A solida4 / inteso4
BdBnHbTe HnpaBnIooIe Ipn pa3pe3aembIX npOdyKToB (3) BKeNo6Kn NODCTabKn Ha yctpoNCTBe.
A sono5/sinus5
C He6oJIbIbIM yCNIIeM BCTaBBTe HAnpaBnIooJIe IJna pa3pe3a-EmbIX npOyKTOB (3) B 60KO-BIe JxNIO6Kn YcTPOINCTBa Do QNKcaUH.
OBCJNYKUBAHNE
O6cnyxnbHne yHNBepcaIbHoro pexkyuero yctpOCTBa He Tpe6yeTc. Ondako peKOMeHNyETcB Bpemr OT BpEmEH CMA3bIBaTb HnpaBnIOUne caJa3OK He6oJIb-IMM KOINueCTBOM Cma3kn ritter INN Ba3eJIHa, YTO6bl COxpaHtB JERKOCTB IX XOJa.
XPAHEHNE
XpaHnTe yCTpoNcTBO B MecTaX, HeoCTyINbIX dIa DeTei.
Bcerda nCnoJb3yIte dIy xpaHEnHa UHHpa nITaHnB BCTpoEHhbl B yCTPOIcTBo Ka6eHaKoNITeNb.
YTNJIN3AUIGNA CTAPbIX 3JEKTPNUECKNX I 3JEKTPOHHbIX YCTPOICTB
3TOT CMBON yKa3bIaEHaTO, YTO DaHHoeN3dJIeNE 3anpeuaetcYTNJIN3nPOBaTb BmecTe C
HEOTCOPTINPOBAHHbIMN TBepdbIMN 6bITOBbIMN OTXODAMN.CyUeCTBYET OTDeIbHnA (6ecnlaTHa) CnCTema IJNA c6opa n BO3Bpata CTapbIX 3JIeKTPnuecknx N3JIeKTPoHHbIX yCTpoiCTB.ДЯ NOJIyuHnRA DOnONHInTeJbHO INΦOpMauNN O6paTNTEcB MHyNUnPaNbHyIO aDMNHnCTpa-UNIO NIN MaRa3IN, B KOTOpOM 6bIINO npNo6peTeHO 3TO n3DeJIne. IpeDaBaA 3TO n3DeJIne Ha NaJIeXKaUyO yTNIIIN3aUIO, Bbl NOMORAeTe N36ExKaTb BO3MOxHbIX HerATNBbIX NocJeDCTBNI DnRA OKpykaIooJIe CpeDi I 3DopOBbI JIoDEi, a TaKKe COxpaHReTe InpoNDhIE pecypcbI.
PPEINICAHNE REACH
Hanpajxhence cetn/NoTppe6nemar MOUHOCTb:cm. MapKnpoBky Ha HnXHei CTopoHe yCTpoiCTBa
ToIuHa pa3pe3a: 0-23 MM
TAPAHTN
B cIyuaX,OTHOcIuxcK BbIOJIHeHnIO rapaHTnN Heo6xoDIMOCTN IPOBeDEHnpeMOHTa, IPOCIM BBICNaTb yCTpOINCTBO NOTOB BRnABHbIO OΦNC cepBnC-HORO 06CnykBaHNIO COOTBetCTByUoEe 3eMnN nIN CTpaHbI!
IORCHEHNA K CUNBOJAM
CMBONHOJCHENHe

MapknpoBka CE: daHHoe n3deJnne COOTBeTCTByeT DeNCTBYIOUIM Tpe6OBaHnM Ebponeckoro coIO3a.
Данhoeиздени ВьibeDEHOHa pblHOK nocJIe 13abrycta2005r.Ero3anpeuaetcyaTININ3npoBaTB BmecTe cobuHbIM bITOBbIM Mycopom.
CIMBOJ C3aepKHyTBIM MycOpHbIM KOHTeHepOM yKa3bIbAet Ha Heo6XoDImocTb pa3deJIbHorO c6opa.

IopxoindT JnKoHTaKaTa C nNueBbIMn npOdyKTAMN

YcTpoNCTBOKnacca3aunntbI II
VŠEOBECNÉ BEZPEČNOSTNÉ UPOZORNENIA
SERVICE, REPARATIONER OCH RESERVDELAR


- GENERAL SAFETY INSTRUCTIONS
- Risk of electric shock
- Risk of injury
- INTENDED USE
- BEFORE USING THE APPLIANCE FOR THE FIRST TIME
- Preparation
- Setting up the appliance
- A solida4 / inteso4
- A sono5/sinus5
- SLICING
- Intermittent operation (PositionII):
- Continuous operation (Positionl):
- CLEANING
- Caution:
- solida4 / inteso4
- G solida4 / inteso4
- G sono5/sinus5
- Remove the blade cover (6).
- Cleaning after each use
- Occasional cleaning
- Assembling the appliance
- A sono5 / sinus5
- MAINTENANCE
- STORAGE
- DISPOSAL OF WASTE ELECTRICAL AND ELECTRONICEQUIPMENT
- REACH DIRECTIVE
- SERVICE, REPAIRS AND SPARE PARTS
- TECHNICAL DATA
- WARRANTY
- EXPLANATION OF SYMBOLS
- Symbol Explanation
- INSTRUCTIONS DE SECURITE GENÉRALES
- Onachoct OT TOKOB ydap
- Onachoct ot HapaHЯBaHe
- KpaTkoBpeMeHen pexmHa pa6ota (no3nua II):
- PpOdbIJIKHTeENpeXIMHa pa6ota (no3nua I):
- ПОЧИстBAHE
- BHHMaHHe:
- IodrotOBka
- G sono5/ sinus5
- CneBceKn npoec Ha pyaHe
- OT Bpeme Ha Bpeme
- Crno6BaHeHaypeda
- A solida/ inteso
- A sono 5 / sinus
- PbXKA
- CbXPAHEHNE
- N3XBbPJIaHE HA YIOTPEBBAHN EJEKTPUcECKN EJEKTPoHn UPeDN
- PERJAMEHT REACH
- Onachoctb nopaxeHn3JIeKtpnuecknM TOKOM
- Onachoctb TpaBmbi
- HAPE3KA
- KpaTkoBpeMeHHbI peKIM (noJoxeHne II):
- PpOdoJXnTeJIbHbIpeKIM pa6oTbI (noLoKeHne I):
- OuNCTKA
- OctopoXHo:
- IoproTOBka
- G sono5 / sinus5
- Pocne kaxdo rope3aHn
- PepnoDnuecka ouncTk
- YKa3aHue:
- CobepuTe yctpoNCTBO
- OBCJNYKUBAHNE
- XPAHEHNE
- YTNJIN3AUIGNA CTAPbIX 3JEKTPNUECKNX I 3JEKTPOHHbIX YCTPOICTB
- PPEINICAHNE REACH
- TAPAHTN
- IORCHEHNA K CUNBOJAM
- CMBONHOJCHENHe
- VŠEOBECNÉ BEZPEČNOSTNÉ UPOZORNENIA
- SERVICE, REPARATIONER OCH RESERVDELAR
Brand : Ritter
Model : Solida 4
Category : Slicer