
VR 301 - Vacuum Cleaner Vileda - Free user manual and instructions
Find the device manual for free VR 301 Vileda in PDF.
| Product type | Robot vacuum |
| Brand | Vileda |
| Model | VR 301 |
| Dimensions | 32 × 9 cm (diameter × height) |
| Weight | Approximately 2.5 kg |
| Power supply | NiMH battery 14.4 V, 1700 mAh |
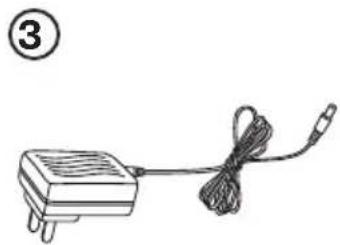
| Charger | Input 100-240 V AC, output 24 V DC |
| Charging time | 4 to 5 hours (first charge: 12 hours) |
| Battery life | 60 minutes |
| Reservoir capacity | 0.35 liter |
| Average power | 24 W |
| Cleaning modes | Short (5 min), Medium (30 min), Long (60 min with return to base) |
| Programming | Via remote control (timer) with AAA batteries |
| Floor types | Hard floors (wood, parquet, tile, linoleum) and velvet carpets |
| Main functions | Manual cleaning, scheduled cleaning, automatic return to docking station |
| Maintenance and cleaning | Emptying the reservoir, cleaning the filter (washable), cleaning the brushes |
| Available spare parts | Filters, side brushes, main brushes, battery |
| Safety | Drop sensors, collision sensors, automatic shutdown in case of blockage |
| Warranty | 2 years (excluding normal wear and consumables) |
Frequently Asked Questions - VR 301 Vileda
User questions about VR 301 Vileda
0 question about this device. Answer the ones you know or ask your own.
Ask a new question about this device
Download the instructions for your Vacuum Cleaner in PDF format for free! Find your manual VR 301 - Vileda and take your electronic device back in hand. On this page are published all the documents necessary for the use of your device. VR 301 by Vileda.
USER MANUAL VR 301 Vileda
| GeneralWarnings | 3 | |
| Part Location | 6 | |
| Product Anatomy | 7 | |
| Battery Charging & Recharging | 8 | |
| Using the Product | 9 | |
| Cleaning Modes | 10 | |
| Cleaning System | 10 | |
| Removing and Emptying the Dustbin | 10 | |
| Cleaning and Replacing the Filter | 11 | |
| Cleaning Main Brushes | 11 | |
| Replacing Side Brush | 11 | |
| Troubleshooting | 12 | |
| Environmental and Product Recycling | 13 | |
| Battery Removal | 13 | |
| Technical Specification | 13 | |
| Vileda Product Guarantee | 14 |
IMPORTANT:
Read all instructions before use. Retain instructions for future reference.
WARNING:
Use the unit only as described in this manual. Failure to follow all instructions listed below may result in electric shock, fire and/or serious injury.
When using any electrical appliance, basic safety precautions should always be observed, including the following, in order to reduce the risk of fire, electrical shock, leaking batteries or personal injury.
USE RESTRICTIONS:
- Only for indoor use. Do not use outdoors or on balconies.
- Intended for domestic use only.
- Device is not a toy. Do not sit or stand on it. Small Children and pets should be supervised when the robot is cleaning.
- Do not pick up anything that is flammable, burning or smoking.
- Do not use this device to pick up anything wet.
- Do not use on long-pile carpet or on wet floors.
- Before using, pick up objects like clothing, loose papers, pull cords for blinds or curtains, power cords, and any fragile objects as they may entangle with the cleaning brushes. If the device passes over a power cord and drags it, there is a chance an object could tumble off a table or shelf.
- WARNING: Black or dark coloured types of floors and stairs could reduce the reliability of cliff sensors. Test with your specific floor and stairs before use.
PERSONAL SAFETY:
- The intended use is described in this manual. The use of any accessory or attachment or the performance of any operation with this appliance other than those recommended in this instruction manual may present a risk of personal injury.
-
Children must be supervised to ensure they do not play with the appliance.
-
This appliance can be used by children aged from 8 years and above and persons with reduced physical, sensory or mental capabilities or lack of experience and knowledge if they have been given supervision or instruction concerning use of the appliance in a safe way and understand the hazards involved.
Children shall not play with the appliance. - Cleaning and user maintenance shall not be made by children without supervision.
- Store in a dry place.
- Store out of reach of children.
- Use only with the attachments recommended by the manufacturer.
- Do not use without the filter in place.
- Keep the product and all accessories away from hot surfaces.
- Do not immerse the appliance in water or other liquid.
ELECTRICAL SAFETY INSTRUCTIONS:
- Never modify the charger in any way.
- The charger has been designed for a specific voltage. Always check that the mains voltage is the same as that stated on the rating plate.
- Only use the charger supplied with the product. Do not attempt to use the charger with any other product nor attempt to charge this product with another charger
- Before use, check the charger cord for signs of damage or ageing.
- Do not abuse the charger cord; never carry the charger or charging station by the cord.
- Never pull the charger cord to disconnect from a socket; grasp the charger and pull to disconnect.
- Keep the charger cord away from hot surfaces and sharp edges.
- Do not handle the charger or the unit with wet hands.
- Do not store or charge the unit outdoors.
- Unplug the charger before cleaning.
Product contains electronic parts. DO NOT submerge it or spray it with water. Clean with a dry cloth only.
BATTERY USE AND CARE:
- Leaks from battery cells can occur under extreme conditions. If the liquid gets on the skin, wash it immediately with soap and water. If the liquid gets into the eyes, flush them immediately with clean water for a minimum of 10 minutes and seek medical attention.
- This product contains NiMH batteries. Do not incinerate batteries or expose to high temperatures, as they may explode.
- When the battery pack is not in use, keep away from other metal objects such as: paper clips, coins, keys, nails, screws or other small metal objects that can make a connection from one terminal to another.
- Shorting the battery terminals may cause fire.
- The battery must be removed from the appliance before it is discarded.
- The battery is to be disposed of safely.
- The appliance must be disconnected from the mains supply when removing the battery.
- In an emergency situation contact professional help immediately!
- WARNING: If the battery is damaged in any way, do not attempt to recharge it. Contact Vileda customer service address (see last page).
- Charge the battery manually for 12 hours before first use. After the first use, charging time is about 4-5 hours
- WARNING: Turn the robot's power switch to OFF when transporting or when in storage, otherwise the battery may become damaged.
- Only use the charger provided with the product. Do not attempt to use the charger with any other product nor attempt to charge this product with another charger as this may damage the product and the battery, and will invalidate your guarantee.
- WARNING: Only use a replacement battery as supplied by the manufacturer.
SERVICE:
- Before using the machine and after any impact, check for signs of wear or damage.
- Do not use the appliance if any part is damaged or defective.
- Repairs should be carried out by a service agent or a suitably qualified person in accordance with relevant safety regulations. Repairs by unqualified persons could be dangerous.
- Never modify the appliance in any way as this may increase the risk of personal injury.
- Only use replacement parts or accessories provided or recommended by the manufacturer.
Part Location


- 1x Main Unit
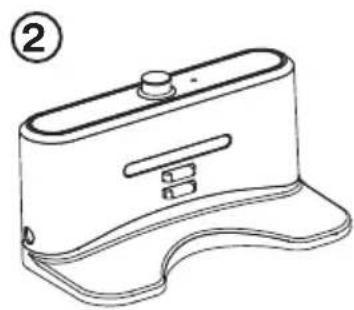
- 1xCharging Station
- 1x Power Supply (* Picture may differ from provided box content)
- 1x Timer
- 2x Batteries AAA (for Timer)
- 1x Filter (extra)
- 1x Side Brush (extra)
- 1x Maintenance Brush
Product Anatomy

- Front Bumper
- Charging Contacts
- Collision Sensors
- Handle
- Clean Mode Buttons
- Cliff Sensors
- Side Brush
- Power Switch
- Battery Charger Socket
- Removable Dustbin
11.Filter - Vacuum Inlet
- Main Brushes


- Power Indicator
- Charging Station Socket
- Charging Contacts
- Docking Sensor
-
Sync Button
-
Link Indicator
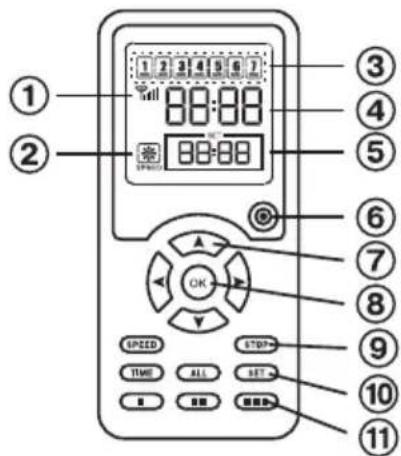
- Speed Indicator
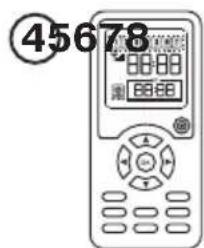
- Week Display (1=Monday, 7=Sunday)
- Clock Time Display
- Scheduling Time Display
- Power Button
- Arrow Keys
- OK Button
- Control Buttons
- Scheduling Buttons
- Clean Mode Buttons
Battery Charging & Recharging
WARNING:
If the battery is damaged in any way, do not attempt to recharge it. Contact Vileda customer service address (see last page).
Charge the battery manually for 12 hours before first use. After the first use, charging time is about 4-5 hours
Turn the robot's power switch to OFF when transporting or when in storage, otherwise the battery may become damaged.
MANUAL CHARGING:
- Connect the DC plug of the battery charger to the battery charger socket located beside the power switch.
- Connect the AC plug of the battery charger to the mains. The buttons on top of the robot will flash while charging and stop flashing when battery is fully charged.
- Once the battery is fully charged unplug the battery charger from mains and battery charger socket.
SYNCHRONISATION OF CHARGING STATION:
- Before first use the Charging Station has to be synchronized with the robot.
- Ensure that the robot is switched off and that the Charging Station is connected to the mains.
- Press and hold the sync button of the Charging Station with an auxiliary tool (e.g. pencil) while switching the Robot on by pressing the power switch.
- If the robot beeps two times the synchronisation was successful, otherwise please repeat the steps mentioned above.
AUTONOMOUS CHARGING:
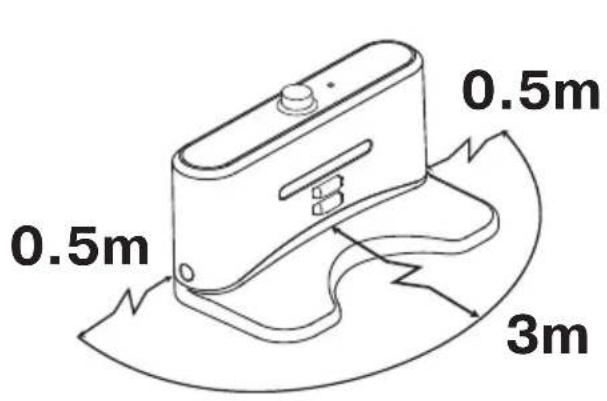
- Install the Charging Station on a hard and flat ground and against a vertical wall.
- Ensure that there are no obstacles within an area of 3m in front of the Charging Station and within 0.5m on its right and left side.
- Connect the DC plug of the battery charger to the battery charger socket of the Charging Station.
- Connect the AC plug of the battery charger to the mains. The power indicator of the Charging Station will light up in a red colour.
- Ensure that the power cord is running alongside the wall, otherwise the robot could get entangled.
- Ensure that the sensor windows of robot and Charging Station are not covered, otherwise the robot cannot search for the Charging Station.
- Place the robot a suitable distance from the Charging Station and switch the robot on, by pressing the power switch.
- Press the "OK" button and "up" button on the Timer in succession to make the robot search for the Charging Station.

Battery life is up to 60 minutes and decreases over time. The central button on top of the robot will flash when battery level is low. Then recharging is needed. The Robot will search for and drive back to the Charging Station autonomously in case of low battery during manual cleaning for 60 minutes and/or any scheduled cleaning. Whilst searching for the Charging Station the central button on top of the robot will flash.
To maintain peak performance of the battery it is recommended to charge 12 hours before first use or when used again after a long time.
Using the Product
Before using, pick up objects like clothing, loose papers, pull cords for blinds or curtains, power cords and any fragile objects as they may entangle with the cleaning brushes. If the device passes over a power cord and drags it, there is a chance an object could tumble off a table or shelf.
MANUAL CLEANING:
- Ensure the battery is charged.
- Place the Robot in the middle of the room.
- To turn the Robot ON press the power switch.
- To START the Robot, press one of the Clean Mode Buttons to choose desired cleaning mode (see section "Cleaning Modes").
- To PAUSE the Robot, press one of the Clean Mode Buttons.
- To RESUME the Robot, press one of the Clean Mode Buttons again.
- To turn the Robot OFF, press the power switch.
SYNCHRONISATION OF TIMER:
- Before first use the Timer has to be synchronized with the robot.
- Ensure that the robot is turned off and that the Timer is equipped with batteries.
- Press and hold the "OK" button of the Timer whilst switching the Robot on by pressing the power switch.
- If the robot is beeping two times the synchronisation was successful, otherwise please repeat the steps mentioned above.
TIME SETTING OF TIMER AND ROBOT:
- Before using scheduled cleaning the system time of the robot has to be set.
- Ensure that the robot is turned on and that the Timer is equipped with batteries.
- Press the "time" button on the Timer. The clock time on the display of the Timer starts blinking.
- Press "right" and "left" button to switch between hour, minute and weekday setting. Use "up" and "down" button to adjust weekday and system time.
- To finish and save the setting press the "time" button again. To cancel the process press the power button of the Timer.
SCHEDULED CLEANING:
- Ensure that the robot is turned on and that the Timer is equipped with batteries.
- Press the "set" button on the Timer. The scheduling time on the display of the Timer will start blinking.
- Press "right" and "left" button to switch between hour, minute and weekday setting.
- Use "up" and "down" button to adjust the cleaning time and to switch between weekdays.
- Press "OK" button to select and deselect the days for cleaning. If the robot should clean every day press the "all" button to select all weekdays at once.
- To finish and save the setting press the "set" button again. To cancel the process press the power button of the Timer.

Example: On the screen, it's Saturday (day 6), 9:58 am. The remote control is scheduled that it will start cleaning autonomously each Monday (Day 1) and Wednesday (Day 3) at 10 am.
IMPORTANT:
For most efficient cleaning, keep your floors as clear as possible (e.g. temporarily remove wires, rugs, chairs, small objects, ...). With fewer obstacles, the Robot will clean more effectively.
Cleaning Modes
The Robot uses its robotic intelligence to navigate autonomously around the room and efficiently clean the whole floor and under furniture.
The Robot has 3 cleaning modes:
Short (■)
Robot cleans for 5 minutes. Ideal for spot cleaning in one area.
Medium (■■)
The Robot cleans for 30 minutes. Ideal for mid-sized rooms (up to 25m^2
Large (■■) and Scheduled Cleaning
The Robot cleans for 60 minutes and it automatically searches for the Charging Station. Ideal for big rooms (more than 25m^2
Cleaning System

- Side brush sweeps into corners and along edges.
- Two rotating brushes collect dirt, hair and particles into the dustbin.
- Vacuum power picks up the remaining fine dirt.
The Robot works on all hard floors such as wood, parquet, tiles, linoleum and short-pile carpets.
Removing and Emptying the Dustbin
- Turn off the power switch.
- Press down the dustbin release button and pull out the dustbin.
- Place the dustbin over a waste bin, slide the two clips to open the fencing plates and empty the dustbin in the waste bin.
- Close the fencing plates, reinsert the dustbin and push until you hear a clicking sound.


Cleaning and Replacing the Filter
- Place the dustbin over a waste bin and slide the two clips to open the fencing plates.
- Take the filter out of the dustbin by pulling the flaps.
- Clear the dirt on the filter using the maintenance brush.
- Insert clean filter or new filter to the dustbin and close the fencing plates.
To buy new filters, please contact Vileda customer service address (see last page).

Cleaning Main Brushes
Main brushes do not need to be cleaned after each use. However, regular cleaning is recommended to avoid excessive build-up of hair that could damage the robot.
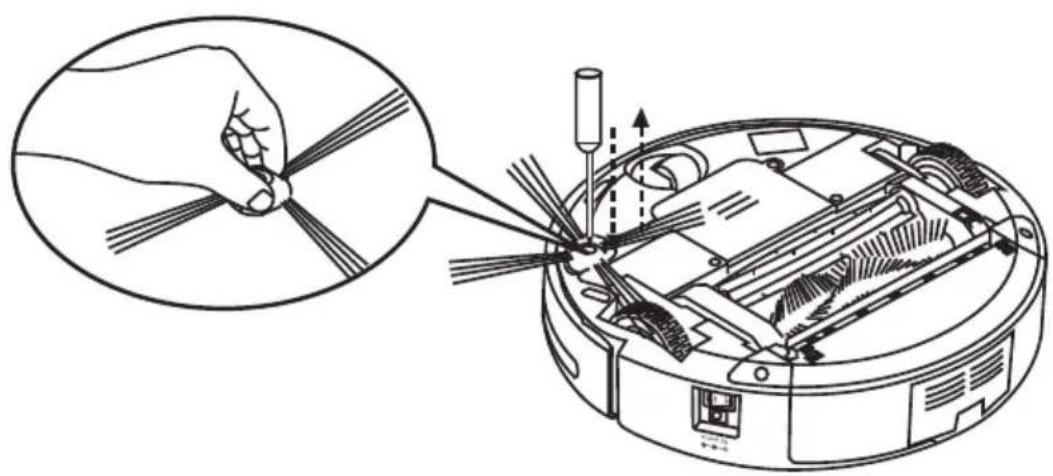
- Turn off the power switch and put the robot on a flat surface with its bottom up.
- Remove the brush retainer by pushing on the flap.
- Take out the main brush and the rubber brush as shown in the illustration.
- Remove all hairs and dirt from both brushes. Plus, clean the brush chamber.
- Wipe out dirt on the shaft and bearing of the brush.
- Place brushes back into the slot.
- Put the brushes retainer back and push until you hear a clicking sound.

Replacing Side Brush
- Turn off the power switch and put the robot on a flat surface with its bottom up.
- Use a cross-head screwdriver to loosen the screw and remove the side brush.
- Insert new side brush and tighten the screw.
Troubleshooting
| Problem Possible reason Possible solution | ||
| Robot does not detect cliffs. · Cliff sensors are dirty. · Clean the sensors with a dry cloth. | ||
| Main brush does not work properly. | · Main brush got stuck and could not rotate. · Main brushes are jammed. · Main brushes are incorrectly assembled. | · Clean main brushes. · Insert main brushes correctly. |
| Robot stops cleaning or does not start cleaning and all light indicators are flashing. | · Main brushes are jammed · Drive wheels are jammed. · Dustbin is not inserted correctly. · Motor is defective. | · Clean main brushes and restart. · Clean drive wheels and restart. · Insert dustbin and restart · Contact Vileda Service (see last page). |
| Central light indicator is flashing. · Low battery. · Recharge battery. | ||
| Robot only moves in circles in the same position. | · One wheel is blocked. · Remove hairs and dirt from wheels. | |
| Timer does not work. · No battery or low battery. · Timer is not synchronized. · Distance between Timer and robot is too big. | · Insert charged battery. · Synchronize Timer (see section "Using the Product"). · Ensure that distance between Timer and robot is less than 10m. | |
| Robot cannot find the Charging Station. | · Charging Station is not properly connected to the mains. · Charging station is covered by any obstacle. · Obstacle sensors of robot or docking sensor of Charging Station are dirty. · Charging Station is not synchronized. · Battery of robot is totally empty. · Remove the battery carefully and insert it again. | · Plug the charger correctly to the mains and to the Charging Station and check if power indicator lights up. · Ensure there is no obstacle within 3m in front of the charging station and within 0.5m from its side. · Clean the sensors with a dry cloth. · Synchronize Charging Station (see section "Battery Charging & Recharging"). · Charge the robot once manually. |
| Robot does not start scheduled cleaning. | · Robot is turned off. · Robot is not physically connected to the power station. · Weekday for autonomous cleaning is not selected. | · Turn the robot on by pressing the power switch. · Connect the robot to the power station (see section "Battery Charging & Recharging"). · Select weekday for autonomous cleaning (see section "Using the Product"). |
| Low Battery after charging for 12 hours | · Charger or battery is defective. · Contact Vileda Service (see last page). | |
For further help, technical advice, or to order spare or replacement parts contact Vileda (address see last page)
Environmental and Product Recycling
The Vileda Relax Plus fulfils the EU directive 2002/96/CE, covering Electrical and electronic appliances and the management of its disposal.
The packaging material is entirely recyclable, and marked with the recycling symbol. Follow local regulations for scrapping. Keep the packaging materials (plastic bags, polystyrene parts, etc.) out of children's reach, as they are potentially dangerous.
When the product has reached the end of its life please do not dispose of it with general household waste. To prevent possible harm to the environment or human health from uncontrolled waste disposal, recycle it responsibly to promote the sustainable reuse of material resources.
The symbol identifies the Vileda Relax Plus as a product submitted to the regime of selective electrical appliance recycling collection.
The product contains a NiMH battery which should not be disposed of with general household waste. Deposit the battery in an official collection point for its recycling.
Batteries can be detrimental for the environment and can explode if they are exposed to high temperatures. The violation of these precautions could cause fire and/or serious injuries.
For more detailed information about treatment, recovery and recycling of this product, please contact your local city office, your household waste disposal service or the shop where you purchased the product.
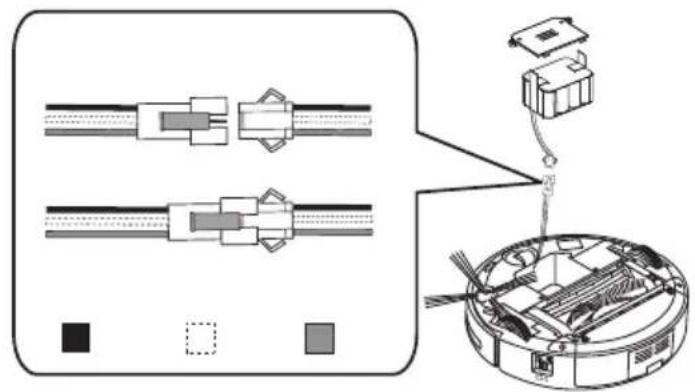
Battery Removal
- Turn off the power switch and put the robot on a flat surface with its bottom up.
- Use a cross-head screwdriver to loosen the two screws and remove the battery cover plate.
- Lift the battery and disconnect the battery by pressing and pulling the flaps at the electrical connector.

Technical Specification
| Battery type 14.4V DC, 1700 mAh NiMH | |
| Charging time 4-5 hours | |
| Charging period for fully discharged battery 12 hours | |
| Charger output 24 V DC | |
| Charger input 100-240 V AC | |
| Unit Average Power 24W | |
| Dust Capacity 0.35 l | |
| Unit Size 32x9 cm |
Vileda Product Guarantee
A. SCOPE
- By this Guarantee, Vileda guarantees the product to be free from defects in materials and workmanship at the date of original purchase for a period of two years from that date. The Vileda company that provides and will honour this Guarantee is designated in this Guarantee or accompanying leaflets or can be found on our website www.vileda.com.
-
If within the guarantee period the product is determined to be defective (at the date of original purchase) due to improper materials or workmanship, Vileda or an authorized service network member in the Guarantee Area will, without charge for labour or parts, repair or (at Vileda's discretion) replace the product or its defective parts subject to the terms and limitations below. Vileda may replace defective products or parts with new or refurbished products or parts. All products and parts replaced become the property of Vileda.
-
This guarantee does not cover:
a) periodic maintenance and repair or parts replacement due to wear and tear.
b) consumables (components that are expected to require periodic replacement during the lifetime of a product such as pads).
c) damage or defects caused by use, operation or treatment of the product inconsistent with normal personal or domestic use.
d) damage or changes to the product as a result of:
I. misuse, including:
- treatment resulting in physical, cosmetic or surface damage or changes to the product;
- failure to install or use the product for its normal purpose or in accordance with Vileda instructions on installation or use;
- failure to maintain the product in accordance with Vileda instructions on proper maintenance;
- installation or use of the product in a manner inconsistent with the technical or safety laws or standards in the country where it is installed or used;
II. use of the product with accessories, peripheral equipment and other products of a type, condition and standard other than prescribed by Vileda;
III. repair or attempted repair by persons who are not Vileda or authorized service network members;
IV. Accidents, fire, liquids, chemicals, other substances, flooding, vibrations, excessive heat, improper ventilation, power surges, excess or incorrect supply or input voltage, radiation, electrostatic discharges including lighting, other external forces and impacts.
B. TERMS
- Guarantee services will be provided only if the original invoice or sales receipt (indicating the date of purchase, model name and dealer's name) is presented with the defective product within the guarantee period. Vileda may refuse free-of-charge guarantee service if these documents are not presented or if they are incomplete or illegible. This Guarantee will not apply if the model name or serial number on the product has been altered, deleted, removed or made illegible.
- This Guarantee does not cover transport costs and risks associated with transport of your product to and from Vileda or the service agent.
- We would like to inform you that the diagnosis fee of your product shall be paid by you if the diagnosis of your product proves that you will not be entitled to a repair under this guarantee (for whatever reason) to rectify the defect or your product is working properly and no hardware fault could be designed.
C. EXCLUSIONS AND LIMITATIONS
- Except as stated above, Vileda makes no guarantee (express, implied, statutory or otherwise) regarding product quality, performance, accuracy, reliability, fitness for a particular purpose, or otherwise.
- Vileda does not take responsibility for secondary or indirect damages caused by the incorrect use of the product. Save as set out elsewhere in this clause the responsibility of Vileda will not exceed the purchase price of the product. If you have any doubts referring to the correct use of the product or referring to the guarantee, call Vileda Customer Service.
- Nothing in this guarantee is intended to restrict Vileda's liability for death, personal injury or damage to private property caused by the goods proving defective while in the consumer's use as a result of Vileda's negligence.
D. YOUR LEGAL RIGHTS RESERVED
As a consumer, you have legal rights in relation to goods that are faulty or not as described. Advice about your legal rights is available from your local Citizens Advice Bureau or Trading Standards Office. Nothing in this guarantee will affect these rights.
E. YOUR GUARANTOR
The guarantee for this product is provided and will be honoured by Freudenberg Household Products, Vileda House, 2 Chichester Street, Rochdale, Lancashire, OL16 2AX. www.vileda.com/uk Tel: 0345 7697356.
GB
Specifications Techniques
Vileda product guarantee
A. OMVANG
Avenue Andre Ernst, 14
4800 Verviers
Belgique/Belgiè
www.vileda.be
www.vileda.nl
NL/B
EuXapioToUe nou eIaEgATE To Vileda Relax Plus. AnoAuaOTe to veo oac pOumT kaOapoukai xaalapowTe!
περιεχόμενα
E. GARANTIYI SAGLAYAN ISLETME


- IMPORTANT:
- WARNING:
- USE RESTRICTIONS:
- PERSONAL SAFETY:
- ELECTRICAL SAFETY INSTRUCTIONS:
- BATTERY USE AND CARE:
- SERVICE:
- Part Location
- Product Anatomy
- Battery Charging & Recharging
- MANUAL CHARGING:
- SYNCHRONISATION OF CHARGING STATION:
- AUTONOMOUS CHARGING:
- Using the Product
- MANUAL CLEANING:
- SYNCHRONISATION OF TIMER:
- TIME SETTING OF TIMER AND ROBOT:
- SCHEDULED CLEANING:
- Cleaning Modes
- Cleaning System
- Removing and Emptying the Dustbin
- Cleaning and Replacing the Filter
- Cleaning Main Brushes
- Replacing Side Brush
- Troubleshooting
- Environmental and Product Recycling
- Battery Removal
- Vileda Product Guarantee
- SCOPE
- TERMS
- EXCLUSIONS AND LIMITATIONS
- YOUR LEGAL RIGHTS RESERVED
- YOUR GUARANTOR
- Specifications Techniques
- OMVANG
- GARANTIYI SAGLAYAN ISLETME
Brand : Vileda
Model : VR 301
Category : Vacuum Cleaner