
00095290 - Digital photo frame HAMA - Free user manual and instructions
Find the device manual for free 00095290 HAMA in PDF.

Frequently Asked Questions - 00095290 HAMA
User questions about 00095290 HAMA
0 question about this device. Answer the ones you know or ask your own.
Ask a new question about this device
Download the instructions for your Digital photo frame in PDF format for free! Find your manual 00095290 - HAMA and take your electronic device back in hand. On this page are published all the documents necessary for the use of your device. 00095290 by HAMA.
USER MANUAL 00095290 HAMA
Operating Instructions
Bedienungsanleitung
Mode d'emploi
Design and functionality
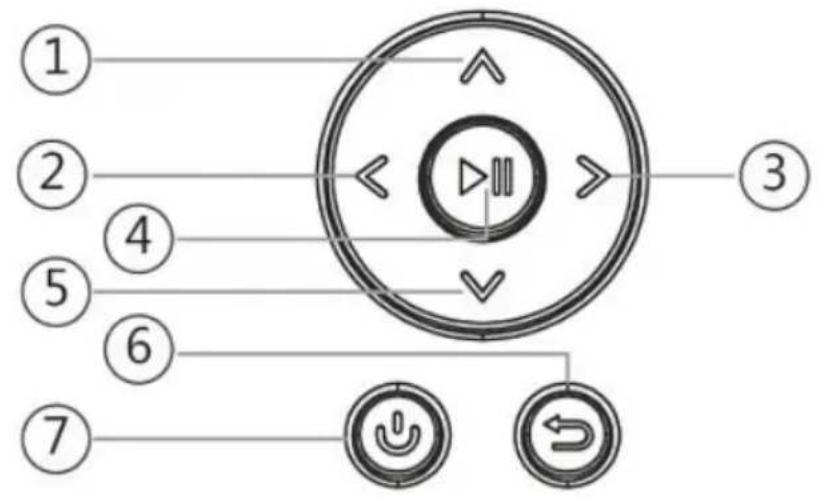
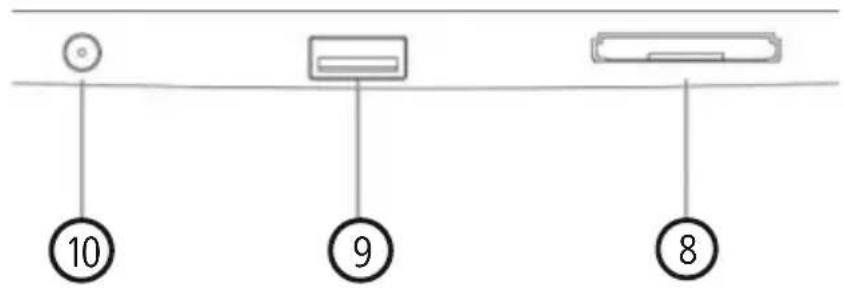
| A: Digital picture frame - Control and connection panel | ||
| 1 | A | Control button up / switch to next file |
| 2 | < | VOL- / left control button |
| 3 | > | VOL+ / right control button |
| 4 | ■II | Play/Pause / OK/ENTER button |
| 5 | V | Control button down / switch to previous file |
| 6 | ← | ESC / back button MENU = 2x |
| 7 | ON/OFF button | |
| 8 | SD/MMC/SDHC card slot | |
| 9 | USB (type A) | |
| 10 | Socket for power supply adapter | |
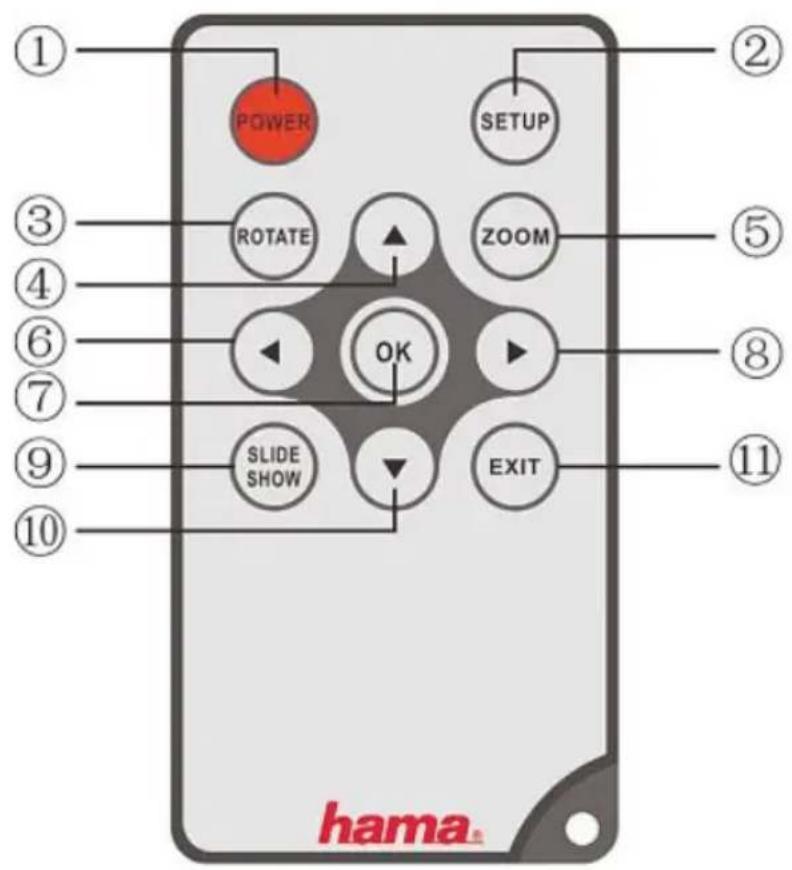
| B: Remote control | |
| 1 | POWER ON/OFF |
| 2 | SETUP EXIT to system settings |
| 3 | ROTATE R orient photo anticlockwise |
| 4 | Up button |
| 5 | ZOOM Image zoom function +/- |
| 6 | Left View previous photo |
| 7 | OK/ ENTER Confirm button; play/pause button in playback mode |
| 8 | Right View next photo |
| 9 | SLIDE SHOW Starts the Photo Slideshow |
| 10 | Down button |
| 11 | EXIT Return to the previous menu |
GB
Contents
- Explanation of Warning Symbols and Notes 6
- Package Contents.. 6
- Safety Instructions 6
4.Defective Pixels 7 - Getting Started.. 8
5.1 Setting up. 8
5.2 Wall mounting.. 8
5.3 Inserting or changing the battery.....9
5.4 Connecting the power supply....9 - Operation 10
6.1 Using the menu 10
6.2 System settings 11 - Functions 13
7.1 Photos 13
7.2 Calendar. 14
7.3 Folder 15
8.Additional functions. 16
8.1 Slide show variations 16
8.2 Causes of errors and error rectification. 16 - Care and Maintenance 17
- Warranty Disclaimer 17
- Service and Support 17
- Technical specifications.. 18
- Menu structure 21
- Recycling Information 22
Thank you for choosing a Hama product.
Take your time and read the following instructions and information completely. Please keep these instructions in a safe place for future reference. If you sell the device, please pass these operating instructions on to the new owner.
1. Explanation of Warning Symbols and Notes

Warning
This symbol is used to indicate safety instructions or to draw your attention to specific hazards and risks.

Note
This symbol is used to indicate additional information or important notes.
2. Package Contents
- Digital picture frame
230V power supply unit
Remote control
These operating instructions

Note
Check the delivery for completeness and visible damage. Inform your supplier/dealer in the event of incomplete or damaged deliveries.
3. Safety Instructions
- The product is intended for private, non-commercial use only.
- Protect the product from dirt, moisture and overheating, and only use it in a dry environment.
- Do not drop the product and do not expose it to any major shocks.
- Do not operate the product outside the power limits given in the specifications.
- Only connect the product to a socket that has been approved for the device. The socket must be installed close to the product and easily accessible.
- Disconnect the product from the network using the power button – if this is not available, unplug the power cord from the socket.
- Lay all cables so that they do not pose a tripping hazard.
- Do not bend or crush the cable.
- Do not modify the product in any way. Doing so voids the warranty.
- Do not attempt to service or repair the product yourself. Leave any and all service work to qualified experts.
- Keep the packaging material out of the reach of children due to the risk of suffocation.
- Dispose of packaging material immediately according to locally applicable regulations.

Warning - Batterien
- Immediately remove and dispose of dead batteries from the product.
- Only use batteries (or rechargeable batteries) that match the specified type.
- When inserting batteries, note the correct polarity (+ and - markings) and insert the batteries accordingly. Failure to do so could result in the batteries leaking or exploding.
- Do not overcharge batteries.
- Keep batteries out of the reach of children.
- Do not short circuit the batteries/rechargeable batteries and keep them away from uncoated metal objects.

Warning
- Do not open the product. Do not continue to operate the product if it is damaged, which may be indicated by smoke, odour or loud noises. Immediately contact your dealer or our service department (see item Service and Support).
- Do not use the product if the adapter, connection cable or power cable is damaged.
4. Defective Pixels

Note
Pixel defects can occur due to the manufacturing process. These manifest themselves as white or black pixels that permanently light up during playback. Within the context of production tolerances, a maximum of 0.01% of these pixel defects measured against the total size of the screen are permitted as a tolerance and are not considered a product defect.
5. Getting Started
5.1 Setting up
- Screw the foot into the threaded hole on the back of the device.
- Remove the protection foil from the display.
- Set the product on a flat, level surface where it will not slip.
- Do not place any other objects on top of the device.
5.2 Wall mounting
Alternatively, you may use the threaded hole on the back of the device to mount it to the wall using a VESA-compatible wall bracket.
VESA specification in the corresponding technical data.

Note on available accessories
You can find a selection of compatible Hama products at www.hama.com.

Note
- Before mounting, check that the wall you have chosen is suitable for the weight to be mounted. Also make sure that there are no electric, water, gas or other lines running through the wall at the mounting site.
- Buy special or suitable installation material from a specialised dealer for wall-mounting.
- Do not mount the product above locations where persons might linger.
GB
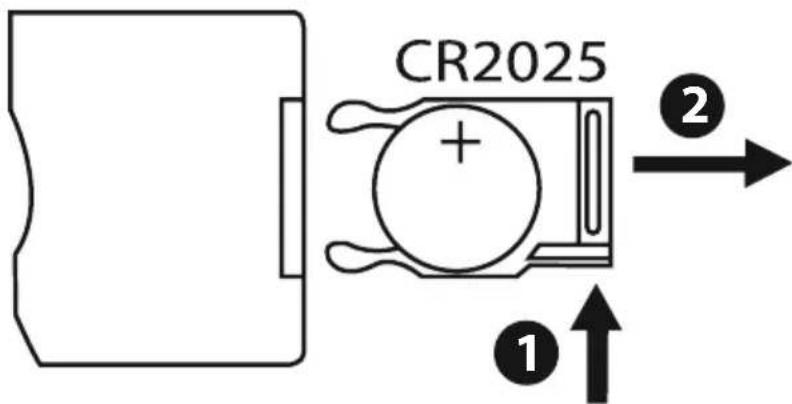
5.3 Inserting or changing the battery
- Open the battery compartment of the remote control
- Insert a type CR2025 button cell battery, observing polarity.
- Remove the contact breaker strip from the battery if present.
- Close the battery compartment. Make sure that the cover closes easily and tightly.
5.4 Connecting the power supply

Warning
- Only connect the product to a socket that has been approved for the device. The socket must be installed close to the product and easily accessible.
- Do not continue to operate the device if it becomes visibly damaged. (This is mandatory for all products with 220V mains connections.)

Note
- The power supply unit is suitable for mains voltages of 100 - 240V and therefore can be used worldwide. Please note that a country-specific adapter may be necessary.
-
You can find a selection of compatible Hama products at www.hama.com.
-
Connect the enclosed power supply unit to a properly installed socket.
- Then connect the lead of the power supply unit to the DC In of the device.
6. Operation
6.1 Using the menu
The device is equipped with a user-friendly menu. The menu appears on the screen.
The following types of storage media can be read:
- SD/SDHC - cards (up to 32 GB)
- USB storage media
Switch on the device by pressing the ON/OFF switch

You open the main menu using the [MENU] button. In the menu, use the [][] buttons to move around, and select the desired function.
When you confirm your selection by pressing [OK], a corresponding submenu appears. In this menu, use the [] or [] buttons to move around, and select the desired line. The selected line is highlighted in colour.
Confirm your selection using the [OK] button. Usually, an additional menu will then appear, in which you move around using the [][][][] buttons and select the desired setting.
Use button [EXIT] to exit the current menu level.
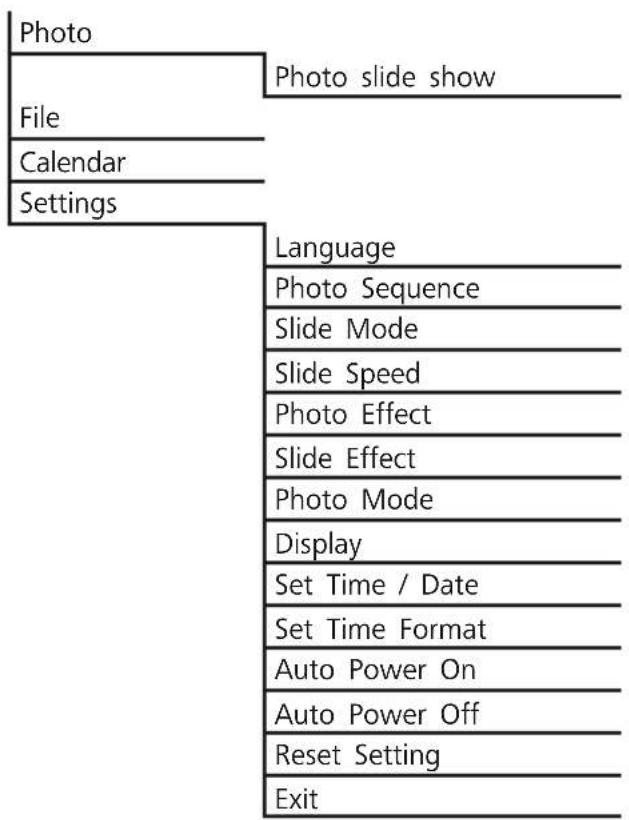
For orientation purposes, the menu structure is also included in the Appendix.
You can control the device using the buttons on the rear or with the included remote control.
6.2 System settings

To enter the setup menu, press the [SETUP] button on your remote control or use the [][] buttons on the rear of the device or the remote control to access the "Settings" menu item
The following menu items are available:
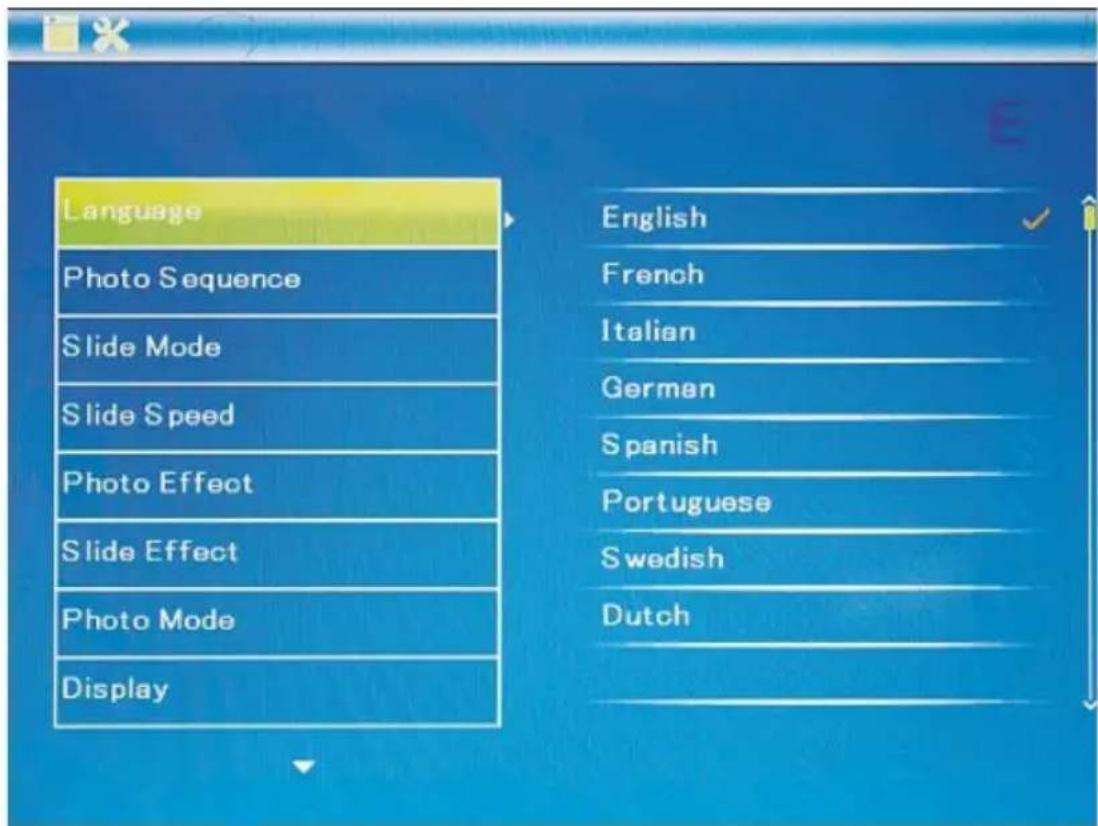
| Language Select the desired language menu/operating language | |
| Photo Sequence | Function menu for setting the picture sequence: either random or sorted by name |
| Slide Mode | Function for displaying up to four images simultaneously |
| Slide Speed Select the time interval at which the images change | |
| Photo Effect | Select between three photo colour effects: colour, monochrome, or sepia |
| Slide Effect Function menu for setting the image transitions | |
| Photo Mode Adjust the photo to fit the screen | |
| Display | Set the brightness, contrast, colour saturation and shading of the device |
| Set Time / Date | Function menu for setting the time and date |
| Set Time Format | |
| Auto Power On | Set the time at which the device is to switch on or off. |
| Auto Power Off | WARNING: Auto switch-on/switch-off function must first be activate |
| Reset Setting | Function menu to reset to factory settings |
| Exit Exits the settings menu and brings you back to the main menu | |
7. Functions
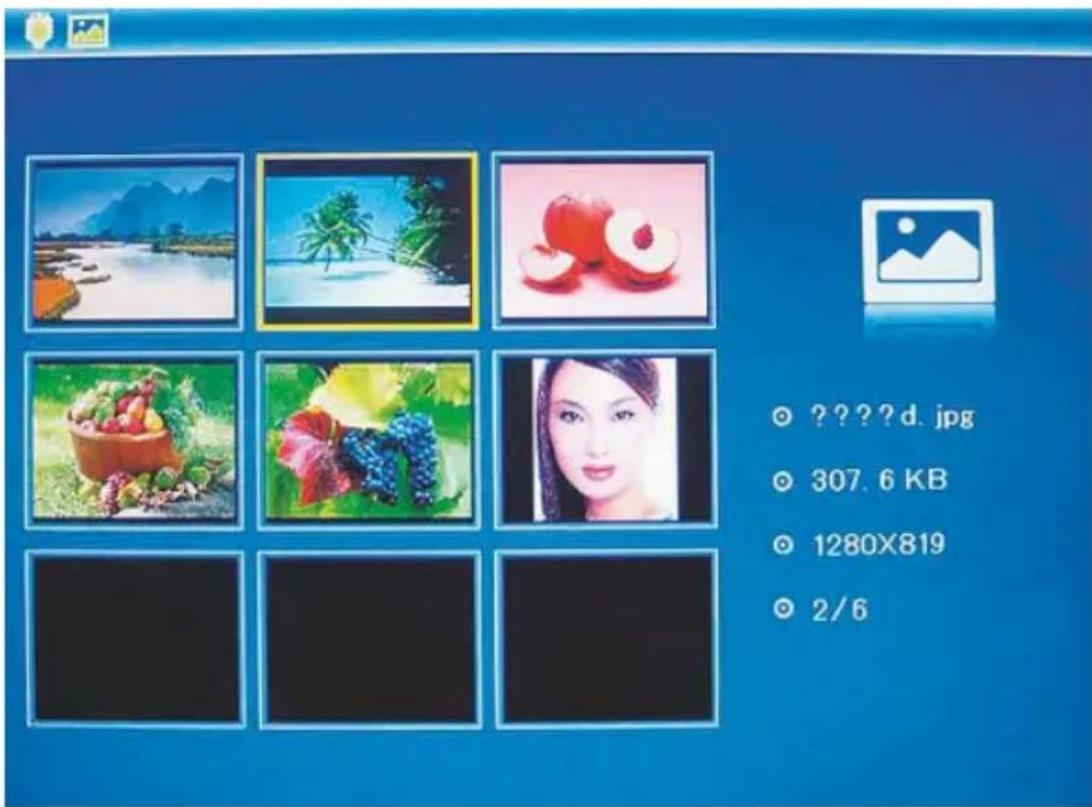
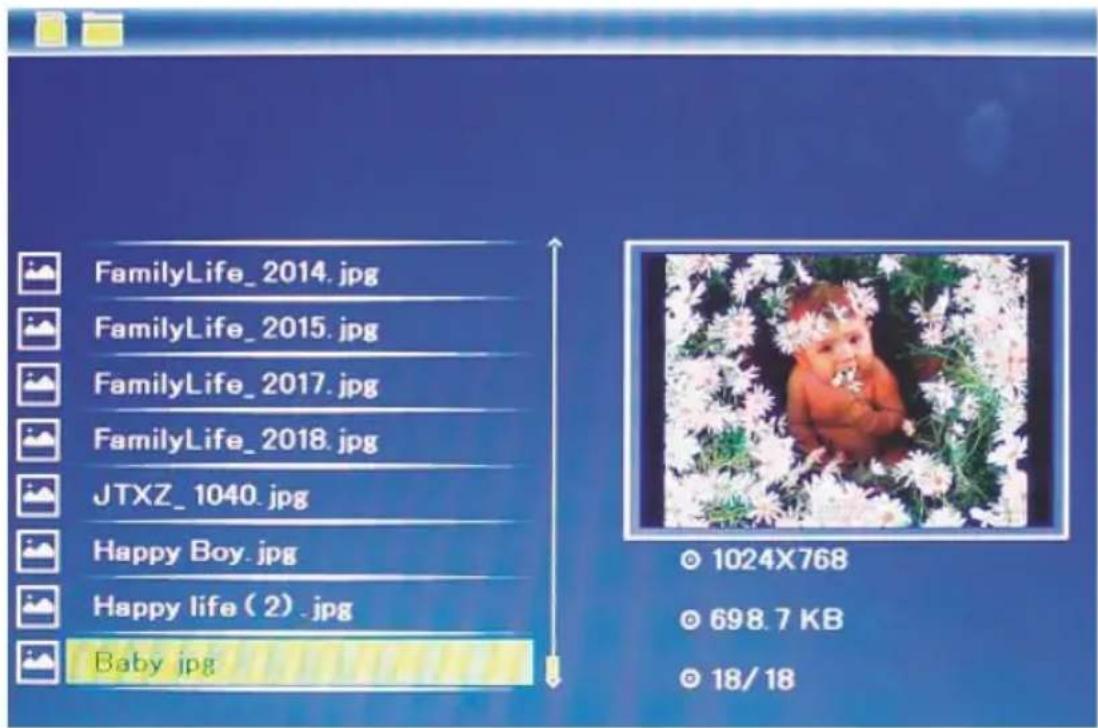
7.1 Photos

The device starts a photo slide show automatically when a storage medium is inserted. If no storage medium has been inserted, the device uses the photos stored on the internal memory. You can navigate in the photo menu as follows:
- Use the [][][][] buttons on the device or remote control to select the symbol and then press [OK].
- In the default setting, the device displays the slide show upon start-up.
- Press the [EXIT] button on the remote control or the [MENU] button on the device to switch to picture preview mode.
- Use the [][][][] buttons to select a photo and then press [OK] to start playback.
- During picture playback (or slide show), press the [PLAY/PAUSE] button on the remote control and then hold down [SETUP] for approx. 2 seconds to show options for the currently displayed picture.

NOTE
You can make additional changes to the settings in the music settings menu.
7.2 Calendar

Use the [][][][] buttons on the device or remote control to select the symbol and then press [OK].
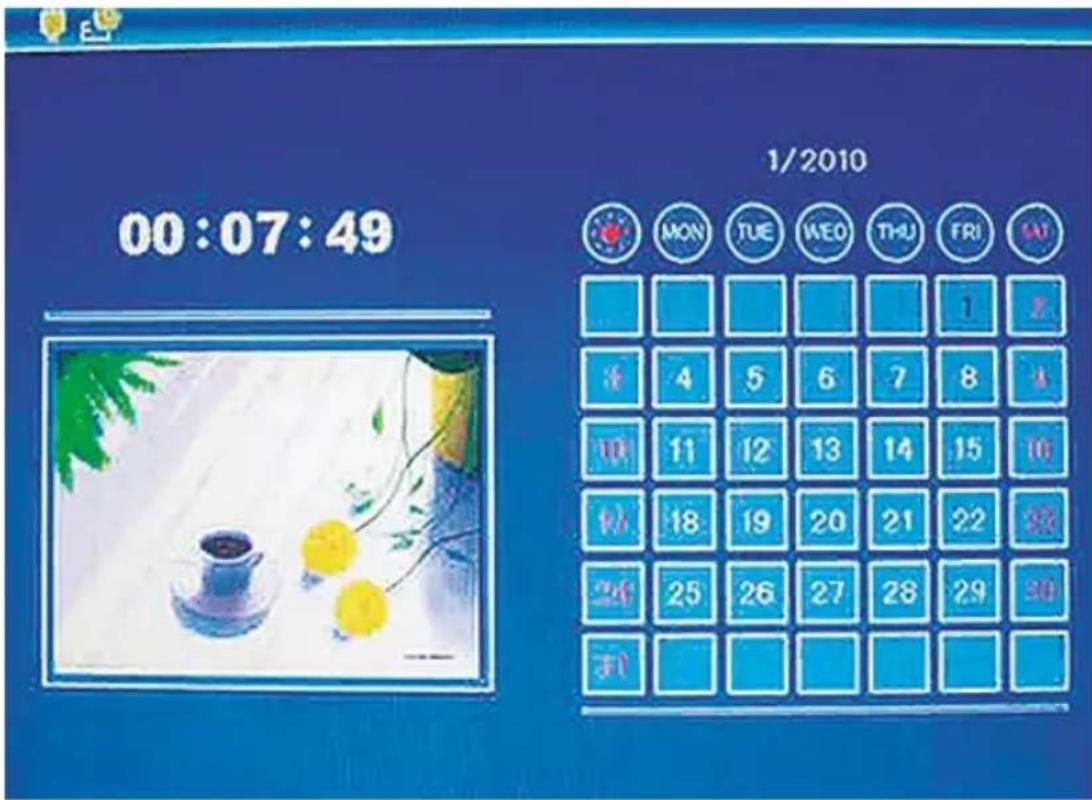
You can perform the following functions:
- You can change the year using the [][] buttons.
- You can change the month using the [][] buttons.

NOTE
- You can make additional changes to the settings in the calendar settings menu.
7.3 Folder

Use the [][][][] buttons on the device or remote control to select the symbol and then press [OK].
Use the [][] buttons to select a file and then press the [] button on the remote control or ③ on your device. A new menu window appears. You can use this window to save all of the files from the storage medium in the internal memory.

- Select Ja/Yes and then press [OK] to transfer the selected file from the storage medium to the internal memory.
- Press Nein/No to return to the folder level.

NOTE
Take care that only models equipped with internal memory support the internal storage of data. This feature is only available with certain models.
8. Additional functions
8.1 Slide show variations


8.2 Causes of errors and error rectification
The following table can be used to localise and rectify minor errors with the device:
| Error Possible cause | Solution | ||
| General information | Display is blank | Device is switched off Switch | on the device. |
| Power supply adapter not connected correctly | Ensure that the power supply adapter is plugged in and connected to the device. | ||
| No mains power Check your fuse box. | |||
| Device is faulty | Inform our customer service department. | ||
| General information | Device turns off | By static electricity, such as occur during normal daily use on any commands or show a black (carpet, wool sweater), it may screen, reset the device by pressing the POWER button on the remote control or on the backpanel of the device. | In case that the device shouldn't react in an electric shock, replace with a new one. |
| DPF | No image appears | No storage medium is inserted | Insert a storage medium. |
| The storage medium does not contain data | Check your storage medium. |

NOTE
- Contact our customer service department if the problem remains after taking the steps detailed above.
9. Care and Maintenance
The display on your device is located behind protective glass.
- Only clean the display with a dry, soft cloth.
- Do not apply pressure to the screen surface when you clean the device.
- To keep from damaging the surface, do not use solvents or alcohol-based cleaners to clean the device.

Note
For gentle cleaning and care of the display, we recommend that you use a microfibre cleaning cloth.
- Clean the rest of the device with a dry cloth. You can lightly dampen the cloth if the device is very dirty.
10. Warranty Disclaimer
Hama GmbH & Co. KG assumes no liability and provides no warranty for damage resulting from improper installation/mounting, improper use of the product or from failure to observe the operating instructions and/or safety notes.
11. Service and Support
Please contact Hama Product Consulting if you have any questions about this product.
Hotline: +49 9091 502-115 (German/English)
Further support information can be found here:
www.hama.com
12. Technical specifications

Note
We reserve the right to make technical and design changes without prior notice.
| Digital Picture Frame 00118560 | |
| Power supply input 100-240V | AC / 50/60Hz / 0,4 A Max |
| Power supply output 5V DC / | 1.0A |
| Power consumption < 4.2 W | |
| Dimensions 182 x 54 x 157 mm | |
| Weight ca. 400 g | |
| Recommended ambient temperature for device | 0°C - 40°C (32 - 104 F) |
| Relative humidity 10 - 80 % (non-condensing) | |
| Display 20,32 cm (8.0") 4:3 TFT-LED | |
| Resolution 1024 x 768 (RGB) | |
| Brightness 300 cd/m2 | |
| Contrast 500 : 1 | |
| Button cell battery (CR 2025) | CR2025 3V |
| Koorthy Speichermedien SD/SDHC/MMC | |
| External connections USB Typ | A, Host |
| Supported file formats | JPEG, JPG (up to 16 MP) |
| Digital Picture Frame 00095290 | |
| Power supply input 100-240V | AC / 50/60Hz / 0,4 A Max |
| Power supply output 5V DC / | 1.0A |
| Power consumption < 4.5 W | |
| Dimensions | 200 x 56 x 165 mm (with the base) 234 x 8 x 198 mm (without the base) |
| Weight ca. 386 g | |
| Recommended ambient temperature for device | 0°C - 40°C (32 - 104 F) |
| Relative humidity 10 - 80 % (non-condensing) | |
| Display 20,32 cm (8.0") 4:3 TFT-LED | |
| Resolution 1024 x 768 (RGB) | |
| Brightness 300 cd/m2 | |
| Contrast 500 : 1 | |
| Button cell battery (CR 2025) | CR2025 3V |
| Ko compatible Speichermedien SD / SDHC / MMC | |
| External connections USB Typ A, Host | |
| Supported file formats | JPEG, JPG (up to 16 MP) |
| Digital Picture Frame 00118577 | |
| Power supply input 100-240V AC / 50/60Hz / 0,4 A Max | |
| Power supply output 5V DC / 1A | |
| Power consumption < 4 W | |
| Dimensions 180 x 56 x 123 mm | |
| Weight ca. 330 g | |
| Recommended ambient temperature for device | 0°C - 40°C (32 - 104 F) |
| Relative humidity 10 - 80 % (non-condensing) | |
| Display 17,78 cm (7") 16:9 TFT-LED | |
| Resolution 800 x 480 (RGB) | |
| Brightness 200 cd/m2 | |
| Contrast 200 : 1 | |
| Button cell battery (CR 2025) CR2025 3V | |
| Compatible Speichermedien SD/SDHC | |
| External connections USB Typ A, Host | |
| Supported file formats | JPEG, JPG (up to 16 MP) |
13. Menu structure
GB
14. Recycling Information
Note on environmental protection:
After the implementation of the European Directive 2012/19/EU and 2006/66/EU in the national legal system, the following applies: Electric and electronic devices as well as batteries must not be disposed of with household waste. Consumers are obliged by law to return electrical and electronic devices as well as batteries at the end of their service
lives to the public collecting points set up for this purpose or point of sale. Details to this are defined by the national law of the respective country. This symbol on the product, the instruction manual or the package indicates that a product is subject to these regulations. By recycling, reusing the materials or other forms of utilising old devices/Batteries, you are making an important contribution to protecting our environment.
GB
A
B
5.2 Installation murale
- Do not open the product. Do not continue to operate the product if it is damaged, which may be indicated by smoke, odour or loud noises. Immediately contact your dealer or our service department (see item "Service and Support").
- Do not use the product if the adapter, connection cable or power cable is damaged.
4. Fallo de pixel

Nota
The following types of storage media can be read:
Check the delivery for completeness and visible damage. Inform your supplier/dealer in the event of incomplete or damaged deliveries.
Check the delivery for completeness and visible damage. Inform your supplier/dealer in the event of incomplete or damaged deliveries.
9. Care and Maintenance
8.2 Causes of errors and error rectification
The following table can be used to localise and rectify minor errors with the device:
Check the delivery for completeness and visible damage. Inform your supplier/dealer in the event of incomplete or damaged deliveries.
All listed brands are trademarks of the corresponding companies. Errors and omissions excepted, and subject to technical changes. Our general terms of delivery and payment are applied.