
Premium Pulsar 00095219 - Digital photo frame HAMA - Free user manual and instructions
Find the device manual for free Premium Pulsar 00095219 HAMA in PDF.


| Product Type | Digital Photo Frame |
| Brand | Hama |
| Model | Premium Pulsar 00095219 |
| Display Size | 25.4 cm (10.0") |
| Resolution | 1024 x 768 (RGB) |
| Aspect Ratio | 4:3 |
| Contrast Ratio | 400:1 |
| Brightness | Max. 200 cd/m² |
| Power Input | 100-240 V AC, 50/60 Hz, 0.3 A |
| Power Output (Adapter) | 5 V DC, 2.0 A |
| Power Consumption | < 6.2 W |
| Dimensions (L x W x H) | 265.5 x 215 x 22.5 mm (without base) |
| Weight | Approx. 638 g |
| Supported Storage Media | SD/SDHC, MMC, MS, USB 2.0 |
| Supported File Formats | JPEG, MP3, WMA, MPEG1, MPEG4, AVI |
| Remote Control Battery | CR2025 button cell, 3 V |
| Intended Use | Indoor display of photos, videos, and music |
| Additional Functions | Clock, calendar, alarm, slideshow with music, thumbnail mode, automatic on/off timer |
| Cleaning Instructions | Use a dry, soft cloth; avoid solvents or alcohol |
| Safety Precautions | Use only included adapter; keep away from moisture; do not open housing |
Frequently Asked Questions - Premium Pulsar 00095219 HAMA
User questions about Premium Pulsar 00095219 HAMA
0 question about this device. Answer the ones you know or ask your own.
Ask a new question about this device
Download the instructions for your Digital photo frame in PDF format for free! Find your manual Premium Pulsar 00095219 - HAMA and take your electronic device back in hand. On this page are published all the documents necessary for the use of your device. Premium Pulsar 00095219 by HAMA.
USER MANUAL Premium Pulsar 00095219 HAMA
Operating Instructions
GB
Mode d'emploi
F
Digitaler Bilderrahmen 10.0 Digital Photo Frame
00095219
Einführung
D
Vorwort
Aufbau und Funktion
D
Fernbedienung
D
Batterie einlegen
D Inbetriebnahme
Sicherheitshinweise
WARNING
ACHTUNG
D
HINWEIS
Systemeinstellungen
D
Funktionen
D
Photo
D
Musik
Film
D
Zusatzfunktionen
D
Uhrzeit
D
Lagerung
GB Operating Instructions
Contents
GB
Introduction ....31
Preface....31
About these operating instructions....31
Copyright 31
Warnings 32
Intended use ....33
Limitation of liability .....33
Safety 34
Basic safety instructions....34
Danger due to electrical current 34
Design and functionality . . .35
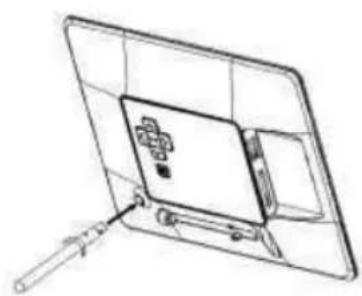
Digital picture frame (rear view) 35
Remote control....36
Inserting the battery .....37
Getting started .....38
Safety instructions .....38
Extent of delivery and delivery inspection .... 38
Unpacking 39
Disposal of packaging materials....39
Positioning requirements .... 39
Electrical connection .....40
Installation and connections. . 40
Operation .....41
Using the menu .....41
System settings .....43
Functions .....45
Photo 45
Thumbnail mode .....45
Music 46
Movie 47
Folder 48
Additional functions .....49
Calendar....49
Time....49
Alarm 50
Activating the device's automatic on/off function ....51
Cleaning and care .....52
Safety instructions .....52
Cleaning....52
Troubleshooting....52
Safety instructions .....52
Causes of errors and error rectification....53
Storage ....54
Disposal 54
Device disposal .....54
Battery disposal ..... 54
Appendix....55
Technical specifications ..... 55
Menu structure for the DPF ..56
Support information .....57
Introduction
Preface
GB
Dear customer,
By purchasing this Hama digital picture frame, you have chosen a quality product which conforms to state-of-the-art development standards in technology and functionality.
Read the following information carefully in order to familiarise yourself with the device and its full range of functions.
We hope you enjoy this device for many years to come.
About these operating instructions
These operating instructions are an integral part of the digital picture frame (hereinafter referred to as the "device"), and provide important information on the intended use, safety, connection and operation of the device.
The operating instructions must be kept near the device at all times. They must be read and adhered to by all persons responsible for operating the device or troubleshooting.
Keep these instructions in a safe place and pass them on to subsequent users or owners together with the device.
Copyright
This documentation is protected by copyright.
It may not be reprinted or reproduced (including illustrations) in whole or in part without prior written consent from the manufacturer. This also applies after changes to the documentation.

Warnings
The following warnings are used in these operating instructions:
GB
! DANGER
A warning of this type indicates the immediate threat of a dangerous situation.
Death or serious injuries can result if this situation is not avoided.
▶ Follow the information in this warning to prevent death or serious personal injury.
WARNING
A warning of this type indicates the possibility of a dangerous situation.
Injuries and/or material damage can result if this situation is not avoided.
▶ Follow the information in this warning to prevent personal injury or material damage.
CAUTION
A warning of this type indicates the possibility of material damage.
Material damage can result if this situation is not avoided.
▶ Observe the information in this warning to prevent material damage.
NOTE
▶ A note indicates additional useful information for handling the device.
Intended use
This device is only intended for indoor use to display photos, videos and music files.
Other uses or uses that go beyond this use are considered unintended.
WARNING
Danger caused by unintended use
Danger may result from unintended or other use of the device.
▶ Only use the device as intended.
▶ Adhere to the procedures described in these operating instructions.
All claims made as a result of damage caused by unintended use are excluded.
The operator alone bears the risk resulting from unintended use.
Limitation of liability
All technical information, data and instructions contained in these operating instructions were current at the time of printing and written to the best of our knowledge based on previous experiences and findings.
Therefore, no claims can be derived from the specifications, illustrations and descriptions contained in these instructions.
The manufacturer accepts no liability for damages caused by failure to observe these instructions, improper use or repairs, unauthorised device modifications or the use of non-approved spare parts.
CAUTION
▶ Pixel defects can occur due to the manufacturing process. These manifest themselves as white or black pixels that permanently light up during playback. Within the context of production tolerances, a maximum of 0.01% of these pixel defects measured against the total size of the screen are permitted as a tolerance and are not considered a product defect.
Safety
GB
This chapter contains important safety instructions for handling the device.
This device complies with the applicable safety regulations. However, improper use can lead to personal injury or material damage.
Basic safety instructions
Observe the following safety instructions to ensure safe handling of the device:
■ Visually inspect the device before using it to make sure that there is no external damage. Do not operate the device if it is damaged.
■ Only have the device repaired by specialists. Improper repair work invalidates any warranty claims.
■ Faulty components may be replaced with original spare parts only. Only original spare parts can guarantee that applicable safety requirements are adhered to.
■ Disconnect the power supply adapter before cleaning the device, during thunderstorms, and in the event of malfunctions.
- Keep the device away from moisture and protect it from being penetrated by liquids or objects. Disconnect the power supply adapter immediately if the device comes into contact with liquids.
■ Do not place any objects on top of the device.
Danger due to electrical current

DANGER
Danger of death due to electrical current
Coming into contact with live electrical lines or components can be fatal.
Adhere to the following safety instructions to avoid dangers associated with electrical current:
▶ Only use the included power supply adapter, since otherwise the device may be damaged.
▶ Do not operate the device when the power supply adapter, connection cable or plug is damaged.
▶ Do not open the housing on the device or on the power supply adapter under any circumstances. There is a risk of electric shock when coming into contact with live connections or if the electronic or mechanical layout of the device is altered.
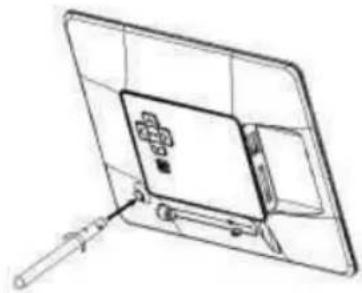
Design and functionality
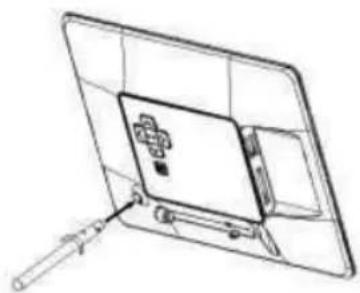
Digital picture frame (rear view)
GB

- [M] Open menu / OSD menu
- ➤ Next image / Right
- ▲ Up / Volume +
- ▶ Play/Pause/ENTER
- ◀ Previous image / Left
- ▼ Down / Volume -
- ← Exit / Back
- On/Off switch
- SD/MMC/MS card slot
- USB HOST type A connection
- Socket for power supply adapter
- Transport bracket for base
- Base support

Design and functionality
GB
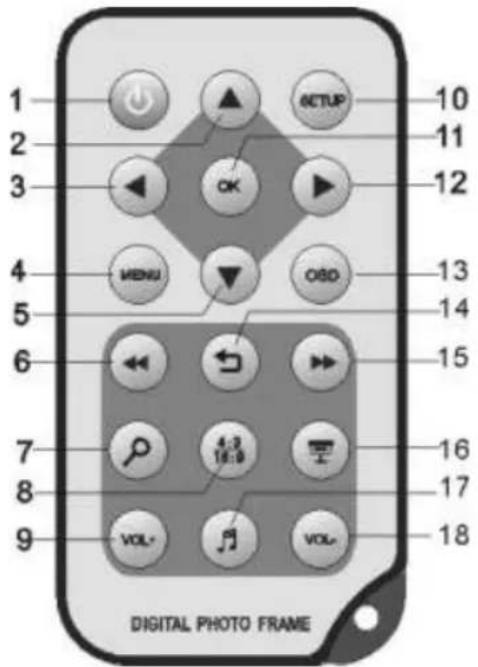
Remote control

- ON/OFF
- Up: Rotate photo clockwise
- ← Left: View previous photo
- MENU: Return to the main menu
- ▼ Down: Rotate photo anticlockwise
- ← View the previous page in thumbnail mode
- Zoom
- 4:3/16:9: Set the displayed photo to the correct format manually
-
VOL+ Increase volume
-
SETUP: Return to system settings
- OK: Play/Pause/ENTER
- ➤ Right; View next photo
- OSD; open or close the „tool“ - bar
- Return: Return to the previous menu
- ▶ View the next page in thumbnail mode
- Start slide show
- 📋 Switch background music on/off during slide show
- VOL- Decrease volume
Remote control
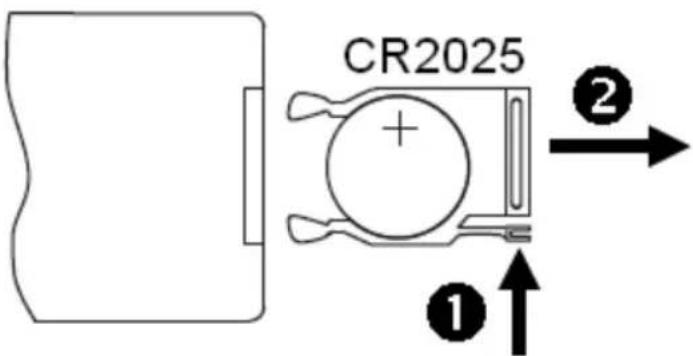
Inserting the battery
To insert/replace the battery, proceed as follows:
◆ Remove the battery compartment from the remote control by pressing in the locking mechanism while simultaneously pulling out the battery compartment.
◆ Remove the used battery and insert a new battery of type CR2025 (button cell) in the battery compartment. Be sure to install the battery according to the correct polarity.
◆ Slide the battery compartment back into the remote control.
GB

Getting started
GB
Safety instructions

WARNING
Personal injury and material damage may occur when using the device for the first time.
Observe the following safety instructions to avoid these dangers.
▶ Packaging materials may not be used as toys. There is a risk of suffocation.
▶ Follow the instructions for positioning the device and making the electrical connections to prevent personal injury and material damage.
Extent of delivery and delivery inspection
The device includes the following components as standard:

• Digital picture frame
• Power supply adapter
- Remote control
- Operating instructions (not shown)
NOTE
▶ Check the delivery for completeness and visible damage. Inform your supplier/dealer in the event of incomplete or damaged deliveries.
Unpacking
When unpacking the device, proceed as follows:
◆ Take the device out of the box and remove the packaging material.
◆ Remove the packaging material for the accessories.
◆ Remove the protection foil on the LCD colour screen of the device.
Disposal of packaging materials
The packaging protects the device from damage during transportation. The packaging materials have been selected according to environmental and disposal factors and can therefore be recycled.

Recycling packaging saves raw materials and reduces the volume of waste. Dispose of packaging materials that are no longer needed according to locally applicable regulations.
NOTE
▶ If possible, retain the original packaging for the duration of the warranty period so that you can pack the device properly in the event of warranty claims.
Positioning requirements
The device must be positioned according to the following requirements in order to ensure safe and error-free operation:
■ Place the device on a flat, level surface.
■ Do not place the device in a hot, wet, or very humid environment.
■ The device requires adequate air circulation in order to function properly. During operation, do not place the device on soft surfaces, carpets, or other materials that might block air circulation.
■ The socket must be easily accessible so that it is easy to disconnect the power supply adapter in case of an emergency.
Operation
Using the menu
GB
The device is equipped with a user-friendly menu. The menu appears on the screen.
◆ The following types of storage media can be read:
- SD/SDHC cards
- MMC cards
- Memory sticks
- USB storage media
◆ Switch on the device by pressing the ON/OFF switch
NOTE
▶ When the device starts up for the first time, a language selection menu opens. Select the operating language you wish to use in this menu.
The device always starts automatically at the main menu.


GB
NOTE
The currently selected mode (setup/memory card/USB) is always highlighted clearly in blue.
You open the main menu using the [MENU] button. In the menu, use the [▲][▼] buttons to move around, and select the desired function.
When you confirm your selection by pressing [OK], a corresponding submenu appears. In this menu, use the [▲] or [▼] buttons to move around, and select the desired line. The selected line is highlighted in colour.
Confirm your selection using the [OK] button. Usually, an additional menu will then appear, in which you move around using the [◀][▶][▲][▼] buttons and select the desired setting.
Use button [←] to exit the current menu level.
For orientation purposes, the menu structure is also included in the Appendix.
You can control the device using the buttons on the rear or with the included remote control.

System settings
To enter the setup menu, press the [SETUP] button on your remote control or use the [▲][▼] buttons on the rear of the device or the remote control to access the "Setup" menu item.
The following menu items are available:
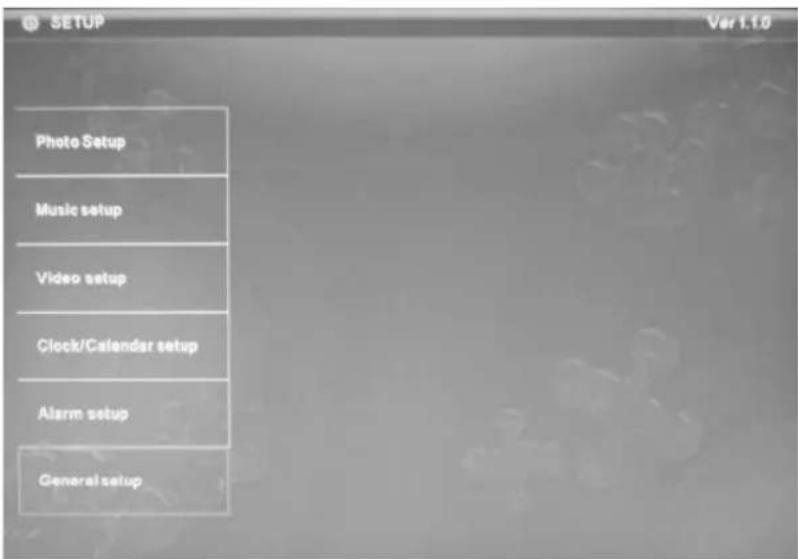
| Slide show interval | The display time of the image can be set here (from 3 sec. up to 15 min) | |
| Photo mode | Select whether the photo is to be displayed in full-screen mode or in its actual proportions (standard) | |
| Photo settings | Image transition | Select between random or continuous image transitions |
| Date stamp | Select whether the photo's creation data is to be displayed in photo mode or in the slide show | |
| Random | Select whether the photos are to be displayed in order or randomly in the slide show |
GB

GB
| Music settings | Function menu for repeating the music files | |
| Video settings | Function menu for repeating the video files | |
| Clock/calendar/setup | Display photo | Select whether you want images to be displayed in the background of the clock/calendar menu here. |
| Set time | Function menu for setting the time | |
| Set date | Function menu for setting the date | |
| Set date format | Function menu for setting the date format | |
| Set time format | Function menu for setting the time format | |
| Alarm setup | Function menu for setting up to 4 alarm times and 3 alarm tonevariants | |
| General Setup | Language | Select the desired language menu/operating language |
| Brightness | ||
| Contrast | ||
| Saturation | ||
| Auto start | Select which function (photo, video, clock, calendar, main menu) you want the device to start after the device is switched on | |
| Switch-on time | Select when the device should switch on | |
| Switch-off time | Select when the device should switch off | |
| Information time | Select the length of time that you want the information bar to be displayed | |
| Default | Function menu for resetting to factory settings |

Functions
Photo
GB
The photo slide show starts automatically after the device is switched on and if a storage medium is inserted. However, you can also start the photo slide show from any menu by pushing the 📋 button on the remote control. It always starts with the first photo. To pause the slide show and display an individual photo, press the Play button [▶] on the device or the [OK] button on the remote control. You can continue the slide show by pushing this button again.
Thumbnail mode
In the photo mode you can display images from the storage medium on the screen as thumbnails. Up to 15 photos can be displayed at the same time.
- Switch on the device and insert a storage medium.
- The device always starts automatically with the photo slide show.
- Press the Exit button ←. The thumbnail mode appears
- Now you are able to navigate to the desired image using the navigation buttons [◀][▶][▲][▼].
- Press the play button [▶] to view the selected image.
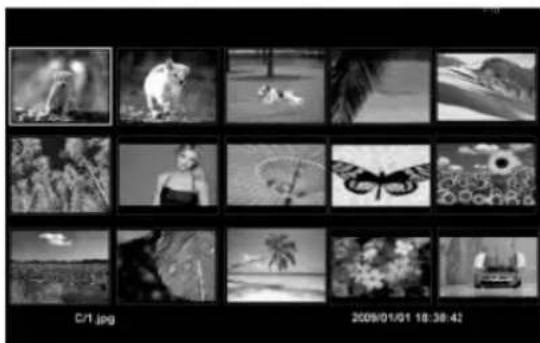
- To move directly to the next thumbnail image page, use the "or" button on the remote control.
NOTE
▶ Under "System Settings" » "General Setup" » "Auto Start", you can select which function the device should launch after it is switched on. (See page 43/44).
Music
GB
Select this function to listen to music. The available MP3 files are displayed in a folder structure. Select a track and confirm with [OK] to play the track.
![Music Title: [ ] SMOKE Audio: HDMI Reviewers Album: OCD/EDITION Yield: 2005 20:45 2007 20:45](/content/2026/06/1146509/images/94b1f559c520d3d7a7a228577541923923d4e21855a5eeb09226788489c3f9be.jpg)
Pressing the [OSD] button on your remote control or the [M] button on the device brings up a helpful info/tool bar:



NOTE
▶ The display time can be set in the setup menu.
NOTE
▶ To leave the current menu level or to end playback, press the "Return" [←] button on the remote control or the device. Return to the main menu by repeatedly pressing this button.

Movie
Select this function to watch movies/videos. Press the [OK] button to play the first video.
The available videos are displayed in a folder structure. The videos can be displayed by selecting the menu item "Folder".
Select a video and confirm with [OK] to play the video.

GB
NOTE
This function can only be executed if files of the correct format have been saved on the storage medium.
▶ Please make sure that a storage medium is inserted in the device.
Pressing the [OSD] button on your remote control or the [M] button on the device brings up a helpful info/tool bar:

NOTE
▶ The display time can be set in the setup menu.
NOTE
▶ To leave the current menu level or to end playback, press the "Return" [←] button on the remote control or the device. Return to the main menu by repeatedly pressing this button.
NOTE
▶ Under "System Settings" » "General Setup" » "Auto Start", you can select which function the device should launch after it is switched on. (See page 43/44).
Folder
GB
The device can copy, delete and move images, videos, music and files on the storage medium. Proceed as follows:
- Press the [MENU] button on your remote control or the rear of the device to access the main menu.
- Select the storage medium (SD/MMC/MS or USB).
- After the [File] menu item is selected, all files contained on the storage medium are displayed.
- Select the file/photo etc. you wish to copy or delete using the [▲][▼] buttons on your remote control or the rear of the device.
- Select the file/photo etc. using the [▶] button.
The file/photo is now highlighted with a red check mark.
- Now press the [OSD] button on your remote control or the [MENU] button on the rear of the device. Select "Copy" to save the selected file or photo on another storage medium or "Delete" to delete the selected file or photo from the storage medium.


WARNING
▶ Once a file/photo has been deleted, it cannot be restored.
NOTE
▶ This device does not have an internal memory.
- Use the [MENU] or [←] button on your remote control to return to the main menu.

Additional functions
The following additional functions are available:
Calendar
The calendar can be found in the main menu. To call up the calendar view, press the “◀▶” buttons on the “Calendar” menu item and press [OK]. The calendar view appears with the set date and time.
GB

Time
The clock display is located in the main menu. To call up the clock view, use the “◀▶” buttons to select the “Time” menu item and press [OK]. The clock view will now appear.

NOTE
▶ Under "System Settings" » "General Setup" » "Auto Start", you can select which function the device should launch after it is switched on. (See page 43/44).
49

Alarm
GB
The device offers four different alarm/alarm time settings. The alarm/alarm times set are displayed in both the calendar and clock views.
The various alarm times can be set in the system settings.
■ In the main menu, select the "System Settings" menu item.
■ Now use the [▲][▼] buttons to select "Alarm Setup".
■ Now use the [▲][▼] buttons to select alarm 1 – 4 and then press the [OK] button on the remote control or the Play button [▶] on your device to set the alarm time.
■ You can now use the [▲][▼] buttons to set your desired settings.
■ The [▶] button will always move you to the next setting item.
■ You can set the alarm with the [▲][▼] buttons as follows:
Off: Deactivate the alarm function
Daily: The alarm is activated for every day
One-time: The alarm will go off once only
■ In addition, you have the option to set different alarm tones for your alarm times (church bells/rooster/forest).
■ To confirm your entry once it is complete, press the [OK] button on the remote control or the Play button [▶] on your device.

▶ To leave the current menu level or to end playback, press the "Return" [←] button on the remote control or the device. Return to the main menu by repeatedly pressing this button.
Activating the device's automatic on/off function
The device offers the option to automatically turn itself off or on at a specified time.
■ In the main menu, select the "System Settings" menu item.
■ Now use the [▲][▼] buttons to select "General Setup" and confirm your entry with the [OK] button on the remote control or the Play button [▶] on your device.
■ Now use the [▲][▼] buttons to move to the on time or off time settings.
■ You can now use the [▲][▼] buttons to set your desired settings.
■ The [▶] button will always move you to the next setting item.
■ You can set the on/off time with the [▲][▼] buttons as follows:
Off: Deactivates the automatic on/off function
Daily: The device turns itself on or off at the specified time every day
One-time: The device turns itself on or off at the specified time once only
■ To confirm your entry once it is complete, press the [OK] button on the remote control or the Play button [▶] on your device.
NOTE
▶ To leave the current menu level or to end playback, press the "Return" [←] button on the remote control or the device. Return to the main menu by repeatedly pressing this button.
Cleaning and care
GB
This chapter contains important information for the cleaning and care of the device.
Safety instructions
CAUTION
Moisture can damage the device.
▶ To prevent irreparable damage, make sure that no moisture gets into the device when you clean it.
Cleaning
The display on your device is located behind protective glass.
■ Only clean the display with a dry, soft cloth.
■ Do not apply pressure to the screen surface when you clean the device.
■ To keep from damaging the surface, do not use solvents or alcohol-based cleaners to clean the device.
NOTE
For gentle cleaning and care of the display, we recommend that you use a microfibre cleaning cloth. This is available from Hama (item no. 51076/51077), individually or together with a cleaning gel as part of a set.
■ Clean the rest of the device with a dry cloth. You can lightly dampen the cloth if the device is very dirty.
Troubleshooting
This chapter contains important information for localising and rectifying errors. Observe the information to avoid dangers and material damage.
Safety instructions
WARNING
Observe the following safety instructions to avoid safety risks and material damage:
▶ Repairs to electrical devices may only be carried out by specialists who have been trained by the manufacturer. Improper repairs can result in significant danger to the operator and damage to the device.
Causes of errors and error rectification
The following table can be used to localise and rectify minor errors with the device:
| Error | Possible cause | Solution | |
| General information | Display is blank | Device is switched off | Switch on the device. |
| Power supply adapter not connected correctly | Ensure that the power supply adapter is plugged in and connected to the device. | ||
| No mains power | Check your fuse box. | ||
| Device is faulty | Inform our customer service department. | ||
| DPF | No image appears | No storage medium is inserted | Insert a storage medium. |
| The storage medium does not contain data | Check your storage medium. | ||
| No Sound | The device is set to “Mute” | Increase the volume of the device | |
| Video/music does not play | No storage medium is inserted | Insert a storage medium. | |
| The storage medium does not contain any files | Check your storage medium | ||
| Music does not play | Incorrect format | Convert the music file to mp3 format | |
| Videos do not play, or playback is not smooth | Incorrect format | Convert the video to a different format |
NOTE
▶ Contact our customer service department if the problem remains after taking the steps detailed above.

Storage
GB
If you are not going to use the device for an extended period of time, switch off the device, disconnect it from power, and store it in a clean, dry place that is away from direct sunlight.
Disposal
Device disposal

Do not dispose of the device with household waste. This product is subject to the European 2002/96/EC Waste Electrical and Electronic Equipment (WEEE) directive.
Dispose of the device at an approved waste disposal company or at your local waste disposal facility. Observe all applicable regulations. In case of doubt, contact your waste disposal facility.
Battery disposal
Batteries must not be disposed of with household waste. Consumers are obliged by law to return batteries to the public collection points set up for this purpose. This legal obligation ensures that batteries are disposed of in an environmentally-friendly fashion. Only return discharged batteries.
Appendix
Technical specifications
| General information | |
| Power supply input | 100-240 V AC / 50/60 Hz / 0,3 A Max |
| Power supply output | 5 V DC / 2,0 A |
| Power consumption | < 6,2 W |
| Dimensions (L x W x H) | 265.5 x 215 x 22.5 mm(without the base) |
| Weight | approx. 638 g |
| Recommended ambient temperature for device | 0 to 30°C (32 to 85°F) |
| Relative humidity | 40 to 64% (non-condensing) |
| Screen | |
| Display | 25,4 cm (=10.0") |
| Resolution | 1024 x 768 (RGB) |
| Contrast | 400 : 1 |
| Format | 4:3 |
| Max. brightness | Max. 200 cd/m2 |
| Remote control | |
| Button cell battery (CR 2025) | 3 V |
| Compatible storage media |
| SD/SDHC/MMC/MS and USB 2.0 |
| Supported file formats |
| JPEG, MP3, WMA, MPEG1, MPEG4, AVI |
GB
Menu structure for the DPF
GB
Storage medium
Photo
Music
Video
Folder
Time
Calendar
Setup
Photo settings
Slide show interval
Photo mode
Image transition
Date stamp
Random
Music settings
Music repeat mode
Video settings
Video repeat mode
Clock/calendar setup
Display photo
Set time
Set date
Set date format
Set time format
Alarm setup
Alarm 1
Alarm 2
Alarm 3
Alarm 4
Ringtone volume
General setup
Language
Brightness
Contrast
Saturation
Auto start
Switch-on time
Switch-off time
Information time
Default
Support information
Contact your dealer or Hama Product Consulting if you have a faulty product:
GB
Support hotline – Hama Product Consulting (German/English):
Phone: +49 (0) 9091/502-115
Fax: +49 (0) 9091 / 502 - 272
Email: mailto:produktberatung@hama.de
For more product information see www.hama.com.
CE
⑤ Mode d'emploi
Sommaire
Introduction .....59
Préface....59
Support technique .....85
Introduction
Préface
Chère cliente, cher client,
Sécurité
Télécommande
Insertion de la pile
Mise en marche
Mesures de sécurité
F
AVERTISSEMENT
ATTENTION

REMARQUE
F
Fonctions
Photo
Musique
Dossier
F
Heure
Alarme
Entreposage

ATENCIÓN

NOTA
Ajustes del sistema
E
Funciones
Foto
Música
Film
Carpeta
Alarma
Limpieza y cuidadod
Almacenamiento
Menu structure for the DPF
E
Medio de memoria
Menu structure for the DPF .140
Supportinformatie.....141
Inleiding
Voorwoord
Geachte klant,
Waarschuwingen
Opbouw en functie
Opbouw en functie
Afstandsbediening

NL

Inbedrijfname

ATTENTIE

AANWIJZING

Systeeminstellingen
NL
Muziek
Film
Map
Extra functies
Alarm
Bewaren
Menu structure for the DPF
![graph TD A["Geheugenmedium"] --> B["Foto"] A --> C["Muziek"] A --> D["Video"] A --> E["Map"] A --> F["Tijd"] A --> G["Kalender"] A --> H["Setup"] A --> I["Foto-instellingen"] I --> J["Diashowinterval"] I --> K["Fotomodus"] I --> L["Beeldovergangen"] I --> M["Dat.-stempel"] I --> N["Willekeurig"] I -…](/content/2026/06/1146509/images/432a81258880c4a056bf1495da1380aa2dca2c679b3b3605e070ac9cf122a428.jpg)
Supportinformatie
Avvertimento
Telecomando
Messa in funzione
ATTENZIONE
INDICAZIONE

Musica
Cartella
Pulizia e cura
Immagazzinamento
Varningar
Säkerhet
Fjärrkontroll
Lägga i batterier
Börja använda
- Digital fotoram
- Adapter
• Fjärrkontroll
• Bruksanvisning (ingen bild)
INFORMATION
Elanslutning

OBSERVERA

INFORMATION
Systeminställningar
Musik
Film
Folder
Extrafunktioner
s
Tid
Alarm
Förvaring
Menu structure for the DPF
![graph TD A["Lagringsmedium"] --> B["Foto"] A --> C["Musik"] A --> D["Video"] A --> E["Mapp"] A --> F["Tid"] A --> G["Kalender"] A --> H["Setup"] A --> I["Fotoinställningar"] I --> J["Bildspelsintervall"] I --> K["Fotoläge"] I --> L["Bildväxlingar"] I --> M["Dat.stämpel"] I --> N["Slumpmässigt"] I --…](/content/2026/06/1146509/images/4541c1ff464782818c331fc5c006ec74c48ab3df19d3bf2e8f643da7d4e0147d.jpg)
Supportinformation
Varoituksia
Turvallisuus
Asennus ja toiminta
Asennus ja toiminta
Kaukosäädin
FIN
Kaukosäädin
Pariston asentaminen
Käyttöönotto
Turvaohjeet

VAROITUS
Sähkökytkentä

HUOMAA

OHJE
Toiminnot
Kuva
Musiikki
Elokuva
Kansio
Lisätoiminnot
FIN
Kellonaika
Hälytys
Puhdistus ja hoito
Säilytys
Budowa i działanie
Budowa i działanie
Uruchamianie
UWAGA

WSKAZÓWKA
Funkcje
Zdjęcia
Muzyka
Folder
Funkcje dodatkowe
Alarm
Przechowywanie
Struktura menu DPF


hama®
Hama GmbH & Co KG
Dresdner Str. 9
D-86651 Monheim/Germany
00095219/03.11
CE
©

© 2009 by Hama GmbH & Co KG
We reserve the right to make technical changes, we are not liable for any errors or printing errors.

- DIGITALER BILDERRAHMEN 10.0 DIGITAL PHOTO FRAME
- EINFÜHRUNG
- VORWORT
- AUFBAU UND FUNKTION
- FERNBEDIENUNG
- BATTERIE EINLEGEN
- D INBETRIEBNAHME
- SICHERHEITSHINWEISE
- WARNING
- ACHTUNG
- D
- HINWEIS
- SYSTEMEINSTELLUNGEN
- FUNKTIONEN
- PHOTO
- MUSIK
- FILM
- ZUSATZFUNKTIONEN
- UHRZEIT
- LAGERUNG
- GB OPERATING INSTRUCTIONS
- CONTENTS
- GB
- INTRODUCTION
- PREFACE
- ABOUT THESE OPERATING INSTRUCTIONS
- COPYRIGHT
- WARNINGS
- DANGER
- CAUTION
- NOTE
- INTENDED USE
- DANGER CAUSED BY UNINTENDED USE
- LIMITATION OF LIABILITY
- SAFETY
- BASIC SAFETY INSTRUCTIONS
- DANGER DUE TO ELECTRICAL CURRENT
- DANGER OF DEATH DUE TO ELECTRICAL CURRENT
- COMING INTO CONTACT WITH LIVE ELECTRICAL LINES OR COMPONENTS CAN BE FATAL
- DESIGN AND FUNCTIONALITY
- REMOTE CONTROL
- INSERTING THE BATTERY
- GETTING STARTED
- SAFETY INSTRUCTIONS
- EXTENT OF DELIVERY AND DELIVERY INSPECTION
- UNPACKING
- DISPOSAL OF PACKAGING MATERIALS
- POSITIONING REQUIREMENTS
- OPERATION
- USING THE MENU
- SYSTEM SETTINGS
- FUNCTIONS
- THUMBNAIL MODE
- MUSIC
- MOVIE
- FOLDER
- ADDITIONAL FUNCTIONS
- CALENDAR
- TIME
- ALARM
- ACTIVATING THE DEVICE'S AUTOMATIC ON/OFF FUNCTION
- CLEANING AND CARE
- MOISTURE CAN DAMAGE THE DEVICE
- CLEANING
- TROUBLESHOOTING
- CAUSES OF ERRORS AND ERROR RECTIFICATION
- STORAGE
- DISPOSAL
- DEVICE DISPOSAL
- BATTERY DISPOSAL
- APPENDIX
- TECHNICAL SPECIFICATIONS
- SUPPORT INFORMATION
- ⑤ MODE D'EMPLOI
- SOMMAIRE
- PRÉFACE
- SÉCURITÉ
- TÉLÉCOMMANDE
- INSERTION DE LA PILE
- MISE EN MARCHE
- MESURES DE SÉCURITÉ
- F
- AVERTISSEMENT
- ATTENTION
- REMARQUE
- FONCTIONS
- MUSIQUE
- DOSSIER
- HEURE
- ALARME
- ENTREPOSAGE
- ATENCIÓN
- NOTA
- AJUSTES DEL SISTEMA
- FUNCIONES
- FOTO
- MÚSICA
- CARPETA
- ALARMA
- LIMPIEZA Y CUIDADOD
- ALMACENAMIENTO
- MENU STRUCTURE FOR THE DPF
- E
- INLEIDING
- VOORWOORD
- WAARSCHUWINGEN
- OPBOUW EN FUNCTIE
- AFSTANDSBEDIENING
- NL
- INBEDRIJFNAME
- ATTENTIE
- AANWIJZING
- SYSTEEMINSTELLINGEN
- MUZIEK
- MAP
- EXTRA FUNCTIES
- BEWAREN
- SUPPORTINFORMATIE
- AVVERTIMENTO
- TELECOMANDO
- MESSA IN FUNZIONE
- ATTENZIONE
- INDICAZIONE
- MUSICA
- CARTELLA
- PULIZIA E CURA
- IMMAGAZZINAMENTO
- VARNINGAR
- SÄKERHET
- FJÄRRKONTROLL
- LÄGGA I BATTERIER
- BÖRJA ANVÄNDA
- INFORMATION
- ELANSLUTNING
- OBSERVERA
- SYSTEMINSTÄLLNINGAR
- EXTRAFUNKTIONER
- TID
- FÖRVARING
- SUPPORTINFORMATION
- VAROITUKSIA
- TURVALLISUUS
- ASENNUS JA TOIMINTA
- KAUKOSÄÄDIN
- FIN
- PARISTON ASENTAMINEN
- KÄYTTÖÖNOTTO
- TURVAOHJEET
- VAROITUS
- SÄHKÖKYTKENTÄ
- HUOMAA
- OHJE
- TOIMINNOT
- KUVA
- MUSIIKKI
- ELOKUVA
- KANSIO
- LISÄTOIMINNOT
- KELLONAIKA
- HÄLYTYS
- PUHDISTUS JA HOITO
- SÄILYTYS
- BUDOWA I DZIAŁANIE
- URUCHAMIANIE
- UWAGA
- WSKAZÓWKA
- FUNKCJE
- ZDJĘCIA
- MUZYKA
- FUNKCJE DODATKOWE
- PRZECHOWYWANIE
- HAMA®
Brand : HAMA
Model : Premium Pulsar 00095219
Category : Digital photo frame