
LB 348V - Lawn mower HUSQVARNA - Free user manual and instructions
Find the device manual for free LB 348V HUSQVARNA in PDF.
Download the instructions for your Lawn mower in PDF format for free! Find your manual LB 348V - HUSQVARNA and take your electronic device back in hand. On this page are published all the documents necessary for the use of your device. LB 348V by HUSQVARNA.
USER MANUAL LB 348V HUSQVARNA
Warning: rotating cutter. Keep hands
Warning: rotating parts. Keep hands
and feet clear. This product is in accordance with applicable EC directives. Noise emission to the environment according to the European Community’s Directive. The machine’s emission is specified in the Technical data chapter and on the label. Never use the machine indoors or in spaces lacking proper ventilation. Exhaust fumes contain carbon monoxide, an odourless, poisonous and highly dangerous gas. Risk of explosion Always shut off the engine before refuelling. Hot surface. Stop the engine. Start the engine Remove the safety switch (battery) before performing maintenance work or leaving the machine unattended. Explanation of warning levels The warnings are graded in three levels. WARNING! IMPORTANT! CAUTION!
WARNING! Used if there is a risk of serious injury or death for the operator or damage to the surroundings if the instructions in the manual are not followed.
IMPORTANT! Used if there is a risk of injury to the operator or damage to the surroundings if the instructions in the manual are not followed. CAUTION! Used if there is a risk of damage to materials or the machine if the instructions in the manual are not followed. STOP STOPCONTENTS English – 75 Contents
MACHINE´S SAFETY EQUIPMENT
General ................................................................. 78
ASSEMBLING AND ADJUSTMENTS
- General p. 79
- Handle p. 79
- Cutting height p. 80
- Filling with oil p. 80
- FUEL HANDLING General p. 81
- Fuel p. 81
- Fueling p. 81
- Transport and storage p. 81
- OPERATING Personal protective equipment p. 82
- General safety precautions p. 82
- Basic working techniques p. 83
- Transport and storage p. 83
- Starting and stopping p. 84
- MAINTENANCE General p. 86
- Maintenance schedule p. 86
- General inspection p. 86
- External cleaning p. 86
- Oil level p. 86
- Oil change p. 86
- Cutting equipment p. 87
- Battery p. 88
- Spark plug p. 88
- Air filter p. 88
- Fuel system p. 88
- Recycling p. 88
- TECHNICAL DATA Technical data p. 89
- EC Declaration of Conformity PRESENTATION 76 – English Dear Customer, Congratulations on your choice to buy a Husqvarna product! Husqvarna is based on a tradition that dates back to 1689, when the Swedish King Karl XI ordered the construction of a factory on the banks of the Husqvarna River, for production of muskets. The location was logical, since water power was harnessed from the Huskvarna River to create the water-powered plant. During the more than 300 years in existence, the Husqvarna factory has produced a lot of different products, from wood stoves to modern kitchen appliances, sewing machines, bicycles, motorcycles etc. In 1956, the first motor driven lawn mowers appeared, followed by chain saws in 1959, and it is within this area Husqvarna is working today. Today Husqvarna is one of the leading manufacturers in the world of forest and garden products, with quality as our highest priority. The business concept is to develop, manufacture and market motor-driven products for forestry and gardening, as well as for the building and construction industry. Husqvarna ′s aim is also to be at the front edge for ergonomics, usability, security and environmental protection. That is the reason why we have developed many different features to add to our products within these areas. We are convinced that you will appreciate with great satisfaction the quality and performance of our product for a very long time to come. The purchase of one of our products gives you access to professional help with repairs and service whenever this may be necessary. If the retailer who sells your machine is not one of our authorised dealers, ask for the address of your nearest service workshop. It is our wish that you will be satisfied with your product and that it will be your companion for a long time. Think of this operator ′s manual as a valuable document. By following its content (usage, service, maintenance, etc), the life span and the second-hand value of the machine can be extended. If you sell this machine, make sure that the operator ′s manual is passed on to the buyer. Thank you for using a Husqvarna product. Husqvarna AB has a policy of continuous product development and therefore reserves the right to modify the design and appearance of products without prior notice. Steps before using a new lawn mower p. 91
- Please read the operator's manual carefully.
- Check that the cutting equipment is correctly fitted and adjusted. See instructions under the heading Assembly.
- Fill with fuel and oil in the engine. A container with sufficient oil quantity is supplied with the machine. See the instructions under the heading fuel handling. Husqvarna AB has a policy of continuous product development and therefore reserves the right to modify the design and appearance of products without prior notice.
WARNING! Under no circumstances may the design of the machine be modified without the permission of the manufacturer. Always use original accessories. Non-authorized modifications and/or accessories can result in serious personal injury or the death of the operator or others.
WARNING! A lawn mower is a dangerous tool if used carelessly or incorrectly and can cause serious, even fatal injuries. It is extremely important that you read and understand the contents of this operator's manual.
WARNING! Long-term inhalation of the engine's exhaust fumes can represent a health hazard.English – 77 WHAT IS WHAT? What is what on the lawn mower?
1 Handle / handlebar 2Drive 3 Starter handle (LB 348V, LC 348V, LC 353V, LV 353VB) 4 Grass catcher (not LB348V) 5 Fuel tank 6 Air filter 7 Spark plug 8 Cutting cover 9 Muffler 10 Water connector 11 Protective cover 12 Oil tank 13 Cutting height control 14 Rear deflector (not LB348V) 15 Engine brake handle / Start bar (LC 353VI) 16 Blade brake (LC 353VB) / Start inhibitor (LC 353VI) 17 Electric starter (LC 353VE, LC 348VE) 18 Symbols 19 Operator′s manual 20 Stop switchMACHINE´S SAFETY EQUIPMENT 78 – English General This section describes the machine´s safety equipment, its purpose, and how checks and maintenance should be carried out to ensure that it operates correctly. Cutting cover
- The cutting cover is designed to reduce vibration and to reduce the risk of cuts.Checking the cutting cover• Make sure the cutting cover is not damaged and that there are no visible defects such as cracks. Ignition key (LC 353VE, LC 348VE) Machines with electric start have a starter key or an easily removed battery. These should be kept separate from the machine when it is not being used or is unattended. • Pull the key towards you to remove it.• LC 353VITo remove the battery (main switch), hold in the lock buttons and pull it to the side. Engine brake handle
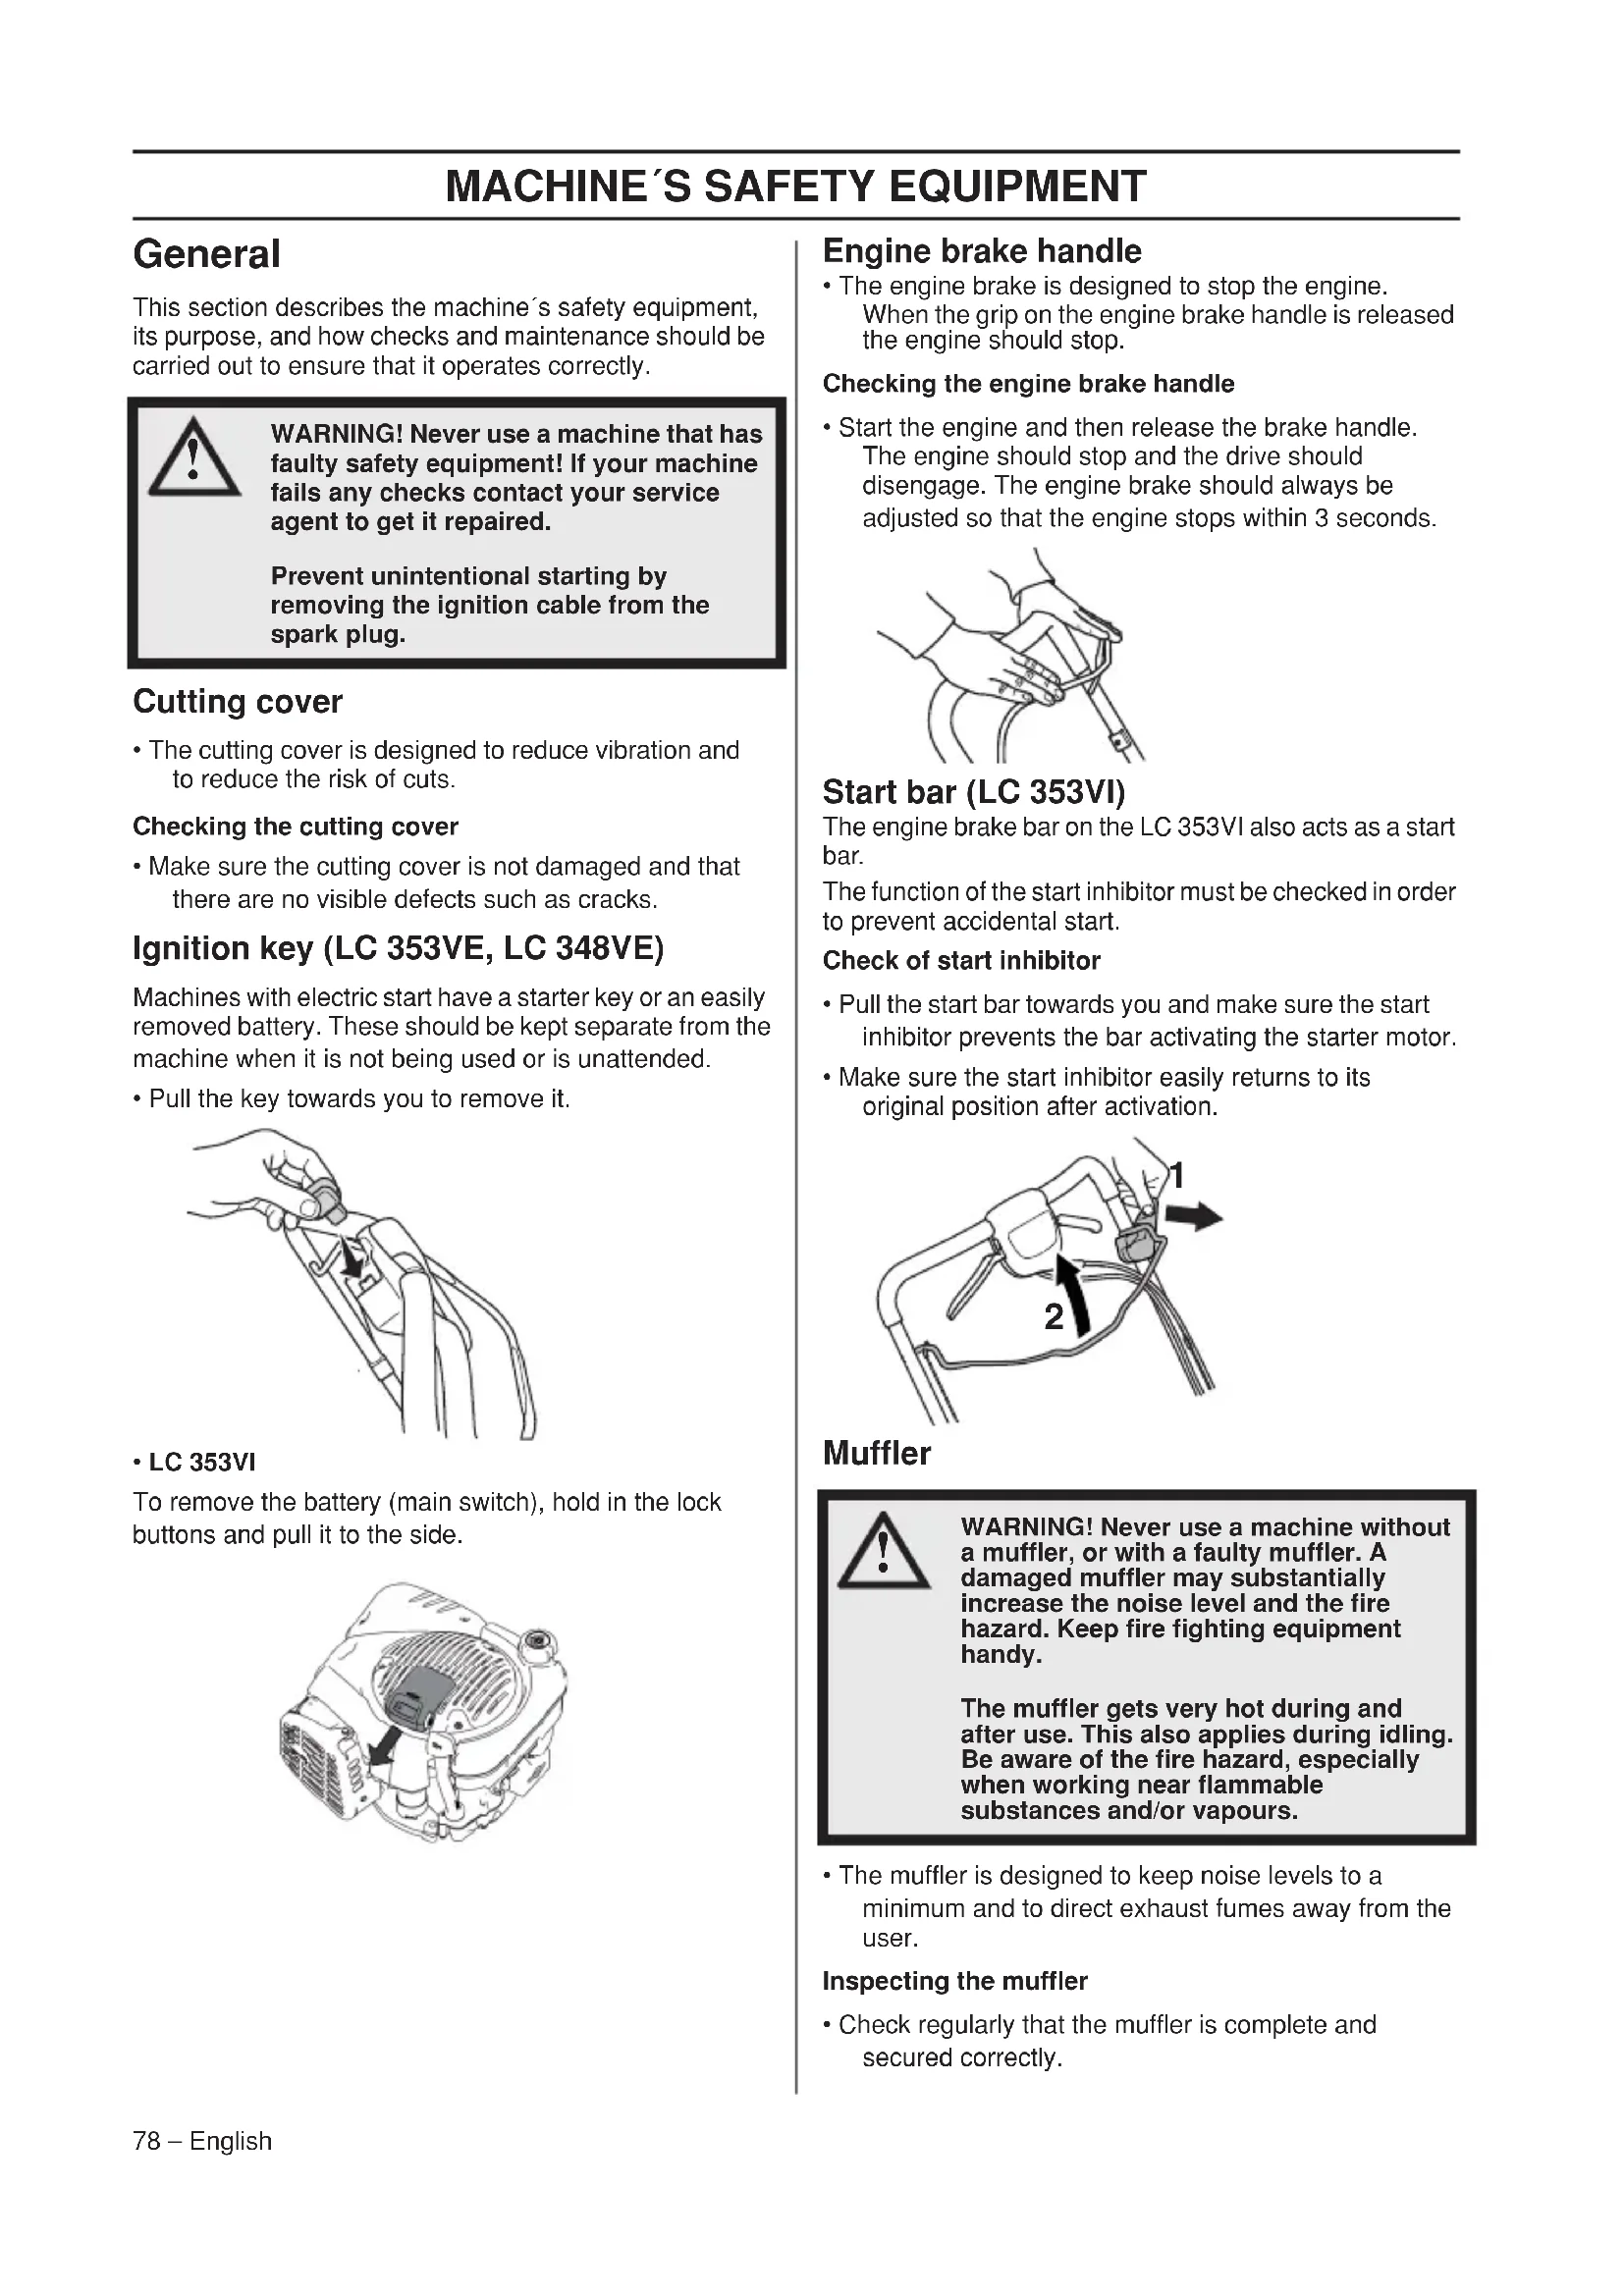
- The engine brake is designed to stop the engine. When the grip on the engine brake handle is released the engine should stop.Checking the engine brake handle• Start the engine and then release the brake handle. The engine should stop and the drive should disengage. The engine brake should always be adjusted so that the engine stops within 3 seconds. Start bar (LC 353VI) The engine brake bar on the LC 353VI also acts as a start bar. The function of the start inhibitor must be checked in order to prevent accidental start.Check of start inhibitor• Pull the start bar towards you and make sure the start inhibitor prevents the bar activating the starter motor.• Make sure the start inhibitor easily returns to its original position after activation. Muffler
- The muffler is designed to keep noise levels to a minimum and to direct exhaust fumes away from the user.Inspecting the muffler• Check regularly that the muffler is complete and secured correctly. WARNING! Never use a machine that has faulty safety equipment! If your machine fails any checks contact your service agent to get it repaired.Prevent unintentional starting by removing the ignition cable from the spark plug.
WARNING! Never use a machine without a muffler, or with a faulty muffler. A damaged muffler may substantially increase the noise level and the fire hazard. Keep fire fighting equipment handy.The muffler gets very hot during and after use. This also applies during idling. Be aware of the fire hazard, especially when working near flammable substances and/or vapours.
2ASSEMBLING AND ADJUSTMENTS
English – 79 General Handle Assembly
- Loosen the lower knobs.• Adjust the hight of the handle and tighten the knobs securely. Assembly of the catcher
- Hook the upper cover on the attachments on the lower cover.• Lower the upper cover. Make sure the edge strip is placed on the outside of the lower cover.• Start by hooking the end of the metal ledge into the slots of the lower cover.• Guide the metal ledge around both the upper and lower cover. Fasten the metal ledge on the lower cover.• Lift the hind shield and suspend the grass container. IMPORTANT! Prevent unintentional starting by removing the ignition cable from the spark plug.ASSEMBLING AND ADJUSTMENTS 80 – English Mulching function A mulching-kit is available as an accessory, to make the machines equipped with a catcher able to be used with mulching function. The Mulching-kit consist of a mulching plug and a mulching knife. Fit the mulching plug in place.
- Lift up the back shield and remove the container.
- Insert the mulching plug into the collector channel.
- Close the shield and ensure that it is locked with the mulching plug. Cutting height The cutting height can be adjusted in five different steps, mm. Filling with oil
- The oil tank is empty at delivery. Fill the oil slowly. See also instructions under the Maintenance heading. The engine oil should be changed the first time after 5 hours running time. CAUTION! Do not set the cutting height too low as there is a risk that the cutters might hit ground with unevenness.FUEL HANDLING English – 81 General Fuel Petrol
- Use good quality unleaded or leaded petrol.• The lowest octane recommended is 90 (RON). If you run the engine on a lower octane grade than 90 so-called knocking can occur. This gives rise to a high engine temperature, which can result in serious engine damage.• Use low-emission petrol, also known as alkylate petrol, if it is available. Engine oil
- See instructions in the section "Maintenance".• The engine oil should be changed the first time after 5 hours running time. Refer to Technical Data for recommendations on which oil type to use. Never use oil intended for two-stroke engines. Fueling Never start the machine:• If you have spilled fuel or engine oil on the machine. Wipe off the spill and allow the remaining fuel to evaporate.• If you have spilled fuel on yourself or your clothes, change your clothes. Wash any part of your body that has come in contact with fuel. Use soap and water.• If the machine is leaking fuel. Check regularly for leaks from the fuel cap and fuel lines. Transport and storage
- Store and transport the machine and fuel so that there is no risk of any leakage or fumes coming into contact with sparks or open flames, for example, from electrical machinery, electric motors, electrical relays/switches or boilers.• When storing and transporting fuel always use approved containers intended for this purpose. Long-term storage
- When storing the machine for long periods the fuel tank must be emptied. Contact your local petrol station to find out where to dispose of excess fuel. WARNING! Running an engine in a confined or badly ventilated area can result in death due to asphyxiation or carbon monoxide poisoning.Fuel and fuel fumes are highly inflammable and can cause serious injury when inhaled or allowed to come in contact with the skin. For this reason observe caution when handling fuel and make sure there is adequate ventilation.The exhaust fumes from the engine are hot and may contain sparks which can start a fire. Never start the machine indoors or near combustible material!Do not smoke and do not place any hot objects in the vicinity of fuel.NOTICE! The machine is equipped with a four-stroke engine. Make sure that there is always sufficient oil in the oil tank.NOTICE! Check the oil level before starting the lawn mower. A too low oil level can cause serious damage to the engine.
WARNING! Always stop the engine and let it cool for a few minutes before refuelling. The engine should be switched off, and the stop switch in STOP position.Use a petrol can at all times to avoid spillage.When refuelling, open the fuel cap slowly so that any excess pressure is released gently.Clean the area around the fuel cap.Tighten the fuel cap carefully after refuelling. Negligence may lead to the start of a fire.Move the machine at least 3 m from the refuelling point before starting it.OPERATING 82 – English Personal protective equipment You must use approved personal protective equipment whenever you use the machine. Personal protective equipment cannot eliminate the risk of injury but it will reduce the degree of injury if an accident does happen. Ask your dealer for help in choosing the right equipment. Always wear:
- Sturdy, non-slip boots or shoes.
- Heavy, long pants. Do not wear shorts, sandals or go barefoot.
- Gloves must be worn when required, for example when fitting, inspecting or cleaning cutting attachments. General safety precautions This section describes basic safety directions for using the machine. This information is never a substitute for professional skills and experience.
- Please read the operator’s manual carefully and make sure you understand the instructions before using the machine.
- Keep in mind that the operator is responsible for accidents or hazards occuring to other people or their property.
- The machine must be kept clean. Signs and stickers must be fully legible. Always use common sense It is not possible to cover every conceivable situation you can face. Always exercise care and use your common sense. If you get into a situation where you feel unsafe, stop and seek expert advice. Contact your dealer, service agent or an experienced user. Do not attempt any task that you feel unsure of!
WARNING! This machine produces an electromagnetic field during operation. This field may under some circumstances interfere with active or passive medical implants. To reduce the risk of serious or fatal injury, we recommend persons with medical implants to consult their physician and the medical implant manufacturer before operating this machine.
WARNING! The machine can be a dangerous tool if used incorrectly or carelessly, which can cause serious or fatal injury to the operator or others. Never allow children or other persons not trained in the use of the machine to use or service it. The machine should not be used by people with reduced physical or mental capacities or people who are unsuitable for health reasons to operate the machine, without supervision of a person responsible for their safety. Never allow anyone else to use the machine without first ensuring that they have read and understood the contents of the operator’s manual. Never use the machine if you are fatigued, while under the influence of alcohol or drugs, medication or anything that could affect your vision, alertness, coordination or judgement.
WARNING! Unauthorized modifications and/or accessories may lead to serious injury or death to the user or others. Under no circumstances may the design of the machine be modified without the permission of the manufacturer. Do not modify this product or use it if it appears to have been modified by others. Never use a machine that is faulty. Carry out the safety checks, maintenance and service instructions described in this manual. Some maintenance and service measures must be carried out by trained and qualified specialists. See instructions under the Maintenance heading. Always use genuine accessories.OPERATING English – 83 Work area safety
- Branches, twigs, stones, etc. should be removed from the lawn before you start to mow.
- Objects hitting against the cutting attachment could be thrown and cause damage to people and objects. Keep people and animals well away.
- Never use the machine in bad weather, for instance in fog, in rain, damp or in wet locations,strong winds, intense cold, risk of lightning, etc. Working in bad weather is tiring and can lead to dangerous conditions, e.g. slippery surfaces.
- Observe your surroundings to ensure that nothing can affect your control of the machine.
- Beware of roots, stones, twigs, pits, ditches etc. Tall grass can hide obstacles.
- Mowing slopes can be dangerous. Do not use the lawn mower on very steep slopes. The lawn mower should not be used on inclines greater than 15 degrees.
- On sloping ground you should work along the slope. It is much easier to work along a slope than it is to work up and down it.
- Be careful when you are approaching hidden corners and objects that could block your view. Work safety
- A lawn mower is only designed to mow lawns. All other use is forbidden.
- Wear personal protective equipment. See instructions under the ”Personal protective equipment” heading.
- Do not start a lawn mower unless the cutter and all covers are fitted correctly. Otherwise the cutter could come loose and cause personal injuries.
- Make sure the cutter does not hit foreign objects such as stones, roots or the like. This can make the cutter dull and bend the engine shaft. A bent axle gives imbalance and heavy vibration, which results in a great risk of the cutter becoming loose.
- The brake handle must never be permanently anchored in handle when the machine is running.
- Place the lawn mower on firm, flat surface and start it. Make sure that the cutter cannot come into contact with the ground or other objects.
- Always place yourself behind the machine. Allow all the wheels to remain on the ground and keep both hands on the handle when mowing. Keep your hands and feet away from the rotating blades.
- Do not tilt the machine when the engine is running. Never run with the machine when it is running. You should always walk with the lawn mower.
- Pay particular attention when pulling the machine towards you during work.
- Never lift up the lawn mower or carry it around when the engine is running. If you must lift the lawn mower, first switch off the engine and disconnect the ignition lead from the spark plug.
- Do not mow the lawn while walking backwards.
- The engine should be switched off when moving over ground that is not to be mowed. For example, gravel paths, stone, shingle, asphalt, etc.
- Never run with the machine when it is running. You should always walk with the lawn mower.
- Shut down the engine before changing the cutting height. Never make adjustments with the engine running.
- Never leave the machine unsupervised with the motor running. Turn off the motor. Ensure the cutting attachment has stopped rotating.
- If any foreign object is hit or if vibrations occur stop the machine immediately. Disconnect the HT lead from the spark plug. Check that the machine is not damaged. Repair any damage. Basic working techniques
- Always cut with a sharp blade for optimal results. A dull blade gives an uneven cut and the grass becomes yellow on the surface of the cut.
- Never mow more than 1/3 of the length of the grass. This especially applies during dry periods. Mow first with the cutting height set high. Then check the result and lower to an appropriate height. If the grass is really long, drive slowly and mow twice if necessary.
- Cut in different directions each time in order to avoid stripes in the lawn.
- Before pulling the machine towards you, disengage the drive and push the machine forward approx. 10 cm.
- Make sure to disengage the drive when approaching an obstacle. Transport and storage
- Secure the equipment during transportation in order to avoid transport damage and accidents.
- Store the equipment in a lockable area so that it is out of reach of children and unauthorized persons.
- Store the machine and its equipment in a dry and frost proof place.
- For transport and storage of fuel, see the section "Fuel handling".
- Always remove the battery when the machine is left unattended. (LC 353VI)OPERATING 84 – English Starting and stopping Before starting
- Keep people and animals well away from the working area.• Perform daily maintenance. See instructions in the section "Maintenance".• Ensure the ignition lead sits correctly on the spark plug. Manual Start The engine brake handle must be held against the handlebar when the engine is started.LB 348V, LC 348V, LC 353V• Position yourself behind the machine.• Grip the starter handle, slowly pull out the cord with your right hand until you feel some resistance (the starter pawls grip). Pull with force to start the engine. Never twist the starter cord around your hand. LC 353VB• Position yourself behind the machine.• Set the stop switch to the start position.Grip the starter handle, slowly pull out the cord with your right hand until you feel some resistance (the starter pawls grip). Pull with force to start the engine. Never twist the starter cord around your hand.LC353VB are equipped with a blade brake. To make the cutters rotate, do the following:• Loosen the latch on the blade brake (1).• Pull the engine brake bar (2) towards you Electric Start LC 348VE, LC 353VELC 348VE and LC 353VE are equipped with electronic start which is used in the following way.• Before using the electronic start for the first time you need to charge the battery. See instructions in the section "Maintenance".• Fold in the engine brake handle towards the handlebar.• Insert the ignition key and push the key.LC 353VIThe machine has electric start via a start bar.• Before using the electronic start for the first time you need to activate the battery. See instructions in the section "Maintenance".LC 353VI has a start inhibitor. Proceed as follows to start the engine and blade rotation:• Fit the battery in the intended compartment on the engine and check the battery status.For more information, see the ”Battery” section.• Loosen the start inhibitor (1).• Pull the start bar (2) towards you. The starter motor will stop when the engine is started. WARNING! Please read the operator’s manual carefully and make sure you understand the instructions before using the machine.Wear personal protective equipment. See instructions under the ”Personal protective equipment” heading.
2OPERATING English – 85 Drive
- To use the drive on the wheel pull the clutch lever towards you. When the drive starts feeling slow you need to adjust the clutch wire. Finely adjust the wire using the adjuster screw.
- To tension the wire and increase speed, screw the adjustment screw counterclockwise. Make sure the wires are not tensioned too tight. If the lawn mower starts to drive withtout the clutch lever is beeing operated, extend the wire.
- To extend the wire and reduce speed, screw the adjustment screw clockwise. Stopping LB 348V, LC 348V, LC 348VE, LC 353V, LC 353VE, LC353VI
- Stop the engine by releasing the engine brake bar/ start bar. The drive is also disengaged when you release the engine brake bar/start bar. LC353VB The cutter stops rotating when you release the brake handle. The engine is switched off by moving the stop switch to the stop position. IMPORTANT! For LC 348VE and LC 353VE remove the key. LC 353VI Always remove the battery when the machine is not in use or when the machine is left unattended.MAINTENANCE 86 – English General
- Let your Husqvarna dealer regularly check the machine and make essential adjustments and repairs.
- Replace any damaged, worn or broken parts.
- Always use genuine accessories. Maintenance schedule In the maintenance schedule you can see which parts of your machine that require maintenance, and with which intervals it should take place. The intervals are calculated based on daily use of the machine, and may differ depending on the rate of usage. *See instructions in the section "Machine’s safety equipment". General inspection
- Check that nuts and screws are tight. LC353VB Make sure the cable clip is properly secured to the bracket. If the cable clip feels loose or have fallen of, mount the clip back into place. External cleaning
- Brush leaves, grass and the like off of the lawn mower.
- Do not use a high pressure washer to clean the machine.
- Never flush water directly on the engine.
- Clean the air intake on the starter. Check the starter and starter cord.
- When cleaning under the cutting cover, empty the fuel tank and put the machine on its side with the muffler down. Cleaning of the gear housing.
- Remove the service hatch.
- Brush leaves and grass off of gear housing. If necessary clean the gear housing with water. For LC348Ve and LC353VE make sure the battery is disengaged. Oil level The lawn mower should stand on flat ground when you check the oil level. Check the oil level with the dipstick on the oil filler cap.
- Remove the oil cap and wipe the dipstick clean.
- Put the dipstick back in. The oil filler cap must be completely screwed down to give a correct picture of the oil level.
- If the oil level is low, fill using engine oil up to the upper level on the dipstick. Oil change
- Empty the fuel tank.
- Unscrew the oil filler cap.
- Place a suitable vessel to collect the oil in.
- Drain the oil by tipping the engine so that the oil runs out through the filler pipe. Ask where you can dispose of surplus engine oil at your local petrol station.
- Fill with new engine oil of a good quality. See instructions in the section "Technical data".
WARNING! The user must only carry out the maintenance and service work described in this Operator's Manual. More extensive work must be carried out by an authorized service workshop. Switch off the engine before carrying out any checks or maintenance. Prevent unintentional starting by removing the ignition cable from the spark plug. The starter key or battery must also be removed on machines with electric start. The life span of the machine can be reduced and the risk of accidents can increase if machine maintenance is not carried out correctly and if service and/or repairs are not carried out professionally. If you need further information please contact your nearest service workshop. Daily maintenance Weekly maintenance 50 hours At least once a year General inspection Spark plug Replacing and adjusting the V-belt Replacing and adjusting the V-belt Oil level Muffler* Air filter Air filter External cleaning Vibration damping system* Fuel system Fuel system Cutting equipment Oil change Oil change Cutting cover and protective cover* Engine brake handle*MAINTENANCE English – 87 Cutting equipment
- Check the cutting attachment for damage or cracks. A damaged cutting attachment should always be replaced.• Always ensure the cutter is well ground and balanced correctly. Replacing the blades Dismantling:• Unscrew the bolt holding the cutter.• Remove the old blade. Make sure the blade bracket is free of damage. Also check that the cutter bolt is undamaged and that the engine shaft is not bent.Assembly:• The blade must be mounted with the angled ends pointing up towards the cover.• Place the cutter with the friction washer against the cutter bracket. Make sure the cutter centres correctly on the shaft. To avoid vibrations, place the mower cutter so that the cutter bracket marking can be seen on the sides of the cutter.• Fit the washer and tighten the bolt correctly. The bolt should be tightened with a torque of 45-60 Nm.• Pull the blade around by hand and make sure it rotates freely.• Test run the machine. WARNING! Always wear heavy-duty gloves when servicing and maintaining the cutting equipment. The cutters are very sharp and cuts can occur very easily.CAUTION! The blades should be balanced after sharpening. Balancing, replacing or sharpening the blades should be conducted by a service workshop.Damaged blades should be replaced when hitting obstacles that result in a breakdown.IMPORTANT!Always exercise care and use your common sense. Avoid all situations which you consider to be beyond your capability. If you still feel uncertain about operating procedures after reading these instructions, you should consult an expert before continuing. Contact an authorised service workshop.Always use genuine parts. For more information, see the ”Technical data” section.MAINTENANCE 88 – English Battery LC 353VE, LC 348VE The battery is a totally enclosed 12 volt lead battery that usually does not require maintenance. The battery is charged during mowing. If the engine refuses to start repeatedly, the battery could become discharged. If that is the case, start the machine manually using the starter cord. A completely discharged battery can be recharged using the battery charger supplied.
- Check all cables and connections. Never use the machine if any cable or plug is damaged, but hand it in to an authorized service workshop for repair. Charging the battery
- Disassemble the cable contact at the battery.
- Connect the battery cable to the charger, then connect the charger to a wall socket (220 V, 50 Hz). LC 353VI The battery is a safety switch and must only be mounted on the engine when the machine is in use. The battery is an intelligent 10.8V lithium battery that must be activated before being used for the first time. Place the battery into the charger and wait until at least 1 green lamp comes on (10 seconds). The battery can then be mounted on the engine. Charge the battery. The battery has an easy-check voltage indicator with LEDs (1-4). If the voltage is too low (1 or 0 LEDs lit), place the battery in the charger and connect to a wall socket (220V, 50Hz). A flat battery will be fully charged after about 60 minutes. The battery can be quick-charged for shorter periods without damage. Spark plug
- If the machine is low on power, difficult to start or runs poorly at idle speed: always check the spark plug first before taking other steps.
- If the spark plug is dirty, clean it and check that the electrode gap is 0.5 mm. Replace if necessary. Air filter
- Remove the air filter cover and take out the filter.
- Clean the filter by knocking the filter against a flat surface. Never use solvent with petroleum, for example, kerosene, or compressed air to clean the filter.
- An air filter that has been in use for a long time cannot be cleaned completely. The filter must therefore be replaced with a new one at regular intervals.
damaged air filter must always be replaced.
- When reassembling, make sure that the filter completely seals against the filter holder. Fuel system
- Check that the fuel cap and its seal are not damaged.
- Check the fuel hose. Replace if necessary. Recycling This machine has the prerequisites to last for many years. This minimizes the machine's environmental impact. Perform service and maintenance according to the instructions in this manual. This way the engine will last longer and the hazardous emissions are minimized. The machine is dismantled and the parts are divided up in different materials for recycling. Most parts of this machine are recyclable. IMPORTANT! An exhausted battery must not be disposed of as household garbage! Leave it at your nearest service agent or collection point. NOTICE! The battery might need recharging once or twice during mowing season and should always be charged prior to winter storage. Do not charge at temperatures below +5° C. IMPORTANT! The battery on this model is a safety component. Always use genuine parts. Lamp indicator on battery. Cause Constant red light Battery charging. Flashing red light Battery too warm and will start to charge when correct temperature has been reached. Constant green light The battery is fully charged. Flashing red and green light Battery damaged and must be replaced. NOTICE! Always use the recommended spark plug type! Use of the wrong spark plug can damage the piston/cylinder.English – 89 TECHNICAL DATA Technical data Note 1 The power rating of the engine indicated is the average net output (at specified rpm) of a typical production engine for the engine model measured to SAE standard J1349/ISO1585. Mass production engines may differ from this value. Actual power output for the engine installed on the final machine will depend on the operating speed, environmental conditions and other values. Note 2: Noise emissions in the environment measured as sound power (L
) in conformity with EC directive 2000/14/EC. Note 3: Reported data for noise pressure level has a typical statistical dispersion (standard deviation) of 1.2 dB(A). Note 4: Reported data for vibration level has a typical statistical dispersion (standard deviation) of 0,2 m/s
dB (A) 98 98 98 98 Sound levels (see note 3) Sound pressure level at the operators ear, dB(A) 84 83 84 84 Vibration levels (see note 4) Handle, m/s
4,0 4,0 4,0 5,3 Cutting Cutting height, mm 25-70 25-70 25-70 25-70 Cutting width, cm 53 53 53 53 Cutter Collect Collect Collect Collect Part number 5104364-10 5104365-10 5104364-10 5104364-10 Bagger capacity, litre 60 60 60 60 Drive Speed, km/h 5,4 5,4 5,4 5,4 Starting Electric starter - - Ye s Ye s Battery - - Lead, 12V/ 2,5Ah Li-ion, 12V/ 15,7Wh90 – English TECHNICAL DATA Note 1: The power rating of the engine indicated is the average net output (at specified rpm) of a typical production engine for the engine model measured to SAE standard J1349/ISO1585. Mass production engines may differ from this value. Actual power output for the engine installed on the final machine will depend on the operating speed, environmental conditions and other values. Note 2: Noise emissions in the environment measured as sound power (L
) in conformity with EC directive 2000/14/EC. Note 3: Reported data for noise pressure level has a typical statistical dispersion (standard deviation) of 1.2 dB(A). Note 4: Reported data for vibration level has a typical statistical dispersion (standard deviation) of 0,2 m/s
dB (A) 95 95 95 Sound levels (see note 3) Sound pressure level at the operators ear, dB(A) 80 80 80 Vibration levels (see note 4) Handle, m/s
Li-ion, 12V/ 15,7Wh144 – French
Li-ion, 12V/ 15,7Wh234 – Hungarian
2DARBAS Lithuanian – 283 Pavara
2Šˆ‘’“‚Ÿ 392 – Ukrainian