XC510 - Air Conditioning Soba - Free user manual and instructions
Find the device manual for free XC510 Soba in PDF.

User questions about XC510 Soba
0 question about this device. Answer the ones you know or ask your own.
Ask a new question about this device
Download the instructions for your Air Conditioning in PDF format for free! Find your manual XC510 - Soba and take your electronic device back in hand. On this page are published all the documents necessary for the use of your device. XC510 by Soba.
USER MANUAL XC510 Soba
-
If the filter is dirty or the appliance is placed too close to a wall, the air will not be able to circulate and power consumption could rise by up to 6% .
-
Avoid opening doors frequently.
Each person present in a room produces 100 to 150 Watts of heat. Consequently the more people there are in a room, the lower the cooling efficiency
- To ensure optimal efficiency we advise that you keep doors and windows closed. The surfaces of walls and windows exposed to the sun are also a significant factor. We recommend part closing the blinds or shutters
SPECIFICATIONS
| Cooling capacity: | 10,000 BTU/h |
| Heating capacity: | 10,500 BTU/h |
| Power consumption: | 1000 / 1050 watts |
| Coolant: | R-407C |
| Moisture extraction: | 24 litres/day |
| Airflow volume: | 360 m³/h |
| Operating temperature range: | 16°-32°C |
| Voltage/frequency: | 230 volts / 50 Hz |
| Size (W x H x D): | 38,5 cm (W) x 37,7 cm (D) x 75 cm (H) |
| Weight: | Net weight: 32 kg Gross weight: 34 kg |
| Waste-air hose length: | 37 cm (compressed): Extends up to 1,5 m |
| Waste-air hose diameter | 11 cm |
| Condensation tank capacity: | 2 litres |

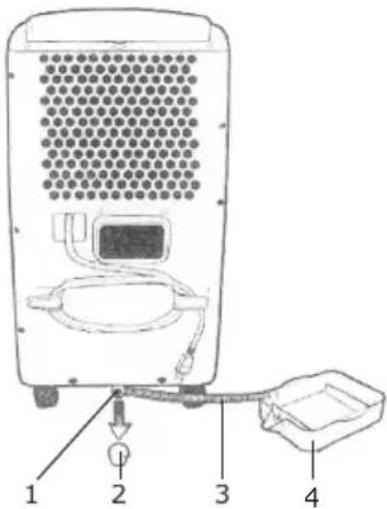
PARTS
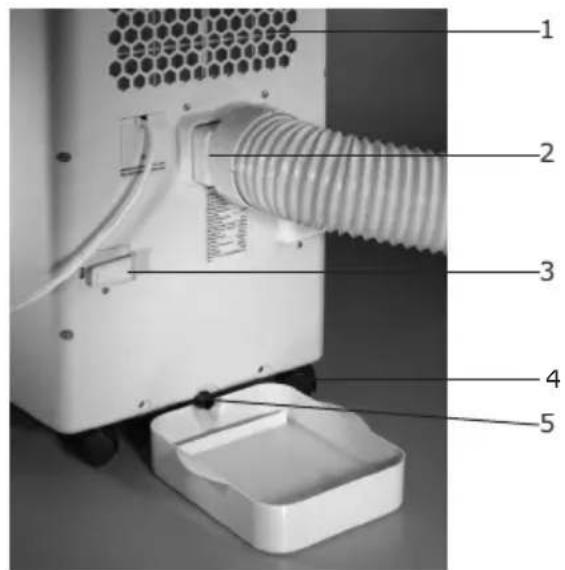
| Front View | Rear View |
| 1. Control panel | 1. Air filter |
| 2. Adjustable vertical/horizontal slats | 2. Waste air outlet |
| 3. Convenient carrying handles | 3. Cord holder |
| 4. Wheels for easy mobility | 4. Wheels |
| 5. Drain tap |
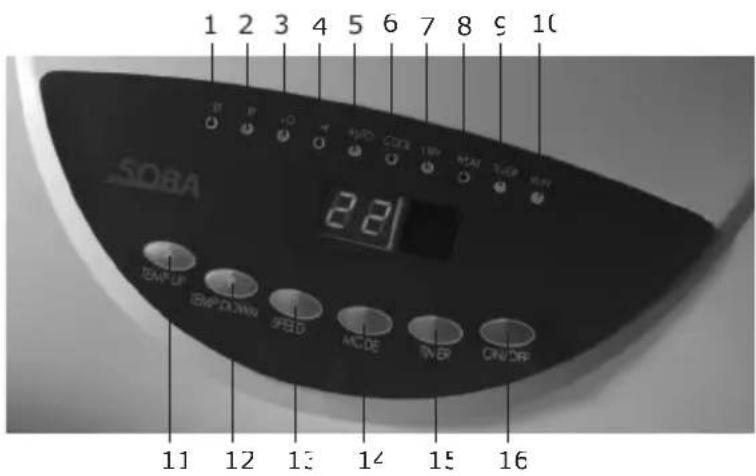
| LED Indicator Lights | Buttons |
| 1. Set temperature | 11. Temperature UF |
| 2. Room temperature | 12. Temperature DOWN |
| 3. Low fan speed | 13. A/C Fan speed |
| 4. High fan speed | 14. Mode |
| 5. Auto function | 15. Timer |
| 6. A/C function | 16. Power ON/OFF |
| 7. Dehumidification function | |
| 8. Heat function | |
| 9. Timer ON | |
| 10. Unit ON |
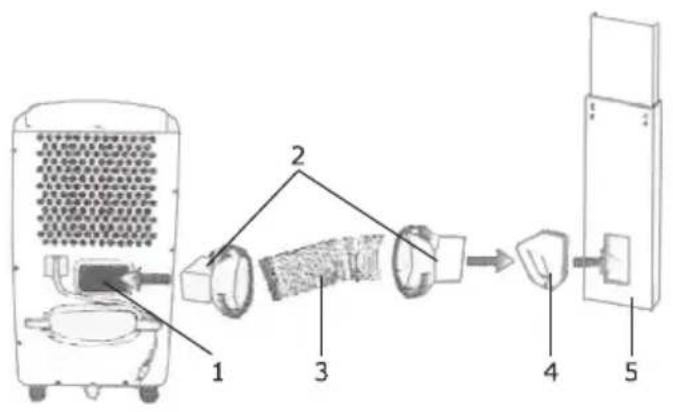
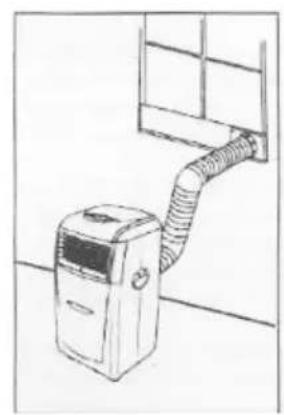
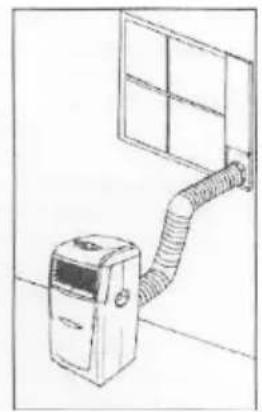
WASTE AIR KIT INSTALLATION
Window Installation
- Waste-air outlet
- Connectors (2)
- Waste-air hose
- Connector/panel adaptor
- Adjustable window panel (optional)
The adjustable Window Panel Kit (optional) adapts from 72 to 108 cm (28.4" to 42.5") to fit various window sizes.
Horizonta
Vertical
Note: The waste-air hose need not be installed for dehumidifying mode.
- Remove the Window Panel, the two connectors, the waste-air hose and the connector/panel adaptor from the accessories box.
- Measure the window where the unit is to be installed and adjust the window panel to fit into the window. If the window is either too wide or too tall, cut some pieces of polystyrene foam to fit round the edges of the window panel to seal air spaces.
- Mount the element that connects the end of the hose with the Window Panel as shown in the diagram.
- Secure the two connectors at both ends of the waste-air hose by pulling the end of the waste-air hose out gently, then screw the two connectors into either end of the hose.
- Insert one end into the waste-air outlet at the back of the unit. Then insert the other end into the connector/panel adaptor.
Wall Installation
- Waste-air outlet
- Connector
- Waste-air hose
- Wall adaptor
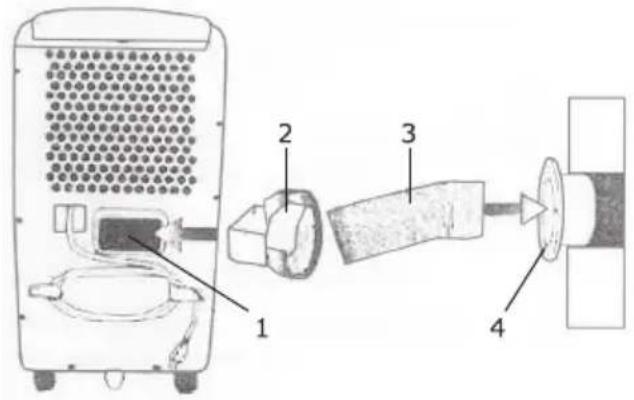
Note: The Wall Adaptor is mounted on the inside wall
- Drill a 11,4cm / 412 inch diameter hole in the wall at least 40,6cm / 16 inches at floor level. As a safety precaution, ask a professional (e.g. mason, carpenter or electrician) to choose the position for the hole to ensure no supporting elements or electrical wires are damaged.
- Hold the wall adaptor against the 11,4cm / 412 inch hole and mark the position of the screw holes.
- Remove the wall adaptor and drill four 0,5 cm/3/16 inch diameter holes at these marks.
- Insert a 15,2 cm/6 inch long piece of 10,1 cm/4 inch PVC pipe (not included) to take the flow of waste air.
Note: To prevent birds, animals or insects from nesting in the PVC pipe, cover over the outer end of the pipe with a fine mesh screen. If necessary protect against the elements.
- Mount the wall adaptor on the wall with four screws.
- Twist the waste-air hose clockwise into the wall adaptor until it fits firmly
- When not in use, unscrew the waste-air hose from the wall adaptor and place the wall adaptor cap over the hole.
Note: The manufacturers provide instructions for interior wall mounting only. Exterior wall mounting is at the customer's discretion.
Note: This unit can also be vented through the ceiling. Please consult with an air conditioning professional for ceiling venting installation.
The waste-air hose can be pulled out, if necessary, to a maximum of 1,5m / 5 feet. If you wish to extend it, use a conventional 1,5m / 5 foot, 10,1cm / 4 inch diameter PVC pipe. First cut the waste-air hose in half and insert the PVC pipe between the two pieces of the hose and fix with duct tape. The overall length must not exceed 3m / 10 feet. Insulating tape can also be used to join the pipe and hose. Do not use aluminium pipes to extend the waste-air hose.
OPERATING AND FUNCTIONS
Plug the air conditioner into a 230V / 50Hz and at least 10 amp socket.
The compressor is an essential element in the production of cold air. The appliance is fitted with an overheating feature that delays start up by three minutes.
To protect the compressor from overheating or freezing, the compressor will only operate when the room temperature is between 61^ - 90^ F or 16^ - 32^ C.
Sensor button and LED lamp functions
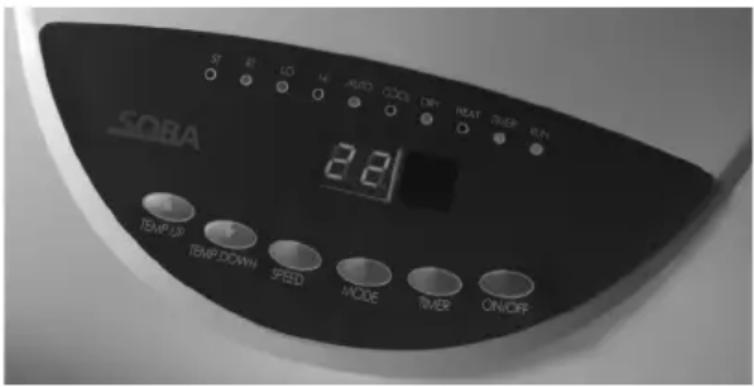
ON/OFF Button: Press to turn the unit on or off.
Temperature up button: Press to raise the thermostat temperature setting (only in COOL mode).
Temperature down button Press to lower the thermostat temperature setti (only in COOL mode).
SPEED button: Press to select either low (LO) or high (HI) fan speed
MODE button: Press to select either "AUTO", "COOL", DRY" or "FAN" mode. Select AUTO mode to activate the pre-set thermostat settings (see no. 11). Select COOL to set the thermostat to your preferred temperature.
- TIMER button: Press until the desired time (1 to 12 hours) appears on the LED display. The timer can be used to switch the unit either ON or OFF when the set time expires.
TIMER ON: Sets the timer so the unit will turn on later. Press the TIMER button when the unit is off. Hold the TIMER button down until the desired number of hours is displayed. The unit will turn on when the set time is reached.
TIMER OFF: Sets the timer so the unit will turn off later. Press the TIMER button when the unit is on. Hold the TIMER button down until the desired number of hours is reached. The unit will shut off when the set time is reached
NOTE: The Sleep function is programmed to lower the temperature only in the first two hours. Then the thermostat temperature, and with it the room temperature rises automatically by 1^ every hour. The unit will shut off when the set time is reached
"ST" (Set Temperature) LED light: The light comes on when the TEMPERATURE UP or TEMPERATURE DOWN buttons are pressed and the LED display shows the new thermostat temperature setting.
"RT" (Room Temperature) LED light: Comes on when the current room temperature is shown.
"LO" LED: The light comes on when the low fan speed is selected.
"HI" LED: The light comes on when the high fan speed is selected.
"AUTO" LED This comes on when the (preset) AUTO MODE is selected. If ambient temperature is higher than 25^ the unit will work in cooling mode. If the ambient temperature is between 20^ and 25^ , the unit will work in ventilation mode. If the ambient temperature is below 20^ , the unit will work in heating mode.
"A/C" LED: This comes on when the cooling function is selected.
"DRY" LED: This comes on when the dehumidifier function is selected.
"HEAT" LED: This comes on when the heat function is selected.
"TIMER" LED: This comes on when the timer function is activated.
"RUN" LED: This comes on when the unit is switched on. This light will flash and the unit will begin to beep and then shut down when the condensation tank is full and the unit cannot it run off. The light will continue to flash and the unit will remain off until the condensation is drained from the unit. Please refer to the "CLEANING THE UNIT" section in this for further information.
NOTE: This unit has a three-minute compressor delay protection circuit.
Consequently, the compressor may take up to three minutes to start when it is turned on or changing modes.
This product is also equipped with a de-frost function. When using the heat function at low ambient temperature, the heating might be interrupted briefly to melt the frost. If this happens, just wait for the heating mode to pick up again. As the appliance has to heat up, the fan will stop for 15-20 seconds when you switch to the heating mode.
SETTING UP
- Remove the cover from the back of the remote control.
- Insert two AAA batteries (batteries not included).
- Plug into the mains.
- Always point the remote control towards the unit when you want to use it.
- Make sure that there is nothing obstructing the signal path.
- The maximum distance between remote control and appliance is 7.9 metres.
- Remove the batteries if the remote control is not going to be used for some time.
A change in the function is usually indicated by a beep.
Note:
- Do not zap with the remote control.
- Do not expose the remote control to direct sunlight or leave it next to a radiator or other source of heat.
- Do not use rechargeable batteries as they differ from standard dry cell batteries in shape, size and performance.
- Be sure to replace the batteries with two new batteries of the same type.
Remote control functions
- LCD Display
- Mode selection button: Press this button to select AUTO, COOL, DRY, HEAT functions
- Temperature UP and Down setting buttons: Press "+" to increase temperature. Press "-" reduce temperature.
- Fan speed selection button: Press this button to select the fan rotation speed. Fan speed cannot be adjusted when the unit is in DRY mode.
- Sleep function button: Press once to switch to Sleep function. Press twice to switch off the Sleep function.
- "ON Timer" button: Set the Timer O function as follows: the remote control unit is switched off; no time shown on the display. Press "ON Timer" button > On Timer signal flashes. > Press "Hour" or "Minute" button until the required time is shown. > Press "ON Timer" button to set the desired time > ON Timer signal stops flashing. Press "ON Timer" button again to cancel the "ON Timer" setting.

/."OFF Timer" button: Set the Timer OFF function as follows: the remote control unit is on; no time shown on the display. Press "OFF Timer" button > OFF Timer signal flashes on display > Press "Hour" or "Minute" button until the required time is shown > Press "OFF Timer" button to set the desired time > OFF Timer signal stops flashing. Press "OFF Timer" button again to cancel the "OFF Timer" setting.
8. "ON/OFF" power button: This button switches the remote control unit "ON" and "OFF". When the remote control unit is switched on, the last setting used will be displayed.
9. "Hour" and "Minute" button: When "ON Timer" or "OFF Timer" signal flashes on the display, press the "Hour" or "Minute" button to set the desired time
ADJUSTING SLATS
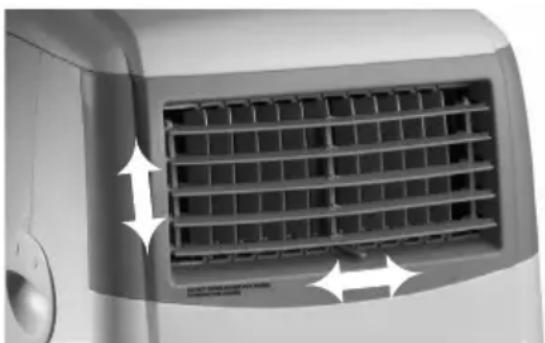
The horizontal slats can be adjusted up and down by gently moving them to desired position to help direct airflow.
The vertical slats can be adjusted to the left or right by using the lever at the bottom of the slats.
CONDENSATION ELIMINATION SYSTEM
The unit automatically dehumidifies the air in the room when in air conditioning mode. The water from the dehumidification process is stored in a collecting tank and usually evaporates with the waste air. However, in extremely humid conditions, the collecting tank may fill up. In this case, the Alarm Indicator Light comes on and the air conditioner switches off automatically
CLEANING THE UNIT
Switch the unit off and unplug it from the outlet before cleaning. For safety reasons, never wash the air conditioner by hosing it down or wiping it with a dripping wet sponge or cloth.
Cleaning the exterior surfaces
Wipe the air conditioner with a damp sponge and dry with a soft, clean cloth. Never use alcohol or any product containing solvents to clean the unit
Air filter
The air filter at the back of the unit collects dust suspended in the air. The air filter must always be in place when the appliance is running to prevent dust from clogging the unit.
- A build up of dust reduces the efficiency of the air conditioner. Consequently, the air filter must be cleaned every two weeks; more frequently if is used in a dusty environment.
Cooling is impaired if the filter is obstructed. - To remove the air filter, grasp the notch at the top edge of the air filter frame and pull the filter out
- Clean the filter with a vacuum cleaner. If the filter is very dirty, you can wash it in warm water (never use hot soapy water). Make sure that the air filter is completely dry before replacing.
- Never bend the filter
Note: The filter comes with an additional charcoal screen that extracts smells and smoke. Slide the charcoal screen out before washing the air filter
STORAGE
At the end of the season or if you do not intend to use the appliance for some time, we recommend that you take the following steps:
- Run off
- Run off plug
- Run off hose
- Run off container
- Run excess condensation off through the Run Off.
- Run the unit for 3 to 4 hours in fan (ventilation) mode. This will thoroughly dry the inside of the unit.
- Disconnect and wind the power cord around the cord hooks at the back of the unit.
Clean the unit and store in the original packaging to protect it from dust. - Store the unit in an upright position in a cool, dry place that is not exposed to sunshine.
TROUBLESHOOTING
If the air conditioner is not working properly, it is usually due to a minor problem that the user can handle. Before calling customer service, please check the following points.
| Problem | Probable Causes | Solutions |
| The air conditioner / dehumidifier is not working. | Plug not properly inserted into power socketA fuse has blown.Water tank is full / alarm light is or | Plug the appliance in properlyCheck fuses (minimum 10 A).Drain off condensation |
| The air conditioner cuts out | Waste-air hose is too long or kinked.Unit is too close to wall or another objectThe appliance is covered.The "timer off" function has been activatedRoom temperature is not between 61° and 90°F / 16° and 32°C. | Waste-air hose may only be extended using max. 5', 4" diameter PVC pipe of flex to a total waste air length of 10' 03 3 mUnit should be at least 1 1/2' away from walls and objects.Unit will overheat if the waste air cannot fully vent.Push the power button to turn unit on.Switch the unit back on when room temperature is between 61°-90°F/ 16° and 32°C. |
| The "RUN" LED indicator light flashes and the alarm sounds. | The condensation tank is full and the unit cannot drain. This safety feature turns off the conditioner to protect it and prevent the tank from overflowing | Drain unit from the run off at the back of the unit. |
| The LED display shows :the unit is set but it is not running. | The "timer on" feature is activated | This is normal.Push the Power button to turn the unit on and deactivate the "timer on" feature. |
| 'E1" Displayed on LED Panel | Evaporator sensor fault | Contact authorised customer service |
| 'E2" Displayed on LED Panel | Room temperature sensor fault | Contact authorised customer service |
| 'E5" Displayed on LED Panel | Overheating protection fault | Contact authorised customer service |
| 'E7" Displayed on LED Panel | Water tank is full | Drain the water tank. The appliance will switch on when the water tank has been emptied |
ENERGIESPARTIPPS
INSTALLATION ABLUFT-KIT
Fensterinstallation
CONDITIONS OF GUARANTEE
The guarantee is valid for 2 years from date of supply to the end user. In order to claim under the guarantee the faulty appliance must be taken to the official after-sales service agent together with proof of purchase (copy of the invoice or receipt). The guarantee covers the costs for work and material.
The guarantee shall be invalid or prematurely discontinued if damages are due to any of the following causes: utilisation of the appliance in the commercial sector, exterior influences, non-professional installation, non-observance of the instructions for use or operating instructions, force majeure, inappropriate use, intervention by non-authorised persons as well as normal wear and tear. Also excluded are damage due to dropping or falling, water or operating with incorrect electrical power.
CONDITIONS DE GARANTIE
National representatives / After-sales service addresses: see last page
Contact us for Customer Service addresses in other countries.
Information from SOBA International Trading AG