iJoy Café 15 bar - Coffee machine BEEM - Free user manual and instructions
Find the device manual for free iJoy Café 15 bar BEEM in PDF.
| Brand | BEEM |
| Model | iJoy Café 15 bar |
| Product type | Coffee and espresso machine |
| Type number | W24.001 |
| Dimensions (W x D x H) | 264 x 224 x 320 mm |
| Weight | 4.6 kg |
| Supply voltage | 220-240 V~ |
| Frequency | 50 Hz |
| Power | 1230 - 1470 W |
| Protection class | I |
| Protection type | IP X0 |
| Pressure | 15 bar |
| Functions | Espresso, Cappuccino, Latte Macchiato, Lungo, milk froth, hot milk |
| Usable coffee types | Ground coffee and pods (Senseo and ESE) |
| Included accessories | Portafilter, 2 filters (1 cup and 2 cups), measuring spoon, milk container, drip trays |
| Maintenance | Clean removable parts in dishwasher, regular descaling recommended |
| Safety | Burn protection, automatic function stop, portafilter lock |
| Spare parts | Available on BEEM website or on request from customer service |
| Warranty | Extended manufacturer warranty (depending on product) |
| Intended use | Domestic and similar (staff kitchens, offices, hotels, etc.) |
Frequently Asked Questions - iJoy Café 15 bar BEEM
User questions about iJoy Café 15 bar BEEM
0 question about this device. Answer the ones you know or ask your own.
Ask a new question about this device
Download the instructions for your Coffee machine in PDF format for free! Find your manual iJoy Café 15 bar - BEEM and take your electronic device back in hand. On this page are published all the documents necessary for the use of your device. iJoy Café 15 bar by BEEM.
USER MANUAL iJoy Café 15 bar BEEM
Coffee and espresso machine
Spare parts and accessories are available on our homepage or on request from our customer service.
This document is copyrighted. Any duplication or reprinting, in whole or in part, and the reproduction of the illustrations, even in modified form, is only permitted with the written approval of the manufacturer.
FR
Droits d'auteur
Appliance description. 21
Operation and use. 22
After using 27
Cleaning and maintenance. 27
Storage 29
General aspects. 30
Troubleshooting 31
Dear Customer,
Before using the appliance, please read the instructions contained in this user manual on startup, safety, intended use as well as cleaning and care.
Open the fold-out page at the beginning and end of the user manual in order to view the illustrations during reading.
Keep this user manual in a safe place and pass it on to any future owners together with the appliance.
Safety precautions
This appliance may be used by children aged 8 years or over and persons with decreased physical, sensory or mental abilities or lack of experience and/or knowledge if they are supervised or were instructed on using the appliance and have understood the resulting dangers.
- Keep the appliance and the connecting cable out of the reach of children under 8 years of age.
Cleaning and user maintenance may not be carried out by children unless they are at least 8 years old and are being supervised.
Children may not play with the appliance.
Inspect the appliance for visible signs of damage before use. Do not use a damaged appliance.
Do not leave the appliance unattended during operation.
Only allow repairs to the appliance to be carried out by an authorised specialist or by the works customer service; this particularly applies to replacing a damaged connecting cable. Unqualified repairs can lead to considerable danger for the user. This will also invalidate the warranty or guarantee.
Repairs to the appliance during the guarantee period may only be carried out by customer service authorised by the manufacturer otherwise the warranty or guarantee will become invalid in the event of damage or subsequent damage.
Defective parts may only be replaced with original spare parts. Only original spare parts guarantee that the safety requirements are met.
Only use spare parts from the manufacturer or spare parts that are specifically recommended by the manufacturer. The warranty or guarantee will otherwise be invalidated.
Do not use this appliance together with an external timer or a separate remote control system.
In the event of a power failure, disconnect the appliance from the mains to prevent the appliance from switching itself on again unintentionally.
Do not operate the appliance in the dark.

DANGER
Danger of electric current!
Do not use the appliance if the mains cable or plug is damaged.
Do not open the housing of the appliance. Danger from electric current if live connections are touched and/or the electrical and mechanical configuration is changed.
Take care when filling the water tank that no water gets inside the appliance.
Do not touch the connecting cable with wet hands when disconnecting the appliance from the mains supply.
Escaping steam or liquid may not be directed towards electrical devices and equipment that contain electrical components.
- Never immerse the appliance or the plug in water or other liquids.
Pull the plug out of the mains socket,
-when you fill the water tank,
-if you are not using the appliance
-if a malfunction occurs during operation,
-before you clean the appliance.
Risk of suffocation!
- Never play with packaging material. Risk of suffocation.

WARNING
Risk of burning!
Do not touch the hot surfaces during operation.
- Only touch the handles and knobs of the appliance during operation.
Before cleaning, allow the appliance to cool down.
Do not carry or move the appliance during operation.
- Keep all parts of your body away from escaping steam.
It is possible that hot steam, hot water or hot milk can escape from the brewing head and steam nozzle. Point the milk frothing nozzle to the drip tray. Never put your hands, other parts of your body or objects sensitive to moisture or heat underneath the brewing head or the milk frothing nozzle while the appliance is in operation.
- Only grip the plastic parts of the strainer holder or steam nozzle during use.
- Never remove the strainer holder during the brewing process.
Do not cover the drain pipe in the drip tray in order to allow the steam to dissipate when the pressure is relieved.
- Never take the milk frothing nozzle out of the milk while this function is in operation. Otherwise hot milk can squirt out. Wait until the function is completed before removing the container from the milk frothing nozzle.
ATTENTION
- Do not pull the connecting cable to remove the plug from the mains socket.
- Never lift or move the appliance with the mains cable.
Do not use abrasive cleaning agents or metal brushes, nylon brushes or other objects that could scratch the surface when cleaning the appliance. - Never operate the appliance without water, otherwise it will be damaged.
Always fill the water tank with cold, clean tap water. Never fill with other liquids.
Descale the appliance regularly. - Touching the hotplate can cause burning. The hotplate becomes hot. A sudden unintentional contact could lead to further danger.
Intended use
This appliance is only intended to be used for brewing Espresso, Cappuccino, latte macchiato and coffee/lungo/diluted black coffee as well as frothing milk and heating drinks for use in the household or similar, non-commercial establishments such as staff kitchens in shops, cafés, offices or other business surroundings; agricultural establishments; use by guests in hotels, motels or other residential facilities; bed and breakfast establishments.
Any use other than previously stated is considered as improper use.
WARNING
If not used for its intended purpose, the appliance may be a source of danger.
- Use the appliance only for its intended purpose.
Observe the procedures described in this user manual.
No claims of any kind will be accepted for damage resulting from use of the appliance for other than its intended purpose.
The risk must be borne solely by the user.
Requirements for the place of operation
For safe and trouble-free operation of the appliance, the installation location must satisfy the following requirements:
Place the appliance on a firm, dry, flat, waterproof and heat-resistant surface.
Do not place the appliance in a hot, wet or very humid environment or in the vicinity of inflammable materials. There must be a gap of at least 15cm between the appliance and any walls, furniture or other objects.
Do not install the appliance under a wall cabinet.
The mains socket must be easily accessible and allow fast disconnection in the event of an emergency.
The surface finishes on furniture may contain substances that can be detrimental to the rubber feet of the appliance. If necessary, place a mat under the feet of the appliance.
Do not lay tablecloths, cloths or serviettes under the feet of the appliance, the appliance could slide away.
The appliance may not be used or stored outdoors.
Electrical connection
For safe and trouble-free operation of the appliance, the following instructions on the electrical connection must be observed:
Before connecting the appliance, compare the connection data (voltage and frequency) on the rating plate with those of your mains power supply. This data must correspond in order to avoid damage to the appliance. If in doubt, ask your electrical appliance retailer.
The mains socket must be protected by at least a 16 A fuse.
Ensure that the mains cable is undamaged and is not laid over sharp edges.
The mains cable must not be pulled tightly, bent, crushed or knotted or come into contact with hot surfaces.
Route the mains cable to prevent risk of tripping.
The electrical safety of the appliance is only assured when it is connected to a properly installed protective earth (PE) conductor system. Connection to a mains socket without PE conductor is forbidden. If in doubt, the electrical system must be checked by a qualified electrician. The manufacturer assumes no liability for injury or damage caused by a missing or interrupted protective earth conductor.
Symbols used

DANGER
This indicates an imminent hazardous situation, which could lead to severe physical injury or death.
Follow these instructions to avoid danger.

WARNING
This indicates a possible hazardous situation, which could lead to severe physical injury or death.
Follow these instructions to avoid danger.
ATTENTION
This indicates a potentially hazardous situation, which could lead to minor injuries or material damage.
Follow these instructions to avoid danger.
NOTE
A note contains additional information to simplify the use of the appliance.
Startup
Unpacking
- Remove the appliance, all accessory parts and the user manual from the box.
- Remove all packaging materials and protective foils from the product and the accessories before using it for the first time.
- Check for visible signs of damage or missing items.
NOTE
Never remove the rating plate or any warning signs on the appliance.
- Keep the original packaging during the warranty or guarantee period of the appliance in order to return the appliance in the packaging in the event of a warranty or guarantee claim. Transport damage will invalidate the warranty or guarantee.
Before using for the first time
Before enjoying the first coffee, we recommend a trial run first with coffee beans in order to remove possible production residues in the water system.
- Insert the drip trays (16, 17) into the appliance as described in the section Using drip trays and cups or glasses (page 23).
-
Fill the water tank (3) to the MAX mark as described in the section Filling the water tank (page 22).
-
Fill the milk container (5) with water up to the MAX mark.
- Insert the milk container into the appliance correctly.
- Put one strainer insert (10 or 11) without coffee into the holder (15) as described in the section Installing the strainer insert (page 22).
- Put the strainer holder into the appliance.
- Insert the plug into the mains socket.
- Switch on the appliance with the ON/OFF switch (4).
- Put a suitable cup onto the resting grate of one of the drip trays (16 or 17).
- Press and hold down the selector switch (12) for 3 seconds and allow the water for one coffee/lungo/diluted black coffee to run through. When the appliance is new, it can take a few seconds until the system has filled with water.
- For Latte subsequently press the button for 3 seconds to rinse the steam nozzle (6).
- Repeat the last step with a little coffee powder in the strainer insert.
- Use the ON/OFF switch (4) to switch the appliance off.
- Allow the appliance to cool down.
- Clean the appliance and the accessories as described in the section Cleaning and maintenance (page 27).
NOTE
During the pumping process, unusual noises may be heard. These noises will stop after the appliance is filled with water.
When using for the first time, it is possible that production-related additives such as grease could cause slight odour or smoke. This is completely normal. Ensure sufficient ventilation.
Appliance description
Overview / Delivery contents
(See illustration on the left fold-out page)
1 Rest/hotplate for cups
2 Operating panel with 3 indicator lamps
3 Water tank
4 ON/OFF switch
5 Milk container
6 Steam nozzle
7 Steam and milk froth regulator
8 Steam nozzle operating lever
9 Measuring spoon
10 Strainer insert (1 cup)
11 Screen insert (2 cups)
12 Espresso , and lungo selector switch
13 Cappuccino, and Latte selector switch
14 Latte Macchiato Clean selector switch
15 Strainer holder
15a Strainer holder retaining bracket
16 Large drip tray with resting grate
17 Small drip tray with resting grate
18 Strainer holder mounting
19 User manual (not illustrated)
Indicator lights
The appliance is equipped with 3 indicator lamps (12-14).
All 3 indicator lamps flash when the appliance is switched on and heats up.
All 3 indicator lamps (12-14) light up permanently when the heat-up phase is completed, the appliance is ready for operation and the milk container is correctly inserted.
NOTE
During the heat-up phase, water can drip out of the strainer insert holder. Therefore, always insert a drip tray (16 or 17) and make sure that it does not overflow.
Operating panel
Symbol Functions
| Press the selector button (12) 1 x for a cup of Espresso | |
| Press the selector button (12) 2 x for a double espresso or two cups of espresso | |
| Lungo | Press the selector button (12) for 3 seconds to prepare a coffee/lungo/diluted black coffee |
| Press the selector button (13) 1 x for a cup of cappuccino | |
| Latte | Press the selector button (13) 2 x for a large cup of cappuccino |
| Press the selector button (13) for 3 seconds to prepare milk/ froth e.g., for hot cocoa | |
| Press the selector button (14) 1x for a glass of latte mac-chiato | |
| Clean | Press the selector button (14) 2 x for a large glass of latte macchiato |
| Press the selector button (14) for 3 seconds to activate the cleaning function |
All functions end automatically or can be ended prematurely by pressing the corresponding selector button.
Operation and use
General instructions
Observe the following instructions to make an aromatic espresso or coffee at just the right temperature.
Rinse out cold cups with hot water to arm them up before use.
Warm up your cups on the resting plate/ hotplate (1).
Fill the water tank with fresh water.
After heating up the appliance, allow hot
water to run through the strainer insert and holder.
Leave the empty, cleaned strainer insert with strainer holder in the hot appliance to heat up.
Experiment with the amount of coffee powder until you find the flavour you prefer. As a general rule, add approx. 7 grammes of coffee powder for one cup of coffee/espresso and approx. 14 grammes of coffee powder for one large cup of coffee or two cups of espresso.
Try various different levels of grinding fineness for the coffee powder. The grinding fineness has an influence on the aroma and the cream of the espresso.
If possible, use freshly ground coffee powder to assure optimum flavour.
Press in the coffee powder lightly. If the coffee powder is pressed too firmly, bitter substances can get into the coffee and the percolation time increases.
Empty and clean the strainer insert after each use.
Clean and descale the appliance at regular intervals. A dirty and/or scaled appliance impairs the aroma.
Filling the water tank
- Swivel up the lid.
- Remove the water tank (3) upwards.
- Pour water up to the MAX marking.
- Install the water tank (3) in the appliance again and close the lid.
ATTENTION
Do not tilt the water tank when installing. The valve on the underside of the water tank may be damaged.
Make sure that both holders on the upper edge of the water tank are inserted into the recesses on the rear of the appliance.
Installing the strainer insert (image A1)
-
Turn the nib on the wall of the strainer insert (10, 11) towards the handle and install the strainer insert into the strainer holder (15).
-
Turn the inserted strainer a quarter-turn to the left or right. The nib prevents the strainer insert from falling out.
Removing the strainer insert (image A1)
- Empty the strainer insert (10, 11) as described in the section Emptying the strainer insert (page 23).
- Turn the the strainer insert (10, 11) so that the nib on the wall of the strainer insert is pointing towards the handle.
- Lift the strainer insert out of the strainer holder (15).
Emptying the strainer insert (image B1)
- Fold the retaining bracket (15a) on the handle of the strainer holder to the front over the edge of the strainer insert.
- Knock the used coffee powder out of the strainer insert into a waste container.
- Fold back the retaining bracket (15a) on the handle of the strainer insert (15) again.
- Remove the strainer insert (10 or 11) out of the strainer holder (15) and clean both parts as described in the section Cleaning and maintenance (page 27).
NOTE
Use a spoon if the coffee grounds do not fall out.
Inserting the strainer holder (image C1)
- Hold the strainer holder (15) by the handle underneath the marking on the strainer holder mounting (18).
- Push the back of the strainer holder (15) upwards into the strainer holder mounting (18).
- Turn the handle of the strainer holder (15) to the right up to the marking so that the handle is sitting firmly in the mounting.
NOTE
While inserting, take care not to tilt the strainer holder.
Removing the strainer holder
- Turn the handle of the strainer holder (15) to the left until the handle is underneath the marking.
- Pull the strainer holder (15) down out of the strainer holder mounting (18).
DANGER
Danger of scalding! The coffee powder or the pad can be hot, allow it to cool down.
Using the drip tray and cups or glasses (images C2-C4, D1)
Large drip tray (16):
the large drip tray (16) is located under the milk container. Pull it out from under the milk container (5) to use it:
- Lift up the drip tray slightly to detach it from the rail.
- Pull the large drip tray over the small drip tray (17).
NOTE
The large drip tray with its resting grate is suitable for small cups, e.g., espresso cups (image D1).
If the large drip tray is not longer needed, push it under the milk container (image C2):
- Lift up the drip tray (16) slightly to detach it from the rail.
- Push it under the milk container (5).
Small drip tray (17):
The small drip tray (17) is located under the strainer holder mounting.
NOTE
The small drip tray (17) with its resting grate for large cups and glasses with a maximum height of 12cm is suitable for example, for brewing cappuccino or latte macchiato (image C3).
When the resting grate for the small drip tray is removed, it is possible to place glasses such as large latte macchiato glasses with a maximum height of 14.5cm under the strainer holder (see image C4).
Making espresso/coffee with coffee powder (image D1)
11 Brewing a cup of espresso
To brew a simple espresso/coffee with coffee powder, proceed as follows:
- Check the drip trays (16, 17) and empty if necessary.
- Check the water level in the water tank (3) and add water, if necessary.
- Switch on the appliance and allow it to heat up.
- Remove the strainer holder (15) and put in the strainer insert (10).
- Fill the strainer insert (10) with coffee powder to the top and wipe off any excess coffee powder with the handle of the measuring spoon (9).
NOTE
Do not overfill the strainer insert. An overfilled strainer insert cannot be inserted into the appliance.
- Remove any surplus coffee powder from the edge of the strainer holder in order not to stain the seal of the strainer holder mounting.
- Press the coffee powder lightly but firmly using the compacting aid of the measuring spoon.
- Insert the strainer holder (15) into the appliance as described in the section Inserting the strainer holder (page 23).
- Pull out the drip tray (16) from under the milk container (5) as described in the section Using drip trays and cups or glasses (page 23) and place a cup onto the resting grate.
- Press the selector button 2)
1 x. The coffee is brewed and runs into the cup. The brewing process finishes automatically or when the selector button (12) is pressed briefly to cancel brewing.
- Use the ON/OFF switch (4) to switch the appliance off.
Brewing a double espresso or 2 cups of espresso
To brew 2 cups of espresso at the same time, proceed as follows:
- Prepare the appliance as described above but use the strainer insert for 2 cups (11).
- Place 2 cups next to each other on the drip tray (16) so that one of the openings in the strainer insert can fill one cup each.
- Press the selector button 2)
2 x. The brewing process finishes automatically or when the selector button (12) is pressed briefly to cancel brewing. - Use the ON/OFF switch (4) to switch the appliance off.
To brew a double espresso with coffee pads, proceed as follows:
- Prepare the appliance as previously described.
- Push the large drip tray (16) under the milk container (5).
- Place a suitable cup onto the resting grate of the small drip tray (17).
- Press the selector button (12)
2 x. The brewing process finishes automatically or when the selector button (12) is pressed briefly to cancel brewing. - Use the ON/OFF switch (4) to switch the appliance off.
Brewing coffee/lungo/diluted black coffee
To brew coffee/lungo/diluted black coffee, proceed as follows:
- Check the drip trays (16, 17) and empty if necessary.
- Check the water level in the water tank (3) and add water, if necessary.
- Switch on the appliance and allow it to heat up.
- Remove the strainer holder (15) and put in the strainer insert.
NOTE
Depending on the strength of the coffee, a smaller or larger strainer insert can be used.
- Fill the strainer insert with coffee as described above.
-
Insert the strainer holder (15) into the appliance as described in the section Inserting the strainer holder (page 23).
-
Place a suitable cup onto the resting grate of the small drip tray (17).
- Press and hold down the selector button 12) for 3 seconds until the indicator lamps 13 and 14 extinguish. The coffee starts brewing.
- If the desired amount of coffee is reached before automatic stopping, press the selector button 12) briefly to cancel the programme. If the amount is too small, press the selector 1× 2× or for 3 seconds accordingly to brew more coffee/lungo/diluted black coffee.
Brewing espresso/coffee with coffee pads (E1, E2)
The appliance can also be used to make coffee using Senseo (image E1 A) coffee pads and to make espresso using ESE (Easy Serving Espresso, image E1 B) pads. The selection of different flavours increases and the cleaning effort for the strainer insert is reduced considerably.
NOTE
- Use the shallow strainer insert (10) when brewing espresso/coffee with coffee pads.
Sales outlets for ESE-Pads can be found on the Internet.
Brewing 1 cup of espresso
To brew an espresso/coffee with coffee pad, proceed as follows:
- Prepare the appliance as described above.
- Remove the strainer holder (15) and insert the shallow strainer holder (10).
- Lay a Senseo pad into the strainer insert as illustrated (image E2 A). ESE pads are a little smaller than the Senseo pads. Therefore, they must be placed in the middle of the strainer insert otherwise the water will not run into the cup over the pad (image E2 B).
- Insert the strainer holder (15) into the appliance as described in the section Inserting the strainer holder (page 23).
- The remaining preparation is the same as for brewing 1 cup of espresso with coffee powder.
NOTE
Take care when inserting the pads that the pad does not lie on the edge of the strainer holder.
Used coffee pads are biologically degradable and can be used as compost.
Brewing cappuccino (image F1)
Brewing 1 cup of cappuccino
To make cappuccino, proceed as follows:
- Check the drip trays (16, 17) and empty if necessary.
- Check the water level in the water tank (3) and add water, if necessary.
- Fill the milk container (5) with milk and put it into the appliance properly.
- Remove the strainer holder (15) and put in the strainer insert (10).
- Fill the strainer insert (10) with coffee powder to the top and wipe off any excess coffee powder with the handle of the measuring spoon (9).
- Press the coffee powder lightly but firmly using the compacting aid of the measuring spoon (9).
- Insert the strainer holder (15) into the appliance as described in the section Inserting the strainer holder (page 23).
- Place a suitable cup onto the resting grate of the small drip tray.
- Use the operating lever (8) only to point the steam nozzle (6) of the appliance to the cup.
- Turn the milk froth regulator (7) to the right. More froth is required for cappuccino.
- Press the selector button (13) 1 x, hot milk and froth runs into the cup first and then the coffee. The process finishes automatically or when the selector switch (13) is pressed briefly to cancel brewing.
- Use the ON/OFF switch (4) to switch the appliance off.
NOTE
Remove any surplus coffee powder from the edge of the strainer holder in order not to stain the seal of the strainer holder mounting (18).
Do not overfill the strainer insert. An overfilled strainer insert cannot be inserted into the appliance.
Brewing 1 large cup of cappuccino
To brew a large cup of cappuccino, proceed as follows:

- Prepare the appliance as described above.
- Remove the strainer holder (15) and put in the higher strainer insert (11).
- Fill with coffee as described above and insert the strainer holder into the appliance.
- Push the large drip tray (16) under the milk container (5).
- Place a large cup onto the small drip tray (17).
- Press the selector button
2 x. The process finishes automatically or when the selector switch (13) is pressed briefly to cancel brewing. - Use the ON/OFF switch (4) to switch the appliance off.
Brewing extra froth and warm milk (Latte)
To prepare milk froth and warm milk for cocoa, you require :
- a suitable cup,
- refrigerated milk with at least 2% fat.
Preparation:
- Check the drip trays (16, 17) and empty if necessary.
- Check the water level in the water tank (3) and add water, if necessary. The water is required for the generation of steam.
- Fill the milk container (5) with milk and put it into the appliance properly.
- Switch on the appliance and allow it to heat up.
-
Use the operating lever (8) only to point the steam nozzle (6) of the appliance to the cup (image F1).
-
Turn the milk froth regulator (7) right to cappuccino for more milk froth or left to latte macchiato for less milk froth.
- Press and hold down the selector button (13) for at least 3 seconds until indicator lamps 12 and 14 extinguish. Milk frothing starts.
- The process finishes automatically or when the selector switch (13) is pressed briefly to cancel brewing.
- Pull out the froth container downwards.
- Tap the froth container once or twice on a firm surface to condense the frothed milk produced.
- Pour or skim the frothed milk into the drinking receptacle.
- Switch off the appliance with the ON/OFF switch (4) and allow it cool down.
- Clean the steam nozzle and the metal tube immediately after use to prevent deposits and clogging of the steam nozzle. Instructions on cleaning can be found in the section Cleaning the steam nozzle (page 28).
Brewing 1 glass of latte macchiato
To make latte macchiato, proceed as follows:
- Check the drip trays (16, 17) and empty if necessary.
- Check the water level in the water tank (3) and add water, if necessary.
- Fill the milk container (5) with milk and put it into the appliance properly.
- Switch on the appliance and allow it to heat up.
- Remove the strainer holder (15) and put in the strainer insert (10).
- Fill the strainer insert (10) with coffee powder to the top and wipe off any excess coffee powder with the handle of the measuring spoon (9).
- Press the coffee powder lightly but firmly using the compacting aid of the measuring spoon (9).
NOTE
Do not overfill the strainer insert. An overfilled strainer insert cannot be inserted into the appliance.
Remove any surplus coffee powder from the edge of the strainer holder in order not to stain the seal of the strainer holder mounting (18).
- Insert the strainer holder (15) into the appliance as described in the section Inserting the strainer holder (page 23).
- Place a suitable glass under the strainer holder mounting.
- Turn the milk froth regulator (7) to the left. More milk than froth is required for latte macchiato.
- Press the selector button (14) 1 x. First of all, the froth and the hot milk run into the glass and then the coffee. Brewing finishes automatically or when the selector button (14) pressed briefly to cancel brewing.
- Use the ON/OFF switch (4) to switch the appliance off.
Brewing a large glass of latte macchiato
To brew a large glass of latte macchiato, proceed as follows:
- Prepare the appliance as described above.
- Remove the strainer holder (15) and put in the higher strainer insert (11).
- Fill the strainer insert (11) with coffee powder to the top and wipe off any excess coffee powder with the handle of the measuring spoon (9).
- Press the coffee powder lightly but firmly using the compacting aid of the measuring spoon (9).
- Insert the strainer holder (15) into the appliance as described in the section Inserting the strainer holder (page 23).
- Remove the resting grate and place a large glass onto the drip tray (17).
- Turn the milk froth regulator (7) to the left. More milk than froth is required for latte macchiato.
Press the selector button (14) 2 x. First of all, the froth and the hot milk run into the glass and then the coffee. Brewing finishes automatically or when the selector button (14) is pressed briefly to cancel brewing. 8. Use the ON/OFF switch (4) to switch the appliance off.
After using
- Switch off the appliance and pull the plug out of the mains socket.
- Clean the appliance and the accessories used as described in the section Cleaning and maintenance (page 27).
Cleaning and maintenance
Before beginning any work, pay attention to the safety instructions in the section Safety instructions (page 17)!
Cleaning the appliance
- Wipe the housing with a damp cloth.
Cleaning the water tank
- Pour the remaining water out of the water tank.
- Clean the water tank in warm washing-up water.
- Rinse out the water tank with fresh water.
- Pour the water away.
- Allow the water tank to dry properly in order to prevent mould from forming when not using the appliance for longer periods of time.
NOTE
The water tank should not be cleaned in the dishwasher. Dishwasher tabs are more aggressive than conventional detergents and can damage both the seal and chromium-plated lid of the water tank.
Cleaning the strainer holder/strainer insert
-
Take the strainer holder (15) with the strainer insert (10 or 11) out of the appliance as described in the section Removing the strainer holder (page 23).
-
Empty the strainer insert (10 or 11) as described in the section Emptying the strainer insert (page 23).
- Rinse the strainer insert (15) and holder (10 or 11) under running water.
HINWEIS
The strainer holder is NOT suitable for the dishwasher.
The strainer inserts can be cleaned in the dishwasher.
Emptying/cleaning the drip trays
- Take the drip trays (16, 17) out of the appliance.
- Empty the drip trays (16, 17) and clean them with warm water.
- After drying, install the drip trays and resting grates (16, 17) into the appliance.
HINWEIS
The drip tray and the resting grate can also be cleaned in the dishwasher.
Cleaning the steam nozzle (images G1, G2)
To prevent clogging, clean the steam nozzle (6) after each use. To do this, proceed as follows:
DANGER
Danger of scalding! The steam nozzle (6) becomes hot during operation, allow the steam nozzle (6) to cool down before removing the attachment.
- Pour water into to the water tank (3) and the milk container (5).
- Set the steam regulator (7) to (image G1).
- Put a suitable receptacle onto the small drip tray (17).
- Only use the operating lever (8) to position the steam nozzle (6) so that it protrudes into the receptacle.
- Press the selector button 14) for at least 3 seconds until indicator lamps 12 and 13 extinguish, cleaning then begins.
-
Milk and other residue is rinsed out of the metal pipe. The process stops automatically.
-
Allow the coffee machine to cool down and remove the milk container and lid out of the coffee machine.
Clean the milk container and its lid
- Remove the lid from the milk container.
- A silicon cover is on the top of the lid (image A). Open the cover and turn it to the side. The silicon cover cannot be removed.

- Turn the lid over (image B). Pull the silicon tube off.
- Remove the steam nozzle: turn it anticlockwise until the groove and latch are above each other, remove the steam nozzle attachment (image G2).
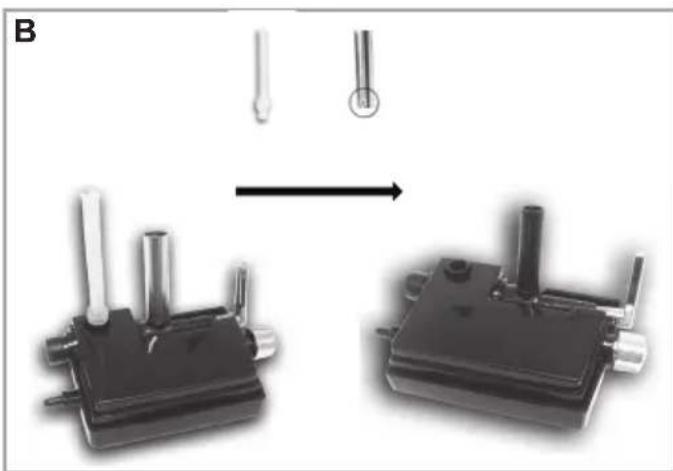
- Press the side of the lid to "Push" (image C). Pull the two lid pieces apart.
- Pull out the operating lever of the steam nozzle by turning it back and forth (image D).

D
- Put ALL parts including the milk container into the dishwasher, put the smaller items into the cutlery basket.
- Allow all items to dry properly.
- Reassemble in reverse order: first attach the operating lever of the steam nozzle.
- Close the lid. For this purpose, hook the cover onto the side (image E1) and press the other side of the cover until it audibly snaps in (image E2).

E1 E2
- Finally attach the silicon tube and the steam nozzle attachment.
- Close the silicon cover on the top of the lid.
NOTE
The milk container (5) and all lid parts can be cleaned in the dishwasher.
Descaling the appliance.
In order not to impair the service life of the appliance and the quality of the espresso and coffee, the appliance must be descaled at regular intervals. The intervals between descending depend on the water hardness (in the case of hard water after 80 coffees; and soft water after 150 coffees).
To descale the appliance, proceed as follows:
- Fill the water tank and milk container with water and citric acid (5% solution) up to the MAX mark.
- Put a suitable receptacle onto the resting grate of the drip trays (16 or 17).
- Push the strainer holder (15) with strainer insert (10 or 11) into the appliance as described in the section Inserting the strainer insert (page 23).
- Press the selector button (12) as for a cup of espresso.
- After the descending solution has run through, allow to work for approx. 10 minutes. Then allow one more cup of descending solution to run through.
- Press the selector button 13) as for preparing milk/extra froth to descale the steam nozzle.
- Pour the water and remaining descaling solution collected away.
- Rinse the water tank (3) and the milk container (5) and repeat the process with fresh water.
- Also repeat the Latte function (13).
- Wash all removable parts with warm water and detergent before brewing espresso or coffee again.
NOTE
If you use a commercially available descaling agent, observe the manufacturer's instructions for use.
If the appliance is severely scaled, it may be necessary to repeat the descending process.
Storage
If you do not intend to use the appliance for a longer period of time, clean it as described in the section Cleaning and maintenance (page 27).
Store the appliance and all accessory parts at a dry, clean and frost-free location which is protected against direct sunlight.
General aspects
Declaration of Conformity
BEEM hereby declares that this appliance complies with the fundamental requirements and other relevant provisions of 2004/108/EC, 2006/95/EC, 2009/125/EC und 2011/65/EU directives.
Guarantee
In addition to the statutory warranty obligation, BEEM also grants an extended manufacturer's guarantee for some products. If this guarantee applies, you will find the corresponding information either on the product-specific packaging, in the advertising materials or on the BEEM web page for the respective product.
For commercial or equivalent use, e.g. in hotels, guest houses or communal premises, or if the customer is not a consumer as defined by the German Civil Code, the guarantee period is 6 months. This does not infringe the warranty disclaimer.
Please visit our website to obtain more information on comprehensive guarantee conditions, available accessories and spare parts as well as user manuals in various languages.
Please contact your supplier if you have any questions on guarantee conditions, ordering accessories or service handling outside of Germany.
Limitation of liability
We assume no liability for damage or follow-up damage in the case of:
failure to observe the operating instructions, improper use, improper or unsuitable handling, incorrectly performed repairs, unauthorized modifications, use of third-party parts or replacement parts, use of unsuitable supplementary or accessory parts.
Troubleshooting
The following table helps in localising and remedying minor faults. If you cannot resolve the problem with the steps described, please contact customer service.
| Fault Possible cause Remedy | ||
| Indicator lamps (12 - 14) do not light up after switching on. | Not plugged in. Insert the mains plug. | |
| Fuse in electrical distribution board defective/switched off. | Replace fuse or switch on the circuit breaker. | |
| The indicator lamp is defective. Contact customer service. | ||
| The fuse in the distributor box triggers. | Too many appliances connected to the same power circuit. | Reduce the number of appliances on the power circuit. |
| No fault detected. Contact customer service. | ||
| Despite pumping noises, no water comes out of the appliance. | No water in the water tank. Fill with water. | |
| Water tank incorrectly installed in the housing. | Install the water tank properly. | |
| Valve on the water tank is clogged. | Clean the valve or allow to be replaced by customer service. | |
| Briefly during initial use of a new appliance. | The system of a new appliance is empty. The noises will decrease after the appliance has been filled with water. | |
| Water runs out on the underside of the appliance. | Drip tray full. Empty the drip tray. | |
| Valve on water tank leaking Contact customer service. | ||
| The espresso runs into the cup very slowly. | Coffee powder pressed in too firmly. | Press in the coffee powder less firmly. |
| The coffee powder is ground too finely. | Grind the coffee powder less finely. | |
| Espresso with ESE pad is too watery. | ESE pad is not centred. | Centre the ESE pad in the strainer insert. |
| The coffee runs over the outside of the strainer holder. | Strainer holder not correctly inserted. | Insert the strainer holder correctly. |
| The edge of the strainer holder is stained by coffee residue. | Clean strainer holder and strainer insert. | |
| Seal of the strainer holder holder is dirty. | Clean seal of strainer holder. | |
| Seal of the strainer holder holder is defective. | Contact customer service. | |
Sommaire
XpaHnTe np6op n shyp nHTaHnB MeCTe, HeoCTyHOM dJa DeTei Do 8 JeT.
Pa6Otbl nO uNCTke n Texo6cIyKuBaHnIO, KOTOpbIe DOnJXHbI npOBODITbcra NOLb3OBaTeJIeM, 3aInpEuaTcra BblONHrTaB DeTAM, 3a NCKJIIOUeHHeM Tex, KOTOpbIe DOCTnRJI8-JeTHero BO3pacta n pa6OtaHT noI npICMOTpOM.
DeTAM 3aPpeucaetcNirpaTb C npnbopom.
Перд пимеонемпровертелпбор на наличе Всшнх Вдимьх повраждан. He ekсплуатугтейповражданы пбор.
He octabnIte np6op 6e3 npncMOtpa BO Bpempa60tbl.
IpepaBaiTe npnbop dIpyeMOHTa TOIbKO aBTOpN3OBaHHbIM dIJIepaM nIIN cepBnCHO cIyX6e 3aBOda-N3rTOBOTeJIa; 3TO OcO6eHNO OTHOCNTcK CJIyuaM 3AmHebl IOBpeJdeHHoro shHypa NITaHna. HeHaJIeKaUee npoBeJeHne peMOHTa MOKeT CO3dA Tb 3NaHTeJIbHyO ONACHOCTb dIpyoJIb3OBaTeJIa.Kpome TOrO, DeIcTBne rapaHTm npekpaauetcI rapaHTnHoe 06ClykBaHne He pOn3BOIDTCra.
PemOH Tnp6opab TeueHne rapaHTnHOrO cpoKa MoKeT npOn3BOINTbcra ToIbKO yNoHOMOeHHoN 3rTOBHTeMe CepBnCHoN cnyKboi, B nPoTINBHOM clyuae npeTeH3nN IO rapaHTn 3a NOBpeJxDeHnA i COnpJxHe HmN HeNCpPaBHOCTn He npHIMaOTc, a rapaHTnHoe 06CnyKBAHne He npOn3BOIntc.
HeicnpaBhIe y3IbI pa3pe7aetc 3aMeHrTb TOJbKO Ha opuHaJIbHbIe 3aIacHbIe Yactn. IcnoIb3OBAHne ToJbKO TaKnx Yacte rapaHTnpyET BblONHeHne Tpe6oBaHn 6e3OnaChOCTn.
IcnoJb3yIte TOJIbKO npHaadJeXHOCTN OT n3rTOBHTeJI nn OCO6O peKOMeHDoBaHHbIe n3rTOBHTeJIeM. B npOTnBHom cnyae rapaHTn aHHynpyETc, a rapaHTnHoe 06cnykBAHHe He npOn3BOdNTc.
He nCnoJb3yIe 3TOT npnbop c BHeHnM TaMepOM IIN C OTdJIbHOI CNCTeMOJ DnCTaHcIOHHO ynpabJIeHnJ.
B clyuae c6o3neKtponntaHnO tcoeHNHTe np6op OT cETN, UTObI He dOnyCTNTb HnpeDnDEHHORO NOBTOpHOROBKIOUcHnnp6opa.
He 3KcnpnyaTnpyTe np6op B TEMHOTe.

ONACHOCTb
OnacHocmb nopaxeHua 3JIekmpuueckum mOKOM!
He nCloIb3yIte npI6Op,ecnHyp nITaHnI nn BnIka nobpeXdeHbl.
HnB Koem cnyae He OTKpbIbaiTe Kopnyc npnbopa. Ppi KOHTaKeTc HaxoJusmncr noi HaipjxehneM DeTaJIaMn i npu n3MeHeHn 3JeKtpnueckoN mexaHnueckoN KOHCTpykCNI npnbopa cyueCTByeT ONaCHOCTb nopaxeHNA TOKOM.
Пи 3аолнени 6ака Дя Вды He дуckeite поннковеня Bды BHyтpb kopnyca npбopa.
OTcoeHnHa np6op ot 3JeKtpocetn, He 6epntecb 3a shhyp nHTaHnBlaJXhIMn pyKaMn.
CTpyBbIXOJaIero npa He DoJxHa 6bITb HnpaBHeHa IprMo Ha 3JeKtpOpnpOpbl n ycTpoiCTBa, KOtOpbl E IMeOT 3JeKtpnueckne KOMNOHEThbl.
HnBkoemcnyaeHe norgykaTe np6opnn3JeKtpueckyIO BnIky B BODy nnDpyrne KndKOCTN.
BbHbTe BnIky n3 po3eTKN
-ππ 3aπpaBke 6aka BODoI,
-Ha BpemnpeepbIBaB NOJb3OBaHn np6Opom,
-B Cnyuae BbIaBHeHnHa HeNCnpaBHOCTn npn 3KcNpyaTaun np6opa,
-перед чистков пибopa.
Onacnocmb ydyuweHua!
3anpeaaetca nrpatb cynapaOBOHbIM MaTePnaIOM.
CyüeCTbyeT onaCHOctb ydyuWeHnra.

PPEyPExKDeHne
Onachocmb oxoza!
He npikacaiTecb K ropaym NOBepxHOCTaM BO BpeMa pa60tbi np6opa.
BoBpeMa pa6oTbI np6opapa3pe7aetc npKacatbcra TOnbKO K erOpyuKaM N KHOKNaM.
-Перед каддои чсков дайтприбору OCTытб.
He nepenocite n He nepedBnraTe pa6oTaUosn np6op.
He pacnojaraTe yactn TeHa na nyTu CTpyu BbIXoJzero npa.
3aBapHoro yCTpOncTba nI npoBOH hAcADKN MOyT BbIXODNTb HApJy ropAyn Nap, KaIIN ropAye BoDbI IIN KAnI INrOpyero MOnoka. BbipOBHnTe hAcADky dJa BCpeHNBaHnma MoLoka B HnPaBJeHn NODHa. Hn B KOem cnyae He NOcTaBnIe pyKn, DpyrHe qactn TeLa IIN HeBnaRoCToKne n/Inn HeTePMocToKne ppeMeTbI NOd 3aBapHOe yCTpOncTBo IIN HacAdKy dJa BCpeHNBaHnMa MOLOKa BO BpeMpa60tBi np6opa.
BoBpeMnCNoJb3OBaHnnpKacaiTecbToIbKOKNlaCTMaCCOBbIMDeTaIaMΦnIbTpOdepXaTeJIyIINnapoBOHaCaADKn.
HnB Koem cIyuae He n3BnekaTe 0nIbTpoJepKataTeNb BO BpeM 3aBapuBaHn.
He 3aKpbIbAitTe BblnucKHyU Tpy6kyB noDIOHe, YTO6bI He npenrTCTBOBaTbBbIXOy npa nOd daBJIeHHeM.
HnB Koem clyuae He BbIHMaIte HacaKy dJa BCHeHbAHnMoJOKa n3 EMKOCTN C MOJOKOM, eCIn BBINOJIHReTcR BCHeHbAHnE MoJOKa. B npOTNBOM clyuae BO3MOxHO pa36pbI3rNBAHne ropayero MoJOKa. DoXdntEcB 3aBepSeHnpa60tI daHHo fYHKUIN N 3aTEM I3BJIeKITE HacaKy dJa BCHeHbAHnMoJOKa n3 EMKOCTN C MOJOKOM.
BHIMAHNE!
Pn OTCoeHHeHn Hhypa NITaHnO Tpo3eTKN BceIa Depxntecb 3a BNkY, a He 3a Ka6eIb.
HnB Koem clyuae He nCnoIb3yIte shHyp nHTaHna DJIa nepeHoCKN, noDbema nnnepeMeueHn np6opa.
Для чисткнипбopa 3апpeшаetся NCПЛьЗВАТь abpa3ИВHьIEЧСТЯЦЕ cpeДСТВa,MeТаллИчecКе И SteТКИ КAKNE-JIN6O ПрEDМеты,СпOCОБныЕ NOцapanaTb NOBepxHOCtB.
HnB Koem cnyuae He 3KcnpyaTnpuYte np6op 6e3 BoDbl, NockoJbky 3TO MOKeT npNBecTN K NOBpeJdeHnA M.
B6akIaBbIcneDyET 3aINBaTbTOJIbKO XOJODHyIO,NUCTYIO BOOpnoBoHyo BDOy. HnB Koem CJUyae He IOnb3yInTeCb dpyrIMN KNDKoCTaMn.
Perynayrho ydaJyTe HaKInb n3 np6opa.
Ппкочовене К патформедл подогрева чашек He npвODNTК ожогам,Онно к патфорma nMeetNOBblseHHyTo Tempepatу.ПOTOMYHeoxидааньИ NCnyr MoKETnpNBecTNI KДPyTNM ONaChbIM CHTyaцnam.
PpimHeHne no Ha3HaueHnIO
Pnp6op npedHa3NaueH dIpynroTOBHeHnE 3cnpecco, KaynuHNO, NaTte-MaknaTo, KoFe IyHRO, TOpayero MOJOKa N MoOnOH NoHbIB BDOMaUSHX yCIOBnX nIIN aHaNOrnHbIX DOMaSHmYcNOBnX, HApPIMep, BV KxHx dIe NepcoHaJa B MaRa3HHax, KaFe, OPhiacx INpOvHX MeCTax pa60TbI, B CeJIbCKOXO3rNCTBeHHbIX BnADeHNx, a TaKKe dIg NcNoJIb3OBAHn NocToJIbUcAMN B FOCTInHnUax, MOTeJAx, NaHCNOHAX IN pOvHX KOJIeKTNBbIX CpeDCTBax pa3MeUeHn. JIO6oe INHOe INIb VbIXOJaUe 3a pamKn DaHHoro INcNoJIb3OBaHne CHTaETcR npImeHHeM He NO Ha3NaueHIO.
IPEyPExKDEHNE
B cnyuae npumehenua npubopa He no Ha3nayehuo OH moxem npedcmaaImb co6ou onacnoemb dny okpykaioux.
IcnoIb3yIe np6op nckIOHTeIbHO B npedycMOtpeHHbIX ueJx.
Co6IouaTe yka3aHn, npNBedeHHbIE B HactoJsem pyKOBoDCTBe nO 3KcIIyatauN.
KaKne-Пибо пpeTeH3nHa BO3MeUeHne y6bItKOB, BO3HKnXx BCNeIcTBne IcNoJIb3OBAHnHe nO Ha3HaueHnIO, He npHnMaIOTc.
Puck Bo3naeraTcNCKJIIOuHTeIbHO Ha noIb3OBATeJIa.
Tpe6obHnK MeCTy yCTaHOBKn
Дябэл�анчу u 63yKOpu3HHeHou экпnyamaцuu npubopa Meсmo ycmaHoeku dOJxHo omeeayamb cneDyUoUm ycNoBuM.
YcTaHOBnTe npi6op Ha npOuHyo, cyXyO, poBHyO, BODocToKyuIO JkapOpnpOHyIO NOBepxHOCTb.
He yctaHaBnBaIte npnbop B ropayx, CbipbIX nII OueHb BnaXhBix ycNoBnx IIO6 B6JIn3n rOpUoyero MaTePnAna. PacCToRHe Do CTeH, Me6eIN IN DpyrNx PpeMToB DOJXHO COCTaBnTb He MeHee 15 cm.
He yctaHaBnBaIte npnbop noHaBeChbIM 1kaΦom.
Po3eTka DOJxHa 6bITb JERKO DoCTyHnHa, YTO6bl B 3KCTpeHHOM Cnyae MOXHO 6blIO 6blCTpo OTcoeDHHt b Ka6JIb OT 3JIeKTPOcETn.
IOBepxHocT Me6eJIM MoryT coepKaTb KOMHOENTbl, CnOCO6HbIe arpeCCNBHO BO3dEInCTBOBaTb Ha nPope3nHeHHbIe HOKKn np6opaa n npuBoDntb Knx pa3MraYHeHIO. Pnp Heo6xoImocTn yloXKeTe NOD peryJnpyeMbIe HOKKn np6opaa NOkPaAdKy.
He nodknaDbIbainTe noD peyIpyEmbIe HOKKn np6opa cKaTeptN, NOToEHca NN caTKeK, TaK KaK np6Op MoKet COCKOJIb3HyTb.
3anpeaetcnaKcnnyaTnpoBaTb nXpaHnTb np6op BHe nomeeHn.
3NeKTpnuYeckoe NpOKnIoueHne
Дя 6e3oNaChou u 6e3yKOpu3HeHHOJ 3Kcnpnyamauu npubopa npu noKnIoyehuu K 3neKmpocemu Heo6xodumo co6nIodamb cJeDyUOue yka3aHua.
Перед подкюченим пибopa copAHNTe 3JIeKTPnueckne napaMeTpbl (HanpЯженье И чаTOta) Ha 3aBOДСКОI Ta6ЛИчke CnapaMeTpamN 3JIeKTPocETn. 3Tn DaHHbIe DOJXHbI COBnaDaTb BO I36ExKaHNe NOBpeXdENH npi6obaP. B cIyuae comHeHn O6paTInTeCb B cIeCuaJIuN3nPoBaHHbI MaRa3IN 3JIeKTPoPn6OpOB.
ДязauNTbIpo3eTKN CJIeDyET npIMeHЯTbnpedoxpaHntJIb, paccHTaHHbI Ha Tok 16 An6oJee.
Y6eIITecb B TOM, yTO uHyp nHTaHn He IMeET NOBpeXdEHN H He npOJKeH No OCTpbIM KpaAM.
He donyckaetc CunbHoe HaTJKeHne shHypa nHTaHn, a TaKxhe HAnuHne n3r6OB, 3aUeMNeHn, y3NoB nn ToyeK COpNIKOCHOBENrC TROPYHMN NOBepXHOCTAMN.
ПокладыBaIteшHypпNTангТakIMобра3OM,УTo6blОасHOCtB cNoTbIkaHn8 6blaNCKJIIOUyeHa.
3neKtpnuecka 6e3oNacHocTb np6opa rapaHTnpObaHa TOnbKO B TOM Cnyae,ecnn OH NODKNUoyen K yCTaHOBHeHHo CORIaCHO npedncaHm CnCTeme C 3aunTHbIM M npOBOM.Pa60ta OT p03eTKn 6e3 3auHTHO rpoBoda 3anpeueta. B cnlyae comHeHna BBIOBITE CneuaJIncTa-3JeKTpNka Dnra npOBepKn DomauHne CETn. N3rotOBtTeJb He HecET OTBETCTBEHHOCr 3a yuep6,Bbl3BaHHbI OTCyTCTBnEM IIN O6pbYBOM 3auHTHO rpoBoda.
IcnoJb3yeMbIe cIMBOJIbI
ONACHOCTb
IcnoJIb3yemcra dna o6o3naueHua HeNocepOcmeHHo apo3aue onacHocmu, Komopar npuOodum K mJxKum meJeCHbIM NoepexKeHua umu cMepeMlbHomU cxody.
Bo n36exaHne onaCHOCTn cJeNyET co6IIOdaTb npBedeHHbIE B 3TOM NyHKTe INHCTpyKcUN.
I P E D U N P E X K D E H N E
UcnoJb3yemcra dna o6o3NaueHua 8O3MOxHOU onaCHO cmyauuu, KOMOPa MOKem npueecmu K mXKKUM meJeCHbIM NOepeXDeHnM ULU CmepmeIbHomy uCxody.
Bo n36eXaHne onaChocTn cNeDyET co6IIOdaTb npBedeHHbIe B 3TOM nyHKTe INHCTpyKcUN.
BHIMAHHE!
IcnoJIb3yemcra oO3NaueHua onaHou cumyaauu, Komopar moXem npueecmu K ne2kum mpaam umu mamepuaHomy yuepe6y.
Bo n36eXaHne onaCHocTn cJeDyeT co6JIIOdaTb npNBedeHHbIe B 3Tom nyHKTe INHCTpyKcMn.
YKA3AHNE
Yka3aHne o6o3HaayeT DOIOJIHNTeJIbHyI OHHOpMaIIO, IO3BOJIAOuIyO o6JIeYHTb o6paIeHne c np6opom.
BbOaB 3KcPnPyatauHIO
PacnaKOBka
1.ИЗВЕКΙTEи3ΚΟΡΟБΚΙΝΥΒΟΡ,ВCE npɪnHaДπΕχΝΟΥΤΙΝΥΚΟΒΟДСΤΒΟ NO ΘΚCПΝΥΑΤΑΥΜι.
2.Донayana nCNoB3OBaHnI CneDyET ChTb c np6opa n npHaJnxKHOCTeB BCE ynaKOBOUHbIe MaTePnAJIbI n 3aunTHyO pHeKHy.
3. Поберптулостсь KMнгктабын yбeДиТecь B OTCyTCTBи BnIMbIX nobpeжден.
YKA3AHNE
HnB Koem Cnyae He ydaIaIe 3aBOIDCKyIO Ta6JIuKy IN BO3MOXHbIe npdeynpejkaIOUne yka3aHn.
XpaHnTe opuHaJIbHyU ynaKOBky np6opab TteueHne rapaHTnHOro cpoka (cpoKa rapaHTnHOrO o6cJyKuBaHnA) C TeM, YTObI B rapaHTnHOM clyuae INB Cnyuae rapaHTnHOrO 6cJyKuBaHnApnpoMxHO 6blIO OTnpaBtB 6paTHO N3rOTOBNTeIO B HAdJeXaUeYnaKOBKe. TpaHCnOpTbIe NOBpeJdeHnRAJIAOTcOCHOBAHmE dIy PpeKpaUeHnra paHTnN Heoka3aHnra papaHTnHbIX ycnyr.
IpeepnepBbIM nCIOJIb3OBAHHeM
IpepepebIM npuzomoeHuem Kope pekeMeHdyemc npoecmu npobhui 3anyck, ymo6by ydaunmb u3 cucmebl 603MOxHbIe ocmamku npou380dcmbeHHbIX Mamepuanoe.
- YctaHOBIne noDoHbI (16, 17), KaK OINcaHo B pa3dJe NcNoJb3O8aHue nodooHoe u Uawek unu cmaKaHo8 (cmp. 87).
- 3anonHnTe 6ak dIa BODbl (3)do MaKcImMaJIbHOI OTMeTKN, KaK OINCAHO B pa3dJe 3anONHeHue 6aka dIa BoDbI (cmp.86).
- 3aene Te Body B KOHTeHep dna MoNoka (5) DO MAKcImaJIbHOI OTMETKn.
- Händlékaum o6pa30m yctaHOBNTe KOHTeHep dIЯ MOnoka.
- BCTaBbTe ΦnIbTp (10 nII 11) 6e3 KoΦe B ΦnIbTpOpeKxAteIb (15), kAk OnIcaHo B pa3dene YcmaHOeKa Φunbmpa (cmp. 87).
- BCTaBbTe ΦnIbTpOpePkateIb B npIbOp.
- BCTaBbTe BUNKy Bpo3eTKy.
- BkIIOUHTe np6Op c nOmoIbIO BbIKIHOuAtela (4).
- NocTaBbTe YaShky noDxOJaIeRo pa3Mepa Ha peWeTky OndHoro n3 noDIOHOB (16 nnn 17).
- Haxmte Ha KhoNky BbIbopa (12) n ydepXnBaIte ee haxaToB TceHne 3 ceKyH, YTO6bl npOnycNTbYepe3 np6Op BOy, Ka dJa KoFe lyHro. B HOBOM np6ope MOxET Notpe6oBaTbcr HeKOTOpoe BpEmr dJa 3aONJIHeHn CnCTeMbI BOdOJ.
- 3aTeM HaxMITE Ha KHONKy BbIbOpa NaTTE uYdePxNBAITe ee HaxaToB B TeueHne 3 cekyHd, YTO6bl npOMbITb napOByIO HacaKy (6).
- Повторе постенье onepaцин с Heболшим Колочьгом MONOTOrO KoPe BФильтpe.
- BbIKIIOUHTe npIbOp c nOMOuBbIKIIOUaTeTn (4).
14.Дождntecb octbBaHn npu6opa. - BbInonHnTe YnCTky npnbopa n npHaJnxHoCTeN, kak OncaHO B pa3dJe Yucmka u yxod (cmp. 92).
YKA3AHNE
Bo Bpempa6oTbI pomnbipn6op MoKeT n3daBaTb Heo6bHhBie 3ByKn. Pocne 3aONHeHn CnCTeMbI BOOJ 3TN 3ByKn Ncye3aIOT.
Пи первом Вкючени прбopa n3-3a HaJIИЧЯ ДОБАВOK, ИСПОЛьЗУЕмBX Ha IpoI3BOДСТBE (HaIpIMeP,ЖИРВ) MOжET NOЯВITьСЯпax ИЛп ЛERКИ DBIMOK. 3TO CHTaETcH HOpMaJIbHbIM YBJIeHnEM! P03a6ObTbTeCb OdoCTaToCHOM pOBeTpIBaHn.
Описиме пибopa
06bem noctabkn, onncanhe npn6opa
Bo BpemnporpeBa n3 KpePHeHnAeBtroepKaTeIaMOryT BbITeKaTbKanII BODbl. Bcerda yctaHaBnBaIteNoDoH (16 nn 17) n He donyckaTe eronepeonneHn.
Panaelb ynpablenna
Ynpablenne n ekcnnyatazaia
Obune yka3aHna
MaIbI noDDOn CpeWetKoN (17) npirodeH dJa 6OJIbXnx YaWeK n CTaKaHOB BbICOTOn He 6OJee 12 cm, HApPIMep, dJa npiroTOBJIeHn KaNyUHn O NaTTe-MaKnato (pnc.C3).
Ecn y6paTb peWetky MaIoro noDoHa, noD cnIbTpOpePxaTeNb TaKKe MOxHO nOcTaBnraTb CTaKaHb I BlicOTOn Do 14,5 cm, T.e. 6oJbwne CtaKaHb I Jn JaTte-MaknaTo (pnc.C4).
PnroToBJIeHne 1 uAaKn 3cnpecco
I npueomoeHua Oduhapnoo 3cnpecco uu KoPe u3 Monomozo KoPe bInOnHume cedyioue deucmbura:
- Поверъп и ри Heo6xOДMOCn onopoxHnTe nOdoHbI (16, 17).
2.ПоверпуpoBEHBBOДБВбakeДЯ BOДы (3)ипи Heo6xOДМОCTNdoJeTe BOДы. - BkIIOUHTe npIbOp n noOxKdITe, noka OH nporpeetc.
4.ИЗВЕКИТеФИЛБТРОДЕРЖАТЕNBIBCTABBTEФИЛБТР(10).
5.ДоКрOMK3aONHnTeФиNbTp(10)MOJOTbIM KoOe,N3JIINuKn KoOe CmAxHnTepyKOYTKoMepHOJIoKKN(9).
YKA3AHNE
He nepenonHnIte pInbTp. PInbTp C n36bIToUHbIM KOJIueCTBOM Kope 6yDeT HeBO3MOXHO BCTaBNTb B npu6op.
- YdaInte n3nNkM MONOTOro KoPe c KpOMKn
fNbTpOepKataTeJ, YTObI He dOnyCTNTb
3aRpa3HeHna yNtOHnTeJI KpePNeHnra
fNbTpOepKataTeJ. - Cnerka yTpaM6yIe MoIOTbI KoPe c NOMOu MepHoi JoxKn.
- BCTaBbTe fHnIbTpOdepKaTeIb (15)В np6Op, kAk onncAo B pa3dJe YcmaHOeKa fUlbmpoodepXamEna (cmp. 87).
- BbITaHHTe NOdoH (16) n3-NOd KOHTeHepa dIy MoJoka (5), KAK ONuCAHO B pa3deJe NcNoJIb3ObaHue noDoHOB u YauweK UNu cMaKaHoB (cmp. 87), I NoCTaBbTe YauWKy Ha peWetKy NOdoHa.
- HaxmTe Ha KhoNky BbIbopa (12) 1 pa3. KoFe 3aBapnBaetcN I NoidaeTcB YaWKy. PpoeDypa 3aBapnBaHnra 3aBepwaETcA BOTOMaTnueckN. JIpy npexKeBpeMeHHoro 3aBepWeHnRA KpaTKO HaxmTe Ha KhoNky BbIbopa (12).
- BbIKJIIOHTe npI6Op c nOMOsbIO BbIKJIIOHTeTn (4).
Пригоровленne Двов Horo 3cnpcecco ИИ 2 Чашек 3cnpcecco
Дяоановременzo npuzomoenenua 2-x чашек ecnpccco bblonHume cneodyouue deucmbu:
1.Подготовытприбор,кak onиcaHo Bblwe, Ondako ИспользунTe Фильър дя 2-x уашек (11).
2. NocTaBbTe 2 yaShKn pydom dpyC dpyrom Ha noDoH (16) TaKIM o6pa3oM, yTo6bI n3 DByx HnXnX OTBepCTnФnIbTpOpePkaTeJIa Noctynan KoFe B KaKdyu YaShKy.
3. KpaTko HaxMnTe Ha KhoNky Bbl6opa (12) 2 pa3a. PpoUeDpya 3abApNBHnna 3aBepShaetcA ABTomatNueckn.ДлЯ npexKdEBpeMeHHoro 3aBepSeHnKa pTaKo HaxMnTe Ha KhoNky Bbl6opa (12).
4. BbIKIIOHTe npIbOp c nOMOuBbIO BbIKIIOUaTeTn (4).
Дя npuzomobeneHua dOouHOo 3cnpceco bInonHume cneDyouue deucmbua:
-
NpOToTObTe npIbOp, kA KOnuCaHo Bblwe.
-
Y6epnte 6oIbwoi noDoH (16) noi KOHTeHep dJa MoNoka (5).
- NocTaBbTe NOxOJaUyU qaUKy Ha peWetKy MaIoro noDoHa (17).
- KpaTKO HaxMITE Ha KHonKy Bbl6opa (12) 2 pa3a. PpoueDypa 3abapuBaHnna 3aBepShaetcA ABTomatNueeKn. Ipy npexKDeBpeMeHHoro 3aBepShenra KpaTKO HaxMITE Ha KHonKy Bbl6opa (12).
- BbIKIIOHTe npnbop c nOmoIbIO BbIKIIOUaTeIa (4).
B 3aBnCmOCTN OT XeJHaEMOn KpeNoCTH HAnITKa MOxHO NcNoJIb3OBaTb MaIbI NJI6OJIbWoi OINbTp.
- 3aONHnTe ΦnBtp MoNtBIM KoΦe, KaK ONuCAHO BbIe.
- BCTaBbTe ΦиьTpOdepKaTeIb (15)В npi6Op,ΚαΚΟΝΑΗΒραδελη ΜγσmaHoeKa ΦиьmpoodepKamEη (cmp.87).
- NocTaBbTe NOxOJaUyU qaUKy Ha peWetKy MaIoro NoDOnHa (17).
- HaxmTe Ha KhoNky Bbl6opa (12) n ydepXnBaIte ee HaxaToB TeueHne 3 cekyH, noka He noracHyT KOHTpOJbHbIe IaMnbl 13 n 14. HauHcTc npoUeDpya npuROTOBHeHn Kaope.
- EcTn Tpe6yemoe KOJNueCTBO KoFe DOCTnHyTo Do aBTOMaTneCKOrO 3aBepSeHn IApoUeDpybl npriROTOBJeHn, KpaTKO HaxMnte Ha KNoKBy BbIbopa Lungo (12), uTo6bl npexDeBpeMeHNO 3aBepuNTb npoueDpy. B Cnyae HeIOCTaTOUHO KOJNueCTBa KoFc MoXHo No XeJaHnO 1 pa3, 2 pa3a nII N TeueHne 3 cekyHd haxaTb Ha KNoKBy BbIbopa, UTo6bl DOnONHInTeJIbHO npriROTOBHTb KoPe nIIN
nyHro.
Pn6op TaKke MoXHo NcNoB3OBAbIg
pnproTOBHeHn KoFe n3 YaIIOB Tnna Sen-
seo (pnc.E1A) nn 3cnpecco n3 YaIIOB
Tnna ESE (Easy Serving System, pnc E1 B).
To no3BOJnEe pacwnpuMb MHOO6pa3ne
BKycOBbIX BapNaHTOB HAnITKa n CyueCTBeHHO
COKpaTNTb 3aTpaTbI Ha YnCTKy fNlbTpTa.
YKA3AHNE
NcnoJb3yIe nnockn nIbTp (10) InI npiroTOBneHn 3cnpecco nIu KoOe I3 YaIIOB.
Ampca pacnpoctpaHnteJeuAnIOB ESE moXHO haHTn B INTepeHeTe.
PnroToBJIeHne 1aAsKn 3cnpecco
IpyusomoeHua 3cnpecco unu Koce u3 yanda bblonHume cnedyouue deucmbua:
- NpOToTObTe npIbOp, kA KOnuCaHo Bblwe.
2.ИЗВЕКИТеФИЛБТРОДЕРЖATEЛь(15)и BCТаБТe ППОСКИФИЛБТР(10). - BCTaBbTe yanTnna Senseo B qnilbTp, kak noka3aHo Ha pucyHke (pnc.E2 A). YanDbI ESE imeIo 6oJee KOMnakTHbIe pa3Mepbl no cpaBHeHIO C yanDaMn Senseo. IooTomy nx Heo6xOIMBOCTaBJIbTb NO ueHTpy qnilbTp a, T.K. B npOTuBHOM cnUae BOda NoctTynaet B yaikky 6e3 npoxokdEHHaYepe3 qanD (pnc.E2 B).
- BCTaBbTe funltpoepkaTeIb (15)В np6Op, kak onucaHo B pa3dJe YcmaHoKa funbmpoepkameIa (cmp. 87).
5.Даьншпдствяаногинbl npoцуpe npiroTOBJIeHn1 7aShK n3cnpceco n3 MONOTOr Kofoe.
YKA3AHNE
PnBknaIbIbAHnn YaIIOB o6paTnte BHHMaHHe Ha To, YTObI YaIe He npJneraI K KpOMKeΦnIbTpOdePkaTeJI.
NcnoJb3OBAHHbIe YaJIbI cNoOC6HbIK 6nOJorUeCKomy pa3IOxKeHNo, NO3TOMy INX MOJHO BblpaCbIBaTbB KOMNocT.
ПригOTOBленеkanучно (pnc.F1)
PnroToBJIeHne 1aAsKn KanyuHNO
IpyuomoeHua kanyuHo bInonHume cneyuouue deucmbua:
- Поберъпnpи Heo6xOIMocTOnopoxHnTe ndoHbI (16, 17).
- PpOBepbTe ypoBeHb BOdbI B 6aKe IJa BOdbI (3) n npn Heo6xOAnMoCTn DoJeTc BOdbI.
- 3aeneMoNOKOBKHTeHepIJaMOJOKa (5) u yctahOBnTe KOHTeHep HndpeXaum M o6pa3oM B np6op.
4.ИЗВЕКИТеФИЛБТРОДЕРЖATELEB(15)и BCTaBBTeФИЛБТP(10).
5.ДоКрOMK3aONHnTeФnIbTp(10)MOJOTbIM KoFe,ИЗЛишКn KoFe cMaxHnTepyKOЯТКоМерHoN loXKn (9). - Cnerka ytpam6yIe moIOTbI KoPe c NOMOuMoMepHoi JoxKn (9).
- BcTaBbTe fHJIbTpOpePkaTeIb (15)В npi6Op, kak onncAoB bpa3dJe YcmaHoEka fUlbmpoodepKameJ (cmp. 87).
- NocTaBbTe NOxOJaUyUaXky Ha peWetKy NOdoHa.
- Повернite паровую насдку (6) TOlbko cnomоцью рычara упавлени (8) takimобразом, чтобл паровая насдка бILA нарравлесив сашк.
- Повернite рergyлар BCпehиваня молoka (7) Врабо. Дяkanуни Тpeбуетсь сольше молочи понbl.
- HaxMMTe Ha KhoNky BbIbopa (13) 1 pa3. ChaHana B YaAkiy NpaIoTcR na Hra ropayee MoIOKO, a 3aTeM KoPe. IpoueDypa nprirotOBJIeHn 3aBepwaeTcR aBTOMaTHUeCKn. IpypeKdEeBpeMeHHoro 3aBepSeHn KpaTKo HaxMMTe Ha KhoNky BbIbopa (13).
- BbIKJIIOUHTe npI6Op c nOMOuBbIO BbIKJIIOUaTeTn (4).
YKA3AHNE
YdaHnTe n3nnuMOnOTOro KoPe c KpOMKn NbTpOpePxaTeJra, TTo6bl He Donyuctb 3aRpa3HeHnry yNlNotHTeJr KpenIeHnra NbTpOpePxaTeJra (18).
He nepenonHnIte pnlbTp. Pnlbtp c n36bItoHbIM KOJIueCTBOM Kope 6ydet HeBO3MOXHO BCTaBNTb B npu6op.
PpuroToBJeHne 1 6oIbwoJ uawkn KaynuHNO
Дя npueomoeHua 6oIbwou yawku kanyuHO bInonHume cneDyouue deucmeur:
- NpOToTObTe npIbOp, kA KOnuCaHo Bblwe.
- ɪЗbaneкnte φилърODEржатель (15) и BCTaBbTe 6OJIee BBICOKN φилъTp (11).
- 3aONHnTeΦnBtpMOJOTbIM KOpe, KaK ONuCaHO Bblue, N BCTaBbTe ΦnBtpoepKaTeJIb B npIbOp.
- Y6epnte 6oIbwoi noDoH (16) noKoHTeHep Ira MoJoka (5).
- NocTaBbTe 60JIbIyU yAShKy Ha MaIbI IoDDOn (17).
- KpaTKO HaxMMte Ha KhoNky BbIbopa (13) 2 pa3a. IpoceDypa npiroTOBneHn 3aBepShaetcA ABtOMaTnueckn.ДЯ npexKDeEBpeMeHHoro 3aBepSeHnKpaTKO HaxMMte Ha KhoNky BbIbopa (13).
- BbIKHIOHTe npIbOp c nOMOuBbIKHIOUaTeTn (4).
PnroTOBJIeHne donoJHntbHOI neHbI n TeNlOro MONoka (naTte)
Дя npusomoeHua MONOuHou neHbI u mennozo monoka (HaPumep, dna kaKao) mpe6yomc:
- Póngxóyáu yαwka.
- Monoko n3 xoJIoIbHnka, XInpHOcTb He MeHee 2%.
PnroToBneHne
- Поверп и пи Heo6xOДMOCn onopoxHnTe nOДонbl (16, 17).
-
Поверпуювь BOДВ 6ake ДЯ BODI (3)и пи Heo6xOIMOCndoJeNTE BOДВ.Boa Heo6xOIMMaДЯ BbIPA6OTKnnapa.
-
3aeneMoNOKOBKHTeHepIIMMOKoA (5) u yctahOBnTe KOHTeHep HndpeXaum M o6pa3oM B np6op.
- BkIouHTe npibop n noOxKdTe, noka OH nporpeetc.
- Повернite паровую насаду (6) TOlbko cnomоцью рычara управлени (8)Тakim obpa3OM,чTo6bl npobayн насадka 6bila habравлеса в постую чашу (pnc.F1).
- Повернite рergyларов BCNeHbAHnmoJOKa (7)ВправО,чTOБы пи��OTOBtBkaNYuHc 6OBJшIM KOLINueCTBOM MOLOHOnpeHbI,ИПВБeBO,чTOБы пи��OTOBtBЯTTeMaKNaToc He6OJIbShIM KOJINueCTBOM MOLOUHOJIeHbl.
- HaxmTe Ha KhoNky Bbl6opa (13) n ydepXnBaIte ee HaxaToB TeueHne 3 cekyH, noka He noracHyT KOHTpOJbHbIe JAmNbI 12 n 14. HauHcTc npoedypa npiroTOBJIeHnmoJIOUHOI neHbI.
- Пюцени рпютовеня заевшаетсу втоматчеси. Дя пекдевременloro 3аьершеня КраТКО нахмITE Ha KhoNKу Bыбopa (13).
9.ИЗВЕКИТЕ EMKOCTь ДПЯ BCПЕНИВАнЯ MOЛOKA, NOTЯНВ EE BHN3. - Odnn nIa p3a noctynte dHnueem EMKoCTn IO TBepDoN NOBepxHOCTn, YTObI yNtOHNTb NOnyuEHHyO MOIOCHHyI NeHy.
- BbIeIte nII N BbIepePaITe MOnOChyIO neHy B YaWKy IIN CTaKaH.
- BbIKNoHTe np6Op c nomoIbHO BbIKNoHTeJIa (4) n HEMHOrO nOdoXdTe, noka np6Op octbIHET.
- OuICTte napOByIO hacaKy I MeTaNueckyIO Tpy6ky HeMeIeHNO NocIe NCNoJIb3OBAHnA, YTO6bl PpeIoTBpaTNTb 06pa3OBAHne OTIOJKeHnI N 3aTopoB B napOBn HacAdke. Yka3aHnI NO UcCTke cm. B pa3dJe YuCmKa napoeou Hacadku (cmp.93).
PnuroTOBJIeHne JatTe-MaknaTo
PnroTOBJIeHne 1 cTakaHa JatTe-MaKaHTo
IpyuomobneHua cmaKaHa lammeMaKuAmo bInonHume cneDyouue deucmeur:
- Поберъпnpи Heo6xOДMocTOnopoxHnTe ndoHbI (16, 17).
2.ПоверпуровьВODыВбakeДЯВODы(3)и пи Heo6xOДIMOCtNdoJeTe BODы.
3. 3aJeTe MOKoB KOHTeHep IJa MOKoA (5) u yCTaHOBtE KOHTeHep HAdIeKaUIM o6pa3OM B np6op.
4. BkIIOHTe npIbOp n IOdoXdITe, noka OH nporpeetc.
5.ИЗВЕКИТеФильТроДержаTeь (15)и BCTaBbTeФильТр (10).
6.ДоКрOMK3aONHnTeФnIbTp(10)MOJOTbIM KoPe,ИЗЛишКn KoPe CMaxHnTepyKoRrKoMМePHOJILOKKN(9).
7. CnErKa yTpaM6yIe MoIOTbI KoPe c NOMOuMoepHoi JoxKn (9).
YKA3AHNE
He nepenonHnIte pInbTp. PInbTp C n36bIToUHbIM KOJIueCTBOM Kope 6yDeT HeBO3MOXHO BCTaBNTb B npu6op.
YdaIte H3nNkMOnOTOro KOce c KpOMKn QnIbTpOpejKaTeJ, YTObI He DONyCTNTb 3aRpa3HeHnYyNIOTHnTeJ KpePNeHnQnIbTpOpejKaTeJ (18).
- BCTaBbTe ΦnIbTpOpePkaTeIb (15)В npIbOp, kak onncAo B pa3dJe YcmaHoEka funIbmpoepkameIa (cmp. 87).
- NpOcTaBbTe NOxOJaUcN CTaKaH NOKpePHeHne OINbTpOepKaTeJ.
- Повернite рergyлар BCпенваня молoka (7) Влев. Ддя пате-мaknatо тpeбуетсь сьльше молoka, чм моноюн пehы.
- Haxmte Ha KhoNky Bb6opa (14) 1 pa3. ChaJana B cTaKaH nOdaIOTcR neHa n ropye MoIOKo, a 3aTeM KoFe. PpoeDpya npiroTOBHeHra 3aBepuaeTcR aBTOMaTnueckn. Iy npexKeBpeMeHHoro 3aBepSeHnKpaTKo Haxmte Ha KhoNky Bb6opa (14).
- BbIKIIOUHTe npIbOp c nOMOuBbIO BbIKIIOUaTeTn (4).
PnroToBneHne 6oIbwoJ uawKn IaTMeMaKnaTO
IpnusomoeHua 6oBwou yawku unu cmaKaHa lamme-Makuamo ebInonHume cledyioue deucmeur:
- NpOdrToBbTe npIbOp, kA KOnuCaHo Bblwe.
2.ИЗВЕКИТеФИЛБТРОДЕРЖATEЛь(15)и BCTaBbTe 6OJIeBBICOKNФИЛbTp(11).
3.ДоКрOMKn 3aNoJIHnTeФиьTp (11) MOnOTbIM KoFe,ИЗЛшКи KoFe cMaxHnTe pyKOarTKoM МePHoJ loKKN (9). - CnErKa yTpaM6yIe MoIOTbI KoPe c NOMOuBIO MepHoi IoxKn (9).
- BCTaBbTe ΦnIbTpOdepKaTeIb (15)В npIbOp,ΚΑΚΟΝΙΝΟΒραδελη ΜγσmaHοΕΚα ΦιMbmpoodepKamEη (cmp.87).
- CHIMITE peuTeKy I NOCTaBbTe B NOdOH (17) 60nbwo CTaKaH.
- Повернite рergyларов BGннвань молoka (7) Влев. Ддя пате-maknatо тpeбуетсь сьльше молoka, чм мolyочиппehы.
- Haxmte Ha KhoNky Bb6opa (14) 2 pa3a. Chaujia B cTaKaH nOaIOTc neHa n ropee MoIOKo, a 3aTeM KoPe. PpoceDypa npiroTOBHeHn 3aBepuaeTcA aBTOMaTuYeCKn. IpnpeXdEbpemEHoro 3aBepuehn KpaTKo Haxmte Ha KhoNky Bb6opa (14).
- BbIKIIOUHTe npIN6Op c NOMOUIBbIKIIOuATeJIa (4).
Pocne nCnoJb3OBaHnA
- BbIKIOUHTe npINbOp IN BbIHbTe BNkU N3 pO3eTKN.
- BbINOJIHnTe YIcTkU npIbopa U
NcNoJIb3yEmbIX npINaIeXHocTei, KaK
OncaHO B pa3dene Yucmka u yxod (cmp. 92).
Ynctka n yxoid
Ipepe haqanom pa6om 03HaKOMbmecb c yka3aHuaMu no mexHuke 6e3oNaChocmu e pa3deene Yka3aHua no 6e3oNaChocmu (cmp.80)!
YncTka npn6opa
YcTpaHHeHHeNCnPaBHOCTeI
CneDyUOa Ta6nua NOMoraet B NONcKe H yCTpaHeHm MeJKNx HeNCnPpABHOCTe. EcN Bam He ydaIOcb yCTpaHHTb HEnCpPABHOCTb NytEm BblONHeHn Yka3aHHbIX DeIcTBn, O6paTITecB B cepBnCHyo cnyk6y.
Notes on environmental protection

The packaging materials used can be recycled. When no longer required, dis- of the packaging materials according to environmental regulations.

This product may not be disposed of in the domestic refuse within the European Union. Dispose of the appliance via
communal collection points.

Elements of Lifestyle
BEEM
Subject to printing error.
Subject to technical modifications.
Sous reserve de modifications techniques.
For service in other countries contact your local dealer.