
FreshAromaPerfect Deluxe V2 - Coffee machine BEEM - Free user manual and instructions
Find the device manual for free FreshAromaPerfect Deluxe V2 BEEM in PDF.
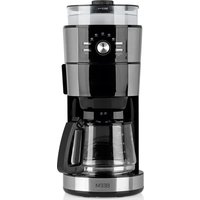
| Product type | Coffee machine with integrated grinder |
| Brand | BEEM |
| Model | FreshAromaPerfect Deluxe V2 |
| Dimensions (H x W x D) | 393 x 243 x 320 mm |
| Weight | 4.7 kg |
| Power supply | 230 V~, 50 Hz |
| Power consumption | 1000 W |
| Protection class | I |
| Water tank capacity | 1.5 L (level indicator) |
| Grinder capacity | 100 to 120 g coffee beans |
| Carafe capacity | 1.5 L (double-walled stainless steel thermal carafe) |
| Supported coffee types | Coffee beans or ground coffee |
| Coffee strength adjustment | 3 levels: light, medium, strong |
| Grind degree adjustment | 5 levels (very fine to very coarse) |
| Cup quantity adjustment | 2, 4, 6, 8 or 10 cups |
| Delayed programming | Yes (programmable start time) |
| Activated charcoal filter | Yes, replacement after approximately 70 uses |
| Permanent filter | Gold permanent filter |
| Safety | Drip-stop, automatic shut-off at end of cycle |
| Maintenance | Regular cleaning of parts, descaling recommended every 6 weeks |
| Included accessories | Thermal carafe, measuring spoon, cleaning brush |
| Warranty | 2 years |
| Certifications | CE, GS, RoHS |
Frequently Asked Questions - FreshAromaPerfect Deluxe V2 BEEM
User questions about FreshAromaPerfect Deluxe V2 BEEM
0 question about this device. Answer the ones you know or ask your own.
Ask a new question about this device
Download the instructions for your Coffee machine in PDF format for free! Find your manual FreshAromaPerfect Deluxe V2 - BEEM and take your electronic device back in hand. On this page are published all the documents necessary for the use of your device. FreshAromaPerfect Deluxe V2 by BEEM.
USER MANUAL FreshAromaPerfect Deluxe V2 BEEM
Fresh-Aroma-Perfect Deluxe
Version 2

Coffee Maker with integrated Coffee Mill
Ganz links: Feinstes Kaffeepulver.
Details of this instruction manual 4
Copyright 41
Warning statements 42
Intended use 43
Disclaimer 43
Safety 4
Fundamental safety precautions 44
Electric shock hazard 45
Danger of burning 45
Initial use 4
Safety tips 46
Unpacking 46
Scope of supply and transport inspection 46
Disposal of the packaging 47
Requirements for the place of use 47
Electrical connection 48
Overview/Delivery contents 49
Accessories 49
Control panel 50
Before using for the first time 51
Operation 5
Safety tips 52
Switching on the display lighting 52
Setting the time 53
Filling with water 53
Filling with coffee beans 53
Placing the filter. 54
Specifying the number of cups 54
Setting the coffee strength 54
Setting the grinding fineness 55
Activating the filter change reminder 56
Using an insulated flask 56
EN
Table of Contents
Instructions for brewing coffee 5
Requirements for aromatic coffee 57
Brewing 5
Brewing coffee with coffee beans 58
Brewing coffee with coffee powder 59
Preparing coffee with preset timer 60
After brewing 6
Emptying / cleaning the filter 62
Cleaning and maintenance 6
Safety tips 63
Cleaning 63
Changing the activated carbon filter 65
- Descaling 66
Troubleshooting 6
Safety tips 67
Faults - causes and remedies 67
Information on storage/disposal 6
Storage 69
Disposal 69
Annex 6
Technical data 69
Spare parts and other accessories 70
Certifications 70
Guarantee, service and repairs. 71
EC Declaration of Conformity 73
Index 7
Introduction
Dear customer,
By purchasing the Fresh-Aroma-Perfect Deluxe coffee machine you have decided in favour of a quality product of BEEM.
Please read the information below to become familiar with your appliance fast and make a full use of its functions.
Your appliance will serve your needs for many years to come provided you handle it and maintain with due care.
We would like to wish you much pleasure while using it.
Details of this instruction manual
This instruction manual forms an integral part of the Fresh-Aroma-Perfect Deluxe coffee machine (hereinafter referred to as "appliance") and contains important information for the start up, safety, intended use, cleaning and care of the appliance.
The instruction manual has to be kept near the unit at all times. It must be read and observed by all persons entrusted with operation, troubleshooting and/or cleaning of the appliance.
Keep this instruction manual in a safe place and pass it on with the unitto any future owners.
Copyright
This document is copyrighted.
Any duplication or reprinting, in whole or in part, as well as reproduction of the illustrations even in modified form is only permitted with the written approval of the manufacturer.
EN
j statements
The following warnings are used in this user manual:
DANGER
A warning of this category draws attention to an impending dangerous situation.
If the dangerous situation is not avoided, it may lead to serious injury or even death.
Follow the instructions in this warning to avoid the danger of serious injury or even death.
WARNING
A warning statement for this safety risk class indicates a potentially dangerous condition.
If the dangerous condition is not prevented, it will cause injury.
Follow the instructions in the warning message in order to prevent injuries of people.
CAUTION
A warning statement for this safety risk class indicates a damage risk.
If the dangerous condition is not prevented, it will cause damage to objects.
Follow the instructions in the warning message in order to prevent such damage.
NOTE
A note contains additional tips to facilitate the use of the appliance.
Intended use
This appliance is intended mainly for non-commercial use in closed rooms for brewing coffee using coffee powder or coffee beans.
Use in any other or further way is not considered an intended use.

WARNING
Danger from use for other than the intended purpose!
If not used for its intended purpose and/or used in any other way, the machine may be or become a source of danger.
Use the machine only for its intended purpose.
Observe the procedures described in this instruction manual.
No claims of any kind will be accepted for damage or injury resulting from use of the machine for other than its intended purpose.
The risk has to be borne solely by the machine owner.
If used commercially, please observe the conditions of the modified warranty period.
Disclaimer
All technical information, data and instructions on installation, operation and maintenance of the appliance contained in this user manual correspond to the the latest standards at the time of printing.
The manufacturer assumes no liability for damage or injury resulting from failure to observe the user manual, use for other than the intended purpose, unprofessional repairs, unauthorised modifications or use of non-approved spare parts.
EN
This appliance complies with the prescribed safety regulations. Improper use can, however, result in personal injury and/or appliance damage.
For safe use of the appliance, observe the following fundamental safety precautions and the precautions described separately in the individual sections:
Fundamental safety precautions
Check up the appliance for visible outside damage. Do not use a damaged appliance.
■Allow children to use the unit only when supervised.
Do not leave the appliance unattended during operation.
Do not pull the mains cable to remove the plug from the socket.
- Persons who due to their physical, mental or motor response abilities are unable to operate the appliance may only use the appliance under supervision or instruction by a responsible person.
All repair of the appliance must be provided by authorized qualified service and/or manufacturer's customer service staff only. Unqualified repairs can pose considerable dangers for the user. In addition, the warranty will be void.
Repairs to the appliance during the warranty period must be carried by an authorized customer service, otherwise no warranty shall be granted for direct and indirect damage.
- Faulty parts must be replaced with original spare parts only. Only such parts can ensure that safety requirements will be honoured.
- Never operate the appliance without water, otherwise the appliance will be damaged.
Electric shock hazard
DANGER
Electric shock hazard!
Contact with live leads or components poses a risk of serious injury or even death!
Observe the following safety precautions to avoid any electric shock hazard:
Do not use the appliance if the mains lead or plug is damaged.
On no account should the housing of the unit be opened. Electric shock hazard if live connections are touched and/or the electrical and mechanical configuration is changed.
Never immerse the unit or the mains plug in water or other liquids.
Danger of burning
WARNING
Hot steam may escape during operation.
Observe the following safety precautions to avoid burning yourself.
Keep your body away from escaping steam.
Do not open the filter compartment during operation.
Before any cleaning, make sure to cool down the appliance.
EN
Initial use
Safety tips

WARNING
Persons may be injured or material damage may be caused during commissioning of the appliance!
Observe the following safety precautions to avoid any danger:
Packaging must never be used to play with. A risk of asphyxiation is involved.
Observe the information on the demands on the installation location and on the electrical connection of the appliance to avoid personal injury and material damage.
Unpacking
Remove the appliance, all accessory parts and the user manual from the box.
Before using for the first time, remove all packaging materials and the protective film from the device and accessories including the information slip in the grinder.
NOTE
Do not remove the rating plate or any warning signs on the appliance.
The notes on the grinder and the water tank lid can be removed but must nevertheless be observed.
Scope of supply and transport inspection
As standard, the appliance is supplied with the components and accessories described in the appliance overview.
NOTE
Check if delivered complete and with no visible defects. Report an incomplete or damaged delivery to your supplier/ dealer immediately.
Disposal of the packaging
The packaging protects the appliance from transport damage. The packaging material was chosen in consideration of the aspects of environmental friendliness and disposal technology involved, and thus is recyclable.

Recycling the packaging material for further use allows to save raw materials and reduces the waste generation. When no longer required, dispose of the packaging materials in accordance with the local regulations in force.
NOTE
Keep the original packaging, if possible, during the warranty period in order to be able to pack the appliance properly in the event of a warranty claim. Transport damage will lead to a void warranty.
Requirements for the place of use
For safe and trouble-free operation of the appliance, the installation location has to satisfy the following requirements:
Place the appliance on a dry, flat, waterproof and heat-resistant surface.
The surface finishes on furniture may contain constituents that can be detrimental to the rubber feet of the appliance. If necessary, place a mat under the feet of the appliance.
Do not place the appliance in a hot, wet or very humid environment or in the vicinity of inflammable materials.
Because of hot surfaces, the appliance must be placed at a location which is out of the reach of children.
The mains socket must be easily accessible to enable quick disconnection of the appliance from the electric circuit in the event of an emergency.
EN
Electrical connection
For safe and trouble-free operation of the appliance, the following instructions have to be observed for the electrical connection:
Before connecting the appliance, compare the connection data (voltage and frequency) on the rating plate with those of your mains power supply. The data have to correspond in order to avoid damage to the appliance. If in doubt, ask your electrical appliance retailer.
The mains socket has to be protected by at least a 10 A circuit breaker.
If the appliance is to be connected to the power supply via an extension lead, the cable cross-section must be at least 1.5 mm².
- Ensure that the mains cable is undamaged and is not laid over hot surfaces or sharp edges.
The mains cable must not pulled tightly, bent or come into contact with the hot appliance or hot surfaces.
Place the cable in such a way as to avoid danger from tripping.
- The electrical safety of the appliance is only assured when it is connected to a properly installed protective earth (PE) conductor system. Connection to a plug socket without PE conductor is forbidden. If in doubt, have the house installation checked by a qualified electrician.
The manufacturer assumes no liability for injury or damage caused by a missing or interrupted protective earth conductor.
Overview / Delivery contents

EN
1Grinder lid
10 Filter compartment
2Grinder
11 Filter insert
3Grinder fineness scale
12 Level indicator
4 Water tank lid
13 Water tank
5 Release button
14Grinder shaft
6 Control panel with control elements
15 Filter holder with filter compartment flap
7 Insulated flask with lid
16 Activated carbon filter
8 Permanent gold filter
17 User manual (not illustrated)
9 Drip protector
Accessories
Cleaning brush
Measuring spoon
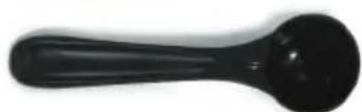
Control panel
18 "On/Off" indicator lamp
19 "On/Off" button (brewing coffee with coffee beans)
20 "Cup" symbol
21 Time display
22 "Auto/Prog" button (setting the timer)
23 "Auto/Prog" indicator lamp
24 "Brew" indicator lamp
25 Coffee strength adjustment
26 "Brew" button (brewing coffee with coffee powder)
27 "2-10" button (setting the number of cups)
28 "2-4" button (for extra-strong coffee)
29 "Filter" button (switching the filter change reminder on and off)
30 "H" button (setting the hour display)
31 "M" button (setting the minute display)
EN
Before using for the first time
NOTE
Activate the display lighting by pressing any key.
Wipe the appliance and the accessories with a slightly damp cloth.
Clean the insulated flask (7) with warm water and detergent.
Activate the filter change reminder as described in the chapter Activating filter change reminder.
Fill the water tank (13) with fresh water up to mark 10 as described in the section Filling with water.
Fill the appliance with coffee as described in the section Filling with coffee beans.
Rinse the filter insert (11) and the permanent gold filter (8) with clear water, and place both units in the appliance as described in the chapter titled Placing the filter.
Place the insulated flask (7) with the lid underneath the filter compartment (10).
Set the number of cups to 10 as described in the section Setting the number of cups.
Press the "On/Off" button (19) to switch the grinder on.
Permit the water to run through the machine.
Empty the insulated flask (7) and discharge the coffee.
Clean the insulated flask (7) with warm water and detergent.
NOTE
During the initial period of use, odour may be produced by the materials used in the appliance. The odour will diminish after a short period of time.
EN
This section contains important information on the operation of the appliance.
Safety tips
WARNING
Danger of burns! Hot steam may escape during operation.
Observe the following safety precautions to avoid burning yourself.
Keep your body away from escaping steam.
Do not open the filter compartment during operation.
CAUTION
Possible damage to the appliance!
Observe the following instructions to avoid damage:
Only fill the grinder storage container with and never with water or coffee power.
Only fill the water tank with water and never with coffee beans or coffee power.
Switching on the display lighting
The blue display lighting goes out 60 seconds after the last keypress except when the appliance is in operation, e.g., coffee is being brewed.
Press any key to switch on the display lighting.
NOTE
Only press the button for the desired action after the lighting goes on.
Setting the time
Insert the plug into the socket. The time 12:00 starts flashing on the display.
Set the hour by pressing the H button (30).
Set the minutes by pressing the M button (31).
NOTE
The time will be stored until either a new time is entered or the plug is removed from the socket for more than a minute.
Filling with water

Open the water tank lid (4).
Place the grinder cover (1) onto the grinder (2).
Fill the necessary amount of water for the number of cups required.
NOTE
The entire amount of water in the tank is always used, independent of the number of cups or the strength of coffee set.
Observe the filling level indicator (12) in the water tank. Do not overfill!
Close the water tank lid (4)
Filling with coffee beans
Remove the grinder cover (1).
Make sure that the water tank lid (4) is closed to prevent coffee beans from falling into the water tank.
our the coffee beans into the grinder (2). Do not overfill!
Replace the cover (1) on the grinder (2).
EN
Placing the filter
Press the unlocking button (5) to open the filter compartment (10).
Place the filter insert (11) into the filter compartment (10).
Place the permanent gold filter (8) into the filter insert (11). Close the filter compartment (10).
Specifying the number of cups
Press and hold the "2-10" button (27) until the required number of cups is displayed.
NOTE
The following settings are possible:
2, 4, 6, 8, or 10 cups.
The number of cups set will be stored until either a new number of cups is entered or the plug is removed from the socket for more than a minute.
Setting the coffee strength
Press and hold the button (25) until the display shows the desired strength.
NOTE
The following settings are possible:
light, medium and strong.
The set coffee strength will be stored until either a new coffee is entered or the plug is removed from the socket for more than a minute.
Particularly strong coffee
Press the "2-4" button (28) to prepare a particularly strong coffee (similar to espresso). The display reads 2-4. By pressing the button "2-4" (28), the number of cups is switched between 2 and 4.
NOTE
This function can be activated only if 2 or 4 cups of coffee have been set.
Press the "2-10" button (27) to switch this function off. The 2-4 symbol in the display goes off.
Setting the grinding fineness
The grinding fineness is set by turning the grinder to the right or left (2).

Turn the grinder (2) in such a way that the scale arrow of the grinder points to the position with the requested fineness on the scale (3).
NOTE
You can set five different levels:
Far left: Finest coffee powder.
Far right: Coarsest coffee powder.
EN
Activating the filter change reminder
NOTE
In order for the filter change reminder to function, the appliance must remain connected to the mains power and the time set as described in the section Setting the time.
Press the "Filter" button (29) to activate the filter change reminder.
The symbol appears in the display. The symbol will start flashing after 70 coffees were brewed. Replace the activated carbon filter as described in the section Replacing the activated carbon filter.
Using an insulated flask
The appliance comes with the double-walled stainless steel insulated flask.
CAUTION
The bottom of the insulated flask becomes hot when coffee is being brewed.
Observe the following instructions to avoid damage:
Place the insulated flask only onto a heat-resistant surface.

To close the insulated flask place the lid as shown and turn it to the left up to stop.
To remove the lit, turn it to the right.

Press the unlocking lever down and keep it pressed down to be able to pour the content of the insulated flask.
Instructions for brewing coffee
Requirements for aromatic coffee
In order to prepare aromatic coffee, please observe the following instructions:
If possible, use freshly ground coffee powder for the optimum flavour.
Experiment with the amount of coffee powder until you find the flavour you prefer.
Try various different levels of grinding fineness for the coffee powder. The grinding fineness for the coffee powder influences the aroma of the coffee.
Fill the water tank with the amount fresh water required for the desired number of cups.
Empty and clean the permanent gold filter after every use.
Clean and descale the appliance at regular intervals. A dirty and/or scaled appliance impairs the aroma.
Brewing
EN
NOTE
When the appliance is operating, the insulated flask (7) has to be located below the filter compartment (10) and the lid of the insulated flask has to be placed correctly. The lid of the insulated flask presses the drip protection (9) upwards, and the coffee can flow from the filter through the lid into the insulated flask.
When the brewing process has been completed, the appliance is switched off automatically.
Brewing coffee with coffee beans
NOTE
Activate the display lighting by pressing any key. The lighting goes out 60 seconds after the last button was pressed.
Fill the water tank with water as described in the section Filling with water.
Fill the appliance with coffee as described in the section Filling with coffee beans.
Placeabingas described in the chapter titled filter.
Select the desired number of cups as described in the section Setting the number of cups.
Set the desired strength of coffee as described in the section Setting the coffee.
GetSettling fineness as described in the section the grinding fineness.
Press the "On/Off" button (19) to switch the grinder on. The indicator lamp (18) is lit; the freshly ground coffee powder is passed through the shaft of the grinder into the filter compartment (20), and the coffee is brewed.
Stopping the brewing process
Press the "On/Off" button (19) to stop the brewing process and switch the appliance off. The indicator lamp (18) goes off; the appliance is switched off.
Brewing coffee with coffee powder
NOTE
Activate the display lighting by pressing any key. The lighting goes out 60 seconds after the last button was pressed.
Fill the water tank with water as described in the section Filling with water.
Place the filter as described in the chapter titled the filter. Fill the filter bag with the desired amount of coffee powder up to a maximum of 2cm under the filter edge using the measuring spoon supplied (1 level spoon per cup).
Press the "Brew" button (26) to start brewing the coffee. The indicator lamp (24) lights up and the coffee is brewed.
Stopping the brewing process
Press the "Brew" (26) or "On/Off" button (19) to stop the brewing process and switch the appliance off. The indicator lamp (24) goes off; the appliance is switched off.
EN
Preparing coffee with preset timer
NOTE
To brew coffee using the timer, the time must be set as described in the section Setting the time.
Activate the display lighting by pressing any key. The lighting goes out 60 seconds after the last button was pressed.
Programming the preset time
Press the "Auto/Prog" button (22) and keep the button pressed for about 3 seconds. The indicator lamp "Auto/Prog" (23) starts flashing.
Use the "H" button (30) and "M" (31) to set the requested starting time.
For brewing coffee with coffee powder:
Also press the "Brew" button (26) while as the "Auto/Prog" indicator lamp (23) is still flashing. The "Brew" indicator lamp (24) lights up.
Fill water into the water tank and the coffee powder into the filter.
Brewing coffee with coffee beans:
Make sure that the "Brew" indicator lamp (24) is not on. If and when required, press the "Brew" button (26) until the "Auto/Prog" indicator lamp (23) continues to flash. The "Brew" indicator lamp (24) goes off.
Set the number of cups, the strength of the coffee and the grinding fineness.
Fill water into the water tank and the coffee beans into the grinder.
place the filter.
Terminate the programming process
Press the "Auto/Prog" button (22) again to activate the preset timer function. You can also wait until the "Auto/prog" indicator lamp(23) stops flashing and then press the "Auto/Prog" button (22). The "Auto/Prog" indicator lamp (23) lights up permanently and the time selection function is activated.
When the preset time is reached, the appliance is switched on automatically.
Stopping the preset timer
In order to stop the timer, press one of the following buttons:
- "Auto/Prog" button (22) - The "Auto/Prog" indicator lamp (23) goes off.
"On/Off" button (19) - The "Auto/Prog" indicator lamp (23) goes off and the appliance starts brewing the coffee with coffee beans.
The "Brew" button (26) The "Auto/Prog" indicator lamp (23) goes out and the appliance starts brewing coffee with coffee powder.
EN
After brewing
Carry out the following operations after each use of the appliance in order to retain proper function of the appliance and prevent mould from forming:

WARNING
Danger of burns!
Observe the following safety precautions to avoid burning yourself.
Always allow the appliance to cool down before cleaning.
Emptying / cleaning the filter
Press the unlocking button (5) to open the filter compartment (10).
Remove the filter (8) and the filter insert (11) from the filter compartment.
Empty and clean the filter (8), the filter insert (11) and the drip protector (9).
Cleaning and maintenance
This section contains important information on cleaning and maintenance of the appliance.
EN
Safety tips

WARNING
Observe the following safety precautions before starting to clean the appliance:
Switch off the appliance and pull the mains plug out of the plug socket before starting cleaning.
Wait until the appliance has cooled down before you start to clean it.
Never immerse the unit or the mains plug in water or other liquids.
Cleaning
CAUTION
Possible damage to the surfaces of the appliance!
Do not use sharp objects or abrasive cleaning agents to clean the surfaces.
Clean the filter insert (11), the filter (8) and the insulated flask (7) after every use.
If necessary, clean the grinder (2) and the grinder cover (1).
Wipe the housing with a damp cloth. Use a little washing-up liquid to remove any stubborn stains.
EN
It is possible that the grinder shaft can become blocked during the grinding process. In this case, clean the grinder shaft (14):
Push the locking button (on the symbol) with a pointed object and remove the lid.

Clean the grinder shaft (14) with the cleaning brush supplied.
Changing the activated carbon filter
Change the activated carbon filter after brewing 70 times or when the symbol starts flashing in the display. Please proceed as follows:
Press the "Filter" button (29) to switch off the filter change reminder. The symbol on the display goes out.
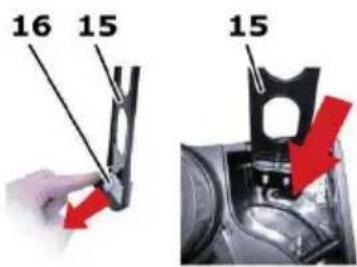
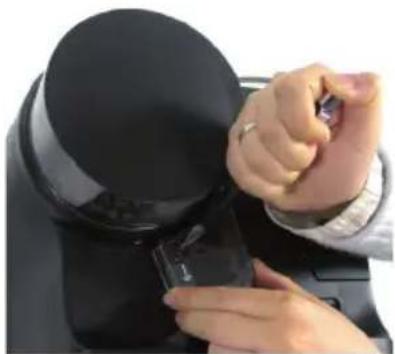
Take the filter holder (15) from the water tank (13) and open the filter container flap and remove the used activated carbon filter.
Remove the activated carbon filter (16) from its plastic packaging and thoroughly rinse under running water in order to remove any potential production residues.
Place the new filter in the filter container and close the filter container flap.
Slide the filter holder (15) into the recess (arrow).
Press the "Filter" button (29) to activate the filter change reminder again.
NOTE
The filter change reminder is active only when symbol in the display is not flashing.
Dscaling
In order not to impair the service life of the appliance and the quality of the coffee, the appliance must be descaled at regular intervals. The descending interval depends on the water hardness (at least every 6 weeks).
Fill the water tank with water to the 10 mark and add citric acid or vinegar essence (approximately 5 % acidic solution).
NOTE
If you use a commercially available descaling agent, observe the manufacturer's instructions for use.
Press the "Brew" button (26).
Allow the descending solution to run through the machine. Empty the insulated flask (7).
NOTE
If the appliance is severely scaled, it may be necessary to repeat the descending process.
Allow two tank fills of clear water to run through the appliance for rinsing.
Wash all removable parts with warm water and washing-up liquid before brewing coffee again.
Troubleshooting
Safety tips
DANGER
Electric shock hazard!
Pull the plug out of the mains socket before starting troubleshooting.
WARNING
Danger caused by unqualified repairs!
Unqualified repairs can pose considerable dangers for the user and serious damage to the appliance.
Repairs to electrical appliances may only be carried out by the works after-sales service or by specialists trained by the manufacturer.
Faults - causes and remedies
| Fault Possible cause Remedy | ||
| No symbol in the display. | Mains plug not plugged in. | Plug the mains plug in. |
| No mains power. | Check the fuse / socket. | |
| Display is defective. | Contact customer service. | |
| The automatic circuit breaker in the fuse box trips. | Too many appliances connected to the same power circuit. | Reduce the number of appliances on the power circuit. |
| Appliance defective | Contact customer service. | |
| Water runs out of the appliance. | Too much water in the water tank. | Do not overfill the water tank! |
EN
| Fault Possible cause Remedy | ||
| The coffee runs into the insulated flask only very slow. | Anti-drip valve is clogged. | Clean the anti-drip valve. |
| Appliance is scaled. | Descale the appliance. | |
| The coffee runs along the outside of the insulated flask. | The insulated flask is not placed correctly. | Set the insulated flask in the middle of the filter compartment. |
| The coffee does not run into the insulated flask. | The lid of the insulated flask has to be placed. | Fit the lid correctly. |
| The coffee is too weak. | Too much water in the water tank. | Only fill in the amount of water required for the desired number of cups. |
| Grounded coffee does not fall into the filter compartment. | Grinder shaft blocked. Clean | grinder shaft. |
| Strong build-up of steam during coffee brewing. | Appliance severely scaled. | Descale the appliance several times. |
NOTE
If you cannot resolve the problem with the steps described above, please contact after-sales service.
Information on storage/disposal
Storage
If you do not intend to use the appliance for a longer period of time, empty and clean it as described in the section Cleaning and maintenance. Store the appliance and all accessory parts in a dry, clean and frost-free place which is protected against direct sunlight.
Disposal
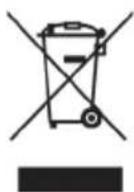
Within the European Community, this product must not be disposed of in the domestic refuse.
Dispose of the appliance in accordance with the EU Directive 2002/96/EU-WEEE (Waste Electrical and Electronic Equipment). For additional queries, please contact the local authority in charge of waste disposal.
Annex
Technical data
| Model | Fresh-Aroma-Perfect Deluxe Version 2 |
| Type number W5.001 | |
| Operating voltage 230 VAC | |
| Mains frequency 50 Hz | |
| Power consumption 1,000 W | |
| Protection class I | |
| Type of protection IP X0 | |
| Grinder capacity | 100 to 120 g of coffee beans, depending on the size of bean |
| Fill of the insulated flask 1.5 litre | |
| Dimensions | 393 x 243 x 320 mm (H x W x D) |
| Approximate weight 4.7 kg | |
Spare parts and other accessories
EN
| Item* Article No. Designation | |
| 7 900 466 036 | Double-walled stainless steel insulated flask |
| 8 900 466 046 Permanent gold filter | |
| 11 900 466 051 Filter insert | |
| 15 900 466 031 Filter holder with filter container flap | |
| 16 D 20 00 614 Activated carbon filter | |
| - 900 466 051 Measuring spoon | |
| - 900 466 056 Cleaning brush | |
- according to the drawing in the description of the appliance
Certifications
| Symbol Meaning | |
| Intertek GS Spare Parts Sutures | The appliance has been tested and certified by Intertek. |
| CE | The appliance conforms to the relevant EU Directives (see Declaration of Con-formity). |
| RoHS | This appliance conforms to the Directives on the Restriction of Hazardous Substances in Electrical and Electronic appliances (RoHS). |
| This appliance conforms to the provisions of the Waste Electrical and Electronic Equipment Directive (WEEE). |
Guarantee, service and repairs
This is a quality product from BEEM and was produced using the latest manufacturing methods.
We guarantee the perfect condition of this quality product. We will remedy any faults due to material flaws or manufacturing faults free of charge within the warranty period.
The warranty period for this appliance is two years.
For commercial or equivalent use, e.g. in hotels, guest houses or communal premises, or if the customer is not a consumer as defined by the German Civil Code, the warranty period is six months. This does not infringe the warranty disclaimer.
Warranty disclaimer: The warranty does not cover faults caused by improper use, failure to observe instructions and safety precautions in the user manual, use of force, modifications, unauthorised attempted repairs and attempted repairs by unqualified third parties. Faults caused by normal wear are also excluded.
If we are obliged by law to provide a warranty, we will comply with such obligation—to the exclusion of the right to cancellation or price reduction – and at our discretion, repair or replace the product free of charge. Should the remedy fail despite several attempts or should the replacement product exhibit faults attributable to us, the customer shall be entitled – at his/her discretion – to reduce the purchase price or to cancel the contract of purchase. Claims under warranty do not prolong the warranty period. For exchange or return of the appliance (withdrawal from the purchase contract) or reduction of the purchase price, the first contact is always the retailer from whom you purchased the product. This particularly applies to returning the appliance or the claim for reductions as these have to be settled with respect to the purchase price. Refunding the purchase price or a credit note in the event of a reduction of the purchase price can only be handled by the retailer from whom you purchased the appliance.
EN
Should - contrary to expectations - faults occur, please try to resolve the matter by telephone first. Should this not be successful, please send the carefully packed appliance to your retailer or to the customer service address shown below. Please state your complete address, type and model number and the serial number of the appliance. This information can be found on the rating plate of the appliance. Please describe the fault or defect in as much detail as possible. The product or spare part order should be accompanied by a printed and dated receipt of purchase or invoice. Without a printed receipt of purchase or invoice, no services under warranty can be provided, whether for repairs, spare parts or other claims.
Outside Germany and in particular in non-EC countries, please contact your retailer or the local distributor first. Information can be obtained - preferably by e-mail - from the customer service address indicated below.
Repairs not covered by the warranty can also be performed against individual payment by customer service - outside Germany by the retailer from whom you purchased the appliance or by a service centre, if available.
Replacement parts and consumables can be ordered from your retailer or the stated customer service address. Please contact first your dealer or the local distributor if you live outside of Germany.
For product information, accessory orders or questions on service handling, please contact your retailer or the stated customer service address. Outside Germany and in particular in non-EC countries, please contact your retailer or the local distributor first.
You can also use the Internet. You will find accessories and spare parts, as well as user manuals in various languages on our website www.beem.de . In addition you will find further product information.
EC Declaration of Conformity
| Name/address of manufacturer: | BEEM Blitz-Elektrö-Erzeugnisse Manufaktur Handels-GmbH Dieselstrasse 19-21 D-61191 Rosbach v.d.H. |
| We hereby declare that the product | |
| Model: Fresh-Aroma-Perfect Deluxe | Version 2 |
| Type: W5.001 | |
| conforms to the following relevant regulations: EU Directive 2006/95/EU Electrical devices for use within certain voltage limits, EU Directive 2004/108/EU Electromagnetic compatibility. | |
| EN55014-1:2006 EN55014-2:1997+A1:2001 EN61000-3-2:2006 EN61000-3-3:1995+A1:2001+A2:2005 EN62233:2008 EN60335-1:2002+A11,A1:04+A12,A2:06+A13:2008 EN60335-2-14:2006+A1:2008 EN60335-2-15:2002+A1:05+A2:2008 | |
| EN55014-1:2006 EN55014-2:1997+A1:2001 EN61000-3-2:2006 EN61000-3-3:1995+A1:2001+A2:2005 EN62233:2008 EN61000-3-3:1995+A1:2001+A2:06+A13:2008 EN61000-3-2-14:2006+A1:2008 EN61000-3-2-15:2002+A1:05+A2:2008 | |
| Rosbach, 16th June 2010 | BEEM. Bijan Mehshat (Legally binding signature of the issuer) |
EN
Index
EN
A
Accessories 49
Activated carbon filter. 65
Appliance elements 49
B
Before using for the first time . . . . . 5 1
Brewing
Timer. 60
with coffee beans 58
with coffee powder 59
Brewing instructions 57
C
Checking contents 46
Cleaning 63
Coffee beans 58
Coffee powder 59
Control panel 50
D
Damaged appliance 44
Danger of burning. 45
Delivery contents 46, 49
Descending 66
Disposal 47,69
E
EC Declaration of Conformity. 73
Electrical connection. 48
F
Filter 62
G
Guarantee. 71
1
Initial use 46
Intended use. 43
L
Liability disclaimer 43
N
New owner 41
0
Operation 52
Activating the filter
change reminder 56
Filling the tank with water 53
Filling with coffee beans 53
Placing the filter. 54
Setting the coffee strength 54
Setting the degree of grinding
fineness. 55
Setting the number of cups. 54
Setting the time 53
Switching on the display lighting
Using an insulated flask 56
P
Packaging. 47
Place of use 47
R
Repairs 71
s
Safety 44
Service 71
Storage 69
T
Technical data. 69
Troubleshooting 67
U
Unpacking. 46
W
Warnings. 42
Table des matieres
Avant-propos 7
Chere cliente, cher client,
2, 4, 6, 8, of 10 kopies.
Herinnering filtervarging activeren
OPMERKING
Elements of Lifestyle

GERMANY
BEEM GmbH

- Fresh-Aroma-Perfect Deluxe
- Version 2
- Details of this instruction manual 4
- Safety 4
- Initial use 4
- Operation 5
- EN
- Table of Contents
- Instructions for brewing coffee 5
- Brewing 5
- After brewing 6
- Cleaning and maintenance 6
- Troubleshooting 6
- Information on storage/disposal 6
- Annex 6
- Index 7
- Introduction
- Details of this instruction manual
- Copyright
- j statements
- DANGER
- WARNING
- CAUTION
- NOTE
- Intended use
- Danger from use for other than the intended purpose!
- Disclaimer
- Fundamental safety precautions
- Electric shock hazard
- Electric shock hazard!
- Contact with live leads or components poses a risk of serious injury or even death!
- Danger of burning
- Hot steam may escape during operation.
- Initial use
- Safety tips
- Unpacking
- Scope of supply and transport inspection
- Disposal of the packaging
- Requirements for the place of use
- Electrical connection
- Overview / Delivery contents
- Accessories
- Control panel
- Before using for the first time
- Possible damage to the appliance!
- Switching on the display lighting
- Setting the time
- Filling with water
- Filling with coffee beans
- Placing the filter
- Specifying the number of cups
- Setting the coffee strength
- Particularly strong coffee
- Setting the grinding fineness
- Activating the filter change reminder
- Using an insulated flask
- Instructions for brewing coffee
- Requirements for aromatic coffee
- Brewing
- Brewing coffee with coffee beans
- Stopping the brewing process
- Brewing coffee with coffee powder
- Preparing coffee with preset timer
- Programming the preset time
- For brewing coffee with coffee powder:
- Brewing coffee with coffee beans:
- Terminate the programming process
- Stopping the preset timer
- After brewing
- Danger of burns!
- Emptying / cleaning the filter
- Cleaning and maintenance
- Cleaning
- Changing the activated carbon filter
- Dscaling
- Troubleshooting
- Faults - causes and remedies
- Information on storage/disposal
- Storage
- Disposal
- Annex
- Technical data
- Spare parts and other accessories
- Certifications
- Guarantee, service and repairs
- Index
- A
- B
- C
- D
- E
- F
- G
- 1
- L
- N
- 0
- P
- R
- s
- T
- U
- W
- Table des matieres
- Avant-propos 7
- Herinnering filtervarging activeren
- OPMERKING
Brand : BEEM
Model : FreshAromaPerfect Deluxe V2
Category : Coffee machine