
Café & Tea Expresser - Coffee machine BEEM - Free user manual and instructions
Find the device manual for free Café & Tea Expresser BEEM in PDF.
| Product type | Express coffee and tea maker |
| Brand | BEEM |
| Model | Café & Tea Expresser |
| Dimensions (L x W x H) | 325 mm x 180 mm x 330 mm |
| Weight | Approximately 4.3 kg |
| Power supply | 220-240 V~, 50 Hz, 1600-1900 W |
| Protection class | I |
| Main functions | Coffee preparation (cup, large cup, carafe) and tea (cup, carafe) |
| Included filters | Permanent coffee filter, permanent tea filter (3 ribs) |
| Supplied accessories | Filter holder, drip tray with overflow grid, glass carafe with lid, measuring spoon |
| Water volume programming | Yes, individually adjustable for each cup |
| Keep warm | Hotplate, 40 minutes after preparation |
| Automatic shut-off | Yes, standby mode after prolonged inactivity |
| Water tank capacity | Full level indicator (MAX), sufficient for one carafe |
| Care and cleaning | Removable parts dishwasher safe; descaling recommended every 4 months |
| Safety | Burn protection (plastic handle), child safety, emergency stop |
| Spare parts available | Yes (filter holder, filters, tank, carafe, etc.) |
| Manufacturer warranty | Additional warranty according to conditions on packaging or website |
| Standards and certifications | Compliant with EU directives (2004/108/EC, 2006/95/EC, 2009/125/EC) |
Frequently Asked Questions - Café & Tea Expresser BEEM
User questions about Café & Tea Expresser BEEM
0 question about this device. Answer the ones you know or ask your own.
Ask a new question about this device
Download the instructions for your Coffee machine in PDF format for free! Find your manual Café & Tea Expresser - BEEM and take your electronic device back in hand. On this page are published all the documents necessary for the use of your device. Café & Tea Expresser by BEEM.
USER MANUAL Café & Tea Expresser BEEM
Elements of Lifestyle
Bedienungsanleitung
User Manual
High-speed coffee and tea maker
Open the fold-out pages at the beginning and end of the user manual in order to view the illustration during reading.
General information. 19
Safety 21
Getting started 23
Appliance description 25
Operation and controls 26
Cleaning and care 33
Storage 34
Simple troubleshooting. 35
Spare parts and accessories 35
Technical data 36
Dear customer,
Before using the appliance, please read the information contained in this user manual regarding setup, safety and intended use as well as cleaning and care.
Open the fold-out pages at the beginning and end of the user manual so that you can view the illustrations while reading.
Keep this user manual for later use and give it to any future owner along with the appliance.
General information
Copyright
This document is copyrighted. Any copying or reprinting, in whole or in part, as well as distribution of the illustrations, even in altered form, is only allowed with the written consent of the manufacturer.
A note about environmental protection

The packaging materials used can be cycled. Dispose of packaging mate which are no longer needed in accordance with local regulations.

This product may not be disposed of normal household waste within the European Union. Dispose of the appliance via municipal collection points.
Warranty/guarantee
In addition to the statutory warranty obligation, BEEM also offers an extended manufacturer's guarantee on certain products.
If offered, you will find the appropriate details either on the product-specific packaging, promotional materials or on the BEEM website for the particular product.
The full warranty conditions, accessories available and spare parts as well as user manuals in various languages can be found on our website at www.beem.de.
Symbols used

DANGER
This is used for a hazard which is an immediate threat leading to severe bodily injury or to death.
To avoid the hazard, follow the instructions given here.

WARNING
This is used for a possibly hazardous situation which could lead to severe bodily injury or to death.
To avoid the hazard, follow the instructions given here.

CAUTION
This is used for a possibly hazardous situation which could lead to minor injuries.
To avoid the hazard, follow the instructions given here.
ATTENTION
This is used for a situation which could lead to material damage.
To avoid the hazard, follow the instructions given here.
Limitation of liability
We assume no liability for damage or consequential damage caused by:
-
failing to observe the operating instructions,
use for any other than the designated purpose,
improper or inappropriate handling,
inexpert repairs,
unauthorized modifications,
use of third-party parts and spare parts, -
use of unsuitable add-ons or accessories.
Conformity declaration
The BEEM company hereby declares that this appliance complies with the fundamental requirements and with the remaining applicable provisions of the directives 2004/108/EC, 2006/95/EC and 2009/125/EC. A complete declaration of conformity can be found under www.beem.de.
Safety
Safety regulations
Only use the appliance for the use described. Do not use the appliance for other, possibly similar, uses under any circumstances.
This appliance is not intended to be used by children under 8 years of age or by persons with limited physical, sensory or mental capabilities or insufficient experience and/or insufficient knowledge, except if they are supervised by a person responsible for their safety or have received instruction from this person as to how the appliance is to be used.
Supervise children to ensure that they do not play with the appliance.
- Cleaning and care tasks must also not be carried out by children under 8 years of age without supervision.
Store the appliance and the accessory parts out of the reach of children under 8 years of age.
Inspect the appliance before use for visible, external damage. Do not operate a damaged appliance.
Do not leave the appliance unattended during operation.
Only use accessory parts of the manufacturer or those which are expressly recommended by the manufacturer. Otherwise all warranty or guarantee rights are void.
Do not use this appliance in combination with an external timer or a separate remote control system.
Only have repairs to the appliance performed by a customer service representative authorised by the manufacturer because otherwise, in the event of damage or subsequent malfunctions, there is no longer any guarantee or warranty coverage. This also applies specifically to the replacement of a damaged power supply cord. Considerable hazards for the user can result from improper repairs.
- Only replace defective components with original spare parts. Only these parts ensure that the safety requirements are fulfilled.
Designated use
This appliance is intended primarily for non-commercial use indoors for making coffee or tea.
Any other use, or a use which goes beyond these, constitutes improper use. All claims whatsoever for damage arising from improper use are excluded.
The owner bears the sole risk.
Overview of hazards
Hazard due to electrical current
Do not use the appliance if the mains cord or plug are damaged.
Do not open the housing of the appliance under any circumstances. If energised connections are touched or the electrical or mechanical configuration is changed, there is a risk of electrical shock.
Never immerse the appliance or the mains plug in water or other liquids.
Never hold the appliance under running water.
Unplug the mains plug from the socket in the following situations:
- When cleaning the appliance
- When the appliance is not in use
- When there is a malfunction of the appliance during operation
Always pull the power supply cord out of the mains socket by the plug and not by the mains cord itself.
Never carry, lift or move the appliance by the mains cord.
Risk of suffocation due to packaging material
Ensure that no children play with the packaging material.
Risk of burns due to hot surfaces
Only grasp the pot by the plastic handle.
- Allow the appliance to cool down before beginning cleaning.
Risk of scalding due to escaping water vapour
- Avoid contact with the water vapour which can escape from the front of the appliance.
Do not open the cover of the appliance during operation.
Safe operation site
The operation site must meet the following requirements to ensure safe and trouble-free operation of the appliance:
The operating surface of the appliance must be solid, dry, level and both water and heat resistant.
The immediate surroundings of the appliance must not be hot, wet or very damp.
The socket must be easily accessible so that the mains connection can be disconnected quickly.
Furniture surfaces may possibly contain substances which could affect the feet of the appliance, causing them to soften. Place another material under the feet of the appliance if needed.
- Ensure that the appliance is far enough away from temperature-sensitive surfaces, such as walls and furniture.
Getting started
Unpacking
Proceed as follows:
- Take the appliance, all accessories and the user manual out of the box.
- Remove all packaging material and protective films from the appliance and the accessories before using them for the first time. Never remove the type plate or any warning notices.
- Keep the original packaging for the duration of the appliance's warranty or guarantee period so that the appliance can be packaged properly for shipping in the event of a warranty claim. Shipping damage voids the guarantee or warranty.
Checking the scope of supply
Proceed as follows:
- Check the contents for completeness and visible damage. Do not operate a damaged appliance.
- Notify your supplier promptly in case of an incomplete or damaged delivery.
Power connection
The following regulations for the electrical supply must be observed to ensure safe and trouble-free operation of the appliance:
-
Be certain that the appliance can be connected to a properly installed protective conductor electrical system. Operation using a socket without an earth conductor is not permitted. If in doubt, have the house mains network inspected by an electrician. The manufacturer assumes no responsibility for damage resulting from the absence or interruption of a protective earth conductor.
-
Before connecting the appliance, compare the electrical data (voltage and frequency) on the type plate with that of your electrical mains network. These data must match to avoid damage to the appliance. If in doubt, ask your electrical appliance retailer.
- Be certain that the socket is protected by at least a 16 A automatic circuit breaker.
- Be certain that the power supply cord is not damaged. Route the power supply cord in such a way that it poses no risk of stumbling. The power supply cord may not be routed over sharp edges and may not be pulled taut or kinked. The power supply cord must not come into contact with hot surfaces.
Before first use

WARNING
Risk of burns due to hot surfaces
Only grasp the pot by the plastic handle.

WARNING
Risk of scalding due to escaping water vapour
- Avoid contact with the water vapour which can escape from the front of the appliance.
Proceed as follows:
- Fill the water tank (2) up to the maximum fill level indicator mark (MAX) with fresh water.
- Remove the drip pan with the grate and place the pot directly onto the warming plate.
- Put the mains plug into a socket.
- Switch on the coffee maker as described in the chapter Preparing a pot of coffee (page 29).
- Allow the water to run through and then dispose of it.
- Repeat the process once again using only water and then once more using a little coffee.
- Switch the coffee maker off.
- Clean the appliance and the accessories as described in the chapter Cleaning and care (page 33).
Please note:
You may notice an odour or a little smoke which result from manufacturing materials such grease the first time you use the appliance. This is completely normal! Just ensure adequate ventilation.
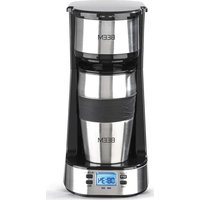
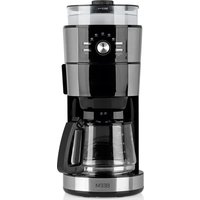
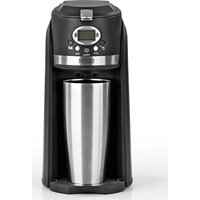
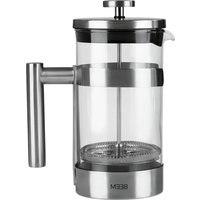
Appliance description
(For illustrations, see the fold out page at the left.)
1 Housing
2 Water tank
3 Cover/handle of water tank
4 Operating panel
5 On/Off button
6 Button for one cup of coffee
7 Button for one large cup of coffee
8 Button for a pot of coffee or tea
9 Button for one cup of tea
10 Filter holder clip
11 Filter holder
12 Filter holder plunger
13 Filter holder receptacle
14 Permanent filter for coffee
15 Permanent filter for tee with 3 internal ribs
16 Glass pot with cover
17 Drip pan with grate
18 Drip pan locator
19 Warming plate
20 Micro switch for the use of the pot
21 Micro switch for the use of the drip pan
22 Measuring spoon (not shown)
23 User manual (not shown)
| Symbol | Controls Function | |
| O | On/Off button (5) | Switches the appliance on and off. |
| Small cup of coffee (6) | Starts the brewing process for one small cup of coffe. | |
| Large cup of coffee (7) | Starts the brewing process for one large cup of coffe. | |
| Pot (8) | Starts the brewing process for a pot of coffee or tea. | |
| Cup of tea (9) | Starts the brewing process for one cup of tea. |
General information
The Café & Tea Expresser makes it possible to prepare a cup of coffee or tea in a very short time.
For pre-paring tea, use loose tea leaves.
- Do not use very finely ground coffee. Choose a coarser grind when grinding the coffee beans yourself.
The amount of water for the cup of coffee or tea can be set individually.
Always use fresh, cold mineral water without carbonation or tap water. Cup and volume markings can be found on the water tank and on the pot for the purpose of measuring the desired amount of water.
The permanent filters eliminate the need to repurchase paper filters. The use of one permanent filter for preparing coffee and another one for preparing tea prevents the mixing of aromas.
- Empty the filter holder and permanent filter after every use and clean in warm washing-up water or in the dishwasher.
Clean and descale the coffee maker regularly so that the aroma of the coffee or tea is not adversely affected.
Operation and controls
Possible uses (figures A1, A2)
With this appliance, you can prepare
1 cup of coffee
1 large cup of coffee
1 pot of coffee
1 cup of tea, or
1 pot of tea
The coffee is brewed in the filter by means of a special procedure using a combination of compression, pressure and heat. The filter holder has a plunger (12) for this purpose which compresses the coffee in the permanent filter, depending on the amount (see figures A1, A2). Use the permanent filter for coffee preparation (14) when brewing coffee.
To enable tea to develop its full aroma, the tea is not compressed, but only brewed using pressure and heat. The tea filter has three internal ribs which block the plunger. This is why it is important to use the permanent filter for tea (15) when preparing tea; only the filter with the light-coloured outer structure is suitable for this.
Pouring in water (figure B)
There are two ways to pour in water. Mind the fill level indicator on the water tank. Do not overfill it!
Proceed as follows:
- Pull the cover/handle (3) of the water tank upwards and fold it towards the back.
- Fill the water tank using a measuring cup.
- Fold the cover/handle forwards and place it back on the water tank.
Or:
- Pull the cover/handle (3) of the water tank upwards and remove the water tank from the appliance.
- Fill the water tank directly from the tap.
- Place the water tank into the appliance and close the cover/handle.
Please note:
The amount of water in the water tank does not have to equal the number of cups. Only the amount of water required for each respective process is used. The water tank must be filled to the maximum level for brewing a pot of coffee or tea. If there is no water or very little water in the water tank, buttons 6-9 on the operating panel blink.
Filling the permanent filter and putting it in place (figures C1, C2)
Making coffee with ground coffee:
Only use the permanent filter for coffee (14) for this purpose.
Proceed as follows:
-
Put enough ground coffee into the permanent filter (14) for the desired number of cups. Depending on your taste, you can vary the strength of the coffee individually by changing the amount of coffee used. Use the coffee side of the measuring spoon (22) as follows to make it easier to get the right amount:
-
Approx. 1 level measuring spoon for 1 cup of coffee
4-6 level measuring spoons for a pot of coffee -
Place the permanent filter into the filter holder (11): When doing so, press the plunger (12) onto the coffee until the clips (10) on both sides of the filter holder audibly click into place.
Making tea
Only use the permanent filter for tea (15) for this purpose, i.e. the filter with the light-coloured outer structure.
Proceed as follows:
-
Put enough loose tea into the permanent filter (15) for the desired number of cups. Depending on your taste, you can vary the strength of the tea individually by changing the amount of tea used. Use the tea side of the measuring spoon (22) as follows to make it easier to get the right amount:
-
Approx. 1 measuring spoon for 1 cup of tea
4-6 measuring spoons for a pot of tea -
Place the permanent filter into the filter holder (11): The plunger (12) is blocked by the upper edge of the ribs in the tea filter. This allows enough room in the tea filter below for the tea leaves to develop their aroma.
- Press the permanent filter firmly into the filter holder until the clips (10) on both sides of the filter holder audibly click into place.
Removing the permanent filter (figure C3)
To remove the permanent filter for coffee or tea, proceed as follows:
- Press on the upper part of the clips (10) to release them.
- Pull the permanent filter (14,15) off of the filter holder (11). This requires a bit of upward force to pull the seal along the inner wall of the filter.
Inserting/removing the filter holder (figure D)
Proceed as follows to insert the filter holder:
- Push the filter holder (11) into the receptacle (13) until it snaps into place.
Proceed as follows to remove the filter holder: - Pull the filter holder - with a bit of force - out of the appliance.
Please note:
If the filter holder gets stuck when removing it, wait a moment until the pressure has gone down.
Inserting/removing the drip pan with grate (figures E1, E2)
For the preparation of one cup of coffee, one large cup of coffee or one cup of tea, the drip pan with the grate must be placed in the appliance (figure E1):
- Simply place the drip pan (17) into the appliance over the warming plate (19). The drip pan fits perfectly into the opening over the warming plate. Place the grate onto the drip pan. When fitted correctly, the locator (18) of the drip pan presses against the micro switch (21). This blocks the function of preparing a pot of coffee or tea.
The drip pan is not required for the preparation of a pot of coffee or tea (figure E2):
- Simply remove the drip pan with the grate from the appliance.
- Place the pot with the cover (16) onto the warming plate (19). The pot presses against the micro switch (20). This blocks the function of preparing coffee or tea by the cup.
Preparing a cup of coffee

WARNING
Risk of scalding due to escaping water vapour
- Avoid contact with the water vapour which can escape from the front of the appliance.
Proceed as follows:
- Fill the water tank (2) with water as described in the chapter Pouring in water (page 26).
- Put the mains plug into a socket.
-
Press the on/off switch 5. Preheating begins and buttons 6-9 blink. When the appliance is ready for operation, buttons 6-9 are illuminated permanently.
-
Put ground coffee for one cup of coffee into the permanent filter (14) as described in the chapter Filling the permanent filter and putting it in place (page 26).
- Place the filter holder into the appliance as described in the chapter Inserting/removing the filter holder (page 27).
- Put the drip pan and the grate (17) in place as described in the chapter Inserting/removing the drip pan with grate (page 27).
- Place a cup onto the grate of the drip pan.
- Press the button (6). The button blinks during the brewing process.
- Remove the cup when the brewing process is finished.
- Remove the filter holder and the permanent filter as described in the chapters Inserting/removing the filter holder (page 27) and Removing the permanent filter (page 27).
- Clean both parts as described in the chapter Cleaning and Care (page 33).
- Press the on/off switch (5) to switch the appliance off.
- Unplug the mains plug from the socket.
Please note: If the appliance is left switched on and is not used for a longer period of time, the stand-by function is activated automatically. This is indicated by a signal light which runs across the operating panel. The appliance can be re-activated by pressing any button, after which buttons 6-9 are illuminated. The press the desired function.
Preparing a large cup of coffee

WARNING
Risk of scalding due to escaping water vapour
- Avoid contact with the water vapour which can escape from the front of the appliance.
Proceed as follows:
- Fill the water tank (2) with water as described in the chapter Pouring in water (page 26).
- Put the mains plug into a socket.
- Press the on/off switch (5). Preheating begins and buttons 6-9 blink. When the appliance is ready for operation, buttons 6-9 are illuminated permanently.
- Put ground coffee for one large cup of coffee into the permanent filter (14) as described in the chapter Filling the permanent filter and putting it in place (page 26).
- Place the filter holder into the appliance as described in the chapter Inserting/removing the filter holder (page 27).
- Put the drip pan and the grate (17) in place as described in the chapter Inserting/removing the drip pan with grate (page 27).
- Place a cup onto the grate of the drip pan.
- Press the button (7). The button blinks during the brewing process.
-
Remove the cup when the brewing process is finished.
-
Remove the filter holder and the permanent filter as described in the chapters Inserting/removing the filter holder (page 27) and Removing the permanent filter (page 27).
- Clean both parts as described in the chapter Cleaning and Care (page 33).
- Press the on/off switch (5) to switch the appliance off.
- Unplug the mains plug from the socket.
Please note: If the appliance is left switched on and is not used for a longer period of time, the stand-by function is activated automatically. This is indicated by a signal light which runs across the operating panel. The appliance can be re-activated by pressing any button, after which buttons 6-9 are illuminated. The press the desired function.
Preparing a pot of coffee

WARNING
Risk of burns due to hot surfaces
Only grasp the pot by the plastic handle.

WARNING
Risk of scalding due to escaping water vapour
- Avoid contact with the water vapour which can escape from the front of the appliance.
Proceed as follows:
- Fill the water tank (2) with water as described in the chapter Pouring in water (page 26).
-
Put the mains plug into a socket.
-
Press the on/off switch (5). Pre-heating begins and buttons 6-9 blink. When the appliance is ready for operation, buttons 6-9 are illuminated permanently.
- Put the correct amount of ground coffee into the permanent filter (14) as described in the chapter Filling the permanent filter and putting it in place (page 26).
- Place the filter holder into the appliance as described in the chapter Inserting/removing the filter holder (page 27).
- Take the drip pan with the grate (17) out of the appliance as described in the chapter Inserting/removing the drip pan with grate (page 27).
- Place the pot with the cover (16) onto the warming plate (19).
- Press the button (8). The button blinks during the brewing process.
- After brewing, the warming plate will keep your coffee warm for 40 min.
- Remove the filter holder and the permanent filter as described in the chapters Inserting/removing the filter holder (page 27) and Removing the permanent filter (page 27).
- Clean both parts as described in the chapter Cleaning and Care (page 33).
- Press the on/off switch (5) to switch the appliance off.
- Unplug the mains plug from the socket.
Please note: If the appliance is left switched on and is not used for a longer period of time, the stand-by function is activated automatically. This is indicated by a signal light which runs across the
operating panel. The appliance can be re-activated by pressing any button, after which buttons 6-9 are illuminated. The press the desired function.
Preparing a cup of tea

WARNING
Risk of scalding due to escaping water vapour
- Avoid contact with the water vapour which can escape from the front of the appliance.
Proceed as follows:
- Fill the water tank (2) with water as described in the chapter Pouring in water (page 26).
- Put the mains plug into a socket.
- Press the on/off switch (5). Preheating begins and buttons 6-9 blink. When the appliance is ready for operation, buttons 6-9 are illuminated permanently.
- Put tea leaves for one cup of tea into the permanent filter (15) as described in the chapter Filling the permanent filter and putting it in place (page 26).
- Place the filter holder into the appliance as described in the chapter Inserting/removing the filter holder (page 27).
- Put the drip pan and the grate (17) in place as described in the chapter Inserting/removing the drip pan with grate (page 27).
- Place a cup onto the grate of the drip pan.
- Press the button (9). The button blinks during the brewing process.
-
Remove the cup when the brewing process is finished.
-
Remove the filter holder and the permanent filter as described in the chapters Inserting/removing the filter holder (page 27) and Removing the permanent filter (page 27).
- Clean both parts as described in the chapter Cleaning and Care (page 33).
- Press the on/off switch (5) to switch the appliance off.
- Unplug the mains plug from the socket.
Please note: If the appliance is left switched on and is not used for a longer period of time, the stand-by function is activated automatically. This is indicated by a signal light which runs across the operating panel. The appliance can be re-activated by pressing any button, after which buttons 6-9 are illuminated. The press the desired function.
Preparing a pot of tea

WARNING
Risk of burns due to hot surfaces
Only grasp the pot by the plastic handle.

WARNING
Risk of scalding due to escaping water vapour
- Avoid contact with the water vapour which can escape from the front of the appliance.
Proceed as follows:
- Fill the water tank (2) with water as described in the chapter Pouring in water (page 26).
-
Put the mains plug into a socket.
-
Press the on/off switch (5). Preheating begins and buttons 6-9 blink.When the appliance is ready for operation, buttons 6-9 are illuminated permanently.
- Put the correct amount of tea leaves into the permanent filter for tea (15) as described in the chapter Filling the permanent filter and putting it in place (page 26).
- Place the filter holder into the appliance as described in the chapter Inserting/removing the filter holder (page 27).
- Take the drip pan with the grate (17) out of the appliance as described in the chapter Inserting/removing the drip pan with grate (page 27).
- Place the pot with the cover (16) onto the warming plate (19).
- Press the button (8). The button blinks during the brewing process.
- After brewing, the warming plate will keep your tea warm for 40 min.
- Remove the filter holder and the permanent filter as described in the chapters Inserting/removing the filter holder (page 27) and Removing the permanent filter (page 27).
- Clean both parts as described in the chapter Cleaning and Care (page 33).
- Press the on/off switch (5) to switch the appliance off.
- Unplug the mains plug from the socket.
Please note: If the appliance is left switched on and is not used for a longer period of time, the stand-by function is activated automatically. This is indicated by a signal light which runs across the operating panel. The appliance can be
re-activated by pressing any button, after which buttons 6-9 are illuminated. The press the desired function.
Programming the amount of water individually
When preparing one cup of coffee, one large cup of coffee or one cup of tea, you have the option of setting the amount of water individually.
Proceed as follows:
- Fill the water tank (2) with water as described in the chapter Pouring in water (page 26).
- Put the mains plug into a socket.
- Press the on/off switch (5). Preheating begins and buttons 6-9 blink. When the appliance is ready for operation, buttons 6-9 are illuminated permanently.
- Put the correct amount of ground coffee or tea leaves for the cup size into the permanent filter (14 or 15) as described in the chapter Filling the permanent filter and putting it in place (page 26).
- Place the filter holder into the appliance as described in the chapter Inserting/removing the filter holder (page 27).
- Put the drip pan with the grate (17) in place as described in the chapter Inserting/removing the drip pan with grate (page 27).
- Place a suitable cup onto the grate of the drip pan.
-
Press the button (6, 7 or 9) for 3 seconds until the indicator lamp of the button blinks quickly.
-
Press the button


(6, 7 or 9) again, when the desired amount of water has been reached. This setting for filling is saved.
Proceed as follows to reset the programming:
- Press the button (8), until the buttons for preparation by the cup (6 and 9) blink.
- Release the button (8). The factory setting is now restored.
Cleaning and care

DANGER
Hazard due to electrical current!
Never immerse the coffee maker or the mains plug in water or other liquids.
Never hold the coffee maker under running water.

WARNING
Risk of burns due to hot surfaces
- Allow the appliance to cool down before beginning cleaning.
Proceed as follows:
- Press the on/off switch (5) to switch the appliance off.
- Unplug the mains plug from the socket.
- Wipe off the housing (1) with a damp cloth.
- Clean the following parts under running water or in the dishwasher:
Permanent filter (14/15)
Filter holder (11)
- Drip pan with grate (17)
Pot (16)
Remove the cover for easier cleaning of the pot.
Proceed as follows:
- Pull the right-hand pin of the cover out of the holder.
- Now you can remove the left-hand pin from the holder.
Proceed as follows to put the cover back in place:
- First put the left-hand pin of the cover into the holder.
- Push the right-hand pin into the holder until it snaps into place.
Dscaling
Please observe the following rules:
The appliance must be descaled regularly so that the lifetime of the appliance and the quality of the coffee are not adversely affected. The descending interval is dependent on the degree of water hardness. We recommend precautionary descending every three months.
If the scale buildup is heavy, it may be necessary to repeat the descending process.
If the appliance stops working due to scale buildup, no warranty or guarantee claim can be made.

WARNING
Risk of burns due to hot surfaces
Only grasp the pot by the plastic handle.

WARNING
Risk of scalding due to escaping water vapour
- Avoid contact with the water vapour which can escape from the front of the appliance.
Proceed as follows:
- Fill the water tank (2) up to the maximum fill level indicator mark (MAX) with a mixture of water and citric acid or vinegar essence (about 5% acid).
- Remove the drip pan with grate (17).
- Place the filter holder with a permanent filter into the appliance.
- Place the pot with the cover closed onto the warming plate (19).
-
Put the mains plug into a socket.
-
Press the on/off switch (5). Pre-heating begins and buttons 6-9 blink. When the appliance is ready for operation, buttons 6-9 are illuminated permanently.
- Press the button (8). The button blinks during the brewing process.
- Wait until about one cup has run through and then shut off the appliance.
- Allow the descending solution to work for about 10 minutes and then switch the appliance back on again.
- The descending procedure is complete when all of the solution has run through.
- After descending, repeat the process two more times using clear water to rinse out the appliance.
- Rinse all removable parts with warm water and washing-up liquid before you make coffee or tea again.
- Press the on/off switch (5) to switch the appliance off.
Please note: If you use a commercially available descending solution, mind the manufacturer's usage instructions.
Storage
If you do not need the appliance for a longer period of time, clean it as described in the chapter Cleaning and care (page 33).
Store the appliance and all accessories in a clean, dry and frost-free location protected from direct sunlight.
Simple troubleshooting
The following table is intended to help in identifying and remedying small problems:
| Problem | Possible cause | Remedy |
| Nothing is shown on the display. | Mains plug not plugged in. | Plug in the mains plug. |
| No mains voltage present. | Check the fuse or socket. | |
| Defective display | Contact customer service. | |
| The automatic circuit breaker in the electrical system triggers. | Too many appliances connected to the same power circuit. | Reduce the number of appliances in the power circuit. |
| No problem can be identified. | Contact customer service. | |
| Water runs out of the appliance. | Too much water in the water tank. | Do not overfill the water tank. |
| Intense steam generation during coffee brewing. | Appliance has heavy scale buildup. | Descale the appliance several times. |
| There is no function when brewing a cup of coffee or tea. | The drip pan with grate is not in place. | Insert the drip pan with grate. |
| The filter holder cannot be removed after brewing a pot of coffee. | Very finely ground coffee was used. | Only use coarsely ground coffee. |
| Too much coffee powder was used; the permanent filter is overfilled. | Do not overfill the permanent filter. |
If you are unable to remedy the problem using the above steps, please contact the customer service department.
Spare parts and accessories
| Item* | Part no. | Designation |
| 11 | 900 951 001 | Filter holder |
| 14 | 900 951 006 | Permanent filter for coffee |
| 15 | 900 951 011 | Permanent filter for tea |
| 22 | 900 951 016 | Measuring spoon |
| 17 | 900 951 021 | Drip pan with grate |
| 2 | 900 951 026 | Water tank with cover |
| 16 | D2000555 | Glass pot with cover |
*Number according to the appliance description.
Technical data
| Model | High-speed coffee and tea maker Café & Tea Expresser |
| Type number | W18.001 |
| Dimensions (L x W x H) | 325 mm x 180 mm x 330 mm |
| Weight, approx. | 4,3 kg |
| Operating voltage | 220-240 V~ |
| Mains frequency | 50 Hz |
| Power | 1600-1900 W |
| Protection class | I |
Table des matieres
Indicación:
Durante la primera puesta en serviciosSEO,SEO,SEO,SEO,SEO,SEO,SEO,SEO,SEO,SEO,SEO,SEO,SEO,SEO,SEO,SEO,SEO,SEO,SEO,SEO,SEO,SEO,SEO,SEO,SEO,SEO,SEO,SEO,SEO,SEO,SEO,SEO,SEO,SEO,SEO,SEO,SEO,SEO,SEO,SEO,SEO,SEO,SEO,SEO,SEO,SEO,SEO,SEO,SEO,SEO,SEO
Elements of Lifestyle
BEEM
Subject to printing errors.
Subject to technical modifications.
For service in other countries contact your local dealer.

- Bedienungsanleitung
- General information
- Copyright
- A note about environmental protection
- Warranty/guarantee
- Symbols used
- DANGER
- WARNING
- CAUTION
- ATTENTION
- Limitation of liability
- Conformity declaration
- Safety
- Safety regulations
- Designated use
- Overview of hazards
- Hazard due to electrical current
- Risk of suffocation due to packaging material
- Risk of burns due to hot surfaces
- Risk of scalding due to escaping water vapour
- Safe operation site
- Getting started
- Unpacking
- Proceed as follows:
- Checking the scope of supply
- Power connection
- Before first use
- Please note:
- Appliance description
- Operation and controls
- Possible uses (figures A1, A2)
- Pouring in water (figure B)
- Filling the permanent filter and putting it in place (figures C1, C2)
- Making coffee with ground coffee:
- Making tea
- Removing the permanent filter (figure C3)
- Inserting/removing the filter holder (figure D)
- Inserting/removing the drip pan with grate (figures E1, E2)
- Preparing a cup of coffee
- Preparing a large cup of coffee
- Preparing a pot of coffee
- Preparing a cup of tea
- Preparing a pot of tea
- Programming the amount of water individually
- Proceed as follows to reset the programming:
- Cleaning and care
- Dscaling
- Please observe the following rules:
- Storage
- Simple troubleshooting
- Table des matieres
- BEEM
Brand : BEEM
Model : Café & Tea Expresser
Category : Coffee machine