
Chef's Choice CC 105 - Sharpener GRAEF - Free user manual and instructions
Find the device manual for free Chef's Choice CC 105 GRAEF in PDF.
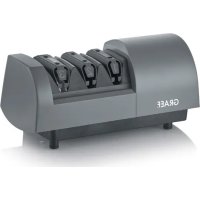
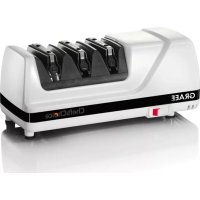
| Product type | Electric knife sharpener |
| Model | Chef's Choice CC 105 |
| Brand | Graef |
| Dimensions (approx.) | 20 x 10 x 10 cm |
| Weight | 1 kg |
| Power supply | 230 V ~ 50 Hz, polarized plug |
| Power | 100 W |
| Sharpening modules | Module 1 (initial sharpening) and Module 2 (finishing) |
| Blade types | Smooth and serrated blades |
| Abrasive discs | Diamond discs |
| Rotation speed | 3000 rpm (estimated) |
| Power indicator | Red LED indicator |
| Auto shut-off | No |
| Safety | Unplug before cleaning; do not immerse |
| Cleaning | Damp cloth; remove bottom cover to remove metal filings |
| Lubrication | None required |
| Warranty | 2 years |
| Country of origin | Germany |
Frequently Asked Questions - Chef's Choice CC 105 GRAEF
User questions about Chef's Choice CC 105 GRAEF
0 question about this device. Answer the ones you know or ask your own.
Ask a new question about this device
Download the instructions for your Sharpener in PDF format for free! Find your manual Chef's Choice CC 105 - GRAEF and take your electronic device back in hand. On this page are published all the documents necessary for the use of your device. Chef's Choice CC 105 by GRAEF.
USER MANUAL Chef's Choice CC 105 GRAEF
EN Operating Instructions
When using electrical appliances, basic safety precautions should always be followed including the following:
- Read all instructions. Every user should read this manual.
- To protect against electrical hazards, do not immerse the Graef Model CC105 in water or other liquid.
- Make sure that only clean knife blades are inserted i Graef Model CC105.
- Unplug from outlet when not in use, before putting on or taking off parts and before cleaning.
- Avoid contacting moving parts.
- Do not operate any appliance with a damaged cord or plug or after the appliance malfunctions, or is dropped or damaged in any manner.
- Please return your sharpener to your local distributor where the cost of repair or electrical or mechanical adjustment can be estimated. If the supply cord is damaged, it must be replaced by the manufacturer, its service agent or similarly qualified persons in order to avoid a hazard.
- CAUTION! This appliance may be fitted with a polarized plug (one blade is wider than the other). To reduce the risk of electric shock, this plug will fit in a polarized outlet only one way. If the plug does not fit fully in the outlet, reverse the plug. If it still does not fit, contact a qualified electrician. Do not modify the plug in anyway.
- The use of attachments not recommended or sold by Graef may cause fire, electric shock, or injury.
- The Graef Model CC105 is designed to sharpen household knives, pocket knives and selected sports knives. Do not attempt to sharpen scissors, ax blades or any blade that does not fit freely in the slots.
- Do not let the cord hang over edge of table or counter or touch hot surfaces.
- When in the "ON" position (Red flash on switch is exposed when "ON") the Graef sharpener should always be on a stable countertop or table.
- WARNING: KNIVES PROPERLY SHARPENED ON YOUR Graef WILL BE SHARPER THAN YOU EXPECT. TO AVOID INJURY USE AND HANDLE THEM WITH EXTREME CARE. DO NOT CUT TOWARD ANY PART OF YOUR FINGERS, HAND OR BODY. DO NOT RUN FINGER ALONG EDGE. STORE IN A SAFE MANNER.
- Do not use outdoors.
- Close supervision is necessary when any appliance is used by or near children or the infirm.
- Do not use honing oils, water, or any other lubricant with the Model CC105.
- For household use only.
SAVE THESE INSTRUCTIONS.
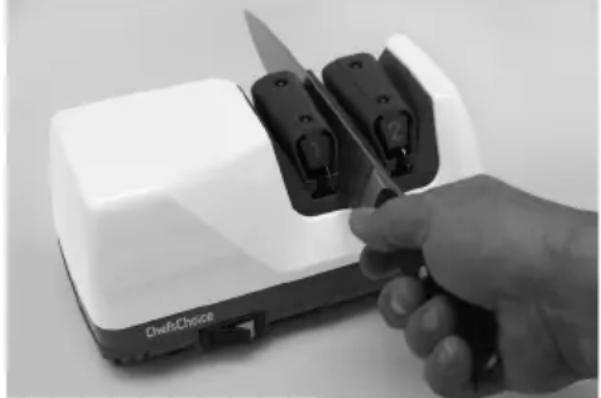
Always clean the blade free of dirt, oil and food before inserting into sharpener. Before you turn on the power, slip a knife blade smoothly into the slot between the left angle guide of Stage 1 and the plastic spring. Do not twist the knife. Move the blade down in the slot until you feel it contact the diamond disk. Pull it towards you lifting the handle slightly as you approach the tip. This will give you a feel for the spring tension. Remove the knife and press the Power Switch. A red "indicator" on the switch appears when this switch is turned "ON."
STAGE 1
If you are sharpening a straight-edge knife for the first time, start in Stage 1. Pull the knife once through the left slot of Stage 1 by slipping the blade between
the left plastic angle guide and the plastic spring while pulling the blade toward you and simultaneously moving the blade downward in the slot until it engages the diamond coated disk. You will hear it make contact with the disk. If the blade is curved, lift the handle just enough as you sharpen near the tip of the knife to keep the blade edge in audible contact with the rotating disk. Sharpen the entire blade length. For an eight (8) inch blade each pull should take about 6 seconds. Pull shorter blades through in 3-4 seconds.

Stage 1. Inserting blade in slot between guide and elastomeric spring. Alternate individual pulls in left and right slots.
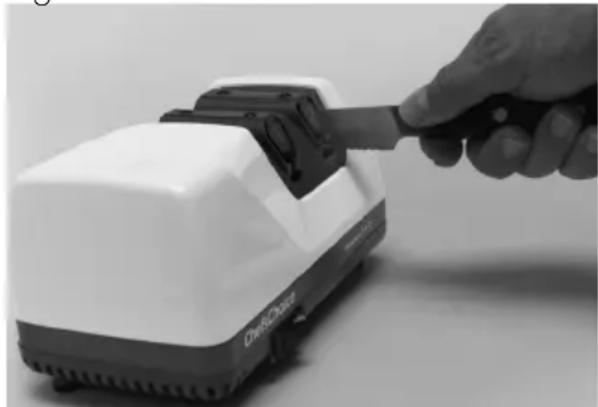
Next, repeat with one full length pull in the right slot of Stage 1.
Note: Each time you insert the blade, simultaneously pull the blade toward you. Never push the blade away from you. Apply just enough downward pressure to make contact with the disk - added pressure does not speed up the sharpening process.
To insure uniform sharpening along the entire blade length, insert the blade near its bolster or handle and pull it at a steady rate until it exits the slot. Always make an equal number of pulls alternating one pull in the left slot and then one pull in the right slot in order to keep the edge facets symmetrical. Generally in Stage 1 you will find that only 3 to 5 pairs of slow pulls is adequate, but for a duller knife more pulls will be needed. Before moving to Stage 2 it is very important to confirm that a burr exists along one
side of the edge. To check for the burr, move your forefinger carefully across the edge as shown. (Do not move your finger along the edge – to avoid cutting your finger). If the last pull was in the right slot, the burr will appear only on the right side of the blade (as you hold it when sharpening) and vice versa. The burr, when present, feels like a rough and bent extension of the edge; the opposite side of the edge feels very smooth by comparison.
If no burr exists, make one or two pairs of additional alternating pulls in the left and right slots of Stage 1 before proceeding to Stage 2. Slower pulls will help you develop the burr. Confirm the presence of the burr after a pull in the left slot and then also after a pull through the right slot before proceeding to Stage 2. It is always necessary to create the burr in Stage 1 before honing in Stage 2.
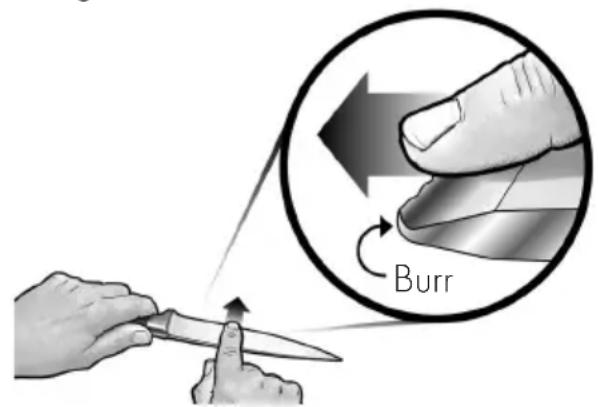
Inserting blade in right slot of Stage 1. Develop a distinct burr along knife edge before honing in stage 2. Burr can be detected by sliding finger across and away from the edge. Caution!
STAGE 2
In general only two pairs of slow pulls (about 4-6 seconds each) followed by two pairs of faster pulls (1-2 seconds each) in Stage 2 will be needed to obtain a razor sharp edge. Make alternating pulls in left and right slots.
PROCEDURE FOR SHARPENING SERRATED BLADES
Serrated blades are similar to small saw blades with scalloped depressions and a series of pointed teeth. In normal use the points of the teeth do most of the cutting.
Serrated blades of all types can be sharpened in the Graef Model CC105. However, except as noted below, use only Stage 2 which will sharpen the teeth of the serrations and develop sharp microblades along the edge of these teeth. The design of serrated edges varies greatly but generally two (2) to six (6) pairs of slower (3-6 seconds) alternating pulls in Stage 2 will be adequate. If the serrated knife is very dull more pulls will be needed. If the knife edge has been severely damaged through use, first
make just one fast pull (2-3 seconds for an 8" blade) in each of the right and left slots in Stage 1, then make a series of slow pulls in Stage 2, alternating right and left slots. Excessive use of Stage 1 will remove more metal along the edge than is necessary in order to sharpen the teeth.
Because serrated blades are saw-like structures, the edges will never appear to be as "sharp" as the edge on a straight edge knife. However, their tooth-like structure can be effective for fibrous foods or help break the skin on hard or crusty foods.
RESHARPENING
Resharpen straight edge knives whenever practical using Stage 2. When that fails to quickly reshapepen, return to Stage 1 and make 3 to 5 pairs of slow alternating pulls. Check for a burr along the edge and then proceed to Stage 2 where two pairs of slow pulls followed by two or more pairs of faster pulls will be necessary as described above to put a new razor-like edge on the knife.
Resharpen serrated blades using the sharpening procedure described in the preceding section for serrated blades.
Sharpen serrated blades only in Stage 2.
CLEANING
NO lubrication is required for any moving parts, motor, bearings, or sharpening surfaces. Do not wet abrasive surfaces. The exterior of the sharpener may be cleaned by carefully wiping with a damp cloth. Do not use detergents or abrasives on exterior surfaces.
Once a year or so, as needed, you can remove metal dust that will accumulate inside the sharpener from repeated sharpenings. Remove the small rectangular clean-out cover that covers an opening on the underside of the sharpener. You will find metal particles adhered to a magnet attached to the inside of that cover. Simply rub off or brush off accumulated filings from the magnet with a paper towel or tooth brush and reinsert the cover in the opening. If larger amounts of metal dust have been created you can shake out any remaining dust through the bottom opening when this cover is removed. After cleaning, replace the cover securely with its magnet in place.
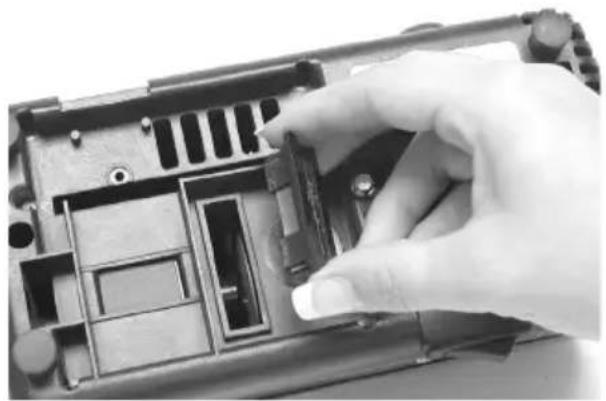
Clean-out cover under sharpener.
AFTER-SALES SERVICE
If your Graef device is damaged, please contact your dealer or the Graef Customer Service at +49 (2932) 9703677 or write an e-mail to service@graef.de.
IMPORTANT!
If possible, keep the original packaging during the guarantee period of the unit in order to be able to pack the unit correctly in case of guarantee.

DISPOSAL OF THE PACKAGING
The packaging protects the unit against transport damage. The packaging materials are selected according to the environmental compatibility and disposal-related aspects and can therefore be recycled.
The return of packaging into the material cycle saves raw material and reduces the waste volume. Dispos of the packaging material no longer needed at collection points for the "Green Dot" recycling system (in Germany).

DISPOSAL OF THE UNIT
At the end of its service life, this product cannot be disposed of in normal domestic waste. The symbol on the product and in the operating instructions point out to this fact. Reuse the materials according to their marking. With the reuse, recycling or other forms of recycling of old equipment, you make an important contribution to the protection of our environment. Please ask your municipal administration for the disposal point.
TWO-YEAR WARRANTY
For this product, we assume 24 months manufacturer warranty for defects, which are due to production or material defects. Your legal warranty claim in conformity with Section 437 et seq. of the German Civil Code (BGB) shall remain unaffected by this regulation. The warranty does not cover damage caused by improper handling or use as well as defects which only slightly influence the function or the value of the appliance. In this case, the warranty will also become null and void. Transport damages, as
far as we are not responsible for it, are excluded from the warranty claims. A warranty claim is excluded for damage caused by a repair which has not been carried out by us or one of our agents. In case of justified complaints, we shall repair the defective product or replace it by a product without defects at our discretion.
DE
EN
FR
NL
IT
ES
PL
UKR
CJYKBAIITPIMKNI KJIIEHTIB
Якwo Baaw npicpi Graef nowkoJxeho, 3BepHITbCra do Baaworo toproBebHo ro nocepednka a6o cnyx6n niTpumkn KJIeHTIB fipMn Tpaef (Graef) 3a Homepom 02932-9703677 a6o haDiIshitb ham eJeKtpoHHoro Jncta Ha service@graef.de
BAXJINBOI!
36epiraTe opriHaIbHy ynaKOBky npotrrom rapaHInHO TepmiHy npicToIO, 06 npicTpim MoXHa 6yNo HaleXnM YHHOM ynaKyBatn Ta TpaHCnOpTyBatn y pa3i nped'YBHeHn npetEn3ii 0oDo rapaHTII.

YTNJI3ALI YNAKOBKN
Ynakobka 3axuae npncpii Bid nookxehnnaic TpaHcnpTyBaHHa. Maepi aann dnyyakobkn BnbpauTbcra BIDNOBIDHO do ekONoriuHO cymichoCTI ta acneKTIB ytnlizau, TOMy BOHN niDnraotb BtopHHni nepepo6ci.
IobepHeHHa ynaKOBKn Do KpyroO6iry MaTepiJIb EkoHOMnTb CnpOBHy Ta 3MeHxye BiXoHN. Ytni3yIte naKyBaJIbHi MaTepiAII, kki 6ilbwe He notpi6Hi, y nyHKtax 360py dIra cnCTeMn nepepo6kn «3eHa TOnKa».

YTNJI3AUZI IPNCTPOIO
Iicra 3akHHe TepmiHy cny6n cei npdyKT He MoXHa yTNI3yBAtn pa3om i3 3BnuaHmN no6yTOBmN BIXOamn. Lc eo3HaayetbCnMBOJOM Ha npOdykTi Ta B IHCTpyKii i3 3actocyBaHHa. MATEpian NiIINrAOTBtOpHHi nepepo6u BiINOBiHO do ix MapkyBaHHa. 3abjkn NobToPHomy BnKOpNCtAHHIO, nepepo6u MATEpiaIIB a6o IHsIM φopmam nepepo6Kn CTapnx npictpoB Bu po6nte BaxnBn BheCOK y 3axnCT Haworo HABKOJIshBoTo cepEOBua. BydJaacka, 3BepHITbcrdo MicceBnx opraHb BnAn Ioo BoDnOBiJaNbHoro NyHKTu yTNI3aui.
2 POKI TAPAHITINHO 3A6E3NEUHNN
Дя данoro npodukty Mn 6epeMo Ha cebe 24 mcaui rapaHTii Bnpo6nka Ha de-
ΦeKTH YpeE3 Bnpo6HnHi a6o MaTePiaIbHI DeΦeKTH, NouHaIouH 3 dAtn npOaJx. Lc NoIoxeHH He BnIbAe Ha Bawi 3akOHHi npTeH3ii 3a rapaHTieIO 3rIHO 3 § 437 i Iani ΓρomadHcBkoKOdeKcy ΦPH (BGB). ΓapantTie He BkIouaE noIskoJXeHHa, CπpUHHeH HεnpaBnIbHOIO 6bpo6koIO a6o BnKOpNCTaHHaM, a TAKOX DeΦeKTH, kI MaOTb IINIse He3NaHn BnINb Ha φyHKciIO a6o λKiCTb npIcTPOIO. Y cIbOMy BnPaIKY TepmIH II rapaHTII TAKOX 3akIHcyETbcR. KpIM TORO, TpaHCnOPTHI 3bNTKN BnKlIOaOTb- cR 3 npTeH3i 3a rapaHTieIO, kIso Mn He HecEMo BiIDNOBIAIbHocTi 3a ue. IpeTeH3ii 3a rapaHTieIO BnKlIOaOTbcRA 3a 3bNTKN, 3anODiHi pEmOHTOM, kIh BnKOHyBaII He Mn a60 He OdnH 3 NaNX npEdCTabHnKIB. Y pa3i o6rpyHTOBAHnx cKapr Mn a6o BiDpe- MOHTyEMO DeΦeKTHn IpoDyKT Ha Cbi NpO3cyd a6o 3amIHMo NOrO 6e3DeΦeKTHm IpoDyKTOM.

Gebr. Graef GmbH & Co. KG | Donnerfeld 6 | 59757 Arnsberg | www.graef.de
- SAVE THESE INSTRUCTIONS.
- STAGE 1
- STAGE 2
- PROCEDURE FOR SHARPENING SERRATED BLADES
- RESHARPENING
- CLEANING
- AFTER-SALES SERVICE
- IMPORTANT!
- DISPOSAL OF THE PACKAGING
- DISPOSAL OF THE UNIT
- TWO-YEAR WARRANTY
- CJYKBAIITPIMKNI KJIIEHTIB
- BAXJINBOI!
- YTNJI3ALI YNAKOBKN
- YTNJI3AUZI IPNCTPOIO
- POKI TAPAHITINHO 3A6E3NEUHNN
Brand : GRAEF
Model : Chef's Choice CC 105
Category : Sharpener