Track Performance - Exercise bike KETTLER - Free user manual and instructions
Find the device manual for free Track Performance KETTLER in PDF.
Download the instructions for your Exercise bike in PDF format for free! Find your manual Track Performance - KETTLER and take your electronic device back in hand. On this page are published all the documents necessary for the use of your device. Track Performance by KETTLER.
USER MANUAL Track Performance KETTLER
- To avoid injuries as a result of overstress or overload, the exer- cise device shall only be operated according to the instructi- ons.
- Prior to the first commissioning and after approx. 6 operating days, check if the connections are mechanically secured.
- Regularly check the operability and the proper condition of the exercising device.
- The safety technical controls are part of the obligations of the owner and shall be implemented regularly and properly.
- The security level of the device can only be maintained if the device is regularly checked for wear and damages.
- Defective or damaged components shall be replaced imme- diately. Works on the electrical components shall only be im- plemented by qualified staff. Only use KETTLER original spare parts.
- Until repair the device shall no longer be used.
- For care, cleaning and maintenance only use the KETTLER De- vice-Care-Set Art.-No. 7921-000
- Please clarify with your general practitioner before you start the training, whether or not your health conditions allow you to train with this device. The medical result shall be the basis for the elaboration of your training program. Wrong or ex- cessive training can lead to health impairments.
- The treadmill shall only be implemented for its intended pur- pose, i.e. the walking and running exercise of adults.
- Please consider the maximum user weight.
- Only exercise with attached security key.
- Start the first training units at low speed to make yourself fa- miliar with the new motion sequences.
- When feeling insecure, grab hold of the handle bars, leave the treadmill over the side platforms and stop the belt. Important: Please also note the safety guidelines in the installation and assembly instruction. Safety Switch
- Prior to every training unit, insert the safety key into the safety switch and attach the string of the safety key to your clothes. Adapt the length of the string: When “stumbling” the safety switch shall be released.
- The safety switch was developed to immediately shut down the drives for the belt and the height adjustment in case you fall or for emergency situations. Only use the safety switch for emergency stops. To stop the treadmill during normal training in a safe, comfortable and proper way under normal conditi- ons, use the STOP button.
- Check the safety switch prior to the begin of your exercises: Position yourself on the side platforms and start the belt at nor- mal speed. Remove the safety key from the safety switch. The belt must stop immediately. Afterwards reattach the safety key to the safety switch and the string to your clothes. When the belt is stopped, move backwards. The safety key must detach from the safety switch. However the string shall remain atta- ched to the clothes. Afterwards reattach the safety key back to the safety switch. Treadmill protection By removing the safety key an unauthorised use of the tread- mill through third parties can be avoided. Please keep the safety key in a safe place and avoid children to get hold of the safety key. SAFETY GUIDELINES GB15 OPERATION OF THE COMPUTERISED DISPLAY TRACK PERFORMANCE
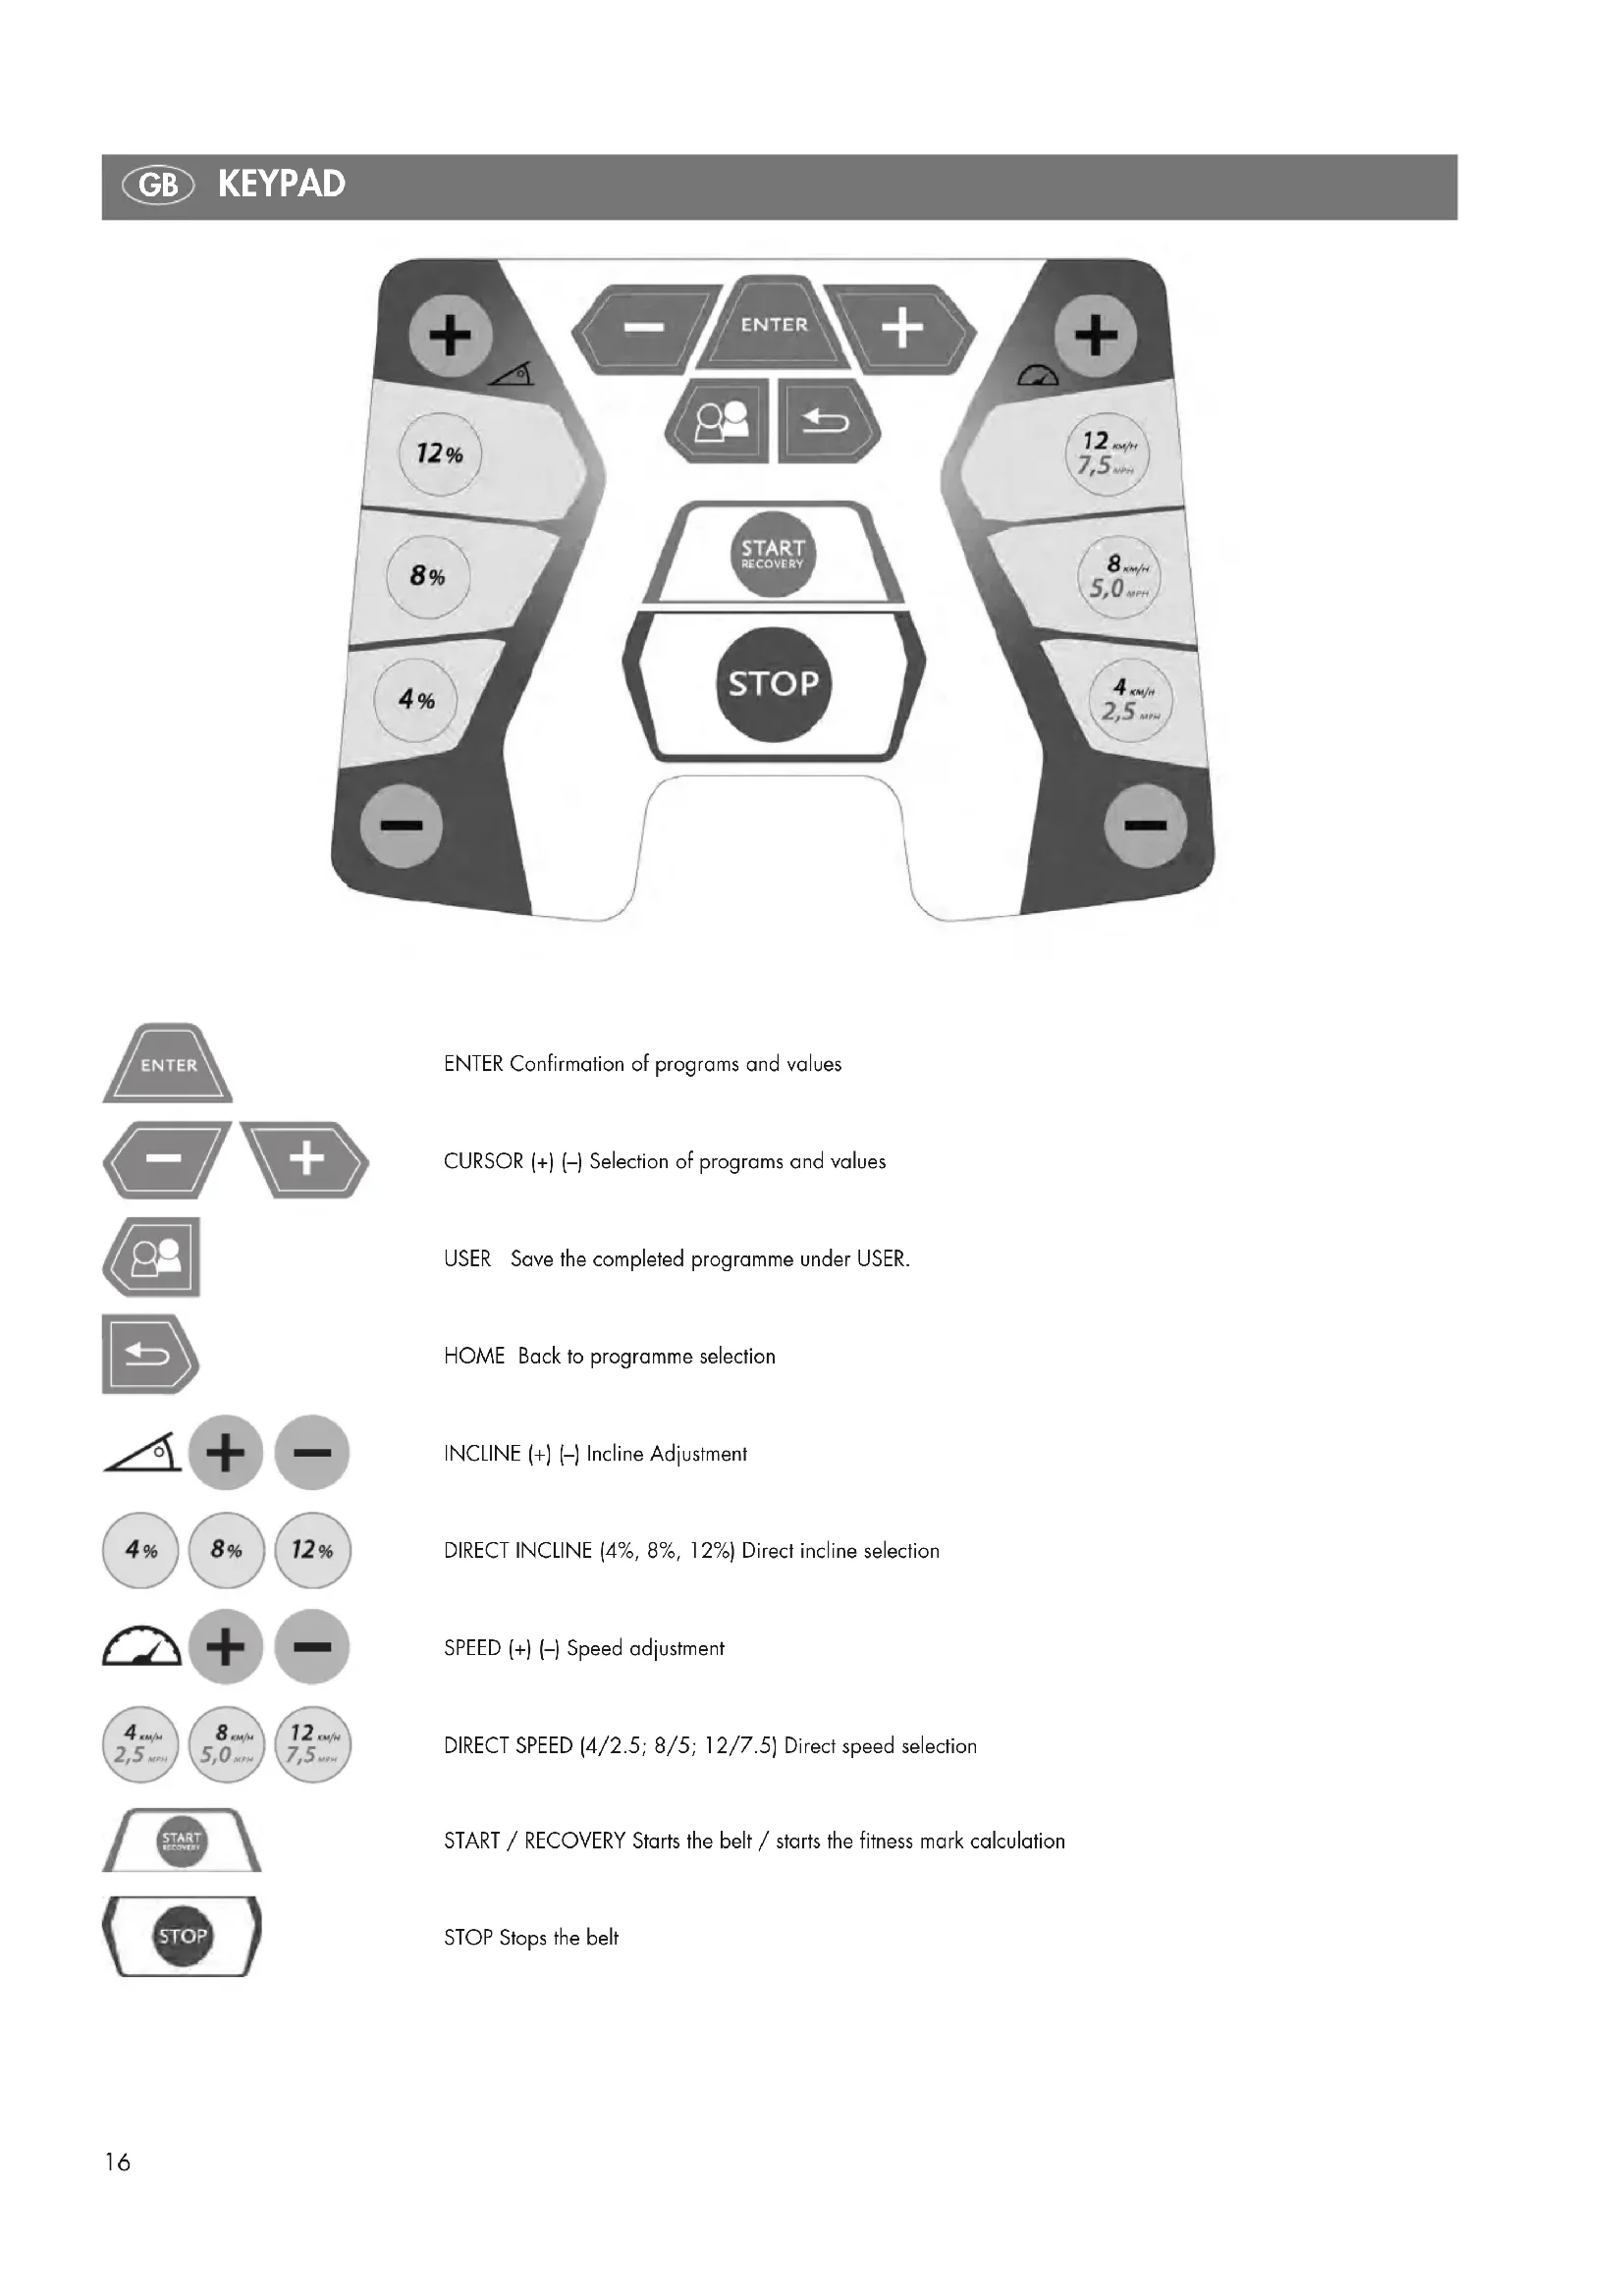
ENTER Confirmation of programs and values CURSOR (+) (–) Selection of programs and values USER Save the completed programme under USER. HOME Back to programme selection INCLINE (+) (–) Incline Adjustment DIRECT INCLINE (4%, 8%, 12%) Direct incline selection SPEED (+) (–) Speed adjustment DIRECT SPEED (4/2.5; 8/5; 12/7.5) Direct speed selection START / RECOVERY Starts the belt / starts the fitness mark calculation STOP Stops the belt17
INCLINE ADJUSTMENT With the INCLINE button (+) the incline angle will be increased by 1%. With the INCLINE button (-) the incline angle will be decreased by 1%. Pressing and holding of this button leads to an automatic fast run through the values. Through the DIRECT INCLINE buttons 4%, 8%, 12% for the incline you can directly adjust the incline. Due to safety reasons the incline angle can only be adjusted ma- nually. Exceptions to this are the ascent profile programmes and the (HRC) heart rate control programmes as well as the PC-Mode. Here the incline angle is automatically adjusted. SPEED ADJUSTMENT With the SPEED button (+) the speed can be increased during the training by 0.1 km/h (mph). With the SPEED button (-) the speed can be decreased during the training by 0.1 km/h (mph). Pressing and holding of this button leads to an automatic fast run through the values. With the DIRECT SPEED buttons (4.0km/h / 2.5mph), (8.0km/h / 5.0mph) and (12km/h / 7.5mph) for the speed you can directly adjust the speed setting. PROGRAM SELECTION After the starting of or after the completion of a program you can select a program by using the CURSOR buttons and the ENTER but- ton for confirmation. You can choose between 8 programs with sub-programs. PROFILE SEGMENTS When selecting the program (prior to the start of the training) the profiles for incline and speed will be graphically presented. The incline profiles will be shown in the left half of the display and the speed profiles in the right half of the display. During the training the incline values will be shown on the left and the speed values on the right, scaled on the existing segments. This might lead to a falsifi- cation of the profiles in the presentation. The current position of the user is blinking. RECOVERY If the pulse signal is taken during the training, start a recovery pulse measurement at the end of the training by pressing the RECOVERY button. The belt of the treadmill will be stopped. The training heart rate and one minute later the recovery pulse will be measured and a fitness mark will be determined. With the same training, the im- provement of this mark gives a measure for the increase of your fit- ness level. The display of the training distance will show the training heart rate P1 and the calorie display will show the recovery pulse P2. After approx. 16 seconds the display changes into the pause mode. The fitness mark will be shown in the speed display at the bottom right. Calculation of the Fitness Mark: Mark = 6 –
P1= Training rate pulse, P2= Recovery pulse
1.0 = Very good F6.0 = Insufficient
Stand-by Power consumption during stand-by mode < 0.5 watt. If the stand-by button is pushed during standstill or if a time defined in the system changeover runs out, the treadmill goes in stand-by mode. The treadmill can be reactivated by pressing the stand-by button. PAUSE If the STOP button will be pressed during the training the program will be interrupted and the pause mode will be activated. Only the START and the STOP buttons are working during the pause. If the START button is pressed during the pause mode, the treadmill starts again and reassumes the speed activated prior to the pause. The training values will be continued and the count will be resu- med from the point of interruption. If no button will be pressed for three minutes during the pause mode or the STOP button will be pressed, the program ends and the trai- ning statistics will be shown. If you want to skip the statistics just press the STOP button. CALORIE CALCULATION The calculation of the calories is a reference value. This value is shown in the top right corner of the display. The calculated value does not claim to be a medical reference. PULSE RECEPTION The treadmill is equipped with a hand pulse detection. To guaran- tee a good hand pulse detection both hand pulse sensors shall be firmly and entirely covered by the hands without moving the hands. Movements of the hands can lead to interferences. The pulse dis- play requires approx. 5 to 15 seconds to show your current pulse. The treadmill also comprises of an in-built POLAR compatible heart rate receiver. To be able to use the wireless pulse system you need to wear a chest strap for the transmission of the heart rate. The chest strap for the transmission of the heart rate is not included in the scope of supply of this treadmill. We recommend the POLAR Chest Strap T34. This can be purchased as additional equipment in specialist shops. Please remember that some materials used in your clothes (e.g. po- lyester, polyamide) can cause electrostatic charging and possibly prevent an accurate heart rate measurement. Please also consider that mobile phones, televisions and other electrical devices that create an electromagnetic field around them, might also cause pro- blems with the measurement of the heart rate.
SYMBOL - TREADMILL MAINTENANCE
If the symbol of the treadmill maintenance is shown, maintain the treadmill as described in the assembly instructions. ERROR MESSAGES During the operation different messages will be shown in the dis- play in case of an error of the control. Error messages can be re- versed by switching off and restarting of the power supply. If the error message remains, contact the customer support.18
USB The USB port is at the back of the console. Using this port it is pos- sible to exchange data with a PC by means of KETTLER Software (WORLD TOURS 1.0 Art.-No. 07926-800). OPERATION SWITCH ON First switch on the device. The ON/OFF button for the treadmill is located next to the power supply cable on the front, underneath the motor cover. Move the switch in the ON-Position. SAFETY KEY Check the function of the safety key prior to every training. Attach the safety key to the safety switch and the string to your clothes. If the safety key is not inserted in the safety switch the symbol of the safety switch will be shown in the display.
For stepping on and off the treadmill always hold tight to the hand rails. Prior to the commencement of the training step on the side plat- forms of the treadmill. Never start the device when standing on the belt. Start your training with a low speed and later increase the speed and the incline angle. Try to always run as centred as pos- sible on the belt. During the training your head and your body shall always point to the front. Never try to turn on the treadmill, while the belt is still moving. TRAINING PROGRAMS Manual Program After switching on the device and inserting the safety key, press the START button. The treadmill will be started after 3 seconds with a speed of 0.8km/h (0.5mph). You can increase / decrease the speed or the incline at any time during the training. To stop the training, simply press the STOP but- ton. When manually starting the training the display of the training di- stance and training time will increase. The manual program is a training without temporal limit. The training program cannot be saved at the end of the workout.
1. Switch on the device.
2. Attach the safety key to the treadmill and the clip to the clothes
3. Press the START button to start the training.
PROGRAM SELECTION The user has the choice to select between two different programs. The following programs are available: P1 : Incline Program with 6 different profiles P2 : Speed Program: with 6 different profiles P3 : Calorie Program P4 : Distance Program P5 : : HRC ascent programme: with 2 different profiles P6 : HRC speed programme: with 2 different profiles P7 : User Programme – 4 individual profiles P8 : RACE Programme: Competition with 4 saved programmes (User Programme) After the selection of the program the user can add some details. The predefined value is blinking and indicates that this value could be confirmed or changed. As soon as you entered and confirmed your values you can start with the training on the treadmill.
P1 : INCLINE PROGRAM WITH 6 DIFFERENT PROFILES
In the “P1: Incline Program” you can choose between 6 preset pro- files. You can increase / decrease the speed or the incline at any time during the training. The time setting in the display will decrease and the distance covered will increase.
1. Switch on the device.
2. Attach the safety key to the treadmill and the clip to the clothes
3. Select the “P1 : Incline Program” with the cursor buttons and
5. Select a profile (cursor buttons) and confirm with Enter
7. Confirm with Enter to begin the training.
8. The training can be interrupted at any time by pressing the
STOP button. A restart of the training is possible during the first 3 minutes.
9. At the end you can save the current programme (USER key),
choose a user number 1 to 4 with the cursor key and confirm by pressing enter. P1: Incline Profile 1 P1: Incline Profile 2 P1: Incline Profile 319
In the “P2: Speed Program” you can choose between 6 preset pro- files. You can increase / decrease the speed or the incline at any time during the training. The time setting in the display will decrease and the distance covered will increase.
1. Switch on the device.
2. Attach the safety key to the treadmill and the clip to the clothes
3. Select the “P2 : Speed Program” with the cursor buttons and
5. Select a profile (cursor buttons) and confirm with Enter
6. Confirm (Enter) or change (Cursors buttons) the maximum speed
7. Confirm with Enter to begin the training.
8. The training can be interrupted at any time by pressing the
STOP button. A restart of the training is possible during the first 3 minutes.
9. At the end you can save the current programme (USER key),
You can increase / decrease the speed or the incline at any time during the training of this program. It is useful for maximised fat bur- ning. The calorie amount will be shown in the top right corner of20
the display and will decrease.
1. Switch on the device.
2. Attach the safety key to the treadmill and the clip to the clothes
3. Select the “P3: Calorie Program” with the cursor buttons and
5. Confirm with Enter to begin the training.
6. The training can be interrupted at any time by pressing the
STOP button. A restart of the training is possible during the first 3 minutes.
7. A COOL DOWN (run down) of 4 minutes is started at the end
of the program (can be interrupted by pressing the STOP but- ton)
8. The training data can not be saved after the end of the pro-
You can increase / decrease the speed or the incline at any time during the training of this program. This training distance target is shown in the display decreases.
1. Switch on the device.
2. Attach the safety key to the treadmill and the clip to the clothes
3. Select the “P4: Distance Program” with the cursor buttons and
4. Confirm (Enter) or change (Cursors buttons) the training distance
5. Confirm with Enter to begin the training.
6. The training can be interrupted at any time by pressing the
STOP button. A restart of the training is possible during the first 3 minutes.
7. A COOL DOWN (run down) of 4 minutes is started at the end
of the program (can be interrupted by pressing the STOP but- ton)
8. The training data can not be saved after the end of the pro-
Under 'P5: HRC ascent-programme' you can choose between two pre-selected profiles. The user can individually adjust the program based on their maximum target pulse. The treadmill automatically adjusts the incline during the training to reach and maintain a cer- tain target heart rate of the user. During the training the user can manually chance the speed and incline of the treadmill. The user needs to wear a chest strap to be able to use the heart rate control programs.
1. Switch on the device.
2. Attach the safety key to the treadmill and the clip to the clothes
and confirm with Enter
6. Choose a profile (cursor key) and confirm by pressing enter
8. Confirm with Enter to begin the training.
9. The training can be interrupted at any time by pressing the
STOP button. A restart of the training is possible during the first 3 minutes. 10.At the end you can save the current programme (USER key), choose a user number 1 to 4 with the cursor key and confirm by pressing enter. P5: Pulse Profile 1 P5: Pulse Profile 2
P6 : HRC SPEED PROGRAMMES: WITH 2 PROFILES
Under 'P6: HRC Speed Programme' you can choose between two pre-selected programmes. The user can individually adjust the pro- gram based on his maximum target pulse. The treadmill automati- cally adjusts the speed during the training to reach and maintain a certain target heart rate of the user. During the training the user can manually chance the speed and incline of the treadmill. The user needs to wear a chest strap to be able to use the heart rate control programs.
1. Switch on the device.
2. Attach the safety key to the treadmill and the clip to the clothes
3. Select the “P6: HRC Speed Program” with the cursor buttons
and confirm with Enter
6. Choose a profile (cursor key) and confirm by pressing enter
8. Confirm with Enter to begin the training.
9. The training can be interrupted at any time by pressing the
STOP button. A restart of the training is possible during the first 3 minutes. 10.At the end you can save the current programme (USER key), choose a user number 1 to 4 with the cursor key and confirm by pressing enter.21
P6: Pulse Profile 1 P6: Pulse Profile 2 Note for Heart Control Programs: If the heart rate is not detected, due to safety reasons the speed will be limited to 1km/h(metric), 0.6MPH(English). P7 : USER PROGRAMME (4 INDIVIDUAL PROGRAMMES) The user has the possibility to train using a saved programme/pro- file and to then re-save it. The training programme must be com- pletely finished in order to save it under user 1-4. In the user programme you can choose between person 1-4.
1. Turn the machine on.
2. Secure the security key on the treadmill and the clip to the user's
and confirm by pressing enter:
4. One person (1-4) can be selected (cursor key). Press the ENTER
5. Depending on the previously saved training session, the time
and date or the training course must be confirmed again (enter) or changed (cursor key).
6. Press the enter key to begin the training session.
7. At the end of the training session you can save the programme
(USER key), choose user number 1 to 4 with the cursor key and confirm by pressing enter. P8 : RACE PROGRAMME: COMPETITION WITH 4 SAVED PRO- GRAMMES (USER PROGRAMME) Under 'P8: RACE Programme' you can choose a competition with 1 of the 4 saved programmes (User programme). You can increase or decrease the speed at any time during the training session. The time and distance from the previously saved training session will be counted down. The training session will be finished with a COOL DOWN.
1. Turn the machine on
2. Secure the security key on the treadmill and the clip to the user's
confirm by pressing enter.
4. Confirm opponent ( selection from the User Programme) (Enter)
or change (Cursor key)
5. Press the enter key to begin workout.
6. The workout session can be stopped at any time by pressing the
STOP key, a resumption of training is possible within 3 minutes of stopping.
7. A COOL DOWN session will begin 4 minutes after the pro-
8. A WIN or LOSE will be displayed at the end.
9. At the end, the current programme can be saved (USER key),
select User 1 to 4 using the cursor key and confirm by pressing enter. SYSTEM CHANGEOVER The menu items for Unit (metric/English), LCD and Controller Ver- sion, Total Running Time, Total Running Performance, Buzzer (ON/OFF) and Stand-by Time can be adjusted individually. The LCD and Controller Version, Total Running Time and Total Running Performance can only be read but not edited. To be able to carry out a system changeover you must be in the pro- gram selection. Press the SPEED button (-) for at least 2 sec. to enter the system changeover menu. You can leave the adjustment mode without any changes at any time by using the STOP button. You can navigate through further menu points by pressing the but- tons SPEED (-) or SPEED (+).
1) Change between the metrical and the English System-
The display shows “UNIT”. Press START to change between KM and MI. Press STOP to confirm and leave the menu. Die unit of measurement for speed and distance will be changed correspondingly.
3) Reading the total running time in hours
4) Reading the total running performance (km or miles)
5) Switch buzzer on/off.
Simply press START to turn the buzzer on or off. The display then changes in the program selection mode.
6) Adjust time for stand-by
Press START and adjust the switch off time by using the buttons Speed (+) or Speed (-). Pressing START again will confirm the value. SUMMARY OF THE MESSAGES/NOTES IN THE LCD-DISPLAY Switch on Program selection Ready Warning Message Training Pause Training Stop Select gender (M= Male, F= Female) in programme: 'P8: RACE Programme'23
Results RACE-Programme Note: Device turns into stand-by PC-Mode Calibration of the incline required (please contact customer sup- port) Treadmill needs immediate service Safety key not inserted24 Training Instruction
Training directions Running is a very efficient form of fitness training. With the tread- mill, you can go through controlled and regulated running exerci- ses at home, no matter what the weather is like outside. The treadmill is suitable not only for jogging, but also for walking exer- cise. Before you start training, you should read the following notes! Planning and controlling your running training The basis for planning your training is your current physical fitness. With an endurance test, your physician can diagnose your perso- nal capability, upon which you will base your training plan. If you have not had an endurance test, you must at any rate avoid high training loads or overload. You should remember the following principle for the training plan: Endurance training is regulated both by the extent of the load and the amount / intensity of the load. Guidelines for endurance training Load intensity The load intensity during running training is preferably monitored by your heart’s pulse rate. Maximum pulse: maximum load is the term used when the indivi- dual maximum heart rate has been reached. The maximum rea- chable heart rate depends on age. The rule of thumb here is: the maximum heart rate per minute equals 220 beats minus your age. Example: age 50 years > 220 -50 = 170 beats/min. Load pulse: The optimum load intensity is reached at 65 – 75% of the individual cardiovascular performance (see diagram). 65% = aim of training is to burn fat 75% = aim of training is to improve fitness This value changes depending on age. The intensity during training is regulated with the treadmill firstly by running speed and secondly by the incline angle of the tread. The physical load increases at higher speeds. It also increases if the incline angle is increased. If you are a beginner, avoid too high a running pace or training with the tread inclined too steeply, other- wise you could quickly exceed the recommended heart rate range. You should set your individual running pace and incline angle when training on the treadmill such that you reach your optimum heart rate according to the indications above. While running, monitor whether you are training within your intensity range by your heart rate. Extent of load Duration of one training unit and number of units per week: Pulsediagramm Fitness and Fat Burner
The optimum extent of load is reached when 65 – 75% of the in- dividual cardiovascular performance is reached over a long pe- riod. Rule of thumb: Beginners should not begin with training units of 30 – 60 minutes. Beginner training can be arranged in intervals for the first 4 weeks: Warm-up At the beginning of every training unit, you should do 3 – 5 minu- tes of warm up running, slowly increasing the load in order get your cardiovascular system and musculature going. Cool-down Just as important is the so-called cool-down. After every training session, you should continue to run slowly for about 2 – 3 minutes. The load for your further endurance training should generally be in- creased first by the extent of the load, e.g. instead of 10 minutes daily, do 20 minutes or instead of once weekly, train twice or three times a week. Beside the individual planning of your endurance training, you can fall back on the training programs integrated into the training computer on the treadmill. You can determine whether your training has achieved the desired result after some weeks as follows:
1. You manage a certain endurance level at lower cardiovascular
performance than before.
2. You maintain a certain endurance level with the same cardio-
Training frequency Duration of training daily 10 minutes 2–3 times a week 20–30 minutes 1–2 times a week 30–60 minutes Training frequency Extent of training session 3 times a week 2 minutes of training Break of 1 minute for physical exercise
2 minutes of training Break of 1 minute for physical exercise
2 minutes of training 3 times a week 3 minutes of training Break of 1 minute for physical exercise
3 minutes of training Break of 1 minute for physical exercise
2 minutes of training 3 times a week 4 minutes of training Break of 1 minute for physical exercise
4 minutes of training Break of 1 minute for physical exercise
3 minutes of training 3 times a week 5 minutes of training Break of 1 minute for physical exercise
4 minutes of training Break of 1 minute for physical exercise
4 minutes of training 4th week 3rd week 2nd week 1st week25
vascular performance over a long time.
3. You recover more quickly from a certain cardiovascular per-
formance level than before. Notes on pulse measurement by hand pulse A minute current created by the contraction of the heart is recorded by the hand sensors and analysed by the electronics
- Always cover the contact areas completely with both hands
- Avoid clasping jerkily
- Hold your hands calmly and avoid contraction and rubbing on the contact areas. Special training directions The sequence of running exercises should be familiar to everyone. Nevertheless, there are certain points that should be observed when running:
- Always make sure the structure and condition of the unit are correct before training.
- Only get on and off the unit when it is at a complete sta still and hold the hand grips to do so.
- Fasten the cord of the safety tread-stop key to your clothing be- fore starting the treadmill.
- Train with the proper running or sports shoes.
- Running on a treadmill is different from running on normal ground. Therefore, you should prepare yourself for the running training with slow walking on the treadmill.
- Hold firmly onto the handlebars during your first training units in order to avoid uncontrolled movements that could lead to a fall. This applies especially to operating the computer while run- ning.
- Beginners should not adjust the incline of the tread to too high a position, in order to avoid overload.
- Run in as even a rhythm as possible.