
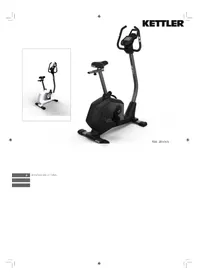
Royal - Exercise bike KETTLER - Free user manual and instructions
Find the device manual for free Royal KETTLER in PDF.
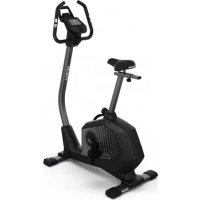
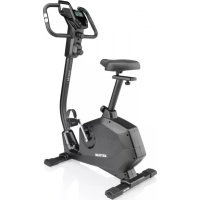
| Product type | Exercise bike |
| Brand | Kettler |
| Model | Royal |
| Power supply | 2 AA 1.5 V batteries |
| Display | Training computer with LCD screen |
| Display functions | Time, speed, distance, kilojoules, pedaling frequency, pulse, recovery, fitness score, total mileage |
| Training modes | Increasing count, preselection with countdown |
| Pulse control | By hand sensors, ear clip or chest strap (optional) |
| Aerobic zone | Calculated using formula 180 - age, +/- 10 beats |
| Braking system | Magnetic |
| Resistance | Adjustable via 10-speed gear shift |
| Maximum user weight | 150 kg |
| Standards | DIN EN 957 - 1/5, HB |
| Use | For adults, cardiovascular and endurance training |
| Maintenance | Clean with eco-friendly products, check screws regularly |
| Inspection | Annual inspection by a recommended specialist |
| Spare parts | Use original Kettler parts, order with reference and serial number |
| Used batteries | Do not dispose of in household waste, recycle |
| Safety | Do not use in damp environments, avoid contact with liquids |
| Assembly | By an adult, follow instructions, tools provided |
| Warranty | Batteries excluded from warranty |
Frequently Asked Questions - Royal KETTLER
User questions about Royal KETTLER
0 question about this device. Answer the ones you know or ask your own.
Ask a new question about this device
Download the instructions for your Exercise bike in PDF format for free! Find your manual Royal - KETTLER and take your electronic device back in hand. On this page are published all the documents necessary for the use of your device. Royal by KETTLER.
USER MANUAL Royal KETTLER
Computer and training instructions
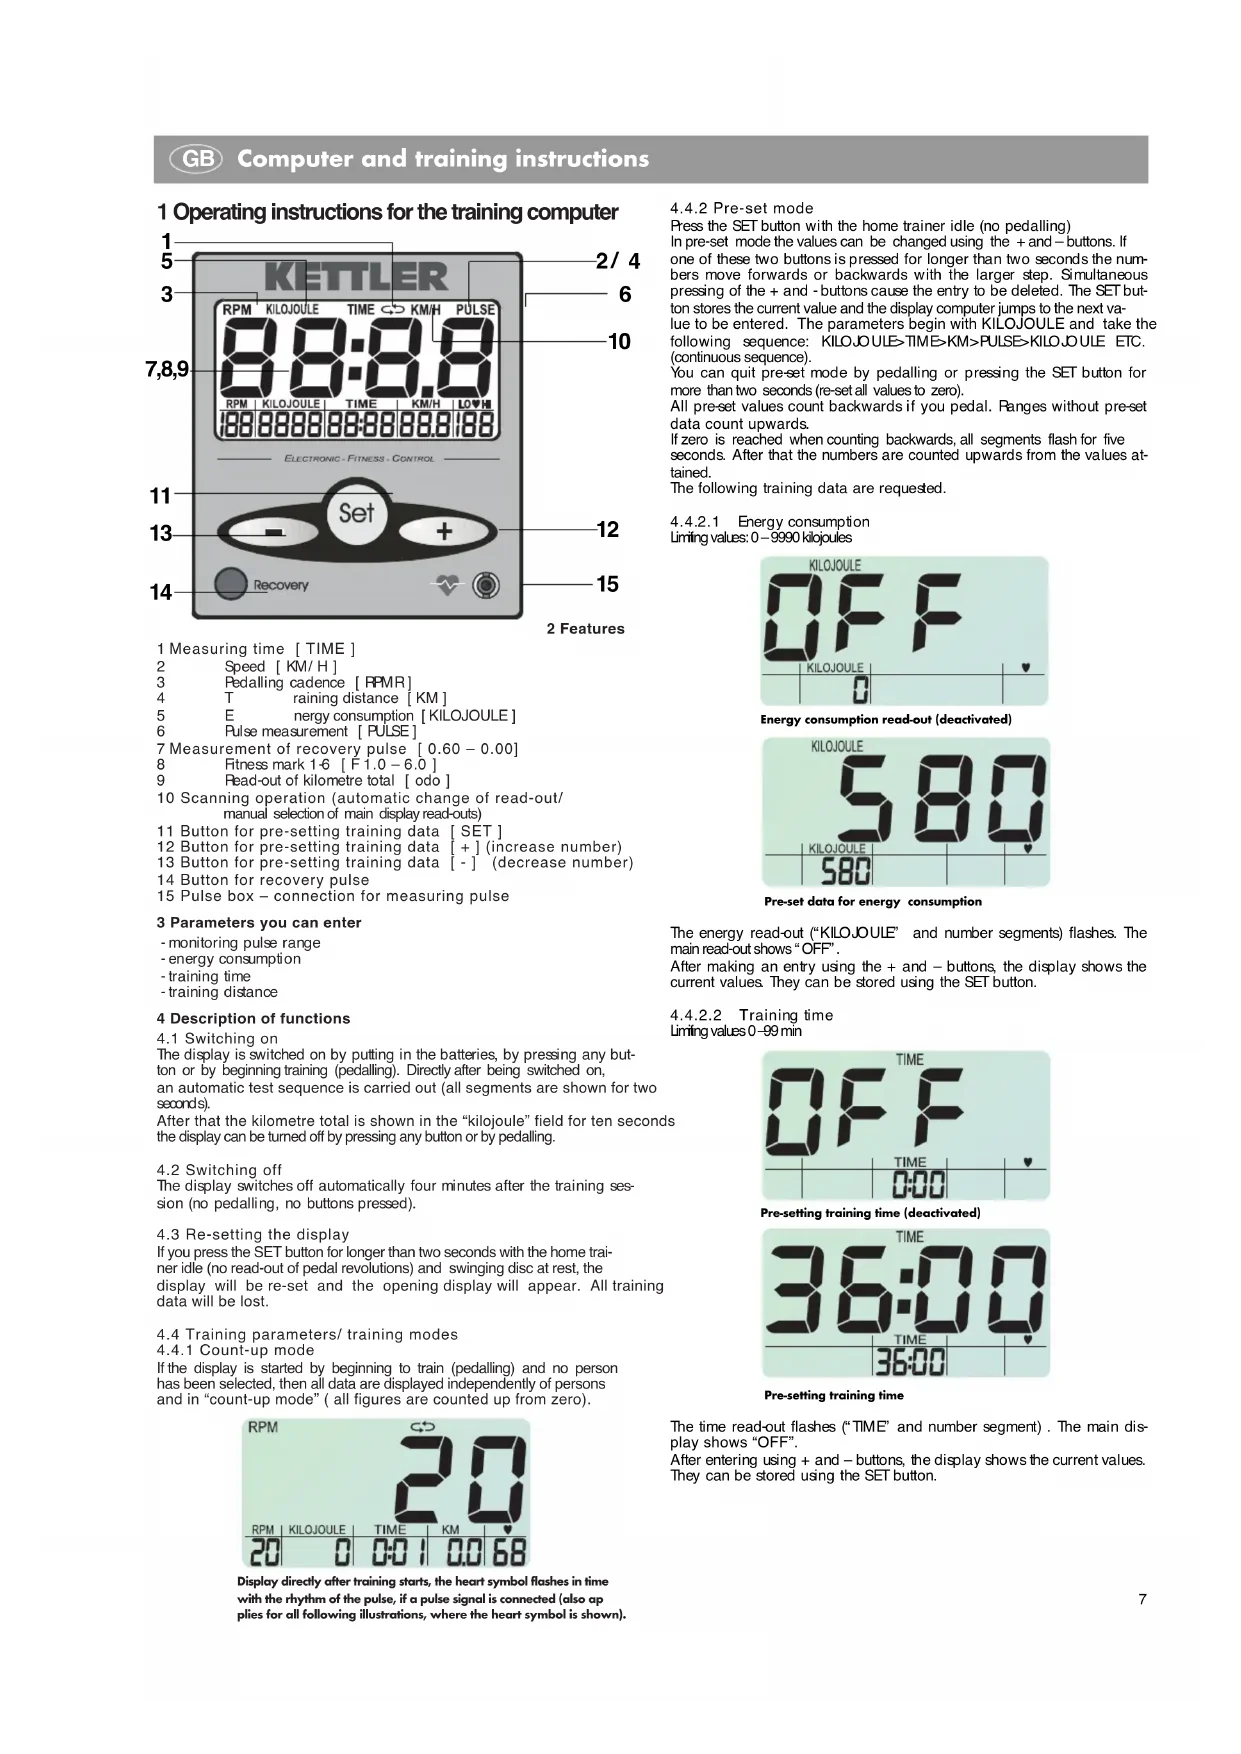
1 Operating instructions for the training computer
1 Measuring time [TIME]
2 Speed [KM/H]
3 Pedalling cadence [RPMR]
4 T raining distance [KM]
5 E nergy consumption [ KILOJOULE ]
6 Pulse measurement [PULSE]
7 Measurement of recovery pulse [0.60 - 0.00]
8 Fitnessmark1-6[F1.0-6.0]
9 Read-out of kilometre total [odo]
10 Scanning operation (automatic change of read-out/ manual selection of main display read-outs)
11 Button for pre-setting training data [SET]
12 Button for pre-setting training data [ + ] (increase number)
13 Button for pre-setting training data [-] (decrease number)
14 Button for recovery pulse
15 Pulse box - connection for measuring pulse
3 Parameters you can enter
-monitoring pulse range
-energy consumption
-training time
-training distance
4 Description of functions
4.1 Switching on
The display is switched on by putting in the batteries, by pressing any button or by beginning training (pedalling). Directly after being switched on,
an automatic test sequence is carried out (all segments are shown for two seconds).
After that the kilometre total is shown in the "kilojoule" field for ten seconds the display can be turned off by pressing any button or by pedalling.
4.2 Switching off
The display switches off automatically four minutes after the training session (no pedalling, no buttons pressed).
4.3 Re-setting the display
If you press the SET button for longer than two seconds with the home trainer idle (no read-out of pedal revolutions) and swinging disc at rest, the display will be re-set and the opening display will appear. All training data will be lost.
4.4 Training parameters/ training modes
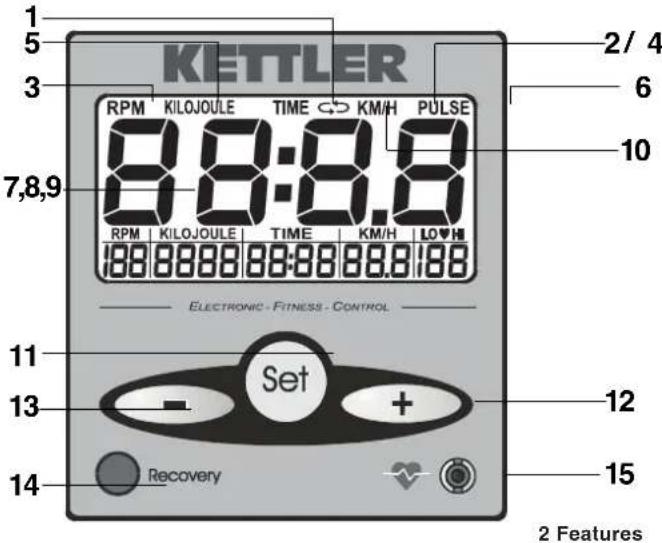
4.4.1 Count-up mode
If the display is started by beginning to train (pedalling) and no person has been selected, then all data are displayed independently of persons and in "count-up mode" (all figures are counted up from zero).
Display directly after training starts, the heart symbol flashes in time
with the rhythm of the pulse, if a pulse signal is connected (also ap
plies for all following illustrations, where the heart symbol is shown).
4.4.2 Pre-set mode
Press the SET button with the home trainer idle (no pedalling)
In pre-set mode the values can be changed using the + and - buttons. If one of these two buttons is pressed for longer than two seconds the numbers move forwards or backwards with the larger step. Simultaneous pressing of the + and - buttons cause the entry to be deleted. The SET button stores the current value and the display computer jumps to the next value to be entered. The parameters begin with KILOJOULE and take the following sequence: KILOJOULE>TIME>KM>PULSE>KILOJOULE ETC. (continuous sequence).
You can quit pre-set mode by pedalling or pressing the SET button for more than two seconds (re-set all values to zero).
All preset values count backwards if you pedal. Ranges without pre-set data count upwards.
If zero is reached when counting backwards, all segments flash for five seconds. After that the numbers are counted upwards from the values attained.
The following training data are requested.
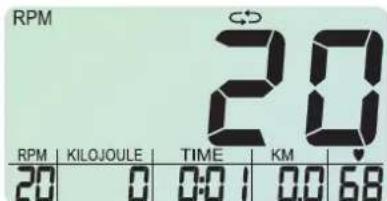
4.4.2.1 Energy consumption
Limiting values: 0-9990 kilojoules
Energy consumption read-out (deactivated)
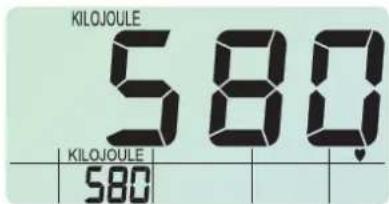
Pre-set data for energy consumption
The energy read-out ("KILJOULE" and number segments) flashes. The main read-out shows "OFF".
After making an entry using the + and - buttons, the display shows the current values. They can be stored using the SET button.
4.4.2.2 Training time
Limiting values 0-99 min
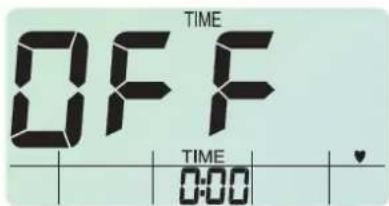
Pre-setting training time (deactivated)
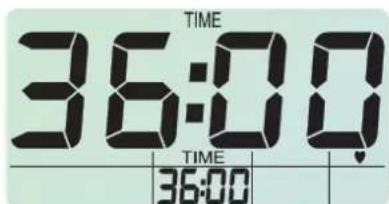
Pre-setting training time
The time read-out flashes ("TIME" and number segment). The main display shows "OFF".
After entering using + and - buttons, the display shows the current values. They can be stored using the SET button.
4.4.2.3 Training distance Limiting values 0-99 km
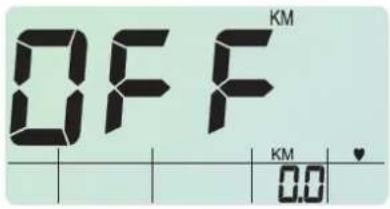
Pre-setting the training distance (deactivated)
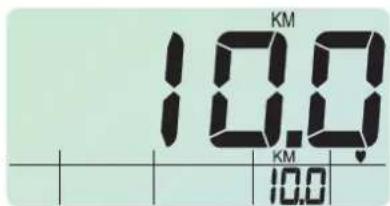
Pre-setting the training distance
The distance display flashes (KM and number segments). The main display shows "OFF".
After a value has been entered using the + and - buttons the display ws the current values. They can be stored using the SET button.
4.4.2.4 Pulse rate monitoring Limiting values 40-180 beats
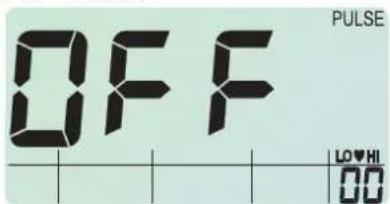
Pre-setting pulse rate (deactivated)
Pre-setting pulse rate
The pulse read-out flashes ("LO/ HI" and the number segments). The main display shows "OFF".
After making an entry using the + and - buttons the display shows the current values. They can be stored using the SET button.
The data calculate the aerobic zone (pulse entry + / - 10 beats). They are stored using the SET button and the data-entry procedure continues with "KILJO ULE" (continuous process).
4.4.2.5 Miscellaneous
If the + or - buttons are pressed for a moderately long time while pre-setting the data
Then the number moves forwards or backwards rapidly. If both buttons are pressed simultaneously the display jumps to the initial value (mostly zero or OFF). The fast forward and reverse only takes place between the data-entry limits.
4.4.2.6 End of entry mode
The preset entry mode can be quit by pedalling (starting training) or by pressing the SET button for more than two seconds (all values reset to zero). Aerobic zone = 180 minus age +/ - 10 beats
5 Displays and calculations
5.1 Kilometre total
After switching on or resetting the display the kilometre total is displayed for ten seconds with "KM". In addition the word "odo" appears. The kilometre total is counted in 100 metre steps upwards. The data is displayed in whole kilometres, however.
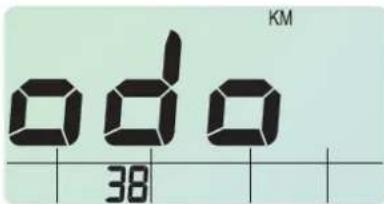
Display of kilometre total (example of 38km )
When the battery is changed the kilometre total is lost. Please make a note beforehand of your training kilometres.
5.2 Energy consumption
The read-out is from 0-9999 kilojoules. The display is possible in count-up and pre-set mode. Calculation of calories is based on a setting of medium resistance
5.3 Pedal revolutions
Pedal revolutions are shown between 20 and 199 rpm.
5.4 Speed/ distance
Both data are shown in the same display at five-second alternating intervals
5.4.1 Speed
The speed is calculated so that at pedal revolutions of 60 rpm a speed of approximately 21.3km / h is indicated.
5.4.2 Distance
Kilometres travelled are indicated in counting-up and pre-set mode in 10m intervals from 0.00 km to 99.99 km.
5.5 Time
The training time is shown between 0.00 and 99.59 minutes. The time read-out is only shown if the pedal revolutions are above 20 rpm. The read-out can be in count-up or pre-set mode.
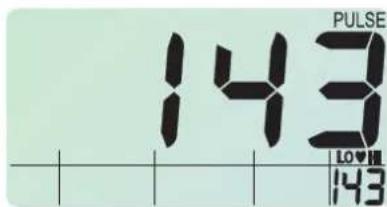
5.6 Pulse-rate measurement
5.6.1 Measurement
Measurement of pulse rate is either by the ear clip or the wrist pulse sensors or with a chest belt with plug-in receiver (obtainable is specialist stores). The connecting plug for wrist-pulse detection is at the back. If there is no ear clip or plug-in receiver in the pulse box on the front then wrist pulse measuring is activated. If an ear clip or plug-in receiver is connected with the pulse box then wrist pulse detection is automatically deactivated.
It is not necessary to pull out the wrist pulse sensors.
5.6.2 Display
The recorded pulse rate is always shown. The heart symbol flashes at the measured pulse rate. If there is no pulse signal then a "P" appears in the pulse display. In this case the "P" is not displayed in the main display in SCAN mode. The read-out jumps immediately to the next item
5.6.3 Monitoring the aerobic zone
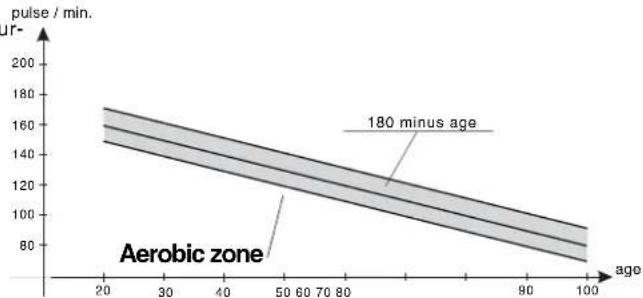
The aerobic zone is calculated with the following formula:
If the pulse rate determined by the age and the resulting aerobic zone is
not attained, the symbol "LO" flashes. If the aerobic pulse rate is exce
ded the "HI" symbol flashes. The LO/ HI read-out is activated when the target pulse rate (180-age) is reached. If no pulse rate limit is entered then this function is deactivated.
5.6.4Recovery
After the recovery button has been pressed the automatic measurement pulse rate recovery is started. The current pulse rate is indicated on the lower right hand side. In the main display the numbers count down from 0.60 to 0.00.. All other read-outs are switched off.
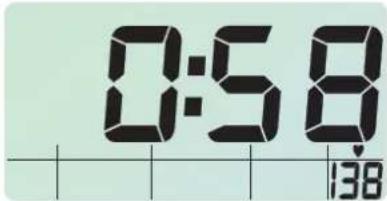
Display during the recovery function
The fitness mark is calculated according to the following formula:
$$ \text {M a r k} = 6 - \left[ \frac {1 0 \times (\mathrm {P} 1 - \mathrm {P} 2)}{\mathrm {P} 1} \right] ^ {2} $$
Two values are calculated for the pulse rate, P1 at the beginning of measuring and P2 after one minute.
Toobtain the fitness mark the following conditions must be met
1. P1 is less than P2 (P1-P2 is negative)
2. The value in the bracket is greater than 5.0 The fitness mark of 1.0 is given
3. P1 is greater than P2 and the bracket value lies in the region bet ween 0 to 5.0
The read-out of the mark is in the central display with a pre-fixed "F" (e.g. F3.0, one decimal place). In the pulse read-out, the difference obtained between starting pulse rate and final pulse rate is shown.
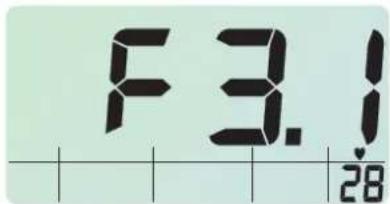
Fitness mark
The read-out of the fitness mark can be quitted during and after counting back by pressing any button.
If at the end of measuring there is no pulse signal (P2 measurement) then a flashing "E" appears in the central display. If the signal drops out at the beginning of counting back (P1 measurement) then the countdown is not started.
6 Training
6.1 Display during training
During training the data of the lower displays in scan mode (automatic change of read-out) are shown for five seconds each in the central display. The data is shown in the following order
DISTANCE > KILOJOULES> TIME > KM >KM/H >PULSE >RPM, etc. (continuous)
If the SET button is pressed the "?" display goes out and the user can call up the other read-outs in the main display by pressing the + or - button. This read-out will remain until the + or - button is used to call up another read-out or the SET button is pressed to reactivate the scan mode. The data that appears in the central main display can be identified by the identification code above the read-out. At the beginning of training the scan mode is always activated. This is also the case if training is interrupted and started again, regardless of the previous setting.
6.2 Interruption of training/ end of training
Training comes to an end when no revolutions are counted or the "recovery" button is pressed.
After four minutes without any button being pressed and without any revolutions being detected the display switches off. All training data is lost.
7 Training instruction
This home trainer has been specially developed for the amateur sportsman or woman. It is particularly well-suited to cardiovascular training.
Training should be planned methodically according to the principles of training for stamina. This produces alterations and adaptations of the cardiovascular system. Among these are the lowering of resting pulse rate and pulse rate under exertion.
This makes more time available for the heart to fill the ventricles and to initiate the heart musculature with blood through the coronary arteries. In addition, the volume and depth of oxygen that can be breathed in increases (the vital capacity). Other positive changes take place in the metabolism. In order to take advantage of these positive changes the training has to be planned according to certain guidelines.
Intensity of training
Intensity is regulated in training with the home trainer firstly by means of the pedalling cadence and secondly by the resistance to pedalling. The trainee determines the resistance to pedalling using a ten-speed shift. It is important never to set too severe a level of intensity and to avoid excessive exertion. Incorrect or excessive training can lead to health problems.
Accordingly, use your pulse rate to check while training whether you have correctly set the intensity of training. A rule of thumb for a suitable pulse rate is:
180 - age in years
which means that, say, a fifty-year-old person should plan his or her s mina training around a pulse rate of 130.
Recommendations for training based on these calculations are regarded as desirable by many recognised authorities on sports medicine. such, you should set the pedalling cadence and the resistance to pedalling according to the rule of thumb mentioned above.
Note that these recommendations apply to healthy person and not to people suffering from cardiovascular disease!
Exertion
- The beginner should increase the severity of his or her training only gradually. The first training units should be relatively short and should take the form of interval training sessions.
Sports medicine regards the following regimes as having training effect
| Frequency of training | Length of training session |
| daily 10 minutes | |
| 2-3 x times a week | 20-30 minutes |
| 1-2 x times a week | 60 minutes |
The beginner is strongly advised not to start with training sessions of 30 -60 minutes.
Training for the beginner should be planned along the following lines:
| Frequency | Lenght of exercise blocks |
| 1st week | |
| three times a week | 2 minutes training1 minute break for gymnastics2 minutes training1 minute break for gymnastics2 minutes training |
| 2 nd week | |
| three times a week | 3 minutes training1 minute break for gymnastics3 minutes training1 minute break for gymnastics2 minutes training |
| 3 rd week | |
| three times a week | 4 minutes training1 minute break for gymnastics3 minutes training1 minute break for gymnastics3 minutes training |
| 4 th week | |
| three times a week | 5 minutes training1 minute break for gymnastics4 minutes training1 minute break for gymnastics4 minutes training |
To document your personal training you can enter the training data you have achieved in the performance table. Before and after each training unit a five-minute session of callisthenics serves as a warm-up or cool down. One day should be left free between every two training sessions later you prefer to train three times weekly for 20-30 minutes. Otherwise there is nothing against daily training.

Changing the batteries
8 Changing the batteries
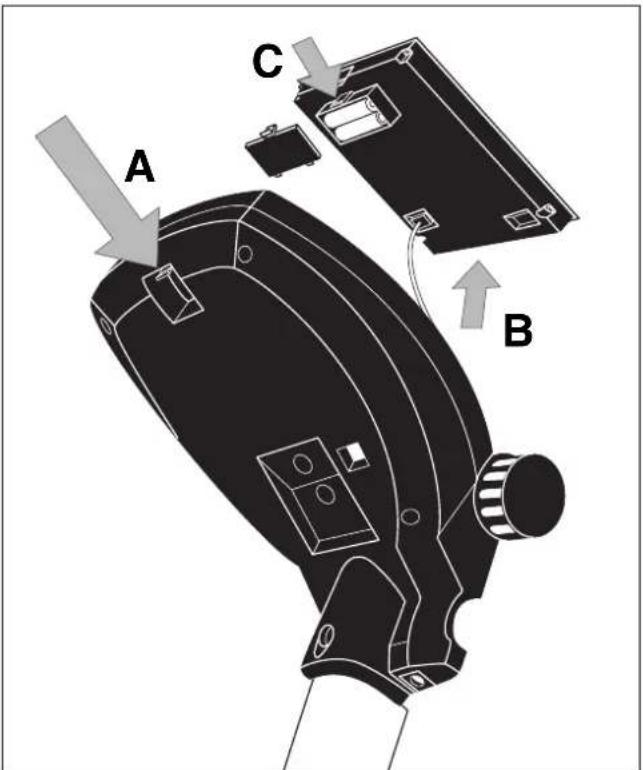
A weak or invisible display means that you need new batteries. The computer is fitted with two batteries. Change the batteries like this:
Take off the battery cover and replace the old batteries with two new AA 1.5 V batteries.
Make sure you follow the identification on the bottom of the battery compartment to put the batteries in the right way round.
If the computer doesn't work properly when you switch on again take the batteries out for a moment and then put them back in.
Important: The guarantee does not cover worn-out batteries.
You should no longer put used batteries in domestic waste.
Plea se do y our bit for the environment and return y our ba teries to the trade or to the local authority pick-up point so that t the collected ba teries can be properly disposed of or recycled in an environment-friendly way.

6.1 Weergaveijdens de training
Assembly Instructions
Before assembling or using the exercise cycle, please read the following instructions carefully. They contain important information for use and maintenance of the equipment as well as for your personal safety. Keep these instructions in a safe place for maintenance purposes or for ordering spare parts.
For Your Safety
? Exercise should be used only for its intended purpose, i.e. for physical exercise by adult persons.
? Any other use of the equipment is prohibited and may be dangerous. The manufacturer cannot be held liable for damage or injury caused by improper use of the equipment.
? Exercise has been designed in accordance with the latest standards of safety. Any features which may have been a possible cause of injury have been avoided or made as safe as possible.
? Incorrect repairs and structural modifications (e.g. removal or replacement of original parts) may endanger the safety of the user.
? Damaged components may endanger your safety or reduce the lifetime of the equipment. For this reason, worn or damaged parts should be replaced immediately and the equipment taken out of use until this has been done. Use only original KETTLER spare parts.
? If the equipment is in regular use, check all its components thoroughly every 1 -2 months. Pay particular attention to the tightness of bolts and nuts. This applies especially to the securing bolts for saddle and handelbars.
? To ensure that the safety level is kept to the highest possible standard, determined by its construction, this product should be serviced regularly (once a year) by specialist retailers.
? Instruct persons using the equipment (in particular children) on possible sources of danger during exercising.
? Before beginning your program of exercise, consult your doctor to ensure that you are fit enough to use the equipment. Base your program of exercise on the advice given by your doctor. Incorrect or excessive exercise may damage your health!
? Any interference with parts of the product that are not described within the manual may cause damage, or endanger the person using this machine. Extensive repairs must only be carried out by KETTLER service staff or qualified personnel trained by KETTLER.
? In case of enquiry, please contact your KETTLER dealer.
? In choosing the location of the apparatus, ensure a sufficient safety distance from any obstacles. The apparatus must not be mounted in the immediate vicinity of main passageways (paths, doorways, corridors).
? For a comfortable training position please adjust the handlebar andsaddle position to your body height.
Handling the equipment
? Before using the equipment for exercise, check carefully to ensure that it has been correctly assembled.
? Before beginning your first training session, familiarize yourself thoroughly with all the functions and settings of the unit.
? It is not recommended to use or store the apparatus in a damp room as this may cause it to rust. Please ensure that no part of the machine comes in contact with liquids (drinks, perspiration etc.). This may cause corrosion.
? The machine is designed for use by adults and children should not be allowed to play with it. Children at play behave unpredictably and dangerous situations may occur for which the manufacturer cannot be held liable. If, in spite of this, children are allowed to use the equipment, ensure that they are instructed in its proper use and supervised accordingly.
? The exercise cycle complies with the DIN EN 957 - 1/5, class HB. It is therefore unsuitable for therapeutic use.
? A slight production of noise at the bearing of the centrifugal mass is due to the construction and has no negative effect upon operation. Possibly occurring noise during reverse pedalling result from engineering and are absolutely safe.
Instructions for Assembly
? Ensure that you have received all the parts required (see check list) and that they are undamaged. Should you have any cause for complaint, please contact your KETTLER dealer.
? Before assembling the equipment, study the drawings carefully and carry out the operations in the order shown by the diagrams. The correct sequence is given in capital letters.
? The equipment must be assembled with due care by an adult person. If in doubt call upon the help of a second person, if possible technically talented.
? Please note that there is always a danger of injury when working with tools or doing manual work. Therefore please be careful when assembling this machine.
? Ensure that your working area is free of possible sources of danger, for example don't leave any tools lying around. Always dispose packaging material in such a way that it may not
List of spare parts
When ordering spare parts, always state the full article number, spare partnumber, the quantity required and the S/N of the product.
Example order: Art. no. 07968-600 / spare-part no. 10100030/2 pieces / S/N no. Please keep original packaging of this article, so that it may be used for transport at a later date, if necessary.
Important: spare part prices do not include fastening material; if fastening material (bolts, nuts, washers etc.) is required, this should be clearly stated on the order by adding the words "with fastening material".
? Do not use corrosive or abrasive materials to clean the equipment. Ensure that such materials are not allowed to pollute the environment.
? The exercise cycle has a magnetic brake system.
? To operate correctly, the pulse function requires a minimum voltage of 2,7 volts (only for computers working with batteries).
? The equipment is dependent of revolutions per minute.
? Please ensure that liquids or perspiration never enter the machine or the electronics.
? Before use, always check all screws and plug-in connections as well as respective safety devices fit correctly.
? Always wear suitable shoes when using.
? All electric appliances emit electromagnetic radiation when in operation. Please do not leave especially radiation-intensive appliances (e.g. mobile telephones) directly next to the cockpit or the electronic controlsystem as otherwise values displayed might be distorted (e.g. pulse measurement).
? The product is not suitable for use by persons weighing over 150 kg.
cause any danger. There is always a risk of suffocation if children play with plastic bags!
? The fastening material required for each assembly step is shown in the diagram inset. Use the fastening material exactly as instructed. The required tools are supplied with the equipment.
? Bolt all the parts together loosely at first, and check that they have been assembled correctly. Tighten the locknuts by hand until resistance is felt, then use spanner to finally tighten nuts completely against resistance (locking device). Then check that all screw connections have been tightened firmly. Attention: once locknuts have been unscrewed they no longer function correctly (the locking device is destroyed), and must be replaced.
? For technical reasons, we reserve the right to carry out preliminary assembly work (e.g. addition of tubing plugs).
GB KETTLER (GB) Ltd.
Merse Road · North Moons Moat · Redditch, Worcestershire B98 9HL · Great Britain
USA KETTLER International Inc.
P.O.Box 2747 Virginia Beach VA 23450 USA
http://www.kettler.net
F
Removal of pedal arms

A weak or an extinguished computer display makes a battery change necessary. The computer is equipped with two batteries. Perform the battery change as described below:
? Remove the lid of the battery compartment and replace the batteries by two new batteries of type AA 1,5V.
? When inserting the batteries pay attention to the designation an the bottom of the battery compartment.
? Should there be any misoperation after switching on the computer again, shortly disconnect the batteries once again and reinsert them.
Important: The guarantee does not cover worn-out batteries.

You should no longer put used batteries in domestic waste. Please do your bit for the environment and return your batteries to the trade or to the local authority pickup point so that the collected batteries can be properly
disposed of or recycled in an environment-friendly way.

- Computer and training instructions
- Operating instructions for the training computer
- Parameters you can enter
- Description of functions
- Training distance Limiting values 0-99 km
- Pulse rate monitoring Limiting values 40-180 beats
- Miscellaneous
- End of entry mode
- Displays and calculations
- Kilometre total
- When the battery is changed the kilometre total is lost. Please make a note beforehand of your training kilometres.
- Energy consumption
- Pedal revolutions
- Speed/ distance
- Speed
- Distance
- Time
- Pulse-rate measurement
- Measurement
- It is not necessary to pull out the wrist pulse sensors.
- Display
- Monitoring the aerobic zone
- 5.6.4Recovery
- Training
- Interruption of training/ end of training
- Training instruction
- Intensity of training
- - age in years
- Note that these recommendations apply to healthy person and not to people suffering from cardiovascular disease!
- Exertion
- Changing the batteries
- Assembly Instructions
- For Your Safety
- Handling the equipment
- Instructions for Assembly
- List of spare parts
- F
- Important: The guarantee does not cover worn-out batteries.
Brand : KETTLER
Model : Royal
Category : Exercise bike