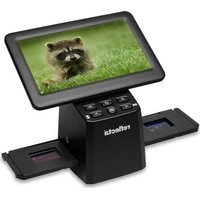
CrystalScan 7200 - To scan Reflecta - Free user manual and instructions
Find the device manual for free CrystalScan 7200 Reflecta in PDF.
User questions about CrystalScan 7200 Reflecta
0 question about this device. Answer the ones you know or ask your own.
Ask a new question about this device
Download the instructions for your To scan in PDF format for free! Find your manual CrystalScan 7200 - Reflecta and take your electronic device back in hand. On this page are published all the documents necessary for the use of your device. CrystalScan 7200 by Reflecta.
USER MANUAL CrystalScan 7200 Reflecta
natural_image
Line drawing of a rectangular electronic device with a slot and connector (no text or symbols)text_image
Incorrect You will loose image data Correct Insertionnatural_image
Line drawing of a rectangular electronic device with a connector and mounting bracket (no text or symbols)natural_image
Technical line drawing of a mechanical component with two views (top and side), no text or symbols present.
natural_image
Line drawing of a printer with paper feed (no text or symbols)Eintasten-Scan
- Color Balance (Farbbalance)
FEDERAL COMMUNICATIONS COMMISSION (FCC) STATEMENT
This Equipment has been tested and found to comply with the limits for a class B digital device, pursuant to Part 15 of the FCC rules. These limits are designed to provide reasonable protection against harmful interference in a residential installation. This equipment generates uses and can radiate radio frequency energy and, if not installed and used in accordance with the instructions, may cause harmful interference to radio communications. However, there is no guarantee that interference will not occur in a particular installation. If this equipment does cause harmful interference to radio or television reception, which can be determined by turning the equipment off and on, the user is encouraged to try to correct the interference by one or more of the following measures:
• Re-orient or relocate the receiving antenna.
- Increase the separation between the equipment and receiver.
- Connect the equipment into an outlet on a circuit different from which the receiver is connected to.
- Consult the dealer or an experienced radio/TV technician for help.
Warning :
Use only shielded signal cables to connect I/O devices to this equipment. You are cautioned that changes or modifications not expressly approved by the party responsible for compliance could void your authority to operate the equipment.
TABLE OF CONTENTS
Getting Started 4
Quick Installation Guide (QIG) 5
Installing Software and Driver 6
Installing Hardware 8
Additional Features 8
Loading the film/slides into the Holders9
One Button Scan 11
How to Scan Slides 12
STEP 1 - Aquire Driver 12
STEP 2- Select Film Type 12
STEP 3 - Optional Prescan 12
STEP 4 - Set Scan Settings 13
STEP 5 - Set Scan Preferences 14
STEP 6 - Scan 17
STEP 7 - Exit 17
User Interface 18
I Main Window Area 18
II Preview Window Area 20
III Scan Setting Area 25
Technical Support 26
GETTING STARTED
Check the package content before getting started.
For Quick Installation please refer to Quick Installation Guide. (Ref. Pg. 9)

Important! Save the original box, receipt and packing material for future shipping needs.
Package Contents
- Slide Scanner.
• Film Holder (Where Applicable)
• Power Adapter [FAIRWAY Model No.: WRG 15F-120A]
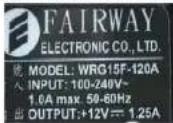
Warning! Using any other power adapter may severely damage the scanner and will void the product warranty.
- Power Cord.
- USB 2.0 Cable.
• CyberView X5 Driver.
• Application software DVD.
• Printed User's Manual.
NOTE:
- Application software means the imaging software such as Adobe® Photoshop® Elements, this is subject to change without notice.
GENERAL GUIDANCE:
- Only use the supplied USB-Cable. Connect the computer to the scanner directly using the USB 2.0 cable.
- Do not use a hub or extension cable. Only use the USB ports on the rear of desktop computers.
- If there are any other devices (multifunction device, printers, scanners, webcam) connected to the computer through USB, disconnect them.
- A minimum of 1GB RAM (Win/Mac) is required.
| Operating Ambient Temperature Range50° to 104°F (10° to 40°C) |
| Note: Do not turn on the scanner unless it is within this range. If the scanner has been stored or transported outside of this range, allow it to return to within this range before turning it on. |
| Operating Ambient Humidity Range 15% to 76% relative humidity (non-condensing) |
| Note: If the scanner is stored or to be transported in cold temperature and then brought into a warm / humid environment condensation may occur. |
This device is designed solely for private use and is not intended for commercial use. The warranty is reduced from 2 years to 1 year if errors or defects arising from inappropriate use, improper operation or stress occur. The guarantee period of the device for private use is 2 years or 20,000 scans.
QUICK INSTALLATION GUIDE (QIG)
WINDOWS SYSTEMS INSTALLATION DURING DRIVER INSTALLATION A. WARNING DIALOGUE BOX MAY APPEAR, IF THIS IS THE CASE PLEASE SELECT "INSTALL THIS DRIVER ANYWAYS".

Be sure to install the Application Software BEFORE installing the scanner driver CyberView X 5.0.
You may install the scanner driver directly if you have already installed TWAIN compliant application software in your computer. Mac users can use iPhoto for editing.
Notice:
- In "Found New Hardware Wizard" window, select "Search automatically or Browse computer for driver software."
- In "Completing the Found New Hardware Wizard" window, click "Finish".
NOTE: Not all PC's will display the found new hardware window, some will install in the background
INSTALLING SOFTWARE AND DRIVER
Before Installing the Scanner Driver...
If you choose to use the provided application for image editing, install the application software (ex: Adobe® Photoshop® Elements) by inserting the application CD into the computer's CD/DVD drive. Follow the instructions that will be displayed in a window that opens automatically.
Installing Scanner Driver
a. Insert insert driver CD into the computer CD/DVD drive and explore the contents.
b. Double click the "CyberView X 5.0" icon to begin the installation process. Follow the onscreen prompts to complete the installation process.
NOTE: Make sure the scanner is NOT connected to the computer during the CyberView X 5.0 driver installation.
c. Restart computer once the installation process is complete.
Please Note: When installing your new scanner onto a Windows system that already has another USB Flatbed scanner or All in-one Scan/Copier/Printer device installed, it may be necessary for you to disconnect the other scanner from the USB port for the Film scanner to work properly,
TWAIN scanner plug-in Installation Guide for Adobe Photoshop Elements 9 and newer versions
The TWAIN scanner plug-in is no longer installed with Photoshop Elements 9. In order to be able to import scanner device through Adobe Photoshop elements, please follow below instructions after installing Adobe Photoshop Elements 9 to find where and how to install the TWAIN component which was previously installed with the application for versions earlier than Photoshop Elements 9.
Important: Do not move plug-ins from previous versions of Photoshop Elements into the Photoshop Elements 9 > Plug-Ins folder, or set the Photoshop Elements 8 (or earlier) > Plug-In folder as the Additional Plug-Ins Folder in Preferences.
Find complete information at offi cial Adobe website:
http://kb2.adobe.com/cps/849/cpsld_84933.html
Macintosh
To install the legacy TWAIN plug-in for Macintosh, copy TWAIN.plugin folder from: //Applications/Adobe Photoshop Elements 9/Optional Plug-Ins/Import Modules/
Into: //Applications/Adobe Photoshop Elements 9/Locales/
Windows
To install the legacy TWAIN plug-in for Windows, copy twain_32.8ba from:
C:\Program Files\Adobe\Photoshop Elements 9\Optional Plug-Ins\Import-Export\
Into: C:\Program Files\Adobe\Photoshop Elements 9\Locales\
64-bit Windows
Photoshop Elements 9 is a 32-bit application. When installed on a 64-bit version of Windows the path is slightly modified.
To install the legacy TWAIN plug-In for Windows, copy twain_32.8ba from: C:\Program Files (x86)\Adobe\Photoshop Elements 9\Optional Plug-Ins\Import-Export\
Into: C:\Program Files (x86)\Adobe\Photoshop Elements 9\Locales\
Installing Hardware
a. Connect the slide scanner to a power source.
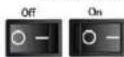
- Locate the power switch on the lower left side of the scanner. Make sure the scanner is TURNED OFF.
-
Plug the AC adapter into an AC power source FIRST before plugging it into the scanner.
-
Attach the USB cable to the computer using the standard USB adapter end. Attach the USB adapter end of the cable to back panel of the scanner.
Additional features
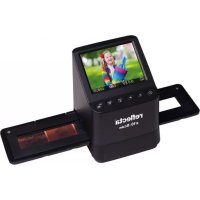
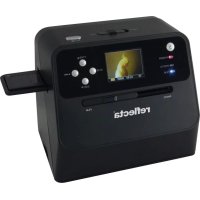
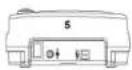
CrystalScan 7200
- Lid.
- Slide Holder
- Film Deck
- One Button Scan
- Release Switch
- Viewing Window.
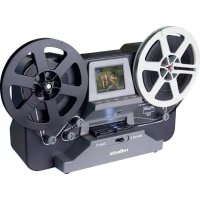
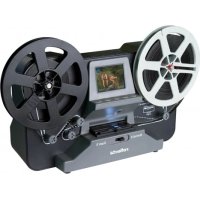
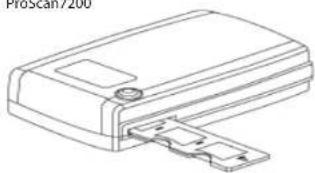
ProScan 7200
- Scanner
- Slide holder
- Film Holder
- One Button Scan
- Back of the unit
- Viewing Window


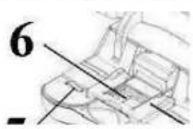
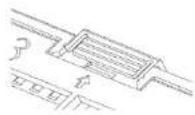
To Scan Film (Film & Mounted Slides) CrystalScan 7200
Mounted Slides
- Open Scanner Lid (1).
- Release the Slide/Film Holder (5) put in slide "Shiny side up" then close slide holder.
- Close Scanner Lid (1) (optional).
- Ready to scan.

Filmstrips
- Open the scanner lid (1).
- Release the Slide Holder (5).
- Position the film that you wish to scan in the center of the viewing window (6).
-
Push down the film frame and close the slide holder.
-
Ready to scan.
ProScan7200
natural_image
Technical line drawing of a mechanical component with a bracket and mounting bracket (no text or symbols)To Scan Mounted Slides
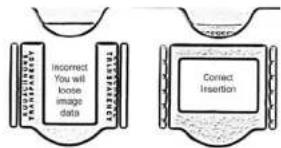
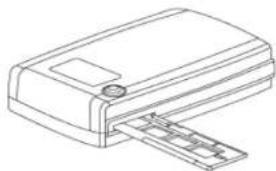
- Mounted Slides
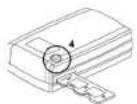
1-1. Load the mounted slides into the slide holder, shiny side facing upward
1-2. Insert the slide holder into the scanner with the arrow facing upwards
1-3. Insert to holder into the scanner from the left or the right side
ProScan 7200 - Scanning Slides (Continued...)
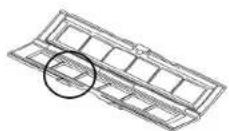
text_image
INCORRECT YOU WILL LOOSE IMAGE DATA Correct Insertion
natural_image
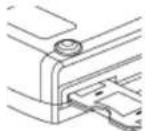
Line drawing of a rectangular electronic component with a small protrusion and mounting bracket (no text or symbols)To Scan Negative Film Strips
2-1. Load the negative into the holder making sure to align the film frames with the frames on the holder, and with the shiny side facing upward
2-2 Close the film holder
2-3. Insert the film holder into the scanner from the left or right side, with the arrow facing upwards
natural_image
Line drawing of a printer with paper feed and paper clip (no text or symbols)1.4
One Button Scan
- Open the CyberView (see page 12 to acquire the CyberView driver program)
- Configure Scan Settings (see Page 13)
- Select the Scan to directory, file format (TIF or JPG, once configured, Press the scanner button) to begin scanning.
CrystalScan 7200 One Touch Button
ProScan 7200
One Touch Button
CyberView X5
Scanning to C:\Users\gl\Documents\image001.tif

Film Type: Positive 135 Resolution: 1000 dpi MagicTouch: Off
Cancel
NOTE: If you do not open CyberViewX 5.0 FIRST, the scan button will not function.
HOW TO SCAN SLIDES
STEP 1 – Acquire Driver
(For PC User)
Open CyberView X 5 from Start - All Programs -CyberView
(For MAC User)
Open Macintosh Hard drive - Applications -CyberView
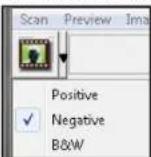
STEP 2 – Select Film Type
Select the film type to be scanned - Positive, Negative or B&W (Black and White).
STEP 3 – Optional Prescan
Select the "Prescan Current Frame" to prescan the slide currently loaded into the scanner or "Prescan..." to prescan slide or slides at specific positions in the magazine.
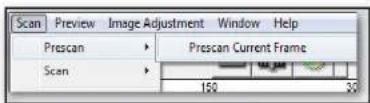
Pre-Scanning should be used to manually adjust color/edit settings for each slide before doing the final scan. It's possible to set different settings for each slide to be scanned.
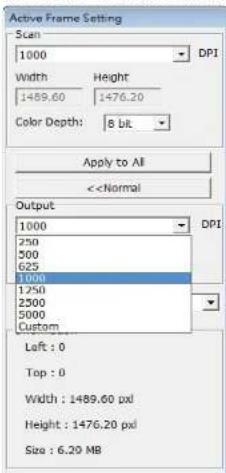
STEP 4 - Set Scan Settings
a. Resolution
The default scanning resolution is 1000dpi, additional resolution options are listed below.
Notice: Higher scanning resolutions result in greater scanning time and hardisk space requirements.
b. Color Depth
Choose between 8 and 16bit. A higher color depth setting will result in a larger range of colors in the final scanned image.
The Film Scanner colour depth is 48 bit true color. The scanning software has the capability of selecting 8 bit color mode or 16 bit color mode when scanning. This will produce 24 or 48 bit color images, 8 bits or 16 bits per Red, Green and Blue color channels.
Example:
8 bit mode = 8 Red, 8 Green, and 8 Blue for a total of 24 bit color 16 bit mode = 16 Red, 16 Green, and 16 Blue for a total of 48 bit color
text_image
Active Frame Setting Scale 1000 DPI Width Height 1459.60 1476.20 Color Depth: 8 bit Apply to All <| Scanning Resolution | Color Depth(by RGB channel) | Color Mode | File Size TIFF(no compression) |
| 300dpi 8 | bit 24-bit ~3 | 50Kb | |
| 600dpi 8 | bit 24-bit ~1 | MB | |
| 1800dpi 8 | bit 24-bit ~1 | 12MB | |
| 3600dpi 8 | bit 24-bit ~5 | 52MB | |
| 7200dpi 8 | bit 48-bit ~2 | 08MB |
STEP 5 – Set Scan Preferences
Select Scan - Preference - Film Type - Scan Setting  text_image
Scale Setting | Advanced Setting | Default Scanning Area | 300/300/300 Proscan Resolution ✓ 300 DPI ✓ 600 DPI Color Depth: 8 bit Scan Mode: Quality Directory: C:\Users\@Document\ Raw File Name: image ✓ Taking Index after Base File Name Bitmap: 3 Options:User Defined Start Number
1 Browse... File Types: TF JPEG Quality: B1 Filename Example: imageX01.1FSet Scan Preferences (Continued...)
4. Options - Use Film Index: Use the number assigned to the slide based on it's position in the cartridge. User Defined Start Number: Enter a specific start number 5. Choose the file type, "TIF" or "JPG". (TIF uncompressed or JPG Compressed) Choose image quality for JPEG. (20-100) 100 offers the least amount of compression  Advanced Setting - PC Users text_image
Scan Setting Advanced Setting | Default Scanning Area | ICE/ROC/GEM | ✓ Auto Exposure □ Digital Noise Reduction Intensity 0 100 200text_image
Scan Setting Advanced Setting Default Scanning Area MagicTouch/AutoColor Auto Exposure Digital Noise Reduction Auto Balance Intensity 100 Auto Contrast 0 200text_image
Scan Setting | Advanced Setting | Default Scanning Area | I/O/ROC/GEM | Enable user setting for auto-creep Width Height Scan Size 3.767667 2.429933 Default Offset: X Offset: V Scan Offset 0.000000 0.000000 Default Get Current Crop Valuetext_image
Scan Setting | Advanced Setting | Default Scanning Area | IEC/ROC/SEM | □ Digital ICE □ Enable GEH □ Enable ROCtext_image
Scan Setting Advanced Setting Default Scanning Area MagicTouch/AutoColor Magic Touch Auto ColorSTEP 6 - Scan
Scan - Scan- Scan Current Frame  This begins the scan to file process text_image
CyberView X5 Scanning to C:\Users\pf\Documents\image001.tif Film Type: Positive 135 Resolution: 1000 dpi Magic Touch: OffSTEP 7 - Exit
Select "Scan > Exit" to close the driver. Scanned image files can be open/edited with any image editing software. text_image
CyberView X3 Quit the application: prompts to save documents Ext. Yes No CancelUSER INTERFACE
text_image
Scan Panew Image Adjustment Window Help Positive 135 Fm DX 600 Scan Setting Scan Custom 1300 DPI Width Height 2.25 ± 1.5 Color Depth: Black Advanced >> Scan Media Quality Information Left: 0 Top: 0 Width: 2228.12 mil Height: +472.38 mil Size: 33.47 Mb ImageI. Main Window Area [Fixed Windows]
Menu Commands - Scan
Prescan - Prescan Current Frame: Pre-scan the existing slide. Scan - Scan Current Frame > Scan the current slide. text_image
Menu Commands - Preview Zoom, Rotate & Flip features.Revert
Discards all modifi cations and restores the image back to the original state.Preference - See Scan Setting (See Page 13)
Exit
Closes the CyberView X5 user interface. There is a message pop-up "Quit the application prompts to save documents?" click "Yes" to save, "No" to discard the current settings or "Cancel" to return to Cyber View X. text_image
CyberView XS Quit the application; prompts to save documents Exit Yes No CancelMenu Commands - Image Adjustment
a. Image Adjustment 1. Variations: Generates different views of image with options to make changes to highlights, midtones, etc.  text_image
Image Adjustment Variations | Color Balance | Curves and Levels | Original More Green Lighter More Yellow More Open Current Mix More Red More Blue darker More Roberto Apply to all frames Red: 0.9 Red X: 9.15 OK Cancel2. Color Balance
To adjust the brightness, contrast, saturation, and color (CMY or RGB) of the image. Comparisons between before and after adjusted images are shown for reference. text_image
Image Adjustment Variation: Color Balance | Curves and Levels Before After Brightness + - Contrast + - Saturation + - Apply to all frames RGB 0.00 GB RGB YKB OK Cancel3. Curves and Levels
Adjust image settings by moving Curve and Levels settings. Comparison between before and after adjustment is displayed for reference. text_image
Image Adjustment Variations | Color balance | Curves and Levels | before After Channel Ross A A A Apply to all frames R:239 G:220 B:181 K:555 Y:0 OK CancelMenu Commands - Window
1. Exposure Setting: To adjust the exposure time (R, G, B) press "Reset" to restore to the default setting. text_image
CyberView X5 50% 200% R 100 % G 100 % B 100 % Reset CloseMenu Commands - Help
- Update: Firmware: Upgrade the firmware version, select the path where the file of firmware has been saved. (These files may be downloaded from our website) - About: Displays system information (including operation system, CPU), product information (including product name, model name, hardware version, fi rmware version, software version, device information including interface and optical resolution).Function Bar Diagram
and brand from the toolbar: Negative Positive (also known as Slide) Black and White II. Preview Window Area [Fixed Windows]
 Prescan: Pre-scan the current film, press drop down ■ for more options.  Scan: Scan film, press drop down button for more options.  Image Adjustment: Press drop down ▼ button for more options. text_image
Adobe Photoshop Positive 120 fps 100 300Toolbar Diagram
 Select scan area: more than one selection can be made at a time. Zoom In: To magnify the image where the cursor is currently located. The image will be magnified with every click until the maximum multiple (1000%) is reached.  Zoom Out: To reduce the size of the viewed image click the Zoom Out cursor to the desired area, the image will reduce by half with every click until the lowest multiple (25%) is reached.  Rotate 90 Left: To rotate the image counter clockwise 90 degrees.  Rotate 90 Right: To rotate the image clockwise 90 degrees.  Flip Horizontal: To Flip the image 180 degrees horizontally.  Flip Vertical: To Flip the image 180 degrees vertically.  Revert: Discard all modifications and restores the image back to the original state in preview windows.Status Line
In the lower left hand corner, the color level (RGB: red, green, blue) and coordinates of the location [ex: I] are displayed. The zoom scale, the current slide magazine location and how many areas selected to scan (2 or higher indicates: Multiple scan areas on one slide [ex: II]). text_image
I. R:5 G:5 R:5 0.291 Y:68 II. Exposure R:100% Qcon Scale 100% Location 3 Selections 1III. Scan Setting Area [Floating Windows]
Normal mode [ex: 1] to input the basic parameter to scan (including scan resolution, lm size, color depth). Advanced mode [ex: II] to input the parameter of scan output, scan resolution, and color depth Scan Setting 1. text_image
Scan Setting Scan Custom 1000 DPI Width Height 2328.13 4724.38 Color Depth: 8 bit Advanced>> Scan Mode Quality Information Left : 0 Top : 0 Width : 2328.13 pxd Height : 4724.38 pxd Size : 31.47 MBtext_image
Scan Setting Scan Custom 1000 DPI Width Height 2328.13 4724.38 Color Depth: 8 bit <TECHNICAL SUPPORT
CyberView
For information regarding the film scanner and CyberView driver, please visit www.reflecta.de.Bundled application software
You can refer to the HELP function on the application menu bar or visit the software company's website. ^xx This user manual has also been archived in the packaged CD.CyberView Manual
X5 SF lel usuario ESPAÑOLDECLARACIÓN DE LA COMISIÓN FEDERAL DE COMUNICACIONES (FCC)
Este equipo ha sido probado y se ha comprobado que cumple los límites para un dispositivo digital de Clase B, según la Sección 15 de las normativas FCC. Estos límites están diseñados para proporcionar una protección razonable contra las interferencias perjudiciales en una instalación residencial. Este equipo genera, utiliza y puede emitir energía de radiofrecuencia y, si no se instala y utiliza de acuerdo con las instrucciones proporcionadas, podría causar interferencias perjudiciales en las comunicaciones de radio. Sin embargo, no existen garantías de que el equipo no provoque interferencias en una instalación particular. Si este equipo provoca interferencias perjudiciales a la recepción de radio o televisión, lo que puede determinarse encendiéndolo y apagándolo, es recomendable intentar corregir las Interferencias mediante una o varias de las siguientes medidas: - Reorientar o colocar en otro lugar la antena receptora. - Aumentar la separación entre el equipo y el receptor. - Conectar el equipo a una toma de corriente de un circuito distinta de aquella a la que esté conectado el receptor de radio o TV. - Solicitar ayuda al proveedor o a un profesional de radio y TV con experiencia.Advertencia:
Utilice únicamente cables de señal protegidos para conectar dispositivos de E/S a este equipo. Se advierte que los cambios o modificaciones no aprobados expresamente por la parte responsable del cumplimiento anularán la autorización para utilizar el equipo.TABLA DE CONTENIDO
PROCEDIMIENTOS INICIALES....4 GUÍA DE INSTALACIÓN RÁPIDA (GIR) 6 INSTALAR EL SOFTWARE Y EL CONTROLADOR....6 Instalar el hardware....8 Funciones adicionales....8 Digitalización con un botón....11 CÓMO DIGITALIZAR DIPOSITIVAS 12 PASO 1 – Adquirir el controlador ....12 PASO 2 – Seleccionar el tipo de película....12 PASO 3 – Predigitalización opcional....12 PASO 4 – Establecer la configuración de digitalización....13 PASO 5 – Establecer las preferencias de digitalización .....14 PASO 6 - Digitalizar....17 PASO 7 – Salir 17 INTERFAZ DEL USUARIO....18 I. Área de la ventana principal....19 Comandos de menú - Scan (Digitalizar)....19 Comandos de menú - Vista previa....19 II. Area de la ventana de vista previa [ventanas fijas]....23 III. Area de configuración de digitalización [ventanas flotantes]....25 SOPORTE TÉCNICO 26PROCEDIMIENTOS INICIALES
Compruebe el contenido del paquete antes de comenzar. Para llevar a cabo una instalación rápida, consulte la Guía de instalación rápida. (Consulte la página 9)  ¡Importante! Guarde la caja, el recibo y el material de embalaje originales por si tuviera necesidad de transportar el producto.Contenido del paquete
- Escáner de diapositivas. - Portapelículas (donde proceda) - Adaptador de alimentación [FAIRWAY N° de modelo: WRG 15F-120A]  ¡Advertencia! El uso de otro adaptador de alimentación puede dañar gravemente el escáner e invalidará la garantía del producto. - Cable de alimentación. - Cable USB 2.0 • Controlador CyberView X5. • DVD con el software de aplicación. - Manual del usuario impreso.NOTA:
\- Software de aplicación es un software de creación de imágenes, como por ejemplo Adobe® Photoshop® Elements, sujeto a cambio sin previo aviso.PAUTAS GENERALES:
- Utilice solamente el cable USB suministrado. Conecte el equipo al escáner directamente mediante el cable USB 2.0. - No utilice un concentrador o alargador. Utilice solamente los puertos USB situados en la parte posterior de los equipos de sobremesa. - Si hay algún otro dispositivo (dispositivo multifunción, Impresoras, escáneres, cámaras Web) conectado al equipo a través del puerto USB, desconéctelos. Se necesita al menos 1 GB de memoria RAM (Windows/Mac). Intervalo de temperaturas ambiente de funcionamiento: 10° a 40 °C (50° a 104 °F)| Nota: no encienda el escáner a menos que la temperatura ambiente se encuentre dentro de ese intervalo. Si el escáner se ha almacenado o transportado fuera de este intervalo de temperatura, deje que recupere la temperatura antes de encenderlo. |
| Nota: Si el escáner se ha almacenado o transportado a una baja temperatura y, a continuación, pasa a un entorno cálido o húmedo, se puede producir condensación. |
GUÍA DE INSTALACIÓN RÁPIDA (GIR)
DURANTE LA INSTALACIÓN DEL CONTROLADOR EN SISTEMAS WINDOWS PUEDE PARECER UN CUADRO DE DIALOGO DE ADVERTENCIA. EN ESTE CASO, SELECCIONE "INSTALL THIS DRIVER ANYWAYS" (INSTALAR ESTE CONTROLADOR DE TODAS FORMAS).  Asegúrese de instalar el software de aplicación ANTES de instalar el controlador del escáner de CyberView X 5.0. Puede instalar el controlador del escáner directamente si ya ha instalado el software de aplicación compatible con TWAIN en el equipo. Los usuarios de Mac pueden utilizar iPhoto para realizar la edición.Avlso:
1. En la ventana "Found New Hardware Wizard" (Asistente para hardware nuevo encontrado), seleccione "Search automatically or Browse computer for driver software" (Buscar automáticamente o explorar el equipo en busca del software del controlador). 2. En la ventana "Completing the Found New Hardware Wizard" (Finalización del Asistente para hardware nuevo encontrado), haga clic en "Finish" (Finalizar). NOTA: no todos los equipos mostrarán la ventana de nuevo hardware encontrado; algunos realizarán instalaciones en segundo planoINSTALAR EL SOFTWARE Y EL CONTROLADOR
Antes de instalar el controlador del escáner.. Si opta por utilizar la aplicación proporcionada para edición de imágenes, instale el software de aplicación (por ejemplo Adobe® Photoshop® Elements) Insertando el CD de aplicaciones en la unidad de CD/DVD del equipo. Siga las instrucciones que aparecerán en una ventana que se abrirá automáticamente.Instalar el controlador del escáner
a. Inserte el CD que contiene los controladores en la unidad de CD/DVD y explore el contenido. b. Haga doble clic en el icono "CyberView X 5.0" para iniciar el proceso de instalación. Siga los mensajes que aparezcan en la pantalla para completar el proceso de instalación. NOTA: asegúrese de que el escáner NO está conectado al equipo durante la instalación del controlador de CyberView X 5.0. c. Reinicie el equipo cuando el proceso de instalación se complete. Tenga en cuenta lo siguiente: Cuando instale el nuevo escáner en un sistema Windows que ya tenga otro escáner plano USB o dispositivo multifunción (escáner, fotocopiadora e impresora) instalado, puede que tenga que desconectar el otro escáner del puerto USB para que el escáner de películas funcione correctamente.Guía de instalación del complemento de escáner TWAIN para Adobe Photoshop Elements 9
El complemento de escáner TWAIN ya no se instala con Photoshop Elements 9. Para poder importar desde un dispositivo de digitalización a través de Adobe Photoshop Elements, siga las instrucciones que figuran a continuación después de instalar Adobe Photoshop Elements 9 para saber dónde y cómo instalar el componente TWAIN que se instaló previamente con la aplicación para versiones anteriores de Photoshop Elements 9. Importante: no mueva los complementos de las versiones anteriores de Photoshop Elements a la carpeta Photoshop Elements 9 > Plug-Ins, o establezca la carpeta Photoshop Elements 8 (o anterior) > Plug-In como la carpeta de complementos adicional en las preferencias. Puede encontrar información completa en el sitio Web oficial de Adobe: http://kb2.adobe.com/cps/849/cpsid\_84933.htmlMacintosh
Para Instalar el complemento TWAIN heredado para Macintosh, copie la carpeta del complemento TWAIN de: //Applications/Adobe Photoshop Elements 9/Optional Plug-Ins/ImportModules/ A: //Applications/Adobe Photoshop Elements 9/Locales/Windows
Para instalar el complemento TWAIN heredado para Windows, copie twain\_32.8ba de: C:\Archivos de programa\Adobe\Photoshop Elements 9\Optional Plug-Ins\Import-Export\ A: C:\Archivos de programa\Adobe\Photoshop Elements 9\Locales\Windows de 64 bits
Photoshop Elements 9 es una aplicación de 32 bits. Si se instala en una versión de 64 bits de Windows la ruta de acceso se modificará ligeramente. Para instalar el complemento TWAIN heredado para Windows, copie twain\_32.8ba de: C:\Archivos de programa (x86)\Adobe\Photoshop Elements 9\Optional Plug-Ins\Import-Export\ A: C:\Archivos de programa (x86)\Adobe\Photoshop Elements 9\Locales\Instalar el hardware
a. Conecte el escáner de diapositivas a una fuente de alimentación. 1. Busque el conmutador alimentación situado en el lado izquilerdo inferior del escáner. Asegúrese de que el escáner está APAGADO.  2. Enchufe el adaptador de CA a una toma de corriente de CA ANTES de enchularlo al escáner. 3. Conecte el cable USB al equipo mediante un adaptador USB estándar. Conecte el adaptador USB del cable al panel posterior del escáner.Funciones adicionales
CrystalScan 7200
1. Tapa. 2. Portadiapositiva 3. Pletina de películas 4. Digitalización con un botón 5. Control de libración 6. Ventana de visualización  1. Entrada de CC 2. Puerto USB 3. Conmutador de alimentación ProScan 7200
1. Escáner 2. Portadiapositiva 3. Portapelículas 4. Digitalización con un botón 5. Parte posterior de la unidad 6. Ventana de visualización text_image
Technical diagram showing exploded view of a multi-pin electronic component with numbered parts and labeled ports.Diapositivas montadas
1. Abra la tapa del escáner (1). 2. Libere el portadiapositivas o portapelículas (5), inserte la diapositiva con la "cara brillante hacia arriba" y, a continuación, cierre el portadiapositivas. 3. Cierre la tapa del escáner cerrada (1) (opcional). 4. Ahora podrá utilizar el dispositivo para digitalizar.  Tiras de películas 1. Abra la tapa del escáner (1). 2. Libere el portadiapositivas (5) 3. Coloque la película que desee digitalizar en el centro de la ventana de visualización (6). 4. Empuje hacia abajo el marco de la película y cierre el portadiapositivas. 5. Ahora podrá utilizar el dispositivo para digitalizar.  ProScan 7200 natural_image
Line drawing of a rectangular electronic device with a mounting bracket and internal components (no text or symbols)text_image
Incorrect You will loose image data Correct Insertionnatural_image
Line drawing of a rectangular electronic device with a connector and mounting bracket (no text or symbols)natural_image
Line drawing of a printer with paper feed (no text or symbols)Digitalización con un botón
1. Abra CyberView (consulte la página 12 para adquirir el programa del controlador CyberView). 2. Defina la configuración de digitalización (consulte la página 13). 3. Seleccione el directorio de destino de la digitalización y el formato de archivo (TIF o JPG). Cuando termine la configuración, presione el botón Digitalizar el para iniciar la digitalización.   7200 text_image
CyberView X5 barrido a C:\Users\gif\Documents\image001.tif Tipo de archivo : Positivo 135 Resolución: 1000 dpi MagicTouch: Off 5.11.00 1.03 54 CancelarCÓMO DIGITALIZAR DIAPOSITIVAS
PASO 1 – Adquirir el controlador
(Para los usuarios de PC) Abra CyberView X 5 desde Start (Inicio) – All Programs (Todos los programas) – CyberView (Para los usuarios de MAC) Ahora el disco duro de Macintosh – Applications (Aplicaciones) – CyberViewPASO 2 – Seleccionar el tipo de película
Seleccione el tipo de película que se va a digitalizar: Positivo, Negativo o Blanco y negro. PASO 3 – Predigitalización opcional
Seleccione "Prescan Current Frame" (Predigitalizar marco actual) para predigitalizar la diapositiva cargada actualmente en el escáner o "Prescan..." (Predigitalizar) para predigitalizar las diapositivas que se encuentren en posiciones específicas del carrete para diapositivas. text_image
Escanear Vista previa Ajuste de la imagen Ventana Ayuda Preescanear > Preescanear fotograma actual Escanear >PASO 4 – Establecer la configuración de digitalización
a. Resolución La resolución de digitalización predeterminada es 1000 ppp. A continuación se enumeran opciones de resolución adicionales. Aviso: Cuanto mayores sean las resoluciones de digitalización, más tiempo tardará esta y mayor será el espacio en disco duro. b. Profundidad de color Elija entre 8 y 16 bits. Cuanto mayor sea el valor de la profundidad de color, mayor será el intervalo de colores de la imagen digitalizada final. La profundidad de color del escáner de películas es de color verdadero de 48 bits. El software de digitalización es capaz de seleccionar el modo de color de 8 o 16 bits durante la digitalización. Esto generará imágenes en color de 24 o 48 bits, 8 o 16 bits por cada uno de los canales de color rojo, verde y azul.Ejemplo:
Modo de 8 bits = 8 rojo, 8 verde y 8 azul para un color de 24 bits en total Modo de 16 bits = 16 rojo, 16 verde y 16 azul para un color de 48 bits en total text_image
Configuración del escáner Escanear Personalizar 1000 DPI Anchura Altura 1346.36 913.33 Profundidad 8 bit del color: <| Resolución de digitalización | Profundidad de color (por canal RGB) | Mode de color | Tamaño de archivo TIFF (sin compresión) |
| 300 ppp 8 | bits 24 | bits | ~350 Kb |
| 600 ppp 8 | bits 24 | bits | ~1MB |
| 1800 ppp 8 | bits 24 | bits | ~12MB |
| 3600 ppp 8 | bits 24 | bits | ~52MB |
| 7200 ppp 8 | bits 48 | bits | ~208MB |
PASO 5 – Establecer las preferencias de digitalización
Seleccione Scan (Digitalizar) - Preference (Preferencias) - Film Type (Tipo de película) - Scan Setting (Configuración de digitalización) text_image
Escancer Preescancer Escancer DMin Revertir Preferences... Salir Ajuste de lo imogen 150 Positivo Negative Banco y Negrotext_image
Configuración del accinar Resolución de presensione 200 DPI 600 DPI Proñabilidad del color: 8 MZ Mode de escavar: Caldad Configuración avanzada | Área de sujuros predominada | I2D/IOC/EDI Nombre del archivo base: image Índus de arreter después de nombre de archivo base Diplos: Clustores: Número inicial delnado por el usuario 1 Navigate... Tipo de arthor: TP Calidad JPEG: Ejemplo de nombre de arthor: mapdof1 cfConfigurar las preferencias de digitalización
1. Seleccione Browse (Examinar) y ella la carpeta designada en la que guardar la imagen digitalizada. 2. Especifique el nombre de archivo.  \- Índice de anastre después de Nombre de archivo base 3. Trailing Index after Base File Name Digits (Agregar índice después de los dígitos del nombre de archivo base): Define la longitud del nombre de archivo y la secuencia de numeración hasta 6 dígitos. Ejemplo: imagen1 o imagen000001. \- Índice de arrastre después de Nombre de archivo base Establecer las preferencias de digitalización (continuación...)
4. Options (Opciones) - Use Film Index (Usar índice de película): utilice el número asignado a la diapositiva en función de su posición en el cartucho. 5. User Defined Start Number (Número de inicio definido por el usuario): Introduzca un número de inicio específico Elija el tipo de archivo: "TIF" o "JPG". (TIF no comprimido o JPG comprimido). Elija la calidad de imagen para JPEG. (20-100) 100 ofrece la mínima cantidad de compresión  Configuración avanzada - Usuarios de PC text_image
Configuración del escinar | Configuración avanzada | Área de escaneo predeterminada | ICE/ROC/GEM | Exposición automática Reducción digital de ruido Intensidad 0 100 200text_image
Configuración del escáner Configuración automada Área de escanes predeterminada Toque maps/Color automático Exposición automática Balance automático Contraste automático Reducción digital de ruido Intensidad 100 0 200text_image
Configuración del esciner | Configuración avanzada | Área de escaneo predeterminada | ICE/ROC/GEN | □ Activar la configuración del usuario para el recorte automatística Tamaño del escaneo Anchura Altura 3.757607 2.429433 Predominado Offset X Offset Y Offset de escaneo 0.000000 0.000000 Predominado Obtional valor de recorte actualtext_image
Configuración del escinar | Configuración avanzada | Área de escinaro predeterminada : ICE/ROC/GEM ICE digital Activeir GEM 75 Activeir ROC 75text_image
Configuración de escárer Configuración avanzada Área de escaneo predeterminada Toque mágica/Color automático Magic Touch Color automáticoPASO 6 - Digitalizar
Scan (Digitalizar) - Scan (Digitalizar) - Scan Current Frame (Digitalizar fotograma actual) text_image
Escanear Vista previa Ajuste de la imagen Ventana Ayuda Preescanear Escanear Escanear fotograma actual 150 300text_image
CyberView XS barrido a C:\Users\gf\Documents\image001.tif Tipo de archivo : Postivo 135 Resolución: 1000 dpi MagicTouch: Off 5.11.00 1.03 54 CancelarPASO 7 – Salir
Seleccione "Scan (Digitalizar) > Exit (Salir)" para cerrar el controlador. Los archivos con las imágenes digitalizadas pueden abrirse y editarse con cualquier software para edición de imágenes. text_image
CyberView X5 ¿Aplicar la resolución de escanco actuala a la configuración predeterminada ? (Esta configuración también puede hacerse en el cuadro de Diálogo de Preferencias.) S' No CancelarINTERFAZ DEL USUARIO
text_image
CyberView X3 Escanear: Visca previa Ajuste de la magen Ventana Ayuda Positivo 125 Film 460 300 150 200 300 600 Configuración del escaneir Escanear Personalizar 1000 DP1 Anchura Altura 1246.35 913.33 Profundidad del color: 8 bit Avanzado>> Mode de escaneo Cidad Inforresión Dquierda: 66 Parte supero: 15 Anchura: 1346.35 pdl Altura: 913.33 pdl Tamaño: 1.52 MΩ Ubicación:1 Selecticonest RxD Ed B-J X448 Y2773 Exposa Escala del zoom:100% X448 Y2773I. Área de la ventana principal
Comandos de menú - Scan (Digitalizar)
Prescan (Predigitallzar) - Prescan Current Frame (Predigitalizar marco actual): predigitalice la diapositiva existente. Scan (Digitalizar) - Scan Current Frame (Digitalizar marco actual) > Permite digitalizar la diapositiva actual. text_image
Escanear Vista previa Ajuste de la imagen Ventana Ayuda Preescanear Escanear Escanear fotograma actual 150 300 Comandos de menú - Vista previa Funciones Zoom, Rotate (Girar) y Flip (Voltear). Vista previa Ajuste de la imagen Ve Acercar Alejar Rotar 90° a la izquierda Rotar 90° a la derecha Invertir horizontamente Invertir verticalmenteRevert (Revertir)
Esta opción permite descartar todas las modificaciones y volver a restaurar el estado original de la imagen.Preference (Preferencias) - Consulte la configuración de digitalización (página 13)
Exit (Sallr)
Cierra la interfaz de usuario de CyberView X5. Aparecerá el mensaje emergente "Quit the application prompts to save documents?\* (?Desea salir de la aplicación y guardar los cambios?). Haga clic en "Yes" (Sí) para guardar, en "No" para descartar la configuración actual o en "Cancelar" para volver a CyberView X text_image
CyberView X5 Aplicar la resolución de escanes actuala la configuración predeterminada ? (Esta configuración también puede hace en el cuatro de diálogo de Preferencias.) Si No CancelarComandos de menú - Image Adjustment (Ajuste de la imagen)
a. Ajuste de Imagen 1. Variations (Variaciones): genera diferentes vistas de la imagen con opciones para realizar cambios en realces, mediostonos, etc. text_image
Ajuste de la imagen Ventana Ay Variaciones... Balance de colores... Curva y niveles...text_image
Ajuste de la imagen Variaciones | Balance de colores | Curves y niveles | Original Más verde Más centro Más amario Más con Selección actual Más mjo Más azul Más oscuro Más magenta + Medios tones Fino Grueso Aplicar a todos los fotogramas R00 G01 B00 X:0 Y:0 Aceptar Cancelar2. Color Balance (Balance de color)
Permite ajustar el brillo, el contraste, la saturación y el color (CMY o RGB) de la imagen. Como referencia, se muestran las comparaciones entre la imagen antes y después de realizar el ajuste. text_image
Ajuste de la imagen varaciones Balance de colores Curvas y niveles Antes Después - Brillo + - Contraste + - Saturación + Aplicar a todos los fotogramas R:26 G:33 B:19 K:3 Y:71 Aceptor Cancelartext_image
Ajuste de la imagen Variaciones | Balance de coores | Curvas y niveles Antes Después Canal RGB Aplicar a todos los fotogramas R:255 G:243 B:210 X:257 Y:0 Acctor CancelarComandos de menú - Windows (Ventana)
1. Exposure Setting (Configuración de exposición): Para ajustar el tiempo de exposición (R, G, B). presione "Reset" (Restablecer) para restaurar la configuración predeterminada. text_image
CyberView X5 50% 200% R 100 % G 100 % B 100 % Remiciar CerrarComandos de menú - Help (Ayuda)
- Update (Actualizar): Firmware: actualice la versión de firmware. y seleccione la ruta de acceso en la que desea guardar el archivo de firmware. (Puede descargar estos archivos de nuestro sitio Web) - About (Acerca de): permite mostrar información del sistema (como por ejemplo el sistema operativo y la CPU), información sobre el producto (como por ejemplo el nombre de producto, el nombre de modelo, la versión de hardware, la versión de firmware, la versión de software e información del dispositivo sobre la interfaz y la resolución óptica.Diagrama de barras de funciones
Seleccione el tipo y marca de película en la barra de herramientas: Positivo (también conocido como diapositiva) Negative (Negativo) B&W (Blanco y negro) II. Área de la ventana de vista previa [ventanas fijas]
 Prescan (Predigitalizar): predigitalice la película actual. Presione el desplegable ▼ para disponer de más opciones.  Scan (Explorar): permite digitalizar una película. Presione el botón desplegable ▼ para disponer de más opciones.  Image Adjustment (Ajuste de Imagen): Presione el botón desplegable ▼ para disponer de más opciones. text_image
CyberView XS Escamear Vista previa Ajuste de la imagen Ventana Ayuda Positivo 135 Fim 200 150 300 200 100 200Diagrama de barras de herramientas
 Select scan area (Seleccionar área de digitalización): se pueden realizar varias selecciones simultáneamente. Zoom In (Ampliar): permite ampliar la imagen en la que se encuentra el cursor actualmente. La Imagen se ampliará cada vez que haga clic hasta que se alcance el múltiplo máximo (1000%). Zoom Out (Reducir): para reducir el tamaño de la imagen visualizada, haga clic en el cursor Zoom Out (Reducir) en el área que desee. La imagen se reducirá a la mitad cada vez que haga clic hasta que se alcance el múltiplo mínimo (25%). Rotate 90 Left (Girar 90° a la Izquierda): permite girar la imagen 90 grados en sentido contrario a las agujas del reloj.  Rotate 90 Right (Girar 90º a la derecha): permite girar la imagen 90 grados en el sentido de las agujas del reloj.  Flip Horizontal (Volteo horizontal): permite voltear la imagen 180 grados horizontalmente.  Flip Vertical (Volteo vertical): permite voltear la imagen 180 grados verticalmente. Revert (Revertir): esta opción permite descartar todas las modificaciones y volver al estado original en las ventanas de vista previa.Estado de la línea
En la esquina inferior izqulerda, se muestran el nivel de color (RGB: rojo, verde y azul) y las coordenadas de la ubicación [ej.: I]. La escala de zoom, la ubicación del cartucho para diapositiva actual y cuántas áreas se han seleccionado para digitalizar (2 o más incida varias caras de digitalización por una cara [ej.: II]). 1.  Selections: II.Área de configuración de digitalización [ventanas flotantes]
El modo normal [ej.: I] permite especificar el parámetro básico para digitalizar (como por ejemplo la resolución, el tamaño de película y la profundidad de color). El modo avanzado [ej.: II] permite especificar el parámetro salida de digitalización, la resolución de digitalización, y la profundidad de color. 1. text_image
Configuración del escáner Escanear Personalizar 1000 DP1 Anchura Altura 1346.36 913.33 Profundidad 8 bit del color: Avanzado>> Modo de Escaneo Calidad Información Izquierda: 66 Parte superior: 16 Anchura: 1346.36 pxl Altura: 913.33 pxl Tamaño: 3.52 MBtext_image
Configuración del escáner Escanear Personalizar 1000 DPI Anchura Altura 1346.36 913.33 Profundidad 8 bit del color: <SOPORTE TÉCNICO
CyberView
Para obtener más información sobre el escáner de películas y el controlador de CyberView X, visite el sitio Web www. reflecta.deSoftware de aplicación Incluido
Puede consultar la función HELP (AYUDA) de la barra de menús de la aplicación o visitar el sitio Web de la compañía de software. \*\*Este manual del usuario también se ha archivado en el CD incluido.CyberView Manuel
X5SF d'utilisation
FRANÇAISDÉCLARATION DE LA COMMISSION FÉDÉRALE DES TÉLÉCOMMUNICATIONS (FCC)
Cet appareil a été testé et déclaré conforme aux limites d'un appareil numérique de classe B, conformément à la partie 15 du règlement de la FCC. Ces limites sont stipulées aux fins de garantir une protection raisonnable contre les interférences nuisibles en installation résidentielle. Cet appareil produit, utilise et peut émettre des fréquences radioélectriques et, s'il n'est pas installé ou utilisé conformément aux directives, il est susceptible de causer des interférences radio ou télévision. Cependant, nous ne pouvons garantir que des interférences ne se produiront pas dans une installation particulière. Si cet appareil cause des interférences nuisibles à la réception de la radio ou de la télévision, ce que vous pouvez facilement observer en éteignant et en rallumant l'appareil, nous vous encourageons à prendre une ou plusieurs des mesures correctives suivantes : - Réorienter ou déplacer l'antenne réceptrice. • Augmentez la distance entre l'appareil et le récepteur. - Branchez l'appareil sur une prise d'un circuit différent. - Consultez votre revendeur ou un technicien radio/télévision qualifié pour de l'aide.Attention :
Utilisez seulement des câbles de signal blindés pour connecter des appareils E/S à cet appareil. Tout changement ou modification non expressément approuvé par les autorités responsables de la conformité peut révoquer le droit de l'utilisateur à employer l'appareil en question.TABLE DES MATIÈRES
PRISE EN MAIN 5 GUIDE DE MISE EN ROUTE (GMR) 7 INSTALLATION DU LOGICIEL ET DES PILOTES....7 Installation du matériel 9 Fonctions supplémentaires ....9 Scan a un bouton....12 COMMENT FAIRE POUR SCANNER DES DIAPOS .... 13 ETAPE 1 - Obtenir le pilote....13 ETAPE 2 – Cholsir le type de film....13 ETAPE 3 – Pré-scan optionnel ....13 ETAPE 4 – Régler les réglages de scan ....14 ETAPE 3 – Regier les preferences de scan....15 ETAPE 6 - Scan (Scanner)....18 ETAPE 7 - Quitter 18 INTERFACE UTILISATEUR....19 I. Section de la fenêtre principale [Fenêtres fixes] 20 Commandes du menu - Scanner 20 Commandes de menu - Prévisualiser....20 II. Section Fenêtre de prévisualisation [Fenêtres fixes]....24 III. Zone de réglage d'image active 26 ASSISTANCE TECHNIQUE....27PRISE EN MAIN
Vérifiez le contenu de la boîte avant de commencer. Pour une installation rapide, référez-vous au Guide d'installation rapide. (Réf. Pg. 9)  Important I Gardez la boîte originale, le ticket et les matériaux d'emballage en cas de besoin au futur.Contenu de la boîte
• Scanneur de diapositive. \- Passe-vues (où cela s'applique) • Adaptateur électrique [N° de modèle FAIRWAY: WRG 15F-120A]  Attention ! L'utilisation d'un autre adaptateur d'alimentation peut endommager le scanneur et annuler la garantie du produit. • Cordon d'alimentation. • Câble USB 2.0. • Pilote de CyberView X5. • DVD du logiciel d'application. • Manuel de l'utilisateur imprimé.REMARQUE :
\- Le logiciel d'application est un logiciel d'imagerie tel que Adobe® Photoshop® Elements, et est sujet à modification sans avis préalable.GUIDE GÉNÉRAL :
- Utilisez uniquement le câble USB fourni. Branchez directement le scanneur sur l'ordinateur en utilisant le câble USB 2.0. - N'utilisez pas un hub ou un câble d'extension. Utilisez uniquement les ports USB à l'arrière des ordinateurs de bureau. - Si d'autres appareils (appareils multifonctions, imprimantes, scanneurs, webcams) sont branchés sur l'ordinateur via USB, débranchez-les. • Un minimum de 1GB de RAM (Windows/Mac) est nécessaire.| Plage de température ambiante de fonctionnement50° à 104°F (10° à 40°C) |
| Remarque : N'allumez le scanneer que si la température ambiante est dans la plage recommandée. Si le scanneer a été rangé ou transporté dans un endroit avec une température différentes, laissez-le s'ajuster à la nouvelle température avant de l'allumer. |
| Humidité ambiente recommandée pour l'utilisation15% à 76% d'humidité relative (sans condensation) |
| Remarque : Si le scanneer a été rangé ou transporté d'un endroit froid à un endroit chaud/humide, de la buée peut apparaître. |
GUIDE DE MISE EN ROUTE (GMR)
SYSTÈME D'EXPLOITATION WINDOWS - PENDANT L'INSTALLATION DU PILOTE UN MESSAGE D'AVERTISSEMENT PEUT APPARAÎTRE, SI C'EST LE CAS VEUILLEZ CHOISIR "INSTALLER QUAND MÊME CE PILOTE".  Assurez-vous de bien installer le Logiciel d'application AVANT d'installer le pilote du scanneur CyberView X 5.0. Vous pouvez installer directement le pilote du scanneer si vous avez déjà installé un logiciel d'application compatible avec TWAIN sur votre ordinateur. Les utilisateurs d'un Mac peuvent utiliser iPhoto pour éditer les photos.Remarque :
1. Dans la fenêtre "Assistant Nouveau périphérique détecté", choisissez "Chercher automatiquement ou parcourir l'ordinateur pour le logiciel pilote". 2. Dans la fenêtre "Continuation de l'Assistant Nouveau périphérique détecté", choisissez "Finir". REMARQUE : Certains PC n'affichent pas la fenêtre de nouveau périphérique détecté, certains l'installe automatiquement en arrière plan.INSTALLATION DU LOGICIEL ET DES PILOTES
Avant d'installer le pilote du scanneur... Si vous décidez d'utiliser le logiciel d'application fourni pour éditer les images, installez le logiciel d'application (par ex : Adobe® Photoshop® Elements) en insérant le DVD du logiciel d'application dans le lecteur de DVD de l'ordinateur. Suivez les instructions qui s'affichent dans la nouvelle fenêtre qui apparaît automatiquement.Installation du pilote du scanneur
a. Insérez le CD dans le lecteur de CD/DVD de votre ordinateur et parcourez le contenu. b. Double-cliquez sur l'icône "CyberView X 5.0" pour commencer l'installation. Sulvez les instructions à l'écran pour terminer l'installation. REMARQUE : Assurez-vous que le scanneur n'est PAS connecté à l'ordinateur lorsque vous installez le pilote de CyberView X 5.0. c. Redémarrez votre ordinateur quand l'installation est terminée. Veuillez noter : Lorsque vous installez votre nouveau scanneer avec un système d'exploitation qui possède déjà un scanneer plat USB ou une imprimante/photocopieur/scanneer tout-en-un, il peut être nécessaire de débrancher l'autre scanneer du port USB pour que le scanneer de diapos marche correctement.Guide d'installation du module d'extension de scanneur TWAIN pour Adobe Photoshop Elements 9
Le module d'extension de scanneur TWAIN n'est plus installé avec Adobe Photoshop Elements 9. Afin d'importer un appareil scanneur dans Adobe Photoshop Elements, veuillez suivre les instructions ci-dessous après l'installation de Adobe Photoshop Elements 9 pour trouver où et comment installer le composant TWAIN qui était précédemment installé avec l'application pour les versions antérieures à Photoshop Elements 9. Important : Ne déplacez pas les fichlers d'extension des versions précédentes de Photoshop Elements dans le dossier Photoshop Elements 9 > Plug-Ins, ne réglez pas non plus le dossier Photoshop Elements 8 (ou version antérieure) > Plug-In comme dossier d'extensions supplémentaires dans vos Préférences. Trouvez les informations complètes sur le site Internet officiel d'Adobe : http://kb2.adobe.com/cps/849/cpsld\_84933.htmlMacintosh
Pour installer le module d'extension TWAIN patrimonial pour Macintosh, copiez le dossier d'extension TWAIN de : //Applications/Adobe Photoshop Elements 9/Optional Plug-Ins/ImportModules/ Dans://Applications/Adobe Photoshop Elements 9/Locales/Windows
Pour installer le module d'extension TWAIN Legacy pour Windows, copiez le dossier twain\_32.8ba de : C:\Program Files\Adobe\Photoshop Elements 9\Optional Plug-Ins\Import-Export\ Dans : C:\Program Files\Adobe\Photoshop Elements 9\Locales\Windows 64 bits
Photoshop Elements 9 est une application 32 bits. Lorsque vous l'installez sur une version 64 bits de Windows, le chemin n'est pas tout à fait le même. Pour installer le module d'extension TWAIN Legacy pour Windows, copiez le dossier twain 32.8ba de : C:\Program Files (x86)\Adobe\Photoshop Elements 9\Optional Plug-Ins\Import-Export\ Dans : C:\Program Files (x86)\Adobe\Photoshop Elements 9\Locales\Installation du matériel
a. Branchez le scanneur de diapositives sur une source d'alimentation. 1. Trouvez le bouton d'alimentation qui est situé sur le bord gauche inférieur du scanneur. Assurez-vous que le scanneur est ETEINT. Arrêt   2. Branchez EN PREMIER l'adaptateur CA sur une prise de courant CA avant de le brancher sur le scanneur. 3. Branchez le câble USB sur l'ordinateur en utilisant l'extrémité USB standard. Branchez l'extrémité de l'adaptateur USB du câble sur le panneau arrière du scanneer,Fonctions supplémentaires
CrystalScan 7200
1. Couvercle 2. Support de diapo 3. Compartiment de film 4. Scan à un bouton 5. Relâchez le commutateur 6. Fenêtre d'observation  1. CC 2. Port USB 3. Interrupteur ProScan 7200
1. Scanner 2. Porte-diapositives 3. Passe-vues 4. Scan à un bouton 5. Amière de l'appareil 6. Fenêtre d'observation text_image
1 2 3text_image
Technical diagram showing three labeled components with numbered callouts and arrows indicating direction or movement.Permet de scanner le film (Film & Diapositive montées) CrystalScan 7200
Diapositives montées 1. Ouvrez le couvercle du scanner (1). 2. Relâchez la/le diapositive/Passe-vues (5) placez-la/le "face brillante vers le haut" puis fermez le porte-diapositive. 3. Fermez le couvercle du scanner (1) (optionnel). 4. Prêt à scanner.  Bout de pellicule 1. Ouvrez le couvercle du scanner (1). 2. Relâchez le Porte-diapositives (5). 3. Placez le film que vous souhaitez scanner au centre de la fenêtre d'observation (6). 4. Pressez la vue du film vers le bas puis fermez le porte-diapositives. 5. Prêt à scanner.  ProScan 7200 natural_image
Line drawing of a rectangular electronic device with a slot and connector (no text or symbols)Permet de scanner les diapositives montées
1. Diapositives montées 1-1. Placez les diapositives montées dans le porte diapositives, face brillante vers le haut 1-2. Insérez le porte-diapositives dans le scanner avec la flèche face vers le haut 1-3. Insérez le porte-diapositives dans le scanner depuis le côté gauche ou du côté droit.ProScan 7200 - Scan des diapositives (Suite....)
text_image
Incorrect You will loose image data Correct Insertionnatural_image
Line drawing of a rectangular electronic device with a mounting bracket and connector (no text or symbols)Permet de scanner les bandes de négatifs de film
2-1. Placez le négatif dans le porte-diapositives en vous assurant que les vues du film soient alignées avec les cadres du porte-diapositives et avec la face brillante vers le haut.2-2 Fermez le passe-vues
2-3. Insérez le Passe-vues dans le scanner du côté gauche ou du côté droit, avec la flèche face vers le haut. natural_image
Technical line drawing of a mechanical component with a magnified inset showing a circular detail (no text or symbols)natural_image
Line drawing of a printer with paper feed (no text or symbols)Scan à un bouton
1. Ouvrez la CyberView (lire page 12 pour obtenir le programme de commandes CyberView) 2. Configurer les réglages de scan (voir page 13) 3. Choisissez le dossier Scanner dans, le format du fichier (TIF ou JPG, une fois configuré, appuyez sur le bouton du scanneer) pour commencer à scanner. CrystalScan 7200 Bouton à touche unique  ProScan 7200 Bouton à touche unique  text_image
CyberView X5 de balayage à C:\Users\gif\Documents\image001.tif Type de film: Positf 135 Résolution: 1000 dpi MagicTouch: Off 5.11.00 1.03 54 AnnulerCOMMENT FAIRE POUR SCANNER DES DIAPOS
ETAPE 1 - Obtenir le pilote
(Utilisateur d'un PC) Ouvrez CyberView X 5 à partir de Démarrer – Tous les programmes – CyberView (Utilisateur d'un MAC) Ouvrez le Disque Dur Macintosh - Applications - CyberViewETAPE 2 - Choisir le type de film
Choisissez le type du film à scanner - Positive, négative ou N&B (Noir et Blanc). ETAPE 3 – Pré-scan optionnel
Choisissez "Prescan Current Frame" (Pré-scanner l'image actuelle) pour pré-scanner la diapo installée dans le scanner, ou "Prescan..." (Pré-scanner...) pour pré-scanner une ou plusieurs diapos dans certains endroits du magasin. text_image
Numériser Aperçu Ajustement de l'image Fenêtre Aide Prénomériser ▶ Prénomériser la prise courante Numériser ▶ETAPE 4 – Régler les réglages de scan
a. Résolution La résolution de scan par défaut est 1000dpi, les autres options pour la résolution sont listées ci-dessous. Remarque : Des hautes résolutions prendront plus de temps et plus d'espace sur le disque dur. b. Profondeur des couleurs Choisissez entre 8 et 16 bits. Une haute profondeur de couleur donnera plus de couleurs sur l'image finale scannée. La profondeur de couleur de Scanner du film est de 48 bits en couleurs réelles. Cela produira des images en couleur 24 ou 48 bit, 8 bits ou 16 bis par canal de couleur Rouge, Vert et Bleu. Cela produira des images en couleur 24 ou 48 bit, 8 bits ou 16 bis par canal de couleur Rouge, Vert et Bleu. Exemple : Mode 8 bit = 8 Rouge, 8 Vert, et 8 Bleu soit un total de 24 bit couleur Mode 16 bit = 16 Rouge, 16 Vert, et 16 Bleu soit un total de 48 bit couleur text_image
Paramètres de numérisation Numérouer Personnalisé 1000 ppp Largeur Hauteur 1346.35 910.00 Profondeur de couleurs : 8 DT <text_image
Résolution de scan 300dpi 8 bit 24-bit - 350Kb 600dpi 8 bit 24-bit - 1MB 1800dpi 8 bit 24-bit - 12MB 3600dpi 8 bit 24-bit - 52MB 7200dpi 8 bit 48-bit - 208MBETAPE 5 – Régler les préférences de scan
Sélectionner Scan - Préférence - Type de film - Réglage de scan  text_image
Paramètres de numérisation | Paramètres associés | Zone de numérisation par défaut | ICS/200/60N Résolution de prénomérisation 300 PPR 600 PPR Mépartaire: C:\Users\gfp(Documents) nom de fichier de base: image Parcourt... Préfondueur de couleurs : 8 bbs Mode de numérisation : Quaïté Numéro d'ordre après nom de fichier de base Diffres: 0 Options: Utilier un numéro de départ personnalis 1 Type de ficher: 15 Quaïté 2006: 90 Example de nom de ficher: Imaje101.17text_image
Répertoire: C:\Users\g\Documents\ Nom de fichier de base: image Parcourir... ✓ Numéro d'ordre après nom de fichier de baseRégler les préférences de scan (suite...)
4. Options - Utiliser index de film : Utilise le numéro assignée à la diapo, en fonction de sa position dans le magasin. 5. Numéro de début défini par l'utilisateur : Entrez un numéro de début spécifique. Choisissez le type de fichier, "TIF" ou "JPG". TIF non compressées ou JPG compressées. Choisissez la qualité de l'image en JPEG. (20-100) 100 donne le moins de compression  Réglage avancé – Utilisateurs de PC Paramètres de numérisation | Paramètres avances | Zone de numérisation par défaut | ICE/ROC/GEM Exposition auto  Réglage avancé - Utilisateurs de Intel Mac text_image
Paramètres de numérisation Paramètres auxifs Zone de numérisation par défaut Retouche mapique / Couleurs auto Exposition auto Réduction du brut numinique Intensité 0 100 200 Équilibre auto Contrésire autoRésolution de scannage par défaut
Ajuste la taille du scan et ajuste le réglage "Scan Offest" (Décalage de scan) pour déplacer la position de l'image de la diapo. text_image
Paramètres de numérisation | Paramètres avances (Zone de numérisation par défaut) | ICE/ROC/GEN Activer le réglage utilisateur pour le rognage auto Largeur Houteur Taille de numérisation 3.767667 2.429033 Default Déclappe X Déclappe Y Déclappe de numérisation 0.000000 0.000003 Default Obléant le valeur de Roignage courantietext_image
Paramètres de numérisation | Paramètres avances | Zone de numérisation par défaut ICE/ROC/GEM □ ICE numérique ✓ Activever GEM 75 □ Activever ROC 75text_image
Paramètres de numérisation Paramètres avancés Zone de numérisation par défaut l'étausche magique / Couleurs auto Magic Touch Couleurs autoETAPE 6 - Scan (Scanner)
Scan (Scanner) - Scan (Scanner) - Scanner l'image actuelle text_image
Numériser Aperçu Ajustement de l'image Fenêtre Aide Prénomériser ▶ Numériser la prise courante Numériser ▶ 150 300text_image
CyberView X5 de babayage à C:\Users\pf\Documents\image001.tif Type de firme Postif 125 Résolution: 1000 dpi MagicTouch: Off 5.11.00 1.03 54 AnnularETAPE 7 - Quitter
Sélectionnez "Scan > Exit" (Scan > Quitter) pour fermer le pilote. Les fichlers d'image scannés peuvent être ouverts/édités avec n'importe quel logiciel d'édition d'image. text_image
CyberView XS Appliquer la résolution de numérisation courante aux paramètres par défaut ? (Ce paramètre peut aussi être cefni dans la boîte de dialogue Préférences.) Oui Non AnnulerINTERFACE UTILISATEUR
text_image
Cyberlave 90 Numéries: Abergé Ajustement de l'image: Ténête: Axle Posif 135 Pm 450 300 150 200 600 Paramette de numérisation: Nungseur Poucomate Largeur 1340.30 Haurur 910.00 Profondeur de couleur: Avardé>> Mocs de numérisation Qualité informations Gauche : 70 Haut : 23 Largueur : 1340.30 pxl Haureur : 910.00 pxl Talle : 3.51 M0 R-9 Y 8 E 20 X-508 Y 163 Export Échelle de room 20% Envelopmien: 1 [Sélecteurs] R-9 Y 8 E 20I. Section de la fenêtre principale [Fenêtres fixes]
Commandes du menu - Scanner
Prescan (Préscan) - Préscanner le cadre actuel: Préscanner la diapositive existante. Scan (Scanner)- Scanner le cadre actuel > Scanner la diapositive actuelle. text_image
Numériser Aperçu Ajustement de l'image Fenêtre Aide Prénomériser ▶ Numériser ▶ Numériser la prise courante 150 300Commandes de menu -
Prévisualiser
Fonctions Zoom, Tourner & Retourner. Retourner
Annule toutes les modifications et restaure l'image à son état original.Préférence - Voir les réglages de Scan (Voir page 13)
Quitter
Ouvre l'interface d'utilisateur de CyberView X5. Un message s'affichera "Quit the application prompts to save documents?" (Vous quittez l'application, enregistrer les documents ?). Cliquez sur "Yes" (Oui) pour enregistrer, "No" (Non) pour annuler le réglage ou "Cancel" (Annuler) pour retourner à Cyber View X. text_image
CyberView X5 Aplicquer la résolution de numérisation courante aux paramètres par défaut ? (Ca paramètre peut aussi être défini dans la boîte de dialogue Préférences.) Out Non AnnulerCommandes de menu - Ajustement de l'image
a. Image Adjustment (Ajustement d'image) 1. Variations : Donne différentes vues de l'image avec des options pour changer les accentuations, les tons moyens etc. text_image
Ajustement de l'image Fenêtre Aid Variations... Équilibre des couleurs... Courbes et niveaux...text_image
Ajustement de l'image Variations Equilibre des couleurs Courbes et niveau Original Plus vert Plus clay Plus jaune Plus cyan Sélection courante Plus rouge Plus bleu Plus foncé Plus magenta Appliquer à toutes les images R30 G01 R09 X09 Y03 OK Annulertext_image
Adjustment de l'image Variations Equilibre des couleurs Courtes et niveaux Avant Après Luminosaté + Oren Rough Contraste + Magenta Vuit Saturation + Jaune Bleu Appliquer à toutes les images R:321 G:305 E:165 X:262 Y:0 OK Annulertext_image
Ajustement de l'image Variations | Équilibre des couleurs | Courbes et niveaux | Avant Après Canel RVB Appliquer à toutes les images R:35 6:46 8:35 X:0 Y:235 OK AnnularCommandes de menu - Fenêtres
1. Réglage de l'exposition : Pour ajuster le temps d'exposition (R, V, B), appuyez sur "Réinitialiser" pour restaurer les réglages par défaut. text_image
CyberView X5 50% 200% R 100 % G 100 % B 100 % Réinitialiser FermerCommandes de menu - Aide
- Mise à jour : Firmware : Met à jour la version du firmware, choisissez le chemin où le fichier de mise à jour du firmware a été enregistré. (Ces fichiers peuvent être téléchargés sur notre site Web) - A propos de :Affiche des informations sur le système (y compris le système d'exploitation, CPU), des informations sur le produit (y compris le nom du produit, le nom du modèle, la version du firmware, la version du logiciel, des informations sur l'appareil y compris l'interface et la résolution optique).Diagramme de barre des fonctions
Veuillez choisir votre type de film et votre marque dans la barre d'outils:Positive
Negative (Négative) (connue aussi comme diapositive) en Black and White (Noir et blanc) II. Section Fenêtre de prévisualisation [Fenêtres fixes]
 Pré-scanner : Pré-scanne le film actuel, appuyez sur le bouton ▼ déroulant pour plus d'options.  Scanner : Scanne le film actuel, appuyez sur le bouton ▼ déroulant pour plus d'options.  Réglage de l'image :Appuyez sur le bouton ▼ déroulant pour plus d'options. text_image
PhotoView 15 Métérés : Apreju - Aquimont de l'Image - Pardine - Aide Position 130 µm 110 300 120 100Diagramme de barre d'outil
 Sélectionner zone de scan : plus d'une sélection peut être faite à la fois. Zoom avant : Pour agrandir l'image à l'endroit où le curseur est situé. L'image sera agrandie avec chaque clic jusqu'au niveau maximum (1000%). Zoom arrière : Pour réduire la taille de l'image affichée, cliquez sur le curseur Zoom arrière sur la partie désirée, l'image sera réduite à moitié avec chaque clic jusqu'au maximum (25%). Rotation 90 gauche : Pour tourner l'image par 90 degrés vers la gauche.  Rotation 90 droite : Pour tourner l'image par 90 degrés vers la droite. Retourner horizontalement : Pour retourner l'image horizontalement par 180 degrés. Retourner verticalement : Pour retourner l'image verticalement par 180 degrés. Restaurer : Annule toutes les modifications et restaure l'image à son état original dans la fenêtre de prévisualisation.Ligne d'état
Dans le coin inférieur gauche, le niveau de couleur (RVB : rouge, vert, bleu) et les coordinnées de l'emplacement (ex. : I) sont affichés. Le niveau du zoom, l'emplacement du magasin actuel et le nombre de zone sélectionnées pour le scan (2 ou plus indique : Multiples zones de scan sur une diapositive [ex : II]).    Exposition R: 100% V: 100% B: 100% Echelle de zoom: 100% Emplacement: 1 Sélections: 1III. Zone de réglage d'image active
III. Scanner la zone de réglages [Fenêtres flottantes]
Mode Normal [ex : l] pour entrer les paramètres basiques du scanneur (y compris la résolution, la taille du film, la profondeur des couleurs). Mode Avancé [ex : ll] permet d'entrer le paramètre de sortie du scanner, la résolution du scanner, et la profondeur de couleur.  text_image
Paramètres de numérisation Numériser Personnalisé 1000 PPP Largeur Hauteur 1346.36 910.00 Profondeur 8 bit de couleurs : Avancé>> Mode de numérisation Qualité Informations Gauche : 70 Haut : 23 Largeur : 1346.36 pxl Hauteur : 910.00 pxl Taille : 3.51 Motext_image
Paramètres de numérisation Numériser Personnalisé 1000 PPP Largeur Hauteur 1346.36 910.00 Profondeur 8 bit de couleurs : <ASSISTANCE TECHNIQUE
CyberView
Pour plus d'informations sur le scanneur de film et le pilote de CyberView, veuillez visiter www.reflecta.deLogiciel d'application intégré
Vous pouvez vous reporter à la fonction AIDE sur la barre du menu d'application ou visitez le site Internet du logiciel de l'entreprise. ^** Ce manuel de l'utilisateur a été archivé dans le CD fourni.CyberView Manuale
X5SF dell'utente
ITALIANODICHIARAZIONE FCC (FEDERAL COMMUNICATIONS COMMISSION)
Questo apparecchio è stato testato ed è risultato conforme ai limiti relativi ai dispositivi digitali di Classe B, ai sensi della Parte 15 delle Norme FCC. Questi limiti sono designati a fornire una protezione ragionevole da interferenze dannose in un'installazione residenziale. Questo apparecchio genera, usa e può irradiare energia a radiofrequenza e, se non è installato e usato in conformità alle istruzioni, può interferire negativamente con le comunicazioni radio. Non vi è tuttavia garanzia che non si manifestino interferenze in installazioni particolari. Se questo apparecchio provoca interferenze dannose alla ricezione radio o televisiva, che possono essere determinate accendendo o spegnendo l'attrezzatura, l'utente è incoraggiato a cercare di correggere l'interferenza adottando una o più delle seguenti misure: - Cambiare l'orientamento o riposizionare l'antenna ricevente. - Aumentare la distanza tra l'apparecchio ed il ricevitore. - Collegare l'apparecchio ad una presa di un circuito differente da quello a cui è connesso il ricevitore. - Consultare il rivenditore o un tecnico specializzato radio/TV per assistenza.Avvertenza:
Utilizzare esclusivamente cavi di segnale schermati per collegare dispositivi I/O a questo apparecchio. Cambiamenti o modifiche non espressamente approvati dalla parte responsabile alla conformità possono annullare l'autorità dell'utente all'uso di questo apparecchio.INDICE
OPERAZIONI PRELIMINARI....5 GUIDA DI INSTALLAZIONE RAPIDA (QIG)....7 INSTALLAZIONE DI SOFTWARE E DRIVER....7 Installazione di hardware 9 Funzioni supplementari 9 Scarsione con un caso ......12 COME ESEGUIRE LA SCANSIONE DI DIPOSITIVE .... 13 FASE 1 – Acquisizione del driver....13 FASE 2 – Selezione del tipo di pellicola ....13 FASE 3 – Prescansione opzionale....13 FASE 4 – Impostazioni di scansione ....14 FASE 5 – Preferenze di San (scansione) 15 FASE 6 – Scansione....18 FASE 7 – Uscita....18 INTERFACCIA UTENTE 19 I. Area finestra principale....20 Comandi del menu - Scan (Scansione) 20 Comandi del menu - Anteprima 20 II. Area finestra di anteprima [finestre fisse]....24 III. Area di impostazione scansione [finestre mobili]....26 SUPPORTO TECNICO....27OPERAZIONI PRELIMINARI
Prima di iniziare, controllare il contenuto della confezione. Per un'installazione veloce, consultare la Guida di installazione rapida (rif. pag. 9)  Important! Conservare la confezione originale, la ricevuta e il materiale di imballaggio per un'eventuale restituzione dell'apparecchio.Contenuto della confezione
• Scanner per diapositive. • Supporto pellicole (laddove applicabile) • Adattatore di alimentazione [N. modello FAIRWAY: WRG 15F-120A]  Avvertenza! L'utilizzo di altri tipi di adattatori di alimentazione potrebbe danneggiare gravemente lo scanner e determinare l'annullamento della garanzia del prodotto. • Cavo di alimentazione. Cavo USB 2.0. • Driver CyberView X5. • DVD del software di applicazione. • Manuale utente in formato cartaceo.NOTA:
\- Per software di applicazione si intende un software di immagine come Adobe® Photoshop® Elements, che è soggetto a modifiche senza preavviso.GUIDA GENERALE:
- Utilizzare solo il cavo USB in dotazione. Collegare il computer direttamente allo scanner con il cavo USB 2.0. - Non utilizzare un hub o una prolunga. Utilizzare solo le porte USB situate sulla parte posteriore dei computer. - Se vi sono altri dispositivi (multifunzione, stampanti, scanner, webcam) collegati al computer tramite USB, scollegarli. - È necessario minimo 1 GB di RAM (Windows/Mac).Intervallo di temperatura ambientale di funzionamento: da 10° a 40°C
Nota: Non accendere lo scanner se la temperatura non rientra nel suddetto intervallo. Se lo scanner è stato conservato o trasportato in un ambiente a temperature che non rientrano nel suddetto intervallo, prima di accenderlo, attendere finché non si ristabilisce la giusta temperatura.Intervallo di umidità ambientale di funzionamento: dal 15% al 76% (senza condensa)
Nota: Se lo scanner è conservato o trasportato in condizioni di bassa temperatura e poi viene introdotto in un ambiente caldo/umido, potrebbe formarsi della condensa. Questo dispositivo è stato progettato esclusivamente per uso privato e non è destinato all'uso commerciale. La garanzia viene ridotta da 2 anni a 1 anno se si verificano errori o difetti derivanti da uso non corretto, funzionamento improprio o sollecitazioni. Il periodo di validità della garanzia del dispositivo per uso privato è di 2 anni o 20.000 scansioni.GUIDA DI INSTALLAZIONE RAPIDA (QIG)
L'INSTALLAZIONE DI SISTEMI WINDOWS DURANTE L'INSTALLAZIONE DEL DRIVER POTREBBE FAR APPARIRE UNA FINESTRA DI DIALOGO DI AVVERTENZA. IN TAL CASO, SELEZIONARE "INSTALL THIS DRIVER ANYWAYS" (INSTALLARE COMUNQUE IL DRIVER).  Assicurarsi di installare il software di applicazione PRIMA di installare il driver CyberView X 5.0 dello scanner. È possibile installare il driver dello scanner direttamente se sul computer si è già installato il software di applicazione compatibile TWAIN. Gli utenti Mac possono utilizzare iPhoto per l'editing.Avviso:
1. Nella finestra "Found New Hardware Wizard" (Installazione guidata nuovo hardware), selezionare "Search automatically or Browse computer for driver software" (Cerca automaticamente o cerca sul computer il software del driver). 2. Nella finestra "Completing the Found New Hardware Wizard" (Completamento dell'installazione guidata nuovo hardware in corso), fare clic su "Finish" (Fine). NOTA: Non tutti i PC visualizzano la finestra "Found New Hardware Wizard" (Installazione guidata nuovo hardware). Alcuni eseguono l'installazione nello sfondo.INSTALLAZIONE DI SOFTWARE E DRIVER
Prima di installare il driver dello scanner. Se si sceglie di utilizzare l'applicazione fornita per l'editing dell'immagine, Installare il software di applicazione (ad esemplo: Adobe® Photoshop® Elements) inserendo il CD di applicazione nell'unità CD/DVD del computer. Osservare le istruzioni visualizzate in una finestra che si apre automaticamente.Installazione del driver dello scanner
a. Inserire il CD del driver nell'unità CD/DVD del computer ed esplorare i contenuti. b. Fare doppio clic sull'icona "CyberView X 5.0" per avviare la procedura di installazione. Osservare le istruzioni su schermo per completare la procedura di installazione. NOTA: Assicurarsi che lo scanner NON sia collegato al computer durante l'installazione del driver CyberView X 5.0. c. Al termine della procedura di installazione, riavviare il computer. Nota: Quando si installa lo scanner su un sistema Windows su cui sono già installati un altro scanner flatbed USB o un multifunzione scanner/fotocopiatrice/stampante, potrebbe essere necessario scollegare l'altro scanner dalla porta USB per un corretto funzionamento dello scanner di pellicole.Guida di installazione plug-in scanner TWAIN per Adobe Photoshop Elements 9
Il plug-in scanner TWAIN non è più installato con Photoshop Elements 9. Per poter importare lo scanner tramite Adobe Photoshop Elements, osservare le istruzioni di seguito dopo l'installazione di Adobe Photoshop Elements 9 per trovare dove e come installare il componente TWAIN precedentemente installato con l'applicazione nelle versioni precedenti di Photoshop Elements 9. Importante: Non spostare I plug-in delle precedenti versioni di Photoshop Elements nella cartella Photoshop Elements 9 > Plug-Ins (Plug-in) e non impostare la cartella Photoshop Elements 8 (or earlier) (Photoshop Elements 8 (o precedente)) > Plug-In (Plug-in) come Additional Plug-Ins Folder (Cartella plug-in supplementari) in Preferences (Preferenze). Per Informazioni complete, consultare il sito web Adobe ufficiale sul sito: http://kb2.adobe.com/cps/849/cpsid\_84933.htmlMacintosh
Per installare il plug-in TWAIN legacy per Macintosh, copiare la cartella del plug-in TWAIN da: //Applications (Applicazioni)/Adobe Photoshop Elements 9/Optional Plug-Ins (Plug-in opzionali)/ImportModules (Importa moduli)/ A: //Applications (Applicazioni)/Adobe Photoshop Elements 9/Locales (Locali)/Windows
Per installare II plug-in TWAIN legacy per Windows, coplare twain\_32.8ba da: C:\Program Files (Programmi)\Adobe\Photoshop Elements 9\Optional Plug-Ins (Plug-in opzionali)\Import-Export (Importa/Esporta)\ A: C:\Program Files (Programmi)\Adobe\Photoshop Elements 9\Locales (Locali)\Windows 64 bit
Photoshop Elements 9 è un'applicazione a 32 bit. Se viene installata su una versione a 64 bit di Windows, il percorso varia leggermente. Per installare il plug-in TWAIN legacy per Windows, copiare twain\_32.8ba da: C:\Program Files (x86) (Programmi (x86))\Adobe\Photoshop Elements 9\Optional Plug-Ins (Plug-in opzionali)\Import-Export (Importa/Esporta)\ A: C:\Program Files (x86) (Programmi (x86))\Adobe\Photoshop Elements 9\Locales (Locali)\Installazione di hardware
a. Collegare lo scanner per diapositive alla presa di rete. 1. Individuare l'interruttore di alimentazione sul lato inferiore sinistro dello scanner. Assicurarsi che lo scanner sia SPENTO. Off  2. Inserire l'adattatore CA in una presa di rete CA PRIMA di inserirlo nello scanner. 3. Collegare il cavo USB al computer utilizzando l'estremità dell'adattatore USB standard. Collegare l'estremità dell'adattatore USB del cavo al pannello posteriore dello scanner.Funzioni supplementari
CrystalScan 7200
1. Coperchio. 2. Supporto diapositive 3. Deck pellicole 4. Scansione con un tasto 5. Interruttore di rilascio 6. Finestra di visualizzazione  1. Ingresso CC 2. Porta USB 3. Interruttore di alimentazione ProScan 7200
1. Scanner 2. Supporto diapositive 3. Supporto pellicole 4. Scansione con un tasto 5. Parte posteriore dell'unità 6. Finestra di visualizzazione       Per eseguire la scansione di pellicole (pellicole e diapositive montate) CrystalScan 7200 Diapositive montate 1. Aprire il coperchio dello scanner (1). 2. Rilasciare il supporto pellicole/diapositive (5), inserire la diapositiva con il "lato lucido verso l'alto", quindi chiudere il supporto diapositive. 3. Chiudere il coperchio dello scanner (1) (opzionale). 4. Pronto per la scansione. Negativi
1. Aprire il coperchio dello scanner (1). 2. Bilasciare il supporto diapositive (5). 3. Posizionare la pellicola di cui eseguire la scansione al centro della finestra di visualizzazione (6). 4. Premere verso il basso la cornice della pellicola e chiudere il supporto diapositive. 5. Pronto per la scanslone.  ProScan 7200 natural_image
Line drawing of a rectangular electronic device with a handle and mounting bracket (no text or symbols)text_image
Incorrect You will loose image data Correct Insertionnatural_image
Line drawing of a rectangular electronic component with a mounting bracket and connector pin (no text or symbols)natural_image
Technical line drawing of a structural component with a magnified inset showing a circular detail (no text or symbols)natural_image
Line drawing of a printer with paper feed and paper clip (no text or symbols)Scansione con un tasto
1. Aprire CyberView (vedere pag. 12 per acquisire il programma del driver CyberView) 2. Configurare le impostazioni di scansione (vedere pag. 13) 3. Selezionare la scansione sulla directory, il formato file (TIF o JPG). Una volta eseguita la configurazione, premere il tasto dello scanner ⚙ per avviare la scansione. CrystalScan 7200  ProScan 7200 Tasto a sfioramento  text_image
CyberView X5 scansione C:\Users\gf\Documents\image001.tif Tipo di pellicola: Positivo 135 Risoluzione: 1000 dpi MagicTouch: Off 5.11.00 1.03 54 AnnullaCOME ESEGUIRE LA SCANSIONE DI DIPOSITIVE
FASE 1 - Acquisizione del driver
(Per utenti PC) Aprire CyberView X 5 da Start – All Programs (Tutti i programmi) – CyberView (Per utenti MAC) Aprire Macintosh Hard drive (Disco rigido Macintosh) – Applications (Applicazioni) – CyberViewFASE 2 – Selezione del tipo di pellicola
Selezionare il tipo di pellicola da digitalizzare - Positive (Positivo), Negative (Negativo) o B&W (B&N) (bianco e nero). text_image
Scansione Anteprima Positivo 135 Fil ✓ Positivo Negativo B/NFASE 3 – Prescansione opzionale
Selezionare "Prescan Current Frame" (Esegui prescansione fotogramma attuale) per eseguire la prescansione della diapositiva attualmente caricata nello scanner o "Prescan..." (Prescansione...) per eseguire la prescansione delle diapositive situate in posizioni specifiche del caricatore. text_image
Scansione Anteprima Regolazione immagine Finestra Guida Prescansione ► Prescansione fotogramma attuale Scansione ► 150 200FASE 4 - Impostazioni di scansione
a. Risoluzione La risoluzione di scansione predefinita è 1000 dpi; le opzioni di risoluzione supplementari solo elencate di seguito. Avviso: Più elevate sono le risoluzioni di scansione maggiori saranno il tempo di scansione e lo spazio necessario su disco. b. Profondità colore Scegliere tra 8 e 16 bit. Più elevata è l'impostazione della profondità di colore maggiore sarà la gamma di colori nell'ultima immagine digitalizzata. La profondità di colore dello scanner pellicole è colori reali a 48 bit. Il software di scansione è in grado di selezionare modalità di colore a 8 o 16 bit durante la scansione. Ciò produrrà immagini a colori a 24 o 48 bit, 8 bit o 16 bit per canali di colore rosso, verde e blu. Esempio: Modalità a 8 bit = 8 rosso, 8 verde e 8 blu per un totale di colori a 24 bit Modalità a 16 bit = 16 rosso, 16 verde e 16 blu per un totale di colori a 48 bit text_image
Impostazione Preferenze di Scansione Scansione Personalizzata 1000 DPI Larghezza Altezza 1346.36 910.00 Profondità 8 bit colore: <| Risoluzione di scansione | Profondità di colore (per canale RGB) | Modalità colore | Dimensioni file TIFF (senza compressione) |
| 300 dpi | 8 bit | 24 bit | ~350 Kb |
| 600 dpi 8 bit 24 bit -1MB | |||
| 1800 dpi 8 bit 24 bit ~12MB | |||
| 3600 dpi 8 bit 24 bit ~52 MB | |||
| 7200 dpi 8 bit 48 bit ~208MB | |||
FASE 5 – Preferenze di San (scansione)
Selezionare Scan (Scansione) - Preference (Preferenze) - Film Type (Tipo di pellicola) - Scan Setting (Impostazione scansione)  text_image
Importazione Preferenze di Scanzione Risoluzione prescizione 300 DPI 600 DPI Preferenza: colore: 9 DE Qualità scanzione: Alta Importazioni avvatten: Area di scanzione predefesa: ICE/800/GBM Persicenza: C:\Autolog\Inocumento Radio nome file: image Suffizi per numerazione fotogrammi One: 1 Obzoni: Numero di partenza: Tipo di file: TIF Qualità INES: 50 Esempio di nome file: image01.tifPreferenze di scansione (segue...)
4. Options - Use Film Index (Opzioni - Usa indice pellicola): Utilizzare il numero assegnato alla diapositiva in base alla sua posizione nella cartuccia. 5. User Defined Start Number (Numero iniziale definito dall'utente): Inserire un numero iniziale specifico Scegliere il tipo di file: "TIF" o "JPG". (TIF non compresso o JPG compresso) Scegliere una qualità di immagine per JPEG. (20-100). 100 offre la quantità minore di compressione  Impostazione avanzata - Utenti PC text_image
Impostazione Preferenze di Scansione Impostazioni avanzato Area di scansione predefinita ICE/ROC/GEM ✓ Esposizione automatica Riduzione software dei rumore digitale Intensità 0 100 200text_image
Impostazione Preferenze di Scansione Impostazioni automatica Area di scansione predefinita MagiTouch/AutoColor Esposizioni automatica Bilanziamento automatico Contrasto automatico Riduzione software del rumore digitale Intensità 100 0 200text_image
Importazione Preferenze di Scandere | Importazioni avvizzate | Area di scandere predefinita | ICF/ROO/GSM □ Importazione personalizzata taglio automatico Langhezza Altozza Dimensione di scandere 0,767667 2,428933 Prodettato Offset X Offset Y Offset discarsone 0,000302 0,000320 Prodettato Offset ed importati valori del attuale tagliotext_image
Importazione Preferenze di Scansione | Importazioni avanzate | Area di scansione predefinita □ Digital ICE ✓ Abita GBM 75 □ Abita ROC 75text_image
Impostazione Preferenze di Scansione Impostazioni avanzate Area di scanzione predefinita MagicTouch/AutoColor Magic Touch Blanciamento Colori automaticoFASE 6 - Scansione
Scan (Scansione) - Scan (Scansione) - Scan Current Frame (Scansione fotogramma attuale) text_image
Scansione Anteprima Regolazione immagine Finestra Guida Prescansione Scansione Scansione fotogramma attuale 150 300text_image
CyberView X5 Scarsere C:\Users\iff\Documents\Image061.Off Tipo di psitica: Postvo 135 Raduzione: 1000 dpi MagicTouch: Off S.11.00 1.02 S4 AnnulbFASE 7 - Uscita
Selezionare "Scan (Scansione) > Exit (Esci)" per chiudere il driver. È possibile aprire/modificare i file immagine digitalizzati con qualsiasi software di editing immagine. text_image
CyberView X5 Applicare la risoluzione di scansione attuale alle impostazioni predefinite? (Questa impostazione può essere fatta anche nella finestra di dialogo Preferente). Si No Annullatext_image
C:\View/X5 Scantione: Anteprima Regolazione immagine - finestre Guida Positive 135 fim 600 Importazione Pericenza di Scantione Scantione: Personalizzata 1000 dpi Laghezza Altazza 9.0.00 1346.35 8 bit Profondità Color: Avanzizze >> Qualità Alte Information: Offset Laterale (X): 70 Offset Verticale (Y): 23 Larghezza 1346.26 px Altazza: 910.00 px Dimensione: 3.51 MB F.E. G.D. E. X:578 Y:228 Epage Scale di timere-100% Positonzumento: Sellings3I. Area finestra principale
Comandi del menu - Scan (Scansione)
Prescan (Prescansione) - Prescan Current Frame (Esegui prescansione fotogramma attuale): Prescansione della diapositiva attuale. Scan (Scansione) - Scan Current Frame (Scansione fotogramma attuale) > Eseguire la scansione della diapositiva attuale. text_image
Scansione Anteprima Regolazione immagine Finestra Guida Prescansione Scansione Scansione fotogramma attuale 150 300Comandi del menu -
Anteprima
Funzioni Zoom, Rotate (Ruota) e Flip (Capovolgi) Revert (Ripristina)
Consente di eliminare tutte le modifiche e ripristinare lo stato originale dell'immagine.Preferenze - Vedere Scan Setting (Impostazione scansione) (vedere pag. 13)
Exit (Esci)
Chiude l'interfaccia utente di CyberView X5. Quando viene visualizzato il messaggio a comparsa "Quit the application prompts to save documents?" (Uscire dai prompt dell'applicazione per salvare i documenti?), fare clic su "Yes" (Si) per salvare, "No" per ignorare le impostazioni attuali o text_image
CyberView X5 Applicare la risoluzione di scansione attuale alle impostazioni predefinita? (Questa impostazione può essere fatta anche nella finatra di dialogo Preferenze). Si No AnnulataComandi del menu - Image Adjustment (Regolazione immagine)
a. Image Adjustment (Regolazione Immagine) 1. Variations (Variazioni): Genera diverse visualizzazioni dell'immagine con le opzioni per apportare modifiche alle luci, ai mezzitoni, ecc. text_image
Regolazione immagine Finestra G Variazioni tonali... Bilanciamento colore... Curve e livelli...text_image
Regolazione immagine varrazioni | Blandamento color | Curve e livelli Origrate Piu vertile Piu chano Piu gelo Merritani Fine Grossolano Piu cano Selta attuale Piu rozzo Piu blu Piu scuro Piu magenta Aplica a tutti i fotogiammi A:0 G:0 B:0 X:0 Y:0 OKtext_image
Regolazione immagine Variazioni | Boscamento color | Curve e level | Pima Dioso Luminata + Cano Rosso Contratto + Magenta Verde Saturazione + Grato Blu Applica a tutti i fotogrammi R14 G20 R15 X3 Y19 OK Annulatext_image
Regolezione immagine Variazioni | Biancamento colore | Curve e livelli Prima Dopo Canale RGB Applica a tutti i fotogrammi R:0 0:0 8:0 X:0 Y:0 OK AnnulaComandi del menu - Window (Finestre)
1. Exposure Setting (Impostazione di esposizione): Per regolare i tempi di esposizione (R, G, B), premere "Reset" (Ripristina) per ripristinare le impostazioni predefinite. text_image
CyberView X5 50% 200% R 100 % G 100 % B 100 % Ripristina ChiudiComandi del menu - Guida
- Update (Aggiorna): Firmware: Aggiorna la versione del firmware e seleziona il percorso di salvataggio del file del firmware (i file possono essere scaricati dal nostro sito web). - About (Informazioni): Visualizza le informazioni di sistema (tra cui sistema operativo e CPU) e le informazioni sul prodotto (tra cui nome del prodotto, nome del modello, versione hardware, versione firmware, versione software e informazioni sul dispositivo quali interfaccia e risoluzione ottica).Diagramma barra delle funzioni
Selezionare il tipo di pellicola e la marca dalla barra degli strumenti: Positive (Positivo) Negative (Negativo), (conosciuto anche come diapositiva) B&W (Bianco e nero) II. Area finestra di anteprima [finestre fisse]
 Prescansione: Prescansione della pellicola attuale; premere il tasto a discesa ▼ per altre opzioni.  Scansione: Scansione della pellicola; premere il tasto a discesa ▼ per altre opzioni.  Regolazione immagine: Premere il tasto a discesa ▼ per altre opzioni. text_image
CyberView 93 Scene: Antivirus - Reprod hormone immagine Photo: G Photo: 150 fps 10 100Diagramma barra degli strumenti
          Selezione area di scansione: È possibile effettuare più di una selezione per volta. Ingrandimento: Consente di ingrandire l'immagine in cui si trova attualmente il cursore. L'immagine viene ingrandita ad ogni clic finché non si ragglunge il multiplo massimo (1000%). Riduzione: Consente di ridurre le dimensioni dell'immagine visualizzata facendo clic sul cursore di riduzione nell'area desiderata. L'immagine si riduce della metà ad ogni clic finché non si raggiunge il multiplo minimo (25%). Rotazione di 90° a sinistra: Consente di ruotare l'immagine di 90 gradi in senso antiorario.  Rotazione di 90° a destra: Consente di ruotare l'immagine di 90 gradi in senso orario. Capovolgimento orizzontale: Consente di capovolgere l'immagine di 180 gradi in orizzontale. Capovolgimento verticale: Consente di capovolgere l'immagine di 180 gradi in verticale. Ripristino: Consente di eliminare tutte le modifiche e ripristinare lo stato originale dell'immagine nelle finestre di anteprima.Riga di stato
Nell'angolo inferiore sinistro, vengono visualizzati il livello di colore (RGB: rosso, verde, blu) e le coordinate della posizione [ad esempio: I]. Scala di zoom, posizione del caricatore per la diapositiva attuale e quantità di aree selezionate per la scansione (2 o più indica varie aree di scansione in una diapositiva [ad esempio: II]). 1. R:0 G:0 B:0 X:432 Y:291 II. Eposizione R:100% G:100% B:100% Scale d zoom:100% Poszionamento:1 Selezioni:1III. Area di impostazione scansione [finestre mobili]
Modalità Normal (Normale) [ad esempio: I] consente di inserire i parametri di base per la scansione (tra cui risoluzione scansione, dimensioni pellicola, profondità colore). Modalità Advanced (Avanzate) [ad esempio: II] consente di inserire i parametri di uscita scansione, risoluzione scansione e profondità colore. 1. text_image
Impostazione Preferenze di Scansione Scansione Personalizzata 1000 DPI Larghezza Altezza 1346.36 910.00 Profondità 8 bit colore: Avanzate>> Qualità Alta Informazioni Offset Laterale (X): 70 Offset Verticale (Y): 23 Larghezza: 1346.36 pxl Altezza: 910.00 pxl Dimensione: 3.51 MBtext_image
Impostazione Preferenze di Scansione Scansione Personalizzata 1000 DPI Larghezza Altezza 1346.36 910.00 Profondità 8 bit colore: <SUPPORTO TECNICO
CyberView
Per informazioni sullo scanner di pellicole e il driver CyberView, visitare il sito www.reflecta.de.Software di applicazione integrato
Consultare la funzione HELP sulla barra dei menu dell'applicazione o visitare il sito dell'azlenda produttrice. \*\*Questo Manuale dell'utente è presente anche sul CD in dotazione.CyberView X5SF Gebruikershandleiding
NEDERLANDSFCC-voorschriften (Federale communicatiecommissie)
Dit apparaat is getest en voldoet aan de beperkingen voor een digitaal apparaat klasse B, volgens deel 15 van de FCC-regels. Deze beperkingen zijn ontwikkeld om een redelijke beveiliging te bieden tegen schadelijke storingen in een residentiële installatie. Deze apparatuur genereert hoogfrequentie-energie en kan deze uitstralen. Als de apparatuur niet overeenkomstig de instructies wordt geïnstalleerd, kan dit storingen veroorzaken in de ontvangst van radio of televisie. Er kan echter geen garantie worden gegeven dat er geen interferentie zal optreden in een specifieke installatie. Mochten er schadelijke storingen optreden in radio- of televisieontvangst, hetgeen kan worden vastgesteld door de apparatuur uit en weer in te schakelen, dan kan de gebruiker proberen de storing te verhelpen door een of meer van de volgende maatregelen te nemen: - Draai de antenne totdat de storing stopt. - Vergroot de afstand tussen de apparatuur en de ontvanger. - Sluit de apparatuur aan op een ander circuit dan dat waar de ontvanger op is aangesloten. - Raadpleeg de dealer of een ervaren radio/tv-technicus voor ondersteuning.Waarschuwing:
Gebruik alleen afgeschemde kabels om I/O-apparaten aan te sluiten op deze ultrusting. Alle wijzigingen of aanpassingen die niet uitdrukkelijk zijn goedgekeurd door de partij die verantwoordelijk is voor de naleving, kunnen de bevoegdheid van de gebruiker om het apparaat te bedienen nietig verklaren.INHOUDSOPGAVE
Aan de slag 5 Snelle installatiegids 7 SOFTWARE EN STUURPROGRAMMA INSTALLEREN....7 Hardware installeren 9 Extra functies....9 Eenknops scan 12 DIA'S SCANNEN 13 STAP 1 open het stuurprogramma....13 STAP 2: selecteer het filmtype....13 STAP 3: optionele voorbeeldscan....13 STAP 4: scaninstellingen vastleggen 14 STAP 5: scanvoorkeuren vastleggen 15 STAP 6: Scan (Scannen)....18 STAP 7: afsluiten 18 GEBRUIKERSINTERFACE....19 1 Hoofdgebied venster 20 Menupdrachten - Scan 20 Menuopdrachten - Voorbeeld 20 II. Voorbeeldvenstergebied [vaste vensters] 24 III. Instelling actief beeld: 26 Technische ondersteuning 27Aan de slag
Controleer de inhoud van de verpakking voordat u aan de slag gaat. Zie de Snelle installatiegids voor een snelle installatie. (zie pag. 9)  Belangrijk! Bewaar de originele doos, de bon en het verpakkingsmateriaal voor eventuele verzending in de toekomst.Inhoud van verpakking
\- Dlascanner • Filmhouder (waar van toepassing) • Voedingsadapter [FAIRWAY Model No.: WRG 15F-120A]  Waarschuwing! Het gebruik van een andere voeding kan de scanner ernstig beschadigen en maakt de garantie ongeldig. - Netsnoer. USB 2.0-kabel. • Stuurprogramma CyberView X5. • DVD met toepassingssoftware. • Gedrukte handleiding.OPMERKING:
\- Toepassingssoftware houdt in de fotosoftware zoals Adobe Photoshop Elements, dit is kan zonder voorafgaande kennisgeving worden gewijzlgd.ALGEMENE RICHTLIJNEN:
- Gebruik uitsluitend de meegeleverde USB-kabel. Sluit de computer rechtstreeks aan op de scanner met de USB 2.0-kabel. - Gebruik geen hub of verlengkabel. Gebruik alleen de USB-poorten achterop een computer. - Als andere apparaten zijn aangesloten op de computer via USB (multifunctionele printers, scanners, webcam) moet u deze verwijderen. • Minimaal 1 GB RAM (Win/Mac) is nodig.Temperatuurbereik werkgebied 10° tot 40°C
Opmerking: Schakel de scanner niet in behalve wanneer de temperatuur binnen dit bereik valt. Als de scanner buiten dit bereik is opgeslagen of vervoerd, moet u hem binnen dit bereik laten terugkeren voor u hem inschakelt.Vochtigheidsbereik omgeving: 15% tot 76% relatieve vochtigheid (niet-condenserend)
NB: Als de scanner is opgeslagen of vervoerd bij een lage temperatuur en daarna naar een warme of vochtige omgeving wordt gebracht, kan condensatie optreden. Dit apparaat is uitsluitend ontworpen voor privégebruik en is niet bedoeld voor commercieel gebruik. De garantie is beperkt van 2 jaar naar 1 jaar als fouten of defecten ontstaan door onjuist gebruik, onjuiste bediening of stress. De garantieperiode van het apparaat bij privégebruik is 2 jaar of 20.000 scans.Snelle installatiegids
WINDOWS SYSTEMEN TIJDENS DE INSTALLATIE VAN HET STUURPROGRAMMA KAN EEN WAARSCHUWINGSVENSTER VERSCHUNEN; SELECTEER IN DAT GEVAL "DIT STUURPROGRAMMA TOCH INSTALLEREN".  Zorg er voor dat u de toepassingssoftware installeert VOORDAT u het scannerstuurprogramma CyberView X 5.0 installeert. U kunt het scannerstuurprogramma direct installeren als u reeds software hebt geïnstalleerd die TWAIN ondersteunt. Mac gebruikers kunnen iPhoto voor het bewerken gebruikenOpmerking:
1. Selecteer in het venster "Wizard nieuwe hardware gevonden" "Automatisch zoeken of op computer bladeren naar stuurprogramma-software." 2. Klik vervolgens in het venster "Wizard nieuwe hardware gevonden" op "Voltoolen". OPMERKING: Niet alle pc's laten het venster voor nieuwe hardware zien, sommige installeren op de achtergrondSOFTWARE EN STUURPROGRAMMA INSTALLEREN
Voordat u het stuurprogramma voor de scanner installeert... Als u er voor kiest om de meegeleverde toepassing voor beeldbewerking te installeren, moet u de toepassingsoftware installeren (bijv. Adobe Photoshop Elements) door de toepassings-cd in het cd/dvd-station van de computer te steken. Volg de aanwijzingen in het venster dat automatisch verschijnt.Het scanner-stuurprogramma installeren
a. Plaats de cd met het stuurprogramma in het cd/dvd-station van de computer en verken de inhoud. b. Dubbelklik op het pictogram "CyberView X 5.0" om het installatieproces te starten. Volg de instructies op het scherm om het installatieproces te voltoolen. OPMERKING: Zorg er voor dat de scanner NIET is verbonden met de computer tijdens de installatie van het stuurprogramma CyberView X 5.0. c. Herstart de computer na voltooiing van het installatieproces. Let op: Bij installatie van de nieuwe scanner op een Windows-computer waarop al een andere USB-flatbedscanner of All-in-one Scan/Kopieer/Printer-apparaat is geinstalleerd, kan het nodig zijn om de andere scanner te ontkoppelen van de USB-poort zodat de filmscanner goed kan werken.Guide d'installation du module d'extension de scanneur TWAIN pour Adobe Photoshop Elements 9
Le module d'extension de scanneur TWAIN n'est plus installé avec Adobe Photoshop Elements 9. Afin d'importer un appareil scanneur dans Adobe Photoshop Elements, veuillez suivre les instructions ci-dessous après l'installation de Adobe Photoshop Elements 9 pour trouver où et comment installer le composant TWAIN qui était précédemment installé avec l'application pour les versions antérieures à Photoshop Elements 9. Important : Ne déplacez pas les fichlers d'extension des versions précédentes de Photoshop Elements dans le dossier Photoshop Elements 9 > Plug-Ins, ne réglez pas non plus le dossier Photoshop Elements 8 (ou version antérieure) > Plug-In comme dossier d'extensions supplémentaires dans vos Préférences. Trouvez les informations complètes sur le site Internet officiel d'Adobe : http://kb2.adobe.com/cps/849/cpsld\_84933.htmlMacintosh
Pour installer le module d'extension TWAIN patrimonial pour Macintosh, copiez le dossier d'extension TWAIN de : //Applications/Adobe Photoshop Elements 9/Optional Plug-Ins/ImportModules/ Dans://Applications/Adobe Photoshop Elements 9/Locales/Windows
Pour installer le module d'extension TWAIN Legacy pour Windows, copiez le dossier twain\_32.8ba de : C:\Program Files\Adobe\Photoshop Elements 9\Optional Plug-Ins\Import-Export\ Dans : C:\Program Files\Adobe\Photoshop Elements 9\Locales\Windows 64 bits
Photoshop Elements 9 est une application 32 bits. Lorsque vous l'installez sur une version 64 bits de Windows, le chemin n'est pas tout à fait le même. Pour installer le module d'extension TWAIN Legacy pour Windows, copiez le dossier twain 32.8ba de : C:\Program Files (x86)\Adobe\Photoshop Elements 9\Optional Plug-Ins\Import-Export\ Dans : C:\Program Files (x86)\Adobe\Photoshop Elements 9\Locales\Hardware installeren
a. Sluit de diascanner aan op een stroombron. 1. De aan/uit-schakelaar bevindt zich onderaan de linkerkant van de scanner. Zorg dat de scanner is uitgeschakeld.  2. Steek EERST de voedingsadapter in een stopcontact voordat u hem met de scanner verbindt. 3. Verbind de USB-kabel met de computer met het standaardeinde van de USB-adapter. Verbindt het USB-adaptereinde van de kabel met de achterkant van de scanner.Extra functies
CrystalScan 7200
1. Klep 2. Diahouder 3. Filmondergrond 4. Eenknops scan 5. Ontgrendelschakelaar 6. Weergavevenster  1. DC-ingang 2. USB-poort 3. Voedingsschakelaar ProScan 7200
1. Scanner 2. Diahouder 3. Filmhouder 4. Eenknops scan 5. Achterkant van het apparaat 6. Weergavevenster      Voor het scannen van film (film en ingeraamde dia's) CrystalScan 7200
Ingeraamde dia's 1. Open de scannerklep (1). 2. Maak de dia-/filmhouder los (5), plaats de dia's met de glimmende kant naar boven en sluit de houder. 3. Sluit de scannerklep (1) (optioneel). 4. Klaar om te scannen. Filmstrips
1. Open de scannerklep (1). 2. Maak de diahouder los (5). 3. Plaats de film in het midden van het weergavevenster (6). 4. Druk het diaraam omlaag en sluit de diahouder. 5. Klaar om te scannen.  ProScan 7200 natural_image
Line drawing of a rectangular electronic device with a connector inserted (no text or symbols)Ingeraamde dia's scannen
1. Ingeraamde dia's 1-1. Laad de Ingeraamde dla's in de diahouder, glimmende kant omhoog. 1-2. Plaats de diahouder in de scanner met de pijl naar boven 1-3. Plaats de houder in de scanner vanaf de linker- of rechterkant ProScan 7200 - Dia's scannen (Vervolg....) text_image
Incorrect You will loose image data Correct Insertionnatural_image
Line drawing of a rectangular electronic component with a mounting bracket (no text or symbols)Negatieven scannen
2-1. Laad het negatief in de houder en zorg er voor dat de filmbeelden binnen de randen van de houder komen, met de glanzende kant omhoog.2-2 Sluit de filmhouder
2-3. Steek de filmhouder van links of rechts in de scanner met de pijl naar boven. natural_image
Technical line drawing of a mechanical component with no visible text or symbolsnatural_image
Line drawing of a printer with paper feed and paper clip (no text or symbols)Eenknops scan
1. Open CyberView (zie pag. 12 voor het openen van het CyberView stuurprogramma) 2. Scaninstellingen configureren (zie pagina 13) 3. Selecteer de map voor de scans, de bestandsindeling (TIF of JPG) en druk na het configureren op de scannerknop om het scannen te starten. CrystalScan 7200 Drukknop  ProScan 7200 Drukknop  text_image
CyberView X5 scannen naar C:\Users\gif\Documents\image001.tif Filmtype: Positief 135 Resolutie: 1000 dpi MagicTouch: Off 5.11.00 1.03 54 AnnulerenDIA'S SCANNEN
STAP 1 open het stuurprogramma
(Voor pc-gebruikers) Open CyberView X 5 vanuit Start - Alle programma's - CyberView (Voor MAC-gebruikers) Open Macintosh Hard drive - Toepassingen - CyberViewSTAP 2: selecteer het filmtype
Selecteer het te scannen filmtype: positief, negatief of B&W (zwart/wit). STAP 3: optionele voorbeeldscan
Selecteer "Prescan Current Frame" (Voorbeeldscan van huidige foto) om een voorbeeldscan te maken van de geladen dia of "Prescan..." (Voorbeeldscan) om voorbeeldscans te maken van een of meer dia's op specifieke posities in de houder. text_image
scan Voorbeeld Beeldaanpassing Venster Help Voorbeeldscan ▶ Voorbeeldscan van huidig beeld Scan ▶ 150 200STAP 4: scaninstellingen vastleggen
a. Resolutie De standaardresolutie voor scans is 1000 dpi, andere opties voor de resolutie zijn hieronder weergegeven. Opmerking: hogere scanresoluties leveren een langere scantijd op en vragen meer ruimte op de harde schijf. b. Kleurdiepte Kies tussen 8 en 16 bit. Een hogere instelling voor de kleurdiepte levert een groter bereik aan kleuren in de uiteindelijks scan op. De kleurendiepte van de filmscanner is 48 bit ware kleuren. De scansoftware kan bij het scannen 8-bits kleurenmodus of 16-bits kleurenmodus kiezen. Dit levert afbeeldingen op met 24 of 48 bit kleuren, 8 of 16 bits per rood, groen en blauw kleurenkanaal.Voorbeeld:
8-bit modus = 8 rood, 8 groen en 8 blauw voor in totaal 24-bit kleur 16-bit modus = 16 rood, 16 groen en 16 blauw voor in totaal 48-bit kleur text_image
Scaninstelling Scan Aangepast 1000 DPI Breedte Hoogte 1345.36 910.00 Kleurdiepte: 8 bit <| Scan-resolutie | Kleurendlepteper(RGB-kanaal) | Kleurmodus BestandsgrootteTIFF (geen compressie) | |
| 300 dpi | 8 bit | 24 bits | ~350 Kb |
| 600 dpi | 8 bit 24 bits ~1MB | ||
| 1800dpi | 8 bit 24 bits ~12MB | ||
| 3600dpi | 8 bit 24 bits ~52 MB | ||
| 7200dpi | 8 bit 48 bits ~208MB | ||
STAP 5: scanvoorkeuren vastleggen
Selecteer Scan - Preference (Voorkeur) - Film Type (Filmttype) - Scan Setting (Scaninstelling) text_image
Voorbeelduzan Scan ✓ DfMin Ongeden maken Voorkouren Afulaten Posief Negief Zwart-wittext_image
Scanutale: Gevanzerle instelling | Standard scanebied | ICD/R/C/GDM Kredute van voorwelding: 300 DPI 800 DPI Klurengkenter, 6 bit Scanmodus, kwalitet: Map: C:\Users\g\Documents, Bestandlistum: Image Volnummer aktel bestandroom: Detals: 3 Options: Door gebruiter gedrineerd begnummer 1 Bestandlistp: TF IPRT kwaltes: 50 Voortweld van bestandroom: mugel601.pdftext_image
Map: C:\Users\gif\Documents\ Bestandsnaam: image Bladeren... ✓ Volgnummer: achter bestandsnaamSet Scan Preferences (Scanvoorkeuren instellen) (Vervolg...)
4. Options (Options) - Use Film Index (Filmindex gebruiken): gebruik het nummer van de dia volgens de positie in de houder. 5. User Defined Start Number (Door gebruiker gedefinieerd beginnummer): Geef een specifiek beginnummer op. Kies het bestandstype, "TIF" of "JPG". (TIF niet gecomprimeerd of JPG gecomprimeerd) Kies de beeldkwaliteit voor JPEG. (20-100) 100 zorgt voor de minste compressie| Bestandstype: | TF |
| JPEG-kwaltet: | 80 |
text_image
Scaninstalling Geavanceerde nstelling Standard erangabied | ICE/ROC/GEM | ✓ Automatische belichting Digitale ruisreductie Interiteit 0 100 200text_image
Scaninstelling Graussensleinstelling Standard scanningised MagicTouch/Automatiche kleur Automatische belichting Automatische balans Automatisch contrast Digitale nuareductile Intensity 100 0 200Standaard scangebied
Past de scangrootte en de instelling "Scan Offset" (Scan verschulving) aan om de beeldpositie van de afbeelding te wijzigen. text_image
Scaninstelling | Gevanzerde instelling | Standard scanningbed | I2E/ROC/GBM □ Gebrukeninstelling voor automatisch bijrjden ischaolen Scan Grabette 3.707667 Offset: X Offset: Y Offset scanner 0.000000 0.000000 On holiday video in fronttext_image
Scaninstelling | Geavanceerde instelling | Standard sangebied | ICE/ROC/GEN □ Digitale ICE ☑ GEN inschakele 75 □ ROC inschakele 75text_image
Scaninstelling Gevanceerde instelling Standaard scangebied MagicTouch/Automatische kleur Magic Touch Automatische kleurSTAP 6 - Scan (Scannen)
Scan (Scannen) - Scan (Scannen)- Scan Current Frame (Huidig beeld scannen) text_image
scan Voorbeeld Beeldaanpassing Venster Help Voorbeeldscan Scan Huidige beeld scannentext_image
CyberView X5 scannen naar C:\Users\F\Documents\Image101.tif Flintype: Postbef 135 Rozolutter: 1000 dpi MagicTouch: Off 5.11.00 1.03 54 AnnularenSTAP 7: afsluiten
Selecteer "Scan > Exit" (Scan > afsluiten) om het stuurprogramma te sluiten. Gescande afbeeldingsbestanden kunnen met elk programma voor het weergeven en/of bewerken van afbeeldingen worden geopend. text_image
CyberView X5 Möchten Sie die aktuellen Einstellungen als Standard spachern? Sie können die Daten im Dialogfeld „Enstellungen“ verändern. Ja Next Annulierentext_image
Scan-View X5 scan - Voorheid: Beeldaspassing Venster Help Posbaf: 135 Film 450 300 150 600 Scan-Teiling Scan Aangapast 1000 DPT Breedze Hoogte 1346.30 910.00 Neurdiepte: 8 bit Variation> Scarmodus Kvalkeit Informaten (Informate) Links: 70 Bowen: 23 Breedze: 0,2f pxl Length: 0,2f pxl Size (Givets): 0,2f MB R.O. O. O. B.O. X5994 Y:133 Selcht Zoomdwal: 100% Locaet:1 Selects: 300I Hoofdgebied venster
Menupdrachten - Scan
Prescan (Voorbeeldscan): Prescan Current Frame (Voorbeeldscan van huidig beeld): Maak een voorbeeldscan van de huidige dia. Scan (Scannen): Scan Current Frame > scan de huidige dla. text_image
scan Voorbeeld Beeldaanpassing Venster Help Voorbeeldscan Scan Huidige beeld scannen 150 300Menuopdrachten - Voorbeeld
Functies Zoomen, Roteren en Omkeren Revert (Ongedaan maken)
Heft alle aanpassingen op en herstelt de oorspronkelijke staat van het beeld.Preference (Voorkeur)- Zie Scaninstelling (zie pagina 13)
Exit (Afsluiten):
Sluit de CyberView X5 gebruikers-interface. Een bericht verschijnt "Quit the application prompts to save documents?" (De toepassing sluiten en documenten opslaan?) Klik op "Yes" (Ja) om op te slaan, 'No' (Nee) om de huidige instellingen te wissen of "Cancel" (Annuleren) om terug te keren naar Cyber View X. text_image
CyberView 13 Möchten Sie die aktuellen Einstellungen als Standard speichem? Sie können die Daten im Dialogfeid „Einstellungen“ verändern. Ja nee AnnulierenMenuopdrachten - Image Adjustment (Beeldaanpassing)
a. Image Adjustment (Afbeeldingsaanpassing) 1. Variations (Variaties): genereert verschillende weergaven van een beeld met opties om veranderingen aan te brengen in hoge lichten, middentonen enzovoort.  text_image
SeedlingPassing Variables | Kootbolans | Curven en Rivieses | Original Hoor groon Lichtor Hoor geel Helder holes mph draf Hoor cyan Hudige cyprone Hoor roed Hoor blaw Donkoster Hoor magenta To passen op alle beiden R3 6.0 R3 X:9 Y:0 OK Annuldentext_image
Beidierpassing Variables: Kredzets Carven on Niveau Voor Na - Heidelberg + 0 Ovan 0 root - Contrast + 0 Hagents Green - Verzadopg + 0 Goal Raar To passen op alle beelden R:0 G:0 B:0 X:0 Y:3 OK Annularentext_image
Image Adjustment variations | color balance Curves and Levels | Before After Channel acc Apply to all frames R:299 G:200 R:181 X:255 Y:0 OK CancelMenuopdrachten - Vensters
1. Exposure Setting (Belichtingsinstelling): Druk om de belichtingstijd in te stellen (R,G, B) op "Reset" om de standaardinstelling te herstellen. text_image
CyberView X5 50% 200% R 100 % G 100 % B 100 % Reset SluitenMenuopdrachten – Help
- Update: Firmware: werk de firmware-versie bij, selecteer het pad waar het firmware-bestand is opgeslagen. (U kunt deze bestanden van onze website downloaden) - Info over: Toont systeeminformatie (waaronder het besturingssysteem, CPU), productinformatie (waaronder naam product, naam model, hardwareversie, firmwareversie, softwareversie, apparaatgegevens waaronder interface en optische resolutie).Diagram functiebalk
Selecteer het type film en merk in de werkbalk: Positive (positief) Negative (Negatief) (ofwel Dia) B&W (zwart/wit) II. Voorbeeldvenstergebied [vaste vensters]
 Prescan (Voorbeeldscan): maak een voorbeeldscan van de huidige film, klik op de keuzeknop voor meer opties. Scannen: scan de film, druk op de keuzeknop ▼ voor meer opties. Image Adjustment (Beeldaanpassing): druk op de keuzeknop ▼ voor meer opties. natural_image
Screenshot of a photo editing interface showing a red arrow pointing to a flower image on a canvas (no text or symbols visible on the image itself)Diagram werkbalk
 Select scan area (Scangebied selecteren): het is mogelijk om meerdere selecties tegelijk te maken. Inzoomen: Om het beeld op de plek van de aanwijzer te vergroten. Het beeld vergroot met elke klik tot het maximum (1000 %) is berelkt. Uitzoomen: Klik om de grootte van het weergegeven beeld te verkleinen met de aanwijzer Uitzoomen op het gewenste gebied. Met elke klik halveert het gebied tot de laagste waarde (25 %) is bereikt. Rotate 90 Left (90 linksom draaien): De afbeeling van graden naar links draaien. Rotate 90 Right (90 rechtsom draaien): De afbeelding 90 graden naar rechts draaien. Flip Horizontal (Horizontaal spiegelen): De afbeelding 180 graden horizontaal keren. Flip Vertical (Verticaal spiegelen): De afbeelding 180 graden vertikaal keren. Revert (Ongedaan maken): Heft alle aanpassingen op en herstelt de oorspronkelijke staat van het beeld.Statusregel
In de linkerbenedenhoek geeft het kleumiveau (RGB: rood, groen, blauw) en coördinaten van de locatie [bijv.: I] worden weergegeven. De zoomschaal, de locatie van de huidige dia in de houder en het aantal voor scannen geselecteerde gebieden (2 of meer geeft aan: meerdere scangebieden op een dia [bijv.: II]). text_image
R:0 G:0 B:0 X:464 Y:127 Belichting R:100% C:100% R:100% Zoomschaal:100% Locate:1 SelectesiIII. Instelling actief beeld:
III. Scan Setting Area (Instelgebied scan) [zwevende vensters] Normal mode (Normale modus): [bijv: I] voor de basisparameters van de scan (inclusief scanresolutie, filmgrootte, kleurdiepte). Advanced mode (Geavanceerde modus) [bijv.: II] voor invoer van de parameters voor de scanuitvoer, scan resolutie, en kleurendiepte text_image
Scaninstelling Scan Aangepast 1000 DPI Breedte Hoogte 1346.36 910.00 Kleurdiepte: 8 bit Verder>> Scanmodus Kwaliteit Information (informatie) Links: 70 Boven: 23 Breedte: 0,2f pxl Lengte: 0,2f pxl Size (Grootte): 0,2f MB Scaninstelling Scan Aangepast 1000 DPI Breedte Hoogte 1346.36 910.00 Kleurdiepte: 8 bit <Technische ondersteuning
CyberView
Ga voor informatie over de filmscanner en het stuurprogramma CyberView naar www.reflecta.deMeegeleverde toepassingssoftware
U kunt de HELP-functie in de menubalk van de toepassing gebruiken of de website van het softwarebedrijf bezoeken. \*\*Deze handleiding is ook opgeslagen op de meegeleverde cd.CyberView Manual do
X5 SF Usuário
PORTUGUÊS DO BRASILDECLARAÇÃO DA COMISSÃO FEDERAL DE COMUNICAÇÕES (FCC)
Este Equipamento foi testado e está comprovadamente em conformidade com os limites para a classe B de aparelhos digitais, de acordo com a Parte 15 das regras do FCC. Tais limites foram estabelecidos para assegurar uma proteção razoável contra interferências prejudiciais numa instalação residencial. Este equipamento gera, usa e pode irradiar energia de radiofrequência e, se não for instalado e usado de acordo com as instruções, poderá causar interferência prejudicial às radiocomunicações. No entanto, não há garantia de que a interferência não ocorrerá numa Instalação específica. Se o equipamento causar interferência prejudicial à recepção de rádio ou televisão, o que poderá ser determinado quando o equipamento for ligado ou desligado, o usuário deverá tomar uma ou mais das seguintes medidas para tentar corrigir a interferência: • Reorientar ou reposicionar a antena receptora. - Aumentar a distância entre o equipamento e o receptor. - Conectar o equipamento a uma tomada num circuito diferente daquele ao qual o receptor está conectado. - Consultar o revendedor ou um técnico experiente de rádio/televisão para obter ajuda.Alerta:
Utilize apenas cabos de sinal revestidos para conectar dispositivos I/O a este equipamento. Você é alertado que alterações ou modificações não expressamente aprovadas pela parte responsável pela conformidade podem anular sua autoridade em operar o equipamento.ÍNDICE
COMEÇANDO 5 GUIA DE INSTALAÇÃO RÁPIDA (QIG) 7 INSTALANDO O SOFTWARE E O DRIVER....7 Instalando o Hardware 9 Atributos adicionais....9 Transferência com Um Botão....12 COMO TRANSFERIR SLIDES....13 PASSO 1 - Adquirir Driver ....13 PASSO 2 - Seleccionar Tipo de Filme ....13 PASSO 3 - Pré-transferência Opcional 13 PASSO 4 - Ajustar as Configurações de Transferência....14 PASSO 5 - Ajustar as Preferências de Transferência....15 PASSO 6 - Transferência....18 PASSO 7 - Sair....18 INTERFACE DO USUÁRIO....19 I. Área da Janela Principal....20 Menu Commands (Comandos) - Digitalizar 20 Menu Commands (Comandos) – Visualização ....20 II. Área de Janela de Visualização [Janelas Fixas] 24 III. Área de Configuração de Digitalização [Janelas Flutuantes]....26 SUPORTE TÉCNICO....27COMEÇANDO
Verifique o conteúdo da embalagem antes de começar. Para Instalação Rápida favor consulte o Gula de Instalação Rápida. (Ref. Pg. 9)  Importante! Guarde a caixa original, recibo e material de embalagem para necessidades futuras de remessa.Conteúdo da Embalagem
- Scanner de Slide. - Suporte de Filme (Onde Aplicável) - Adaptador de Energia [FAIRWAY Modelo N°. : WRG 15F-120A]  Alerta! Utilizar qualquer outro adaptador de energia pode danificar severamente o scanner e irá anular a garantia do produto. - Cabo de Energia - Cabo USB 2.0 - Driver Cyberview X5. • Software aplicativo DVD. • Manual do Usuário Impresso.NOTA:
\- O software do aplicativo significa o software gráfico tal como o Adobe® Photoshop® Elements, que é sujelto a alteração sem notificação.GUIA GERAL:
- Utilize apenas o cabo USB fornecido. Conecte o computador ao scanner diretamente utilizando o cabo USB 2.0. - Não use um hub ou cabo de extensão. Use apenas as portas USB na traseira de computadores de mesa. - Se houver quaisquer outros dispositivos (dispositivo multifuncional, impressoras, scanners, webcam) conectados ao computador através de USB desconecte-os. - Um mínimo de 1GB RAM (Windows/Mac) é requerido.Variação de Temperatura Ambiente Operacional 50° a 104°F (10° a 40°C)
Observação: Não ligue o scanner a menos que ele esteja dentro desta variação. Se o scanner tiver sido armazenado ou transportado para fora desta variação, deixe-o voltar para esta variação antes de ligá-lo.Abrangência de Umidade Ambiental Operacional 15% e 76% de umidade relativa (sem condensação)
Nota: Se o scanner for armazenado ou tiver de ser transportado e levado a um ambiente mais quente/úmido, condensação pode ocorrer. Cet apparell est conçu uniquement pour un usage privé et n'est pas destiné à un usage commercial. La garantie est réduite de 2 ans à 1 an si des erreurs ou des défauts résultant d'une utilisation inappropriée, un mauvais fonctionnement ou du stress se produisent. La période de garantie de l'apparell pour un usage privé est de 2 ans ou 20 000 scans.GUIA DE INSTALAÇÃO RÁPIDA (QIG)
INSTALAÇÃO EM SISTEMAS WINDOWS DURANTE A INSTALAÇÃO DO DRIVER UMA CAIXA DE DIÁLOGO DE ALERTA PODE APARECER, SE ESTE FOR O CASO FAVOR SELECIONE "INSTALL THIS DRIVER ANYWAYS - INSTALAR ESTE DRIVER DE QUALQUER FORMA".  Certifique-se em instalar o Software do Aplicativo ANTES de instalar o driver CyberView 5.0 do scanner. Você pode instalar o driver do scanner diretamente se você já liver instalado o software aplicativo compatível com TWAIN em seu computador. Os usuários de Mac podem utilizar iPhoto para edição.Avlso:
1. Na janela do "Assistente de Novo Hardware Encontrado", selecione "Buscar automaticamente ou Pesquisar computador para software do driver." 2. Na janela de "Finalização do Assistente de Novo Hardware Encontrado", clique em "Finalizar". NOTA: Nem todos os PC's irão exibir a janela de novo hardware encontrado, algumas irão instalá-lo em pano de fundoINSTALANDO O SOFTWARE E O DRIVER
Antes de Instalar o Driver do Scanner. Se você optar por usar o aplicativo fornecido para edição de imagens, instale o software do aplicativo (ex: Adobe® Photoshop® Elements) inserindo o CD do aplicativo no drive de CD/DVD do computador. Siga as instruções que serão exibidas em uma janela que se abre automaticamente.Instalando o Driver do Scanner
a. Insira o CD do driver no drive de CD/DVD do computador e explore o conteúdo. b. Clique duas vezes no icone "CyberView X 5.0" para iniciar o processo de instalação. Siga os alertas na tela para completar o processo de instalação. OBS.: Certifique-se de que o scanner NÃO está conectado ao computador durante a instalação do driver CyberView X 5.0. c. Reincie o computador uma vez que o processo de instalação esteja completo. Favor Observar: Ao instalar seu novo scanner em um sistema Windows que já possua outro scanner USB Flatbed ou dispositivo Multifuncional instalado, pode ser necessário que você desconecte o outro scanner da porta USB para que o scanner Film funcione apropriadamente,Plug-in do scanner TWAIN Guia de Instalação para Adobe Photoshop Elements 9
O plug-in do scanner TWAIN não é mais instalado com o Photoshop Elements 9. Para ser apto a importar o dispositivo de scanner através do Adobe Photoshop elements, favor siga as instruções abaixo depois de instalar o Adobe Photoshop Elements 9 para descobrir onde e quando instalar o componente TWAIN que foi previamente instalado com o aplicativo para versões anteriores ao Photoshop Elements 9. Importante: Não remova plug-ins das versões antigas do Photoshop Elements na pasta Photoshop Elements 9 > Plug-Ins, ou configure a pasta Photoshop Elements 8 (ou anterior) > Plug-In como a Additional Plug-Ins Folder (Pasta de Plug-Ins Adicionais) em Preferences (Preferências). Encontre informações completas no website oficial da Adobe: http://kb2.adobe.com/cps/849/cpsid\_84933.htmlMacintosh:
Para instalar o plug-in de legado TWAIN para Macintosh, copie a pasta do plugin TWAIN de: //Applications/Adobe Photoshop Elements 9/Optional Plug-Ins Plug-Ins/ImportModules/ Para: //Applications/Adobe Photoshop Elements 9/Locales/Windows
Para instalar o plug-in de legado TWAIN para Windows, copie twain\_32.8ba de: C:\Arquivos de Programas\Adobe\Photoshop Elements 9:\Optional Plug-Ins\Import-Export\ Para: C:\Program Files (Arquivos de Programas)\Adobe\Photoshop Elements 9\Locales\Windows 64-bits
O Photoshop Elements 9 é um aplicativo de 32-bits. Ao instalar em uma versão de 64-bits do Windows o caminho é um pouco modificado. Para instalar o plug-in de legado TWAIN para Windows, copie twain\_32.8ba de: C:\Arquivos de Programas (x86)\Adobe\Photoshop Elements 9\Optional Plug-Ins\Import-Export\ Para: C:\Arquivos de Programas (x86)\Adobe\Photoshop Elements 9\Locales\Instalando o Hardware
a. Conecte o scanner de slide à uma fonte de energia. 1. Localize o interruptor de energia na lateral esquerda inferior do scanner. Certifique-se de que o scanner esteja DESLIGADO.  2. Plugue o adaptador AC em uma fonte de energia AC PRIMEIRAMENTE antes de plugá-lo no scanner. 3. Conecte o cabo USB ao computador utilizando a extremidade padrão do adaptador USB. Conecte a extremidade do adaptador USB do cabo no painel traseiro do scanner.Atributos adicionais
CrystalScan 7200
1. Tampa. 2. Suporte de Slides 3. Encaixe de Filme 4. Transferência com Um Botão 5. Libere a Chave 6. Janela de Visualização text_image
1. Entrada DC 2. Porta USB 3. Botão LigarProScan 7200
1. Scanner 2. Suporte de slides 3. Suporte de Filme 4. Transferência com Um Botão 5. Traseira da unidade 6. Janela de Visualização text_image
1 2 3 4natural_image
Three technical line drawings of electronic components with no visible text or symbolsPara Digitalizar Filme (Filme e Slides Montados) CrystalScan 7200
Slides Montados 1. Abrir a Tampa do Scanner (1). 2. Liberar o Suporte do Slide/Filme (5) isira o "Lado brilhando do slide para cima" então feche o suporte do slide. 3. Feche a Tampa do Scanner (1) (opcional). 4. Pronto apra digitalizar.  Titas de filmes 1. Abrir a tampa do scanner (1). 2. Libere o Suporte do Slide (5). 3. Posicione o filme que você deseja digitalziar no centro da janela de visualização (6). 4. Empurre o filme para baixo no suporte e feche o suporte de slide. 5. Pronto apra digitalizar.  ProScan 7200 natural_image
Line drawing of a rectangular electronic device with a slot and connector (no text or symbols)ProScan 7200 - Digitalziando Slides (Continuação...)
text_image
Incorrect You will loose image data Correct insertionnatural_image
Line drawing of a rectangular electronic device with a connector inserted (no text or symbols)natural_image
Line drawing of a mechanical device with a handle and base (no text or symbols)Transferência com Um Botão
1. Abra o CyberView (ver página 12 para aquisição do programa do driver CyberView) 2. Configure as Configurações do Scan (consulte a Página 13) 3. Seleção Transferir para diretrório, formato de arquivo (TIF ou JPG, uma vez configurado, Pressione o botão do scanner) para iniciar a transferência.   7200 text_image
CyberView X5 digitalização para C:\Users\gif\Documents\image001.tif Tipo de película: Positivo 135 Resolução: 1000 dpi MagicTouch: Off 5.11.00 1.03 54 CancelarCOMO TRANSFERIR SLIDES
PASSO 1 - Adquirir Driver
(Para Usuário de PC) Abra o CyberView X 5 a partir de Iniciar – Todos os Programas –CyberView (Para Usuários MAC) Abra o Disco Rigido do Macintosh – Aplicativos – CyberViewPASSO 2 - Seleccionar Tipo de Filme
Selecione o tipo de filme a ser tranferido - Positivo, Negativo ou B&W (Preto e Branco). Digitalizar Pré-visualiza PASSO 3 - Pré-transferência Opcional
Selecione "Prescan Current Frame" (Pré-transferir Estrutura Atual) para pré-transferir o slide atualmente carregado no scanner ou "Prescan..." para pré-transferir o slide ou slides em posições específicas no estojo. text_image
Digitalizar Pré-visualizar Ajuste da imagem Janela Ajuda Pré-digitalizar Pré-digitalizar imagem actual Digitalizar 150 300PASSO 4 - Ajustar as Configurações de Transferência
a. Resolução A resolução padrão de transferência é 1000dpi, opções adicionais de resolução estão listadas abalxo. Aviso: Resoluções maiores de transferência resultam em maior tempo de transferência e maiores requerimentos de espaço em disco. b. Profundidade de Cor Selecione entre 8 e 16 bit. Uma configuração de profundidade de cor maior resultará em uma variação maior de cores na imagem trsnferida final. A profundidade de cor do Scanner de Filme pe 48 bits de cor verdadeira O software de digitalização tem a capacidade de selecionar modo de cor de 8 bits ou modo de cor de 16 bits ao digitalizar, isto produzirá imagens de 24 ou 48 bits de cor, 8 bits ou 16 bits por canais de cor Vermelho, Verde e Azul.Exemplo:
modo 8 bits = 8 Vermelho, 8 verde, e 8 Azul para um total de 24 bits de cor modo 16 bits = 16 Vermelho, 16 verde, e 16 Azul para um total de 48 bits de cor text_image
Definições de digitalização Digitalizar Personalizar 1000 DPT Largura Altura 1346.36 910.00 Profundidade 8 bit da cort << Normal Saída Personalizar 1000 DPT 300 600 720 900 1200 1500 1800 2100 2400 2700 3000 3300 3600 Personalizar Altura: 910.00 pxl Tamanho: 3.51 MB| Resolução de Digitalização | Profundidade de Cor (por canal RGB) | Modo de Cor | Tamanho do Arquivo TIFF (sem compressão) |
| 300dpi 8 | bit 24-bit ~350Kb | ||
| 600dpi 8 | bit 24-bit ~1MB | ||
| 1800dpi 6 | bit 24-bit ~12MB | ||
| 3600dpi 5 | bit 24-bit ~52MB | ||
| 7200dpi 6 | bit 48-bit ~208MB |