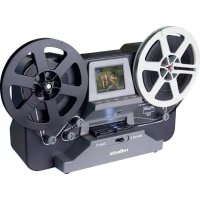
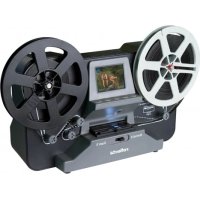
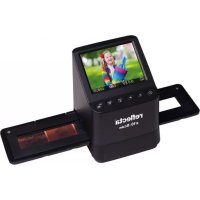
Combo Album Scanner - To scan Reflecta - Free user manual and instructions
Find the device manual for free Combo Album Scanner Reflecta in PDF.
User questions about Combo Album Scanner Reflecta
0 question about this device. Answer the ones you know or ask your own.
Ask a new question about this device
Download the instructions for your To scan in PDF format for free! Find your manual Combo Album Scanner - Reflecta and take your electronic device back in hand. On this page are published all the documents necessary for the use of your device. Combo Album Scanner by Reflecta.
USER MANUAL Combo Album Scanner Reflecta
natural_image
Line drawing of a portable kitchen appliance with control panel and display (no text or symbols)Combo Album-Scanner
Bedienungsanleitung
Inhaltsverzeichnis
DE
- Vorbereitung....2
Lieferumfang 2
Teilnamen....3
natural_image
Line drawing of a toaster oven with control panel and buttons (no text or symbols)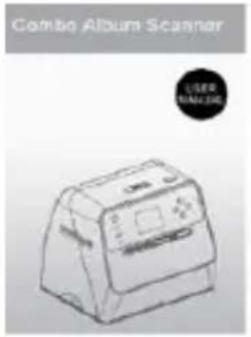
natural_image
Line drawing of a computer scanner with no visible text or symbols on the device itself
natural_image
Line drawing of a stylized pen or plunger (no text or symbols)Combo Album- Scanner
Bedienungsanleitung
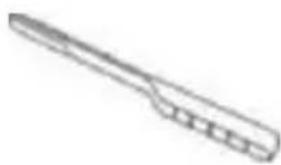
Reinigungsbürste
natural_image
Pure technical line drawing of a rectangular frame with internal slots and a small component at the bottom (no text or symbols)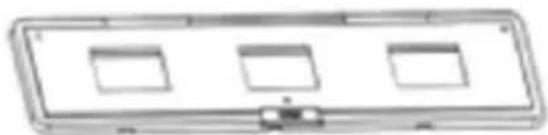
natural_image
Simple line drawing of a rectangular device with three square cutouts and a small connector (no text or symbols)natural_image
Simple line drawing of a cylindrical object with a lid and protruding port (no text or symbols)Adapter

natural_image
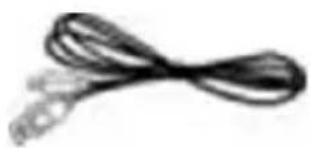
Coiled black cable with two connectors (no text or symbols visible)USB-Kabel
Lithiumbatterie
Teilnamen
DE
text_image
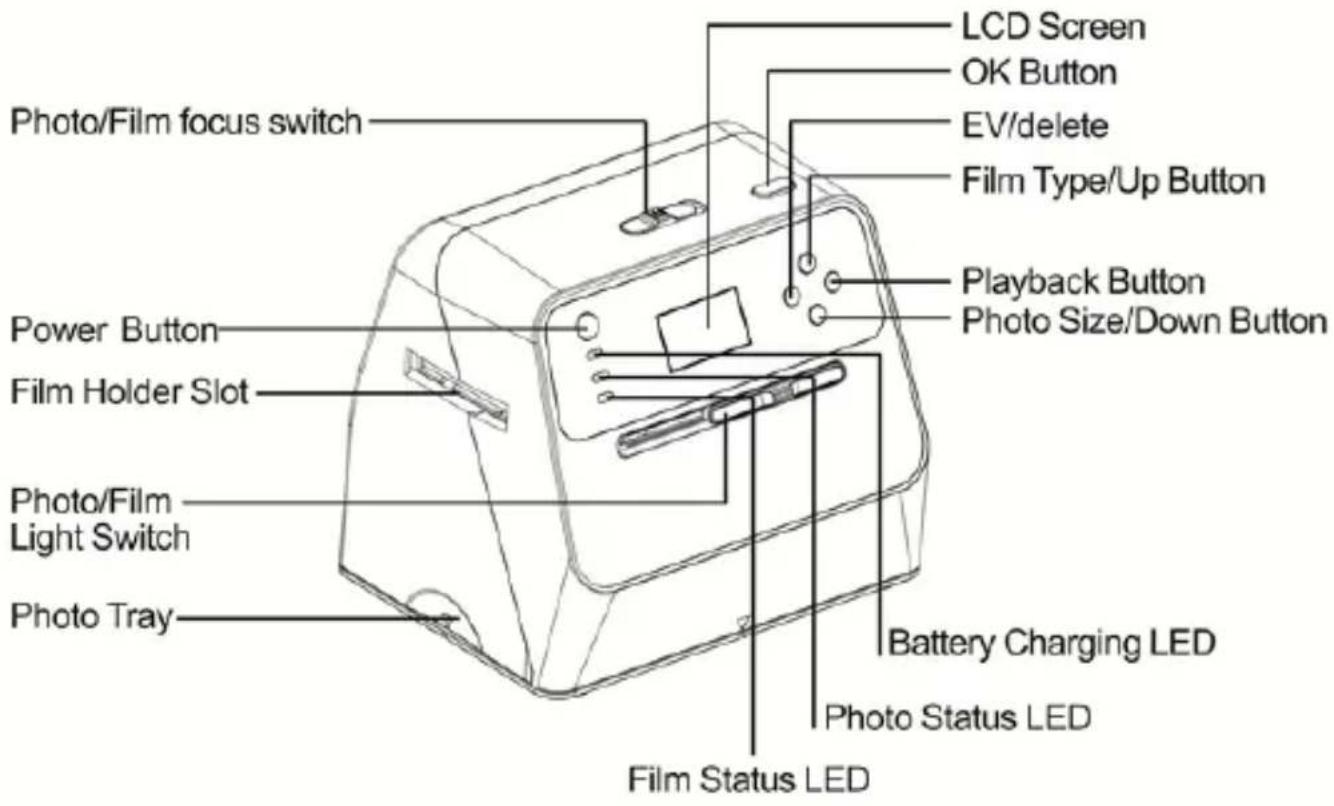
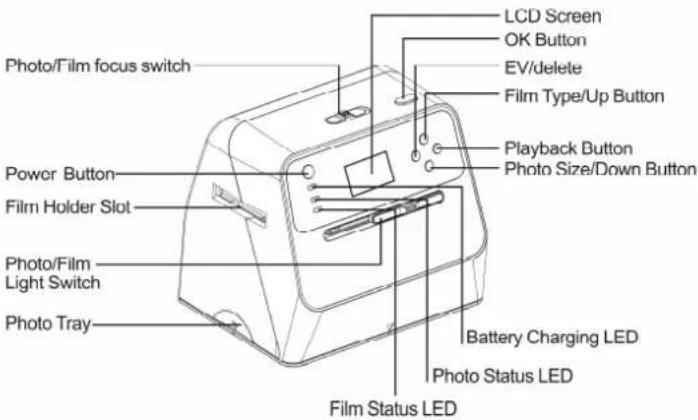
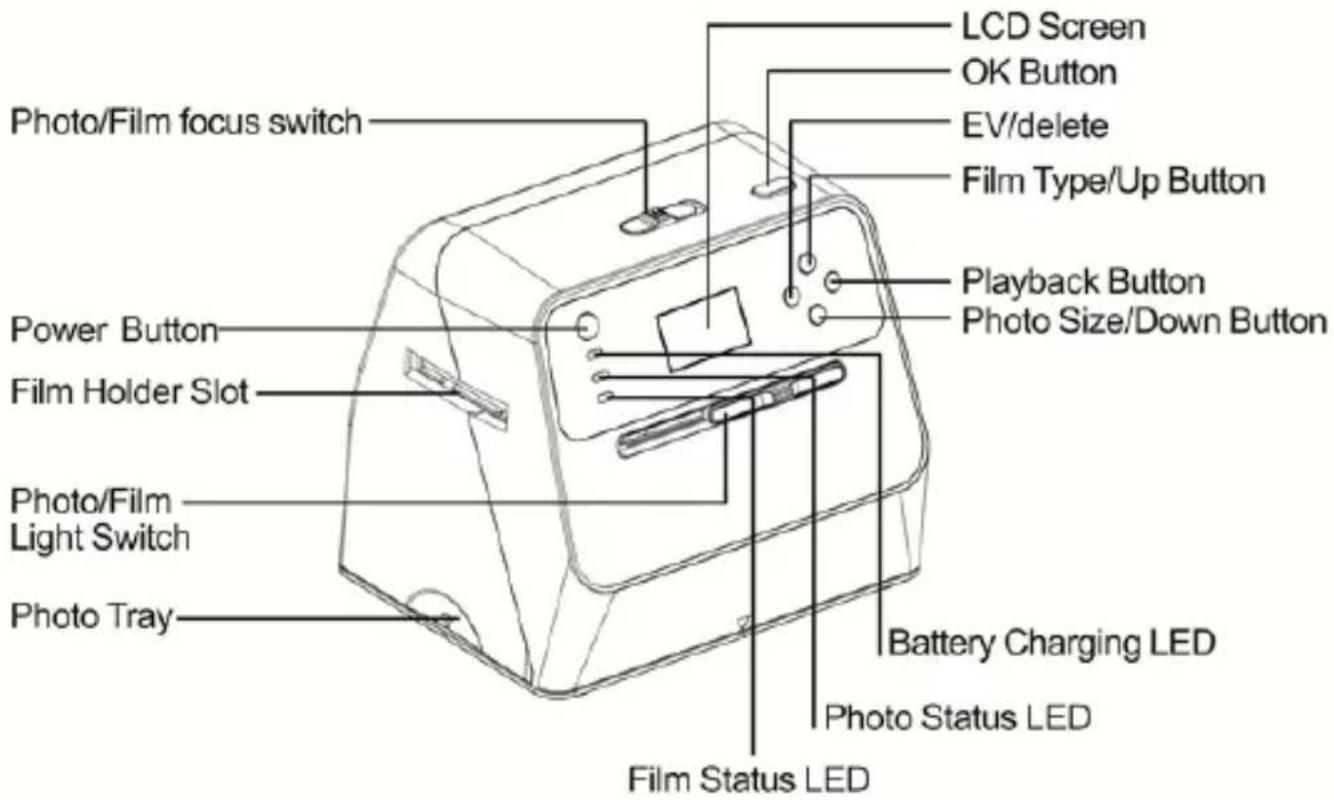
LCD Screen OK Button EV/delete Film Type/Up Button Playback Button Photo Size/Down Button Power Button Film Holder Slot Photo/Film Light Switch Photo/Film focus switch Photo Tray Battery Charging LED Photo Status LED Film Status LEDtext_image
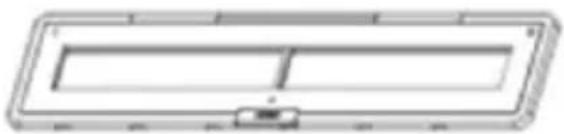
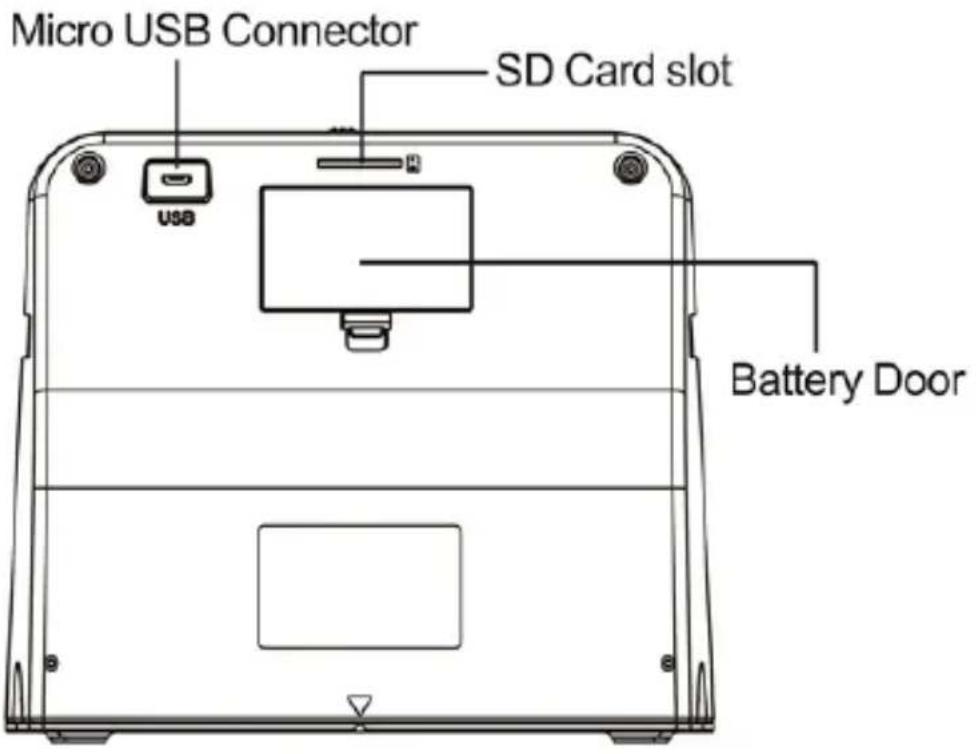
Micro USB Connector SD Card slot Battery Doortext_image
Battery Door| EN | DE |
| Battery Door Batteriefach |
natural_image
Line drawing of a device connected to a desktop computer via cable (no text or symbols)natural_image
Line drawing of a device connected to an electrical outlet, showing wiring and a close-up of the screen (no text or symbols)Hinweis:
text_image
Diagram showing two views of a device with labeled buttons and display screens, highlighting UI control points.natural_image
Pure electrical circuit lines without any symbols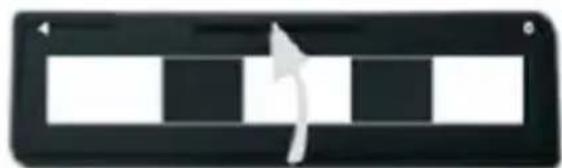
natural_image
Black and white striped rectangular button with a curved arrow pointing right (no text or symbols)natural_image
Pure electrical circuit lines without any symbols
natural_image
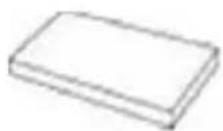
Stacked black plastic tray with white and black square cutouts (no text or symbols)natural_image
Pure electrical circuit lines without any symbols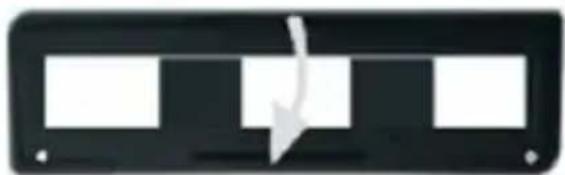
natural_image
Pure electrical circuit lines without any symbolsnatural_image
Line drawing of a portable device with directional arrows and a close button, no text or symbols presentnatural_image
Line drawing of a handheld electronic device with a scroll wheel and control panel (no text or symbols)natural_image
Line drawing of a portable kitchen appliance with control panel and buttons, showing directional arrows (no text or symbols)Filmtyp-Auswahl:
text_image
Line drawing of a portable electronic device with labeled buttons and an arrow pointing to the control panel.natural_image
Line drawing of a portable electronic device with control panel and indicator lights (no text or symbols)natural_image
Line drawing of a portable electronic device with control panel and buttons, showing directional arrows (no text or symbols)text_image
Diagram of a device with a screen displaying a photo, showing control buttons and an arrow pointing to the screen.4. Wiedergabemodus
natural_image
Line drawing of a portable electronic device with control panel and buttons, no text or symbols present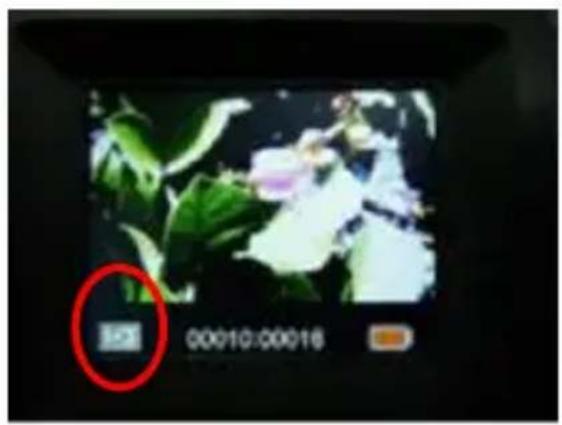
text_image
123 00:00:00:00:16natural_image
Line drawing of a portable electronic device with control panel and buttons, no text or symbols presenttext_image
Diagram of a printer with labeled parts and arrows indicating component positions
text_image
Delay 3 Yes No 00052:00020natural_image
Line drawing of a laptop connected to a device via cable (no text or symbols)text_image
Technical diagram of a printer with labeled parts and arrows indicating components
text_image
LINK? Yes No7. Anhang
Spezifikationen
natural_image
Simple line drawing of a trash bin with two crossed lines and a black horizontal bar at the bottom (no text or symbols)reflecta®
reflecta GmbH
natural_image
Line drawing of a portable kitchen appliance with control panel and buttons (no text or symbols)Combo Album Scanner
User's manual
Table of Contents
EN
- Preparation 2
Standard Accessories 2
Part Names ...... 3
Installing the battery pack 5
Charging the battery pack 7
Preparing Your Combo Album Scanner ..... 9
-
Scanning Photo Albums/Magazines/Photos . 10
-
Scanning Film 12
Placing film/slide into the holder 12
Scanning Film and Slide 13
-
Playback Mode 19
-
Delete Mode 20
-
Linking the Card to Computer 21
-
Appendix 23
Specifications 23
Icons & Indicators 24
1. Preparation
Standard Accessories
Combo Album Scanner Manual

Cleaning brush
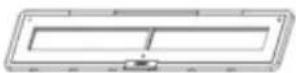
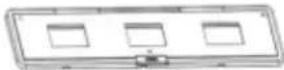
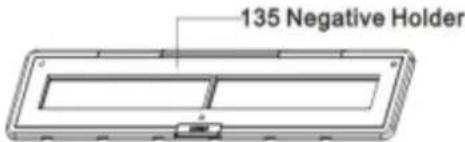
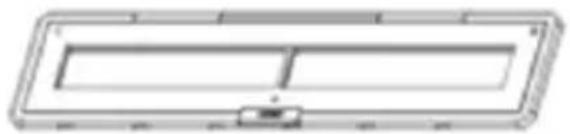
135 negative holder 135 slide holder
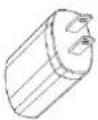
Adaptor USB cable

Lithium battery
text_image
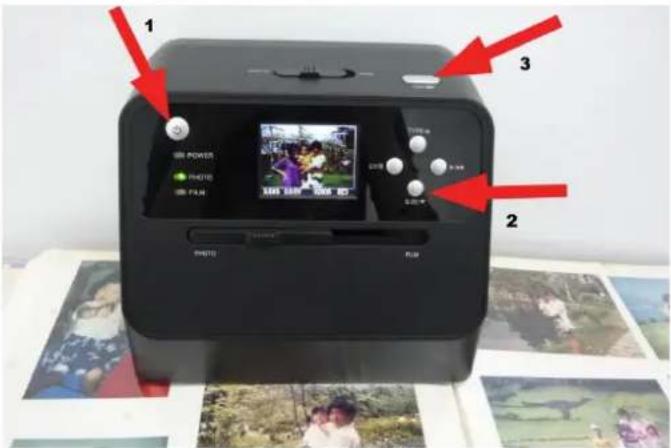
Photo/Film focus switch Power Button Film Holder Slot Photo/Film Light Switch Photo Tray LCD Screen OK Button EV/delete Film Type/Up Button Playback Button Photo Size/Down Button Battery Charging LED Photo Status LED Film Status LED| EN EN | |
| Photo/Film focus switch Photo/Film focus switch | |
| Power Button Power button | |
| Film ▲older Slot Film holder slot | |
| Photo/Film Light Switch Photo/Film light switch | |
| Photo Tray Photo tray | |
| LCD Screen LCD screen | |
| OK Button OK button | |
| EV/delete EV/delete | |
| Film Type/Up Button Film type/up button | |
| Playback Button Playback button | |
| Photo Size/Down Button Photo size/down button | |
| Battery Charging LED Battery charging LED | |
| Photo Status LED Photo status | LED |
| Film Status LED Film status LED | |
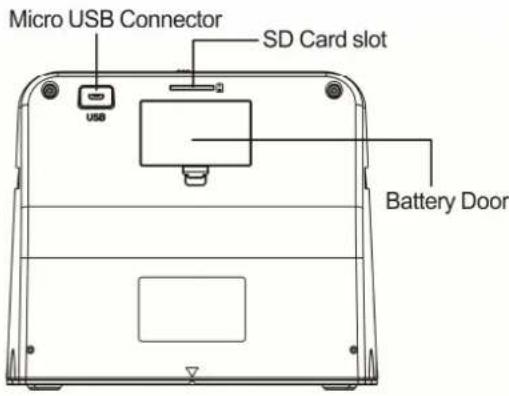
text_image
Micro USB Connector SD Card slot Battery Door| EN EN | |
| Micro USB Connector Micro USB connector | |
| SD Card slot SD card slot | |
| Battery Door Battery door | |

text_image
Brush| EN EN | |
| Brush Brush |
text_image
135 Negative HolderEN
| EN EN | |
| 135 Negative ▲older 135 negative holder | |
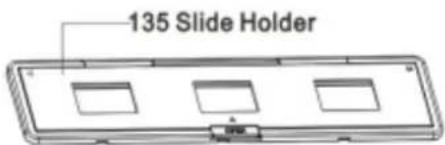
text_image
135 Slide HolderNote: We suggest using the bundled brush to clean the glass surface in the Combo Album Scanner periodically to produce clear images. Please make sure your film negatives/mounted slides and their holders are clean before inserting into the Combo Album Scanner. Dust or dirt from the film holder will affect the quality of your scanned images.
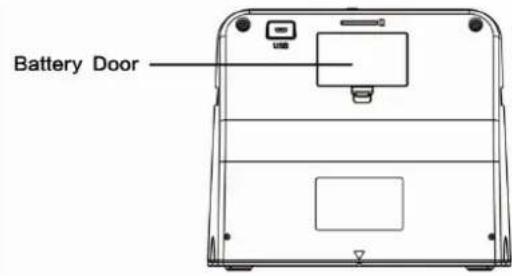
Installing the battery pack
-
Open the battery door by lightly pressing and sliding the door latch.
-
Insert the supplied battery. Make sure the (+ and -) ends of the battery match the polarities indicated in the battery compartment.
-
Snap the cover back and press the latch into place.
text_image
Battery Door| EN EN | |
| Battery Door Battery door |
Battery power status

Full Empty
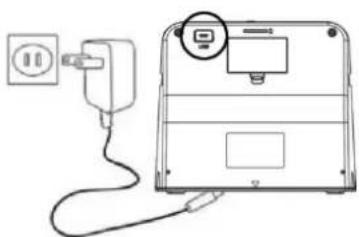
Charging the battery pack
EN
The battery pack will not be fully charged at the time of purchase and therefore needs to be charged before use. If the battery charge becomes low while you are using the scanner, it is recommended to recharge it as soon as possible.
-
Insert the battery pack into the battery compartment (see page 8)
-
You may charge the battery in 2 ways:
(a) Plug the Micro USB adaptor of the supplied USB cable to the USB connector of the scanner, and plug the other USB end into the USB port of your computer/notebook. Please charge the battery for at least 3 hours prior to first use.
natural_image
Line drawing of a desktop computer setup with monitor, tower, and front panel (no text or symbols)(b) Connect the Micro USB cable to the power adaptor then plug it to the household power outlet. Connect the micro USB terminal to the
-7-
Micro USB connector of the scanner. The red LED will turn on during battery charging when the scanner is not in use, and will be off when it is fully charged.
Please charge the battery for at least 3 hours
natural_image
Line drawing of a device with an electrical outlet connected to a power plug (no text or symbols)Note:
The scanner can also be operated without the battery when the power adaptor and USB cable is connected to the scanner.
Status LED indication:
Red LED: (1) On when the power of the scanner is on.
(2) When the scanner is not in use and the power is off, it will be on during battery charging and off when battery is fully charged.
Green LED: Lights up when photo scanning is set.
Blue LED: Lights up when film scanning is set.
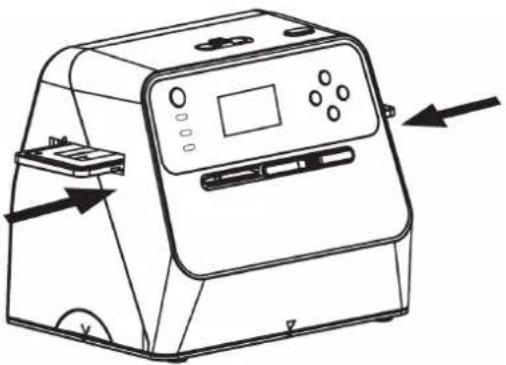
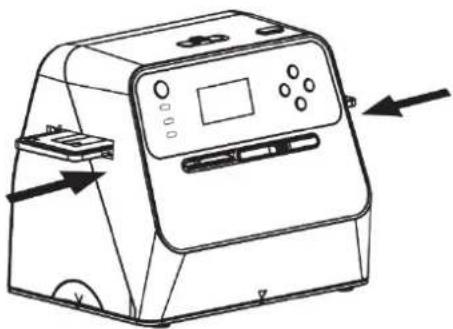
- Insert and push an SD card into the SD card slot until the card locks in place. Push once again to release the card. Unit only accepts SD or SD▲C card up to a maximum of 32GB.
- Load the battery into the scanner as described in the section "Installing the Battery Pack".
- Select the media you want to scan. Slide the photo/film focus switch and photo/film light switch to the appropriate media.
- Connect the power adapter to the household electric power plug, then connect the power adapter to the scanner via the micro USB cable. Make sure the USB terminal is inserted in the correct orientation. Do not use too much force to connect the USB terminal into the micro USB connector.
- Press the power button, then the OK button to select NO (not linked to a computer) on the pop up dialog on the LCD screen. The photo LED (green) or the film LED (Blue) will light up depending on the media chosen.
- The scanner is now ready for use.
Note:
If you do not see the light from your LCD screen, slide the
photo/film light switch to its proper position.
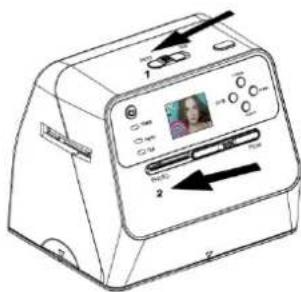
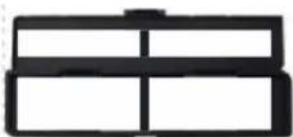
2. Scanning Photo Albums/Magazines/Photos
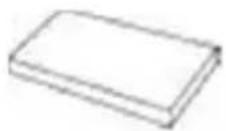
NOTE: the film tray doubles as the base for this unit. You must detach it to scan photos.
-
Slide the photo/film focus switch to "PHOTO"
-
Slide the photo/film light switch to "PHOTO"
text_image
Diagram of a printer with labeled ports and control buttons, showing image display and directional arrows-
With the film tray removed, place the scanner on the picture in the photo album, magazine or photo you want to scan.
-
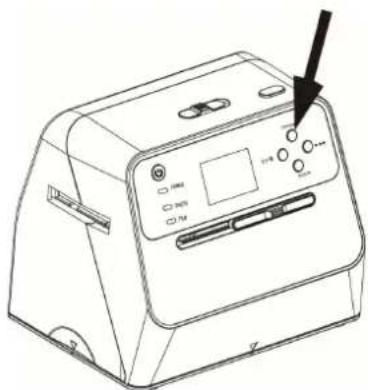
Press the power button to turn on the scanner. You will see the image of the media under the scanner on the LCD screen.
-
Select the size of the photo (3.5" x 5" or 4" x 6", 4" x 4", 4.2" x 3.2", 3.4" x 2.1") by pressing the down button
-
Press the OK button to scan the picture. The scanned digital image will be automatically stored on your SD card.
Note:
4 x 4", 4.2 x 3.2" and 3.4 x 2.1" are the sizes of Poloroid and Fuji instant film photos.
EN
text_image
1 POWER PHOTO PHO 2 3 2 PHOTO PHONote:
You may scan your photo by placing it on the photo tray. You can also scan directly from your photo album without removing the pictures from their holder.
If you see a black image on the LCD screen and do not see the image you want to scan, please check that both switches are on the "P▲OTO" setting. Please do not insert the film holder into the scanner while scanning photos.
- Brightness adjustment: the exposure of the scanner is set automatically. On some occasions you need to
adjust the brightness (exposure) of your subject.
Press the EV/delete button to adjust exposure value. Press the up or down button to adjust the exposure compensation between +2EV to -2EV in 0.5 increments.
The amount of compensation is shown at the bottom of the LCD screen. Press the EV/delete button again to complete the setting.

text_image
Diagram showing two views of a device with labeled UI elements and Chinese text annotations pointing to interface controls.3. Scanning Film
Placing film/slide into the holder
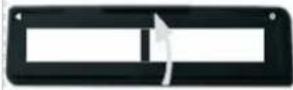
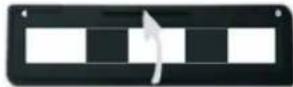
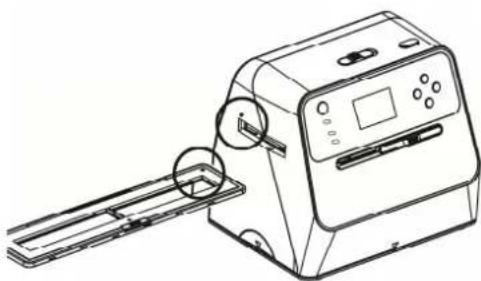
- Keep the glossy side of your film upwards. Open the negative/positive slide holder as Illustrated.
EN
- Put a 135 positive slide/negative film into holder as shown.
natural_image
Simple black rectangular outline with no text, numbers, or symbols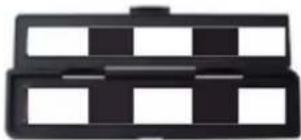
natural_image
Abstract black-and-white geometric pattern with no text or symbols- Close the holder and make sure the holder is closed properly.
Scanning Film and Slide
- Slide the photo/film focus switch to "FILM"
- Slide the photo/film light switch to "FILM"
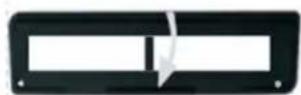
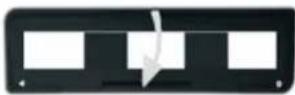
Insert the loaded film/slide holder properly into the slot according to the ▲ or ● sign shown on the scanner and film holder.
natural_image
Line drawing of a printer with an arrow indicating direction and a magnified inset showing the paper edge (no text or symbols)(▲ Insert through the right entrance)
natural_image
Line drawing of a handheld electronic device with a scroll wheel and control panel (no text or symbols)(● Insert through the left entrance)
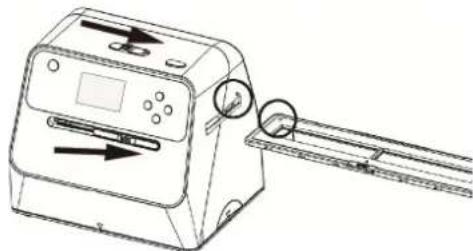
You can adjust the location of the film by moving the film holder; the film holder can be moved in both directions.
Keep your picture in the rectangular white frame shown on the LCD screen. Improper adjustment of picture may result in copying of the black edges of the film holder.
If the black edges of the slide film appears on the top or bottom of the LCD screen, tilt the scanner forward or
backward to eliminate the black edge.
natural_image
Line drawing of a portable electronic device with control panel and buttons, showing directional arrows (no text or symbols)Film Type Selection:
To select film type, press the Film type button.
135 positive (slide)
135 negative
135 black & white


natural_image
Line drawing of a portable electronic device with control buttons and a black arrow pointing to the button (no text or symbols present)Note: Improper selection of film type may result in improper colour in your LCD screen and the scanned images.
Press the OK button to convert the pictures to digital images.
To get the best digitized images, wait for the image display on the LCD screen to adjust to the brightness and become stable. It normally takes 3\~4 seconds, depending on the brightness of your film.
natural_image
Line drawing of a portable electronic device with a black arrow pointing to the top button (no text or symbols present)
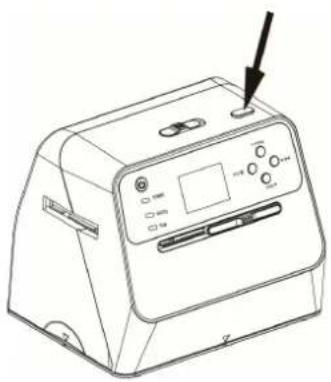
Note: To save power, the scanner will automatically go into sleep mode if you do not use it for more than 3 minutes. You may wake up the scanner by pressing any button.
It will turn off automatically if it has not been used for more than 6 minutes.
Move the film holder to the next picture.
natural_image
Line drawing of a portable kitchen appliance with control panel and buttons (no text or symbols)Brightness adjustment: the exposure of the scanner is set automatically. On some occasions you need to adjust the brightness (exposure) of your subject.
Press the EV/delete button to adjust exposure value. Press the up or down button to adjust the exposure compensation between +2EV to -2EV in 0.5 increments.
The amount of compensation is shown at the bottom of the LCD screen. Press the EV/delete button again to complete the setting.
text_image
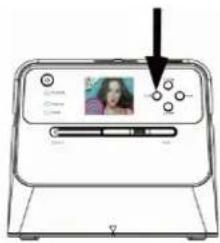
Diagram of a device screen with a photo placeholder and control buttons, showing a cursor pointing to the screen.4. Playback Mode
EN
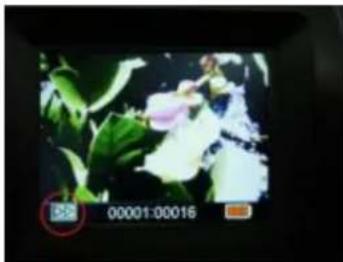
- Press the playback button to playback the digital images saved on your card. You will see the playback icon in the lower left hand corner, as shown below.
text_image
Diagram showing a device with control buttons and an LCD screen displaying time, date, and status indicators.- Press the up button to review the next image. Press the down button to review the previous image.
text_image
Technical diagram of a printer with labeled buttons and indicator arrows, showing front panel and back panel views.-19-
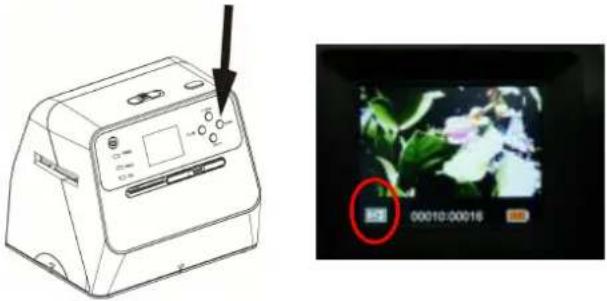
- Press the playback button again for slideshow Icon shown as below:
natural_image
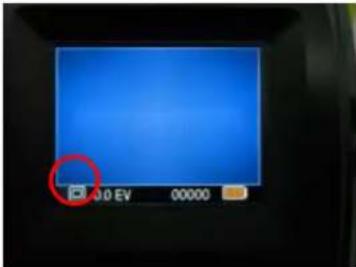
Digital camera interface showing a flower image with green leaves and white flowers, no readable text or symbols in the main scene.- Press the playback button again to go back to the original screen.
Icon shown as below:
text_image
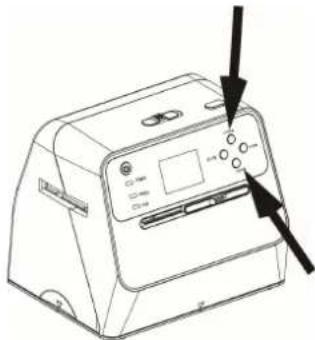
0.0 EV 000005. Delete Mode
-
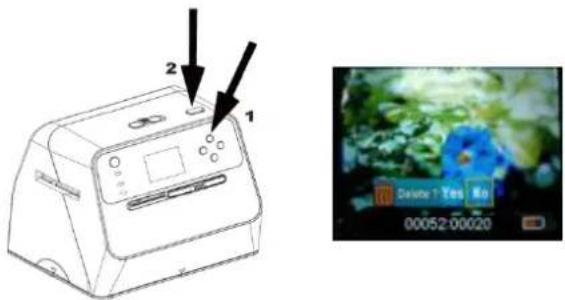
To delete an image: Under Playback Mode, press the delete button once and then the up button to select YES. Press the OK button to delete current image.
-
To delete all images: Press the delete button twice and then the up button once to select YES. Press the OK button to delete.
-
To format the SD card: Press the delete button three times and then the up button and select YES. Press OK to begin formatting.
text_image
2 1 Delive 1 Yes No 00052:00020Note: a. At least one picture has to be taken for you to enter Delete Mode and format your SD card.
b. Formatting the SD card will delete all the files in the card. Download your files in the SD card onto your computer before formatting the SD card.
c. If you don't want to delete images, push the down button once to select NO, then press the OK button to leave Delete Mode.
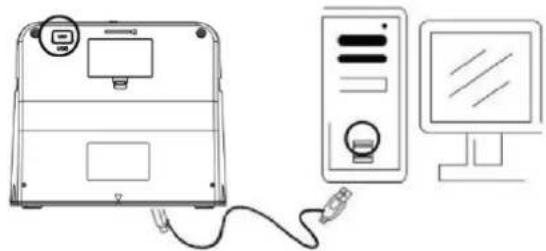
6. Linking the Card to Computer
1
2
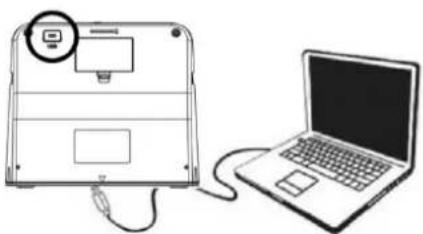
- Connect the scanner to the computer via the USB cable.
natural_image
Line drawing of a laptop connected to a device with a magnified inset showing a screen (no text or symbols)- Turn on the power of the scanner.
- Press the up button to select "SD to PC", then select YES, then press the OK button for confirmation. To save power, the LCD screen will be turned off when connected to a computer.
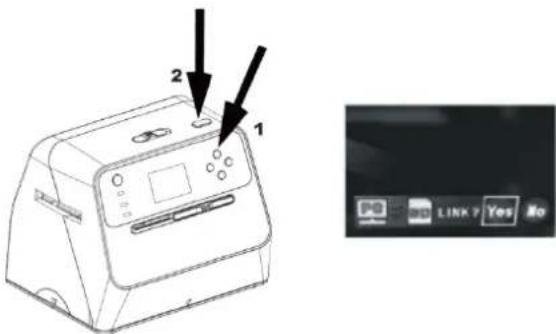
text_image
1 2 LINK Yes No7. Appendix
EN
Specifications
| Image Sensor 1/2.33" | 14 Mega CMOS Sensor, |
| Preview and Review 2.4" Colour LCD Display | |
| Lens Specification F/No = 3.4, f = 5.2 mm | |
| Colour Balance Automatic | |
| Exposure Control Automatic & Manual adjustment | |
| Supported photo size 4 | X 6 inches. and 3.5 X 5 inches |
| Supported photomedia | Photo album/magazine/photo |
| Supported Film SizeAuto Cropping | 135 Negative & Slide (3:2) |
| Supported Film TypeAuto Conversion | 135 SlideColour Negative Film (135, 110 & 126)Black & White Negative Film |
| Focusing Fixed Focus/Dual Focus | |
| EV adjustment Yes, ± 2.0 EV | |
| PC Interface USB 2.0 | |
| USB Type Micro USB Type B | |
| Image Format Photo 3:2 Ratio135 film 3:2 Ratio110 Negative 4:3 Ratio126 Negative, 1:1 Ratio | |
| Light Source Photo:24 and film 3 white LED | |
| Power | Power adaptor: 5V/1 amp.Li-ion 3.7V/1050mAh Battery |
| Net Weight | Approximately 1050 gm. |
| Dimension | 18.2 (▲) x 20.9 (W) x 16.2 (D) cm |
Specifications are subject to change without prior notice.
Icons & Indicators
 | Battery Full |  | Delete One |
 | Battery 2/3 |  | Delete All |
 | Battery 1/3 |  | Format SD Card |
 | Battery Empty |  | Yes |
 | 135 Slide |  | No |
 | 135 Negative Film |  | Card Error |
 | B/W 135 Negative Film |  | Card Full |
 | 110 Negative Film |  | Card Lock |
 | 126 Negative Film | Playback Mode | |
 | PC-SD-CardSelection |  | SlideShow |
 | PC-SD CardLink-connected | [8630] | Wait |
| 3.5 X 5/4 X 6 | Photo size selected | ||
 | EV Compensation Indicator | ||
| +0.0EV | EV Compensation | ||
 | Available number take in SD card | ||
PC System Requirements
- Pentium ^ P4 1.6G▲z or equivalent AMD Athlon
● Free USB 2.0 port - 512MB RAM
● 500MB free hard disk space
● 1024 x 768 pixel colour monitor - CD-ROM drive
- Windows ^ XP Service Pack II/Vista ^TM , 32/64 bits Windows 7/Windows 8/Windows 10
Mac System Requirements
● PowerPC G5/Intel Core Duo recommended
● Free USB 2.0 port
- 768MB RAM
- 500MB free hard disk space
● 1024 x 768 colour monitor
- CD-ROM drive
- Mac 10.5 \~ Up
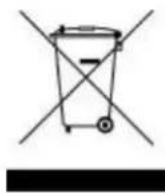
This symbol found on the product or in the instructions indicate that your electrical and electronic equipment should be disposed of separately from your household waste at the end of its life. There are separate collection systems for recycling in the EU. For more information, please contact the local authority or your retailer where you purchased the product.
reflecta®
reflecta GmbH
Merkurstrasse 8 Fon +49 74 57/94 65 60
72184 Eutingen, Germany Fax +49 74 57/94 65 72
natural_image
Line drawing of a portable electronic device with control panel and display (no text or symbols)natural_image
Line drawing of a portable electronic device with control panel and buttons (no text or symbols)natural_image
Line drawing of a stylus or tool with a handle and segmented body (no text or symbols)natural_image
Pure technical line drawing of a rectangular frame with internal cutouts and a small component at the bottom (no text or symbols)natural_image
Simple line drawing of a rectangular device with three square cutouts and a small labeled component on the side (no text or symbols)natural_image
Line drawing of a cylindrical mechanical component with two protruding ports (no text or symbols)Adaptador
natural_image
Coiled black cable with two connectors (no text or symbols visible)Cable USB

Batería de litio
text_image
LCD Screen OK Button EV/delete Film Type/Up Button Playback Button Photo Size/Down Button Power Button Film Holder Slot Photo/Film Light Switch Photo/Film Photo Tray Battery Charging LED Photo Status LED Film Status LEDtext_image
Micro USB Connector SD Card slot USB Battery Doortext_image
Battery Door USBnatural_image
Line drawing of a device connected to a server and computer monitor (no text or symbols)natural_image
Line drawing of a device connected to a power outlet, showing cable and socket (no text or symbols)Nota:
text_image
Diagram showing two views of a device with photo, film, and display screens, annotated with arrows indicating action points.natural_image
Two black rectangular panels with white rectangular cutouts and directional arrows, no text or symbols present.natural_image
Simple black rectangular shape with vertical and horizontal lines, no text or symbols present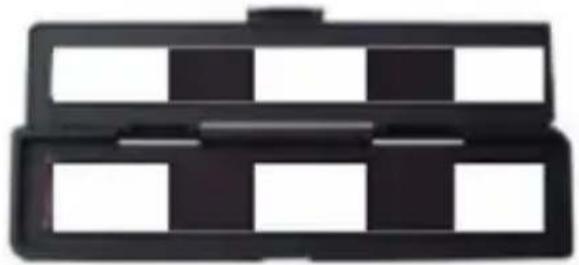
natural_image
Black rectangular object with white and black checkered pattern (no text or symbols)natural_image
Pure electrical circuit lines without any symbols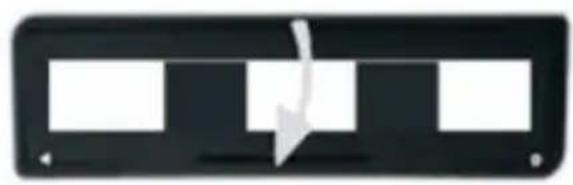
natural_image
Pure electrical circuit lines without any symbolsnatural_image
Line drawing of a printer with directional arrows indicating movement, no text or symbols presentnatural_image
Line drawing of a printer with a paper feed and control panel (no text or symbols)natural_image
Line drawing of a portable electronic device with control panel and buttons, showing directional arrows (no text or symbols)text_image
Technical line drawing of a device with labeled buttons and a black arrow pointing to the button.natural_image
Line drawing of a portable electronic device with control panel and indicator lights (no text or symbols)natural_image
Line drawing of a portable electronic device with control panel and buttons, showing directional arrows (no text or symbols)text_image
Diagram of a device with labeled buttons and a screen displaying a photo, showing a cursor pointing to the button.text_image
Diagram of a device with control panel and screen display showing time, date, and camera settingsnatural_image
Line drawing of a portable electronic device with control panel and buttons, no text or symbols presenttext_image
Technical diagram of a printer with labeled parts and arrows indicating components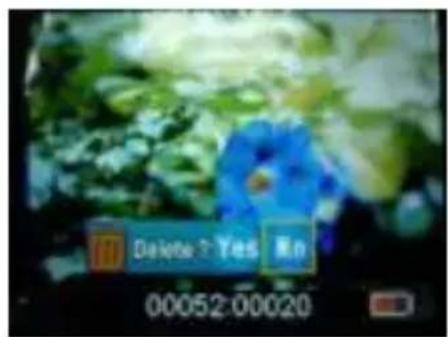
text_image
Delete? Yes No 00052:00020natural_image
Line drawing of a laptop connected to a device with a cable, showing no text or symbols present.text_image
Technical diagram of a device with labeled parts, showing two arrows pointing to components on the top panel.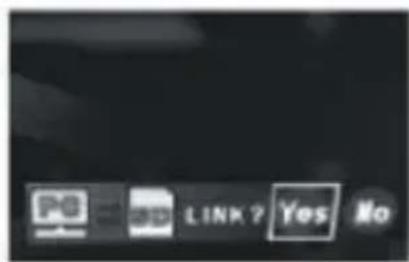
text_image
No LINK? Yes No7. Apéndice
Especificaciones
natural_image
Simple line drawing of a trash bin with two crossed lines indicating no waste or prohibition (no text or symbols)reflecta®
reflecta GmbH
Merkurstrasse 8
natural_image
Line drawing of a portable kitchen appliance with control panel and display (no text or symbols)natural_image
Line drawing of a portable kitchen appliance with control panel and buttons (no text or symbols)text_image
Combo Album Scanner LIFE RANJALManuel
natural_image
Line drawing of a stylized tool or plunger (no text or symbols)Brosse de nettoyage
natural_image
Simple line drawing of a rectangular frame with internal compartments and a small labeled component (no text or symbols)
natural_image
Simple line drawing of a rectangular device with three recessed slots and a small connector (no text or symbols)natural_image
Simple line drawing of a cylindrical object with a protruding port (no text or symbols)
natural_image
Coiled black cable with two connectors (no text or symbols visible)
text_image
LCD Screen OK Button EV/delete Film Type/Up Button Playback Button Photo Size/Down Button Power Button Film Holder Slot Photo/Film Light Switch Photo/Film focus switch Photo Tray Battery Charging LED Photo Status LED Film Status LEDtext_image
Micro USB Connector SD Card slot Battery Doortext_image
Battery Door USBnatural_image
Line drawing of a device connected to a server and monitor (no text or symbols)natural_image
Line drawing of a device connected to an electrical outlet, showing wiring and a close-up of the screen (no text or symbols)Remarque :
2. Scanner des albums photos/magazines/photos
text_image
Diagram showing two views of a device with labeled buttons and display screens, highlighting UI control points.natural_image
Black rectangular object with a white horizontal bar and a white arrow pointing right (no text or symbols)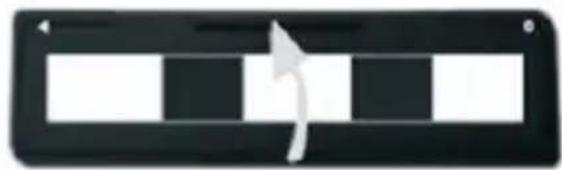
natural_image
Black and white striped rectangular button with a curved arrow pointing right (no text or symbols)natural_image
Abstract black geometric shape with no text or symbols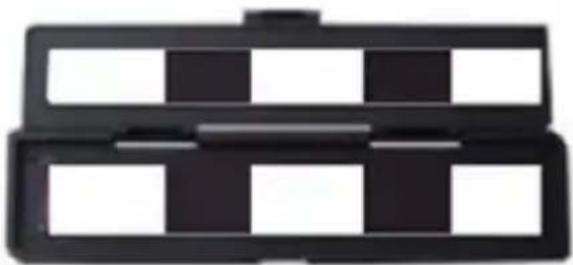
natural_image
Black plastic tray with white and black square cutouts (no text or symbols)natural_image
Pure electrical circuit lines without any symbols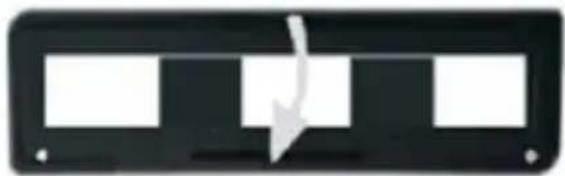
natural_image
Pure electrical circuit lines without any symbolsnatural_image
Line drawing of a portable device with arrows indicating flow or movement, no text or symbols presentnatural_image
Line drawing of a printer with a slide and control panel (no text or symbols)natural_image
Line drawing of a portable electronic device with control panel and buttons, showing directional arrows (no text or symbols)text_image
Line drawing of a portable electronic device with labeled buttons and a black arrow pointing to the button.natural_image
Line drawing of a portable electronic device with control panel and buttons (no text or symbols)natural_image
Line drawing of a portable electronic device with control panel and buttons, showing directional arrows (no text or symbols)text_image
Diagram of a device with a screen displaying a photo, labeled with icons and a black arrow pointing to the screen.4. Mode lecture
natural_image
Line drawing of a portable electronic device with control panel and indicator lights (no text or symbols)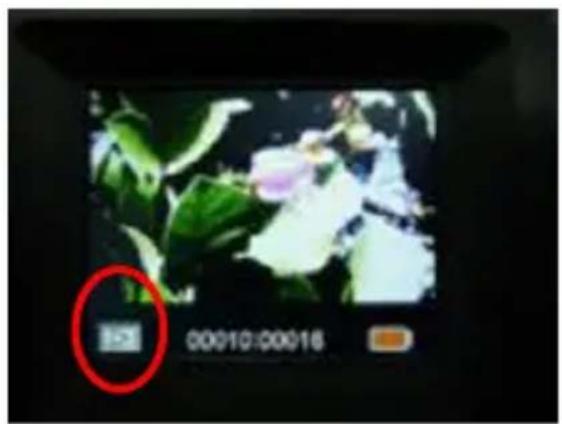
text_image
00:0010:00:016natural_image
Line drawing of a portable electronic device with control panel and buttons, no text or symbols presenttext_image
Diagram of a printer with labeled parts and arrows indicating process flow or positioning
text_image
Delay 3 Yes No 00052:00020natural_image
Line drawing of a laptop connected to a device with a cable, showing no text or symbols present.text_image
Diagram of a printer with labeled parts and arrows indicating measurement or assembly steps
text_image
No LINK? Yes No7. Annexe
natural_image
Simple line drawing of a trash bin with two crossed lines indicating no waste or restriction (no text or symbols)reflecta®
reflecta GmbH
Merkurstrasse 8 Tél. : +49 74 57/94 65 60
natural_image
Line drawing of a portable kitchen appliance with control panel and display (no text or symbols)Scanner Album Combo
Manuale d'uso
Contenuti
IT
- Preparazione....2
natural_image
Line drawing of a portable kitchen appliance with control panel and buttons (no text or symbols)Scanner Album Combo
text_image
Combo Album Scanner LIFE MANUALManuale
natural_image
Line drawing of a stylized tool or plunger (no text or symbols)natural_image
Pure technical diagram of a rectangular enclosure or enclosure with internal partitions and a small component (no text or symbols)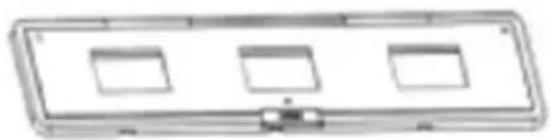
natural_image
Simple line drawing of a rectangular device with three square cutouts and a small connector (no text or symbols)natural_image
Simple line drawing of a cylindrical object with a protruding port (no text or symbols)
natural_image
Coiled black cable with two connectors (no text or symbols visible)text_image
LCD Screen OK Button EV/delete Film Type/Up Button Playback Button Photo Size/Down Button Power Button Film Holder Slot Photo/Film Light Switch Photo/Film focus switch Photo Tray Battery Charging LED Photo Status LED Film Status LEDtext_image
Micro USB Connector SD Card slot USB Battery Doortext_image
Battery Doornatural_image
Line drawing of a device connected to a desktop computer via cable (no text or symbols)natural_image
Line drawing of a device connected to an electrical outlet, showing wiring and a control panel (no text or symbols)Nota:
text_image
Diagram showing two views of a device with labeled buttons and display screens, highlighting UI control points.natural_image
Pure electrical circuit lines without any symbols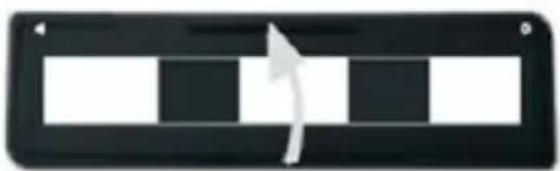
natural_image
Black rectangular object with three vertical black stripes and a white arrow pointing right (no text or symbols)natural_image
Simple black rectangular frame with vertical and horizontal lines, no text or symbols present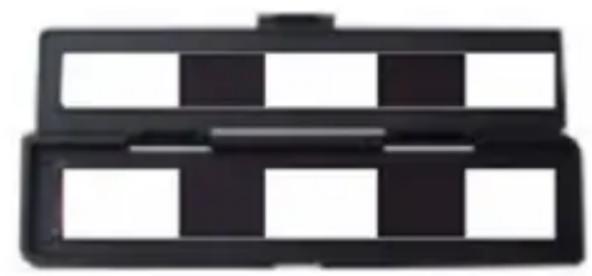
natural_image
Black plastic tray with four square cutouts, no text or symbols visiblenatural_image
Pure electrical circuit lines without any symbols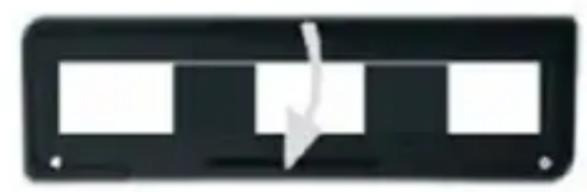
natural_image
Pure electrical circuit lines without any symbolsnatural_image
Line drawing of a portable device with directional arrows and a close-up view of its handle (no text or symbols)natural_image
Line drawing of a handheld electronic device with a rack and control panel (no text or symbols)natural_image
Line drawing of a portable electronic device with control panel and buttons, showing directional arrows (no text or symbols)text_image
Line drawing of a portable electronic device with labeled buttons and a black arrow pointing to the control panel.natural_image
Line drawing of a portable electronic device with control panel and buttons (no text or symbols)natural_image
Line drawing of a portable electronic device with control panel and buttons, showing directional arrows (no text or symbols)text_image
Diagram of a device with a screen displaying a photo, labeled with icons and a black arrow pointing to the screen.natural_image
Line drawing of a portable electronic device with control panel and indicator lights (no text or symbols)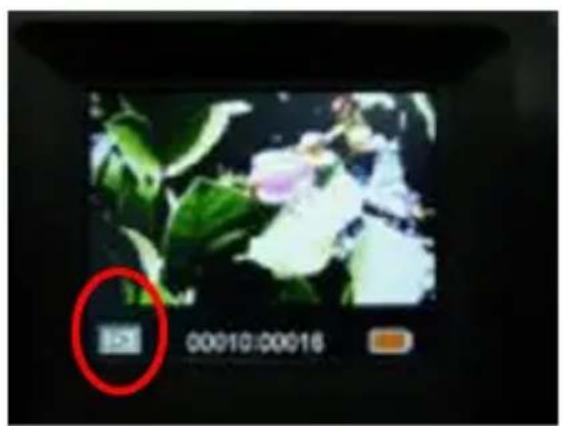
text_image
00010:00016natural_image
Line drawing of a portable device with control panel and buttons, no text or symbols presenttext_image
Diagram of a printer with labeled parts and arrows indicating process flow or positioning
text_image
Delay 3 Yes No 00052:00020natural_image
Line drawing of a laptop connected to a device with a cable, showing no text or symbols present.text_image
Technical diagram of a printer with labeled parts and arrows indicating assembly or inspection steps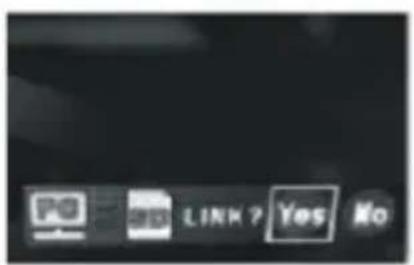
text_image
PO LINK ? Yes No7. Appendice
Specifiche
natural_image
Simple line drawing of a trash bin with two crossed lines indicating no waste or restriction (no text or symbols)reflecta®
reflecta GmbH
Merkurstrasse 8 Tel.: +49 74 57/94 65 60
72184 Eutingen, Germania Fax: +49 74 57/94 65 72
natural_image
Line drawing of a portable kitchen appliance with control panel and display (no text or symbols)Combo Albumscanner
Gebruikshandleiding
Inhoudsopgave
NL
- Voorbereiding 2
Standaard accessoires 2
Onderdeelnamen 3
natural_image
Line drawing of a portable kitchen appliance with control panel and buttons (no text or symbols)Combo Albumscanner
natural_image
Line drawing of a portable computer with a label 'COMBOA BIOM SCANNER' (no other text or symbols)Handleiding
natural_image
Line drawing of a stylized pen or plunger (no text or symbols)natural_image
Simple line drawing of a rectangular device with internal compartments and a small labeled component (no text or symbols)natural_image
Simple line drawing of a rectangular device with three square cutouts and a small base (no text or symbols)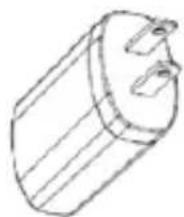
natural_image
Line drawing of a cylindrical mechanical component with a flanged top and side port (no text or symbols)Adapter
natural_image
Coiled black cable with two connectors (no text or symbols visible)USB-kabel
Lithiumbatterij
Onderdeelnamen
NL
text_image
LCD Screen OK Button EV/delete Film Type/Up Button Playback Button Photo Size/Down Button Power Button Film Holder Slot Photo/Film Light Switch Photo/Film focus switch Photo Tray Battery Charging LED Photo Status LED Film Status LED| EN | NL |
| Photo/Film focus switch Foto-/filmfocusschakelaar | |
| Power Button Aan-/uittoets | |
| Film Holder Slot Sleuf voor filmhouder | |
| Photo/Film Light Switch Foto-/filmlichtschakelaar | |
| Photo Tray Fotolade | |
| LCD Screen LCD-scherm | |
| OK Button OK-toets | |
| EV/delete | EV/wissen |
| Film Type/Up Button Filmtype-/omhoogtoets | |
| Playback Button Weergavetoets | |
| Photo Size/Down Button fotogrootte-/omlaagtoets | |
| Battery Charging LED LED batterijlading | |
| Photo Status LED LED fotostatus | |
| Film Status LED LED filmstatus | |
text_image
Micro USB Connector SD Card slot Battery Door| EN | NL |
| Micro USB Connector MicroUSB | B-poort |
| SD Card slot SD-kaartsleuf | |
| Battery Door Batterijklepje |

text_image
Brushtext_image
Battery Door| EN | NL |
| Battery Door Batterijklepje |
natural_image
Line drawing of a device connected to a desktop computer via cable (no text or symbols)natural_image
Line drawing of a device connected to a power outlet, showing cable and control panel (no text or symbols)Opmerking:
text_image
Diagram of a printer with labeled buttons and display screen, showing directional arrows for photo and film operations.text_image
Diagram showing two views of a device with photo, display, and control buttons labeled in Chinese.3. Film scannen
natural_image
Black rectangular object with a white arrow pointing right, no visible text or symbols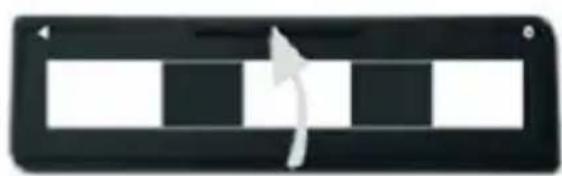
natural_image
Black and white striped rectangular button with a curved arrow pointing right (no text or symbols)natural_image
Abstract black geometric shape with no text or symbols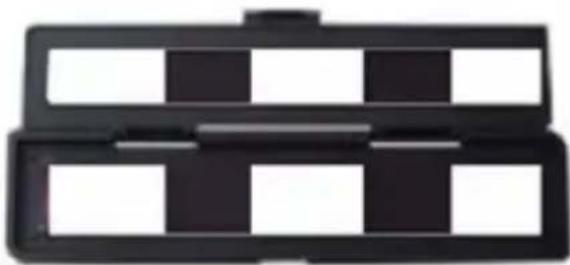
natural_image
Stacked black plastic tray with four white compartments (no text or symbols visible)natural_image
Pure electrical circuit lines without any symbols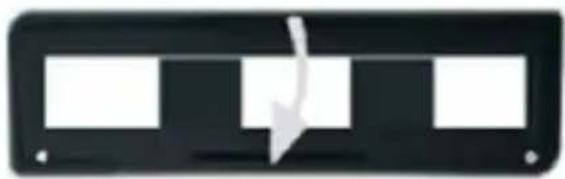
natural_image
Black rectangular object with three white rectangular blocks and a white arrow pointing downward (no text or symbols)Film en dia scannen
NL
natural_image
Line drawing of a portable device with directional arrows and a close button, no text or symbols presentnatural_image
Line drawing of a printer with a rack and control panel (no text or symbols)(● Insteken via linker ingang)
natural_image
Line drawing of a portable electronic device with control panel and buttons, showing directional arrows (no text or symbols)Selectie filmtype:
text_image
Line drawing of a device with labeled buttons and an arrow pointing to the control panelnatural_image
Line drawing of a portable electronic device with control panel and buttons (no text or symbols)natural_image
Line drawing of a portable electronic device with control panel and buttons, showing directional arrows (no text or symbols)text_image
Diagram of a device with a screen displaying a photo, showing control buttons and an arrow pointing to the screen.4. Afspeelmodus
text_image
Diagram of a portable device with control panel and screen showing time, date, and status indicatorsnatural_image
Line drawing of a portable device with control panel and buttons, no text or symbols presentnatural_image
Digital camera display showing a wedding photo with green leaves and white flowers, no readable text or symbols on the image itself.text_image
Diagram of a printer with labeled parts and arrows indicating component positions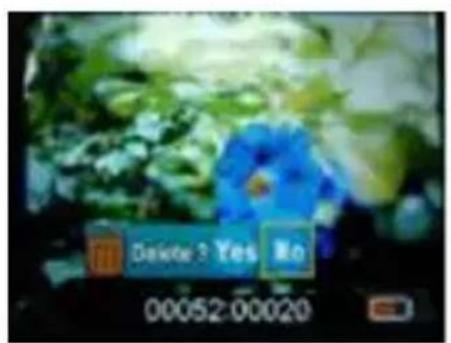
text_image
Delay 3 Yes No 00052:00020natural_image
Line drawing of a laptop connected to a device with a cable, showing no text or symbols present.text_image
Technical diagram of a printer with labeled parts and arrows indicating components
text_image
OK Cancel LINK? Yes No7. Bijlage
Specifications
natural_image
Simple line drawing of a trash bin with two crossed lines and a black horizontal bar at the bottom (no text or symbols)reflecta®
reflecta GmbH
Merkurstrasse 8 Tel.: +49 74 57/94 65 60