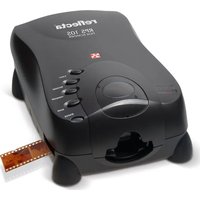
CyberView X5 - Scanner Reflecta - Free user manual and instructions
Find the device manual for free CyberView X5 Reflecta in PDF.
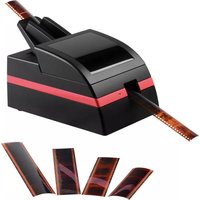
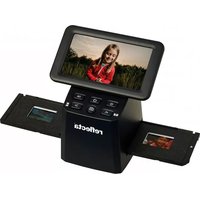
| Product type | 35 mm slide and film scanner |
| Brand | Reflecta |
| Model | CyberView X5 |
| Optical resolution | 10,000 dpi |
| Resolutions available | 300, 600, 1,000, 1,800, 2,500, 3,600, 5,000, 7,500, 10,000 dpi |
| Color depth | 48 bits (16 bits per RGB channel) |
| Supported film types | 35 mm mounted slides, 35 mm film strips (positive, negative, black and white) |
| Output formats | TIFF (uncompressed), JPEG (compressed, adjustable quality from 20 to 100) |
| Power supply | 12 V, 1.5 A mains adapter (input 100-240 V ~ 50/60 Hz) |
| Connectivity | USB 2.0 (cable included) |
| Main features | One-touch scanning, preview, exposure adjustments, color balance, curves and levels, MagicTouch (dust and scratch removal), Auto Color, direct sharing to Facebook and Dropbox |
| Included software | CyberView (TWAIN driver), image editing software (Presto! ImageFolio) |
| Dimensions (approx.) | 150 x 150 x 150 mm |
| Weight (approx.) | 1 kg |
| Operating temperature | 10 °C to 40 °C |
| Operating humidity | 15 % to 76 % RH (non-condensing) |
| Maintenance | Wipe with a soft, dry cloth. Do not use chemicals. Avoid condensation. |
| Safety | Use only the provided adapter. Do not open the casing. Avoid exposure to moisture and extreme temperatures. |
| Available spare parts | Power adapter, USB cable, software CD (contact Reflecta after-sales service) |
| Repairability | Contact Reflecta technical support (www.reflecta.de, mail@reflecta.de) |
| Warranty | 2 years for private use, 1 year for commercial use (from date of purchase, upon presentation of receipt) |
| Package contents | Scanner, power adapter, USB cable, CyberView driver CD, editing software CD, printed user manual |
Frequently Asked Questions - CyberView X5 Reflecta
User questions about CyberView X5 Reflecta
0 question about this device. Answer the ones you know or ask your own.
Ask a new question about this device
Download the instructions for your Scanner in PDF format for free! Find your manual CyberView X5 - Reflecta and take your electronic device back in hand. On this page are published all the documents necessary for the use of your device. CyberView X5 by Reflecta.
USER MANUAL CyberView X5 Reflecta
reflecta RPS 10M CyberView X5 User's Manual
Federal Communications Commission (FCC) statement
this equipment has been tested and found to comply with the limits for a class B digital device, pursuant to Part 15 of the FCC rules. these limits are designed to provide reasonable protection against harmful interference in a residential installation. this equipment generates uses and can radiate radio frequency energy and, if not installed and used in accordance with the instructions, may cause harmful interference to radio communications. However, there is no guarantee that interference will not occur in a particular installation. if this equipment does cause harmful interference to radio or television reception, which can be determined by turning the equipment off and on, the user is encouraged to try to correct the interference by one or more of the following measures:
• re-orient or relocate the receiving antenna.
- increase the separation between the equipment and receiver.
- Connect the equipment into an outlet on a circuit different from which the receiver is connected to.
- Consult the dealer or an experienced radio/ tV technician for help.
Warning :
use only shielded signal cables to connect i/o devices to this equipment. You are cautioned that changes or modifications not expressly approved by the party responsible for compliance could void your authority to operate the equipment.
Table of Contents
Getting Started 4
Quick Installation Guide (QIG) 6
installing software and driver 6
installing Hardware 8
inserting 35mm slides 7
inserting 35mm Film strips 8
additional Features 9
one Button scan 9
How to Scan Slides 10
steP 1 - acquire driver 10
steP 2-select Film type 10
steP 3 - optional Prescan 10
steP 4 - set scan settings 10
steP 5 - set scan Preferences 12
steP 6 - scan 15
steP 7 - exit 15
How to Use Sharing Function 18
scanning into Facebook 19
to scan to dropbox 21
User Interface 22
i main Window area 23
ii Preview Window area 27
iii active Frame setting area 27
iV thumbnail Panel area 28
29Technical Support 30
GETTING STARTED
Check the package content before getting started.
For Quick installation please refer to Quick installation Guide.

important! save the original box, receipt and packing material for future shipping needs.
Package Contents
- slide scanner.
- Power a dapter
INPUT/输入/输入: 100-240V \~ 50/60Hz 0.6A OUTPUT/输出/输出: +12V = 1.5A ⊖—⊕—⊕
Warning! Using any other power adapter may severely damage the scanner and will void the product warranty.
- USB 2.0 Cable.
- CyberView driver.
- application software CD for scan editing.
- Printed user's manual.
NOTE:
- application software means the imaging software such as Prest "image Folio" this is subject to change without notice.
GENERAL GUIDANCE:
- only use the supplied USB-Cable. Connect the computer to the scanner directly using the USB 2.0 cable.
- do not use a Hub or extension cable. only use the usB ports on the rear of desktop computers.
- if there are any other devices (multifunction device, printers, scanners, web-cam) connected to the computer through usB disconnect them.
- a minimum of 1GB ram (Windows/mac) is required.
| Operating Ambient Temperature Range50° to 104°F (10° to 40°C) |
| note: do not turn on the scanner unless it is within this range. if the scanner has been stored or transported outside of this range, allow it to return to within this range before turning it on. |
| Operating Ambient Humidity Range 15% to 76% relative humidity (non-condensing) |
| note: if the scanner is stored or to be transported in cold temperature and then brought into a warm / humid environment condensation may occur. |
This device is designed solely for private use and is not intended for commercial use. The warranty is reduced from 2 years to 1 year if errors or defects arising from inappropriate use, improper operation or stress occur. The guarantee period of the device for private use is 2 years or 20,000 scans.
TWAIN scanner plug-in Installation Guide for Adobe Photoshop Elements 12 You can install the TWAIN component that was installed with versions of Photoshop Elements earlier than version 9 for use with Elements 11 or 12.
Important: Do not move plug-ins from previous versions of Photoshop Elements into
the Photoshop Elements 11 or later > Plug-Ins folder. Also, don't set the Photoshop Elements 8 (or earlier) > Plug-Ins folder as the Additional Plug-Ins Folder in Preferences.
Find complete information at official Adobe website:
http://helpx.adobe.com/photoshop-elements/kb/twain-installed-photoshop-elements-11.html
Macintosh
If you would like to have TWAIN support on Mac OS, then Adobe strongly recommends
that you access your device through Rosetta (PPC) OS. Otherwise, you scan your image,
and then open it in Photoshop Elements.
To install the legacy TWAIN plug-in for Mac OS, copy the ImportModules folder from:
//Applications/Adobe Photoshop Elements
into
//Applications/Adobe Photoshop Elements
*The version Number is 11 or 12 depending on the Photoshop version you have installed.
Windows
Adobe strongly suggests that you use WIA support for your device, if available. If your
device does not support WIA drivers, then try updating your TWAIN driver. Contact the
manufacturer of your device for further TWAIN support.
To install the legacy TWAIN plug-in, do the following:
For Windows (32 bit), copy the Import-Export folder from:
C:\Program Files\Adobe\Photoshop Elements <version number\Optional Plug-Ins\
into
C:\Program Files\Adobe\Photoshop Elements
For Windows (64 bit), copy the Import-Export folder from:
C:\Program Files (x86)\Adobe\Photoshop Elements
into
C:\Program Files (x86)\Adobe\Photoshop Elements
*The version number is 11 or 12, depending on the Photoshop version you have installed.
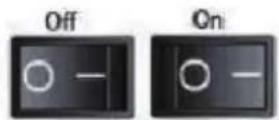
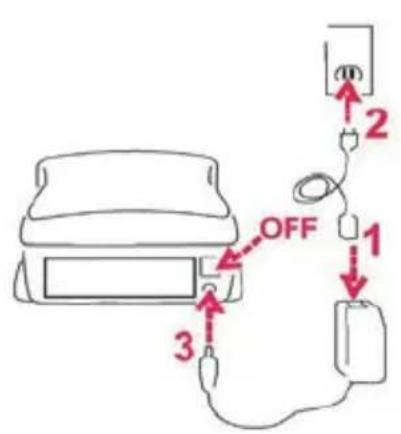
installing hardware
a. Connect the slide scanner to a power source.
- Locate the power switch on the lower right side of the scanner. make sure the scanner is turned off.
-
Plug the aC adapter into an aC power source First before plugging it into the scanner.
-
attach the usB cable to the computer using the standard usB adapter end. attach the usB adapter end of the cable to back panel of the scanner.
Inserting Mounted Slides
attention Before scanning...
make sure there is no filmstrip inside scanner before you insert the slide and there is no slide inside scanner before you insert the filmstrip.
Please note the slide and filmstrip cannot be put into the scanner at the same time.
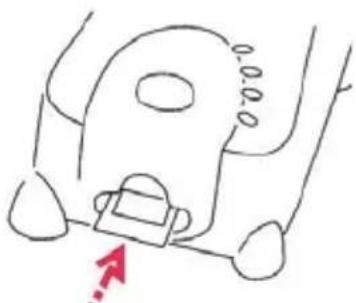
mounted slides
- insert the slide into the slot on the front of the unit, with the dull (emulsion) side facing down
natural_image
Simple line drawing of a vehicle's seat and dashboard (no text or symbols)Inserting Mounted Slides (Continued...)
- set scan settings and preferences see Page 10
- see scanning directions on page 10
note: some slide mounts are thin and will require you to apply gentle pressure to the edge of the mount after insertion for it to register in the scanner, you will know it is detected by the Preview bar in the user interface, the icons will illuminate in color

no slide detected

slide detected
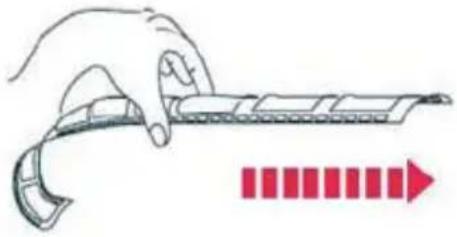
inseeting Filmstrips
- insert the filmstrip with emulsion side up from the left fm entrance.
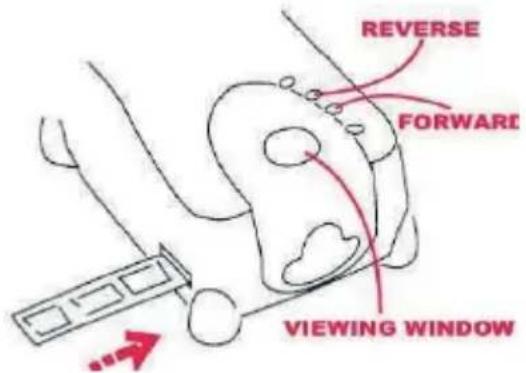
- scanner will auto load and position the first frame in the center of the viewing window, if the first frame is not at the correct position, please move it by clicking "ForWard" or "reVerse" button and you can also move it via the fine tuning function in CyberView interface. see Page 22
- see scanning directions on page 10
You can load the film easily by holding around the 3rd frame of the limstrip when inserting, film strips/rolls are inserted facing dull side (emulsion) down
natural_image
Illustration of a hand holding a flexible electronic device with a red arrow indicating direction (no text or symbols)Additional features
Buttons on the scanner
eject - ejects the Film strip reverse - reverses the strip one frame Forward - advances the film one frame scan - see one Button scanning (below)
One Button scan
- open the CyberView (see page 10 to acquire the CyberView driver program)
- Configure scan settings (see Page 10-11)
- select the scan to directory, file format (tiF or JPG, once configured, Press the scanner button) to begin scanning.
One Touch Button
NOTE: if you do not open CyberView First, the scan button will not function.
HOW TO SCAN SLIDES
STEP 1 – Acquire Driver
(For PC user)
open CyberView from start – all Programs -CyberView
(For maC user)
open macintosh Hard drive – applications – CyberView
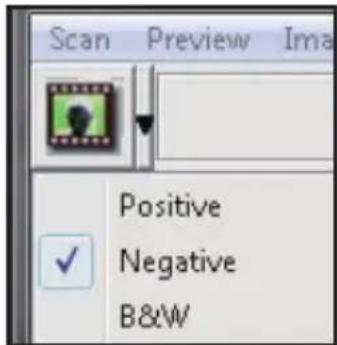
STEP 2 – select Film Type
select the film type to be scanned - Positive, negative or B&W (Black and White).
STEP 3 – Optional Prescan
select the "Prescan Current Frame" to prescan the slide currently loaded into the scanner or "Prescan all.." to prescan an entire negative strip

Pre-scanning should be used to manually adjust color/edit settings for each slide before doing the final scan. it's possible to set different settings for each slide to be scanned.
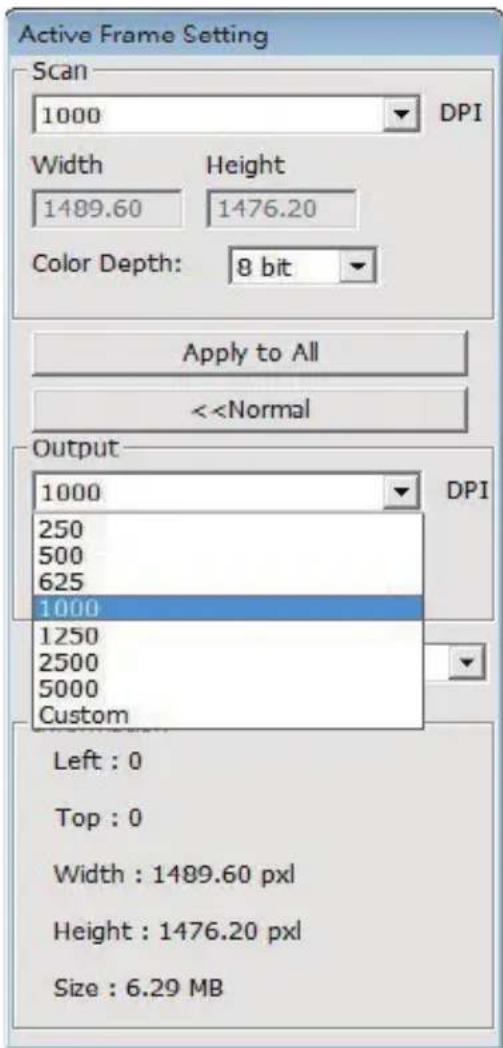
STEP 4 – set scan settings
a. resolution
the default scanning resolution is 1000dpi, additional resolution options are listed below.
set scan settings (Continued...)
notice: Higher scanning resolutions result in greater scanning time and hardisk space requirements.
b. Color depth
Choose between 8 and 16bit. a higher color depth setting will result in a larger range of colors in the final scanned image.
the Film scanner color depth is 48 bit true color. the scanning software has the capability of selecting 8 bit color mode or 16 bit color mode when scanning, this will produce 24 or 48 bit color images, 8 bits or 16 bits per red, Green and Blue color channels.
Example:
8 bit mode = 8 Red, 8 Green, and 8 Blue for a total of 24 bit color
16 bit mode = 16 Red, 16 Green, and 16 Blue for a total of 48 bit color
Configuring scan Preferences
1. select Browse and choose the designated folder to save the scanned image to 2. enter the file name. set scan Preferences (Continued...)
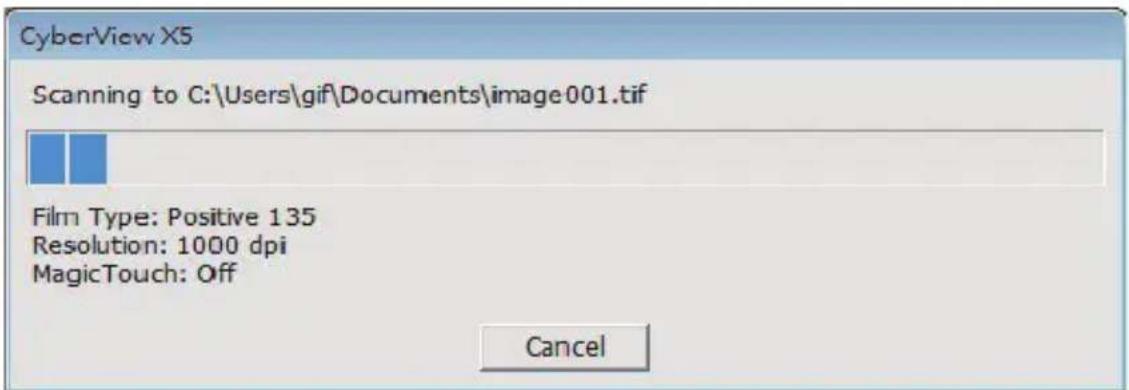
3. trailing index after Base File name digits: defines the length of the file name and numbering sequence up to 6 digits example image1 or image000001.  4. options - use Film index: use the number assigned to the frame on it's position. user defined start number: enter a specific customizable start number 5. Choose the file type, "tif" or "JPG".(tif uncompressed or JPG Compressed-Choose image quality for JPeG. (20-100) 100 offers the least amount of compression  advanced setting  "auto exposure" - attempts to find the correct exposure to get the widest range of whites and blacks while putting the middle grays at around the middle of the data range. "auto Balance"- using the image histogram to balance RGB channels. it estimates images' color cast and adjust the images accordingly "auto Contrast" - the scanner software analyzes the data and automatically adjusts the setting for the White and Black Points. "digital noise reduction" – applies a filter, reducing the film grain. "multipass Xposure" - When enabled multi-exposure performs a triple scan to obtain the best possible image, this process captures the three individual scans, first a normal pass then two more scans to highlight the shadow details to expose the darker areas more fully, the software then intuitively calculates the final scan, which now contains the data from all three scans. "multiple sampling" - Configure the settings to scan a single image (multiple times) 2x, 4x, 8x or 16x for the highest quality output. Please note this greatly increases scan time. With multi-sampling image noise is a thing of the past. default scanning area adjust the scanning size as well as adjust the "scan offset" setting to move the image position of slide.  magictouch/auto Color enable / disable magictouch and auto Color adjustment to scans.  Magic Touch is a powerful dust and scratch removal technology that does away with the hassle of learning complex and tedious software techniques. Being hardware-based, it works seamlessly with the scanning process to ensure the best possible results when bringing images into the computer. dust, scratches and other flaws are intelligently detected and eliminated, restoring the image to its original beauty. scanning with magic touch requires longer scanning times, the feature is turned off by default. Auto Color takes the guesswork out of the scanning process to streamline the workflow and achieve the best results. Proprietary color enhancement technology is applied to scanned images to provide the most accurate color adjustment, resulting in vibrant images with optimal brightness, contrast and saturation.STEP 6 - scan
scan - scan- scan Current Frame  this begins the scan to file process  all scanned images will be saved to the directory location set previously, the factory default locations are: Windows: C:\users\Yourname\documents; MAC: mac Hd\users\[Your name]\Pictures\Cyberview images),STEP 7 - Exit
select "scan > exit" to close the driver. scanned image files can be open/edited with any image editing software.  NOTE: if using the supplied image editor, for help with this application see the users Help from within the applicationHOW TO USE SHARING FUNCTION
Sharing/CloudStorage:   DropboxSimple design and easy to use
Open the CyberviewX 5 software, you will need to select positive for slides or negative for film strips. Configure the Scan setting - Scan – Preference - Film Type – Sharing/Cloud Storage Note: the tool bar options are disabled until activating in the Settings window  Select your method either Sharing or Cloud   Then Click "OK" The toolbar icons are now active  Scanning into, you must first log out of your account, the scanning function will require authentication/login on each use 1. Log off of your Facebook account 2. In the Cyberview interface activate Sharing feature as described above 3. Follow the onscreen prompts to log in and authenticate the device   Success
Minimize this browser window 4. Minimize the browser window and on the next CyberView screen, note the Code number you have been given (this will be a different code every time, copy it down, you will need to enter it on the Facebook website  5. Enter the code you made a note of earlier, then clickConnect Facebook for Devices  6. Your scanner is now connected to Facebook Facebook for Devices  Dropbox must first do
To scan to, you must first go here: https://www.dropbox.com/ and sign up for an account and download and install their software, if you are not currently a Dropbox member and would like to use this service. Once you have created and installed Dropbox application you will now have a new folder on your computer that you may select to scan into for automatic sync uploads with your Dropbox account. To scan into the Dropbox folder
1. Open Cyberview X5 2. Next select Scan – Preference – the film type you wish to scan (Positive or Negative) 3. In this scan settings window select the Sharing and CloudStorage tab   4. Check the box beside CloudStorage to activate it NOTE: When selecting the CloudStorage - Dropbox feature the software will automatically scan to the CyberviewX folder it creates in your Dropbox folder on your computer, ready for synchronization with your Dropbox account. 5. Click OK to save settings, Once configured you are ready to scan. 6. All the files scanned will be saved into the Dropbox folder  Synchronization will automatically occur with your online account when active. (Active=Dropbox is running in the system tray) USER INTERFACE
 there are four major parts of theCyberView X 5 user interface: I. Main Window Area [Fixed Windows] II. Preview Window Area [Fixed Window] III. Active Frame Setting Area [Floating Window]i. Main Window Area [Fixed Windows]
Menu Commands - Scan
Prescan - Prescan Current Frame: Pre-scan the existing slide. Scan - scan Current Frame - scan selected to File - scan all  Menu Commands - Preview (overview)  Zoom, rotate & Flip features. Revert discards all modifications and restores the image back to the original state.Preference - see scan setting (see Page 13)
Exit Closes the CyberView X5 user interface. there is a message pop-up "Quit the application prompts to save documents?" click "Yes" to save, "no" to discard the current settings or "Cancel" to return to Cyber View X. Menu Commands - image Adjustment
a. image adjustment 1. Variations: Generates different views of image with options to make changes to highlights, midtones, etc.  2. Color Balance
to adjust the brightness, contrast, saturation, and color (CmY or rGB) of the image. Comparisons between before and after adjusted images are shown for reference.  Example: if a previewed image appears too dark, use the "Brightness" slider in the "Color Balance" window to adjust the image by selecting the slider in the center and moving it to the right. The image's "after" view becomes lighter. Select "ok" to accept the changes which will be sent to the scanning hardware. This can also be used to adjust each of the functions in "Color Balance" by contrast, saturation and specific color ranges of cyan, magenta and yellow. 3. Curves and Levels
adjust image settings by moving Curve and levels settings. Comparison between before and after adjustment is displayed for reference.  Example: When the previewed image appears to be too dark, adjustments with the input slider in the Curves and levels window can be made to correct the image. selecting the Gray slider in the center and moving it to the left will result in changes in the "after" view resulting in a lighter image. once the adjusted image is acceptable select "ok" to send changes to the scanning hardware. The same method can also be used to adjust each color channel independently, using the channel drop down menu "r GB = all colors" r = red, G = Green, and B = Blue.Menu Commands - Windows
1. exposure setting: to adjust the exposure time (r, G, B) press "reset" to restore to the default setting. Menu Commands - help
- Update: Firmware: upgrade the firmware version, select the path where the file of firmware has been saved. (these files may be downloaded from our website) - About: displays system information (including operation system, CPu), product information (including product name, model name, hardware version, firmware version, software version, device information including interface and optical resolution).Function Bar Diagram
Please select your film type and brand from the toolbar: Negative Positive (also known as Slide) Black and White ii. Preview Window Area [Fixed Windows]
 Prescan: Pre-scan the current film, press drop down for more options. Scan: scan film, press drop down ▼button for more options. Image Adjustment: Press drop down button for more options.ii. Preview Window Area [Fixed Windows] (Continued...)
 a. ejects the film to the left b. reverses the film one frame to the left a. advances the film one frame to the right b. ejects the film to the right   Goto... You can select which frame to move to in the strip image alignment tool  Frame adjustment tool (taBs) if your film is miss aligned after insertion you can use these taBs on the ruler to adjust alignment by dragging the taB to align with the edge of the film frame  You can select the ruler measurement unit "in"-cm"-px" by clicking the upper-left corner.Toolbar Diagram
 Select scan area: more than one selection can be made at a time. Zoom In: to magnify the image where the cursor is currently located. the image will be magnified with every click until the maximum multiple (1000%) is reached.  Zoom Out: to reduce the size of the viewed image click the Zoom out cursor to the desired area, the image will reduce by half with every click until the lowest multiple (25%) is reached. natural_image
Vertical column of five abstract icons with green and yellow shapes, no text or symbols presentstatus line
in the lower left hand corner, the color level (rGB: red, green, blue) and coordinates of the location [ex: i] are displayed. the zoom scale, the current slide magazine location and how many areas selected to scan (2 or or higher indicates: multiple scan areas on one slide [ex: ii]). i.  ii. iii. scan setting Area [Floating Windows]
Normal mode [ex: i] to input the basic parameter to scan (including scan resolution, film size, color depth). Advanced mode [ex: ii] to input the parameter of scan output, scan resolution, and color depth i.  ii.  When scanning more than 6 frames (6 at a time are viewable in the thumbnail panel) you may scroll to view more by clicking on the right arrow button. the left / right arrow buttons allow you to scroll through pre-scanned images with ease. this model scanner is capable of scanning an entire roll of (uncut) film up to 40 frames  to de-select frames you do not wish to scan click on the check mark box to remove selection. TECHNICAL SUPPORT
Dear customers, our reflecta products undergo a strict end quality control. If the equipment does not function properly, or to your expectations please first make sure that you have installed the latest software and firmware. These can be found on our website: www.reflecta.de If an error persists, then please contact our customer service, see below. The warranty period is 24 months and begins on the date of purchase. Please keep your receipt as proof of purchase. reflecta GmbH Merkurstrasse 8 72184 Eutingen Germany Phone: +49 (0) 7457-946560 E-Mail: mail@reflecta.dereflecta RPS 10M
CyberView X5
Bedienungsanleitung
Erklärung der Federal Communications Commission (FCC)
Dieses Gerät wurde getestet und als mit den Grenzwerten für Digitalgeräte der Klasse B gemäß Teil 15 der FCC-Regularien übereinstimmend befunden. Diese Grenzwerte wurden geschaffen, um angemessenen Schutz gegen Störungen beim Betrieb in Wohngebieten zu gewährleisten. Dieses Gerät erzeugt, verwendet und strahlt Hochfrequenzenergie ab und kann – falls nicht in Übereinstimmung mit den Bedienungsanweisungen installiert und verwendet – Störungen der Funkkommunikation verursachen. Allerdings ist nicht gewährleistet, dass es in bestimmten Installationen nicht zu Störungen kommt. Falls dieses Gerät Störungen des Radio- oder Fernsehempfangs verursachen sollte, was leicht durch Aus- und Einschalten des Gerätes herausgefunden werden kann, wird dem Anwender empfohlen, die Störung durch eine oder mehrere der folgenden Maßnahmen zu beseitigen: - Neuausrichtung oder Neuplatzierung der Empfangsantenne(n). - Vergrößern des Abstands zwischen Gerät und Empfänger. - Anschluss des Gerätes an einen vom Stromkreis des Empfängers getrennten Stromkreis.Warnung:
Schließen Sie I/O-Geräte ausschließlich mit abgeschirmten Signalkabeln an das Gerät an. Jegliche Änderungen oder Modifikationen, die nicht ausdrücklich von der für die Übereinstimmung verantwortlichen Stelle zugelassen sind, können die Berechtigung des Anwenders zum Betrieb des Gerätes erlöschen lassen.INHALT
Erste Schritte 4
Kurzinstallationsanleitung 6
Software und Treiber installieren 6 Hardware installieren 8 Dias einlegen 8 Filmstreifen einlegen 10 Zusätzliche Merkmale 10 Eintasten-Scan 10Benutzeroberfläche 11
I. Hauptfenster 12 II. Vorschaufenster 16 III. Scaneinstellungen 18 IV. Miniaturbilder 19So scannen Sie Dias 20
Schritt 1 – Software starten 20 Schritt 2 - Filmtyp wählen 20 Schritt 3 – Vorscan (bei Bedarf) 20 Schritt 4 – Scaneinstellungen festlegen 21 Schritt 5 – Hauptscan 22 Schritt 6 – Standard-Scanbereich 24 Schritt 7 – Beenden 25Verwendung der Freigabefunktion 26
Technischer Kundendienst 30
ERSTE SCHRITTE
Prüfen Sie zuerst den Lieferumfang. Wenn es schnell gehen soll, finden Sie in der Kurzanleitung Erläuterungen zum schnellen Start (Lesen Sie auf Seite 11 nach.)  Wichtig! Bewahren Sie die Originalverpackung und den Kaufbeleg zum späteren Versand und zum Wahrnehmen von Garantieleistungen am besten auf.Lieferumfang
- Filmscanner. • Netzteil [Modell: A2-36SG12R-V] INPUT/输入/输入: 100-240V \~ 50/60Hz 0.6A OUTPUT/输出/输出: +12V = 1.5A ⊖—⊕—⊕Warnung! Der Einsatz anderer Netzteile kann den Scanner schwer beschädigen und lässt die Garantie erlöschen.
- USB 2.0-Kabel • CyberView-Treiber-CD - Anwendungs-Software CD zum Bearbeiten der Scans • Gedruckte BedienungsanleitungHINWEIS:
\- Mit „Anwendungssoftware“ ist eine Bildbearbeitungssoftware wie Adobe® Photoshop® gemeint; diese Ausstattung kann sich ohne Vorankündigung ändern.Allgemeine Hinweise:
- Verwenden Sie ausschließlich das mitgelieferte USB-Kabel. Schließen Sie den Scanner über das USB 2.0-Kabel direkt an den Computer an. - Verwenden Sie keine Hub und kein Verlängerungskabel. Nutzen Sie ausschließlich die USB-Ports an der Rückwand von Desktop-Computern. - Falls weitere Geräte (Multifunktionsgeräte, Drucker, Scanner, Webcams) per USB mit dem Computerverbunden sind, trennen Sie diese. - Ein Minimum von 1 GB RAM (Windows/Mac) ist erforderlich.| Umgebungstemperatur im Betrieb: 10 bis 40 °C |
| Hinweis:Schalten Sie den Scanner nur bei Umgebungstemperaturen in diesem Bereich ein. Falls der Scanner bei Temperaturen außerhalb dieses Bereiches gelagert oder transportiert worden sein sollte, lassen Sie das Gerät vor dem Einschalten erst auf die richtige Temperatur kommen. |
| Luftfeuchtigkeit im Betrieb: 15 – 76 % relative Luftfeuchte (nicht kondensierend) |
| Hinweis:Falls der Scanner stark abgekühlt wurde und dann zu einem warmen, feuchten Ort gebracht wird, kann sich Feuchtigkeit niederschlagen. |
KURZINSTALLATIONSANLEITUNG
BEI DER INSTALLATION UNTERWINDOWS KANNWÄHREND DER TREIBERINSTALLATION EINEWARNMELDUNG ANGEZEIGT WERDEN. IN DIESEM FALL WÄHLEN SIE BITTE DIE „AUSWAHLMÖGLICHKEIT ZUM FORTSETZEN DER INSTALLATION“.  Installieren Sie die Anwendungssoftware unbedingt, bevor Sie den CyberView-Scannertreiber installieren. Sie können den Scannertreiber direkt installieren, wenn bereits eine TWAIN-kompatible Software in Ihrem Computer installiert ist. Mac-Anwender können iPhoto zur Bearbeitung verwenden.Hinweis:
1. Im „Neue Hardware gefunden“-Assistenten wählen Sie die Option zur automatischen Suche oder zur Installation der Software von einer Liste oder bestimmten Quelle. 2. Klicken Sie zum Abschluss des Assistenten, der Sie durch die Installation neuer Hardware führt, auf „Fertig stellen“. HINWEIS: Die Meldung „Neue Hardware gefunden“ wird nicht bei sämtlichen PCs angezeigt; je nach Betriebssystem erfolgt die Installation auch ohne diesen Hinweis.Software und Treiber installieren
Bevor Sie den Scannertreiber installieren... Wenn Sie die mitgelieferte Anwendung zur Bildbearbeitung nutzen möchten, legen Sie die CD mit der Anwendungssoftware (z. B. mit Adobe® Photoshop® Elements) zuerst in das CD/DVD-Laufwerk Ihres Computers ein. Ein Fenster mit Installationshinweisen öffnet sich automatisch.Scannertreiber installieren
a. Legen Sie die Anwendungs-CD in das CD/DVD-Laufwerk ein, lassen Sie sich die Inhalte anzeigen. b. Doppelklicken Sie zum Starten der Installation auf das „CyberView“-Symbol. Führen Sie die Installation mit den Anweisungen auf dem Bildschirm aus. HINWEIS: Achten Sie unbedingt darauf, dass der Scanner bei der CyberView X 5.0 -Treiberinstallation noch nicht mit dem Computer verbunden ist. c. Starten Sie den Computer nach Abschluss der Installation neu. Bitte beachten: Wenn Sielhren neuen Scanner in einem Windows-System installieren, in dem bereits ein anderer USB-Flachbettscanner oder ein Universalgerät zum Scannen/Kopieren/Drucken installiert ist, müssen Sie den anderen Scanner eventuell vom USB-Port trennen, damit der Diascanner richtig funktioniert. TWAIN-Scanner-Plugin – Installationsanleitung zu Adobe Photoshop Elements 9 und aktuelleren Versionen Das TWAIN-Scanner-Plugin wird bei Photoshop Elements 9 nicht mehr installiert. Damit gescannte Bildervon Adobe Photoshop Elements importiert werden können, führen Sie nach der Installation von Adobe Photoshop Elements 9 die nachstehenden Schritte zum Herausfinden aus, wo und wie die TWAIN-Komponenten für Vorgängerversionen von Photoshop Elements 9 installiert werden. Wichtig: Verschieben Sie Plugins von Photoshop Elements-Vorgängerversionen nicht in den Photoshop Elements 9 > Plugins-Ordner, stellen Sie den Ordner Photoshop Elements 8 > Plugins (oder ähnlich) in den Voreinstellungen nicht als Ordner für zusätzliche Plugins ein. Umfassende Informationen finden Sie auf den offiziellen Adobe-Internetseiten: http://kb2.adobe.com/cps/849/cpsid\_84933.htmlMacintosh
Zur Installation des älteren TWAIN-Plugins für Macintosh kopieren Sie den TWAIN. plugin-Ordner von: //Applications/Adobe Photoshop Elements 9/Optional Plug-Ins/ImportModules/ Zu: //Applications/Adobe Photoshop Elements 9/Locales/Windows
Zur Installation des älteren TWAIN-Plugins für Windows kopieren Sie twain\_32.8ba von: C:\Program Files\Adobe\Photoshop Elements 9\Optional Plug-Ins\Import-Export\ Zu: C:\Program Files\Adobe\Photoshop Elements 9\Locales\Windows, 64 Bit
Photoshop Elements 9 ist eine 32-Bit-Anwendung. Bei der Installation unter einem 64-Bit-Windows-Betriebssystem ändert sich der Pfad etwas. Zur Installation des älteren TWAIN-Plugins für Windows kopieren Sie twain\_32.8ba von: C:\Program Files (x86)\Adobe\Photoshop Elements 9\Optional Plug-Ins\Import-Export\ Zu: C:\Program Files (x86)\Adobe\Photoshop Elements 9\Locales\Hardware installieren
a. Verbinden Sie den Diascanner mit einer Stromquelle. 1. Der Ein-/Ausschalter befindet sich unten rechts am Scanner. Achten Sie darauf, dass der Scanner AUSGESCHALTET ist.  2. Schließen Sie das Netzteil an die Steckdose an, bevor Sie das Netzteil mit dem Scanner verbinden. 3. Schließen Sie den normalen (größeren) USB-Stecker des USB-Kabels an den Computer an. Verbinden Sie den Stecker am anderen Ende des Kabels mit dem Anschluss an der Rückseite des Scanners.  Gerahmte Dias einlegen Achtung, vor dem Scannen... Achten Sie vor dem Einlegen des Dias darauf, dass sich kein Filmstreifen im Scanner befindet. Beim Einlegen eines Filmstreifens darf kein Dia in den Scanner eingelegt sein. Bitte beachten Sie, dass Filmstreifen und Dias nicht gleichzeitig in den scanner eingelegt werden dürfen. Gerahmte Dias 1. Legen Sie das Dia so in den Schlitz an der Vorderseite des Gerätes ein, dass die stumpfe Seite (Emulsion) unten liegt. natural_image
Simple line drawing of a vehicle's head and side profile with a red arrow pointing to the front wheel (no text or symbols)Filmstreifen einlegen
1. Legen Sie den Filmstreifen mit der Emulsionsseite nach unten in den linken Filmeinzug ein. 2. Der Scanner zieht den Streifen automatisch ein und zeigt das erste Bild in der Mitte des Sichtfensters an. Falls sich das erste Bild nicht an der richtigen Position befindet, verschieben Sie es mit den Vorwärts-„oder Rückwärts“-Tasten. Sie können das „Verschieben“ auch über die Feinabstimmungsfunktion der CyberView-Benutzeroberflächeerledigen. Siehe Seite 24 Der Filmstreifen lässt sich leicht einlegen, wenn Sie ihn etwa auf der Höhe des dritten Bildes greifen. natural_image
Illustration of a hand holding a flexible object with red arrow indicating direction (no text or symbols)Zusätzliche Merkmale
Tasten am Scanner Auswerfen – Wirft den Filmstreifen aus Rückwärts – Verschiebt den Streifen um ein Bild rückwärts Vorwärts – Verschiebt den Streifen um ein Bild vorwärts Scannen – Siehe Eintasten-Scan weiter unten Eintasten-Scan
1. Öffnen Sie CyberView 2. Scan-Einstellungen konfigurieren 3. Wählen Sie den Zielordner, das Dateiformat (TIF oder JPG), starten Sie den Scan anschließend mit der Scantaste (☐).   HINWEIS: Falls CyberView nicht zuvor gestartet wurde, ist die Scantaste ohne Funktion.Benutzeroberflache
 Die CyberView X5-Benutzeroberfläche he besteht aus fünf Hauptteilen: I. Hauptfen ster(fi xierte Fenster) II. Vorschaufen ster(fixi ertes Fenster) III. Scaneinstellungen (schwebendes Fenster)I. Hauptfens ter (fixierte Fenster)
Menübefehle - Scannen
Prescan (Vorscan) - Diarahmen-V orscan:V orscan devorha nd e ne Dias. Scan (Scannen) - Aktuellen Diarahmen scannen > Aktuelles Dia scannen. D Min
Analysiert Filme igenschaften für geeignete Belichtungszeiten und optimale Farbqualität.Rückgän gig
Ver wirft sämtliche Änderungen und nutzt wieder die Origina lei nstellung en.Voreinstellungen -S iehe Scan-Einstellungen 14)
Beend en
Schließ die CyberView X5-Benutzero berfläche. Wenn die Meldung „Quit the application prompts to save documents?“ (Anwendung beende n?rscheint, klicken Sie zum Speichern auf „Yes “(Ja), zum Verwerfen und zur Rückkehr zur CyberView-Benutzeroberfläche auf „Cancel (Abbrechen). Menubefehle-Bild anpassung
a. Image Adjustrenl(Bildanpassungen)
1. Variations (Varianten): Erzeugt unterschiedliche Ansichten eines Bildesril Optionen zur Veränderung von Glanzlichlem, MilleHiinen usw.Bildanpassungen
Fenster
Hilfe
Variationen... Farbbalance... Kurven und Pegel...Bildanpassungen
Variationen Farbbalance Kurven und Pegel natural_image
Two antelope standing in a grassy field, no visible text or symbolsnatural_image
Two antelopes standing in a grassy field, no visible text or symbols2. Color Balance (Farbbalance)
Zur Anpassung von Helligkeit, Kontrast, Sättigung und Farbe (CMY oder RGB) des Bildes. Zum Vergleich werden Vorher- und Nachher-Bilder angezeigt.   Beispiel: Ist die Vorschau eines Bildes zu dunkel, verwenden Sie den Schieber „Brightness“ (Helligkeit) im Fenster „Color Balance“ (Farbabgleich) und stellen mit ihm durch Verschieben nach rechts die gewünschte Helligkeit ein. Das Nachher-Bild wird heller. Übernehmen Sie die „After“ (Änderung) mit OK; das Bild wird später mit den angepassten Einstellungen gescannt. Auf gleiche Weise können Sie auch die anderen Funktionen des „Color Balance“ (Farbabgleich), wie Kontrast, Sättigung und Anpassungen für die Farben Cyan, Magenta und Gelb einstellen.3. Curves and Levels (Kurven und Pegel)
Durch Verschieben der Kurve- und Pegel-Einstellungen können Sie das Bild weiter anpassen. Zum Vergleich werden Vorher- und Nachher-Bilder angezeigt.  Beispiel: Ist die Vorschau eines Bildes zu dunkel, verwenden Sie den Schieber im Fenster Kurven und Stufen, um das Bild zu korrigieren. Wenn Sie beispielsweise den Grau-Schieber in der Mitte nach links versetzen, führt dies zu einem helleren Nachher-Vorschaubild. Klicken Sie auf OK, wenn Sie mit den Anpassungen zufrieden sind. Auf dieselbe Weise können Sie auch die restlichen Farbkanäle unabhängig voneinander anpassen –dazu stellen Sie die RGB-Werte (R = Rot, G = Grün, B = Blau) nach Belieben ein.Menübe fehle - Fenster
1. Belichtungseinstellung: Stellt die Belichtungszeit ein (R, G, B). Drücken Sie "zurücksetzen" um die Voreinstellungen wiederherzustellen. bar
| Category | Value | | -------- | ----- | | R | 100 | | G | 100 | | B | 100 |Me nübe fe h le - Hilfe
Aktualisierung: Firmware: Zum Aktualisieren der Firmware-Version. Dazu wählen Sie den Ordner, in dem die Firmware-Datei gespeichert wurde. (Diese Dateien können Sie von unseren Internetseiten herunterladen.) Info:Zeigt die Systeminformationen (einschl. Betriebssystem, CPU), Produktinformation (einschl. Produktname, Modellname, Hardware-Version, Firmware-Version, Software-Version, Geräteinformation einschl. Interface und optische Auflösung).Symbolleiste
Wählen Sie bitte Ihren Filmtyp in der Symbolleiste aus: Positive (Positiv) Ne gative (Negativ) (auch Dia ge nannt) Black and White (Schwarzwe iß) II. Vorschaufenster [f ixiert]
 Vorscan: Startet einen Vorscan des aktuellen Dias. Mehr Optionen erscheinen, wenn Sie auf die Schaltfläche klicken. Scannen: Startet das Scannen. Mehr Optionen erscheinen beim Anklicken der Schaltfläche. Bildanpassungen: Mehr Optionen erscheinen beim Anklicken der Schaltfläche  an in der Vorschau an. Durch Anklicken der oberen linken Ecke können Sie die gewünschte Maßeinheit („cm“, „oZII“, oder „Pixel“)auswählen.Symbolleiste
 natural_image
Vertical sequence of icons including zoom, document, folder, and refresh symbols (no text or labels)Statuszeile
In der unteren linken Ecke, , die Farbebenen (RGB: rot, grün, blau) und Koordinaten der Position (Beispiel: I) werden angezeigt. Zusätzlich werden Zoomfaktor, Diaposition im Magazin und die Anzahl zum Scan ausgewählter Bereiche angezeigt (eine Angabe von 2 oder höher bedeutet, dass mehrere Scanbereiche in einem Dia definiert wurden). (Abbildung II) 1.  ||. III. Scaneinstellungen (schwebende Fenster)
Normal-Modus [Beispiel: I] zur Eingabe der Grundparameter für den Scan (einschl. Scan-Auflösung, Filmgröße, Farbtiefe). Erweiterter Modus [Beispiel: II] zur Eingabe der Parameter für Scanausgabe, Scan-Auflösung und Farbtiefe 1.  II. IV. Miniaturbilder (schwebend)
Bilder werden hier lediglich im Vorscan-Modus angezeigt. Beim Scannen in eine Datei werden die Bilddaten direkt auf der Festplatte gespeichert; im CyberView-Fenster wird dabei nichts angezeigt. Zeigt vorgescannte Bilder in einer Miniaturansicht. Per Vorgabe werden sämtliche vorgescannten Bilder automatisch ausgewählt. Beachten Sie die kleine Auswahlmarkierung unter dem Bild.  Wenn Sie mehr als sechs Bilder scannen (in der Miniaturansicht werden bis zu sechs Bilder gleichzeitig dargestellt), können Sie die angezeigten Bilder durch Anklicken der Links- und Rechtspfeile durchblättern. Mit den Links-/Rechts-Schaltflächen können Sie bequem durch die vorgescannten Bilder blättern. Dieses Scannermodell kann eine komplette Filmrolle (ungeschnitten) mit bis zu 40 Bildern scannen.  Zum Abwählen von Bildern, die Sie nicht scannen möchten, entfernen Sie die Auswahlmarkierung durch Anklicken. So scannen Sie
Schritt 1 – Software starten (Am PC) Öffnen Sie CyberView X 5 über Start – Alle Programme – CyberView (Am Mac) Öffnen Sie „Gehe zu“ - Programme – CyberView Schritt 2 – Filmtyp wählen Wählen Sie den gewünschten Typ: Positiv, Negativ oder Schwarzweiß.  Schritt 3 – Vorscan (bei Bedarf) Wählen Sie „Prescan Current Frame“ (Dia-Vorscan) zur Vorschau des gerade eingelegten Dias – oder „Prescan...“ (Vorscan...) zur Vorschau von Dias an bestimmten Positionen im Magazin.  Den Vorscan können Sie beispielsweise zur manuellen Anpassung von Farben un anderen Einstellungen pro Dia verwenden, bevor Sie den eigentlichen Scan starte Pro Dia können Sie unterschiedliche Einstellungen festlegen.Schritt 4 - Scaneinstellungen festlegen
a. Auflösung
Die Scan Standardauflösung beträgt 1000 DPI; weitere Auflösungsoptionen werden nachstehend aufgelistet. Hinweis: Bei höheren Auflösungen dauert das Scannen länger, es wird mehr Platz zum Speichern gebraucht.b. Farbtiefe
Hier können Sie zwischen 8 und 16 Bit auswählen. Eine höhere Farbtiefe bewirkt feinere Farbabstufungen im gescannten Bild. Der Filmscanner besitzt eine Farbtiefe von 48-Bit TrueColor. Die Scansoftware kann wahlweise im 8-Bit- oder 16-Bit-Farbmodus scannen. Dadurch entstehen Bilder mit 24- oder 48-Bit-Farben; 8 oder 16 Bits pro rotem, grünem und blauem Farbkanal.Be ispiel:
8-Bit-Modus = Jeweils 8 Bits für Rot, Grün und Blau, insgesamt 24 Bits. 16-Bit-Modus = Jeweils 16 Bits für Rot, Grün und Blau, insgesamt 48 Bits.  HINWEIS: Sorgen Sie dafür, dass genügend Speicherplatz im Computer zur Verfügung steht, wenn Sie die Scanauflösung änder Eine hohe Scanauflösung resultiert in größeren Dateien, die eventuell problematisch zu speichern sind Farbbild-Dateigrößen bei unterschiedlichen Auflösungen und Farbtiefen: other
Sc anauflösung Dateigröße | Category | Farbtiefe (pro TIFF keine RGB-Kanal) | Farbm odus (pro TIFF keine RGB-Kanal) | Kom prim iierung | | :--- | :--- | :--- | :--- | | 300 dpi | 8 Bit | 24 Bit | ~700 Kb | | 600 dpi | 8 Bit | 24 Bit | ~3 MB | | 1800 dpi | 8 Bit | 24 Bit | ~25MB | | 3600 dpi | 8 Bit | 24 Bit | ~102MB | | 7200 dpi | 8 Bit | 48 Bit | ~408MB | | 10000 dpi | 8 Bit | 24 Bit | ~787MB |Hauptscan
Schritt1 - Scanvoreinstellungen festlegen
Wählen Sie Scan -Voreinstellungen -Positiv / Negativ oder S/W -Scaneinstellungen   „Standardauflösung beim normalen Scannen verwenden “ Nutzt beim Scannen die normale Standardauflösung. „Farbtiefe “ Standard-Farbtiefe beim normalen Scannen. „Scanmodus “-Standard-Scanmodus beim normalen Scannen.Konfigurieren von Scan-Voreinstellungen
1. Klicken Sie auf „Durchsuchen“ wählen Sie dann den Ordner, in dem die gescannten Bilder abgelegt werden sollen. 2. Geben Sie den Dateinamen ein. Verzeichnis: Basisdateiname: C: |Users|Service2|Desktop|Testscans intern|10 K tests| image Durchsuchen... 3. Dateinamen mit fortlaufender Indexnummer ergänzen: Definiert die Länge von Dateiname und Indexnummer; maximal sechsstellig. Beispiel: bild1 oder bild000001  Dateinamen mit fortlaufender Indexnummer ergär Ziffern: Sca n- Vo rein stel lun gen festlegen (Fortsetzung)
4. Optionen – Magazinindex verwenden: Verwendet die Position innerhalb des Magazins als Indexnummer. 5. Benutzer definierte Startnummer: Zur Eingabe einer individuellen Startnummer. Dateityp auswählen: TIF oder JPG. (TIF nicht komprimiert oder JPG komprimiert. Wählen Sie die Bildqualität für JPEG. (20-100) 100 steht für die geringste Kompressionsrate  Erweiterte Einstellungen   „Auto Belichtung“— Versucht, automatisch eine optimale Belichtung zu erzielen, bei der Weiß weiß, Schwarz schwarz bleibt. „Auto-Weißabgleich“ - Verwendet das Histogramm des Bildes, um den Weißabgleich der RGB-Kanäle zu ermitteln. Dabei wird das Farbspektrum des Bildes ermittelt und die Bilddarstellung entsprechend angepasst. „Auto Kontrast “– Die Scannersoftware analysiert die Bilddaten und passt den Kontrast automatisch an. „Digitale Rauschreduktion“ – Reduziert Pixelrauschen„Mehrfach-Belichtung“ –
Bei Aktivierung führt die Mehrfach- Belichtung einen Dreifachscan zur Erzielung des bestmöglichen Bildes aus. Dieser Vorgang erfasst drei individuelle Scans: zuerst normal, dann zwei weitere Scans zur Hervorhebung von Schattendetails, wodurch dunklere Bereiche besser belichtet werden. Anschließend berechnet die Software intuitiv den letzten Scan, der nun die Daten von allen drei Scans enthält.„Mehrfaches Abtasten“ –
2x, 4x, 8 x oder 16x für die beste Bildausgabe. Bitte beachten Sie, dass sich die Scanzeit hierdu deutlich erhöht. Mit den mehrfachen Abtastvorgängen gehört Bildrauschen der Vergangenheit aStandard-Scanbereich
Hier können Sie die Größe des gescannten Bereiches und den „Offset (Position des gescannten Bereiches) festlegen Magic Touch / Auto Color
Aktivieren / Deaktivieren Magic Touch und Auto Color Scans.  Magic-Touch ist eine leistungsfähige Technologie, um Staub und Kratzer zu entfernen, ohne vorher die komplexe Bedienung von Software-Funktionen erlernen zu müssen. Da die Technologie Hardware-basiert ist, arbeitet sie nahtlos mit dem Scanvorgang zusammen und sorgt für bestmögliche Ergebnisse beim Einlesen von Bildern in den Computer. Staub, Kratzer und andere Makel werden intelligent erkannt und beseitigt, das Bild erscheint wieder in seiner ursprünglichen Pracht. Bei S/W und Kodachrome Filmen muss Magic Touch deaktiviert werden. Da das Scannen mit Magic T ouch länger dauert, ist diese Funktion per Vorgabe zunächst abgeschaltet. Auto Color ist ein effektives Verfahren zu Farbrestauration von alten, verblassten oder vergilbten Bildern. Auto Color ist jedoch kein Verfahren, das man bei jedem Bild anwenden kann. Strandaufnahmen mit blauem Meer und blauem Himmel zum Beispiel werden durch Auto Color extrem verfremdet.Schritt 6 - Scannen
Scan - Scan - Aktuelles Dia scannen  Der Scan-Prozess wird gestartet  Alle gescannten Bilder werden in dem vorgegebenen Ordner gespeichert, der werksseitig vorgegebene Ordner ist: Windows: C:\Users\IhrName\Eigene Dateien; Mac: Mac-Festplatte\Users\IhrName\Pictures\Cyberview ImagesSchritt 7 - Beenden
Wählen Sie „Scan > Exit (Scan > Beenden), um den Treiber zu schließen. Gescannte Bilddateien können Sie mit jeder beliebigen Bildbearbeitungssoftware öffnen und bearbeiten.  HINWEIS: Wenn Sie das mitgelieferte Bildbearbeitungsprogramm verwenden, schauen Sie bitte in die Online-Hilfe innerhalb der Anwendung oder suchen Sie sich die Dokumentation auf der mitgelieferten DVD heraus.Verwendung der Freigabefunktion
Fre igabe /Cloud-Spe icher:   DropboxEinfache s De sign, einfache Be nutzung
Öffnen Sie die CyberView X5-Software; wählen Sie Positiv für Dias und Negativ für Films treifen. Konfigurieren Sie Scaneinstellung -Scan -Präferenzen -Filmtyp -Freigabe/Cloud-Speicher. Hinweis: Die Optionen der Werkzeugleiste sind bis zur Aktivierung im Einsellungen-Fenster deaktiviert.  Wählen Sie Ihre Methode: Freigabe oder C bud   Klicken Sie dann auf „OK.“ Nun sind die Symbo le der Werkze ug leiste akti v.  ZUm S:annen in facebook müssen Se sich zunarnst oon Ihrem Kooto abnelden, denn die Scanfunktion erfordert teijed er Eenutzung eine Authentifizierung/Anmeldung. f. Il/I;jden Se sich oon Ihrem Faceb:Jok-Kooto ab 2. Akti\Aeren Se die Freigabe- Funktioo auf der CytaView-Oterft ::Che, wie zuoor teschrieben wurde 3. Ee achten Sie de Bldschirm anweisungen zur Anmadung und Authentifizierung des Gerats     Dieses Browser-Fenster minimieren
4. Minimieren Sie das Brows er-Fens ter und sc hreiben Sie am näc hs ten C yber View-Bildschirm die angez eigte Codenummer ab (dies er Code ist jedes Mal anders ), denn Sie m üss en den Code auf der Facebook-Internetseite eingeben  5. Geben Sie den zuvor notierten Code ein und klic ken Sie dann auf Verbinden  6. Nun is t Ihr Scanner m it Facebook ver bunden  Zum Scannen an Dropbox müssen Sie -sofern Sie noch kein Dropbox-Mitglied sind und diesen Dienst nutz en möchten -zunächs thttp s://www.dropbox.co m/ aufrufen, ein Konto registrieren und die zugehörige Software herunterlade n und installieren. Sobald Sie ein Konto ers tellt und die Dropbox-Applikation installiert haben, z eigt Ihr Com puter einen neuen Ordner an, in de n Sie für autom atisc he Synchronisierungs-Uploads mit Ihrem Dropbox-Konto sc annen können.  Desktop  Downloads  Dropbox  Eigene Bilder  Eigene Dokumente  Eigene Musik  Eigene Videos  Favorite So sc annen Sie in den Dropbox-Ordner: 1. Öffnen Sie Cyber View X5 2. Wählen Sie dann Scan -Präferenzen -den gewünschten Film typ (Positiv oder Negativ) 3. W ählen Sie in diesemScaneinstellungen-Fenst er das Register Freigabe und Cloud-Speicher   4. Wählen Sie das Kästen neben „CloudSpeicher“ um ihn zu aktivieren Hinwe is: Wenn Sie die Funktion Cloud-Speicher – Dropbox wählen, scannt die Software omati sch in den Cyber View-Ordnerder in Ihrem Dropbox-Ordnerauf Ihrem Computer erstellt wird, sodass er mit Ihrem Dropbox-Kont o sync hr onisi ert werden kann. 5. Zum Speic hern der Einstellungen klicken Sie auf OK. Nach Abschluss der Konfiguration können Sie mit dem Sc annen beginnen. 6. Alle ges cannten Dateien werden im Dropbox-Ordner gespeic hert  Die Sync hronisierung m it Ihrem Online-Konto ges c hieht bei Aktivierung autom atisch. (Aktiv = Dropbox befindet sich in der Tas kleis te) Technischer Kundendienst
Liebe Kundin, lieber Kunde, unsere reflecta Produkte unterliegen einer strengen Qualitätsendkontrolle. Sollte dieses Gerät wider Erwarten nicht einwandfrei funktionieren, stellen Sie bitte zuerst sicher, dass die aktuelle Software und Firmware installiert ist. Die aktuelle Software und Firmware für dieses Gerät finden Sie unter: www. reflecta.de Besteht der Fehler weiterhin, kontaktieren Sie bitte unseren untenstehenden Kundendienst. Die Garantiezeit beträgt 24 Monate und beginnt am Tag des Kaufes. Bitte bewahren Sie den Kassenbon, als Nachweis für den Kauf auf. reflecta gmbh Merkurstrasse 8 72184 Eutingen Germany Tel: +49 (0) 7457-946560 E-Mail: mail@reflecta.dereflecta RPS 10M CyberView X5 Manual del usuario
DECLARACIÓN DE LA COMISIÓN FEDERAL DE COMUNICACIONES (FCC)
Este equipo ha sido probado y se ha comprobado que cumple los límites para un dispositivo digital de Clase B, según la Sección 15 de las normativas FCC. Estos límites están diseñados para proporcionar una protección razonable contra las interferencias perjudiciales en una instalación residencial. Este equipo genera, utiliza y puede emitir energía de radiofrecuencia y, si no se instala y utiliza de acuerdo con las instrucciones proporcionadas, podría causar interferencias perjudiciales en las comunicaciones de radio. Sin embargo, no existen garantías de que el equipo no provoque interferencias en una instalación particular. Si este equipo provoca interferencias perjudiciales a la recepción de radio o televisión, lo que puede determinarse encendiéndolo y apagándolo, es recomendable intentar corregir las interferencias mediante una o varias de las siguientes medidas: ◆ Reorientar o colocar en otro lugar la antena receptora. ◆ Aumentar la separación entre el equipo y el receptor. - Conectar el equipo a una toma de corriente de un circuito distinta de aquella a la que esté conectado el receptor de radio o TV. - Solicitar ayuda al proveedor o a un profesional de radio y TV con experiencia.Advertencia:
Utilice únicamente cables de señal protegidos para conectar dispositivos de E/S a este equipo. Se advierte que los cambios o modificaciones no aprobados expresamente por la parte responsable del cumplimiento anularán la autorización para utilizar el equipo.TABLA DE CONTENIDOS
Primeros pasos 4
Guía de instalación rápida (GIR) 6
Instalar el software y el controlador 6 Instalar el hardware 8 Funciones adicionales 9 Digitalización con un botón 9CÓMO DIGITALIZAR DIAPOSITIVAS 10
PASO 1 - Adquirir el controlador 10 PASO 2 – Seleccionar el tipo de película 10 PASO 3 – Predigitalización opcional 10 PASO 4 – Establecer la configuración de digitalización 10 PASO 5 – Establecer las preferencias de digitalización 12 PASO 6 – Digitalizar 15 PASO 7 – Salir 15Como utilizar la funcion de compartir 18
Escaneo en Facebook .. 19 Para escanear a Dropbox 21INTERFAZ DEL USUARIO 22
I. Área de la ventana principal 23 II. Área de la ventana de vista previa 27 III. Área de configuración de digitalización 27 IV. Área del panel de miniaturas 28SOPORTE TÉCNICO 30
PRIMEROS PASOS
Compruebe el contenido del paquete antes de comenzar. Para llevar a cabo una instalación rápida, consulte la Guía de instalación rápida.  ¡Importante! Guarde la caja, el recibo y el material de embalaje originales por si tuviera necesidad de transportar el producto.Contenido del paquete
Escáner de películas. Adaptador de corriente INPUT/输入/输入: 100-240V \~ 50/60Hz 0.6A OUTPUT/輸出/輸出: +12V=1.5A ⊖—⊕¡Advertencia! El uso de otro adaptador de alimentación puede dañar gravemente el escáner e invalidará la garantía del producto.
◆ Cable USB 2.0. ◆ CD con controladores de CyberView - CD con software de aplicaciones para editar digitalizaciones. ◆ Manual del usuario impreso.NOTA:
◆ Software de aplicación es un software de creación de imágenes, como por ejemplo Presto Image Folio, sujeto a cambio sin previo aviso.PAUTAS GENERALES:
◆ Utilice solamente el cable USB suministrado. Conecte el equipo al escáner directamente mediante el cable USB 2.0. No utilice un concentrador o alargador. Utilice solamente los puertos USB situados en la parte posterior de los equipos de sobremesa. Si hay algún otro dispositivo (dispositivo multifunción, impresoras, escáneres, cámaras Web) conectado al equipo a través del puerto USB, desconéctelos. Se necesita al menos 1 GB de memoria RAM (Windows/Mac).| Intervalo de temperatura ambiente de funcionamiento de 10 °C a 40 °C (de 50 °F a 104 °F) |
| Nota: no encienda el escáner a menos que la temperatura ambiente se encuentre dentro de ese intervalo. Si el escáner se ha almacenado o transportado fuera de este intervalo de temperatura, deje que recupere la temperatura antes de encenderlo. |
| Intervalo de humedades ambiente de funcionamiento: humedad relativa de entre el 15% y el 76% (sin condensación) |
| Nota: Si el escáner se ha almacenado o transportado a una baja temperatura y, a continuación, pasa a un entorno cálido o húmedo, se puede producir condensación. |
Guía de Instalación para enchufar escáner TWAIN para Adobe Photoshop Elements 12
Usted puede instalar components de TWAIN que fueron instalados con versiones de Photoshop Elements previos a la versión 9 para usarlos con Elements 11 o 12. Importante: No trasladar la carpeta Plug-Ins desde versiones previas de Photoshop Elements a la carpeta Plug-Ins de Photoshop Elements 11 o posteriores. Tampoco con figure la carpeta Plug-Ins de Photoshop Elements 8 (o anteriores) como Carpeta Adicional Plug-Ins dentro de Preferencias. Encuentre información complete en la página web oficial de Adobe: http://helpx.adobe.com/photoshop-elements/kb/twain-installed-photoshop-elements-11.htmlMacintosh
Si usted necesita tener soporte para TWAIN en Mac OS, Adobe le recomienda encarecidamente que acceda a su equipo a través del OS Rosetta (PPC). De forma contraria, escanee su imagen y ábralo er Photoshop Elements. Para instalar el heredado enchufe TWAIN para Mac OS, copiar la carpeta Import Modules desde: //Applications/Adobe Photoshop ElementsInstalar el hardware
Conecte el escáner de diapositivas a una fuente de alimentación. 1. Busque el conmutador alimentación situado en el lado derecho inferior del escáner. Asegúrese de que el escáner está APAGADO. Apagado Encendido   2. Enchufe el adaptador de CA a una toma de corriente de CA ANTES de enchufarlo al escáner. 3. Conecte el cable USB al equipo mediante un adaptador USB estándar. Conecte el adaptador USB del cable al panel posterior del escáner. Inserción de diapositivas montadas
Atención antes de digitalizar... Asegúrese de que no haya tira de películas en el interior del escáner antes de insertar la diapositiva, y de que no haya ninguna diapositiva en el interior del escáner antes de insertar la tira de películas. Tenga en cuenta que no es posible colocar diapositivas y tiras de película en el escáner de forma simultánea. Diapositivas montadas 1. Inserte la diapositiva en la ranura situada en la parte delantera de la unidad, con el lado mate hacia abajo natural_image
Simple line drawing of a vehicle's front and side components with a red arrow pointing to the lower side (no text or symbols)Digitalizar diapositivas (continuación...)
2. Establecer la con figuración y las preferencias de digitalización Consulte la página 10 3. Consulte las opciones de digitalización en la página 10 Nota: Algunos soportes de diapositivas son muy delgados, y requerirán que aplique una ligera presión al borde del soporte tras insertarlo para poder registrarlo en el escáner. Sabrá que se ha detectado porque los iconos de la barra Preview (Vista previa) de la interfaz de usuario de iluminarán en color  No se ha detectado ninguna diapositiva  Se ha detectado una diapositivaInsertar tiras de películas
1. Inserte la tira de película con el lado mate hacia abajo, desde la entrada de películas izquierda. 2. El escáner realizará la carga de forma automática, y colocará el primer fotograma en el centro de la ventana de visualización. Si el primer fotograma no se encuentra en la posición correcta, desplácelo con el botón "FORWARD" (AVANCE) o "REVERSE" (RETROCESO), y también puede moverlo con la función de ajuste preciso de la interfaz de CyberView. (Consulte la página 22) 3. Consulte las opciones de digitalización en la página 10 Puede cargar la película fácilmente sosteniéndola en torno al tercer fotograma de la tira de película, tiras / Rols película se insertan lado mate hacia abajo (lado de la emulsión) natural_image
Illustration of a hand holding a pen with a red arrow pointing right (no text or symbols)Funciones adicionales
Botones del escáner Expulsar - expulsa la tira de película Retroceso - retrocede la película en un fotograma Avance - avanza la película en un fotograma Digitalizar - consulte a continuación Digitalización con un solo botón Digitalización con un botón
1. Abra CyberView (consulte la página 10 para adquirir el programa del controlador CyberView). 2. Defina la configuración de digitalización (consulte la página 10-11) 3. Seleccione el directorio de destino de la digitalización y el formato de archivo (TIF o JPG). Cuando termine la configuración, presione el botón Digitalizar (☑) para iniciar la digitalización.  Botón Un toque  NOTA: si no abre CyberView PRIMERO, el botón Digitalizar no funcionará.CÓMO DIGITALIZAR DIAPOSITIVAS
PASO 1 - Adquirir el controlador
(Para los usuarios de PC) Abra CyberView desde Start (Inicio) – All Programs (Todos los programas) – CyberView (Para los usuarios de MAC) Ahora el disco duro de Macintosh – Applications (Aplicaciones) – CyberViewPASO 2 – Seleccionar el tipo de película
Seleccione el tipo de película que se va a digitalizar - Positivo, Negativo o Blanco y negro. PASO 3 – Predigitalización opcional
Seleccione "Prescan Current Frame" (Predigitalizar marco actual) para predigitalizar la diapositiva cargada actualmente en el escáner, o en "Prescan All..." (Predigitalizar todo...) para predigitalizar toda una tira de negativos  La predigitalización debe usarse para ajustar manualmente la configuración de color y edición para cada diapositiva antes de realizar la digitalización final. Es posible establecer diferentes configuraciones para cada diapositiva que se va a digitalizar.PASO 4 – Establecer la configuración de digitalización
a. Resolución La resolución de digitalización predeterminada es 1000 ppp. A continuación se enumeran opciones de resolución adicionales.Establecer la configuración de digitalización (continuación...)
Aviso: Cuanto mayores sean las resoluciones de digitalización, más tiempo tardará esta y mayor será el espacio en disco duro. b. Profundidad de color Elija entre 8 y 16 bits. Cuanto mayor sea el valor de la profundidad de color, mayor será el intervalo de colores de la imagen digitalizada final. La profundidad de color del escáner de películas es de color verdadero de 48 bits. El software de digitalización es capaz de seleccionar el modo de color de 8 o 16 bits durante la digitalización. Esto generará imágenes en color de 24 o 48 bits, 8 o 16 bits por cada uno de los canales de color rojo, verde y azul.Ejemplo:
Modo de 8 bits = 8 rojo, 8 verde y 8 azul para un color de 24 bits en total Modo de 16 bits = 16 rojo, 16 verde y 16 azul para un color de 48 bits en total   "Prescan Resolution" (Resolución de predigitalización) - resolución de predigitalización predeterminada. "Color Depth" (Profundidad de color): profundidad de color predeterminada durante la digitalización. "Scan Mode" (Modo de digitalización): modo de digitalización predeterminado para digitalizar.Configurar las preferencias de digitalización
1. Seleccione Browse (Examinar) y elija la carpeta designada en la que guardar la imagen digitalizada. 2. Especifique el nombre de archivo. Establecer las preferencias de digitalización (continuación...)
3. Trailing Index after Base File Name Digits (Agregar índice después de los dígitos del  4. Opciones - Use Film Index (Usar índice de película): Utilice el número asignado a la diapositiva en función de su posición en el cartucho. User Defined Start Number (Número de inicio definido por el usuario): Introduzca un número de inicio específico 5. Elija el tipo de archivo "TIF" o "JPG". (TIF sin comprimir o JPG sin comprimirElija la calidad de imagen para JPEG. (20-100) 100 ofrece la mínima cantidad de compresión Configuración avanzada
 "Auto Exposure" (Exposición automática): esta opción pretende encontrar la exposición correcta para obtener el intervalo más amplio de blancos y negros mientras coloca los grises medios alrededor del centro del intervalo de datos. "Auto Balance" (Balance automático): utilice histograma de la imagen para equilibrar los canales RGB. Esta opción estima el tinte de color de las imágenes y ajusta estas según se necesita. "Auto Contrast" (Contraste automático): el software del escáner analiza los datos y ajusta automáticamente la configuración para los puntos blancos y negros. "Digital Noise Reduction" (Reducción de ruido digital): aplica un filtro que reduce la granularidad de la película. "Multipass Xposure"- Al activar la función Exposición múltiple, se realiza un escaneo triple para obtener la mejor imagen posible. Este proceso captura los 3 escaneos individuales. En primer lugar, una pasada normal y luego otros 2 escaneos para resaltar los detalles de las sombras para una mayor exposición de las áreas más oscuras. A continuación, el software calcula de forma intuitiva el escaneo final, que contiene los datos de los 3 escaneos. "Muestreo múltiple"- Ajuste la configuración para escanear una sola imagen (varias veces) 2x, 4x, 8x o 16x para el resultado de calidad más alta. Tenga en cuenta que esta opción aumenta ampliamente el tiempo requerido para el escaneo. Gracias a la función Muestro múltiple, el ruido de la imagen es asunto del pasado. Área de digitalización predeterminada Esta opción permite ajustar el tamaño de la digitalización y el parámetro "Scan Offset" (Desfase de digitalización) para mover la posición de la imagen de la diapositiva.  Magic Touch/Auto Color (Toque mágico/Color automático) Esta opción permite habilitar y deshabilitar el ajuste de toque mágico y color automático para las digitalizaciones.  Magic Touch (Toque mágico) es una versátil tecnología de eliminación de polvo y arañazos gracias a la cual ya no tendrá que aprender complejas y tediosas técnicas de are. Basada en hardware, funciona perfectamente con el proceso de digitalización garantizar los mejores resultados posibles cuando transmita imágenes al equipo. vo, los arañazos y otras imperfecciones se detectan y eliminan inteligentemente, urando la belleza original de la imagen. Magic Touch no funciona con película Kodachrome y B / W de Cine. Usted tiene que desactivar Magic Touch. "Y lo traduce a todos los idiomas digitalización con Magic Touch requiere mayores tiempos de digitalización por lo que ción está desactivada de forma predeterminada. nción Auto Color (Color automático) elimina las conjeturas del proceso de digitalización para racionalizar el flujo de trabajo y lograr los mejores resultados. La logía de mejora de color patentada se aplica a imágenes digitalizadas para proporcionar el ajuste de color más preciso, gracias a lo cual se consiguen imágenes vibrantes con un brillo, contraste y saturación óptimos.PASO 6 - Digitalizar
Scan (Digitalizar) - Scan (Digitalizar) - Scan Current Frame (Digitalizar fotograma actual)  Esta acción inicia la digitalización para procesar archivos.  Todas las imágenes digitalizadas se guardarán en el directorio establecido anteriormente. Las ubicaciones predeterminadas de fábrica son: Windows: C:\Usuarios\[SU\_NOMBRE\Documents; MAC: Disco duro Mac\Usuarios\[SU\_NOMBRE]\Pictures\Cyberview Images),PASO 7 – Salir
Seleccione "Scan (Digitalizar) > Exit (Salir)" para cerrar el controlador. Los archivos con las imágenes digitalizadas pueden abrirse y editarse con cualquier software para edición de imágenes.  NOTA: Si usa el editor de imágenes suministrado, puede obtener ayuda en cuanto al uso de la aplicación en el menú Ayuda en la aplicación. Igualmente, puede examinar el DVD suministrado para obtener la documentación de ayuda.CÓMO USAR LA FUNCIÓN DE PARTICIPACIÓN
Uso compartido/almacenamiento en cloud:   DropboxDiseño sencillo y fácil de utilizar
Abra el software CyberviewX 5. Deberá seleccionar positivo para las diapositivas y negativo para las tiras de películas. Ajuste la configuración de escaneo - Escaneo - Preferencia - Tipo de película - Uso compartido/almacenamiento en cloud Nota: Las opciones de la barra de herramientas están desactivadas hasta que se realiza la activación en la ventana Configuración.  Seleccione el método entre Uso compartido o Cloud.   A continuación, haga clic en "Aceptar". Los iconos de la barra de herramientas aparecerán activos.  Al escanear en , en primer lugar, deberá cerrar sesión en la cuenta, puesto que la función de escaneo requiere una autenticación/inicio de sesión en cada uso. 1. Cierre la sesión de la cuenta de Facebook. 2. En la interfaz de Cyberview, active la función Uso compartido, tal como se describe arriba. 3. Siga las instrucciones en pantalla para iniciar sesión y autenticar el dispositivo.    Log in to-use your Facebook account with OAuth 2D device Auth Demo App. final Password  ☑ Keep nie kigjed in Forget your password!Success
Minimice esta ventana del navegador. 4. Minimize the browser window and on the next CyberView screen, note the Code number you have been given (this will be a different code every time, copy it down, you will need to enter it on the Facebook website  5. Ingrese el código que anotó previamente y haga clic en Conectar. Facebook for Devices  6. El escáner se encuentra ahora conectado a Facebook. Facebook for DevicesConnect your Device with Facebook
You have successfully connected your device with Facebook! You may now return to your device. Para escanear en Dropbox, deberá dirigirse a la siguiente página en primer lugar: https://www.dropbox.com/ y registrar una cuenta y descargar e instalar el software, si actualmente no es miembro de Dropbox y desea utilizar este servicio. Una vez que haya creado una cuenta e instalado la aplicación Dropbox, aparecerá una nueva carpeta en la computadora que puede seleccionar para escanear en dicha carpeta para la sincronización automática de las cargas con la cuenta de Dropbox.  Para escanear en la carpeta de Dropbox 1. Abra Cyberview X5. 2. A continuación, seleccione Escaneo – Preferencia – tipo de película que desea escanear (positivo o negativo). 3. En esta ventana de configuración, seleccione la pestaña Uso compartido y CloudStorage (Almacenamiento en cloud).  4. Seleccione la casilla junto a CloudStorage (Almacenamiento en cloud) para activar.  NOTA: Al seleccionar la función CloudStorage (Almacenamiento en cloud) - Dropbox, el software escaneará automáticamente en la carpeta de CyberviewX creada en su carpeta de Dropbox de la computadora, lista para la sincronización con su cuenta de Dropbox. 5. Haga clic en Aceptar para guardar la configuración. Una vez que esté realizada la configuración, podrá comenzar a escanear. 6. Todos los archivos escaneados se almacenarán en la carpeta de Dropbox.  La sincronización se realizará de forma automática con la cuenta en línea, cuando se encuentre activa. (Activa = Dropbox se está ejecutando en la barra del sistema) INTERFAZ DEL USUARIO
I. Área de la ventana principal [ventanas fijas]  La interfaz de usuario de CyberView X 5 se compone de cuatro partes principales: I. Área de la ventana principal[ventanas fijas] II. Área de la ventana de vista previa [ventana fija] III. Área de configuración de marco activo [ventana flotante]Comandos de menú - Scan (Digitalizar)
Prescan (Predigitalizar) - Prescan Current Frame (Predigitalizar marco actual): predigitalice la diapositiva existente. Scan (Digitalizar) - Scan Current Frame (Digitalizar fotograma actual)- Scan Selected to File (Digitalizar selección en archivo) - Scan All (Digitalizar todo)  Comandos de menú - Preview (Vista previa) (información general)  Funciones Zoom, Rotate (Girar) y Flip (Voltear).Revert (Revertir)
Esta opción permite descartar todas las modificaciones y volver a restaurar el estado original de la imagen.Preferencias - Consulte la configuración de digitalización (página 11) Exit (Salir)
Cierra la interfaz de usuario de CyberView X5. Aparecerá el mensaje emergente "Quit the application prompts to save documents?" (¿Desea salir de la aplicación y guardar los cambios?). Haga clic en "Yes" (Sí) para guardar, en "No" para descartar la configuración actual o en "Cancelar" para volver a Cyber View X. Comandos de menú - Image Adjustment (Ajuste de la imagen)
a. Ajuste de imagen 1. Variations (Variaciones): genera diferentes vistas de la imagen con opciones para realizar cambios en realces, mediostonos, etc.  2. Color Balance (Balance de color)
Permite ajustar el brillo, el contraste, la saturación y el color (CMY o RGB) de la imagen. Como referencia, se muestran las comparaciones entre la imagen antes y después de realizar el ajuste.  Ejemplo: Si una imagen de vista previa aparece demasiado oscura, utilice el control deslizante "Brightness" (Brillo) de la ventana "Color Balance" (Balance de color) para ajustar la imagen seleccionando el control deslizante del centro y moviéndolo hacia la derecha. La vista "Después" de la imagen se hace más clara. Seleccione "OK" (Aceptar) para aceptar los cambios, que se enviarán al hardware de digitalización. Esta operación también se puede utilizar para ajustar cada una de las funciones de "Color Balance" (Balance de color) mediante el contraste, la saturación e intervalos específicos de color de cian, magenta y amarillo.3. Curves and Levels (Curvas y niveles)
Permite ajustar la configuración de imagen mediante el desplazamiento del parámetro Curve and Levels (Curvas y niveles). Como referencia, se muestra una comparación entre el ajuste antes y después.  Ejemplo: Cuando la imagen de vista previa se muestra demasiado oscura, se pueden realizar ajustes con el control deslizante Input (Entrada) de la ventana Curves and Levels (Curvas y niveles) para corregir la imagen. Seleccionando el control deslizante Gray (Gris) situado en el centro y moviéndolo hacia la izquierda, los cambios que se mostrarán en la vista "After", donde aparecerá una imagen más clara. Cuando esté conforme con la imagen ajustada, seleccione "OK" (Aceptar) para enviar los cambios al hardware de digitalización. También se puede utilizar el mismo método para ajustar cada canal de color independientemente, utilizando el menú desplegable de canal "RGB = All colors" ("RGB = Todos los colores") R = Rojo, G = Verde y B = Azul.Comandos de menú - Windows
1. Exposure Setting (Configuración de exposición): permite ajustar el tiempo de exposición (R, G, B), presione "Reset" (Restablecer) para restaurar la configuración predeterminada. Comandos de menú - Help (Ayuda)
Update (Actualizar): Firmware: actualice la versión de firmware, y seleccione la ruta de acceso en la que desea guardar el archivo de firmware. (Puede descargar estos archivos de nuestro sitio Web) - About (Acerca de): permite mostrar información del sistema (como por ejemplo el sistema operativo y la CPU), información sobre el producto (como por ejemplo el nombre de producto, el nombre de modelo, la versión de hardware, la versión de firmware, la versión de software e información del dispositivo sobre la interfaz y la resolución óptica.Diagrama de barras de funciones
Seleccione el tipo y marca de película en la barra de herramientas: Negativo Positivo, (también conocido como diapositiva) Blanco y Negro II. Área de la ventana de vista previa [ventanas fijas]
 Prescan (Predigitalizar): predigitalice la película actual. Presione el desplegable ▼para disponer de más opciones  Scan (Explorar): permite digitalizar una película. Presione el botón desplegable ▼para disponer de más opciones.  Image Adjustment (Ajuste de imagen): Presione el botón desplegable para disponer de más opciones.II. Área de la ventana de vista previa [ventanas fijas](continuación....)
 a. Expulsa la película hacia la izquierda b. Mueve la película un fotograma hacia la izquierda  a. Mueve la película un fotograma hacia la derecha b. Expulsa la película hacia la derecha  Ir a... Puede seleccionar qué fotograma de la tira desea mover Herramienta de alineación de imágenes  Herramienta de ajuste de fotogramas (PESTAÑAS): si la película está incorrectamente alineada, puede utilizar las PESTAÑAS de la regla para ajustar la alineación arrastrando la PESTAÑA para alinearla con el borde del fotograma de la película  Puede seleccionar la unidad de medida "pulgadas", "centímetros", "píxeles". Para ello, haga clic en la esquina superior izquierda.Diagrama de barras de herramientas
 Select scan area (Seleccionar área de digitalización): se pueden realizar varias selecciones simultáneamente.  Zoom In (Ampliar): permite ampliar la imagen en la que se encuentra el cursor actualmente. La imagen se ampliará cada vez que haga clic hasta que se alcance el múltiplo máximo (1000%).  Zoom Out (Reducir): para reducir el tamaño de la imagen visualizada, haga clic en el cursor Reducir en el área que desee. La imagen se reducirá a la mitad cada vez que haga clic hasta que se alcance el múltiplo mínimo (25%).  Rotate 90 Left (Girar 90° a la izquierda): permite girar la imagen 90 grados en sentido contrario a las agujas del reloj.  Rotate 90 Right (Girar 90° a la derecha): permite girar la imagen 90 grados en el sentido de las agujas del reloj.  Flip Horizontal (Volteo horizontal): permite voltear la imagen 180 grados horizontalmente.  Flip Vertical (Volteo vertical): permite voltear la imagen 180 grados verticalmente.  Revert (Revertir): esta opción permite descartar todas las modificaciones y volver al estado original en las ventanas de vista previa.Estado de la línea
En la esquina inferior izquierda se muestran el nivel de color (RGB: rojo, verde, azul) y las coordenadas de la ubicación [p. ej.: I]. El nivel de zoom, la ubicación del cargador de diapositivas actual y el número de áreas que se han seleccionado para digitalizar (2 o más indica: Varias áreas de digitalización en una diapositiva [p. ej.: II]). 1. R:0 G:0 B:0 X:748 Y:181 II. Exposición R:102% G:100% B:100% Escala del zoom:100% Ubicación:1 Selecciones:1III. Área de configuración de digitalización [ventanas flotantes]
Modo normal [p. ej.: l] permite especificar el parámetro básico para digitalizar (como por ejemplo la resolución, el tamaño de película y la profundidad de color). Modo avanzado [p. ej.: II] permite especificar el parámetro salida de digitalización, la resolución de digitalización, y la profundidad de color 1.  II.  Cuando se digitalizan más de 6 marcos (se pueden visualizar 6 simultáneamente en el panel de miniaturas) puede desplazarse para ver más haciendo clic en el botón de flecha derecha. Los botones de flecha izquierda y derecha permiten desplazarse por las imágenes predigitalizadas con facilidad. Este modelo de escáner es capaz de digitalizar un rodillo de película (sin cortar) de hasta 40 fotogramas  Para anular la selección de marcos que no desea digitalizar, haga clic en la casilla de verificación para quitar la selección. SOPORTE TÉCNICO
Estimados clientes, nuestros productos se someten a un estricto Reflecta control de calidad final. Si el equipo no funciona correctamente, o de sus expectativas, por favor primero asegúrese de que ha instalado el último software y firmware. Estos se pueden encontrar en nuestra página web: www.reflecta.de Si un error persiste, póngase en contacto con nuestro servicio al cliente, ver más abajo. El período de garantía es de 24 meses y comienza en la fecha de compra. Por favor guarde su recibo como prueba de compra. reflecta gmbh Merkurstrasse 8 72184 Eutingen Germany Tel: +49 (0) 7457-946560 E-Mail: mail@reflecta.de reflecta RPS 10M CyberView X5 Manuel d'utilisationDÉCLARATION DE LA COMMISSION FÉDÉRALE DES TÉLÉCOMMUNICATIONS (FCC)
Cet appareil a été testé et déclaré conforme aux limites d'un appareil numérique de classe B, conformément à la partie 15 du règlement de la FCC. Ces limites sont stipulées aux fins de garantir une protection raisonnable contre les interférences nuisibles en installation résidentielle. Cet appareil produit, utilise et peut émettre des fréquences radioélectriques et, s'il n'est pas installé ou utilisé conformément aux directives, il est susceptible de causer des interférences radio ou télévision. Cependant, nous ne pouvons garantir que des interférences ne se produiront pas dans une installation particulière. Si cet appareil cause des interférences nuisibles à la réception de la radio ou de la télévision, ce que vous pouvez facilement observer en éteignant et en rallumant l'appareil, nous vous encourageons à prendre une ou plusieurs des mesures correctives suivantes : ♦ Réorienter ou déplacer l'antenne réceptrice. ◆ Augmentez la distance entre l'appareil et le récepteur. - Brancher l'appareil sur une prise d'un circuit différent. - Consultez votre revendeur ou un technicien radio/télévision qualifié pour de l'aide.Attention :
Utilisez seulement des câbles de signal blindés pour connecter des appareils E/S à cet appareil. Tout changement ou modification non expressément approuvé par les autorités responsables de la conformité peut révoquer le droit de l'utilisateur à employer l'appareil en question.TABLE DES MATIÈRES
MISE EN ROUTE
GUIDE D'INSTALLATION RAPIDE (QIG) 6 Installation du Logiciel et des Pilotes 6 Installation du matériel 8 Fonctions supplémentaires 9 Scan à un bouton 9 COMMENT FAIRE POUR SCANNER DES DIAPOS 10 ETAPE 1 - Obtenir le pilote 10 ETAPE 2 – Choisir le type de film 10 ETAPE 3 – Pré-scan optionnel 10 ETAPE 4 – Régler les réglages de scan 10 ETAPE 5 – Régler les préférences de scan 12 ETAPE 6 - Scanner 15 ETAPE 7 - Quitter 15 COMMENT UTILISER LA FONCTION DE PARTAGE 18 Numerisation dans Facebook 19 Pour numeriser vers Dropbox 21 INTERFACE UTILISATEUR 22 I. Zone de fenêtre principale [Fenêtres fixes] 23 II. Section Fenêtre de prévisualisation [Fenêtres fixes] 27 III. Scanner la zone de réglages [Fenêtre flottante] 27 IV. Section Panneau miniatures [Fenêtre flottante] 28 ASSISTANCE TECHNIQUE 30MISE EN ROUTE
Vérifez le contenu de la boîte avant de commencer. Pour une installation rapide, référez-vous au Guide d'installation rapide.  Important ! Gardez la boîte originale, le ticket et les matériaux d'emballage en cas de besoin au futur.Contenu de la boîte
♦ Scanneur de fim. Adaptateur secteur INPUT/輸入/輸入: 100-240V \~ 50/60Hz 0.6A OUTPUT/輸出/輸出: +12V = 1.5A ⊖—⊕—⊕Attention ! L'utilisation d'un autre adaptateur d'alimentation peut endommager le scanneur et annuler la garantie du produit.
Câble USB 2.0 ◆ CD du pilote de CyberView ◆ CD du logiciel d'application pour l'édition des scans. ◆ Manuel de l'utilisateur impriméREMARQUE :
\- Le logiciel d'application est un logiciel d'imagerie tel que Presto Image Folio, et est sujet à modification sans avis préalable.GUIDE GÉNÉRAL :
Utilisez uniquement le câble USB fourni. Branchez directement le scanneur sur l'ordinateur en utilisant le câble USB 2.0. N'utilisez pas un hub ou un câble d'extension. Utilisez uniquement les ports USB à l'arrière des ordinateurs de bureau. Si d'autres appareils (appareils multifonctions, imprimantes, scanneurs, webcams) sont branchés sur l'ordinateur via USB, débranchez-les. - Un minimum de 1GB de RAM (Windows/Mac) est nécessaire.| Température ambiente recommandée pour l'utilisation50° à 104°F (10° à 40°C) |
| Remarque : N'allumez le scanneur que si la température ambiante est dans la plage recommandée. Si le scanneur a été rangé ou transporté dans un endroit avec une température différentes, laissez-le s'ajuster à la nouvelle température avant de l'allumer. |
| Humidité ambiente recommandée pour l'utilisation15% à 76% d'humidité relative (sans condensation) |
| Remarque : Si le scanneur a été rangé ou transporté d'un endroit froid à un endroit chaud/humide, de la buée peut apparaître. |
Guide d'installation de plug-in pour scanner TWAIN pour Adobe Photoshop Elements 12
Vous pouvez installer le composant TWAIN installé avec les versions de Photoshop Éléments antérieurs à la version 9 pour utilisation avec Eléments 11 ou 12. Important: Ne déplacez pas les plug-ins des versions précédentes des Photoshop Elements vers Photoshop Elements 11 ou ultérieurs > Dossier Plug-ins Egalement, ne paramétrez pas Photoshop Elements 8 (ou antérieurs)> Dossier Plug-Ins comme le dossier supplémentaire Plug-Ins dans Préférences. Vous trouverez des informations complètes sur le site internet de Adobe: http://helpx.adobe.com/photoshop-elements/kb/twain-installed-photoshop-elements-11.htmlMacintosh
Si vous souhaitez obtenir un support technique de TWAIN sur le SE Mac, Adobe vous recommande fortement d'accéder à votre appareil avec le SE Rosetta (PPC). Vous pouvez aussi scanner votre image, puis l'ouvrir dans Photoshop Elements. Pour installer l'ancien plug-in TWAIN, copiez le dossier ImportModules depuis: //Applications/Adobe Photoshop ElementsFenêtres
Adobe vous recommande fortement d'utiliser le support WIA avec votre appareil, si disponible. Si votre appareil ne prend pas en charge les pilotes WIA, essayez de mettre à jour le pilote TWAIN. Contactez le fabricant de votre appareil pour plus de support technique TWAIN. Pour installer l'ancien plug-in TWAIN, procédez comme suit: Pour Windows (32 bit), copiez le dossier Import-Export à partir de: C:\Program Files\Adobe\Photoshop ElementsInsérer des diapos montées
Attention avant la numérisation... Assurez-vous qu'il n'y a aucun film à l'intérieur du scanneer avant d'insérer la diapo et qu'il n'y a aucune diapo à l'intérieur du scanneer avant d'insérer le film. Veuillez noter que la diapo et le film ne peuvent pas être insérés dans le scanneur en même temps.Diapositives montées
1. Insérez la diapo dans la fente à l'avant de l'unité, avec le côté dur (émulsion) vers le bas. natural_image
Simple line drawing of a vehicle's head and side profile with a red arrow pointing to the lower side (no text or symbols)Insérer des diapos montées (suite...)
2. Réglez les paramètres Numérisation et les préférences - Voir page 10 3. Voir Options de numérisation à la page 10 Remarque : Certains support de diapo sont fins et vous pourrez avoir besoin d'appuyer gentiment sur le bord du support avant de l'insérer dans le scanneur, vous verrez lorsqu'elle est détectée dans la barre Prévisualisation dans l'interface de l'utilisateur, les icônes s'allumeront en couleur.  Aucune diapo détectée  diapo détectéeInsérer des films
1. Insérez le film avec le côté émulsion vers le bas dans l'entrée de film à gauche. 2. Le scanneur chargera automatiquement et positionnera la première image au centre de la fenêtre de visualisation, si la première image n'est pas dans la bonne position, cliquez sur le bouton « AVANCER » ou « RECULER » et vous pouvez aussi la déplacer avec la fonction de réglage fin dans l'interface de CybverView. Voir page 22. 3. Voir Options de numérisation à la page 10 Vous pouvez charger facilement le film en locataire Autour de la 3ème l'image du film. Film de bandes / rouleaux sont insérés côté mat vers le bas (côté émulsion) natural_image
Illustration of a hand holding a tool with a red arrow indicating direction (no text or symbols)Fonctions supplémentaires
Boutons du scanneur Ejecter - Ejecte le film Reculer - Recule d'une image du film. Avancer - Avance d'une image du film. Scanner - Voir Scan à un bouton ci-dessous Scan à un bouton
1. Ouvrez la CyberView (lire page 10 pour obtenir le programme de commandes CyberView) 2. Configurer les réglages de scan (voir page 10-11) 3. Choisissez le dossier Scanner dans, le format du fichier (TIF ou JPG, une fois configuré, appuyez sur le bouton du scanneur) pour commencer à scanner.  Bouton à touche unique  REMARQUE : Si vous n'ouvrez pas CyberView EN PREMIER, le bouton du scanneur ne marchera pas.COMMENT FAIRE POUR SCANNER DES DIAPOS
ETAPE 1 - Obtenir le pilote
(Utilisateur d'un PC) Ouvrez CyberView à partir de Démarrer – Tous les programmes – CyberView (Utilisateur d'un MAC) Ouvrez le Disque Dur Macintosh – Applications – CyberViewETAPE 2 – Choisir le type de film
Choisissez le type du film à scanner - Positif, Négatif ou N&B (Noir et Blanc). ETAPE 3 – Pré-scan optionnel
Choisissez « Prénumériser la prise courante » pour pré-scanner la diapo installée dans le scanner, ou « Prénumériser tout... » pour pré-scanner un film de négatives entier.  Un pré-scan doit être utilisé pour ajuster manuellement les couleurs/éditer les réglages de chaque diapo avant de faire le scan final. Il est possible de régler plusieurs réglages pour chaque diapo à scanner.ETAPE 4 – Régler les réglages de scan
a. Résolution La résolution de scan par défaut est 1000dpi, les autres options pour la résolution sont listées ci-dessous.Régler les réglages de scan (suite...)
Remarque : Des hautes résolutions prendront plus de temps et plus d'espace sur le disque dur. b. Profondeur des couleurs Choisissez entre 8 et 16 bits. Une haute profondeur de couleur donnera plus de couleurs sur l'image finale scannée. La profondeur des couleurs du Scanner de film est 48 bit, True Color. Le logiciel de numérisation est capable de choisir entre le mode couleur 8 bit et couleur 16 bit lors de la numérisation, Cela produira des images en couleur 24 ou 48 bit, 8 bits ou 16 bits par canal de couleur Rouge, Vert et Bleu.Exemple :
Mode 8 bit = 8 Rouge, 8 Vert, et 8 Bleu soit un total de 24 bit couleur Mode 16 bit = 16 Rouge, 16 Vert, et 16 Bleu soit un total de 48 bit couleur   « Résolution de pré-scan » - La résolution de pré-scan par défaut. « Profondeur de couleur » – La profondeur de couleur par défaut du scanneur. « Mode de scan » – Le mode de scan par défaut du scanneur.Configuration des préférences de scan
1. Choisissez Naviguer et choisissez le dossier désiré pour enregistrer l'image scannée. 2. Entrez le nom du fichier. Régler les préférences de scan (suite...)
3. Index de suivi après chiffres du nom de fichier de base : Définie la longueur du nom de fichier et de la séquence de numérotation, jusqu'à 6 chiffres. Exemple image1 ou image000001.  4. Options - Utiliser index de film : Utilise le numéro assignée à la diapo, en fonction de sa position dans le magasin. Numéro de début défini par l'utilisateur : Entrez un numéro de début spécifique. 5. Choisissez le type de fichier, « TIF » ou « JPG ». (TIF non compressé ou JPG compressé. Choisissez la qualité de l'image JPEG. (20-100) 100 donne le moins de compression  Paramètres avancés  « Exposition auto » - Essaye de trouver l'exposition appropriée pour une plus large gamme de blancs et noirs en utilisant les gris au centre autour de la plage des données. « Balance auto » - Utilisez l'histogramme pour balancer les canaux RVB. Il estime les couleurs de l'image et ajuste l'image en conséquence. « Contraste auto » - Le logiciel du scanner analyse les données et ajuste automatiquement le réglage des Points blancs et noirs. « Réduction du bruit numérique » - Utilise un filtre, réduit les grains sur l'image. "Multipass Xposure"- Lorsque cela est activé, Multi-exposition effectue un triple scan pour obtenir la meilleure image possible. Ce processus prend trois scans individuels, d'abord une passe normale puis deux autres scans pour mettre en évidence les détails dans les ombres et exposer plus clairement les zones sombres. Le logiciel calcule alors intuitivement le scan final, qui contient à présent les données des trois balayages. "Multiple échantillonnage"- Configurez les paramètres pour scanner une image unique (plusieurs fois) 2x, 4x, 8x ou 16x pour la plus haute qualité finale. Veuillez noter que cela augmente considérablement le temps de scan. Avec Multi-échantillonnage, le bruit de l'image est une chose du passé. Zone de numérisation par défaut Ajuste la taille du scan et ajuste le réglage « Décalage de numérisation » pour déplacer la position de l'image de la diapo.  Magic Touch / Couleur auto Active / désactive la fonction Touché magique et Couleur auto pour les scans.  Touché magique est un outil puissant avec une technologie permettant de supprimer les rayures et la poussière sans besoin d'appendre des méthodes ou des logiciels compliqués et avancés. Basé sur le matériel, elle marche facilement avec le processus de scan pour assurer des excellents résultats lorsque vous ouvrez des images sur l'ordinateur. La poussière, les rayures ou les autres petits problèmes sont facilement détectés et corrigés, pour restaurer la beauté originale de l'image. Scanner avec Touché magique prendra plus longtemps, la fonction est désactivée par défaut. Couleur auto réduit les estimations du processus de scan pour faciliter l'opération et donner des meilleurs résultats. Une technologie propriétaire d'amélioration des couleurs est utilisée sur les images scannées pour fournir un ajustement plus précis des couleurs, donnant des images plus belle avec une luminosité, un contraste et une saturation optimale.ETAPE 6 - Scanner
Numériser - Numériser - Numériser la prise courante  Cela démarre le processus de scan dans un fichier.  Toutes les images scannées seront enregistrés dans le dossier choisi précédemment, le chemin par défaut est : Windows : C:\Users\[YOUR NAME\Documents; MAC : Mac HD\Users\[YOUR NAME]\Pictures\Cyberview Images),ETAPE 7 - Quitter
Sélectionnez « Scan > Quitter » pour fermer le pilote. Les fichiers d'image scannés peuvent être ouverts/édités avec n'importe quel logiciel d'édition d'image.  REMARQUE : Si vous utilisez l'éditeur d'image fourni, pour de l'aide avec cette application, ouvrez le menu Aide dans l'application ou naviguez le DVD fourni pour trouver la documentation d'aide.Comment utiliser la fonction de PARTAGE
Partage/Stockage en nuage :   DropboxConception simple et facile à utiliser
Lancez le logiciel CyberViewX 5, vous devrez sélectionner positif pour les diapositives ou négatifs pour les bandes de film. Configurez les paramètres de scan - Scan - Préférence - Type de Film - Partage/Stockage en nuage. Remarque : les options de la barre d'outils sont désactivées jusqu'à l'activation dans la fenêtre Paramètres.  Choisissez votre méthode soit partage soit Nuage.   Puis cliquez sur « OK ». Les icônes de la barre d'outils sont désormais actives  Pour scanner dans, vous devez d'abord vous fonction de scan va exiger une authentication déconnecter de votre compte, la 1. Déconnectez-vous de votre compte Facebook 2. Dans l'interface de Cyberview, activez la fonction Partage de la manière décrite ci-dessus. 3. Suivez les instructions à l'écran pour vous identifier et authentifier l'appareil.     Réduire cette fenêtre du navigateur 4. Minimize the browser window and on the next CyberView screen, note the Code number you have been given (this will be a different code every time, copy it down, you will need to enter it on the Facebook website  5. Entrez le code que vous avez noté précédemment, puis cliquez sur Connexion. Facebook for Devices  6. Votre scanner est maintenant connecté à Facebook. Facebook for Devices  Dropbox
Pour scanner dans, vous devez d'abord aller ici : https://www.dropbox.com/ et vous inscrire pour un compte et télécharger et installer leur logiciel, si vous n'êtes pas encore un membre de Dropbox et que vous souhaitez utiliser ce service. Une fois que vous avez créé et installé l'application Dropbox vous allez maintenant avoir un nouveau dossier sur votre ordinateur que vous pouvez sélectionner pour recevoir automatiquement les scans, pour les téléchargements synchronisés automatiques avec votre compte Dropbox.      Pour scanner dans le dossier Dropbox 1. Ouvrez Cyberview X5. 2. Ensuite, sélectionnez Scan - Préférence - le type de film que vous souhaitez scanner (positif ou négatif). 3. Dans cette fenêtre de réglage du scan, sélectionnez l'onglet Partage et Stockage en nuage.   4. Cochez la case à côté de Stockage en nuage pour l'activer. REMARQUE : Lorsque vous sélectionnez la fonction Stockage en nuage - Dropbox le logiciel va scanner automatiquement dans le dossier CyberViewX qu'il a créé dans votre dossier Dropbox sur votre ordinateur, prêt pour la synchronisation avec votre compte Dropbox. 5. Cliquez sur OK pour enregistrer les para mètres. Une fois tout configuré, vous êtes prêt à faire un scan. 6. Tous les fichiers scannés seront enregistrés dans le dossier Dropbox.  La synchronisation se fera automatique ment avec votre compte en ligne lorsqu'il est actif. (Actif = Dropbox fonctionne dans la barre des tâches du système) INTERFACE UTILISATEUR
I. Zone de fenêtre principale [Fenêtres fixes]  Il y a quatre parties principales pour l'interface utilisateur CyberView X 5: I. Zone de fenêtre principale(Fenêtres fixes) II. Zone de la fenêtre de présentation [Fenêtre fixe] III. Zone de réglage de fenêtre active [Fenêtre flottante]Commandes du menu - Scanner
Préscan - Préscanner le cadre actuel: Préscanner la diapositive existante. Scanner - Scanner l'image actuelle - Scanner la sélection dans fichier - Scanner tout Commandes du menu - Prévisualiser (aperçu)
 Fonctions Zoom, Tourner & Retourner.Retourner
Annule toutes les modifications et restaure l'image à son état original.Préférence - Voir les réglages de Scan (Voir page 11)
Quitter
Ouvre l'interface d'utilisateur de CyberView X5. Un message s'affichera « Vous quittez l'application, enregistrer les documents ? ». Cliquez sur « Oui » pour enregistrer, « Non« pour annuler le réglage ou « Annuler » pour retourner à Cyber View X. Commandes de menu - Ajustement de l'image
a. Ajustement de l'image 1. Variations : Donne différentes vues de l'image avec des options pour changer les accentuations, les tons moyens etc.  2. équilibre des couleurs
Pour régler la luminosité, le contraste, la saturation et la couleur (CMY ou RVB) de l'image. Des comparaisons entre les images avant et après les réglages sont montrées pour référence.  Exemple : Si une image prévisualisée est trop foncée, utilisez la barre « Luminosité » dans la fenêtre « Balance de couleurs » pour ajuster l'image en sélectionnant la barre au centre et la déplaçant vers la droite. La vue « Après » de l'image sera plus claire. Choisissez « OK » pour accepter les modifications, qui seront envoyées au scanneur. Cela peut aussi être utilisé pour ajuster chacune des fonctions dans « Balance de couleurs » par contraste, saturation et plages de couleur spécifique cyan, magenta et jaune.3. Courbes et niveaux
Ajustez les réglages de l'image en ajustant les réglages Courbe et Niveaux. Des comparaisons entre les images avant et après les réglages sont montrées pour référence.  Exemple : Lorsque l'image prévisualisée est trop sombre, vous pouvez ajuster l'image avec les barres dans les fenêtres Courbes et Niveaux. Choisissez la barre Gris au centre et déplacez-la vers la gauche pour afficher les changements dans la fenêtre « Après » avec une image plus claire. Une fois que l'image ajustée est acceptable, choisissez « OK » pour envoyer les changements au scanneur. La même méthode peut être utilisée pour ajuster la couleur des canaux indépendemment, en utilisant le menu déroulant « RVB = Toutes les couleurs » R = Rouge, V = Vert, et B = Bleu.Commandes de menu - Fenêtres
1. Réglage de l'exposition : Pour ajuster le temps d'exposition (R, V, B), appuyez sur "Réinitialiser" pour restaurer les réglages par défaut. Commandes de menu - Aide
Mise à jour : Firmware : Met à jour la version du firmware, choisissez le chemin où le fichier de mise à jour du firmware a été enregistré. (Ces fichiers peuvent être téléchargés sur notre site Web) A propos de : Affiche des informations sur le système (y compris le système d'exploitation, CPU), des informations sur le produit (y compris le nom du produit, le nom du modèle, la version du firmware, la version du logiciel, des informations sur l'appareil y compris l'interface et la résolution optique).Diagramme de barre des fonctions
Veuillez choisir votre type de film et votre marque dans la barre d'outils: Négatif Positive (aussi connu sous Diapo) Noir et blanc II. Section Fenêtre de prévisualisation [Fenêtres fixes]
 Pré-scanner : Pré-scanne le film actuel, appuyez sur le bouton ▼ déroulant pour plus d'options  Scanner : Scanne le film actuel, appuyez sur le bouton ▼ déroulant pour plus d'options.  Réglage de l'image : Appuyez sur le bouton déroulant pour plus d'options.II. Section Fenêtre de prévisualisation [Fenêtres fixes] (Suite...)
 a. Ejecte le film à gauche b. Recule le film d'une image vers la gauche  a. Avance le film d'une image vers la droite b. Ejecte le film à droite  Aller à... Vous pouvez choisir à quelle image vous voulez aller sur le filmOutil d'alignement de l'image
 Outil d'alignement de l'image (TABS) - Si votre film est mal aligné après l'avoir inséré, vous pouvez utiliser ces TABS sur la règle pour ajuster l'alignement en déplaçant le TAB pour l'aligner avec le bord du film.  Vous pouvez choisir l'unité de mesure « in »-« cm »-« px » en cliquant dans le coin supérieur gauche.Diagramme de barre d'outil
 Sélectionner zone de scan : plus d'une sélection peut être faite à la fois.  Zoom avant : Pour agrandir l'image à l'endroit où le curseur est situé. L'image sera agrandie avec chaque clic jusqu'au niveau maximum (1000%).  Zoom arrière : Pour réduire la taille de l'image affichée, cliquez sur le curseur Zoom arrière sur la partie désirée, l'image sera réduite à moitié avec chaque clic jusqu'au maximum (25%).  Rotation 90 gauche : Pour tourner l'image par 90 degrés vers la gauche.  Rotation 90 droite : Pour tourner l'image par 90 degrés vers la droite.  Retourner horizontalement : Pour retourner l'image horizontalement par 180 degrés.  Retourner verticalement : Pour retourner l'image verticalement par 180 degrés.  Restaurer : Annule toutes les modifications et restaure l'image à son état original dans la fenêtre de prévisualisation.Ligne d'état
Dans le coin inférieur gauche, le niveau de couleur (RVB : rouge, vert, bleu) et les coordinnées de l'emplacement [ex. : I] sont affichés. Le niveau du zoom, l'emplacement du magasin actuel et le nombre de zone sélectionnées pour le scan (2 ou plus indique : Multiples zones de scan sur une diapositive [ex : II].1.
R:0 V:0 B:0 X:731 Y:82II.
Exposition R :100% V :100% B :100% Échelle de zoom :100% Emplacement:1 | Sélections:1III. Scanner la zone de réglages [Fenêtre flottante]
Mode Normal [ex : I] pour entrer les paramètres basiques du scanneur (y compris la résolution, la taille du film, la profondeur des couleurs). Mode Avancé [ex : II] permet d'entrer le paramètre de sortie du scanner, la résolution du scanner, et la profondeur de couleur.1.
II.
 Lorsque vous scannez plus de 6 images (6 à la fois peuvent être vues dans le panneau miniature), vous pouvez défiler pour afficher plus en cliquant sur le bouton flèche droite. Les boutons flèche gauche/droite vous permettent de défiler les images pré-scannées facilement. Ce modèle de scanneur est capable de scanner un rouleau entier (non découpé) de jusqu'à 40 images.  Pour désélectionner des images que vous ne voulez pas scanner, cliquez sur la coche pour annuler la sélection. ASSISTANCE TECHNIQUE
Chers clients, nos produits Reflecta soumis à un contrôle strict de la qualité de fin. Si l'appareil ne fonctionne pas correctement, ou à vos attentes s'il vous plaît vérifiez d'abord que vous avez installé la dernière version du logiciel et du micrologiciel. Ceux-ci peuvent être consultés sur notre site Internet: www.reflecta.de Si une erreur persiste, alors s'il vous plaît communiquer avec notre service à la clientèle, voir ci-dessous. La période de garantie est de 24 mois et commence à la date de l'achat. S'il vous plaît garder votre reçu comme preuve d'acha t. reflecta gmbh Merkurstrasse 8 72184 Eutingen Germany Tel: +49 (0) 7457-946560 E-Mail: mail@reflecta.dereflecta RPS 10M CyberView X5 Manuale dell'utente
DICHIARAZIONE FCC (FEDERAL COMMUNICATIONS COMMISSION)
Questo apparecchio è stato testato ed è risultato conforme ai limiti relativi ai dispositivi digitali di Classe B, ai sensi della Parte 15 delle Norme FCC. Questi limiti sono designati a fornire una protezione ragionevole da interferenze dannose in un'installazione residenziale. Questo apparecchio genera, usa e può irradiare energia a radiofrequenza e, se non è installato e usato in conformità alle istruzioni, può interferire negativamente con le comunicazioni radio. Non vi è tuttavia garanzia che non si manifestino interferenze in installazioni particolari. Se questo apparecchio provoca interferenze dannose alla ricezione radio o televisiva, che possono essere determinate accendendo o spegnendo l'attrezzatura, l'utente è incoraggiato a cercare di correggere l'interferenza adottando una o più delle seguenti misure: ♦ Cambiare l'orientamento o riposizionare l'antenna ricevente. ◆ Aumentare la distanza tra l'apparecchio ed il ricevitore. Collegare l'apparecchio ad una presa di un circuito differente da quello a cui è connesso il ricevitore. Consultare il rivenditore o un tecnico specializzato radio/TV per assistenza.Avvertenza:
Utilizzare esclusivamente cavi di segnale schermati per collegare dispositivi I/O a questo apparecchio. Cambiamenti o modifiche non espressamente approvati dalla parte responsabile alla conformità possono annullare l'autorità dell'utente all'uso di questo apparecchio.INDICE
Operazioni preliminari 4
Guida di installazione rapida (QIG) 6
Installazione di software e driver 6 Installazione di hardware 8 Inserting 35mm Slides 8 Inserting 35mm Film strips 9 Funzioni supplementari 10 Scansione con un tasto 10COME ESEGUIRE LA SCANSIONE DI DIAPOSITIVE 10
FASE 1 – Acquisizione del driver 11 FASE 2 – Selezione del tipo di pellicola 11 FASE 3 – Prescansione opzionale 11 FASE 4 – Impostazioni di scansione 11 FASE 5 – Preferenze di San 13 FASE 6 – Scansione 16 FASE 7 – Uscita 16INTERFACCIA UTENTE
I. Area finestra principale 17 II. Area finestra di anteprima 22 III. Area di impostazione scansione 24 IV. Area riquadro miniatura 25SUPPORTO TECNICO 26
OPERAZIONI PRELIMINARI
Prima di iniziare, controllare il contenuto della confezione. Per un'installazione veloce, consultare la Guida di installazione rapida. (rif. pag. 11)  Importante! Conservare la confezione originale, la ricevuta e il materiale di imballaggio per un'eventuale restituzione dell'apparecchio.Contenuto della confezione
♦ Scanner pellicole. Adattatore di alimentazione INPUT/輸入/輸入: 100-240V \~ 50/60Hz 0.6A OUTPUT/輸出/輸出: +12V = 1.5A ⊖—⊕—⊕Avvertenza! L'utilizzo di altri tipi di adattatori di alimentazione potrebbe danneggiare gravemente lo scanner e determinare l'annullamento della garanzia del prodotto.
◆ Cavo USB 2.0. ◆ CD Driver CyberView ◆ CD del software di applicazione per editing scansione. ◆ Manuale utente in formato cartaceo.NOTA:
Per software di applicazione si intende un software di immagine come Adobe® Photoshop® Elements, che è soggetto a modifiche senza preavviso.GUIDA GENERALE:
◆ Utilizzare solo il cavo USB in dotazione. Collegare il computer direttamente allo scanner con il cavo USB 2.0. Non utilizzare un hub o una prolunga. Utilizzare solo le porte USB situate sulla parte posteriore dei computer. Se vi sono altri dispositivi (multifunzione, stampanti, scanner, webcam) collegati al computer tramite USB, scollegarli. ♦ È necessario minimo 1 GB di RAM (Windows/Mac).| Gamma temperatura ambiente operativo da 10° a 40°C |
| Nota: Non accendere lo scanner se la temperatura non rientra nel suddetto intervallo. Se lo scanner è stato conservato o trasportato in un ambiente a temperature che non rientrano nel suddetto intervallo, prima di accenderlo, attendere finché non si ristabilisce la giusta temperatura. |
| Intervallo di umidità ambientale di funzionamento: dal 15% al 76% (senza condensa) |
| Nota: Se lo scanner è conservato o trasportato in condizioni di bassa temperatura e poi viene introdotto in un ambiente caldo/umido, potrebbe formarsi della condensa. |
GUIDA DI INSTALLAZIONE RAPIDA (QIG)
L'INSTALLAZIONE DI SISTEMI WINDOWS DURANTE L'INSTALLAZIONE DEL DRIVER POTREBBE FAR APPARIRE UNA FINESTRA DI DIALOGO DI AVVERTENZA. IN TAL CASO, SELEZIONARE "INSTALL THIS DRIVER ANYWAYS" (INSTALLARE COMUNQUE IL DRIVER).  Assicurarsi di installare il software di applicazione PRIMA di installare il driver CyberView dello scanner. È possibile installare il driver dello scanner direttamente se sul computer si è già installato il software di applicazione compatibile TWAIN. Gli utenti Mac possono utilizzare iPhoto per l'editingAvviso:
1. Nella finestra "Found New Hardware Wizard" (Installazione guidata nuovo hardware), selezionare "Search automatically or Browse computer for driver software" (Cerca automaticamente o cerca sul computer il software del driver). 2. Nella finestra "Completing the Found New Hardware Wizard" (Completamento dell'Installazione guidata nuovo hardware in corso), fare clic su "Finish" (Fine). NOTA: Non tutti i PC visualizzano la finestra "Found New Hardware Wizard" (Installazione guidata nuovo hardware). Alcuni eseguono l'installazione nello sfondoINSTALLAZIONE DI SOFTWARE E DRIVER
Prima di installare il driver dello scanner... Se si sceglie di utilizzare l'applicazione fornita per l'editing dell'immagine, installare il software di applicazione (ad esempio: Adobe® Photoshop® Elements) inserendo il CD di applicazione nell'unità CD/DVD del computer. Osservare le istruzioni visualizzate in una finestra che si apre automaticamente.Installazione del driver dello scanner
a. Inserire il CD del driver nell'unità CD/DVD del computer ed esplorare i contenuti. b. Fare doppio clic sull'icona "CyberView" per avviare la procedura di installazione. Osservare le istruzioni su schermo per completare la procedura di installazione. NOTA: Assicurarsi che lo scanner NON sia collegato al computer durante l'installazione del driver CyberView X 5.0. c. Al termine della procedura di installazione, riavviare il computer. Nota: Quando si installa lo scanner su un sistema Windows su cui sono già installati un altro scanner flatbed USB o un multifunzione scanner/fotocopiatrice/stampante, potrebbe essere necessario scollegare l'altro scanner dalla porta USB per un corretto funzionamento dello scanner di pellicole. Guida di installazione plug-in scanner TWAIN per Adobe Photoshop Elements 12 È possibile installare il componente TWAIN installato con le versioni di Photoshop Elements precedente alla versione 9 utilizzati con Elements 11 o 12. Importante: Non spostare i plug-in dalle versioni precedenti di Photoshop Elements alla cartella Photoshop Elements 11 o successivo > Plug-In. Inoltre, non impostare la cartella Photoshop Elements 8 (o precedente) > Plug-In come cartella Plug-In aggiunti in Preferenze. Per informazioni complete, consultare il sito web Adobe u☐ciale sul sito: http://helpx.adobe.com/photoshop-elements/kb/twain-installed-photoshop-elements- 11.htmlMacintosh
Per il supporto TWAIN su Mac OS, Adobe consiglia di accedere al dispositivo tramite sistema operativo Rosetta (PPC)OS. In caso contrario, è possibile acquisire l'immagine e aprirla in Photoshop Elements. Per installare il plug-in TWAIN legacy per Mac OS, copiare la cartella ImportModules da: //Applicazioni/Adobe Photoshop ElementsInstallazione di hardware
a. Collegare lo scanner per diapositive alla presa di rete. 1. Individuare l'interruttore di alimentazione sul lato inferiore destro dello scanner. Assicurarsi che lo scanner sia SPENTO.  2. Inserire l'adattatore CA in una presa di rete CA PRIMA di inserirlo nello scanner. 3. Collegare il cavo USB al computer utilizzando l'estremità dell'adattatore USB standard. Collegare l'estremità dell'adattatore USB del cavo al pannello posteriore dello scanner. Inserimento delle diapositive montate
Attenzione prima della scansione... Assicurarsi che all'interno dello scanner non vi sia alcuna striscia della pellicola prima di inserire la diapositiva e che non vi sia alcuna diapositiva all'interno dello scanner prima di inserire la striscia della pellicola. La diapositiva e la striscia della pellicola non possono essere inserite contemporaneamente nello scanner.Diapositive montate
1. Inserire la diapositiva nella fessura sulla parte anteriore dell'unità con il lato opaco (emulsione) rivolto verso il basso natural_image
Simple line drawing of a stylized animal head with a small inset showing internal anatomy (no text or symbols)Scansione di diapositive (segue....)
2. Consultare Impostazioni e preferenze di scansione a pagina 13 3. Consultare Opzioni di scansione a pagina 12 Nota: Alcuni supporti delle diapositive sono sottili e richiedono una leggera pressione sul bordo del supporto dopo l'inserimento per registrarli nello scanner. Quando viene rilevato dalla barra Anteprima nell'interfaccia utente, le icone si accendono con colori diversi  Nessuna diapositiva rilevata  Diapositiva rilevataInserimento delle strisce della pellicola
1. Inserire la striscia della pellicola con il lato di emulsione rivolto verso il basso dall'ingresso sinistro della pellicola. 2. Lo scanner carica e posiziona automaticamente il primo fotogramma al centro della finestra di visualizzazione. Se il primo fotogramma non è nella posizione corretta, spostarlo facendo clic sul tasto "AVANTI" o "INDIETRO". È possibile spostarlo anche con la funzione di sintonizzazione fine nell'interfaccia CyberView. Vedere pagina 24 3. Consultare Opzioni di scansione a pagina 12 È possibile caricare la pellicola in modo semplice tenendo il 3º fotogramma della striscia della pellicola natural_image
Illustration of a hand holding a curved object with red arrow indicating direction (no text or symbols)Funzioni supplementari
Tasti sullo scanner Eject - Espelle la striscia della pellicola Indietro - Porta indietro la striscia di un fotogramma Avanti - Porta avanti la pellicola di un fotogramma Scansione - Consultare Scansione con un tasto di seguito Scansione con un tasto
1. Aprire CyberView (vedere pag. 11 per acquisire il programma del driver CyberView) 2. Configurare le impostazioni di scansione (vedere pag. 12) 3. Selezionare la scansione sulla directory, il formato file (TIF o JPG). Una volta eseguita la configurazione, premere il tasto dello scanner (☐) per avviare la scansione.  Tasto a sfioramento  NOTA: Se non si apre PRIMA CyberView, il tasto di scansione non funziona.COME ESEGUIRE LA SCANSIONE DI DIAPOSITIVE
FASE 1 – Acquisizione del driver
(Per utenti PC) Aprire CyberView da Start – All Programs (Tutti i programmi) – CyberView (Per utenti MAC) Aprire Macintosh Hard drive (Disco rigido Macintosh) – Applications (Applicazioni) – CyberViewFASE 2 – Selezione del tipo di pellicola
Selezionare il tipo di pellicola da digitalizzare - Positivo, Negativo o B&N (Bianco e Nero). FASE 3 – Prescansione opzionale
Selezionare "Prescansione fotogramma attuale" per eseguire la prescansione della diapositiva attualmente caricata nello scanner o "Prescansione completa" per eseguire la prescansione di tutti i negativi.  La prescansione deve essere utilizzata per regolare manualmente il colore/modificare le impostazioni di ciascuna diapositiva prima di eseguire la scansione finale. È possibile impostare varie impostazioni per ciascuna diapositiva da digitalizzare.FASE 4 – Impostazioni di scansione
a. Risoluzione La risoluzione di scansione predefinita è 1000 dpi; le opzioni di risoluzione supplementari solo elencate di seguito.Impostazioni di scansione (segue...)
Avviso: Più elevate sono le risoluzioni di scansione maggiori saranno il tempo di scansione e lo spazio necessario su disco. b. Profondità colore Scegliere tra 8 e 16 bit. Più elevata è l'impostazione della profondità di colore maggiore sarà la gamma di colori nell'ultima immagine digitalizzata. La profondità di colore dello scanner pellicole è colori reali a 48 bit. Il software di scansione è in grado di selezionare modalità di colore a 8 o 16 bit durante la scansione. Ciò produrrà immagini a colori a 24 o 48 bit, 8 bit o 16 bit per canali di colore rosso, verde e blu.Esempio:
Modalità a 8 bit = 8 rosso, 8 verde e 8 blu per un totale di colori a 24 bit Modalità a 16 bit = 16 rosso, 16 verde e 16 blu per un totale di colori a 48 bit   "Prescan Resolution" (Risoluzione prescansione) - Risoluzione di prescansione predefinita. "Color Depth" (Profondità colore) – Profondità di colore predefinita durante la scansione. "Scan Mode" (Modalità scansione) – Modalità di scansione predefinita durante la scansione.Configurazione delle preferenze di scansione
1. Selezionare Browse (Cerca) e scegliere la cartella indicata per il salvataggio delle immagini digitalizzate. 2. Digitare il nome del file. Preferenze di scansione (segue...)
3. Trailing Index after Base File Name Digits (Indice finale dopo nome del file base - Cifre): Definisce la lunghezza del nome del file e la sequenza numerica fino a 6 cifre. Esempio: immagine1 o immagine000001.  4. Options - Use Film Index (Opzioni - Usa indice pellicola): Utilizzare il numero assegnato alla diapositiva in base alla sua posizione nella cartuccia. 5. User De ned Start Number (Numero iniziale de nito dall'utente): Inserire un numero iniziale speci co Scegliere il tipo di le: "TIF" o "JPG". (TIF non compresso o JPG compresso) Scegliere una qualità di immagine per JPEG. (20-100). 100 o re la quantità minore di compressione Impostazioni avanzate
 "Auto Exposure" (Esposizione automatica) - Tenta di trovare l'esposizione adeguata per ottenere la più ampia gamma di bianchi e neri con i grigi intermedi intorno al centro della gamma dati. "Auto Balance" (Bilanciamento automatico) - Uso dell'istogramma immagine per bilanciare i canali RGB. Stima il dominante di colore delle immagini, regolandole di conseguenza. "Auto Contrast" (Contrasto automatico) - Il software dello scanner analizza i dati e regola automaticamente l'impostazione dei punti bianchi e neri. "Digital Noise Reduction" (Riduzione disturbi digitali) – Applica un filtro, riducendo la grana della pellicola. "Multi-Exposure" Quando è abilitata, la funzione Multi-Exposure esegue una tripla scansione per ottenere la migliore immagine possibile. Questa procedura acquisisce tre scansioni individuali; prima una scansione normale, quindi altre due scansioni per evidenziare i dettagli delle ombre ed esporre in modo più completo le aree più scure. Il software calcola quindi intuitivamente la scansione – nale, che conterrà i dati di tutte le tre scansioni. "Multi-Sampling" Configurare le impostazioni per la scansione di una singola immagine (più volte) 2x, 4x, 8x o 16x per ottenere la massima qualità. Notare che questa procedura aumenta notevolmente il tempo di scansione. Con la funzione Default Scanning Area (Area di scansione predefinita) Regola le dimensioni di scansione e l'impostazione "Scan Offset" (Offset scansione) per spostare la posizione dell'immagine della diapositiva.  Magic Touch/Auto Color  Magic Touch (Tocco magico) è una potente tecnologia di rimozione polvere e graffi che elimina la necessità di apprendere le tecniche di software complessi e noiosi. Essendo basato su hardware, funziona perfettamente con il processo di scansione per garantire i migliori risultati possibili quando si trasferiscono le immagini sul computer. Polvere, graffi e altri difetti vengono intelligentemente individuati ed eliminati, ripristinando la bellezza originale dell'immagine. Magic Touch non funziona con Kodachrome Film e B & W Film, bisogna disattivarlo. La scansione con Magic Touch (Tocco magico) richiede tempi di scansione più elevati. La funzione è disattivata per impostazione predefinita. Auto Color (Colore automatico) rende più intuitivo il processo di scansione per semplificare il flusso di lavoro e ottenere i migliori risultati. La tecnologia proprietaria di miglioramento del colore viene applicata alle immagini digitalizzate per fornire la regolazione del colore più accurata, producendo immagini più vivaci con luminosità, contrasto e saturazione ottimaliFASE 6 – Scansione
Scansione - Scansione - Scansione fotogramma attuale  Inizia la scansione per l'elaborazione del file.  Tutte le immagini digitalizzate vengono salvate nel percorso della impostato in precedenza. I percorsi predefiniti sono: Windows: C:\Users (Utenti)\[YOUR NAME] (NOME)\Documents (Documenti); MAC: Mac HD (HD Mac)\Users (Utenti)\[YOUR NAME] (Nome)\Pictures (Foto)\Cyberview Images (Immagini Cyberview),FASE 7 – Uscita
Selezionare "Scan (Scansione) > Exit (Esci)" per chiudere il driver. È possibile aprire/modificare i file immagine digitalizzati con qualsiasi software di editing immagine.  NOTA: Se si utilizza l'editor di immagini in dotazione, per una guida di questa applicazione, consultare Help nell'applicazione o cercare il DVD in dotazione per la documentazione della guida.INTERFACCIA UTENTE
I. Area finestra principale [finestre fisse]  L'interfaccia utente di CyberView X 5 presenta quattro componenti principali: I. Area finestra principale [finestre fisse] II. Area finestra di anteprima [finestre fisse] III. Area impostazione fotogramma attivo [finestre mobili]Comandi del menu - Scan (Scansione)
Prescan (Prescansione) - Prescan Current Frame (Esegui prescansione fotogramma attuale): Prescansione della diapositiva attuale. Scansione - Scansione fotogramma attuale - Scansione della selezionato su file - Scansiona tutto Comandi del menu - Anteprima (descrizione)
 Funzioni Zoom, Rotate (Ruota) e Flip (Capovolgi)Revert (Ripristina)
Consente di eliminare tutte le modifiche e ripristinare lo stato originale dell'immagine.Preference (Preferenze) - Vedere Scan Setting (Impostazione scansione) (vedere pag. 11)
Exit (Esci)
Chiude l'interfaccia utente di CyberView X5. Quando viene visualizzato il messaggio a comparsa "Quit the application prompts to save documents?" (Uscire dai prompt dell'applicazione per salvare i documenti?), fare clic su "Yes" (Sì) per salvare, "No" per ignorare le impostazioni attuali o "Cancel" (Annulla) per tornare a Cyber View X. Comandi del menu - Image Adjustment (Regolazione immagine)
a. Regolazione immagine 1. Variazioni tonali: Genera diverse visualizzazioni dell'immagine con le opzioni per apportare modifiche alle luci, ai mezzitoni, ecc.  2. Bilanciamento colore
Consente di regolare luminosità, contrasto, saturazione e colore (CMY o RGB) dell'immagine. Per riferimento vengono visualizzati i confronti tra prima e dopo la regolazione delle immagini.  Esempio: Se l'immagine in anteprima è troppo scura, è possibile utilizzare il cursore "Brightness" (Luminosità) della finestra "Color Balance" (Bilanciamento colore) per regolare l'immagine. Selezionando il cursore al centro e spostandolo a destra la visualizzazione "After" (Dopo) diventa più luminosa. Selezionare "OK" per accettare le modifiche che verranno inviate all'hardware di scansione. È possibile utilizzare questa opzione anche per regolare ciascuna delle funzioni di "Color Balance" (Bilanciamento colore) relative a contrasto, saturazione e gamme specifiche di colore: ciano, magenta e giallo.3. Curve e livelli
Regola le impostazioni dell'immagine spostando le impostazioni di Curves and Levels (Curve e livelli). Per riferimento vengono visualizzati i confronti tra prima e dopo la regolazione.  Esempio: Se l'immagine in anteprima è troppo scura, è possibile effettuare le regolazioni con il cursore di input della finestra Curves and Levels (Curve e livelli) per correggere l'immagine. Selezionando il cursore grigio al centro e spostandolo a sinistra la visualizzazione "After" (Dopo) diventa più luminosa. Una volta regolata l'immagine, selezionare "OK" per inviare le modifiche all'hardware di scansione. Lo stesso metodo può essere utilizzato anche per regolare ciascun canale di colore in modo indipendente mediante il menu a discesa del canale "RGB = All colors" ("RGB = Tutti i Colori"); R = Rosso, G = Verde e B = Blu.Comandi del menu - Window (Finestre)
1. Exposure Setting (Impostazione di esposizione): Per regolare i tempi di esposizione (R, G, B), premere "Ripristina" per ripristinare le impostazioni predefinite. Comandi del menu - Help
Update (Aggiorna): Firmware: Aggiorna la versione del firmware e seleziona il percorso di salvataggio del file del firmware. (i file possono essere scaricati dal nostro sito web) - About (Informazioni):Visualizza le informazioni di sistema (tra cui sistema operativo e CPU) e le informazioni sul prodotto (tra cui nome del prodotto, nome del modello, versione hardware, versione firmware, versione software e informazioni sul dispositivo quali interfaccia e risoluzione ottica).Diagramma barra delle funzioni
Selezionare il tipo di pellicola e la marca dalla barra degli strumenti: Negative (Negativo) Positive (Positivo) (conosciuto anche come diapositiva) B&W (Bianco e nero) II. Area finestra di anteprima [finestre fisse]
 Prescansione: Prescansione della pellicola attuale; premere il tasto a discesa per altre opzioni.  Scansione: Scansione della pellicola; premere il tasto a discesa ▼ per altre opzioni.  Regolazione immagine: Premere il tasto a discesa ▼ per altre opzioni.II. Area finestra di anteprima [finestre fisse](segue....)
 a. Espelle la pellicola a sinistra b. Porta indietro la pellicola di un fotogramma a sinistra  a. Porta avanti la pellicola di un fotogramma a destra b. Espelle la pellicola a destra  Vai a... È possibile selezionar eil fotogramma verso cui spostarsi nella strisciaStrumento di allineamento immagine
 Strumento di regolazione fotogramma (LINGUETTE) se la pellicola non è correttamente allineata dopo l'inserimento, è possibile utilizzare queste LINGUETTE sul righello per regolare l'allineamento trascinando la LINGUETTA per l'allineamento con il bordo del fotogramma della pellicola È possibile selezionare l'unità di misura del righello "in"- "cm"- "px" facendo clic nell'angolo superiore sinistro. Diagramma barra degli strumenti
 Selezione area di scansione: È possibile effettuare più di una selezione per volta. Ingrandimento: Consente di ingrandire l'immagine in cui si trova attualmente il cursore. L'immagine viene ingrandita ad ogni clic finché non si raggiunge il multiplo massimo (1000%).  Riduzione: Consente di ridurre le dimensioni dell'immagine visualizzata facendo clic sul cursore di riduzione nell'area desiderata. L'immagine si riduce della metà ad ogni clic finché non si raggiunge il multiplo minimo (25%).  Rotazione di 90° a sinistra: Consente di ruotare l'immagine di 90 gradi in senso antiorario.  Rotazione di 90° a destra: Consente di ruotare l'immagine di 90 gradi in senso orario.  Capovolgimento orizzontale: Consente di capovolgere l'immagine di 180 gradi in orizzontale.  Capovolgimento verticale: Consente di capovolgere l'immagine di 180 gradi in verticale.  Ripristino: Elimina tutte le modifiche e ripristina lo stato originale dell'immagine nelle finestre di anteprima.Riga di stato
Nell'angolo inferiore sinistro, vengono visualizzati il livello di colore (RGB: rosso, verde, blu) e le coordinate della posizione [ad esempio: I]. Scala di zoom, posizione del caricatore per la diapositiva attuale e quantità di aree selezionate per la scansione (2 o più indica varie aree di scansione in una diapositiva [ad esempio: II]).1.
R:0 G:0 B:0 X:432 Y:291II.
Esposizione R:100% G:100% B:100% Scala di zoom:100% Posizionamento:1 Selezion:1III. Area di impostazione scansione [finestre mobili]
Modalità Normali [ad esempio: I] consente di inserire i parametri di base per la scansione (tra cui risoluzione scansione, dimensioni pellicola, profondità colore). Modalità Avanzate [ad esempio: II] consente di inserire i parametri di uscita scansione, risoluzione scansione e profondità colore.1.
II.
 Quando si esegue la scansione di oltre 6 fotogrammi (si possono visualizzare 6 per volta nel pannello delle miniature), è possibile scorrere per visualizzarne altre facendo clic sul tasto freccia destro. I tasti freccia sinistro/destro consentono di scorrere facilmente tra le immagini sottoposte a prescansione. Questo modello di scanner è in grado di eseguire la scansione di un intero rullo di pellicola (non tagliata) fino a 40 fotogrammi  Per deselezionare i fotogrammi da non digitalizzare, fare clic sulla casella del segno di spunta per rimuovere la selezione. HOW TO USE SHARING FUNCTION
 Dropbox
ondivisione/CloudStorage:Design semplice e facile da usare
Aprire il software CyberViewX 5, sarà necessario selezionare Positive (Positivi) per le diapositive o Negati ve (Negativi) per le pellicole. Configurare l'impostazione Scan (Scansione) - Scan (Scansione) - Preference (Preferenze) - Film Type (Tipo di pellicola) - Sharing (Condivisione)/Cloud Storage NOTA: Le opzioni della barra degli strumenti sono disabilitate finché non so no attive nella finestra Settings (Impostazioni)  Selezionare il metodo o S haring (Condi visione) o Cloud   Quindi fare clic su "OK". Adesso le icone della barra degli strumenti sono atti ve facebook, prima è necessario ese
Per eseguire la scansione su , prima è necessario eseguire l'accesso al proprio account; la funzione di scansione richiederà l'autenticazione/accesso ad ogni utilizzo. 1. Uscire dal proprio account Facebook 2. Nell'interfaccia Cyberview, attivare la funzionalità Sharing (Condivisione), come de in precedenza 3. Seguire le istruzioni su schermo per accedere ed autenticare il dispositivo    Log n to use your Facebook account with OAuth 2Device Auth-Dems App. Email: Password:  √ Keep me logged in Forgot your password?Success
Ridurre a icona questa finestra del browser 4. Ridurre a icona la finestra del browser quindi, nella successi va schermata di CyberView, prendere nota del codice che è stato assegnato (il codice sarà sempre diverso) perché è necessario inserirlo nella pagina di Facebook.  5. Inserire il codice annotato in precedenza, quindi fare clic su Connect (Connetti). Facebook for Devices  6. Adesso lo scanner è collegato a Facebook. Facebook for DevicesConnect your Device with Facebook
You have successfully connected your device with Facebook! You may now return to your device. Dropbox
Per eseguire la scansione su , prima è necessario andare al sito: https://www.dropbox.com/ e registrarsi per creare un account e scaricare ed installare il loro software; questo se non si è ancora utenti Dropbox e si vuole utilizzare il servizio. Dopo aver creato l'account ed avere installato l'applicazione Dropbox, sul computer sarà presente una nuova cartella che è possibile selezionare per la scansione ed eseguire la sincronizzazione automatica dei caricamenti con l'account Dropbox.      Per eseguire la scansione nella cartella Dropbox 1. Aprire Cyberview X5 2. Selezionare Scan (Scansione) – Preference (Preferenze) – il tipo di pellicola di cui si vuole eseguire la scansione (Positive (Positivi) o Negative (Negativi)). 3. In questa finestra delle impostazioni di scansione, selezionare la scheda Sharing and CloudStorage (Condivisione e CloudStorage).  4. Selezionare la casella accanto a CloudStorage per attivarlo.  Cloud Storage  NOTA: Quando si seleziona la funzionalità CloudStorage - Dropbox il software eseguirà automaticamente la scansione nella cartella che CyberViewX crea nella cartella Dropbox del computer, pronta per la sincroni zzazione con l'account Dropbox. 5. Fare clic su OK per salvare le impostazioni. Al termine della configurazione si è pronti per la scansione. 6. Tutti i file di cui è eseguita la scansione saranno salvati nella cartella Dropbox.  La sincronizzazione avverrà automaticamente con il proprio account online, quando è attivo. (Attivo = Dropbox è in esecuzione nella barra delle applicazioni) SUPPORTO TECNICO
Cari clienti, i nostri prodotti REFLECTA sottoposti ad un rigoroso controllo di qualità finale. Se l'apparecchiatura non funziona correttamente, o alle vostre aspettative per prima cosa assicurarsi di aver installato l'ultimo software e firmware. Questi possono essere trovate sul nostro sito: www.reflecta.de Se l'errore persiste, si prega di contattare il nostro servizio clienti, vedere di seguito. Il periodo di garanzia è di 24 mesi e decorre dalla data di acquisto. Si prega di conservare lo scontrino come prova di acquisto. reflecta gmbh Merkurstrasse 8 72184 Eutingen Germany Tel: +49 (0) 7457-946560 E-Mail: mail@reflecta.dereflecta RPS 10M
CyberView X5
Gebruikershandleiding
FCC-voorschriften (Federale communicatiecommissie)
Dit apparaat is getest en voldoet aan de beperkingen voor een digitaal apparaat klasse B, volgens deel 15 van de FCC-regels. Deze beperkingen zijn ontwikkeld om een redelijke beveiliging te bieden tegen schadelijke storingen in een residentiële installatie. Deze apparatuur genereert hoogfrequentie-energie en kan deze uitstralen. Als de apparatuur niet overeenkomstig de instructies wordt geïnstalleerd, kan dit storingen veroorzaken in de ontvangst van radio of televisie. Er kan echter geen garantie worden gegeven dat er geen interferentie zal optreden in een specifieke installatie. Mochten er schadelijke storingen optreden in radio- of televisieontvangst, hetgeen kan worden vastgesteld door de apparatuur uit en weer in te schakelen, dan kan de gebruiker proberen de storing te verhelpen door een of meer van de volgende maatregelen te nemen: ♦ Draai de antenne totdat de storing stopt. ◆ Vergroot de afstand tussen de apparatuur en de ontvanger. - Sluit de apparatuur aan op een ander circuit dan dat waar de ontvanger op is aangesloten. Raadpleeg de dealer of een ervaren radio/tv-technicus voor ondersteuning.Waarschuwing:
Gebruik alleen afgeschermde kabels om I/O-apparaten aan te sluiten op deze uitrusting. Alle wijzigingen of aanpassingen die niet uitdrukkelijk zijn goedgekeurd door de partij die verantwoordelijk is voor de naleving, kunnen de bevoegdheid van de gebruiker om het apparaat te bedienen nietig verklaren.INHOUDSOPGAVE
Aan de slag 4
Snelle installatiegids 6
Software En Stuurprogramma Installeren 6 Hardware installeren 8 Extra functies 10 Eenknops scan 10DIA'S SCANNEN 11
STAP 1: open het stuurprogramma 11 STAP 2: selecteer het filmtype 11 STAP 3: optionele voorbeeldscan 11 STAP 4: scaninstellingen vastleggen 11 STAP 5: scanvoorkeuren vastleggen 13 STAP 6: Scannen 16 STAP 7: afsluiten 16GEBRUIKERSINTERFACE 17
I. Hoofdvenstergebied 17 II. Voorbeeldvenstergebied 22 III. Instelgebied voor actief beeld 24 IV. Deelvenster miniaturen 25Technische ondersteuning 26
AAN DE SLAG
Controleer de inhoud van de verpakking voordat u aan de slag gaat. Zie de Snelle installatiegids voor een snelle installatie. (zie pag. 11)  Belangrijk! Bewaar de originele doos, de bon en het verpakkingsmateriaal voor eventuele verzending in de toekomst.Inhoud van verpakking
Filmscanner. Voeding INPUT/输入/输入: 100-240V \~ 50/60Hz 0.6A OUTPUT/输出/输出: +12V = 1.5A ⊖—⊕—⊕Waarschuwing! Het gebruik van een andere voeding kan de scanner ernstig beschadigen en maakt de garantie ongeldig.
USB 2.0-kabel. ◆ CyberView cd met stuurprogramma's ◆ Cd met toepassingssoftware voor bewerken scans. ♦ Gedrukte handleiding.OPMERKING:
Toepassingssoftware houdt in de fotosoftware zoals Adobe® Photoshop® Elements, dit is kan zonder voorafgaande kennisgeving worden gewijzigd.ALGEMENE RICHTLIJNEN:
Gebruik uitsluitend de meegeleverde USB-kabel. Sluit de computer rechtstreeks aan op de scanner met de USB 2.0-kabel. - Gebruik geen hub of verlengkabel. Gebruik alleen de USB-poorten achterop een computer. Als andere apparaten zijn aangesloten op de computer via USB (multifunctionele printers, scanners, webcam) moet u deze verwijderen. Minimaal 1 GB RAM (Win/Mac) is nodig.Temperatuursbereik werkomgeving 10° tot 40°C
NB: Schakel de scanner niet in behalve wanneer de temperatuur binnen dit bereik valt. Als de scanner buiten dit bereik is opgeslagen of vervoerd, moet u hem binnen dit bereik laten terugkeren voor u hem inschakelt.Vochtigheidsbereik omgeving:
15% tot 76% relatieve vochtigheid (niet-condenserend) NB: Als de scanner is opgeslagen of vervoerd bij een lage temperatuur en daarna naar een warme of vochtige omgeving wordt gebracht, kan condensatie optreden.SNELLE INSTALLATIEGIDS
WINDOWS SYSTEMEN TIJDENS DE INSTALLATIE VAN HET STUURPROGRAMMA KAN EEN WAARSCHUWINGSVENSTER VERSCHIJNEN; SELECTEER IN DAT GEVAL "DIT STUURPROGRAMMA TOCH INSTALLEREN".  Zorg er voor dat u de toepassingssoftware installeert VOORDAT u het scannerstuurprogramma CyberView installeert. U kunt het scannerstuurprogramma direct installeren als u reeds software hebt geïnstalleerd die TWAIN ondersteunt. Mac gebruikers kunnen iPhoto voor het bewerken gebruikenOpmerking:
1. Selecteer in het venster "Wizard nieuwe hardware gevonden" "Automatisch zoeken of op computer bladeren naar stuurprogramma-software." 2. Klik vervolgens in het venster "Wizard nieuwe hardware gevonden" op "Voltooien". OPMERKING: Niet alle pc's laten het venster voor nieuwe hardware zien, sommige installeren op de achtergrond.SOFTWARE EN STUURPROGRAMMA INSTALLEREN
Voordat u het stuurprogramma voor de scanner installeert... Als u er voor kiest om de meegeleverde toepassing voor beeldbewerking te installeren, moet u de toepassingssoftware installeren (bijv. Adobe® Photoshop® Elements) door de toepassings-cd in het cd/dvd-station van de computer te steken. Volg de aanwijzingen in het venster dat automatisch verschijnt.Het scanner-stuurprogramma installeren
a. Plaats de cd met het stuurprogramma in het cd/dvd-station van de computer en verken de inhoud. b. Dubbelklik op het pictogram "CyberView" om het installatieproces te starten. Volg de instructies op het scherm om het installatieproces te voltooien. OPMERKING: Zorg er voor dat de scanner NIET is verbonden met de computer tijdens de installatie van het stuurprogramma CyberView X 5.0. c. Herstart de computer na voltooiing van het installatieproces. Let op: Bij installatie van de nieuwe scanner op een Windows-computer waarop al een andere USB-flatbedscanner of All-in-one Scan/Kopieer/Printer-apparaat is geïnstalleerd, kan het nodig zijn om de andere scanner te ontkoppelen van de USB-poort zodat de filmscanner goed kan werken. Installatiehandleiding invoegtoepassing TWAIN-scanner voor Adobe Photoshop Elements 12 U kunt de TWAIN-component installeren die bij de versies van Photoshop werden geïnstalleerd Elements ouder dan versie 9 voor gebruik met Elements 11 of 12. Belangrijk: Verplaats geen invoegtoepassingen van vorige versies van Photoshop Elements naar Photoshop Elements 11 of later > map Plug-Ins (Invoegtoepassingen). Stel evenmin Photoshop Elements 8 (of vroeger) > map Plug-Ins in als de map Additionele Plug-Ins (Extra invoegtoepassingen) in Reverences (Voorkeuren). Zoek complete informatie op de officiële Adobe-website: http://helpx.adobe.com/photoshop-elements/kb/twain-installed-photoshop-elements-11.html Macintosh Als u TWAIN-ondersteuning wenst op Mac OS, raadt Adobe u sterk aan toegang te verkrijgen tot uw via het Rosetta-OS (PPC).Anders kunt u uw afbeelding scannen en het vervolgens openen in Photoshop Elements. Om de oude TWAIN-invoegtoepassing voor Mac OS te installeren, kopieert u de map ImportModules van: //Applications/Adobe Photoshop ElementsHardware installeren
Sluit de diascanner aan op een stroombron. 1. De aan/uit-schakelaar bevindt zich onderaan de rechterkant van de scanner. Zorg dat de scanner is UITGESCHAKELD. Uit Aan  2. Steek EERST de voedingsadapter in een stopcontact voordat u hem met de scanner verbindt. 3. Verbind de USB-kabel met de computer met het standaardeinde van de USB-adapter. Verbindt het USB-adaptereinde van de kabel met de achterkant van de scanner. Ingeraamde dia's plaatsen
Let op voor het scannen... Controleer of zich geen filmstrook in de scanner bevindt voordat u de dia plaatst en of zich geen dia in de scanner bevindt voordat u de filmstrook plaatst. Houd er rekening mee dat een dia en een filmstrook niet tegelijk in de scanner passen. Ingeraamde dia's 1. Plaats de dia in de gleuf aan de voorkant van de eenheid met de matte (emulsie) kant naar beneden natural_image
Simple line drawing of a vehicle's front and side view with a red arrow pointing to the side (no text or symbols)Filmstroken plaatsen
1. Steek de filmstrook met de emulsiekant omhoog vanaf de linker filming-gang naar beneden. 2. De scanner laadt automatisch en plaatst het eerste beeld in het midden van het weergavevenster. Als het eerste beeld niet op de juiste plek staat, verplaatst u het door op de knop "VOORUIT" of "ACHTERUIT" te klikken; u kunt het ook verplaatsen met de fijnafstelfunctie in de CyberView-interface. Zie Pagina 24 3. Zie scanopties op pagina 12 U kunt de film gemakkelijk laden door deze rond het derde beeld vast te pakken. natural_image
Illustration of a hand holding a flexible object with red arrow indicating direction (no text or symbols)Extra functies
Knoppen op de scanner Uitwerpen: werpt de filmstrook uit Achteruit: schuift de strook één beeld terug Vooruit: schuift de strook één beeld vooruit Scan: zie Eenknopscan hieronder Eenknops scan
1. Open CyberView (zie pag. 11 voor het openen van het CyberView stuurprogramma) 2. Scaninstellingen configureren (zie pagina 12) 3. Selecteer de map voor de scans, de bestandsindeling (TIF of JPG) en druk na het configureren op de scannerknop (☐) om het scannen te starten.   OPMERKING: Als u niet EERST CyberView opent, werkt de scanknop niet.DIA'S SCANNEN
STAP 1: open het stuurprogramma
(Voor pc-gebruikers) Open CyberView vanuit Start – Alle programma's – CyberView (Voor MAC-gebruikers) Open Macintosh Hard drive – Toepassingen -CyberViewSTAP 2: selecteer het filmtype
Selecteer het te scannen filmtype: Positief, Negatief of B&W (Zwart/Wit). STAP 3: optionele voorbeeldscan
Selecteer "Voorbeeldscan van huidig beeld" om een voorbeeldscan te maken van de dia die op dit moment in de scanner is geladen, of druk op "Prescan Alles" om een voorbeeldscan van de gehele negatiefstrook te maken.  Gebruik voorbeeldscannen om handmatig kleuren en andere instellingen aan te passen voor elke dia voordat u de uiteindelijke scan uitvoert. Het is mogelijk om verschillende instellingen op te geven voor elke te scannen dia.STAP 4: scaninstellingen vastleggen
a. Resolutie De standaardresolutie voor scans is 1000 dpi, andere opties voor de resolutie zijn hieronder weergegeven.Scanvoorkeuren instellen (Vervolg...)
Opmerking: hogere scanresoluties leveren een langere scantijd op en vragen meer ruimte op de harde schijf. b. Kleurdiepte Kies tussen 8 en 16 bit. Een hogere instelling voor de kleurdiepte levert een groter bereik aan kleuren in de uiteindelijks scan op. De kleurendiepte van de filmscanner is 48 bit ware kleuren. De scansoftware kan bij het scannen 8-bits kleurenmodus of 16-bits kleurenmodus kiezen. Dit levert afbeeldingen op met 24 of 48 bit kleuren, 8 of 16 bits per rood, groen en blauw kleurenkanaal.Voorbeeld:
8-bit modus = 8 rood, 8 groen en 8 blauw voor in totaal 24-bit kleur 16-bit modus = 16 rood, 16 groen en 16 blauw voor in totaal 48-bit kleur   "Resolutie voorbeeldscan": standaardresolutie voor voorbeeldscans. "Kleurendiepte": standaard kleurendiepte bij het scannen. "Scanmodus": standaard scanmodus.Scanvoorkeuren instellen
1. Klik op Brwose (Bladeren) en kies de map waarin u de gescande foto's wilt opslaan. 2. Geef de bestandsnaam op. Scanvoorkeuren instellen (Vervolg...)
3. Volgnummer achter basisnaam bestand: Bepaalt de lengte van de bestandsnaam en nummervolgorde tot 6 cijfers Voorbeeld image1 of image000001.  4. Opties - Filmindex gebruiken: gebruik het nummer van de dia volgens de positie in de houder. Door gebruiker gedefinieerd beginnummer: Geef een specifiek beginnummer op. 5. Kies het bestandstype, TIF of JPG. (TIF niet-gecomprimeerd, JPG gecomprimeerd. Kies beeldkwaliteit voor JPEG (20-100) 100 zorgt voor de minste compressie Geavanceerde instelling
 "Auto Exposure" (Automatische belichting: probeert de juiste belichting te bepalen voor het grootste bereik aan zwart en wit waarbij het middengrijs rond het midden van de gegevensomvang komt. "Auto Balance" (Automatische balans): gebruikt het beeldhistogram om RGB-kanalen in balans te brengen. Het schat de kleurtint van het beeld en past de beelden hierop aan. "Auto Contrast" (Automatisch contrast): de scannersoftware analyseert de gegevens en past automatisch de instelling voor witte en zwarte punten aan. "Digital Noise Reduction" (Digitale ruisreductie): past een filter toe om de filmkorrel te beperken. "Multipass Xposure" Is Multi-Exposure geactiveerd, dan wordt er drie keer gescand om het best mogelijke beeld te bepalen. Dit proces maakt drie aparte scans, eerst een normale scan en daarna nog twee met meer details in de schaduwpartijen zodat de donkere partijen beter belicht worden. De software bepaalt dan intuïtief de uiteindelijke scan, met gecombineerde gegevens van de drie scans. "Multiple Sampling" Configureert de instellingen om een enkel beeld (meerdere keren) 2x, 4x, 8x of 16x te scannen voor een resultaat met de hoogste kwaliteit. Denk eraan dat de scantijd hierdoor veel langer duurt. Met Multi-Sampling behoort beeldruis tot het verleden.Standaard scangebied
Past de scangrootte en de instelling "Offset Scannen" aan om de beeldpositie van de afbeelding te wijzigen.  Gebruikers van Intel-Mac - Magic Touch / Auto Color Schakel Magische aanraking en Automatische kleuraanpassing van scans in of uit.  Magic Touch is een krachtige technologie voor het verwijderen van stof en krassen, waardoor het niet langer nodig is om lastige en tijdrovende software manieren hiervoor te leren. Omdat het op de hardware gebaseerd is, werkt het naadloos amen met het scanproces om voor de best mogelijke resultaten te zorgen bij het overzetten van beelden naar de computer. Stof, krassen en andere ongerechtigheden worden intelligent gedetecteerd en verwijderd, waardoor de oorspronkelijke schoonheid van het beeld hersteld wordt. Scannen met Magic Touch levert langere scantijden op; de optie is standaard uitgeschakeld. Auto Color (Automatische kleur) haalt het raadwerk uit het scanproces om de werkstroom te stroomlijnen en om de beste resultaten te bereiken. De bedrijfseigen technologie voor kleurverbetering wordt op gescande foto's toegepast om voor de meest nauwkeurige kleuraanpassing te zorgen, wat levendige foto's oplevert met een optimale helderheid, contrast en verzadiging.STAP 6 – Scannen
Scan - Scan- Huidige beeld scannen  Dit start het scanproces.  Alle gescande foto's worden opgeslagen in de eerder opgegeven map. De standaardlocaties zijn: Windows: C:\Gebruikers\[UW NAAM\Mijn documenten; MAC: Mac HD\Gebruikers\[UW NAAM]\Afbeeldingen\Cyberview Images),STAP 7: afsluiten
Selecteer "Scan > afsluiten" om het stuurprogramma te sluiten. Gescande afbeeldingsbestanden kunnen met elk programma voor het weergeven en/of bewerken van afbeeldingen worden geopend.  OPMERKING: Als u de meegeleverde afbeeldingseditor gebruikt, kunt u hulp voor deze toepassing vinden in de gebruikers-Help in de toepassing of u kunt de help-documentatie op de dvd vinden.GEBRUIKERSINTERFACE
I. Hoofdvenstergebied [vaste vensters]
 De gebruikersinterface van CyberView X 5 bestaat uit vier hoofdonderdelen: I. Hoofdvenstergebied [vaste vensters] II. Voorbeeldvenstergebied [vaste vensters] III. Instelgebied voor actief beeld [zwevend venster]Menupdrachten - Scan
Prescan - Prescan Current Frame (Voorbeeldscan van huidig beeld): Maak een voorbeeldscan van de huidige dia. Scan - Huidige beeld scannen - Scan geselecteerde naar bestand - Scan Alles Menuopdrachten: Voorbeeld (overzicht)
 Functies Zoomen, Roteren en OmkerenRevert (Ongedaan maken)
Heft alle aanpassingen op en herstelt de oorspronkelijke staat van het beeld.Voorkeur- Zie Scaninstelling (zie pagina 11)
Exit (Afsluiten):
Sluit de CyberView X5 gebruikers-interface. Een bericht verschijnt "Quit the application prompts to save documents?" (De toepassing sluiten en documenten opslaan?) Klik op "Yes" (Ja) om op te slaan, "No" (Nee) om de huidige instellingen te wissen of "Cancel" (Annuleren) om terug te keren naar Cyber View X. Menuopdrachten: Image Adjustment (Beeldaanpassing)
a. Beeldaanpassing
1. Variaties: genereert verschillende weergaven van een beeld met op- ties om veranderingen aan te brengen in hoge lichten, middentonen enzovoort.  2. Kleurbalans
Pas de helderheid, het contrast, de verzading en de kleur (CMY of RGB) van het beeld aan. Als referentie worden vergelijkingen weergegeven tussen voor en na het aanpassen.  Voorbeeld: Als een voorbeeld te donker lijkt, gebruikt u de schuif "Brightness" (Helderheid) in het venster "Color Balance" (Kleurbalans) om het beeld aan te passen door de schuif in het midden naar rechts te verplaatsen. De weergave "After" (Na) wordt lichter. Klik op "OK" om de wijzigingen te accepteren, die naar de scanhardware gezonden worden. U kunt hiermee ook de functies in "Color Balance" (Kleurbalans) aanpassen op contrast, verzadiging en specifieke kleurbereiken voor cyaan, magenta en geel.3. Curven en Niveaus
Pas de beeldinstellingen aan door de instellingen voor Curve en Level (Niveau) te verplaatsen. Als referentie wordt een vergelijking getoond voor en na het aanpassen.  Voorbeeld: Als de voorbeeldafbeelding te donker is, kunt u de Input (Invoer) schuif in het venster Curves and Levels (Curven en niveaus) verplaatsen om het beeld te corrigeren. Selecteer de grijze schuif in het midden en verplaats deze naar links om het beeld "After" (Na) lichter te maken. Nadat het aangepaste beeld acceptabel is geworden, klikt u op "OK" om wijzigingen naar de scanhardware te sturen. Dezelfde methode is ook bruikbaar voor het apart instellen van elk kleurenkanaal, waarbij u het kanalenmenu "RGB = All colors" (RGB = Alle kleuren) gebruikt. R = rood, G = groen en B = blauw.Menuopdrachten: Vensters
1. Exposure Setting (Belichtingsinstelling): Druk om de belichtingstijd in te stellen (R,G, B) op "Reset" om de standaardinstelling te herstellen. Menuopdrachten: Help
Update: Firmware: werk de firmware-versie bij, selecteer het pad waar het firmware-bestand is opgeslagen. (U kunt deze bestanden van onze website downloaden) Info over: Toont systeeminformatie (waaronder het besturingssysteem, CPU), productinformatie (waaronder naam product, naam model, hardwareversie, firmwareversie, softwareversie, apparaatgegevens waaronder interface en optische resolutie).Diagram functiebalk
Selecteer het type film en merk in de werkbalk: Negatief Positive (Positief, ook bekend als Dia) Zwart-wit II. Voorbeeldvenstergebied [Vaste Vensters]
 Prescan (Voorbeeldscan): maak een voorbeeldscan van de huidige film, klik op de keuzeknop voor meer opties.  Scannen: scan de film, druk op de keuzeknop -voor meer opties.  Image Adjustment (Beeldaanpassing): druk op de keuzeknop voor meer opties.II. Voorbeeldvenstergebied [vaste vensters] (Vervolg...)
 a. Werpt de film naar links uit b. Schuift de film één beeld naar links terug  a. Schuift de film één beeld naar rechts vooruit b. Werpt de film naar rechts uit  Ga naar... U kunt kiezen naar welk beeld in de strook u wilt gaanBeelduitlijningshulpmiddel
 Beeldinstelhulpmiddel (TABS) Als de film na het insteken onjuist is uitgelijnd, kunt u deze TABS op de liniaal gebruiken om de uitlijning aan te passen door de TAB te verslepen zodat hij is uitgelijnd met de rand van het beeld.  U kunt de maateenheden "in", "cm" of "px" selecteren door in de linkerbovenhoek te klikken.Diagram werkbalk
 Select scan area (Scangebied selecteren): het is mogelijk om meerdere selecties tegelijk te maken. Zoom In (Inzoomen): Om het beeld op de plek van de aanwijzer te vergroten. Het beeld vergroot met elke klik tot het maximum (1000 %) is bereikt.  Zoom Out (Uitzoomen): Klik om de grootte van het weergegeven beeld te verkleinen met de aanwijzer Uitzoomen op het gewenste gebied. Met elke klik halveert het gebied tot de laagste waarde (25 %) is bereikt.  Rotate 90 Left (90 linksom draaien): De afbeelding 90 graden naar links draaien.  Rotate 90 Right (90 rechtsom draaien): De afbeelding 90 graden naar rechts draaien.  Flip Horizontal (Horizontaal spiegelen): De afbeelding 180 graden horizontaal keren.  Flip Vertical (Verticaal spiegelen): De afbeelding 180 graden vertikaal keren.  Revert (Ongedaan maken): Heft alle aanpassingen op en herstelt de oorspronkelijke staat van het beeld.Statusregel
In de linkerbenedenhoek geeft het kleurniveau (RGB: rood, groen, blauw) en coördinaten van de locatie [bijv.: I] worden weergegeven. De zoomschaal, de locatie van de huidige dia in de houder en het aantal voor scannen geselecteerde gebieden (2 of meer geeft aan: meerdere scangebieden op een dia [bijv.: II]. III. Scan Setting Area (Instelgebied scan) [zwevende vensters]
Normal mode (Normaal modus): [bijv: I] voor de basisparameters van de scan (inclusief scanresolutie, filmgrootte, kleurdiepte). Advanced mode (Verder modus): [bijv: II] voor invoer van de parameters voor de scanuitvoer, scan resolutie, en kleurendiepte  Bij het scannen van meer dan zes foto's (in het miniatuurvenster zijn er zes tegelijk zichtbaar) kunt u bladeren om er meer te bekijken door op de knop met het pijltje naar rechts te klikken. Met de pijltjesknoppen naar links en rechts kunt u eenvoudig door de voorbeeldscans bladeren. Dit model scanner kan een gehele rol (ongesneden) film tot 40 beelden scannen  Om de selectie op te heffen voor foto's die u niet wilt scannen, verwijdert u de betreffende vinkjes. HOW TO USE SHARING FUNCTION
elen/Opslag in de cloud:  Dropbox
Eenvoudig ontwerp, gemakkelijk te gebruiken
Open de software CyberviewX 5. Kies positief voor dia's en negatief voor negatieven. Configureer de Scaninstelling - Scan - Voorkeur - Filmtype - Delen/Opslag in de cloud. Opmerking: de opties in de werkbalk zijn pas actief nadat ze geactiveerd zijn in het venster Instellingen  Selecteer de methode: Delen of Cloud.   Klik op "OK" De pictogrammen in de werkbalk zijn nu actief. facebook, moet u eerst van uw ad
Om te scannen naar, moet u eerst van uw account afmelden. Voor de scanfunctie is het nodig dat u elke keer aanmeld en authenticeert. 1. Meld af bij uw Facebook-account 2. Activeer delen in de i nterface van Cyberview, zoals hierboven beschreven 3. Volg de instructies op het scherm om aan te melden en het apparaat te authenticeren    Log in to use your Facebook account with GAuth 2 Device Auth Demo App. Inak: Password:  Keep me logged in Forgot your password?  Minimaliseer het venster van de browser 4. Minimaliseer het venster van de browser en noteer op het volgende scherm van CyberView het codenummer dat u ontvangen hebt. (Dit is elke keer een andere code, noteer hem dus, want u hebt hem nodig op de website van Facebook.)  5. Voer de code in die u zojuist genoteerd hebt, en klik op Verbinding maken Facebook for Devices  6. De scanner is nu verbonden met Facebook Facebook for DevicesConnect your Device with Facebook
You have successfully connected your device with Facebook! You may now return to your device. Dropbox
Om te scannen naar, gaat u eerst naar https://www.dropbox.com/. Maak een account en download en installeer de software, als u nog niet bent aangesloten bij Dropbox en gebruik wilt maken van deze service. Hebt u de toepassing van Dropbox gemaakt en geïnstalleerd, dan staat er een nieuwe map op uw computer die u kunt selecteren om automatisch te synchroniseren met de uploads naar uw Dropbox-account.     Scannen naar de Dropbox-map
1. Open Cyberview X5 2. Selecteer Scannen – Voorkeuren – het filmtype dat u wilt scannen (positief of negatief) 3. In het venster met de scan8instellingen selecteert u de tabs Delen en Opslag in de cloud  4. Vink het vakje naast Opslag in de cloud om het te activeren.  Opmerking: Selecteert u Opslag in de cloud – Dropbox, dan zal de software automatisch scannen naar de map CyberviewX die gemaakt is in de map Dropbox op uw computer, gereed om te synchroniseren met uw Dropbox account. 5. Klik op OK om de instellingen op te slaan. Nu er geconfigureerd is, bent u klaar om te scannen. 6. Alle gescande bestanden worden opgeslagen in de map Dropbox.  Synchronisatie met uw online-account geschiedt automatisch, als het systeem actief is. (Dat is et geval als Dropbox in het systeemvak staat.) SUPPORTO TECNICO
Beste klanten, Reflecta onze producten ondergaan een strenge einde kwaliteitscontrole. Als de apparatuur niet naar behoren werkt, of aan uw verwachtingen dan eerst ervoor zorgen dat u de nieuwste software en firmware hebt geïnstalleerd. Deze zijn te vinden op onze website: www.reflecta.de Als er een fout zich blijft voordoen, neem dan contact op met onze klantenservice, zie hieronder. De garantietermijn bedraagt 24 maanden en gaat in op de datum van aankoop. Bewaar de kassabon als aankoopbewijs. reflecta gmbh Merkurstrasse 8 72184 Eutingen Germany Tel: +49 (0) 7457-946560 E-Mail: mail@reflecta.dereflecta RPS 10M CyberView X5 Manual do Usuário
DECLARAÇÃO DA COMISSÃO FEDERAL DE COMUNICAÇÕES (FCC)
Este Equipamento foi testado e está comprovadamente em conformidade com os limites para a classe B de aparelhos digitais, de acordo com a Parte 15 das regras do FCC. Tais limites foram estabelecidos para assegurar uma proteção razoável contra interferências prejudiciais numa instalação residencial. Este equipamento gera, usa e pode irradiar energia de radiofrequência e, se não for instalado e usado de acordo com as instruções, poderá causar interferência prejudicial às radiocomunicações. No entanto, não há garantia de que a interferência não ocorrerá numa instalação específica. Se o equipamento causar interferência prejudicial à recepção de rádio ou televisão, o que poderá ser determinado quando o equipamento for ligado ou desligado, o usuário deverá tomar uma ou mais das seguintes medidas para tentar corrigir a interferência: ◆ Reorientar ou reposicionar a antenna receptora. ◆ Aumentar a distância entre o equipamento e o receptor. ◆ Conectar o equipamento a uma tomada num circuito diferente daquele ao qual o receptor está conectado. Consultar o revendedor ou um técnico experiente de rádio/televisão para obter ajuda.Alerta:
Utilize apenas cabos de sinal revestidos para conectar dispositivos I/O a este equipamento. Você é alertado que alterações ou modificações não expressamente aprovadas pela parte responsável pela conformidade podem anular sua autoridade em operar o equipamento.ÍNDICE
Inicialização 4
Guia de Instalação Rápida (QIG) 6
Instalando Software e Driver 6 Instalando o Hardware 8 Inserting 35mm Slides 7 Inserting 35mm Film strips 8 Características Adicionais 9 Transferência com Um Botão 9Como Transferir Slides 10
PASSO 1 - Adquirir Driver 10 PASSO 2- Seleccionar Tipo de Filme 10 PASSO 3 - Pré-transferência Opcional 10 PASSO 4 - Ajustar as Configurações de Transferência 10 PASSO 5 - Ajustar as Preferências de Transferência 12 PASSO 6 - Transferência 15 PASSO 7 - Sair 15Como usar a funcao Sharing 18
Digitalizacao em Facebook 19 Para digitalizar para Dropbox 21Interface de Usuário 22
I Área da Janela Principal 23 II Área da Janela de Visualização 27 III Área de Configuração da Estrutura Ativa 27 IV Área do painel de Miniaturas 28Suporte Técnico 30
INICIALIZAÇÃO
Verifique o conteúdo da embalagem antes de começar. Para Instalação Rápida favor consulte o Guia de Instalação Rápida.  Importante! Guarde a caixa original, recibo e material de embalagem para necessidades futuras de remessa.Conteúdo da Embalagem
♦ Scanner de Filme. Adaptador de Energia INPUT/输入/输入: 100-240V \~ 50/60Hz 0.6A OUTPUT/输出/输出: +12V = 1.5A ⊖—⊕Alerta! Utilizar qualquer outro adaptador de energia pode danificar severamente o scanner e irá anular a garantia do produto.
♦ Cabo USB 2.0. ◆ CD do Driver CyberView ◆ Software em CD para a edição de digitalização. ◆ Manual do Usuário Impresso.NOTA:
\- O software do aplicativo significa o software grá do tal como o Presto Image Folio, que é sujeito a alteração sem notificação.GUIA GERAL:
Utilize apenas o cabo USB fornecido. Conecte o computador ao scanner diretamente utilizando o cabo USB 2.0. - Não use um hub ou cabo de extensão. Use apenas as portas USB na traseira de computadores de mesa. Se houver quaisquer outros dispositivos (dispositivo multifuncional, impressoras, scanners, webcam) conectados ao computador através de USB desconecte-os. ◆ Um mínimo de 1GB RAM (Windows/Mac) é requerido.| Temperatura Ambiental de Operação Vairação de 50° a 104°F (10° a 40°C) |
| Nota:Não ligue o scanner a menos que ele esteja dentro desta variação. Se o scanner tiver sido armazenado ou transportado para fora desta variação, deixe-o voltar para esta variação antes de ligá-lo. |
| Abrangência de Umidade Ambiental Operacional 15% e 76% de umidade relativa (sem condensação) |
| Nota:Se o scanner for armazenado ou tiver de ser transportado e levado a um ambiente mais quente/úmido, condensação pode ocorrer. |
Guia de instalação do scanner plug-in TWAIN para Adobe Photoshop Elements 12
Você pode instalar o componente TWAIN que foi instalado com as versões do Photoshop Elements anteriores à versão 9 para utilização com Elements 11 ou 12. Importante: Não mova os plug-ins das versões anteriores do Photoshop Elements ao Photoshop Elements 11 ou superior > Pasta de Plug-Ins. Também, não configure o Photoshop Elements 8 (ou anterior) > Pasta de Plug-Ins como a Pasta de Plug-Ins Adicional em Preferências Encontre as informações completas na site de web oficial do Adobe: http://helpx.adobe.com/photoshop-elements/kb/twain-installed-photoshop-elements-11.htmlMacintosh
Se deseja ter o suporte de TWAIN no seu SO Mac, Adobe recomenda fortemente que você acess seu dispositivo pelo SO Rosetta (PPC). Do contrário, você pode digitalizar a sua imagem, e em seguida abri-la em Photoshop Elements. Para instalar o plug-in TWAIN herdado para o SO Mac, copie a pasta ImportModules do: //Aplicativos/Adobe Photoshop ElementsWindows
Adobe sugere fortemente que você use o suporte WIA para o seu dispositivo, se for disponível. Se seu dispositivo não suporta controladores WIA, então tente atualizar seu controlador TWAIN. Contacte o fabricante do seu dispositivo para obter suporte posterior de TWAIN. Para instalar o plug-in TWAIN herdado, faça o seguinte: Para Windows (32 bit), copie a pasta Importar-Exportar do: C:\Arquivos de Programa\Adobe\Photoshop ElementsInstalando o Hardware
Conecte o scanner de slide à uma fonte de energia. 1. Localize o interruptor de energia na lateral direita inferior do scanner. Certifique-se de que o scanner esteja DESLIGADO. Desligado Ligado   2. Plugue o adaptador AC em uma fonte de energia AC PRIMEIRAMENTE antes de plugá-lo no scanner. 3. Conecte o cabo USB ao computador utilizando a extremidade padrão do adaptador USB. Conecte a extremidade do adaptador USB do cabo no painel traseiro do scanner.  Inserindo Slides Montados
Atenção Antes de Digitalizar... Certifique-se que não há tira de fme dentro do scanner antes de inserir o slide e não há nenhum slide dentro do scanner antes de inserir a tira de filme. Nite que o slide e a tira de filme não pode ser colocados no scanner ao mesmo tempo.Slides Montados
1. Insira o slide no slot na frente da unidade, com a face lateral (emulsão) para baixa natural_image
Simple line drawing of a vehicle's head and torso with a red arrow pointing to the lower side (no text or symbols)Digitalziando Slides (Continuação....)
2. De fina as configurações de digitalização e preferênmcias Ver Página 10 3. Ver opções de digitalização na página 10 Nota: Algumas montagens de slides são finas e exigem que você aplique uma leve pressão na borda da montagem após a inserção para que se registrem no scanner, você vai saber que ele é detectado pela barta de visualização na interface do usuário, os ícones acende em cor  Nenhum slide detectado  slide detectadoInserindo tiras de fime
1. Insira a tira de filme com o lado da emulsão para a esquerda da entrada do filme. 2. O scanner irá auto carregar e posicionar o primeiro quadro no centro da janela de visualização, se o primeiro quadro não estiver na posição correta, por favor mova-o, clicando no botão "AVANÇAR" ou no botão "REVERTER" e você também pode movê-lo através da da função de ajuste fino na interface do Cyberview. Consulte a página 22. 3. Ver opções de digitalização na página 10 Guia Você PODE carregar o Filme fácilmente segurando AO Redor que 3º Quadro da tira de Filme, tiras de filme / rolos são inseridas lado maçante para baixa (lado da emulsão) natural_image
Illustration of a hand holding a pen or ruler with a red arrow pointing right (no text or symbols)Atributos adicionais
Botões no scanner Ejetar - Ejeta a tira de filme Reverter - Reverte a um quado na tira Avançar - Avança um quadro no filme Digitalizar - Ver Digitalização em Um Botão abaixo Transferência com Um Botão
1. Abra o CyberView (ver página 10 para aquisição do programa do driver CyberView) 2. Configure as Configurações do Scan (consulte a Página 10-11) 3. Seleção Transferir para diretório, formato de arquivo (TIF ou JPG, uma vez configurado, Pressione o botão do scanner (☐) para iniciar a transferência.  Botão de Um Toque COMO TRANSFERIR SLIDES
PASSO 1 - Adquirir Driver
(Para Usuário de PC) Abra o CyberView a partir de Iniciar – Todos os Programas –CyberView (Para Usuários MAC) Abra o Disco Rígido do Macintosh – Aplicativos – CyberViewPASSO 2- Seleccionar Tipo de Filme
Selecione o tipo de filme a ser tranferido - Positivo, Negativo ou PB (Preto e Branco). PASSO 3 - Pré-transferência Opcional
Selecione o "Pré-digitalizar imagem actual" para pré-digitalização do slide atualmente carregado no scanner ou "Pré-digitalizar tudo." para a pré-digitalização de uma faixa inteira de negativo  A Pré-Transferência deve ser utilizada para ajustar manualmente as configurações de cor/edição oara cada slide antes da realização da transferência final. É possível ajustar diferentes configurações para cada slide a ser transferido.PASSO 4 - Ajustar as Configurações de Transferência
a. Resolução A resolução padrão de transferência é 1000dpi, opções adicionais de resolução estão listadas abaixo.Definir Configurações de Digitalização (Continuação...)
Aviso: Resoluções maiores de transferência resultam em maior tempo de transferência e maiores requerimentos de espaço em disco. b. Profundidade de Cor Selecione entre 8 e 16 bit. Uma configuração de profundidade de cor maior resultará em uma variação maior de cores na imagem trsnferida final. A profundidade de cor do Scanner de Filme pe 48 bits de cor verdadeira. O software de digitalização tem a capacidade de selecionar modo de cor de 8 bits ou modo de cor de 16 bits ao digitalizar, isto produzirá imagens de 24 ou 48 bits de cor, 8 bits ou 16 bits por canais de cor Vermelho, Verde e Azul.Exemplo:
modo 8 bits = 8 Vermelho, 8 verde, e 8 Azul para um total de 24 bits de cor modo 16 bits = 16 Vermelho, 16 verde, e 16 Azul para um total de 48 bits de cor  NOTA: Certifique-se que há espaço disponível no computador ao alterar a Resolução de Digitalização. Uma resolução maior de digitalização resulta em arquivos maiores que podem ser difíceis de salvar. Tamanho de arquivo de imagem colorida de diferentes resoluções e profundidades de cor:| Resolução de Digitalização | Profundidade de Cor (por canal RGB) | Modo de Cor | Tamanho do Arquivo TIFF (sem compressão) |
| 300dpi 8 | bit 24-bit ~350 | Kb | |
| 600dpi 8 | bit 24-bit ~1.4 | MB | |
| 1800dpi 8 | bit 24-bit ~12 | 9MB | |
| 3600dpi 8 | bit 24-bit ~52 | MB | |
| 7200dpi 8 | bit 24-bit ~20 | 8MB | |
| 10000dpi 8 | bit 24-bit ~40 | 2MB |