
Super 8 Normal 8 - To scan Reflecta - Free user manual and instructions
Find the device manual for free Super 8 Normal 8 Reflecta in PDF.
| Product Type | 8mm and Super 8 Film Scanner |
| Brand | Reflecta |
| Model | Super 8 Normal 8 |
| Image Sensor | CMOS 3.53 megapixels (2304x1536), 1/3 inch |
| Display | 2.4-inch color TFT LCD |
| Video Resolution | 1440 x 1080P (1080p), 30 fps |
| Supported Film Types | 8mm and Super 8 on 3 or 5 inch reels |
| File Format | MP4 (MPEG-4) |
| Storage | SD/SDHC memory card up to 32 GB (not included) |
| Outputs | USB 2.0, TV output (NTSC/PAL) |
| Power Supply | 12 V DC via included power adapter |
| Dimensions (W x H x D) | 269 x 166 x 114 mm |
| Weight | 1410 g |
| Exposure Control | Automatic/Manual (-2.0 to +2.0) |
| Sharpness | Adjustable (low to high, default medium) |
| Image Adjustment | X/Y position and zoom (W) |
| Available Languages | English, French, Spanish, German, Italian |
| Package Contents | Scanner, power adapter, USB cable, TV cable, reel, reel adapters, brush, manual |
| Maintenance | Clean the light table with the provided brush; clean the film with a lint-free cloth |
| Safety | Do not drop; use only the included adapter; insert SD card correctly |
Frequently Asked Questions - Super 8 Normal 8 Reflecta
User questions about Super 8 Normal 8 Reflecta
0 question about this device. Answer the ones you know or ask your own.
Ask a new question about this device
Download the instructions for your To scan in PDF format for free! Find your manual Super 8 Normal 8 - Reflecta and take your electronic device back in hand. On this page are published all the documents necessary for the use of your device. Super 8 Normal 8 by Reflecta.
USER MANUAL Super 8 Normal 8 Reflecta
natural_image
Line drawing of a vintage film projector with two reels and a control panel (no text or symbols)Film Scanner Super 8 - Normal 8
User's Manual
Version 2.3
Table of Contents
Introduction......1
Features ....1
Before Using the Film Scanner....1
Package Contents....2
Film Type 2
Function of Buttons....2
Getting Started ....3
Preparing the Film ....3
-
Attach Power Cord .... 3
-
Insert SD/SDHC Memory Card (Max. 32 GB)....3
-
Turn on/off the Film Scanner ....4
-
Clean the Light Table....4
-
Mount the Reels and Film ....4
-
Menu Selections ....5
Record....6
Playback....6
Rewind....7
Exposure 7
Sharpness....8
USB....8
Frame ADJ....8
Language....8
Format....8
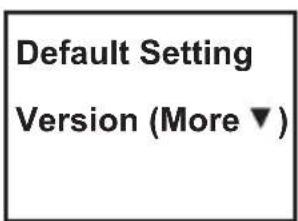
Default Setting....8
Connect to a TV set 9
Specifications....9
Introduction
Your old 8mm and Super 8 films are degrading. Worse, the memories are fading and the film is becoming more brittle just sitting in the box. Convert your Film into digital now before the memories are lost forever!
Introducing the reflecta Film Scanner Super 8 - Normal 8. A simple to use device that will convert your movie reels into digital movies (no sound) in one step. Works like a typical projector where you mount the 3 inch or 5 inch reel, insert a memory card, press a few buttons and the Film Scanner will scan frame-by-frame to create a digital MP4 movie file that you can play on any computer. You can also edit, upload movie files to the internet or burn them to DVD's.
Features
- A fully automated apparatus to digitize 8 mm and Super 8 film reels of up to 5" into digital videos.
• Frame-by-Frame digitizing for high-quality digital output.
• Stand-alone machine, no computer, software or drivers are required - Scans and directly saves digital movies into SD/SDHC cards (32GB max, not included)
- Converts 8 and Super 8 movies into MPEG-4 (MP4) digital movie files at 1080P/30 fps
• Compatible with all Windows, Mac and Linux Operating Systems - Playback the digital movies on TV using the included TV Cable
Before Using the Film Scanner
This section provides important safety information you should read before operating the device.
- Do not drop or handle the device too aggressively as it may cause damage to the device.
- 8 mm or Super 8 media MUST be mounted with a suitable reel (up to 5" in diameter) and adapter, before recording/rewinding.
Package Contents
- reflecta Film Scanner (1x)
- Power Adapter (1x)
- USB Cable (1x)
- TV-OUT Cable (1x)
- 5" Reel in 8 mm Diameter Hole (1x)
- Reel Adapter (2x)
- Brush (1x)
- User's Manual (1x)

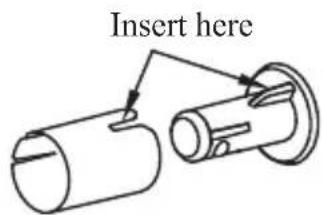
Reel Adapter
8 mm diameter inside; 13 mm outside
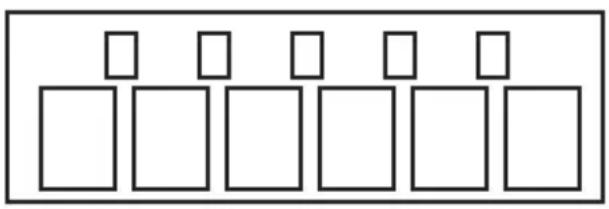
Film Type
natural_image
Pure diagram of six identical empty squares arranged in a row, no text or symbols present
natural_image
Six identical rectangular shapes arranged in a row, each with a small square top on top (no text or symbols)8 mm Super 8
Function of Buttons
- Power button: To turn power on or off. ⏻
- Up or Down arrow buttons: To highlight Menu item on LCD viewer.
- Enter/Start/Stop button: To Start/Stop highlighted item.
- Menu button: To go back to Menu selection; Press twice to go to Menu mode or record mode.
Getting Started
Preparing the Film
If your film is not in good condition (ie. it is broken, ruptured with perforated holes, misaligned, taped overlap, bent, spliced, gluey, or thick), please check and fix the problem first. Otherwise it may damage or jam the reflecta Film Scanner Super 8 and Normal 8, or produce poor quality videos.
Also, some early films might have been wound too tight, which might cause jittering during the recording process. You can use the reflecta Film Scanner Super 8 and Normal 8 to rewind it back and forth to regain proper winding tightness.
Before recording, it is good practice to use a lint-free cloth and/or anti-static film cleaner to remove dirt particles, clean any processing chemical residues, and to dry any scattered mildew on the film in order to prevent them showing up on recorded videos.
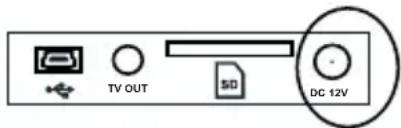
1. Attach Power Cord
Plug in the included DC 12V power adapter.
Power port
2. Insert SD/SDHC Memory Card (Max. 32 GB)
Insert the SD/SDHC memory card before powering on the Film Scanner device.
- Using a MicroSD card with an adapter, or SDXC card (64GB), which is not compatible with the Film Scanner will lead to a "Card error" message appearing on the screen. The Film Scanner can only take a SD/SDHC memory card of up to a maximum capacity of 32 GB.
• Make sure the SD/SDHC card is unlocked (white tab in forward position). - Insert and push the SD/SDHC card inward until it clicks. Improper insertion may damage the card reader or the SD/SDHC Card, which neither is covered under warranty.
- Dismount/eject the SD/SDHC card by pushing the card in and releasing, instead of pulling it out. The Film Scanner will power off automatically when the SD/SDHC card is mounted/dismounted.
3. Turn on/off the Film Scanner
Press the power button to turn the Film Scanner on/off.
4. Clean the Light Table
Push the film door tab left to flip open the door. Use the included brush to clean the light table very gently.
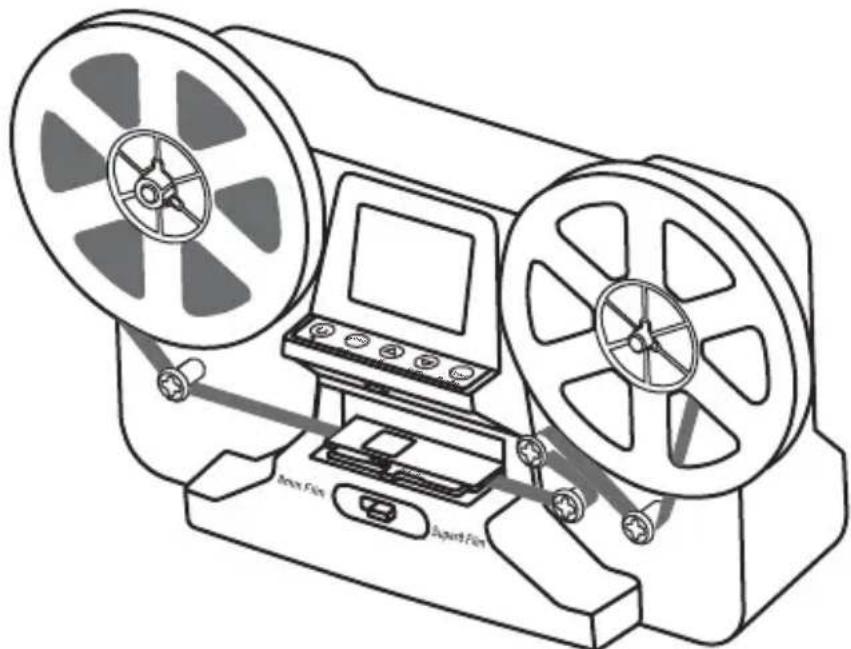
5. Mount the Reels and Film
a. If your film reel has a 8 mm (small) mounting hole, mount the reel directly to the shaft, otherwise use the provided reel adapter.
b. Mount the included 5" reel onto the right shaft.
c. Follow the Film Routing Diagram printed on the face of the Film Scanner to route the film.
natural_image
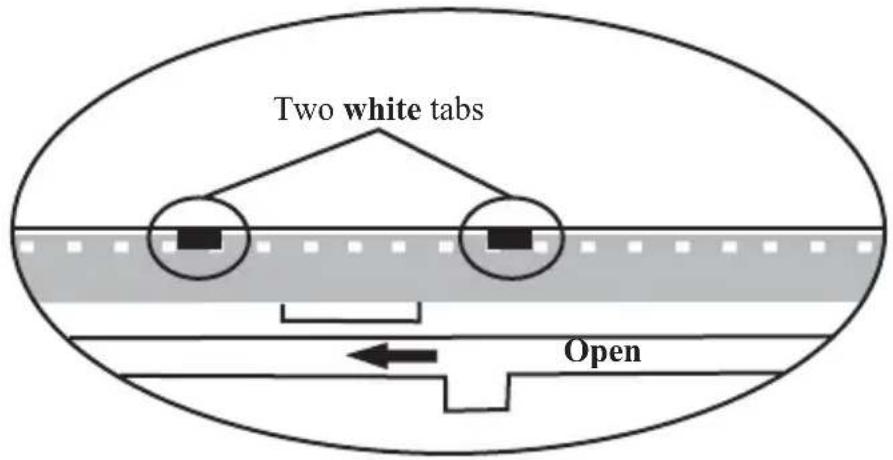
Line drawing of a vintage film projector with two reels and a central screen (no text or symbols)d. Push open the flap door, place film perforation holes at the top but under the two white tabs.
e. Close the film flap door after the film has been properly placed.
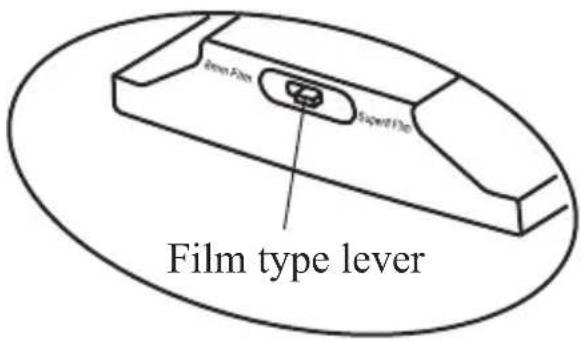
f. Select film type by pushing the film type lever to either the left or right.
6. Menu Selections
Use the Up or Down arrow buttons to highlight the Menu selection and then press Enter.

1st page 2nd page 3rd page 4th page
Record
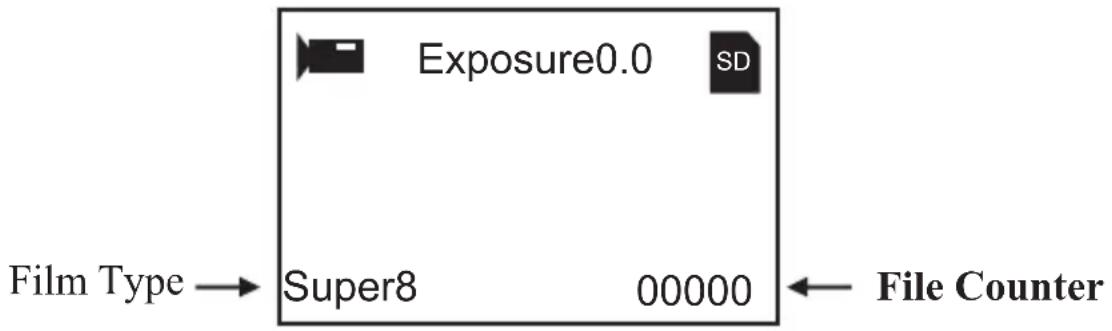
- Move the Film Selection Lever left (8 mm) or right (Super 8) to select the film type, then press the Enter/Start button.
- Press Enter/Start to start recording. While recording is in process, a red dot on the upper left corner will blink.
- The Film Scanner will stop recording 2 seconds after the user presses the Enter/Stop button.
- The file counter at the lower right corner will increase by one after each recording stop. The number on the counter also represents the file name of the recorded film.
Note:
Adjustments for Exposure, Sharpness, Frame Adjustment/Movie Register are available, please make adjustments before recording.
Playback
- Press the Menu button, highlight the Playback selection, then press Enter.
- Press the Up/Down arrow button to select the file to Playback, then press Enter/Start.
- Press Enter/Stop to pause the playback.
- Press the Menu button once to the enter Edit mode. Highlight Return (go back to Playback) or Delete (delete the current file).
- Press the Menu button twice to go back to Record mode or the Main menu.
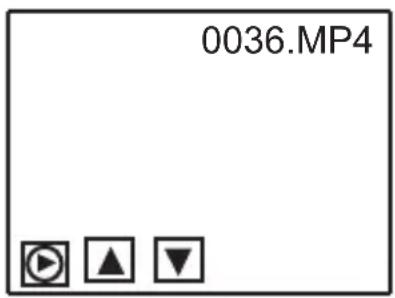
Note: Mac computers will create and add hidden files to SD/SDHC memory card each time the user playbacks the recorded MP4 movie files on the Mac. The hidden or modified MP4 files stored on the SD/SDHC memory card can no longer be played back on the Film Scanner. A "No File" message will be displayed on the Viewer instead.
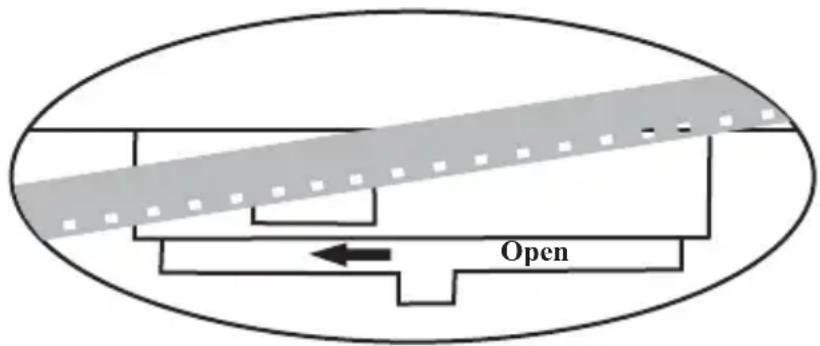
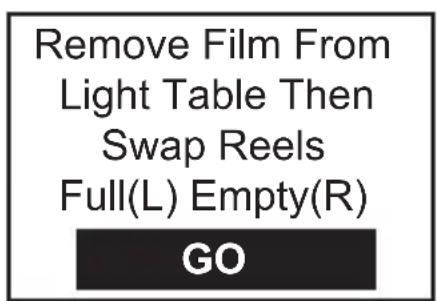
Rewind
- Open the flap door and remove film, then close the flap door. Check and confirm the flap door is closed and not in the way of the rewinding process to prevent film from being scratched.
- Swap reels. Place an empty reel on the right shaft and place film perforation holes on the outside (as shown). If any reel adapter is needed, always place the grey adapter on the right side reel.
- Follow the film routing diagram printed on the Film Scanner (the dotted line) and follow the instructions on the screen.
- Press the Enter button to Start/Stop the rewinding process.
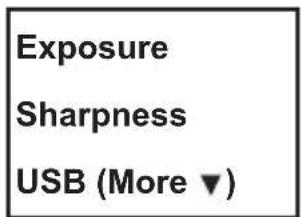
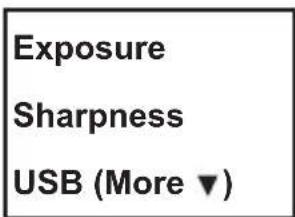
Exposure
- Exposure range is from 2.0 to -2.0.
- Press Up/Down to change the value and press Enter to complete the change selection.
- The default setting is 0.0. Negative values provide a darker effect and an
Exposure of 2.0 gives the brightest result. - Adjust the required Exposure before recording.

bar
| Value | |---| | 0.5 | | 0 | | -0.5 |Sharpness
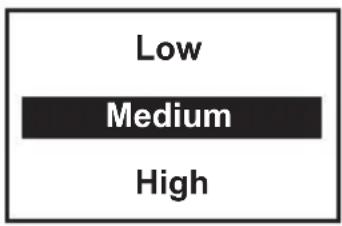
- Sharpness range is from Low to High. The default setting is Medium.
- Press Up/Down to change the value and press Enter to complete the change selection.
- Adjust the required Sharpness before recording.
EN
USB
Plug in the included USB cable to upload the recorded MP4 files. The SD/SDHC memory card is read as an External Drive, called NO_NAME drive (G:)*. The stored MP4 files are located under the directory of FilmScanner/MOVIE.
*Note: (G:) may vary from computer to computer.
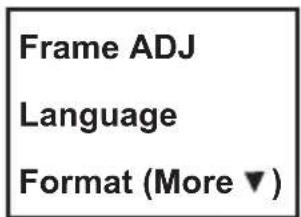
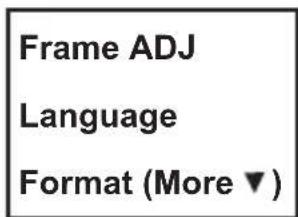
Frame ADJ
You can make adjustments for the Movie Register (the film centre X and Y). It needs to be adjusted before recording if the default setting is off.
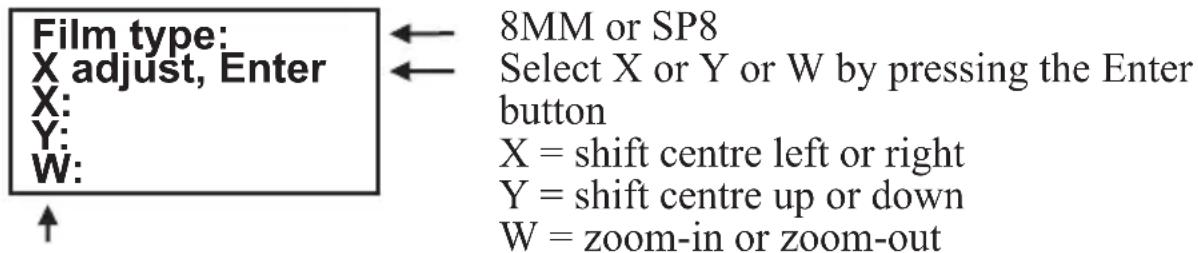
Adjust the values of X, Y, W by pressing the Up or Down buttons
Language
English, French, Spanish, German and Italian are available on the Film Scanner.
Format
Highlight Yes or No to erase all files on the inserted SD/SDHC memory card.
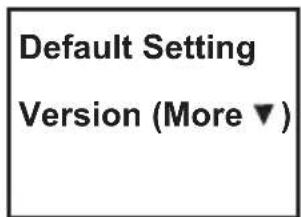
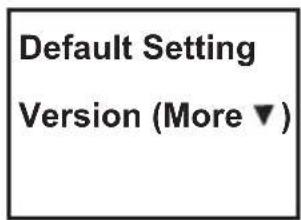
Default Setting
Reset all values to 0.0 or medium.
Connect to a TV set
You can use your TV screen as the default screen.
- Turn on the reflecta Film Scanner and TV.
- Set TV input to A (or TV, TV) mode.
- Connect the Film Scanner "TV OUT" port to your TV's Video-In port (yellow) with the included TV-Out cable.
- The LCD screen on the Film Scanner will turn dark and the display will be on your TV instead.
Specifications
Image sensor: 3.53 Megapixels (2304H x 1536V) 1/3" CMOS sensor
Display: Colour 2.4" TFT LCD
Exposure control: Auto/Manual (-2.0 to 2.0)
White Balance: Auto
Resolution: 1440 x 1080 p
Playback frame rate: 30 frames per second*
Scan method: Video
Film type: 8 mm and Super 8 roll film in 3" or 5" reel
File format: MP4
TV-OUT type: NTSC/PAL
Built-in memory: None
External memory: SD/SDHC memory card up to 32 GB (Max.)**
Power Supply: DC 12V
Interface: USB 2.0
Language: English, French, Spanish, German and Italian
Dimension (L/W/H): 269 x 166 x 114 mm/10.6 x 6.5 x 4.5 inch
Weight: 1410 g/3.1 lb
Note:
*Users who wish to modify playback speed to 18 or 24 ftps can download "VLC", a free software from VLC.org not supported by reflecta.
**Each 50 ft film takes about 125 MB of memory and about 30 minutes to record.
Inhaltsverzeichnis
Einleitung....1
Spezifikationen 1
natural_image
Pure geometric diagram of six empty squares arranged in rows (no text or symbols)
natural_image
Six identical rectangular shapes arranged in a row, each with a small square top on top (no text or symbols)8 mm Super 8
Tastenfunktionen
natural_image
Pure mechanical diagram showing two cylindrical components connected by a pipe fitting (no text or symbols)natural_image
Line drawing of a vintage film projector with two reels and a central monitor, no text or symbols present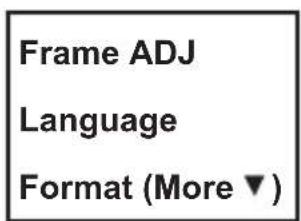
Belichtung
DE
USB

8MM oder SP8
natural_image
Pure geometric diagram of six empty squares arranged in rows (no text or symbols)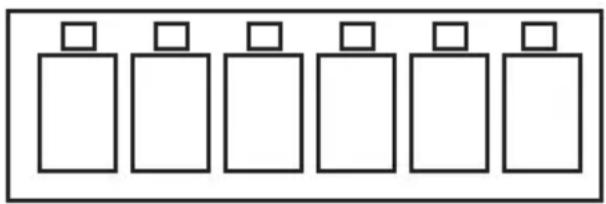
natural_image
Six identical rectangular shapes arranged in a row, each with a small square top on top (no text or symbols)8 mm Super 8
natural_image
Line drawing of a vintage film projector with two reels and a screen, no text or symbols present1 ^ère page 2
^e page 3
^e page 4
^e page
Enregistrement
Exposition
FR
USB
natural_image
Pure geometric diagram of six empty squares arranged in rows (no text or symbols)
natural_image
Six identical rectangular shapes arranged in a row, each with a small square top on top (no text or symbols)8 mm Super 8
natural_image
Line drawing of a vintage film projector with two reels and a central screen, no text or symbols presentEsposizione
IT
USB
Tipo TV-OUT: NTSC/PAL
natural_image
Pure geometric pattern of six empty squares arranged in rows (no text or symbols)
natural_image
Six identical rectangular shapes arranged in a row, each with a small square top (no text or symbols)8 mm Súper 8
Exposición
ES
USB
natural_image
Pure geometric diagram of six empty squares arranged in rows (no text or symbols)
natural_image
Six identical rectangular shapes arranged in a row, each with a small square top on top (no text or symbols)8 mm Super 8
Toetsfuncties
natural_image
Line drawing of a vintage film projector with two reels and a central screen, no text or symbols present| Record | Exposure | Frame ADJ | Default Setting |
| Playback | Sharpness | Language | Version (More ▼) |
| Rewind (More ▼) | USB (More ▼) | Format (More ▼) |
Belichting
NL
USB
www.reflecta.de