
BM100 - Bread maker PROLINE - Free user manual and instructions
Find the device manual for free BM100 PROLINE in PDF.
| Brand | Proline |
| Model | BM100 |
| Product type | Bread maker |
| Power supply | 220-240 V, 50 Hz, 680 W |
| Number of programs | 12 |
| Bread capacity | 500 g / 750 g / 1000 g |
| Adjustable crust color | Yes (light, medium, dark, fast) |
| Delay timer | Up to 13 hours |
| Keep warm | Yes, 1 hour |
| Power failure protection | Yes, resumes within 6-11 min |
| Bread pan | Non-stick coating |
| Kneading arm | Removable |
| Viewing window | Yes |
| Number of special programs | Dough, bagel, jam, bake only |
| Cleaning | Damp cloth, do not immerse |
| Safety | Automatic shutdown on fault (E00/E01) |
| Dough function | Yes, without salt/sugar |
| Quick program | Yes (0.75 kg and 1 kg) |
| Maximum bread weight | 1 kg |
Frequently Asked Questions - BM100 PROLINE
User questions about BM100 PROLINE
0 question about this device. Answer the ones you know or ask your own.
Ask a new question about this device
Download the instructions for your Bread maker in PDF format for free! Find your manual BM100 - PROLINE and take your electronic device back in hand. On this page are published all the documents necessary for the use of your device. BM100 by PROLINE.
USER MANUAL BM100 PROLINE
natural_image
White industrial coffee maker with black tray and control panel (no visible text or symbols)OPERATING INSTRUCTIONS
ISTRUZIONI OPERATIVE
NÁVOD K OBSLUZE
MANUEL D'UTILISATION
For your safety please read the following information.
Warning: This appliance must be earthed.
The appliance must be connected to a 220-240 volts 50 cycle AC supply by means earthed.
of a three pin socket, suitably
The appliance is supplied with a rewireable 13 amp 3 pin mains plug fitted with a 5 amp fuse. Should the fuse require replacement, it must be replaced with a fuse rated at 5 amp and approved to BS1362.
If the mains plug is unsuitable for the socket outlet in your home or is removed for any other reason, then the old plug should be disposed of safely to prevent the hazard of electric shock.
There is a danger of electric shock if the old plug is inserted into any 13 amp socket outlet.
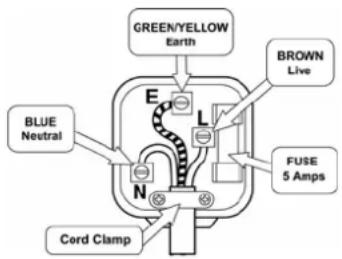
How to wire a 13 amp plug
Important
The wires in the mains lead on this appliance are coloured in accordance with the following code:
Green and Yellow - Earth
Blue – Neutral
Brown – Live
As the colours may not correspond with the markings identifying the terminals in your plug proceed as follows.
The blue wire must be connected to the terminal marked N or coloured black.
The brown wire must be connected to the terminal marked L or coloured red.
The green and yellow wire must be connected to the terminal in the plug which is marked with the letter E or with the earth symbol 12 or coloured green and yellow.
The mains lead MUST be secured under the cord clamp.
IMPORTANT SAFETY INFORMATION
Before using the appliance, the following basic precautions should always be followed:
- Read all instructions carefully.
- Check that the voltage of wall outlet corresponds to that shown on the rating plate.
- Do not operate any appliance with a damaged cord or plug or after the appliance malfunctions, or is dropped or damaged in any manner. Return the appliance to the retail store where you purchased this appliance or the nearest authorised service agent for examination, repair.
- Accessible surfaces may get hot. Do not touch hot surfaces. Use handles at all times.
- To protect against electric shock do not immerse cord, plugs, or appliance housing in water or other liquid.
GB
- Unplug from outlet when not in use, before putting on or taking off parts and before cleaning
- Do not let cord hang over edge of table or hot surface.
- The use of accessories not recommended by the appliance manufacturer may cause damage or injury and will invalidate the warranty.
-
Close supervision is necessary when your appliance is being used near children or infirm persons.
-
Do not place on or near a hot gas or electric burner, or in a heated oven.
-
Do not touch any moving or spinning parts of the machine when baking.
-
Metal foils or other materials must not be inserted into the bread maker as this can give rise to the risk of a fire.
-
The bread may burn, therefore do not use the product near or below combustible material such as curtains.
-
If the surface is cracked, switch off the appliance to avoid the possibility of electric shock.
-
Never cover the bread maker with a towel or any other material, heat and steam must be able to escape freely. A fire can be caused if it is covered by, or comes into contact with combustible material.
-
Do not operate the appliance for other than its intended use.
-
Do not use outdoors.
-
This appliance is not intended for use by persons (including children) with reduced physical, sensory or mental capabilities, or lack of experience and knowledge, unless they have been given supervision or instruction concerning use of the appliances by a person responsible for their safety.
-
Do not allow children to use this appliance without close supervision.
WARNING:
- This appliance is intended for domestic use only; any other use may invalidate the warranty and might be dangerous.
- If the mains lead is damaged it must be replaced by the manufacturer, its service agent or similarly qualified person with a lead of the same type and rating to avoid a hazard.
● Make sure the product has cooled down to room temperature before cleaning or storing.
OVERVIEW
USING YOUR BREAD MAKER
Check quantities of ingredients carefully. IMPORTANT: All recipes should only be used as a guideline and may need to be adapted.
GB
- Lift out the bread pan by the handle.
- Pour the water into the bread pan.
- Add the rest of the ingredients to the pan in the order listed in the recipes.
- Ensure that all the ingredients are weighed accurately as incorrect measures will produce poor results.
- Insert the bread pan into the baking chamber and press the pan down until it locks into position.
- IMPORTANT: Make sure that the bread pan is positioned securely back into the baking chamber. Align the bread pan with the brackets and press down without upsetting the mixture to lock into position.
- Close the lid and plug into the wall socket. The unit will beep and the display should read 'MENU 1 TIMER 3:25'.
Press 📄 repeatedly on the control panel until the required program is selected.
| Display | Menu | Setting | Time |
| 1 | basic | 3:25 | |
| 2 | french | 3:35 | |
| 3 | whole | wheat | |
| 4 | sweet/brioche' | 3:27 | |
| 5 | fast | (0.75kg) | |
| 6 | fast | (1kg) | |
| 7 | Quick | 1:43 | |
| 8 | bread/butter | 3:55 | |
| 9 | Dough | 1:30 | |
| 10 | Bagel | dough | |
| 11 | Jam | 1:05 | |
| 12 | Bake | 1:00 |
- Select the crust colour by pressing repeatedly on the control panel until the indicator moves to the required crust colour (LIGHT, MEDIUM, DARK or RAPID).
- Select the loaf size by pressing size (0.5kg, 0.75kg or 1kg). repeatedly on the control panel until the indicator moves to the required loaf
- Press ⏻ on the control panel to start the program. The power indicator light comes on.
• To stop the program, press ⏻ for 1 second. The power indicator light goes off.
- You can add ingredients into your bread pan and set the timer to delay baking by up to 13 hours.
Press the ⏻ + or ⏻ - repeatedly on the control panel to set the time delay.
IMPORTANT:
- When using the timer feature for more than a couple of hours during hot weather, slightly increase the amount of water that you use in the mixture.
-
Do not use the timer if your recipe includes fresh eggs, milk or other ingredients may spoil.
• The yeast must always be kept away from the liquid and the salt when using the timer. -
When baking is finished, the unit will beep 5 times and the display will show 0:00. Then it will go to temperature maintaining procedure. During the procedure, the second numbers will flash and the unit will beep 5 times every 5 minutes. After the temperature maintains for 1 hour, the unit will beep 5 times and return to the initial status.
-
Open the lid of the bread maker and lift out the bread pan by handle using oven gloves.
- Turn the bread pan upside down and gently shake until bread falls out, then the bread can be for eating.
• For best results, remove the bread as soon as possible to stop the crust from getting soggy.
DOUGH FUNCTION
Dough function operation is similar to bread making function, except no need to add salt, sugar and milk powder. When the program is finished, the unit will beep 5 times for warning.
POWER INTERRUPTION PROTECTION
If the bread maker is accidentally unplugged, or in the event of power failure, the bread maker will automatically resume power if the power comes back on within 6-11 minutes of the interruption.
IMPORTANT:
The keep-warm feature will automatically continue to keep bread warm for up to an hour after baking has finished (except when using the dough setting).
ERROR MESSAGES
In the case the temperature in the unit cannot reach the requirement of baking program, when you start the program, the unit will automatically stop program and the display will show "E00" or "E01" and the unit will beep continuously to warn you.
If the thermostat opens, when the unit is plugged in, the display will show "EEE" and the unit will beep continuously to warn you.
If the thermostat closes, when the unit is plugged in, the display will show "HHH" and the unit will beep continuously to warn you.
Contact the dealer and send to nearest service centre for repair.
RECIPES
Basic Bread Recipe
| Ingredients: | Large (1kg) | Regular (0.75kg) | Small (0.5kg) | |||
| Water | 330ML. | 280 | ML | 1 | ||
| Oil | 2 | tsp | 2tsp. | |||
| Salt | 1tbsp | 3/4tbsp | 1/2tbsp | |||
| Sugar | 2tsp | 1-1/2tsp | 1tbsp | |||
| Milk Powder | 2tsp | 1tsp | 1tsp | |||
| Flour | 4 cup | 3-1/4 cup | 2-1/4 cup | |||
| Yeast | 1tbsp | 1tbsp | 1tbsp | |||
French bread Recipe
| Ingredients: | Large (1kg) | Regular (0.75kg) | Small (0.5kg) | |||
| Lemon Juice | 1tbsp | 1tbsp | 1tbsp | |||
| Water | 320ML. | 280 | ML | 1 | ||
| Oil | 2 | tsp | 1-1/2tsp. | 1tsp | ||
| Salt | 2tbsp | 1-1/4tbsp | 1tbsp | |||
| Sugar | 2tsp | 1-1/2tsp | 1tsp | |||
| Flour | 4 cup | 3-1/4 cup | 2-1/4 cup | |||
| Yeast | 1tbsp | 1tbsp | 1tbsp | |||
GB
Whole Wheat Bread Recipe
| Ingredients: | Large (1kg) | Regular (0.75kg) |
| Water | 320ML. | 270 |
| Oil 3 tsp 2tsp. 1-1/2tsp | ||
| Salt 1tbsp 1tbsp 1tbsp | ||
| Sugar | 2tsp | 2tsp |
| Milk Powder | 3tsp | 2-1/2tsp |
| Flour | 3 cup | 3 cup |
| Whole-wheat flour | 1 cup | 3/4 cup |
| Yeast | 1tbsp | 1tbsp |
1/4 cup
1 tbsp
Sweet Bread Recipe
| Ingredients: | Large (1kg) | Regular (0.75kg) | Small (0.5kg) |
| Water | 320ML. | 220 | ML |
| Oil | 2 tsp 1 tsp | 1tsp | |
| Salt 1-1/2tbsp | 1tbsp 1/2tbsp | ||
| Sugar | 1/2cup | 1/3cup | 1/4cup |
| Milk Powder | 2tsp | 1-1/2tsp | 1tsp |
| Flour | 4-1/4cup | 3-1/3cup | 2-1/2cup |
| Yeast | 1tbsp | 1tbsp | 1tbsp |
Fast (0.75kg)
| (Attention: Water temperature 45°C -50°C ) | ||
| Ingredients: | Regular (0.75kg) | |
| Water & Egg | 280 ML | |
| Oil | 2tsp. | |
| Salt | 1tbsp | |
| Sugar | 2tsp | |
| Milk Powder | 3tsp | |
| Flour | 3 cup | |
| Yeast | 4tbsp | |
Fast (1kg)
| (Attention: Water temperature 45°C-50°C) | ||
| Ingredients: | Regular (1kg) | |
| Water & Egg | 370 ML | |
| Oil | 2tsp. | |
| Salt | 1-1/2tbsp | |
| Sugar | 2tsp | |
| Milk Powder | 3tsp | |
| Flour | 4cup | |
| Yeast | 4tbsp | |
GB
Quick Bread Recipes
Ingredients
| Water | 310 ML |
| Egg | 1pcs |
| Oil 3tsp. | |
| Salt 1tbsp | |
| Sugar | 3/4cup |
| Milk Powder 2tsp | |
| Flour | 3-1/4cup |
| Yeast | 3tbsp |
Bread Butter Recipe
Ingredients
| Water | 310 ML |
| Butter | 2tsp |
| Oil 2tsp. | |
| Salt 1-1/2tbsp | |
| Sugar | 3tsp. |
| Milk Powder 3tsp | |
| Flour | 3-1/4cup |
| Yeast | 1tbsp |

The maximum quantities of flour and yeast should not go beyond the requirement of the recipe.
CLEANING AND MAINTENANCE
Disconnect the appliance from the power and let it cool down prior to cleaning.
- Bread pan: Rub inside and outside with a damp cloth. Do not use any sharp instruments or abrasive cleaning agents as they may damage the non-stick coating. The pan must be dried completely prior to further use.
- Kneading blade: If the kneading blade is difficult to remove from the shaft, fill the bread pan with warm water and allow it to soak for approx. 30 minutes. The kneader can then be easily removed for cleaning. Also wipe the blade carefully with a cotton damp cloth.
- Lid and window: Clean the lid inside and outside with a slightly damp cloth.
- Housing: Gently wipe the outer surface of housing with a wet cloth. Do not use any abrasive cleaner. Never immerse the housing into water for cleaning.
- Before the bread maker is packed away for storage, ensure that it has completely cooled down, is clean and dry, and the lid is closed.
NOTE: It is suggested not disassembling the lid for cleaning.
SPECIFICATIONS
AC 220V-240V 50Hz
680W
IMPORTANT DISPOSAL INSTRUCTIONS

natural_image
Symbol of a trash bin with crossed lines indicating no waste or discharge (no text or labels)As a responsible retailer we care about the environment.
As such we urge you to follow the correct disposal procedure for your product and packaging materials. This will help conserve natural resources and ensure that it is recycled in a manner that protects health and the environment.
You must dispose of this product and its packaging according to local laws and regulations. Because this product contains electronic components, the product and its accessories must be disposed of separately from household waste when the product reaches its end of life.
Contact your local authority to learn about disposal and recycling.
The product should be taken to your local collection point for recycling. Some collection points accept products free of charge.
If something doesn't seem to work
If there is something about your appliance which you do not understand and you live in the UK you can phone our help line during normal office hours on: 0844 8009595.
Calls are charged at standard rates.
We apologise for any inconvenience caused by minor inconsistencies in these instructions, which may occur as a result of product improvement and development.
Kesa Electricals UK, HU1 3AU 26 / 05 / 2009
INFORMATIONS DE SÉCURITÉ IMPORTANTES
FR
UTILISATION DE LA MACHINE À PAIN
Rapide (1 kg)
natural_image
Symbol of a trash bin with crossed lines indicating no waste or restriction (no text or labels)Kesa Electricals UK, HU1 3AU 26 / 05 / 2009
BELANGRIJKE VEILIGHEIDSVOORZORGEN
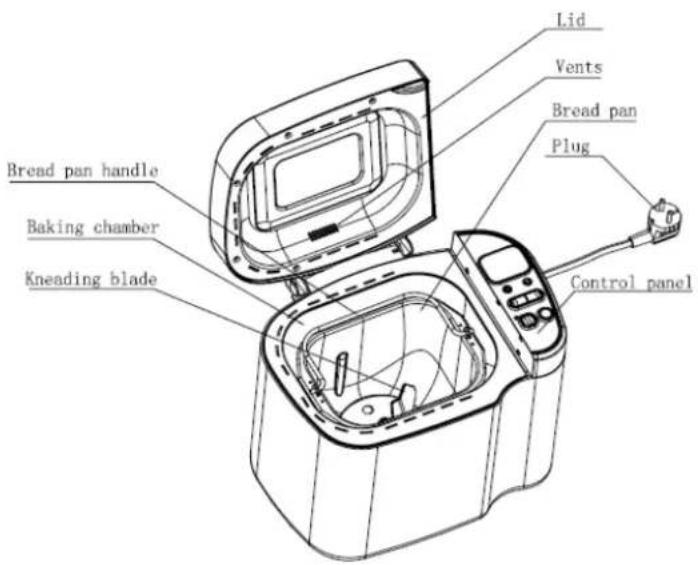
| Lid | Deksel |
| Vents | Ventilatieopeningen |
| Bread pan Broodvorm | |
| Plug | Stekker |
| Control panel Bedieningspaneel | |
| Bread pan handle Handgreep broodvorm | |
| Baking chamber Ovenruimte | |
| Kneading blade Kneedmes | |
UW BROODBAKMACHINE GEBRUIKEN
1/4 kop
1 eetl.
natural_image
Symbol of a trash bin crossed with no text or numbers, representing waste sorting or disposal (no text present)Kesa Electricals UK, HU1 3AU 26 / 05 / 2009
IMPORTANTI INFORMAZIONI RELATIVE ALLA SICUREZZA
veloce (1kg)
natural_image
Symbol of a trash bin with crossed lines indicating no waste or discharge (no text or labels)Kesa Electricals UK, HU1 3AU 26 / 05 / 2009
Lid : Tapadera
Vents: Ranura de ventilación
Bread pan: Molde para pan
Plug: Enchufe
Control panel: Panel de control
In the case the temperature in the unit cannot reach the requirement of baking program, when you start the program, the unit will automatically stop program and the display will show "E00" or "E01" and the unit will beep continuously to warn you.
Ingredientes: Grande (1kg) Regular (0.75kg) Pequeño (0.5kg)
Agua 330 ML. 280 ML 190 ML
Aceite 2 cucharaditas 2 cucharaditas. 1-1/2 cucharadita
Sal 1 cucharada 3/4 cucharada 1/2 cucharada
Ingredientes: Grande (1kg) Regular (0.75kg) Pequeño (0.5kg)
Ingredientes: Grande (1kg) Regular (0.75kg) Pequeño (0.5kg)
Agua 320ML. 270 ML 210ML
Ingredientes: Grande (1kg) Regular (0.75kg) Pequeño (0.5kg)
Agua 320ML. 220 ML 160ML
Aceite 2 cucharaditas 1 cucharadita 1cucharadita
Sal 1-1/2 cucharada 1 cucharada 12 cucharada
Azúcar 12 taza 1/3 taza 14 taza
natural_image
Symbol of a trash bin with crossed lines indicating no waste or discharge (no text or labels)Kesa Electricals UK, HU1 3AU 26 / 05 / 2009
IMPORTANTES INFORMAÇÕES DE SEGURANÇA
chávenas
(1kg)
chávenas
chávenas
CLEANING AND MAINTENANCE
- Bread pan: Rub inside and outside with a damp cloth. Do not use any sharp instruments or abrasive cleaning agents as they may damage the non-stick coating. The pan must be dried completely prior to further use.
-
Kneading blade: Se for difícil retirar a pá para amassar do respectivo eixo, encha a forma do pão com água quente e deixe embeber durante cerca de 30 minutos. The kneader can then be easily removed for cleaning. Also wipe the blade carefully with a cotton damp cloth.
-
Lid and window: Clean the lid inside and outside with a slightly damp cloth.
-
Housing: Gently wipe the outer surface of housing with a wet cloth. Do not use any abrasive cleaner. Never immerse the housing into water for cleaning.
-
Before the bread maker is packed away for storage, ensure that it has completely cooled down, is clean and dry, and the lid is closed.
NOTE: It is suggested not disassembling the lid for cleaning.
ESPECIFICAÇÕES
AC 220V-240V 50Hz
680W
INSTRUÇÕES IMPORTANTES DE COMO DEITAR AO LIXO

natural_image
Symbol of a trash bin crossed with diagonal lines, representing waste sorting or disposal (no text present)Kesa Electricals UK, HU1 3AU 26 / 05 / 2009
DŮLEŽITÉ BEZPEČNOSTNÍ INFORMACE
POUŽITÍ VAŠÍ DOMÁCÍ PEKÁRNY CHLEBA
natural_image
Symbol of a trash bin crossed with diagonal lines, representing waste sorting or disposal (no text present)Kesa Electricals UK, HU1 3AU 26 / 05 / 2009
DÔLEŽITÉ BEZPEČNOSTNÉ INFORMÁCIE
| Lid | Veko |
| Vents | Prieduchy |
| Bread pan | Nádoba na chlieb |
| Plug | Elektrická zástrčka |
| Control panel | Ovládací panel |
| Bread pan handle | Rukovát' nádoby na chlieb |
| Baking chamber | Otvor na pečenie |
| Kneading blade | Čepele na miesenie |

POUŽÍVANIE DOMÁCEJ PEKÁRNE
DÔLEŽITÉ POKYNY NA LIKVIDÁCIU

natural_image
Symbol of a trash bin crossed out by two crossed lines, with no text or labels present.Kesa Electricals UK, HU1 3AU 26 / 05 / 2009
- How to wire a 13 amp plug
- IMPORTANT SAFETY INFORMATION
- GB
- WARNING:
- OVERVIEW
- USING YOUR BREAD MAKER
- IMPORTANT:
- DOUGH FUNCTION
- POWER INTERRUPTION PROTECTION
- ERROR MESSAGES
- RECIPES
- CLEANING AND MAINTENANCE
- SPECIFICATIONS
- IMPORTANT DISPOSAL INSTRUCTIONS
- As a responsible retailer we care about the environment.
- If something doesn't seem to work
- Calls are charged at standard rates.
- INFORMATIONS DE SÉCURITÉ IMPORTANTES
- FR
- UTILISATION DE LA MACHINE À PAIN
- Rapide (1 kg)
- BELANGRIJKE VEILIGHEIDSVOORZORGEN
- UW BROODBAKMACHINE GEBRUIKEN
- IMPORTANTI INFORMAZIONI RELATIVE ALLA SICUREZZA
- veloce (1kg)
- IMPORTANTES INFORMAÇÕES DE SEGURANÇA
- ESPECIFICAÇÕES
- INSTRUÇÕES IMPORTANTES DE COMO DEITAR AO LIXO
- DŮLEŽITÉ BEZPEČNOSTNÍ INFORMACE
- POUŽITÍ VAŠÍ DOMÁCÍ PEKÁRNY CHLEBA
- DÔLEŽITÉ BEZPEČNOSTNÉ INFORMÁCIE
- POUŽÍVANIE DOMÁCEJ PEKÁRNE
- DÔLEŽITÉ POKYNY NA LIKVIDÁCIU
Brand : PROLINE
Model : BM100
Category : Bread maker