
PLI 136 GE1 - Refrigerator PROLINE - Free user manual and instructions
Find the device manual for free PLI 136 GE1 PROLINE in PDF.
| Brand | Proline |
| Model | PLI 136 GE1 |
| Product type | Built-in larder fridge |
| Net refrigerator volume | 136 L |
| Dimensions (W x D x H) | 875 x 540 x 545 mm |
| Gross weight | 29.18 kg |
| Climate class | N (ambient temperature 16 °C to 32 °C) |
| Rated voltage | 220 - 240 V ~ |
| Frequency | 50 Hz |
| Rated current | 0.56 A |
| Refrigerant | R600a (isobutane) / 26 g |
| Energy consumption | 0.340 kWh/24h - 124 kWh/year |
| Interior lighting | Bulb 15 W, E14 socket |
| Number of stars | None (fridge only) |
| Thermostat adjustment | Positions 1 to 5, 0 = off |
| Defrost | Automatic (water drained via evaporation tray) |
| Door reversal | Possible, instructions provided |
| Built-in installation | Yes, fixing kit included |
| Child safety | No (no lock, but recommendation for disposal) |
| Maintenance | Clean with baking soda and warm water; do not use abrasive products |
| Repairability | Bulb replacement possible; spare parts available from after-sales service |
Frequently Asked Questions - PLI 136 GE1 PROLINE
User questions about PLI 136 GE1 PROLINE
0 question about this device. Answer the ones you know or ask your own.
Ask a new question about this device
Download the instructions for your Refrigerator in PDF format for free! Find your manual PLI 136 GE1 - PROLINE and take your electronic device back in hand. On this page are published all the documents necessary for the use of your device. PLI 136 GE1 by PROLINE.
USER MANUAL PLI 136 GE1 PROLINE
User and installer instructions
RÉFRIGÉRATEUR ENCASTRÉ
Guide d'utilisation
FRIGORÍFICO BUILD IN
natural_image
Interior view of a white refrigerator with open shelves displaying various food items including watermelon, cake, and snacks (no visible text or labels)Inhoud
VOOR U HET TOESTEL BEGINT TE GEBRUIKEN 2
natural_image
Symbol of a trash bin crossed with no text or numbers, representing waste sorting or recycling (no text present)Waste electrical and electronic products must not be disposed of with household waste. Please refer to the retailer from whom you purchased this item for disposal instructions.
DEEL 1 VOOR U HET TOESTEL
BEGINT TE GEBRUIKEN
Afbeelding A

Afbeelding D
Afbeelding E
Afbeelding H
Deur omkeren
Afbeelding K
natural_image
Technical line drawing of a mechanical component with internal gears and housing (no text or symbols)natural_image
Simple line drawing of a structural beam or support with a notch (no text or symbols)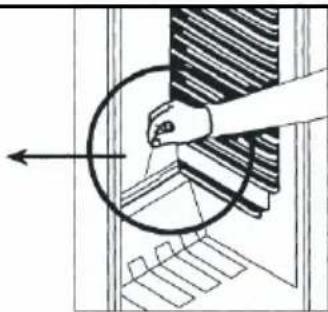
natural_image
Diagram showing a hand interacting with a circular object, possibly a mechanical or architectural component (no text or symbols present)natural_image
Line drawing of a mechanical device with internal components and no visible text or symbolsSwitching On the refrigerator for the first time 2619
HOW TO OPERATE THE APPLIANCE .... 20
Thermostat Setting 20
FOOD STORAGE IN THE APPLIANCE 20
CLEANING AND MAINTENANCE 21
Defrosting the Refrigerator 21
Replacing the Light Bulb 21
BEFORE CALLING YOUR AFTER SALES SERVICE 22
PARTS OF THE APPLIANCE AND THE COMPARTMENTS ...... 23
SPECIFICATIONS....24

natural_image
Symbol of a trash bin crossed with no text or numbers, representing waste sorting or recycling (no text present)Waste electrical and electronic products must not be disposed of with household waste. Please refer to the retailer from whom you purchased this item for disposal instructions.
PART 1. BEFORE USING THE APPLIANCE
Safety information
- Check that the voltage marked on the rating p left matches that of your local supply.
- Failure to use the correct voltage will render the to the appliance.
- The manufacturer accepts NO responsibility for on the rating plate.
- This appliance is intended for domestic use warranty and might be dangerous.
- This appliance is intended for indoor use only,
- This appliance shall not be exposed to rain.
- The mains plug shall be the main disconnect times.
ate located inside the refrigerator on the
guarantee VOID and may cause damage
using any other voltage than that marked
only; any other use may invalidate the
do not use or store outdoors.
device and shall remain operable at all
- A short power-supply cord is provided to reduce the risk of a tripping hazard.
- To disconnect from the mains completely, turn the appliance OFF, then remove the plug from wall outlet.
- Do not immerse the appliance, its lead or plug in water or any other liquid.
- Remove all food and unplug from the supply when not in use and before cleaning the appliance.
- If the supply cord is damaged, it must be replaced by a special cord or assembly available from the manufacturer or service agent.
- Do not operate the appliance with a damaged cord or plug or after the appliance malfunctions or has been damaged in any way.
- Do not let cord hang over edge of the surface, or touch hot surfaces.
- Do not place the appliance on or near hot surfaces, or in direct sunlight.
- Children must be supervised to make sure they do not swing on the door.
- Accessible surfaces may get hot when in use, use handles and knobs at all times.
- Always attach a plug to the appliance, and then plug it into the wall outlet and switch on.
- If you are discarding an old appliance with a lock or catch fitted to the door, ensure that the lock is left in a disabled condition to avoid the entrapment of young children when playing.
- As old refrigeration appliances may contain CFC's which will damage the ozone layer, when disposing of any refrigeration appliance please contact your local waste disposal department for advice on the correct method of disposal.
- This appliance is not intended for use by persons (including children) with reduced physical, sensory or mental capabilities, or lack of experience and knowledge, unless they have been given supervision or instruction concerning use of the appliance by a person responsible for their safety.
- Children should be supervised to ensure that they do not play on or near the appliance. This appliance is for refrigerating food and making ice cubes.
REFRIGERANT
The refrigerating gas contained in the circuit of causes a low level of pollution but is inflammable
this appliance is Isobutene (R600a); it e.
CAUTION:
Extreme caution must be used when moving the
appliance. It is very heavy.
WARNINGS:
- Do not damage the refrigerant circuit.
- Do not use electrical appliances inside the food unless they are of the type recommended by t
- If the appliance is installed in a carpeted area, holes in the base of the unit, adjust the levelling carpet movement.
storage compartments of the appliance, the manufacturer.
do not let the carpet block the ventilation feet after a few hours to compensate for
- Keep ventilation openings, in the appliance enclosure or the built in structure clear of obstructions.
- To avoid a hazard due to instability of the appliance, it must be fixed in accordance with the instructions.
PART 2. INSTALLATION
BUILDING INTO THE KITCHEN CABINET
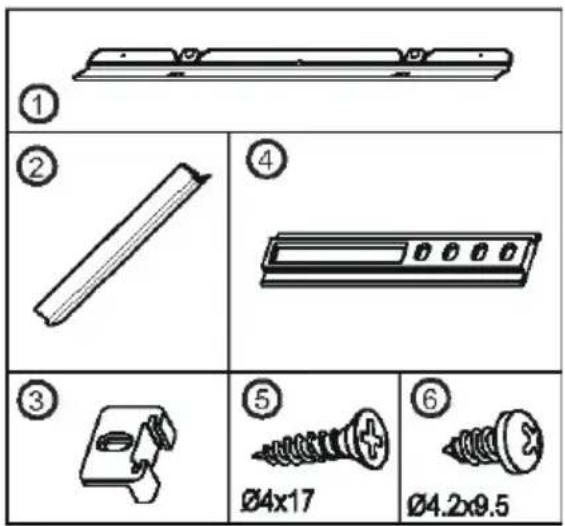
Figure A

! Before installation, read the instructions carefully.
! Fit the refrigerator in stable kitchen units only.
! If necessary, reverse the door according to instructions.
- See fig.A for the necessary attachment components.
- Insert trim flap ^(1) into slot and secure using screws ^(6) . (fig.D)
- Pass the power cord through ventilation shaft and position it so that the appliance can be easily plugged in once it has been installed. (fig.B - fig.C)
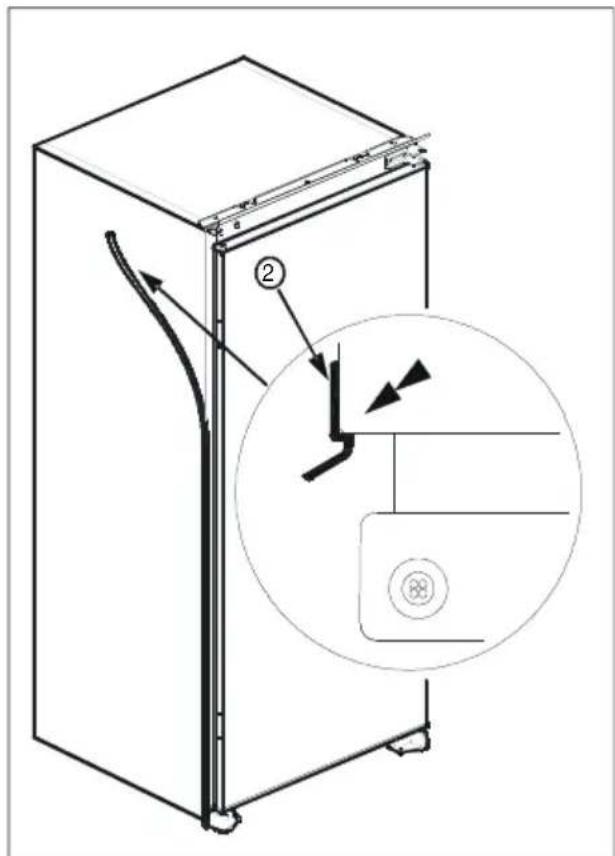
- Take out the trim gasket ^(4) located on the side panel of the appliance and stick it on the rear of of the door hinges. (fig.D - fig.E)
- Raise the appliance and slide into the kitchen unit.
- Push the appliance to the rear of the door hinges, make sure that the trim gasket ^(2) covers the space between the appliance and the kitchen unit.
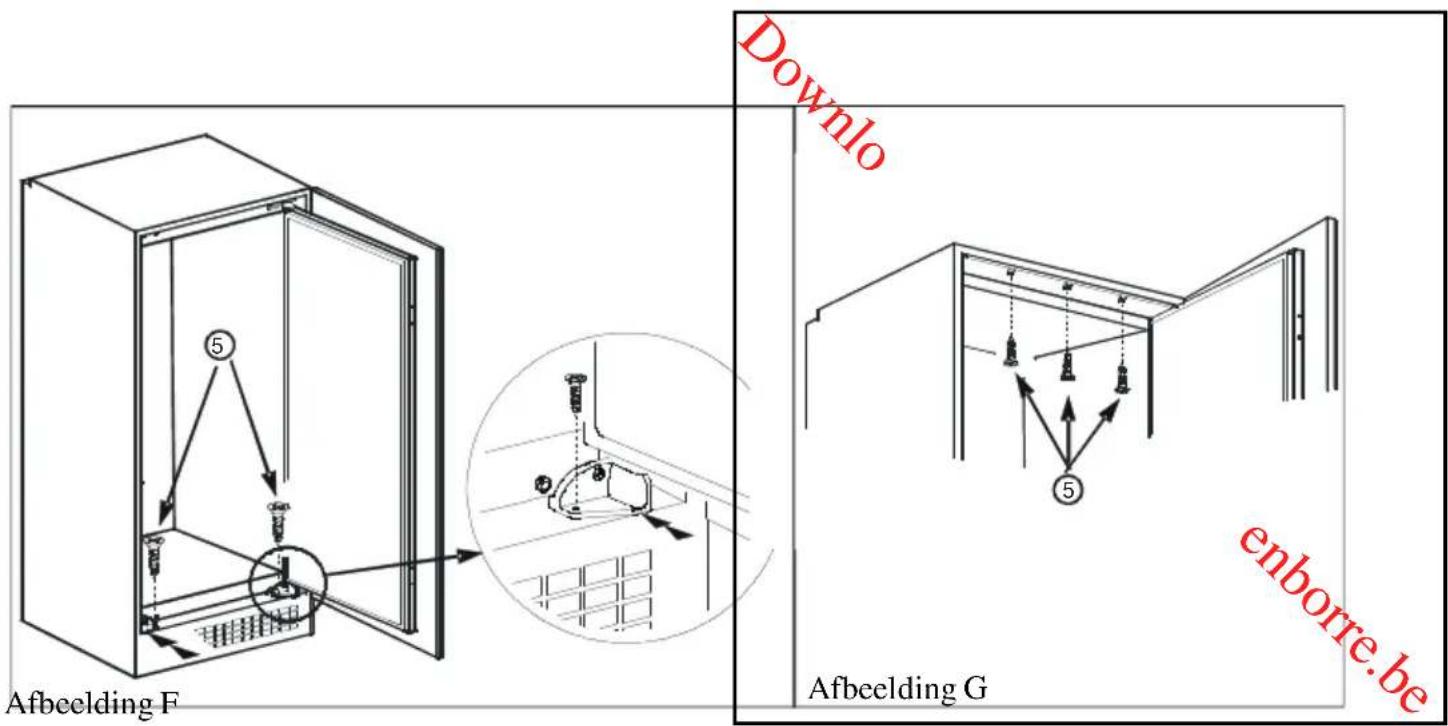
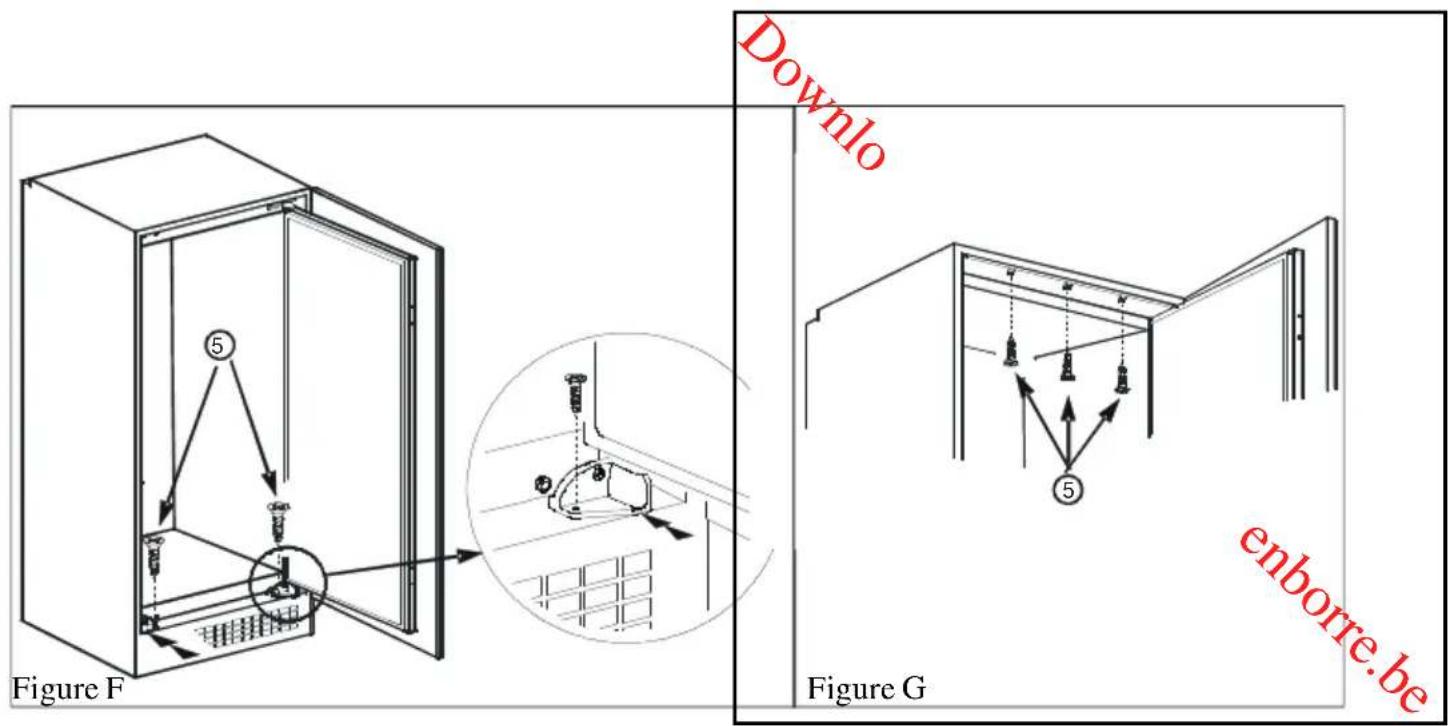
- Align the front feet with front surface of the kitchen unit. (fig.F)
- Secure the front feet by using screws ^(5) . (fig.F)
-
Screw trim flap ^(1) to kitchen unit using screws ^(5) . (fig.G)
-
Screw guides ^(3) to appliance door with screws ^(6) . (fig.H)
- Place the appliance door against the cabinet door.
- Slide rails ^(4) into guides ^(3) aligning the groove. (fig.H)
- Screw the rails ^(4) to the unit door with screws ^(5) . (fig.H)
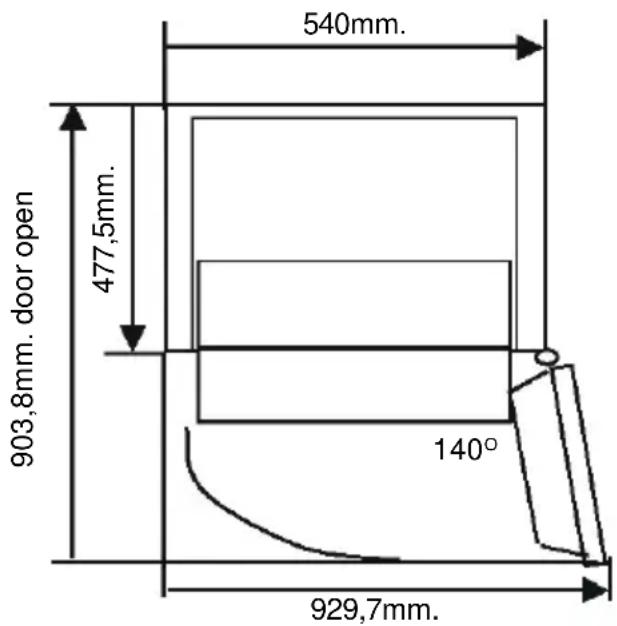
- Set 1\~2 mm gap on handle side between unit itself and unit door by adjusting guides ^(3) . That is vital for appliance performance. (fig.H)
![min. 200 cm² Figure B min. 200 cm² 90 min max. 2100 550 min. 200 cm² 560-570 540 90° min. 260 cm² A A B [mm] Downloaded from www.vandenborre.be 875 875-895 1020 1020-1040 1225 1225-1245](/content/2026/02/395296/images/36898a6ccb9583ff0ff5c832d33d36afa8d70a583759e08fca5f9869c4847506.jpg)
Figure C
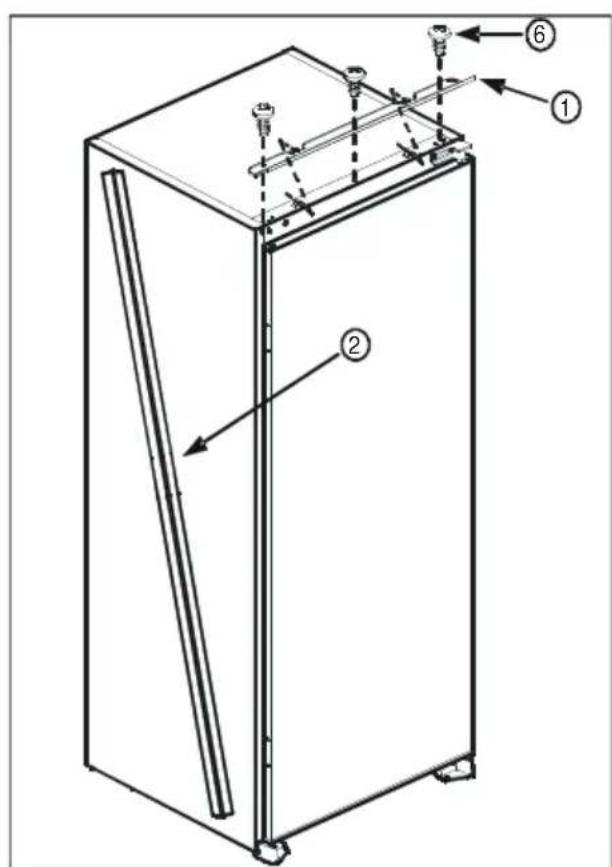
Figure D
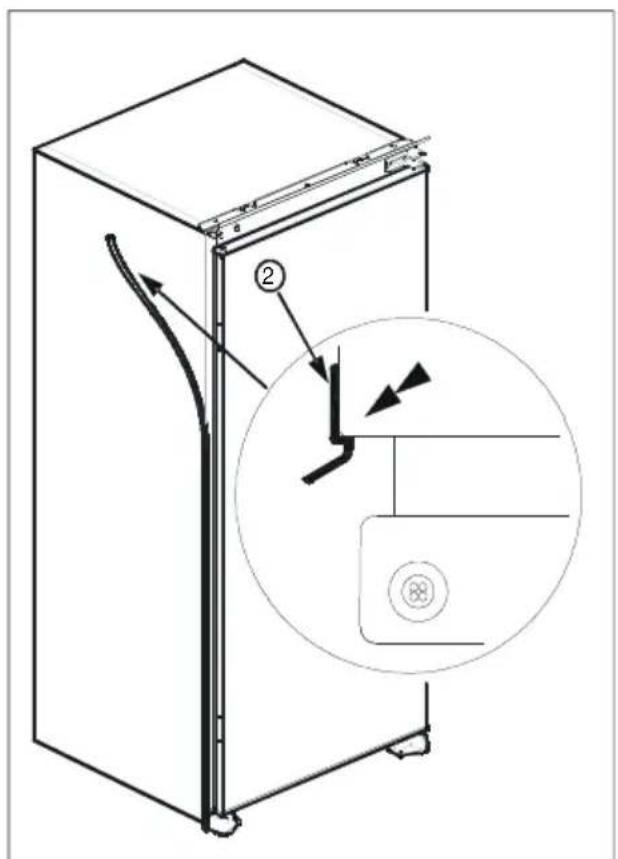
Figure E

enborre.be
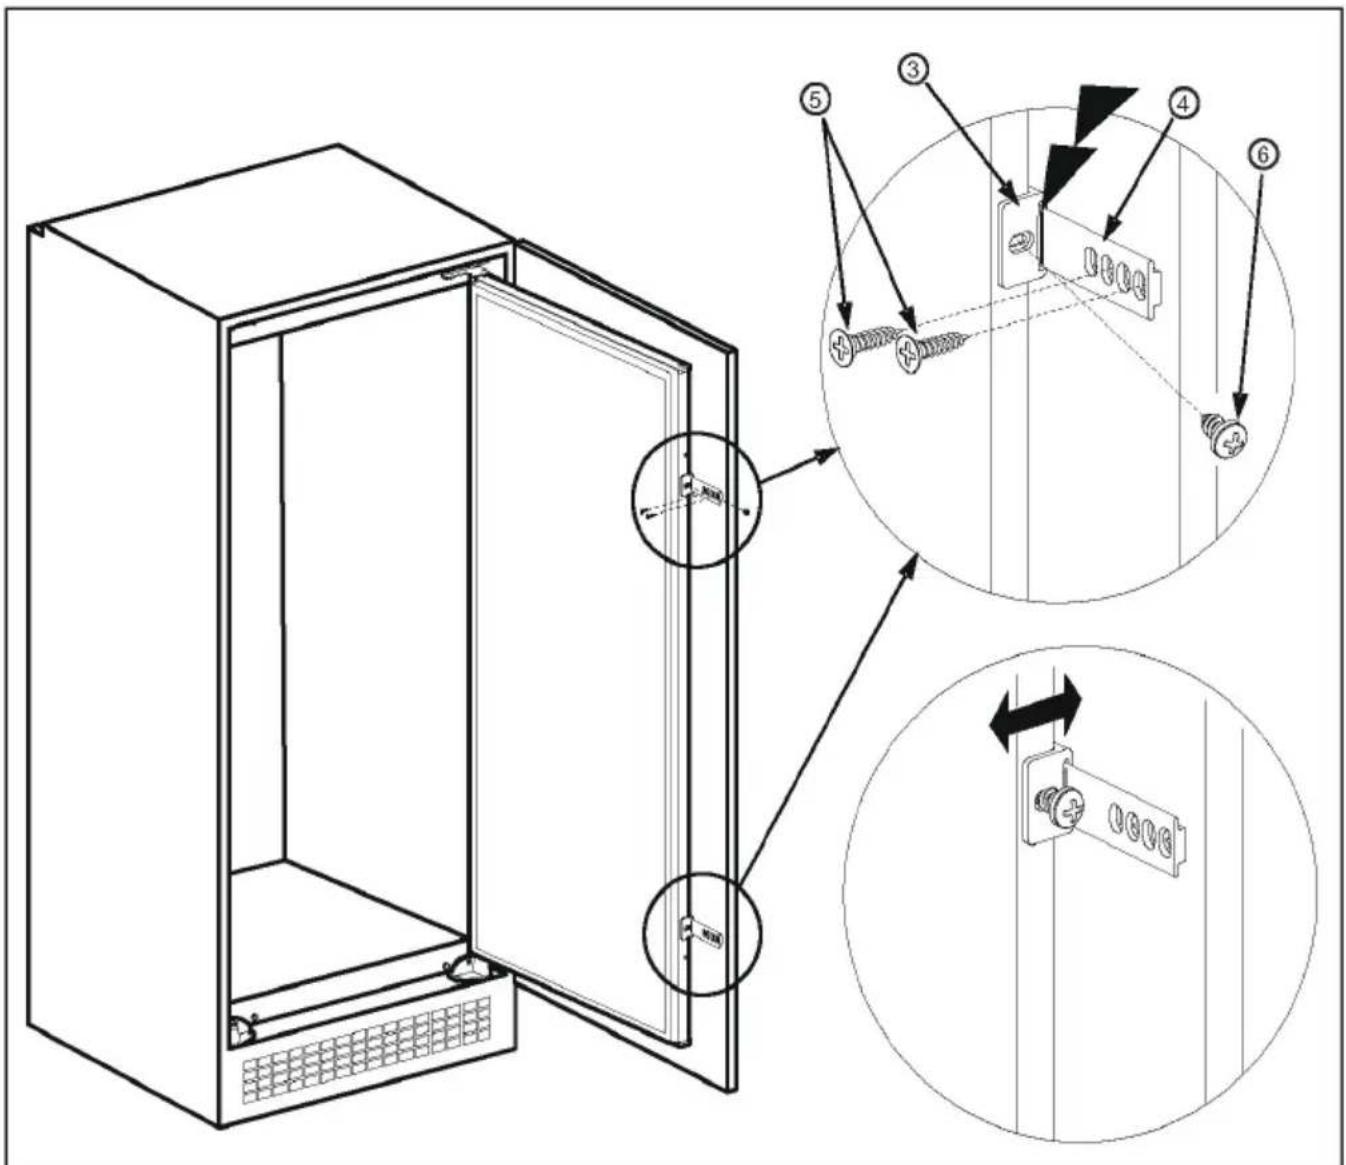
Figure H
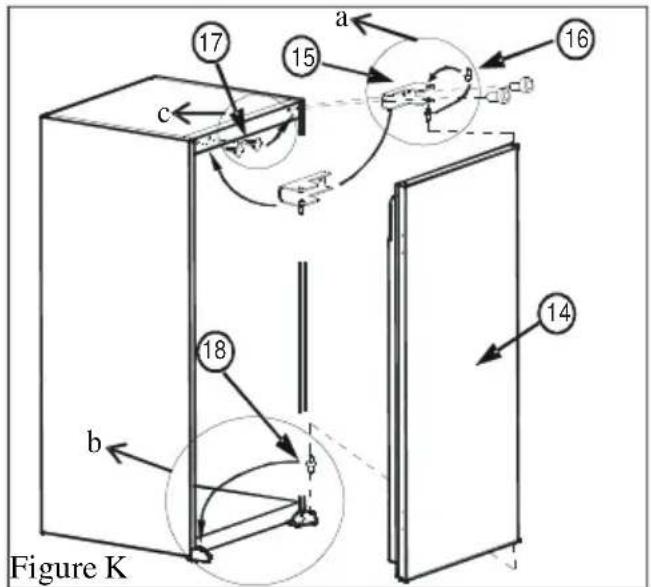
Door reversing
- Open appliance door ^(14) .
- Unscrew door hinge pin ^(16) and screw it to opposite side firmly and take to safe.
- Repeat with the lower pin ^(18) . (fig.K.b)
- Fit blanking plugs ^(17) to opposite side. (fig.K.c)
- Place appliance door ^(14) on the lower pin ^(18) and insert top hinge pin ^(16) into hinge hole on the door ^(14) and then screw door hinge ^(15) onto opposite side from original position. (fig.K)
Switching On the refrigerator for the first time
- Before switching on, install the appliance in an upright position and wait at least three hours. This will give the refrigerant circuit time to settle and operate efficiently.
- Clean the appliance thoroughly, especially the interior, before use (See Cleaning and Maintenance).
• Installation of the appliance and electrical connections must be carried out by a qualified technician, in accordance with the Installation Manual and local regulations. - Installation procedure into the kitchen unit is given in the Installation section. This product is intended to be used in proper kitchen units only.
- The appliance must be connected with a properly installed fused socket and connected to a 220 - 240V 50Hz mains supply.
- Insert the plug into a socket with an efficient ground connection. If the socket has no ground contact or the plug does not fit the socket call a qualified electrician to install one.
- Manufacturer is not responsible for failure to connect to the ground connection as described in this booklet.
- There may be an odor when you first switch on the appliance. It will disappear after the appliance starts to cool.
PART 2. HOW TO OPERATE THE APPLIANCE
Thermostat Setting
natural_image
Technical line drawing of a mechanical component with internal gears and housing (no text or symbols)- The thermostat automatically regulates the internal temperature of the refrigerator. By rotating the knob from position 1 to 5, colder temperatures can be obtained.
- The “0” position shows thermostat is closed and no cooling is available.
- For short-term storage of food in the refrigerator, you can set the knob between minimum and medium position (1-3).
-
For long-term storage of food in the refrigerator, you can set knob medium position.(3-5)
-
Note that; the ambient temperature, temperature of the freshly stored food and how often the door is opened, affects the temperature in the refrigerator. If required, change the temperature setting.
- When you first switch on the appliance, you should run it without any food for 24 hours and not open the door.
- If the unit is switched off or unplugged, you must allow at least 5 minutes before restarting in order not to damage the compressor.
- LARDERS (without star rating): Larders (coolers) have not got a freezer compartment but can cool down to 4-6°C.
PART 3. FOOD STORAGE IN THE APPLIANCE
Refrigerator compartment is used for storing fresh food for short periods of time.
- Do not place food in direct contact with the rear wall of the refrigerator compartment. Leave some space around food to allow circulation of air.
- Do not place hot food or evaporating liquid in the refrigerator.
• Always store food in closed containers or wrapped.
• To reduce humidity and avoid formation of frost, never place liquids in unsealed containers in the refrigerator. - Meat of all types, wrapped in packages, is recommended to be placed on the glass shelf just above the crisper drawer, where the air is colder.
- You can put fruits and vegetables into crisper drawer without packaging.
- To avoid the cold air escaping, try not to open the door too often, and do not leave the door open for a long time.
PART 4. CLEANING AND MAINTENANCE
- Disconnect the appliance from the mains supply before cleaning.
- Do not pour water over the appliance.
- The refrigerator should be cleaned periodically and lukewarm water.
- Clean the accessories separately with soap and water. Do not put them in a dishwasher.
- Do not use abrasive cleaners, detergents or soaps. After washing, rinse with clean water and dry carefully. When the cleaning operations have been completed, reconnect to the mains supply with dry hands.
Defrosting the Refrigerator
natural_image
Simple line drawing of a mechanical component or bracket (no text or symbols)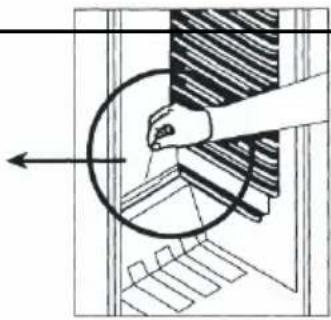
natural_image
Diagram showing a hand holding a circular object with an arrow pointing to it, surrounded by layered materials (no text or symbols)- Defrosting occurs automatically during operation; the defrost water is collected by the evaporating tray and evaporates automatically.
- The evaporating tray and the defrost water drain hole should be cleaned periodically along with the defrost drain plug.
- Pour 12 glass of the water into the drain hole to clean inside it.
Replacing the Light Bulb
natural_image
Line drawing of a mechanical device with internal components and a dial (no text or symbols)When replacing the bulb of the refrigerator compartment;
- Unplug the unit from the power supply,
- Press the hooks on the sides of the light cover top and remove the light cover
- Change the present light bulb with a new one of not more than 15 W with E14 base.
- Replace the light cover and after waiting 5 minutes plug the refrigerator into the mains supply..
PART 5. BEFORE CALLING YOUR AFTER SALES SERVICE
If your refrigerator is not working properly, it may
be a minor problem, check the following.
The appliance does not operate, Check if;
- There is a power failure,
- The mains plug is not properly plugged in, or is loose
- The thermostat setting is on position "0",
- The socket is defective. To check this, plug in another appliance that you know is working into the same socket.
The appliance performs poorly; Check if;
- You have overfilled the refrigerator.
- The door seal is damaged or not in contact with the refrigerator all the way around the door opening.
- There are not enough ventilation ducts on the kitchen unit, see in the Installation section.
If there is noise;
The cooling gas which circulates in the refrigerator circuit may make a slight noise (bubbling sound) even when the compressor is not running. Do not worry, this is quite normal. If these sounds are different check if;
- The appliance is installed as described in the Installation section.
- The objects on the appliance are vibrating.
If there is water in the lower part of the refrigerator; Check if;
The drain hole is not clogged (use defrost drain plug to clean the drain hole).
Recommendations
- In order to increase space and improve the appearance, the “cooling section” of refrigerators is positioned inside the back wall of the refrigerator compartment. When the compressor is working, this wall is covered with frost or water drops. Do not worry. This is quite normal. The appliance should be defrosted only if an excessively thick ice layer forms on the back wall.
- If the appliance is not used for a long time (for example during the summer holidays), set the thermostat knob to position “0”. Defrost and clean the refrigerator leaving the door open to prevent the formation of mildew and odors.
- The internal temperature can be effected by such factors as the installation location of the appliance, ambient temperatures and the amount of times the door is opened and how long it is left open. Also the thermostat setting.
PART 6.
PARTS OF THE APPLIANCE AND THE COMPARTMENTS
| Brand | PROLINE | |
| Appliance type | Built-in | Larder |
| Star rating | None | |
| Frequency (Hz) | 50 Hz. | |
| Light Power (Watts) | 15W | |
| Net Refrigerator Volume | 136l | |
| Rated Voltage (V) | 220 - 240V | |
| Climate Class +Ambient Range | N / Between 16 - 32 °C | |
| Gross Weight (Kg) | 29,18 | |
| Energy consumption (kWh/24h) | 0,340 | |
| Energy Consumption (kWh/year) | 124 | |
| Rated Current (A) | 0,56 | |
| Refrigerant/Amount | R600a / 26g | |
| Product dimensions (W x D x H) | 875 X 540 X 545 | |
| Insulation Blowing Gas | Cyclo pentane | |
We apologise for any inconvenience caused by minor inconsistencies in these instructions, which may occur as a result of product improvement and development.
Kesa Electricals© UK: EC1N 6TE. 01 / 02 / 2012
Sommaire
AVANT D'UTILISER L'APPAREIL 26
natural_image
Symbol of a trash bin crossed with no text or numbers, representing waste sorting or recycling (no text present)Figure A

Figure D

Figure E
enborre.be

Figure H
natural_image
Technical line drawing of a mechanical component with internal gears and housing (no text or symbols)natural_image
Simple line drawing of a structural beam or support with a notch (no text or symbols)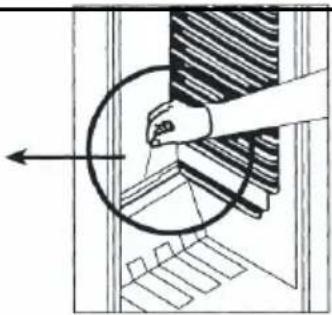
natural_image
Diagram showing a hand holding a circular object with an arrow pointing to a textured surface (no text or symbols)natural_image
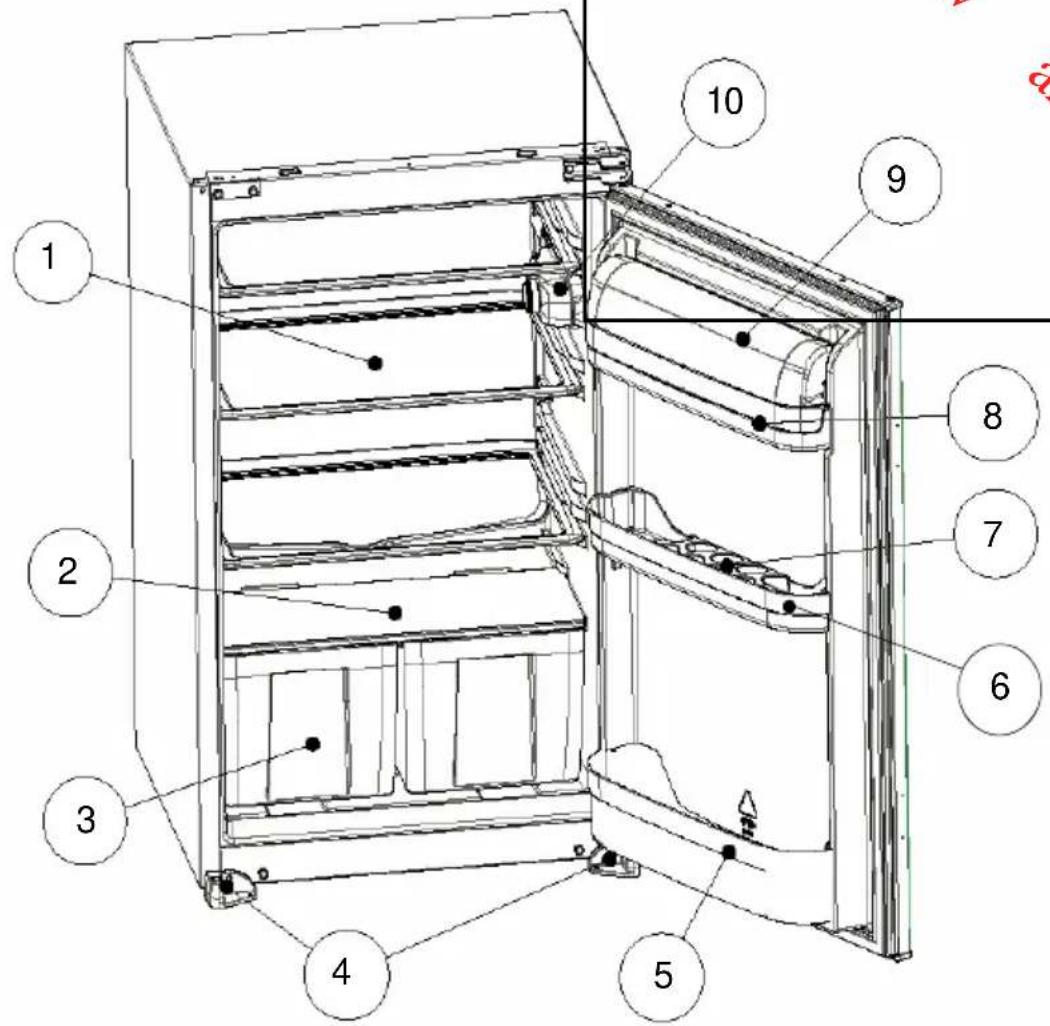
Line drawing of a mechanical device with internal components and a circular component (no text or symbols)1) ÉTAGÈRE DU RÉFRIGÉRATEUR
2-) ÉTAGÈRE EN VERRE
3) BAC À LÉGUMES
4-) PIEDS GAUCHE ET DROIT
5) ÉTAGÈRE À BOUTEILLES
6-) Etagère du milieu
7) PORTE-OEUFS
8) ÉTAGÈRE À BEURRE
9) COUVERCLE DE L'ÉTAGÈRE À BEURRE
10-) BOITIER DU THERMOSTAT
PARTIE 7. SPECIFICATIONS
natural_image
Symbol of a trash bin crossed with no text or numbers, representing waste sorting or recycling (no text present)Ilustración
A

Ilustración
H
natural_image
Technical line drawing of a mechanical component with internal gear and housing (no text or symbols)natural_image
Simple line drawing of a mechanical component or bracket (no text or symbols)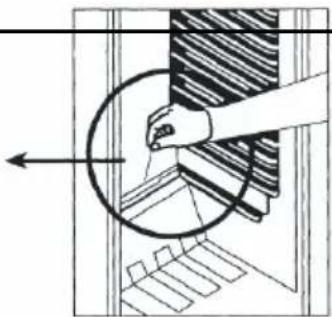
natural_image
Diagram of a hand operating a circular component with a striped pattern, showing internal structure and motion direction (no text or symbols)natural_image
Line drawing of a mechanical device with internal components and a dial (no text or symbols)natural_image
Symbol of a trash bin crossed with no text or numbers, representing waste sorting or recycling (no text present)Figura A

Figura D

Figura E

enborre.be

Figura H
natural_image
Technical line drawing of a mechanical component with internal gears and housing (no text or symbols)natural_image
Simple line drawing of a structural beam or support with a notch (no text or symbols)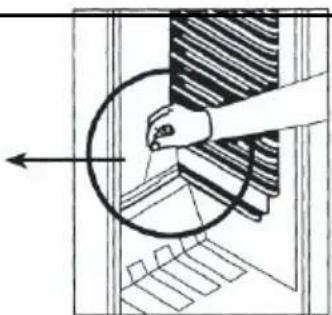
natural_image
Diagram showing a hand pressing down on a circular component with a striped pattern, no text or symbols presentnatural_image
Technical line drawing of a mechanical device with internal components (no text or symbols)
- Inhoud
- VOOR U HET TOESTEL BEGINT TE GEBRUIKEN 2
- DEEL 1 VOOR U HET TOESTEL
- BEGINT TE GEBRUIKEN
- Deur omkeren
- HOW TO OPERATE THE APPLIANCE .... 20
- FOOD STORAGE IN THE APPLIANCE 20
- CLEANING AND MAINTENANCE 21
- BEFORE CALLING YOUR AFTER SALES SERVICE 22
- PARTS OF THE APPLIANCE AND THE COMPARTMENTS ...... 23
- SPECIFICATIONS....24
- PART 1. BEFORE USING THE APPLIANCE
- Safety information
- REFRIGERANT
- CAUTION:
- WARNINGS:
- PART 2. INSTALLATION
- BUILDING INTO THE KITCHEN CABINET
- Door reversing
- Switching On the refrigerator for the first time
- PART 2. HOW TO OPERATE THE APPLIANCE
- Thermostat Setting
- PART 3. FOOD STORAGE IN THE APPLIANCE
- PART 4. CLEANING AND MAINTENANCE
- Defrosting the Refrigerator
- Replacing the Light Bulb
- PART 5. BEFORE CALLING YOUR AFTER SALES SERVICE
- The appliance does not operate, Check if;
- The appliance performs poorly; Check if;
- If there is noise;
- If there is water in the lower part of the refrigerator; Check if;
- Recommendations
- PART 6.
- PARTS OF THE APPLIANCE AND THE COMPARTMENTS
- Sommaire
- AVANT D'UTILISER L'APPAREIL 26
Brand : PROLINE
Model : PLI 136 GE1
Category : Refrigerator