HD3 - Computer drum ROLAND - Free user manual and instructions
Find the device manual for free HD3 ROLAND in PDF.
| Product Type | Electronic Drum Set (Computer Drum) |
| Brand | Roland |
| Model | HD-3 (V-Drums Lite) |
| Drum Kits | 20 (10 kits × 2 variations) |
| Musical Phrases | 20 (one per kit) |
| Pads Included | Kick, snare, 3 toms, hi-hat, crash, ride |
| Pedals | Kick pedal, hi-hat pedal |
| Metronome | Tempo 40-250, 3 sounds, 10-level volume |
| Display | Backlit LCD 16 characters × 2 lines |
| Connectors | Output (stereo mini-jack), Phones (stereo mini-jack), Mix In (stereo mini-jack), MIDI Out (DIN 5-pin), Sensor (DB-25) |
| Auto Off | Yes, adjustable (10/30/240 min or off) |
| Power Supply | AC adapter (DC IN), consumption 500 mA |
| Dimensions (W × D × H) | 950 × 560 × 1170 mm |
| Weight | 14.5 kg (without adapter) |
| Supplied Accessories | Owner's manual, installation manual, drum key, screws, cable tie, sensor cable, AC adapter, audio cable |
| Options | PM-03 monitor, DAP-1 accessory box, TDM-1 mat |
| Maintenance and Cleaning | Unplug before cleaning; use a soft dry cloth. Do not use solvents. |
| Safety | Follow power-on sequence; lower volume before connections; do not open the unit. |
| Repairability | Spare parts available from the manufacturer (Roland). Have repairs carried out by an authorized technician. |
Frequently Asked Questions - HD3 ROLAND
User questions about HD3 ROLAND
0 question about this device. Answer the ones you know or ask your own.
Ask a new question about this device
Download the instructions for your Computer drum in PDF format for free! Find your manual HD3 - ROLAND and take your electronic device back in hand. On this page are published all the documents necessary for the use of your device. HD3 by ROLAND.
USER MANUAL HD3 ROLAND
IMPORTANT: THE WIRES IN THIS MAINS LEAD ARE COLOURED IN ACCORDANCE WITH THE FOLLOWING CODE.
BLUE: NEUTRAL
BROWN: LIVE
As the colours of the wires in the mains lead of this apparatus may not correspond with the coloured markings identifying the terminals in your plug, proceed as follows:
The wire which is coloured BLUE must be connected to the terminal which is marked with the letter N or coloured BLACK. The wire which is coloured BROWN must be connected to the terminal which is marked with the letter L or coloured RED.
Under no circumstances must either of the above wires be connected to the earth terminal of a three pin plug.

HD-3
V-Drums Lite
Owner's Manual
Roland
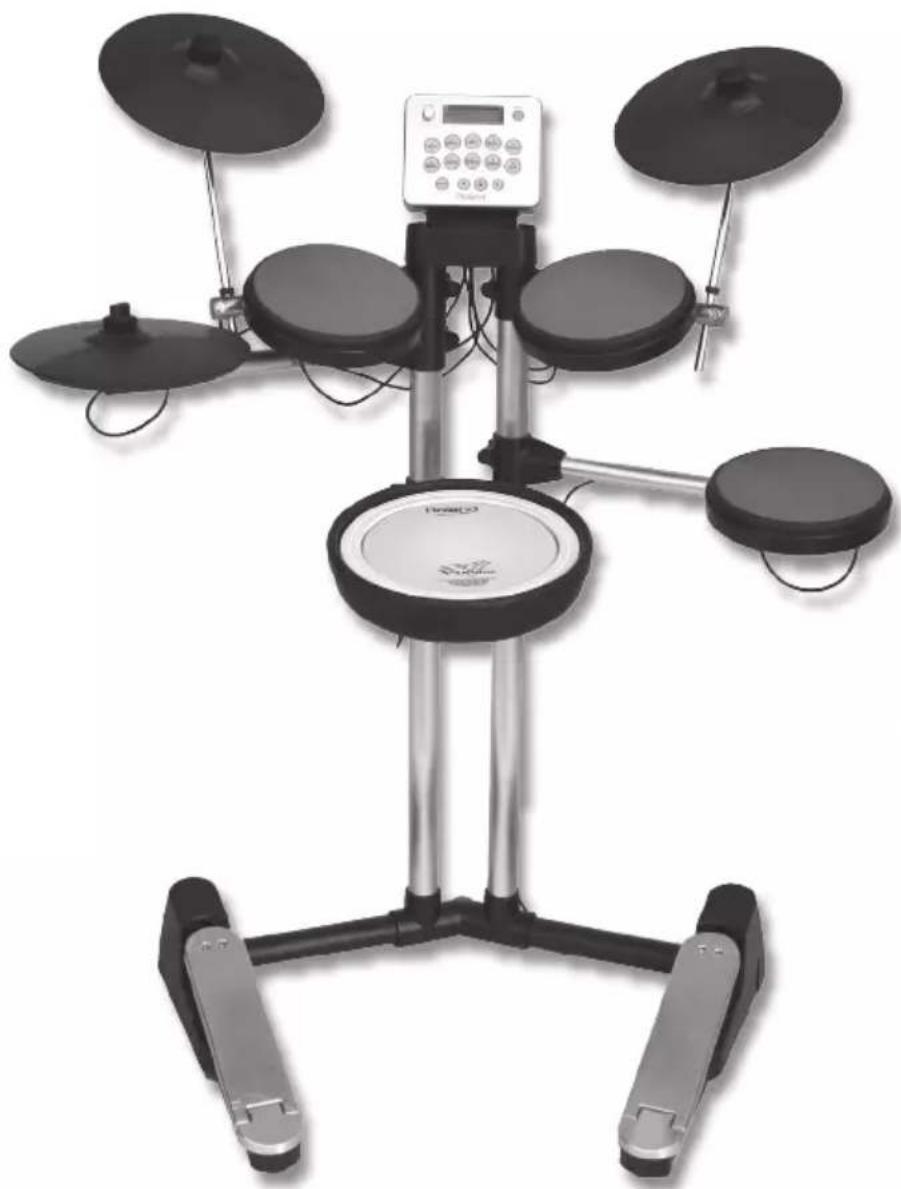
Main Features
A rich and wide variety of sounds
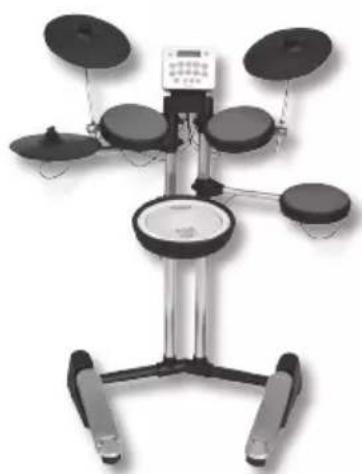
The HD-3 features 20 different drum kits, designed to be used with all styles of music.
Reference
"Drum Kit Sound List" (p. 17)
Enjoy playing on your own
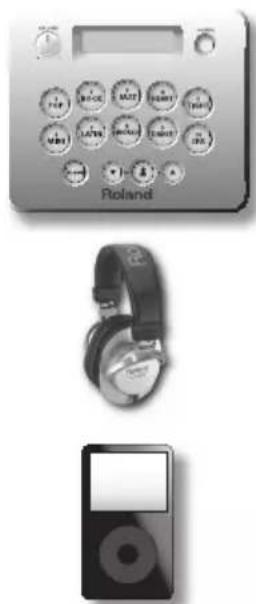
When using headphones, only you will hear what you are playing.
Unlike acoustic drums, no loud sounds are produced, so you can play without worrying about other people.
The MIX IN jack allows one to connect external audio sources, ideal for playing along with audio players, etc.
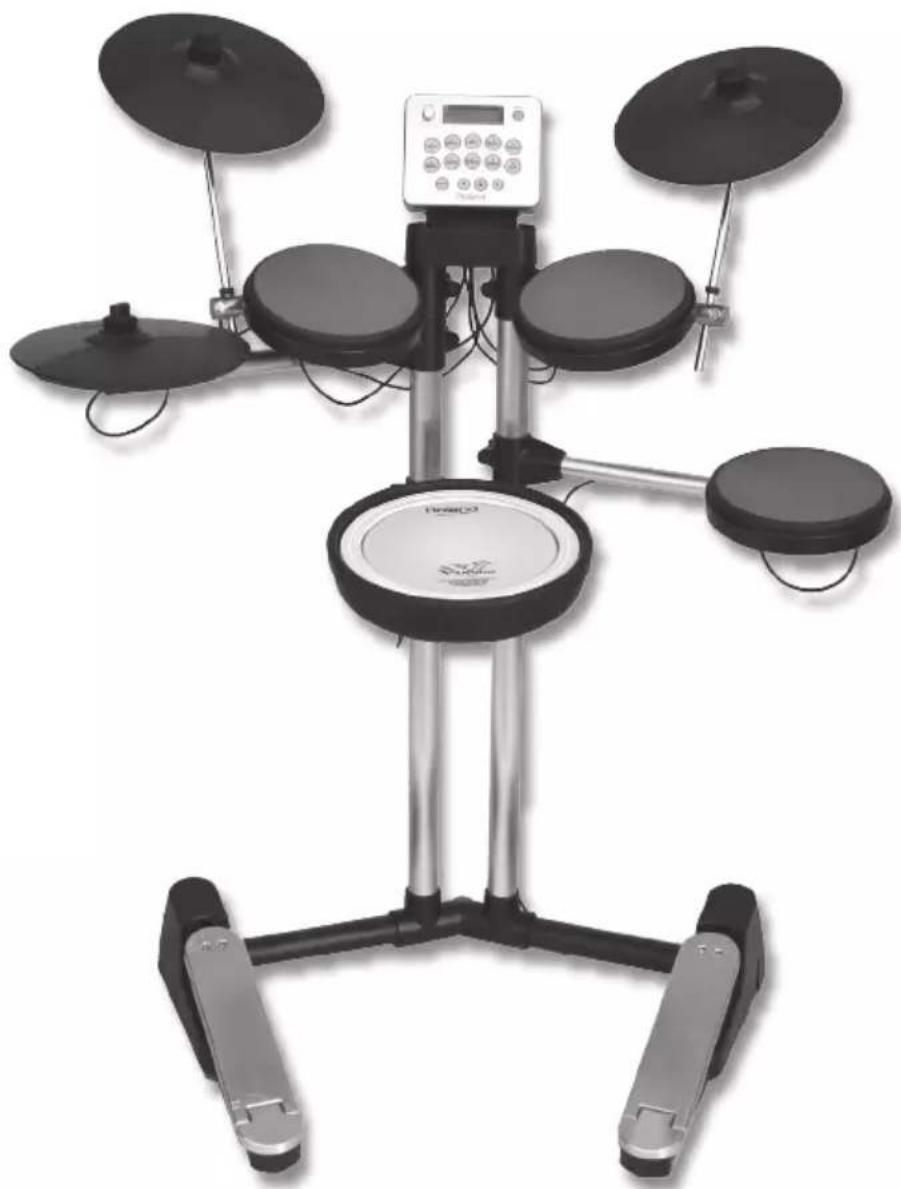
A compact drum set
The HD-3 is compact, simple and easy to set up just about anywhere.
Play whenever you want
Just turn on the HD-3, select a drum kit, and it's ready to play.
Before using this unit, carefully read the sections entitled: "USING THE UNIT SAFELY" and "IMPORTANT NOTES" (the rear side of the Setup Guide). These sections provide important information concerning the proper operation of the unit. Additionally, in order to feel assured that you have gained a good grasp of every feature provided by your new unit, Owner's manual and Setup Guide should be read in its entirety. The manual should be saved and kept on hand as a convenient reference.
Copyright © 2011 ROLAND CORPORATION
All rights reserved. No part of this publication may be reproduced in any form without the written permission of ROLAND CORPORATION.
Roland, V-Drums, and V-Drums Lite are registered trademarks of Roland Corporation in the United States and/or other countries.
Contents
Main Features 2
Panel Descriptions 4
Front Panel. 4
Side Panel. 5
Introducing the Drum Set 6
Drum Set Elements. 6
The Basics of Playing 8
How to Read Drum Notation. 10
Playing the Kit 11
Switching the Power On and Off 11
Selecting a Kit. 11
Listening to Patterns 12
Playing Along With the Metronome. 12
Various Settings (the Edit screens) 14
Basic Operation in the Edit Screens 14
Parameter List. 15
Changes the sound of the metronome 15
Adjust the metronome volume 15
Adjust the contrast of the display 15
Automatically turn the HD-3 off (auto off) 15
Exchange the pad settings for left-handed players. 15
Adjust the pad sensitivity. 16
Change the note number of the pad 16
Set the note number for cross sticking 16
Resetsthe factory settings. 16
Appendix. 17
Drum Kit Sound List 17
AboutMIDI 18
Troubleshooting 20
Setting-up the HD-3 for Left-handed Use. 21
Main Specifications 22
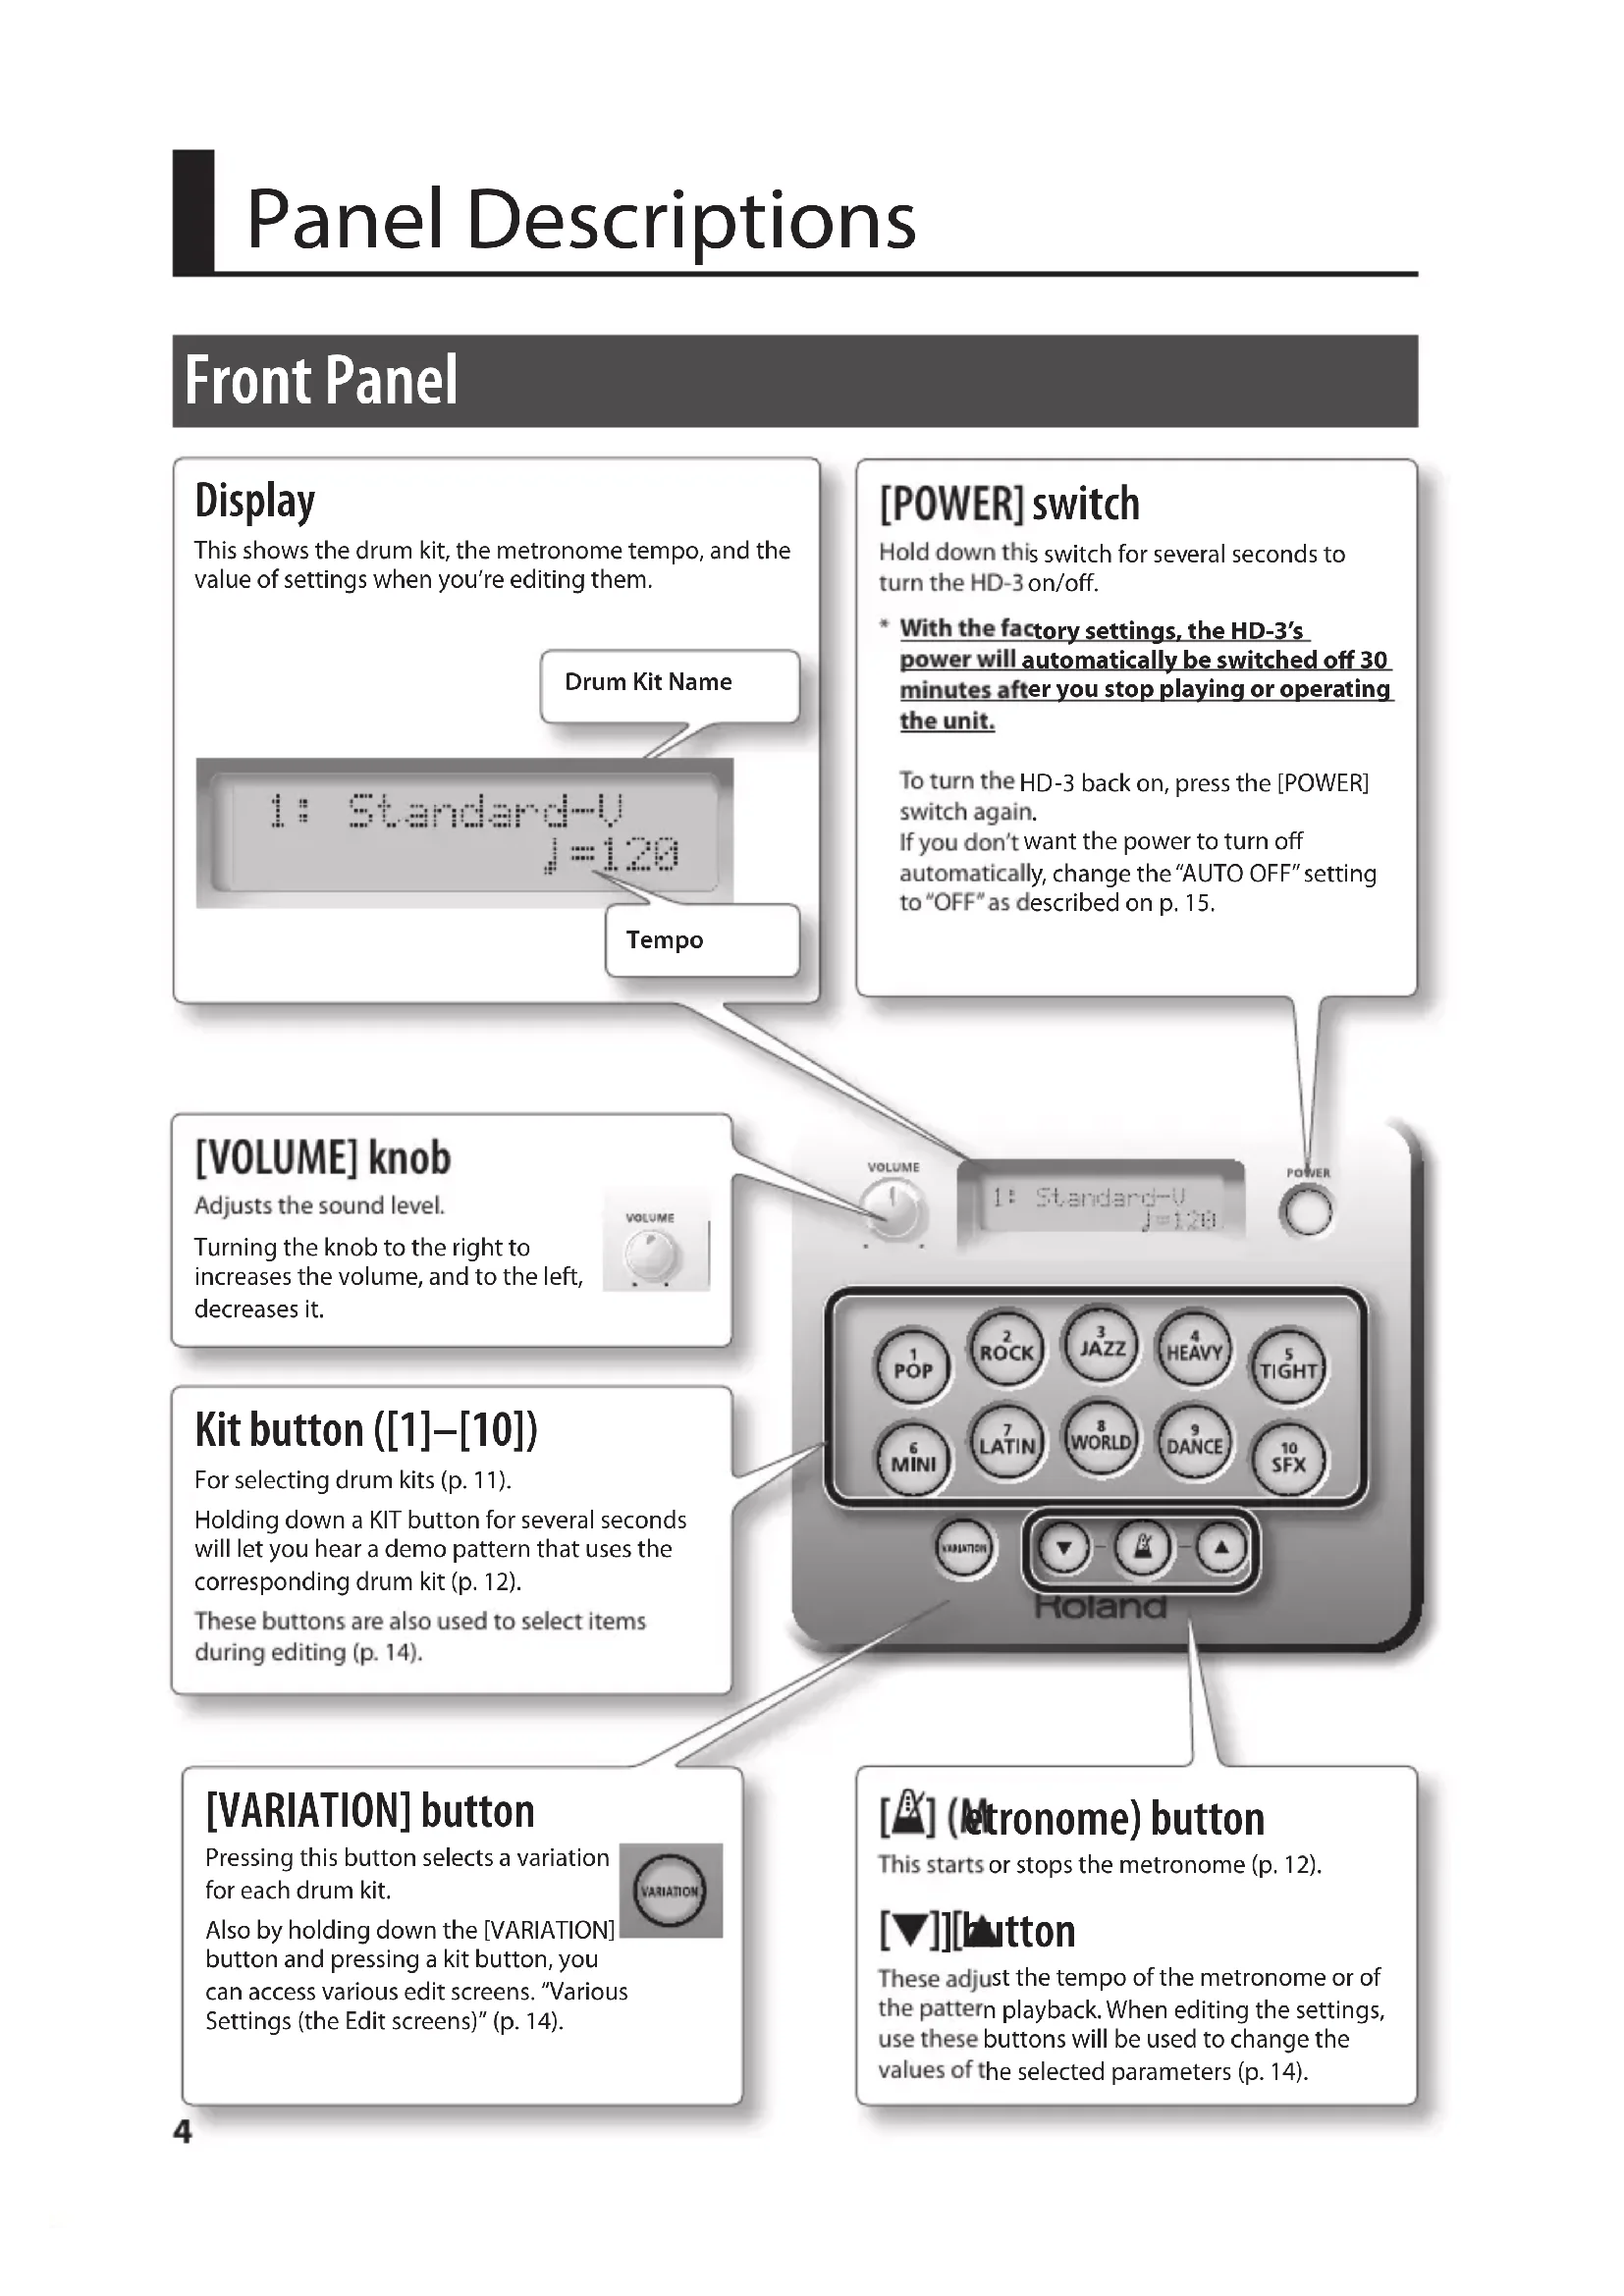
Front Panel
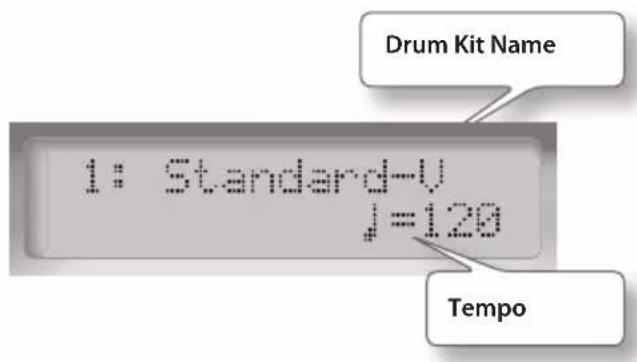
Display
This shows the drum kit, the metronome tempo, and the value of settings when you're editing them.
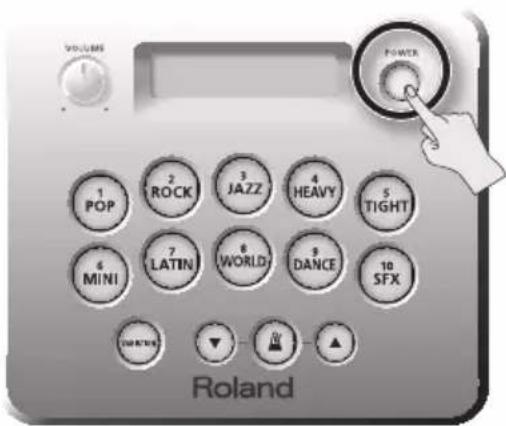
[POWER] switch
Hold down this switch for several seconds to turn the HD-3 on/off.
- With the factory settings, the HD-3's power will automatically be switched off 30 minutes after you stop playing or operating the unit.
To turn the HD-3 back on, press the [POWER] switch again.
If you don't want the power to turn off automatically, change the "AUTO OFF" setting to "OFF" as described on p. 15.
[VOLUME] knob
Adjusts the sound level.
Turning the knob to the right to increases the volume, and to the left, decreases it.
![ROLAND HD3 - [VOLUME] knob - 1](/content/2026/02/395143/images/db333b0797b7c1d320d0f05b474bd0f856a388c87cb23279a2dc2a06e6a50665.jpg)
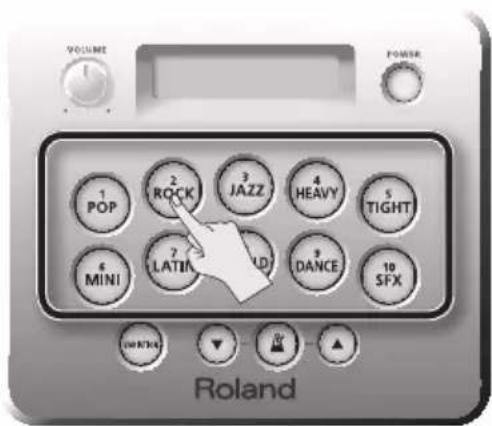
Kit button ([1]–[10])
For selecting drum kits (p. 11).
Holding down a KIT button for several seconds will let you hear a demo pattern that uses the corresponding drum kit (p. 12).
These buttons are also used to select items during editing (p. 14).
[VARIATION] button
Pressing this button selects a variation for each drum kit.
![ROLAND HD3 - [VARIATION] button - 1](/content/2026/02/395143/images/b3896ea94327b5d4fa7edb343bd9668c5da4b0817946f5593f5b4cf1bfd3cd63.jpg)
Also by holding down the [VARIATION] button and pressing a kit button, you can access various edit screens. "Various Settings (the Edit screens)" (p. 14).
![ROLAND HD3 - [VARIATION] button - 2](/content/2026/02/395143/images/eba973cdb11d44140eb70312c39f8e5a4f2c1f98f5997b2505de99ed3085b0a5.jpg)
[ ] (letronome) button
This starts or stops the metronome (p. 12).
[▼] [Button
These adjust the tempo of the metronome or of the pattern playback. When editing the settings, use these buttons will be used to change the values of the selected parameters (p. 14).
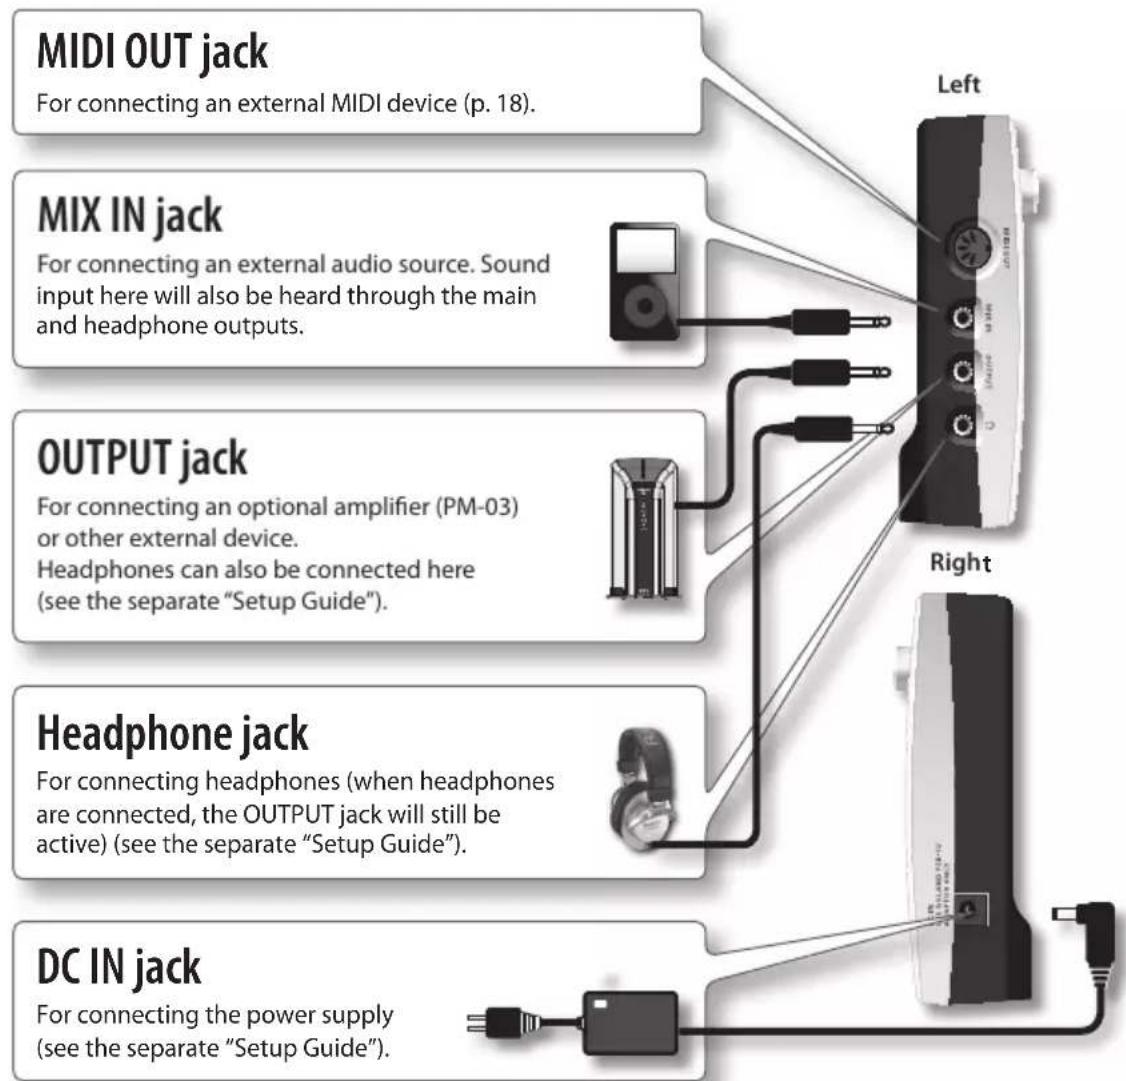
Side Panel
- To prevent malfunction and damage to your speakers, always be sure to turn the volume all the way down on all your equipment, then switch the power off on everything before you make any connections.
Playing along with music (MIX IN jack)
If you connect an audio player to the MIX IN jack, you can play along with your favorite songs as the sound will be mixed with the drum sounds and output together. Enjoy playing along with your favorite music!
- Use your audio player's volume control to adjust the sound level.
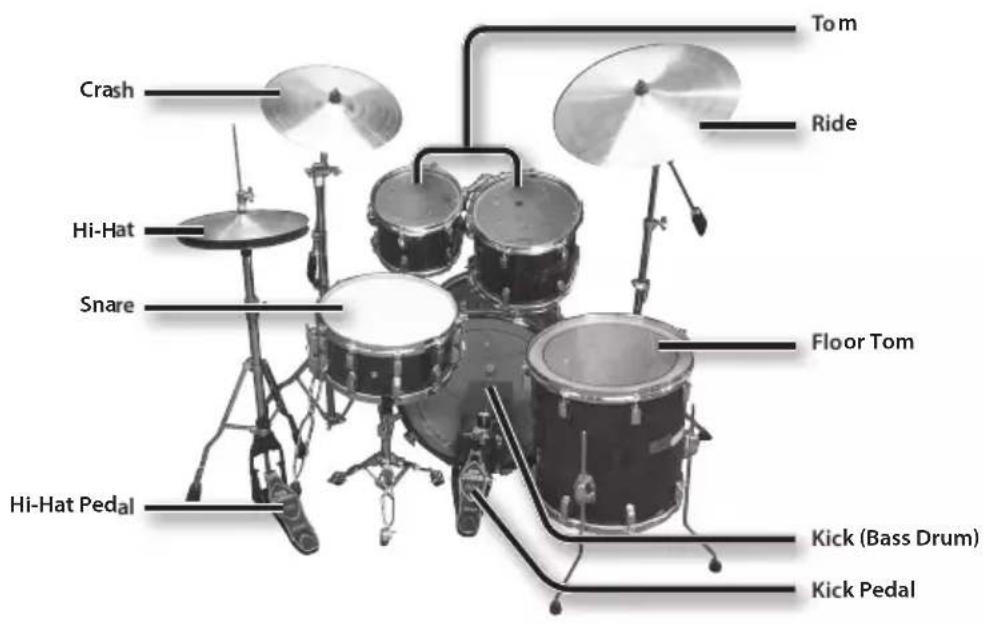
Introducing the Drum Set
Playing drums is not only fun, but just about anyone can easily start playing — they make sound when you simply hit them! Drums create the rhythmic foundation of music and are vital in maintaining the tempo and groove of the entire band.
Drum Set Elements
Here are some basic terms related to drum sets.
- The indications in parentheses () show the names used on the HD-3.
Bass Drum (Kick)
Played with a kick pedal, it's the largest drum in the kit.
Snare Drum
The snare drum is the main "voice" of a drum kit.
Hi-Hat/Hi-Hat Pedal
An acoustic hi-hat uses 2 cymbals mounted on a hi-hat stand.
Pressing the hi-hat pedal opens and closes it.
- The HD-3 uses a single pad.
Tom (Tom 1, Tom 2)
These are usually mounted above the bass drum.
Floor Tom (Tom 3)
Sometimes called a bass tom, it either stands on it's own legs or is mounted on a stand.
Ride Cymbal
Usually mounted on the right side of the kit, the ride cymbal is principle elements in keeping time.
Crash Cymbal
Smaller than the ride, the crash cymbal is mainly used for accents.
Acoustic Drum
HD-3
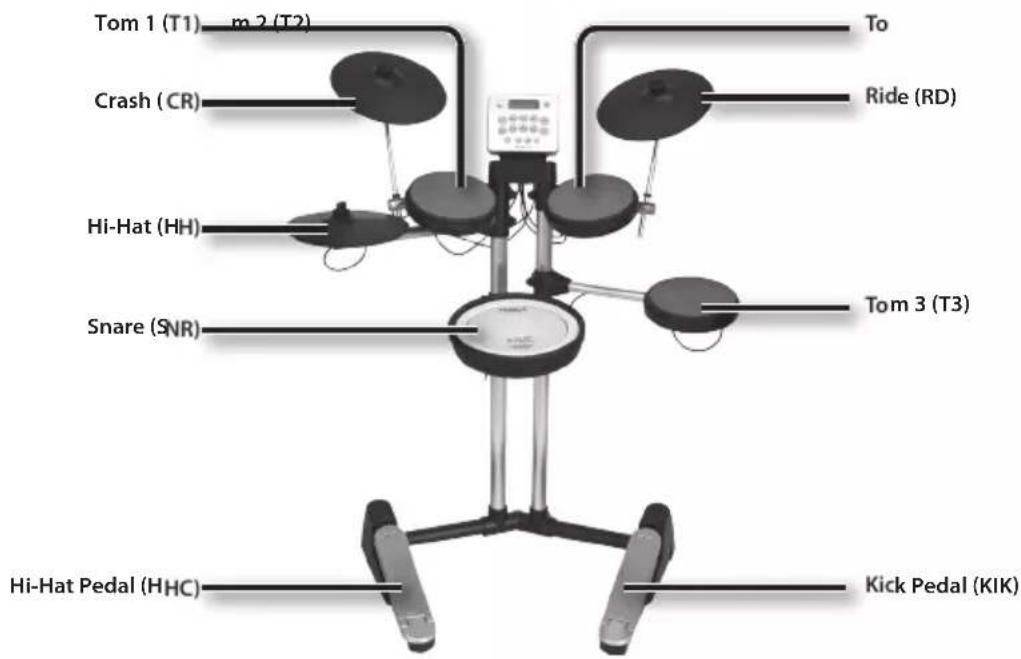
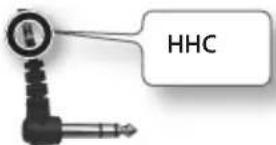
- Letters and numbers in parentheses ( ) relate to the cable labeling.
The Basics of Playing
Drums are played using both hands and both feet. Here we'll explain how to hold the sticks and use the pedals.
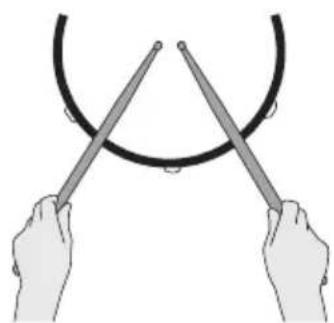
Holding the Sticks
The most common way to hold the sticks is called the "matched grip" as shown in the illustrations below.
Left hand
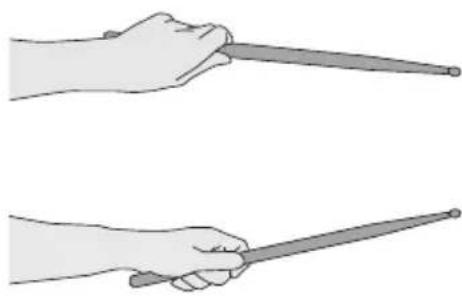
Right hand

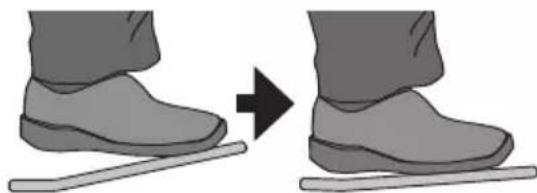
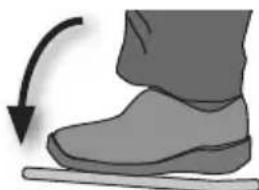
Using the Kick Pedal
The kick pedal can be pressed in either of two ways: "heel up" or "heel down."
Heel down
In this method, the entire bottom of your foot from heel to toe stays in contact with the pedal. Use your ankle joint to make your toes push down the pedal. This method allows more precise control of the volume, and is often used in jazz and bossa nova.

Heel up
In this method, your heel floats above the pedal. With your heel off the pedal, lower your entire foot to push down the pedal. This method applies the full weight of your foot to the pedal, making it easier for you to produce a stronger sounds than the heel down method. This is often used in rock and pop.
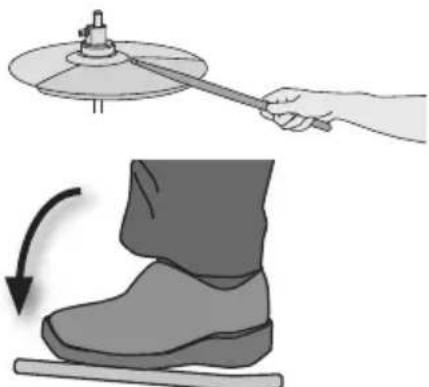
Using the hi-hat
In an acoustic drum set, the hi-hat consists of two cymbals placed facing each other vertically on a hi-hat stand. The two
cymbals can be closed together by pressing the pedal.
A variety of playing techniques are possible, such as playing the cymbals with the pedal and/or playing them with sticks.
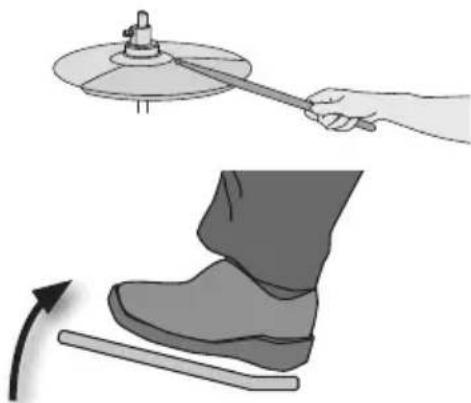
When you press the pedal, the two cymbals will come together (closed). When you release the pedal, the two cymbals will separate (opened).
The HD-3 lets you use five different hi-hat performance techniques.
Closed
With the hi-hat pedal pressed firmly, strike the pad with a stick. A short "chick" sound will be heard.
Half-open
With the hi-hat pedal pressed gently, strike the pad with a stick. A slightly longer "swish" sound will be heard.
Open
With the hi-hat pedal completely released, strike the pad with a stick. An even longer "sound" than the half-open sound will be heard.
Foot closed
Just press the pedal without using a stick. This sound will be softer and shorter than the closed sound played with a stick. Useful for keeping time with this tight sound.
Foot splash
Press and immediately release the pedal without using a stick.
This is equivalent to momentarily clashing the two cymbals of an acoustic hi-hat. It produces a "splash" sound that is softer than the open strike.
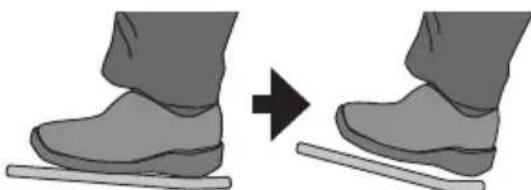
How to Read Drum Notation
Here's an example of typical notation used for a drum set. This example is a basic 8-beat pattern often used in rock and pop.
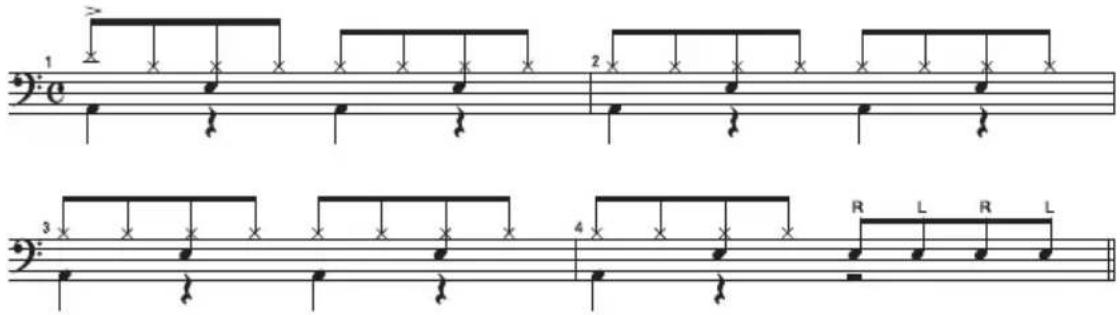
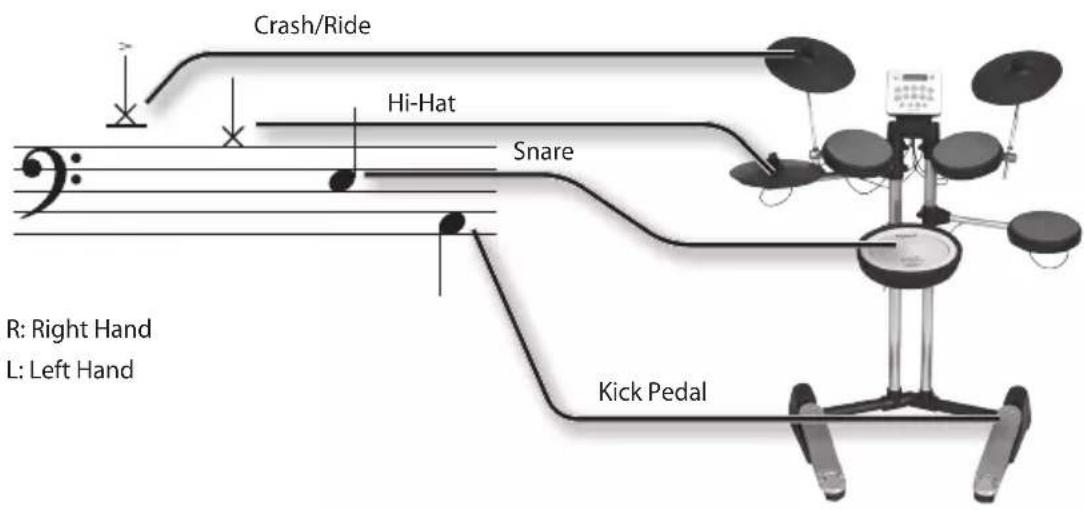
- The crash and ride are written in the same position of the notation. Notes with the accent mark " "are played on the crash, and notes without the accent mark are played on the ride.
- The hi-hat part can also be substituted with the ride cymbal part.
Switching the Power On and Off
For details on connecting the HD-3 sound module, refer to the separate "Setup Guide."
-
Once the connections have been completed, turn on power to your various devices in the order specified. By turning on devices in the wrong order, you risk causing malfunction and/or damage to speakers and other devices.
-
Make sure that the HD-3's [VOLUME] knob, and that of any connected drum monitor, is set to the minimum level.
- Hold down the [POWER] switch of the HD-3 sound module to turn on the unit. To turn off the unit, hold down the [POWER] switch for several seconds.
-
Before switching the power on/off, always be sure to turn the volume down. Even with the volume turned down, you might hear some sound when switching the power on/off. However, this is normal and does not indicate a malfunction.
-
Turn on the power of the connected drum monitor.
-
Raise the volume of both to get the sound level required.
-
This unit is equipped with a protection circuit. A brief interval (a few seconds) after power up is required before the unit will operate normally.
- Turn the power off by reversing the order in which you turned the power on.
Selecting a Kit
A drum kit consists of sounds assigned to each pad. In some cases, the sound will change depending upon your playing dynamics.
- Press one of the kit buttons ([1]-[10]).
Pressing these buttons will call up different kits.
- Press the [VARIATION] button.
Variation kits are provided for each kit. Pressing the [VARIATION] button will switch to the variation kit of the selected drum kit.
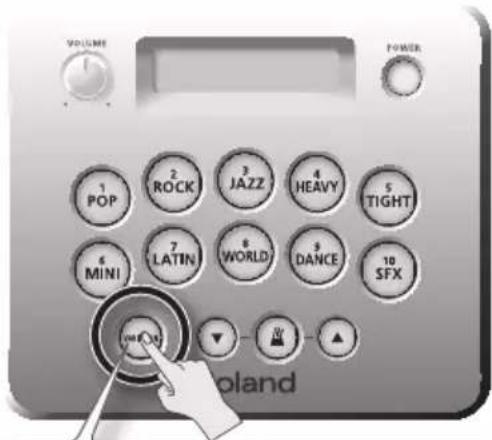
The [VARIATION] button will light if a variation kit is selected.
Listening to Patterns
Here's how to listen to a performance example (pattern) using the drum kit.
- Before playing back a pattern, lower the volume of the HD-3. The volume of these patterns may be louder than when you play the kit normally, and you do not want to risk damage to your ears or connected equipment.
1. Press and hold one of the Kit Buttons ([1]–[10]) for a few seconds.
A pattern using this current kit will play. If you press the [VARIATION] button, the pattern for that variation kit will play.
MEMO
Each pattern will play at it's default tempo (set at the factory). If you want to change the tempo, play back the pattern and use the [▼][▲] buttons to adjust the tempo.
- You can NOT play the pads when a pattern is playing.
- No data for the music that is played will be output from MIDI OUT jack.
2. To stop pattern playback, press any kit button ([1]-[10]).
Playing Along With the Metronome
Here's how you can play the kit while listening to the metronome.
This is the best way to practice and learn to play at a steady tempo.
1. Press button.
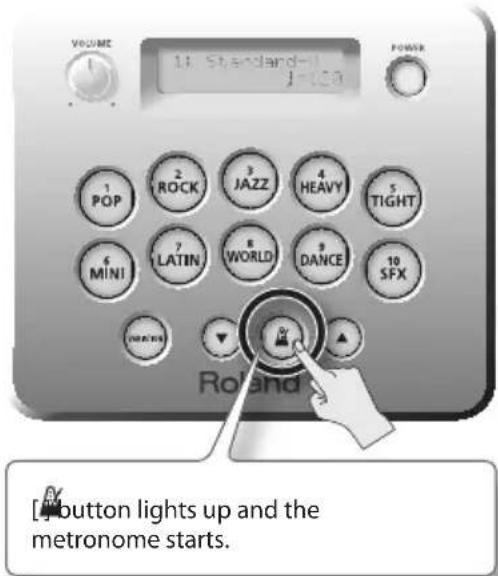
2. Use the [Y] buttons to adjust the metronome speed.
![ROLAND HD3 - Use the [Y] buttons to adjust the metronome speed. - 1](/content/2026/02/395143/images/aaace5a9bfd5b0e644b1658676c764360a9dd4798ec3fb804f833e1ce6c1f94d.jpg)
The display will indicate the tempo.
Range: 40-250
![ROLAND HD3 - Use the [Y] buttons to adjust the metronome speed. - 2](/content/2026/02/395143/images/ad91413c43924634aeea187559511a5a5eadf3c89e45478fb78d2cc2bdc506dc.jpg)
MEMO
You can change the sound and volume of the metronome. For details, refer to "Changes the sound of the metronome" (p. 15).
TIPS
You can rapidly adjust the metronome volume by holding down the [ ] button and using the [ ] buttons.
The Edit screens allow you to make various settings for the HD-3.
Basic Operation in the Edit Screens
In the edit screens, you'll use the following procedure to make settings.
- While continuing to hold down the [VARIATION] button, press one of the kit buttons ([1]-[10]) to select the parameter that you want to edit.
Current value of the selected parameter will appear.
If you've selected pad sensitivity (Pad Sens) or the note number (MIDI Note) transmitted by that pad, hitting any pad or pressing the pedals will allow you to edit the parameters of that pad.
Reference
For details on each item, refer to "Parameter List" (p. 15).
-
If you hold down the [VARIATION] button for a while, you'll be presented with a message asking you to select a parameter by pressing one of the kit buttons ([1]-[10]).
-
Use the [Y] buttons to edit the value.
If you press [and]multaneously, the parameter will revert to its default value.
- Press the [VARIATION] button or one of the kit buttons ([1]-[10]) to exit the edit screen.
Parameter List
| Parameter Value Explanation | ||
| 1 | Metronome Sound | |
| Changes the sound of the metronome You have three different sound choices for the metronome: click, cowbell, and maracas. | ||
| CLICK (default) Click | ||
| COWBELL Cowbell | ||
| MARACAS Maracas | ||
| 2 | Metronome Volume | 1-10 (default: 5) |
| Adjust the metronome volume This adjusts the volume of the metronome. You can also adjust the volume of the metronome from an ordinary screen by holding down the [ ] button and pressing the [ ] button. | ||
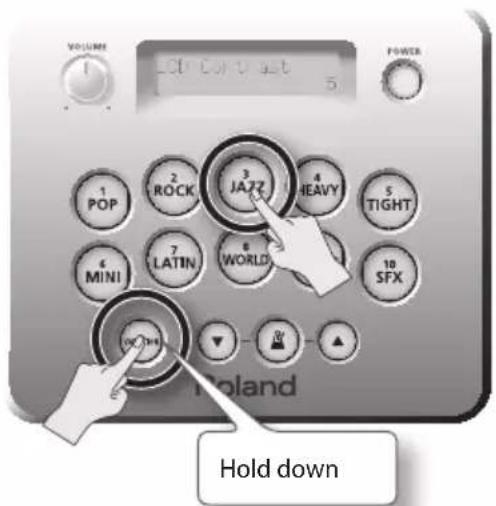
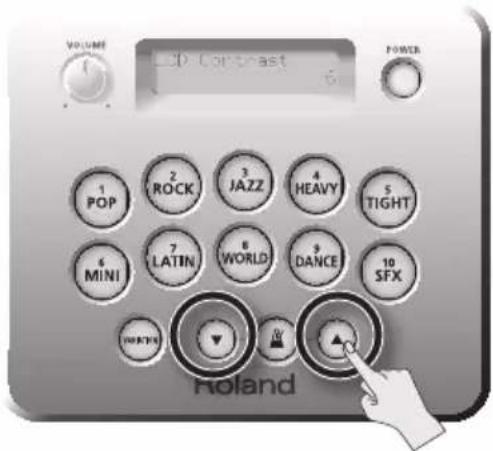
| 3 LCD Contrast | 1-10 (default: 5) | Adjust the contrast of the display This adjusts the contrast of the characters in the display. |
| 4 Auto Off | Automatically turn the HD-3 off (auto off) With the factory settings, the HD-3 will automatically be switched off 30 minutes after you stop playing or operating the unit. | |
| OFF The HD-3 will remain on. | ||
| 10 min, 30 min, 240 min (default: 30 min) | The HD-3 will automatically turn off when no operation has been performed for the specified time. | |
| 5 L-R Exchange | OFF, ON (default: OFF) | Exchange the pad settings for left-handed players This changes the HD-3's settings for left-handed use. If this is "ON," the following pads will be exchanged between left and right. • Crash and ride • Tom 1 and tom 2 • Hi-hat control pedal and kick pedal * You'll need to remove the Tom 3 pad and the hi-hat pad, and exchange them. See "Setting-up the HD-3 for Left-handed Use" (p. 21). |
| 6 Pad Sens | -5 - +5 (default: 0) | Adjust the pad sensitivity This adjusts the sensitivity of each pad. For example if the pad sensitivity value is raised, even children, whose playing strength is less developed will be able to produce maximum volume. In step 2 of "Basic Operation in the Edit Screens" (p. 14), strike the pad whose setting you want to edit. After you've selected the pad, use [▼]按钮 to edit the value. |
| 7 MIDI Note No. | Change the note number of the pad You can change the MIDI note number of each of the HD-3's pads. In step 2 of "Basic Operation in the Edit Screens" (p. 14), strike the pad whose setting you want to edit. After you've selected the pad, use [▼]按钮 to edit the value. | |
| OFF No note number is assigned. | ||
| 0-127 | The selected note number is assigned. For the default settings of each pad, refer to "About MIDI" (p. 18). | |
| 8 MIDI X-Stick | Set the note number for cross sticking Here you can select whether the note number that has been set for SNARE Rim will be output, or note number 37 will be output when the cross-stick sound is produced. | |
| OFF (default) | Choose this setting when you only need rim shot performance data, when using computer software, games, etc. (The note number that has been set for SNARE Rim will always be output.) | |
| ON | Choose this setting when sounding an external drum sound module. (Note number 37 will be output when the cross-stick sound is produced.) | |
| 10 Factory Reset | Reset the factory settings Resets the HD-3 to the factory-set condition. When "Factory Reset = OK!" appears in the display, press [▲]. When "Sure?" appears, press [▲ again]. If you decide to cancel, press [▼]. | |
Drum Kit Sound List
| No. | Kit Name | Kick Snare | Tom 1 Tom | 2 Tom 3 | Hi-Hat Crash | Ride | ||||
| 1 | Normal | Standard-V | Solid Kick | Bright Snare | Wood Tom1 | Wood Tom3 | Wood Tom4 | Medium Hi-Hat | Thin Crash | Bright Ride |
| Variation | Lite Pop Sol | d Kick | Bright Snare | Wood Tom1 | Cowbell | Wood Tom2 | Tambou-rine Hi-Hat | Splash/ Crash | Bright Ride/ Crash | |
| 2 | Normal | Hard Rock | Heavy Kick | Metal Snare | Wood Tom2 | Wood Tom3 | Wood Tom4 | Heavy Hi-Hat | Medium Crash | Heavy Ride/ Crash |
| Variation | Stage | Solid Kick | Metal Snare | Wood Tom2 | Wood Tom3 | Wood Tom4 | Heavy Hi-Hat | Power Crash | Heavy Ride/China | |
| 3 | Normal | Vintage | Vintage Kick | Wood Snare | Vintage Tom1 | Vintage Tom2 | Vintage Tom3 | Dark Hi-Hat | Sizzle Ride | Bright Ride |
| Variation | Brushes | Vintage Kick | Brush S Brush | Tom1 Brush | Tom2 Brush | Tom3 | Brush Hi-Hat | Brush Sizzle Ride | Brush Ride | |
| 4 | Normal | Double Bass | Blast Kick | Heavy Snare | Solid Tom1 | Solid Tom2 | Solid Tom3 | Medium Hi-Hat | Effect Cymbal/ Crash | Heavy Ride/China |
| Variation | Power | Heavy Kick | Heavy Snare | Wood Tom4 | Wood Tom4 | Wood Tom4 | Medium Hi-Hat | Power Crash | Heavy Ride/Crash | |
| 5 | Normal | Funky Jam | Slap Bass & Kick | Vintage Snare | Dry Tom1 | Slap Bass | Dry Tom3 | Cutting Gt.&Hi-Hat | Cutting Gt./ Crash | Distortion Gt. |
| Variation | Bright | Dry Kick | Vintage Snare | Dry Tom1 | Dry Tom2 | Dry Tom3 | Medium Hi-Hat | Splash/ Crash | Bright Ride/ Crash | |
| 6 | Normal | Compact | Compact Kick | Wood Snare | Fiber Tom1 | Fiber Tom2 | Fiber Tom3 | Light Hi-Hat | Paper Crash | Bright Ride/ Crash |
| Variation | Jungle | Compact Kick | Wood Snare | Frame Tom | Hard Comp S | Fiber Tom3 | Tambou-rine Hi-Hat | Effect Cymbal/ Splash | Bright Ride/Effect Cymbal | |
| 7 | Normal | Latin Groove | Heavy Kick | Wood Snare | Bongo | Conga | Timbale | Medium Hi-Hat | Splash | Bright Ride/ China |
| Variation | Latin Perc | Surdo | Pandeiro | Bongo | Conga | Timbale | Jingle Hi-Hat | Guiro | Agogo | |
| 8 | Normal | World Perc | Cajon | Cajon | Tabla | Baya | Djembe | Tambou-rine Hi-Hat | Crotale / Rain Stick | Effect Cymbal |
| Variation | Africa | Heavy Kick | Wood Snare | Pot Drum | Djembe | Bendir | Tambou-rine Hi-Hat | African Jingle | Effect Cymbal | |
| 9 | Normal | Dance Beat | Dance Kick | Clap Snare | Dense Click | Radio Tom | Super Low | Dance Hi-Hat | Scratch/ Sweep Cymbal | Dance Cymbal |
| Variation | Electronic | TR-808 Kick | TR-808 Snare | CR-78 Bongo | TR-808 Tom1 | TR-808 Tom2 | Elec Hi-Hat | TR-808 Cowbell/ Crash | Elec Cymbal | |
| 10 | Normal | Beat Box | Voice Kick | Snap/Clap | Voice-Dat | Voice-Doot | Heart Beat | Voice Hi-Hat | Voice-Ahaaa/ Cymbal | Voice-Tun/ Haaa |
| Variation | Toy Box | Elephant Kick | Toy Snare | Hoo... | Droid Voice | Jet Stream | Industrial Hi-Hat | Twinkle Bell/ Hand Cymbal | Toy Bell/ Nantoka! | |
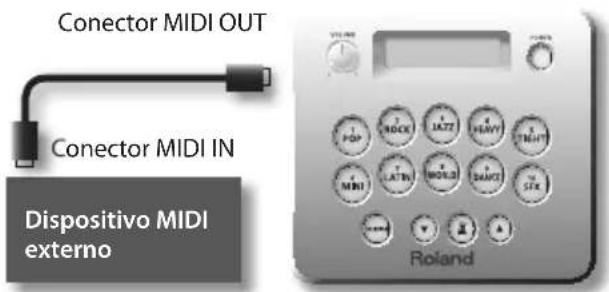
About MIDI
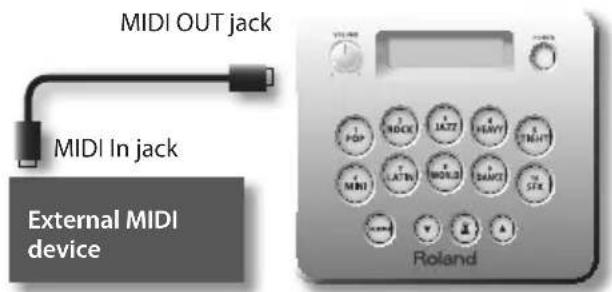
You can connect a MIDI sound module or sequencer to the HD-3's MIDI OUT connector.
By connecting an external sound module to the HD-3's MIDI OUT connector you can play sounds on that external module.
If you connect the MIDI OUT to a sequencer, you can record your performance.
You can also use the HD-3 as a controller for games that support MIDI.
| Item Settings | |||
| MIDI transmit channel 10 | |||
| Hi-Hat Pedal | Position data is transmitted using control change number 4 (foot controller). | ||
| Note number produced when you strike a pad (default) | Pad Note Number | ||
| Snare Head 38 | |||
| Snare Rim 40 | |||
| Tom 1 48 | |||
| Tom 2 45 | |||
| Tom 3 43 | |||
| Crash Bow 49 | |||
| Crash Edge 55 | |||
| Ride Bow 51 | |||
| Ride Edge 53 | |||
| Hi-Hat Open Bow 46 | |||
| Hi-Hat Open Edge 26 | |||
| Hi-Hat Close Bow 42 | |||
| Hi-Hat Close Edge 22 | |||
| Hi-Hat Foot Close | 44 | ||
| Kick Pedal | 36 | ||
| Item Settings | |||
| Program Change | The following program change numbers are transmitted when you switch drum kits. | ||
| Drum Kit Program Change Number | |||
| 1 | Normal 1 | ||
| Variation 11 | |||
| 2 | Normal 2 | ||
| Variation 12 | |||
| 3 | Normal 3 | ||
| Variation 13 | |||
| 4 | Normal 4 | ||
| Variation 14 | |||
| 5 | Normal 5 | ||
| Variation 15 | |||
| 6 | Normal 6 | ||
| Variation 16 | |||
| 7 | Normal 7 | ||
| Variation 17 | |||
| 8 | Normal 8 | ||
| Variation 18 | |||
| 9 | Normal 9 | ||
| Variation 19 | |||
| 10 | Normal 10 | ||
| Variation 20 | |||
Troubleshooting
| Problem Items to check Action | ||
| Power does not turn on | AC adaptor is connected properly? Correctly connect the AC adaptor (p. 5). | |
| No sound | Could the [VOLUME] knob be turned all the way to the left? | Turn the [VOLUME] knob toward the right (p. 4). |
| Are all pad cables connected correctly? | Make sure that the pad connections are correct, and that each pad is connected to the proper input. (See the separate "Setup Guide.") | |
| Are your headphones connected to theophone jack or the OUTPUT jack? | Make sure that the connections are correct (p. 5). | |
| Could the cable be connected to an output jack (instead of the input) of the connected device? | Refer to the owner's manual of the device you're using, and check that you're using the correct jack. | |
| Is the input setting correct on the connected device? | Refer to the owner's manual of the connected device, and check its input setting. | |
| Sound is too soft/ loud when playing | Could the pad sensitivity be set too low or too high? | Check the sensitivity adjustments (p. 16). |
| Double triggering occurs | Could a cable be touching a pad? | Use the cable ties to fasten the cables so that they do not touch the pads. When doing so, be sure that the cables are not strained by the movement of the pads when you strike them. |
| Are the cymbal knob and cymbal felt attached correctly? | Double triggering can occur if the cymbal knob or cymbal felt are loose. Tighten the cymbal knob more securely so that the double triggering does not occur. (See the separate "Setup Guide.") | |
| No Sound from external audio source connected to the MIX IN jack | Could you be using a connection cable that contains a resistor? | If you are using a connection cable that contains a resistor, this will reduce the volume. Use a connection cable that does not contain a resistor. |
| The connected cable might be broken. | Replace the cable. | |
| Is the connected device powered-on? | Check the power of the connected device. | |
| Is the volume level of the connected device turned down completely? | Refer to the owner's manual for the device, then set the volume. | |
| Sound is distorted in headphones | Sometimes, setting the headphone output too high using certain tones can make it appear that the sound is somewhat distorted. | Use the [VOLUME] knob to decrease the volume. This alleviates the distortion (p. 4). |
| Output sound is distorted | Could the volume be too high? | Use the [VOLUME] knob to decrease the volume. Alternatively, lower the input volume of the amplified speaker system that's connected. |
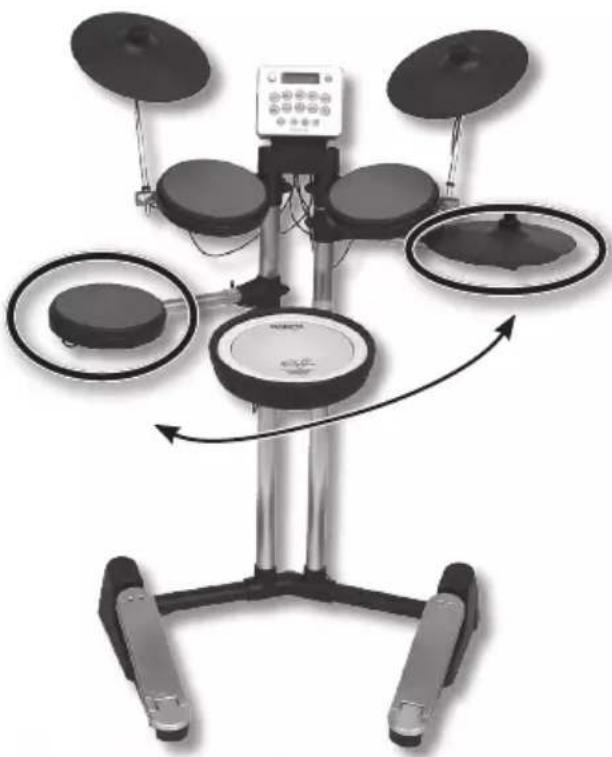
Setting-up the HD-3 for Left-handed Use
The HD-3 lets you change the setup for left-handed use by exchanging the position of tom 3 and the hi-hat.
-
Disconnect the hi-hat and tom 3 cable, and detach the hi-hat and tom 3 from the arms.
-
For details on detaching and attaching the pads, refer to "Setup Guide."
-
Exchange the hi-hat and tom 3, and attach them to the arms.
-
When attaching tom 3, make sure that the angle is correct.
-
Reconnect the hi-hat and tom 3 cables.
Hi-Hat (HH)
Tom 3 (T3)
- Adjust the height of the hi-hat and tom 3 arms.
- Switch the settings of the pads for left-handed use.
As described in "Basic Operation in the Edit Screens" (p. 14), turn "L-R Exchange" ON.
Reference
"Exchange the pad settings for left-handed players" (p. 15)
Roland HD-3: V-Drums Lite
| Kit Configuration Snare, Tom | x 3, Crash, Ride, Hi-Hat, Hi-Hat Pedal, Kick Pedal | |
| Drum Kits 20 | ||
| Patterns 20 | ||
| Metronome | Tempo 40 – 250 | |
| Sounds 3 types | ||
| Volume 10 levels | ||
| Controls | [POWER] button | |
| Kit button x 10 | ||
| [VARIATION] button | ||
| Metronome button | ||
| [▼] button | ||
| [▲] button | ||
| [VOLUME] knob | ||
| Display 16 Characters, 2 lines | (backlit LCD) | |
| Connectors | OUTPUT jack (Stereo miniature phone type) | |
| Headphone jack (Stereo miniature phone type) | ||
| MIX IN jack (Stereo miniature phone type) | ||
| MIDI OUT jack | ||
| Trigger Cable connector (DB-25 type) | ||
| * (*1) OUTPUT jack can be connected with headphones. | ||
| Current Draw 500 mA | ||
| Dimensions | 950 (W) x 560 (D) x 1170 (H) mm37-7/16 (W) x 22-1/16 (D) x 46-1/16 (H) inches | |
| Weight 14.5 kg / 32 lbs (Excluding AC Adaptor) | ||
| Accessories | Owner's Manual, Setup Guide, Drum Key, Thumb Screw for Sound Module x 2,Screw for Foot Pipe x 4, Cable Tie, Trigger Cable (Prepositioned in Drum Stand),AC Adaptor, Audio Cable | |
| Options (sold separately) | Personal Drum Monitor PM-03 | |
| V-Drums Accessory Package DAP-1 | ||
| V-Drums Mat TDM-1 | ||
- In the interest of product improvement, the specifications and/or appearance of this unit are subject to change without prior notice.

HD-3
V-Drums Lite
Bedienungsanleitung
Roland
Eigenschaften
"Drum-Kit - Soundliste" (S. 17)
Hi-Hat (HH)
Tom 3 (T3)
Roland HD-3 V-Drums Lite
Bascule (foot splash)
Roland HD-3 V-Drums Lite
Roland HD-3 V-Drums Lite
Alternatively, you can use the HD-3 controller to control the game.
Roland HD-3 V-Drums Lite
Roland HD-3 V-Drums Lite
Hi-Hat (HH)
Tom 3 (T3)