PK6 - Hi-fi system ROLAND - Free user manual and instructions
Find the device manual for free PK6 ROLAND in PDF.
| Product type | MIDI dynamic pedalboard |
| Brand | Roland |
| Model | PK-6 |
| Pedalboard | 13 dynamic-sensitive keys |
| Modes | MONO, POLY, DRUM, MIDI CONTROLLER |
| Functions | Hold, Bass Octaver, Portamento, Transpose, Octave, Program Change, MIDI Merge |
| Display | 3-character display |
| Connectors | MIDI IN, MIDI OUT, MIDI THRU, PK OUT, EXTERNAL PEDAL, DC IN |
| Power supply | 6 LR6 AA batteries, PSB-1U AC adapter (optional) or via PK cable |
| Battery life | Approximately 1 hour of continuous use |
| AC adapter | PSB-1U (optional) |
| External pedal | Jack for expression pedal (Roland EV-5) or foot switch (DP, FS-5U) |
| Safety | Do not disassemble, use specified adapter, avoid liquids, follow instructions |
| Maintenance | Soft dry cloth, mild non-abrasive detergent |
| Compliance | European EMC Directive 2004/108/EC, Class B, Canadian standards |
| Included accessories | Owner's manual, batteries (for testing) |
| Options | PSB-1U AC adapter, EV-5 expression pedal, DP/FS-5U foot switch |
| Repairability | Entrust to an authorized Roland service center |
Frequently Asked Questions - PK6 ROLAND
User questions about PK6 ROLAND
0 question about this device. Answer the ones you know or ask your own.
Ask a new question about this device
Download the instructions for your Hi-fi system in PDF format for free! Find your manual PK6 - ROLAND and take your electronic device back in hand. On this page are published all the documents necessary for the use of your device. PK6 by ROLAND.
USER MANUAL PK6 ROLAND
This product complies with the requirements of European Directive EMC 2004/108/EC.
This equipment has been tested and found to comply with the limits for a Class B digital device, pursuant to Part 15 of the FCC Rules. These limits are designed to provide reasonable protection against harmful interference in a residential installation. This equipment generates, uses, and can radiate radio frequency energy and, if not installed and used in accordance with the instructions, may cause harmful interference to radio communications. However, there is no guarantee that interference will not occur in a particular installation. If this equipment does cause harmful interference to radio or television reception, which can be determined by turning the equipment off and on, the user is encouraged to try to correct the interference by one or more of the following measures:
Reorient or relocate the receiving antenna.
Increase the separation between the equipment and receiver.
Connect the equipment into an outlet on a circuit different from that to which the receiver is connected.
Consult the dealer or an experienced radio/TV technician for help.
This device complies with Part 15 of the FCC Rules. Operation is subject to the following two conditions:
(1) This device may not cause harmful interference, and
(2) This device must accept any interference received, including interference that may cause undesired operation.
Unauthorized changes or modification to this system can void the users authority to operate this equipment.
This equipment requires shielded interface cables in order to meet FCC class B Limit.
For Canada
NOTICE
This Class B digital apparatus meets all requirements of the Canadian Interference-Caising Equipment Regulations.
AVIS
This product contains chemicals known to cause cancer, birth defects and other reproductive harm, including lead.
For the UK
IMPORTANT: THE WIRES IN THIS MAINS LEAD ARE COLOURED IN ACCORDANCE WITH THE FOLLOWING CODE.
BLUE: NEUTRAL
BROWN: LIVE
As the colours of the wires in the mains lead of this apparatus may not correspond with the coloured markings identifying the terminals in your plug, proceed as follows:
The wire which is coloured BLUE must be connected to the terminal which is marked with the letter N or coloured BLACK.
The wire which is coloured BROWN must be connected to the terminal which is marked with the letter L or coloured RED.
Under no circumstances must either of the above wires be connected to the earth terminal of a three pin plug.
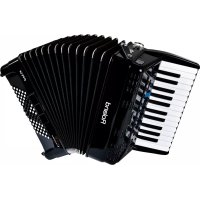
Roland
PK-6
Owner's Manual
Thank you, and congratulations on your choice of the Roland PK-6 Dynamic MIDI Pedal.
Features
- T hirteen-note pedal keyboard with dynamics
- Easy to use and to set up, thanks to its display.
- F features four modes: MONO, POLY, DRUM, and MIDI CONTROLLER.
The PK-6 can be used to transmit chords (polyphonic mode) or notes (monophonic mode) to an external arranger keyboard, MIDI module, organ, etc. It may also come in handy for guitar and bass players who need to add notes or chords to their parts and therefore wish to control a MIDI-compatible sound module. After selecting a drum set on the receiving MIDI instrument, the PK-6 can even be used to play drum parts with your feet. In addition, the PK-6 can transmit other MIDI commands that can be used to control Music Style/Rhythm playback on an arranger module (like the BK-7m) or an arranger keyboard.
HOLD, OCTAYER BASS and PORTAMENTO footswitches.
These footswitches allow you to hold the last note you played, to add a note one octave below the note you actually play and to create glides between one note and the next.
- Convenient SHIFT footswitch for instant access to the PK-6's parameters.
- You can decide to control parameters like expression, filter cutoff frequency, resonance, etc., with and external foot switch (EXTERNAL PEDAL jack) by connecting an optional expression pedal (Roland EV-5), an optional pedal switch (Roland DP-series) or an optional foot switch (BOSS FS-5U).
- The MIDI Merge function (MIDI IN to MIDI OUT) combines MIDI messages the PK-6 receives from an external MIDI device with the ones you generate by playing it and transmits all MIDI data to a receiving MIDI device.
T hree-way power supply.
The PK-6 can be powered using 6 alkaline AA-type batteries (supplied), using an optional adaptor or via its PK OUT socket (if you connect it to device that has a PK IN socket).
The explanations in this manual include illustrations that depict what should typically be shown by the display. Note, however, that your unit may incorporate a newer, enhanced version of the system (e.g., include newer sounds), so what you actually see in the display may not always match what appears in the manual.
Before using this instrument, carefully read "Using the unit safely" auf S. 4 and "Important notes" auf S. 6. Those sections provide information concerning the proper operation of the PK-6. Additionally, in order to feel assured that you have gained a good grasp of every feature provided by your new unit, the manual should be read in its entirety. The manual should be saved and kept on hand as a convenient reference.
USING THE UNIT SAFELY
INSTRUCTIONS FOR THE PREVENTION OF FIRE, ELECTRIC SHOCK, OR INJURY TO PERSONS
About WARNING and CAUTION Notices
| ▲WARNING | Used for instructions intended to alert the user to the risk of death or severe injury should the unit be used improperly. |
| ▲CAUTION | Used for instructions intended to alert the user to the risk of injury or material damage should the unit be used improperly. * Material damage refers to damage or other adverse effects caused with respect to the home and all its furnishings, as well to domestic animals or pets. |
About the Symbols
| A | The \( \Delta \) symbol alerts the user to important instructions or warnings. The specific meaning of the symbol is determined by the design contained within the triangle. In the case of the symbol at left, it is used for general cautions, warnings, or alerts to danger. |
| ① | The \( \otimes \) symbol alerts the user to items that must never be carried out (are forbidden). The specific thing that must not be done is indicated by the design contained within the circle. In the case of the symbol at left, it means that the unit must never be disassembled. |
| E | The ● symbol alerts the user to things that must be carried out. The specific thing that must be done is indicated by the design contained within the circle. In the case of the symbol at left, it means that the power- cord plug must be unplugged from the outlet. |
ALWAYS OBSERVE THE FOLLOWING
WARNING
Do not disassemble or modify by yourself
- Do not open (or modify in any way) the unit or its AC adaptor.

Do not repair or replace parts by yourself.
- Do not attempt to repair the unit, or replace parts within it (except when this manual provides specific instructions directing you to do so). Refer all servicing to your retailer, the nearest Roland Service Center, or an authorized Roland distributor, as listed on the "Information" page

Don't use or store in locations that are
- Subject to temperature extremes (e.g., direct sunlight in an enclosed vehicle, near a heating duct, on top of heat-generating equipment); or are
- Damp (e.g., baths, washrooms, on wet floors); or are
- Exposed to steam or smoke; or are
- Subject to salt exposure; or are
- Humid; or are
- Exposed to rain; or are
Dusty or sandy; or are - Subject to high levels of vibration and shakiness.


Don't place in an unstable location
- Make sure you always have the unit placed so it is level and sure to remain stable. Never place it on stands that could wobble, or on inclined surfaces.

Use only the specified adaptor and the correct voltage
- Be sure to use only the PSB-1U AC adaptor, and make sure the line voltage at the installation matches the input voltage specified on the AC adaptor's body. Other AC adaptors may use a different polarity, or be designed for a different voltage, so their use could result in damage, malfunction, or electric shock.

WARNING
Use only the PSB-1U AC adaptor power cord
- Use only the PSB-1U power-supply cord. Also, the supplied power cord must not be used with any other device.

Do not bend the power cord or place heavy objects on it
- Do not excessively twist or bend the power cord, nor place heavy objects on it. Doing so can damage the cord, producing severed elements and short circuits. Damaged cords are fire and shock hazards!

Don't allow foreign objects or liquids to enter the unit; never place containers with liquid on the unit
- Never allow foreign objects (e.g., flammable material, coins, pins) or liquids (e.g., water or juice) to enter this unit. Doing so may cause short circuits, faulty operation, or other malfunctions.

Turn off the unit if an abnormality or malfunction occurs
- I immediately turn the power off, remove the AC adaptor from the outlet, and request servicing by your retailer, the nearest Roland Service Center, or an authorized Roland distributor, as listed on the "Information" page when:
The AC adaptor, the power-supply cord, or the plug has been damaged; or
If smoke or unusual odor occurs
- Objects have fallen into, or liquid has been spilled onto the unit; or
The unit has been exposed to rain (or otherwise has become wet); or
The unit does not appear to operate normally or exhibits a marked change in performance.

WARNING
Adults must provide supervision in places where children are present

- W hen using the unit in locations where children are present, be careful so no mishandling of the unit can take place. An adult should always be on hand to provide supervision and guidance.
Do not drop or subject to strong impact
- Protect the unit from strong impact.
(Do not drop it!)

Do not share an outlet with an unreasonable number of other devices

- Do not force the unit's power-supply cord to share an outlet with an unreasonable number of other devices. Be especially careful when using extension cords—the total power used by all devices you have connected to the extension cord's outlet must never exceed the power rating (watts/amperes) for the extension cord. Excessive loads can cause the insulation on the cord to heat up and eventually melt through.
Do not use overseas
- Before using the unit in a foreign country, consult with your retailer, the nearest Roland Service Center, or an authorized Roland distributor, as listed on the "Information" page.

Handle batteries carefully
- Batteries must never be recharged, heated, taken apart, or thrown into fire, or water.
- Never expose batteries to excessive heat such as sunshine, fire or the like.
Incorrect handling of batteries, rechargeable batteries, or a battery charger can cause leakage, overheating, fire, or explosion. Before use, you must read and strictly observe all of the precautions that accompany the batteries, rechargeable batteries, or battery charger. - If used improperly, batteries may explode or leak and cause damage or injury. In the interest of safety, please read and observe the following precautions.
- Carefully follow the installation instructions for batteries, and make sure you observe the correct polarity.
- Avoid using new batteries together with used ones. In addition, avoid mixing different types of batteries.
- Remove the batteries whenever the unit is to remain unused for an extended period of time.
- Never keep batteries together with metallic objects such as ballpoint pens, necklaces, hairpins, etc.
- Used batteries must be disposed of in compliance with whatever regulations for their safe disposal that may be observed in the region in which you live
CAUTION
Place in a well ventilated location
The unit and the AC adaptor should be located so their location or position does not interfere with their proper ventilation.

CAUTION
Grasp the plug when connecting or disconnecting the AC adaptor
- A lways grasp only the plug on the AC adaptor cord when plugging into, or unplugging from, an outlet or this unit.

Periodically clean the AC adaptor's plug
- At regular intervals, you should unplug the AC adaptor and clean it by using a dry cloth to wipe all dust and other accumulations away from its prongs. Also, disconnect the power plug from the power outlet whenever the unit is to remain unused for an extended period of time. Any accumulation of dust between the power plug and the power outlet can result in poor insulation and lead to fire.

Manage cables for safety.
- Try to prevent cords and cables from becoming entangled. Also, all cords and cables should be placed so they are out of the reach of children.

Avoid climbing on top of the unit, or placing heavy objects on it
- Never climb on top of, nor place heavy objects on the unit.

Do not connect or disconnect the AC adaptor with wet hands
- Never handle the AC adaptor or its plugs with wet hands when plugging into, or unplugging from, an outlet or this unit.

Disconnect everything before moving the unit
Before moving the unit, disconnect the AC adaptor and all cords coming from external devices.

Unplug the AC adaptor from the outlet before cleaning
- Before cleaning the unit, turn off the power and unplug the AC adaptor from the outlet.

If there is a possibility of lightning strike, disconnect the AC adaptor from the outlet
- W whenever you suspect the possibility of lightning in your area, disconnect the AC adaptor from the outlet.

Handle leaking batteries carefully
If fluid has leaked from a battery, make sure not to touch it with your bare hands.

If any of the leaking fluid gets into your eyes, the loss of vision may result. Do not rub your eyes; use clean water to flush them thoroughly. Then, promptly see a doctor.
- Burning of the skin or dermatitis may result if fluid has gotten onto your skin or clothing. Use clean water to flush affected areas thoroughly; then, promptly see a doctor.
- Using a soft cloth, carefully wipe any remaining fluid from the inside of the battery compartment. Then, install new batteries.
1. Important notes
In addition to the items listed under "Using the unit safely" auf S. 4, please read and observe the following:
Power supply
- Do not connect this unit to same electrical outlet that is being used by an electrical appliance that is controlled by an inverter (such as a refrigerator, washing machine, microwave oven, or air conditioner), or that contains a motor. Depending on the way in which the electrical appliance is used, power supply noise may cause this unit to malfunction or may produce audible noise. If it is not practical to use a separate electrical outlet, connect a power supply noise filter between this unit and the electrical outlet.
The AC adaptor will begin to generate heat after long hours of consecutive use. This is normal, and is not a cause for concern. - To prevent malfunction and equipment failure, always make sure to turn off the power on all your equipment before you make any connections.
- With the factory settings, the PK-6 will automatically be switched off 240 minutes (4 hours) after you stop playing or operating the unit. If you don't want the unit to turn off automatically, change the "Auto Off" setting to "Off" as described on S. 25.
Note: The settings you were editing will be lost when the unit is turned off. If you want to keep your settings, you must save your settings before turning the unit off.
Power supply: Use of Batteries
- When installing or replacing batteries, always turn this unit off and disconnect any other devices you may have connected. This way, you can prevent malfunction and damage.
The life of the supplied batteries may be limited, since its primary purpose was to enable testing. - If operating this unit on batteries, please use alkaline batteries.
Placement
- This device may interfere with radio and television reception. Do not use it in the vicinity of such receivers.
- Noise may be produced if wireless communications devices, such as cell phones, are operated in the vicinity of this unit. Such noise could occur when receiving or initiating a call, or while conversing. Should you experience such problems, you should relocate such wireless devices so they are at a greater distance from this unit, or switch them off.
- Do not expose the unit to direct sunlight, place it near devices that radiate heat, leave it inside an enclosed vehicle, or otherwise subject it to temperature extremes. Excessive heat can deform or discolor the unit.
- When moved from one location to another where the temperature and/or humidity is very different, water droplets (condensation) may form inside the PK-6. Damage or malfunction may result if you attempt to use the unit in this condition. Therefore, before using the unit, you must allow it to stand for several hours, until the condensation has completely evaporated.
- Do not allow objects to remain on top of the keyboard. This can be the cause of malfunction, such as keys ceasing to produce sound.
- Depending on the material and temperature of the surface on which you place the unit, its rubber feet may discolor or mar the surface. You can place a piece of felt or cloth under the rubber feet to prevent this from happening. If you do so, please make sure that the unit will not slip or move accidentally.
- Do not put anything that contains water (e.g. flower vases) on the PK-6. Also, avoid the use of insecticides, perfumes, alcohol, nail polish, spray cans, etc., near the unit. Swiftly wipe away any liquid that spills on the unit using a dry, soft cloth.
Maintenance
- For everyday cleaning wipe the unit with a soft, dry cloth or one that has been slightly dampened with water. To remove stubborn dirt, use a cloth impregnated with a mild, non abrasive detergent. Afterwards, be sure to wipe the unit thoroughly with a soft, dry cloth.
- Never use benzene, thinner, alcohol or solvents of any kind, to avoid the possibility of discoloration and/or deformation.
Repairs and Data
- Please be aware that all data contained in the unit's memory may be lost when the unit is sent for repairs. Important data should always be backed up in another MIDI device (e.g., a sequencer), or written down on paper (when possible). During repairs, due care is taken to avoid the loss of data. However, in certain cases (such as when circuitry related to memory itself is out of order), we regret that it may not be possible to restore the data, and Roland assumes no liability concerning such loss of data.
Additional precautions
- Please be aware that the contents of memory can be irretrievably lost as a result of a malfunction, or the improper operation of the unit. To protect yourself against the risk of loosing important data, we recommend that you periodically save a backup copy of important data you have stored in the unit's memory, in another MIDI device (e.g., a sequencer).
Unfortunately, it may be impossible to restore the contents of data that was stored in the unit's memory once it has been lost. Roland Corporation assumes no liability concerning such loss of data. - Use a reasonable amount of care when using the PK-6's buttons, other controls and jacks/connectors. Rough handling can lead to malfunctions.
- Never strike or apply strong pressure to the display.
- When connecting/disconnecting cables, grasp the connector itself—never pull on the cable. This way you will avoid causing shorts, or damage to the cable's internal elements.
- To avoid disturbing others nearby, try to keep the unit's volume at reasonable levels.
- The sound of pedals being struck and vibrations produced by playing an instrument can be transmitted through a floor or wall to an unexpected extent. Please take care not to cause annoyance to others nearby.
- When you need to transport the unit, package it in the box (including padding) that it came in, if possible. Otherwise, you will need to use equivalent packaging materials.
- Use only the specified expression pedal (Roland EV-series, sold separately) or pedal switch (Roland DP-series, BOSS FS-5U). By connecting any other expression pedal or footswitch, you risk causing malfunction and/or damage the unit.
- When you operate the pedals, please be careful not to get your fingers pinched between the movable part and the panel. In places where small children are present, make sure that an adult provides supervision and guidance.
Contents
- Important notes.. 6
- Panel description 8
Front panel. 8
Rear panel 9
3.Preparations before using the PK-6. 10
Inserting batteries 10
Battery life 10
Battery charge indication 10
Using an AC adaptor (optional) 11
Connecting the PK-6 to an external instrument with its PK cable 11
Connecting the PK-6 to an external MIDI device. 12
Using both the PK-6 and a MIDI keyboard controller 13
Connecting an optional expression pedal or footswitch to PK-6 13
- Using the PK-6's modes 14
MONO mode 14
POLYmode. 14
DRUM mode 15
MIDI CONTROLLER mode. 16
Using the PK-6's performance functions 17
HOLD function. 17
OCTAYER BASS function 17
PORTAMENTO function 18
Cross Portamento function 18
- Other useful functions 19
Transpose function. 19
Octave function 19
Sending program change messages to external devices (PG). 20
MIDI transmit channels. 21
- Advanced settings (Parameter mode) 23
Basic operation in Parameter mode 23
Saving the settings (Write Function). 23
Parameter settings 24
Archiving and restoring your settings (MIDI Dump) 26
Getting ready to archive/restore 26
Archiving your settings to the external sequencer 26
Transmitting your settings back to the PK-6 26
Restoring the settings to the factory condition (Factory Reset) 26
- Appendix. 27
Troubleshooting 27
Specifications. 28
- MIDI Implementation 159
MIDI Implementation Chart 161
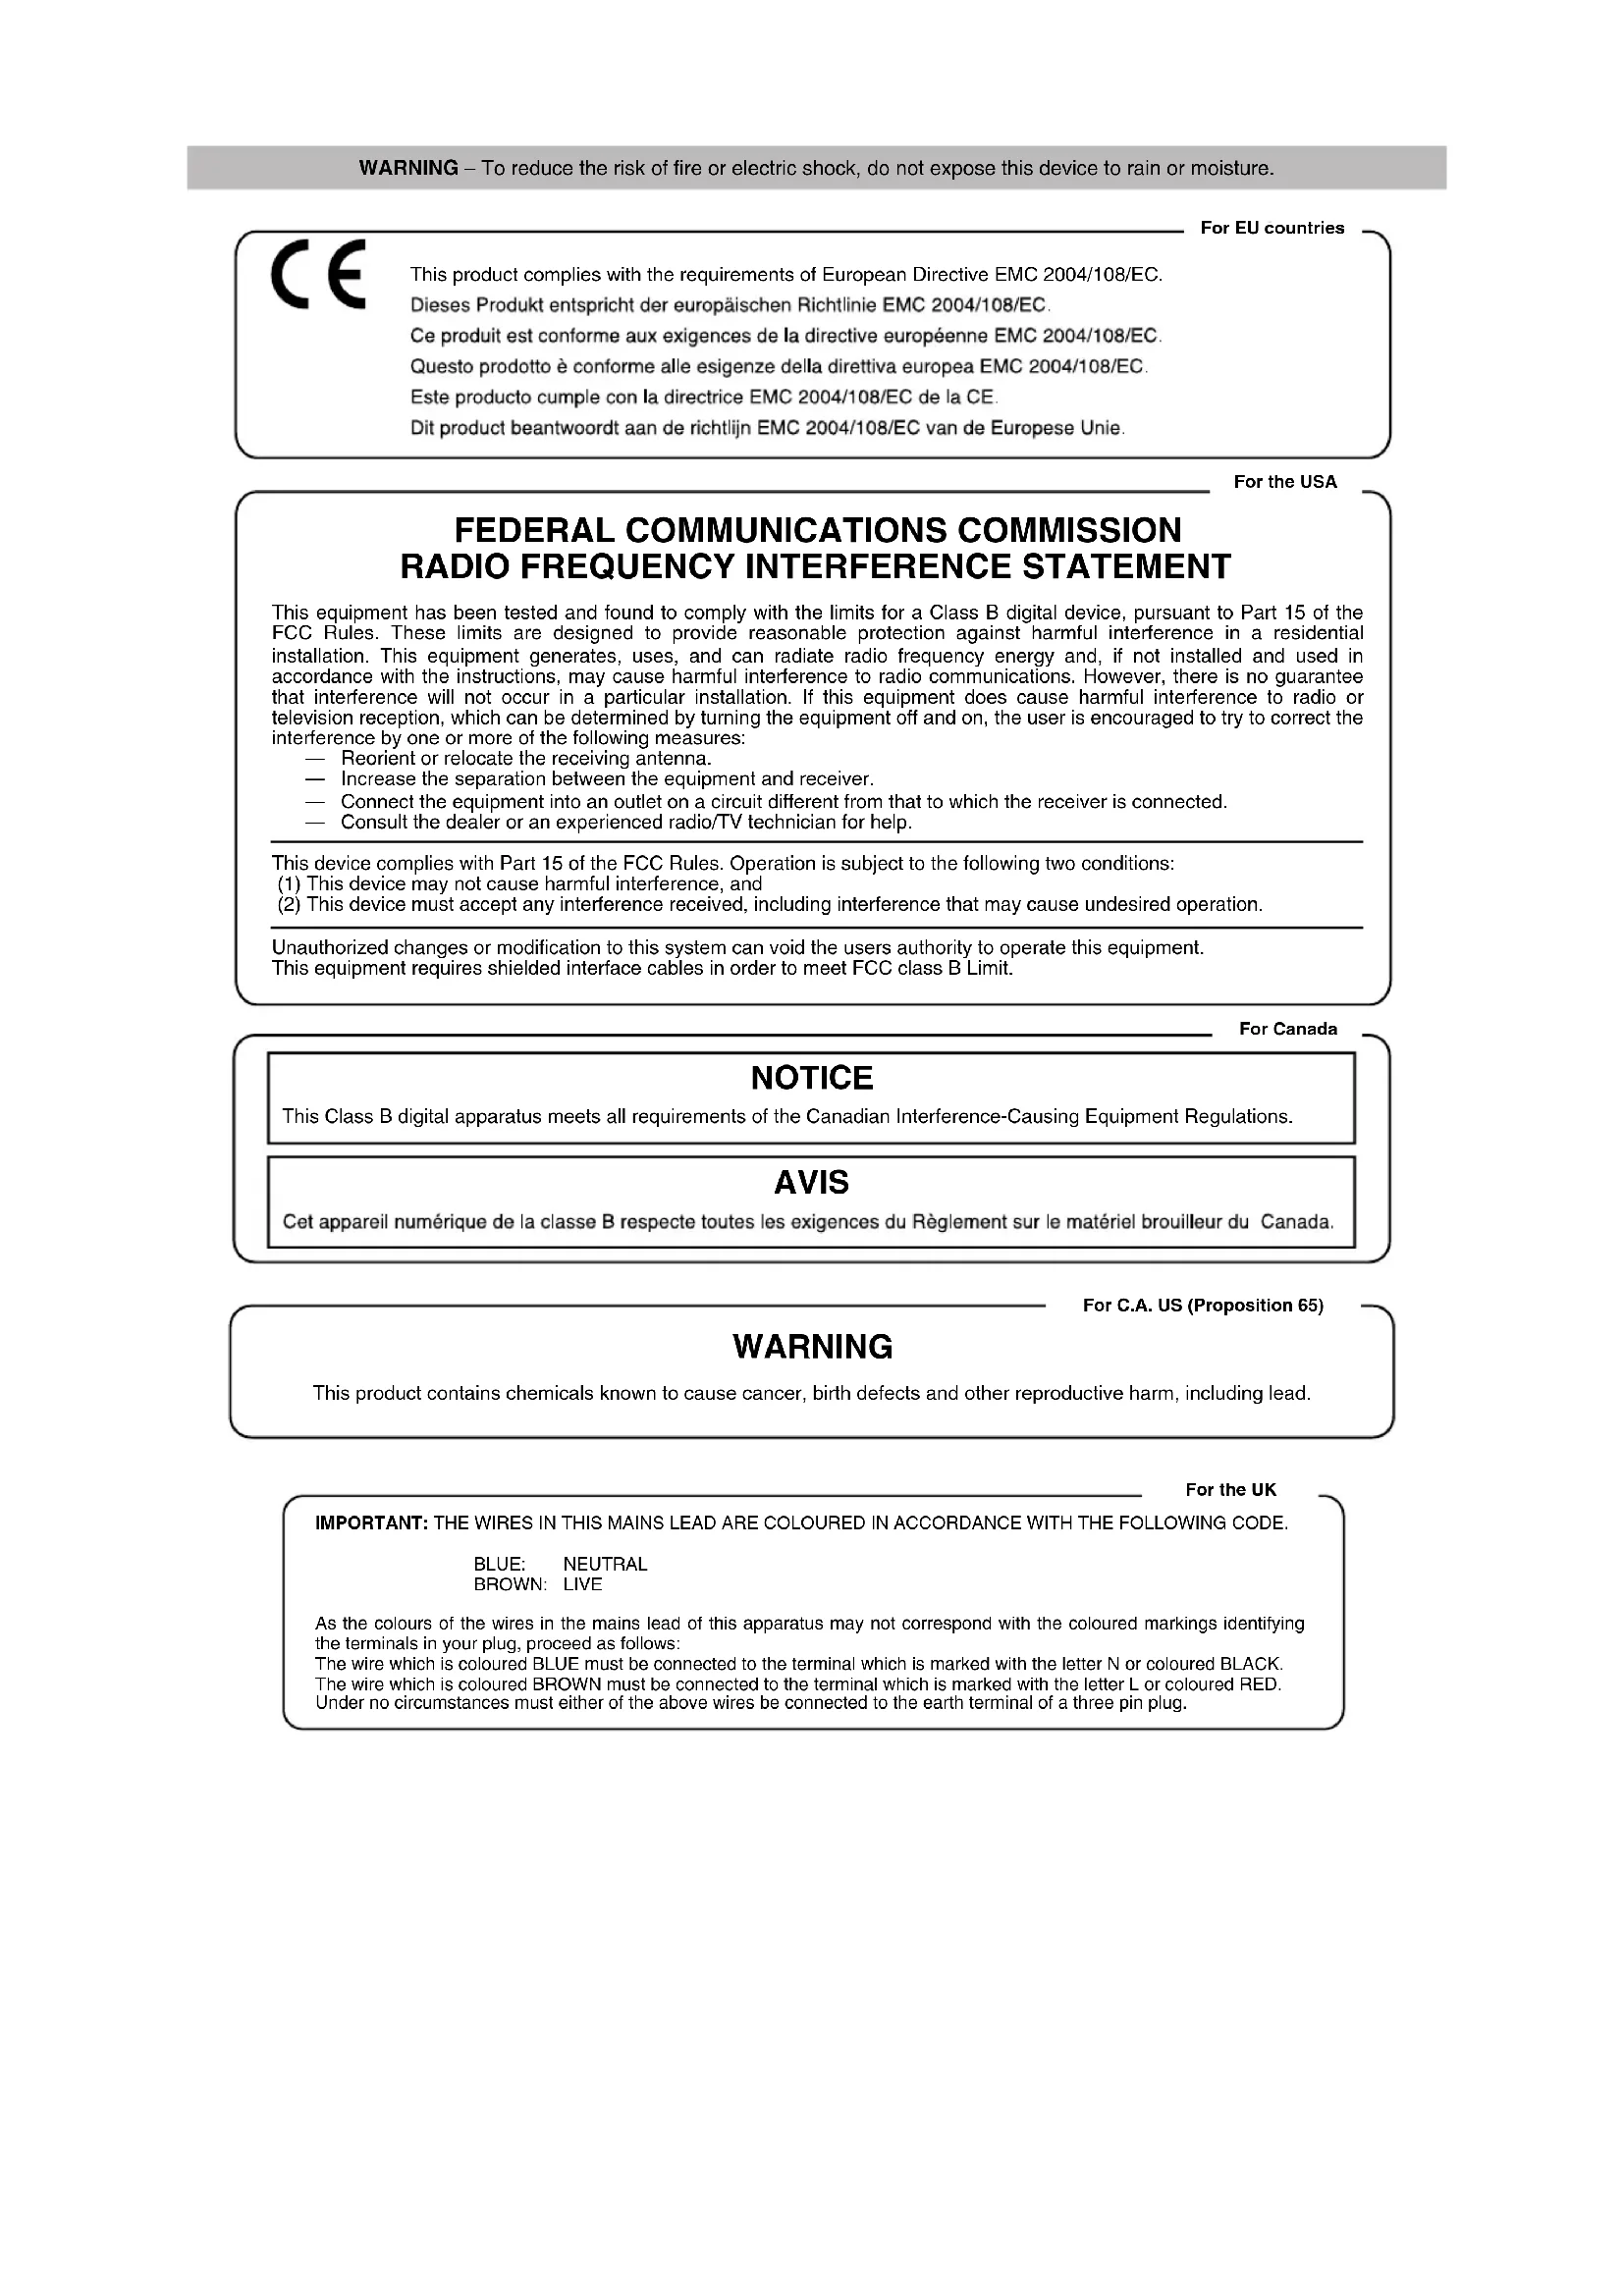
2. Panel description
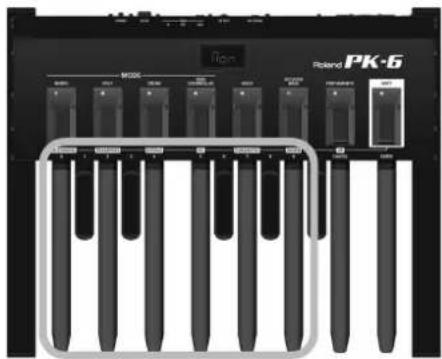
Front panel
① Display
This three-character display keeps you informed about the current function, mode or parameter value you set.
② MONO/MIDI CHANNEL footswitch
Allows you to enable the PK-6's monophonic mode (page 14). In Shift mode, this footswitch allows you to set MIDI channels (page 21).
③ POLY/TRANSPOSE footswitch
Allows you to enable the PK-6's polyphonic mode (page 14). In Shift mode, this footswitch allows you to change the transposition (page 19).
(4) DRUM/OCTAVE footswitch
Allows you to enable the PK-6's DRUM mode (page 15). In Shift mode, this footswitch allows you to change the octave (page 19).
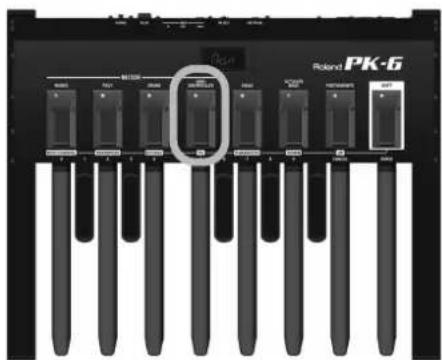
⑤ MIDI CONTROLLER/PG footswitch
This footswitch sets the PK-6 to control the playback/ pattern selection of Music Styles/Rhythms on an external arranger instrument (page 16). In Shift mode, it allows you to send MIDI Program Change messages (page 20).
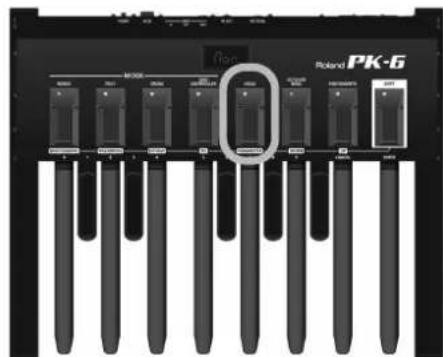
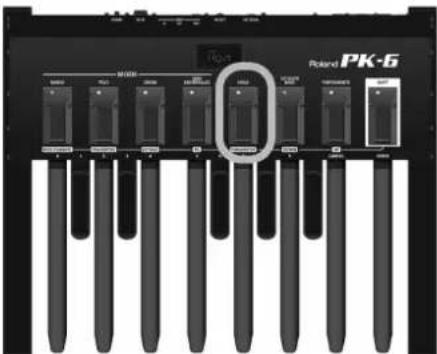
HOLD/PARAMETER footswitch
Pressing this footswitch allows you to hold the note your are currently playing even after releasing the pedal in question.
In Shift mode, this footswitch selects Parameter mode (page 23).
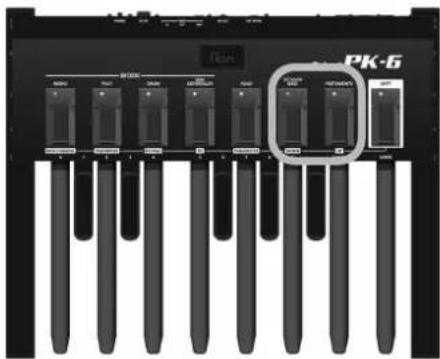
⑦ OCTAVER BASS/DOWN footswitch
Allows you to switch Octaver Bass mode on and off. When on, the PK-6 adds a lower note to the one you are playing (page 17).
In Shift mode, this footswitch allows you to select parameters from a list and to set parameter values.
⑧ PORTAMENTO/UP footswitch
This footswitch activates or switches off the Portamento function of the MIDI device you are controlling (page 18).
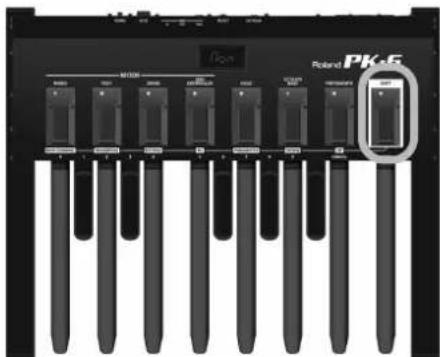
In Shift mode, this footswitch allows you to select parameters from a list and to set parameter values (opposite direction of the [DOWN] footswitch).
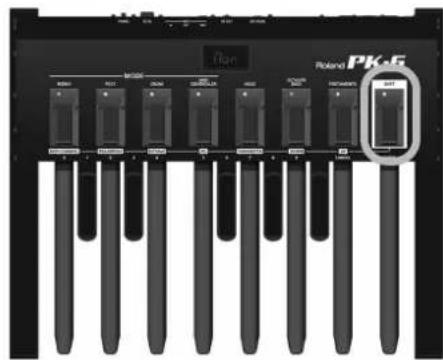
⑨ SHIFT footswitch
This footswitch provides access to the secondary functions of the other footswitches: MIDI CHANNEL, TRANSPOSE, OCTAVE, PG, PARAMETER, DOWN, and UP.
In Shift mode, this footswitch is used to confirm the values you set with the PK-6's pedals (see the numbers above the pedals).
Rear panel


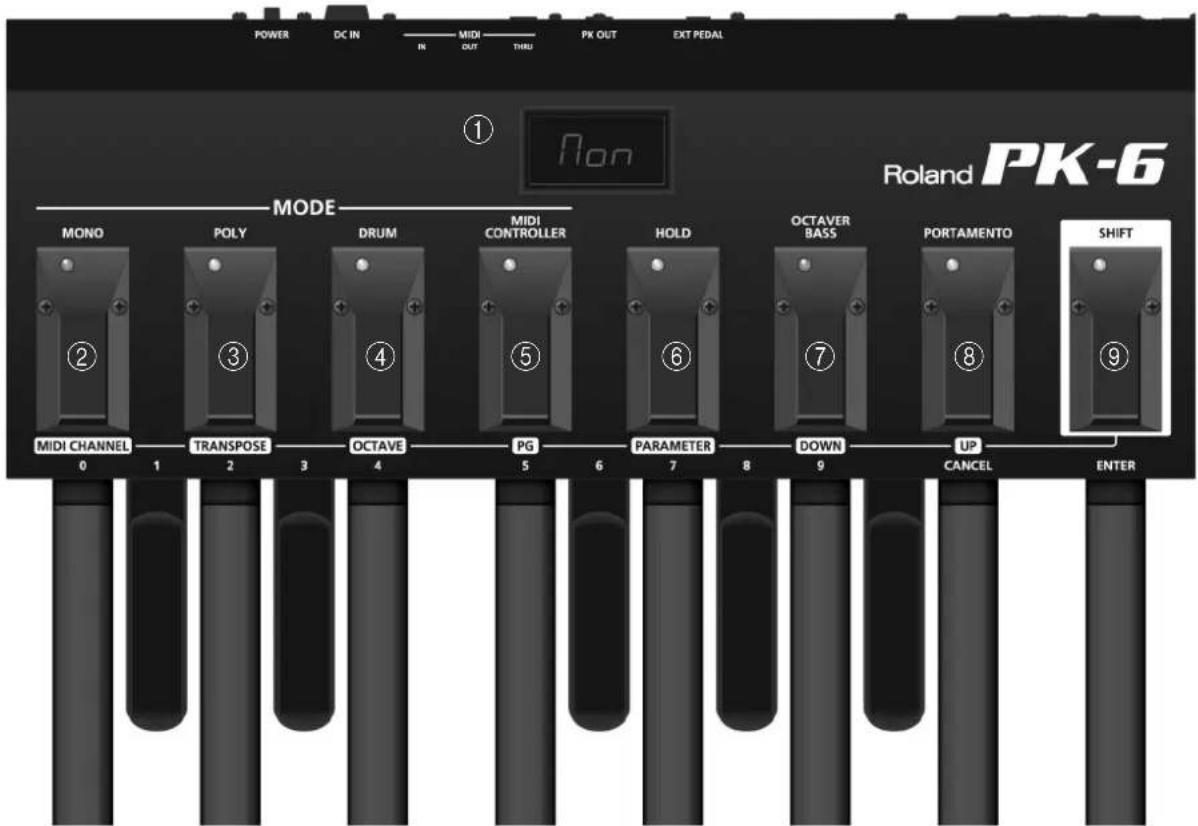
① Battery compartment
This is where you install the 6 supplied LR6 AA-type batteries (page 10).
② EXTERNAL PEDAL socket
Allows you to connect an optional expression pedal (Roland EV-5), an optional pedal switch (Roland DP-series) or an optional footswitch (BOSS FS-5U).
③ PK OUT connector
Use the PK cable supplied with the PK-6 to connect this socket to an external instrument's PK IN socket (page 11).
④ MIDI connectors
They allow you to connect the PK-6 to external MIDI devices (page 12).
⑤ DC IN jack
Allows you to connect an optional AC adaptor (page 11).
⑥ POWER switch
This turns the power on/off (page 12).
With the factory settings, the PK-6's power will automatically be switched off 240 minutes (4 hours) after you stop playing or operating the PK-6.
If the PK-6's power has been turned off automatically, you can use the [Power] switch to turn it back on again.
If you don't want the power to turn off automatically, change the "Auto Off" setting to "OFF" (page 25).
3. Preparations before using the PK-6
Inserting batteries
The PK-6 can be powered with the 6 supplied LR6 AA-type batteries or equivalent replacement batteries.
- Remove the lid from the PK-6's battery compartment by pressing the tab and lifting the lid.
- Insert 6 AA-type batteries (supplied) into the battery compartment (3 on either side), taking care to orient them in accordance with the "+" and "-" indications.
- Close the battery compartment: first insert the catches on the lid into the matching cavities, then push the lid down firmly until you hear a click.
Battery life
Continued use Approximately 16 hours
NOTE
The battery life given here is only an approximation. It will vary depending on the frequency and conditions of use.
Battery charge indication
If, while using batteries, three dots "... appear in the display, the remaining battery power is low. In this case, replace the batteries at your earliest convenience.

Lit three dots: remaining battery power is low. Flashing three dots and current message: replace batteries now.
If the three dots and the display message flash, you need to replace the batteries right away (or use an optional adaptor).
Checking the battery charge
The PK-6 also allows you to check the remaining battery charge at any time:
- Press the [SHIFT/ENTER] footswitch to activate the secondary footswitch functions (the indications below the footswitches).
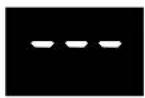
The [SHIFT] indicator lights. The display shows ---
- Press the [HOLD/PARAMETER] footswitch.
The [PARAMETER] indicator flashes.

The display will indicate "rEt" to signal the PK-6 is now in Parameter mode.
- Press the [OCTAYER BASS/DOWN] or [PORTAMENTO/UP] footswitch to select the "Bat" parameter.
- Press the [ENTER] pedal to confirm.
The display shows the battery status from 0 to 100. "100" means full charge, "0" means that you need to replace batteries right away.
Using an AC adaptor (optional)
The PK-6 can also be powered with an optional PSB-1U adapter.
NOTE
Be sure to use only the AC adaptor recommended for the PK-6 (PSB-1U). Also, make sure the line voltage at the installation matches the input voltage specified on the AC adaptor's body. Other AC adaptors may use a different polarity, or be designed for a different voltage, so their use could result in damage, malfunction, or electric shock.
- Connect the power cord to the optional AC adaptor.
To the PK-6's DC IN connector
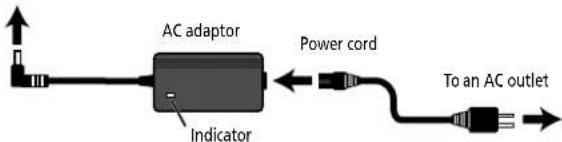
Place the AC adaptor so the side with the indicator faces upwards and the side with textual information faces downwards.
The indicator will light once you plug the AC adaptor into a wall outlet.
- Connect the optional AC adaptor to the PK-6's DC IN socket.
- Plug the power cord into a power outlet.
Connecting the PK-6 to an external instrument with its PK cable
Use the PK cable that is supplied with the PK-6 to connect the external instrument and PK-6. This connection system will allow the external instrument to power the PK-6 (so that you don't need batteries or an optional adaptor).
The PK-6 will be turned on/off by the power switch of the external instrument, regardless of the position of the PK-6's own power switch.
- Make sure that the external instrument's power is turned off and the volume is minimized.
- Use the PK cable that is supplied with the PK-6 to connect the external instrument's PK IN connector to the PK-6's PK OUT connector.
Once everything is properly connected, be sure to follow the procedure below to turn on their power. If you turn on equipment in the wrong order, you risk causing malfunction or equipment failure.
- Turn on the power of the external instrument and adjust the volume as explained in the its owner's manual.
-
Check whether the PK-6 is on as well.
-
Play the pedal keyboard. If you hear the pedal part of external instrument, connections are complete.
NOTE
If the external instrument's Pedal part sounds in the wrong octave, you can transpose the note numbers the PK-6 transmits (page 19).
NOTE
To prevent malfunction and equipment failure, always turn down the volume, and turn off all the units before making any connections.
NOTE
This unit is equipped with a protection circuit. A brief interval (a few seconds) after turning the unit on is requested before it will operate normally.
Connecting the PK-6 to an external MIDI device
You can use your PK-6 as a MIDI controller for a MIDI tone generator (Roland arranger keyboard, synthesizer, sound module, etc.),
- Make sure that the external MIDI device is turned off and its volume is minimized.
NOTE
To prevent malfunction and equipment failure, always turn down the volume, and turn off all the units before making any connections.
- Use a MIDI cable (commercially available) to connect the PK-6's MIDI OUT socket to the MIDI IN connector of MIDI external device.
- Insert batteries into the PK-6's compartment (page 10) or connect an optional PSB-1U adaptor to its DC IN socket (page 11).
Once everything is properly connected, be sure to follow the procedure below to turn on their power. If you turn on equipment in the wrong order, you risk causing malfunction or equipment failure.
-
Turn on the power of the external MIDI device and adjust the volume as explained in the its owner's manual.
-
Press the PK-6's [POWER] switch positioned in the rear panel.

- Set the PK-6's MIDI channel (page 21).
- Set the MIDI channel on the external MIDI device to match the channel set for the PK-6.
- Play the PK-6's pedal keyboard.
If the external instrument plays the notes, connections are complete.
NOTE
This unit is equipped with a protection circuit. A brief interval (a few seconds) after turning the unit on is requested before it will operate normally.
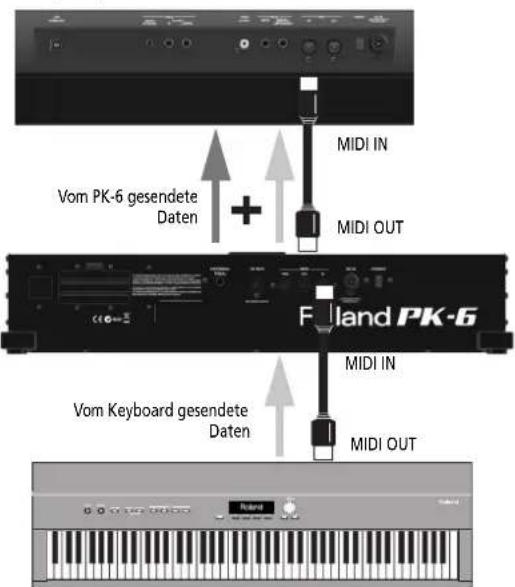
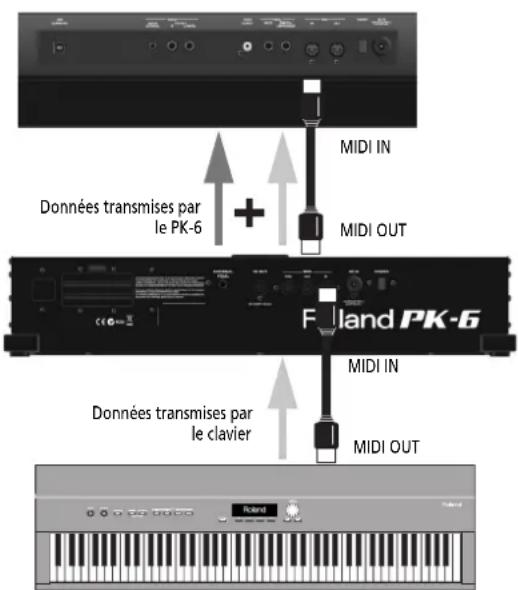
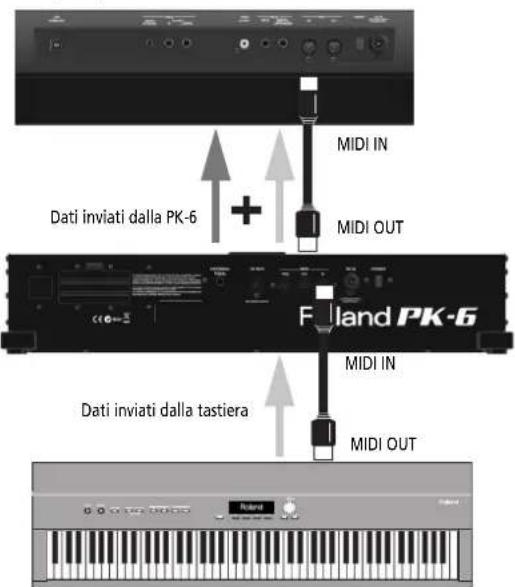
Using both the PK-6 and a MIDI keyboard controller
You can also control an external MIDI module using both a MIDI keyboard and the PK-6.
This allows you to use both your hands and your feet to control either the same part or two different parts of the external module.
- Make sure that the external MIDI device is turned off and its volume is minimized.
NOTE
To prevent malfunction and equipment failure, always turn down the volume, and turn off all the units before making any connections.
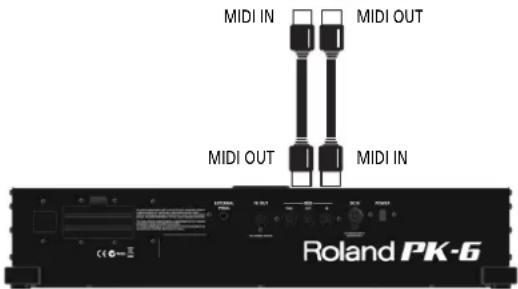
- Use a MIDI cable (commercially available) to connect the PK-6's MIDI OUT socket to the MIDI IN connector of MIDI external device. Use another MIDI cable to connect the keyboard's MIDI OUT socket to the PK-6's MIDI IN socket.
BK-7m, BK-5, JUPITER-80, etc.
In this scenario, the messages the PK-6 receive via its MIDI IN socket are mixed ("merged") with the PK-6's MIDI messages and transmitted via its MIDI OUT socket to the external MIDI module ("Soft Thru" function).
NOTE
The exact copy of the MIDI data received via the PK-6's MIDI IN socket is also sent out from its MIDI THRU socket. Though you could also use this connection scenario, be aware that it only works if your MIDI module has two MIDI IN sockets. Therefore, the "merge" approach is usually more practical.
Connecting an optional expression pedal or footswitch to PK-6
The PK-6 provides an EXTERNAL PEDAL socket to which you can connect an optional footswitch (Roland DP-series or BOSS FS-5U) or an expression pedal (Roland EV-series).

If you connect a footswitch, you can select the function it should perform (page 24). By default, the footswitch will control the "Expression" function.
NOTE
Use only the specified expression pedal (Roland EV-series, sold separately) or pedal switch (Roland DP-series, BOSS FS-5U). By connecting any other expression pedal or footswitch, you risk causing malfunction and/or damage the unit.
4. Using the PK-6's modes
The PK-6 can be used in one of four modes: MONO, POLY, DRUM, or MIDI CONTROLLER. Each mode is intended for a different application, so be sure to read the following so as to select the mode that is most convenient for you.
MONO mode
This mode enables the PK-6 to play in monophonic mode. This means that only one note message is transmitted at any one time. At power on, the PK-6 is in MONO mode.
- If necessary, press the [MONO] footswitch to select MONO mode.
The MONO indicator lights and the display shows:

At the same time, a "Mono Mode ON" control change message is transmitted to PK-6's MIDI OUT socket (CC126, v = 0 ).
- Play the pedal keyboard.
NOTE
By default, MONO mode transmits on MIDI channel "2", which corresponds to the bass part of Roland arranger keyboards. To change the MIDI channel for MONO mode, please see page 21.
The following table lists the functions available in MONO mode:
| Function in MONO mode Refer to | page |
| HOLD 17 | |
| OCTAYER BASS 17 | |
| PORTAMENTO 18 | |
| OCTAVE 19 | |
| TRANSPOSE 19 | |
| RETRIGGER 24 | |
| VELOCITY 24 |
| Function in MONO mode Refer to | page |
| PC (Program Change) 20 |
POLY mode
This mode enables the PK-6 to play in polyphonic mode, meaning that several note messages can be transmitted simultaneously (to play chords).
- Press the [POLY] footswitch to select POLY mode.
The POLY indicator lights and the display shows:

At the same time, a "Poly Mode ON" control change message is transmitted to the PK-6's MIDI OUT socket (CC127, v = 0).
- Play the pedal keyboard.
NOTE
By default, POLY mode transmits on MIDI channel "11", which corresponds to the "Note-To-Arranger" (NTA) part of Roland arranger keyboards. To change the MIDI channel for POLY mode, please see page 21.
The following table lists the functions available in POLY mode:
| Function in POLY mode Refer to page | |
| HOLD 17 | |
| OCTAYER BASS 17 | |
| PORTAMENTO 18 | |
| OCTAVE 19 | |
| TRANSPOSE 19 | |
| VELOCITY 24 | |
| PC (Program Change) 20 | |
DRUM mode
This mode enables the PK-6 to send note messages to trigger drum instrument sounds on external MIDI devices.
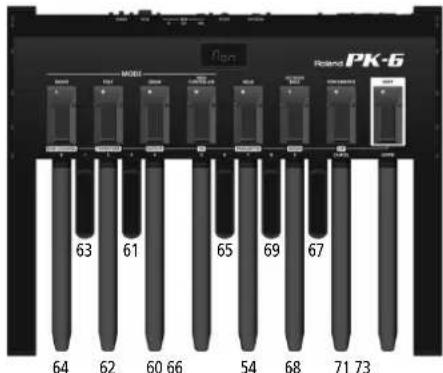
There are two note maps (i.e. note number assignments to the PK-6's pedals). "drM" is the factory map that cannot be overwritten. The second, "drU", is programmable, allowing you to trigger whichever sounds you like. Both maps already contain useful note number assignments for GM/GM2/GS-compatible MIDI sound sources.
- Press the [DRUM] foot switch to select DRUM mode (Factory Set).
The DRUM indicator lights and the display shows:

- Play the pedal keyboard.
The PK-6's pedals now transmit the following note numbers:
This allows you to play the basic instruments (kick, rim, snare, hhat, toms, etc.) of a GM/GM2/GS-compatible sound module.
NOTE
By default, DRUM mode transmits on MIDI channel "10", which usually corresponds to the Drum part. To change the MIDI channel for DRUM mode, please see page 21.
- Press the [DRUM] foot switch again to select the User Set.
The display shows:

This is the second note number map. (If you press [DRUM] again, the display reverts to "drM", the factory note map.)
- Play the pedal keyboard.
If you do not change the "drU" assignments, the PK-6's pedals now transmit the following note numbers:
To assign other note numbers to the pedals in "drU" mode, see "Drum User Edit" auf S. 25.
The following table lists the functions available in DRUM mode:
| Function in DRUM mode Refer to | page |
| HOLD 17 | |
| OCTAYER BASS 17 | |
| OCTAVE (only for "drM") 19 | |
| TRANSPOSE (only for "drM") 19 | |
| VELOCITY 24 | |
| PC (Program Change) 20 |
MIDI CONTROLLER mode
This mode enables the PK-6 to transmit MIDI messages to an external Roland backing keyboard or module. In this mode, the pedals do NOT transmit note messages.
Select this mode if you want to start/stop Music Style/Rhythm playback and select accompaniment patterns (Fill-In, Intro, Ending, etc.).
There are two assignment sets (i.e. groups of pedal functions). "Ctr" is the factory set that cannot be overwritten. The second, "CtU", is programmable, allowing you to control whichever functions you like.
Both sets already contain useful assignments for Roland arranger keyboards and modules.
- Press the [MIDI CONTROLLER] footswitch to select MIDI CONTROLLER mode (Factory Control).
The MIDI CONTROLLER indicator lights and the display shows:

- Play the pedal keyboard.
The PK-6's now transmits MIDl messages that perform the following functions:
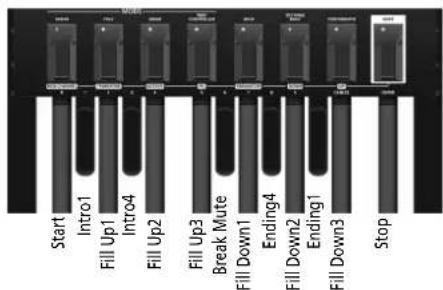
NOTE
The above assignments work for the majority of Roland arranger devices.
NOTE
By default, the messages are transmitted on MIDI channel "10". To change the MIDI channel in accordance with the device you want to control, please see page 21.
- Press the [MIDI CONTROLLER] footswitch again to select the user assignment set (CtU).
The display shows:

This is the second assignment set. (If you press [MIDI CONTROLLER] again, the display reverts to "Ctr", the factory assignments.)
- Play the pedal keyboard.
The PK-6 now transmits MIDI messages that perform the following functions:
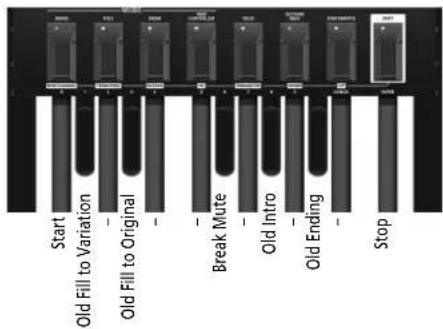
To assign other MIDI messages to the pedals in "CtU" mode, see "MIDI Controller User Edit" auf S. 25.
NOTE
The function that allows you to edit the "CtU" assignments can also be selected directly by pressing and holding the [MIDI CONTROLLER] footswitch.
NOTE
In MIDI CONTROLLER mode, the following functions are not available: Hold, Octaver Bass, Portamento, Octave, Transpose, Retrigger, Velocity and PC (Program Change).
Using the PK-6's performance functions
The PK-6 provides 3 footswitches (HOLD, OCTAYER BASS and PORTAMENTO) that allows you to influence/ enhance the notes played via the pedals.
HOLD function
When the [HOLD] indicator lights, briefly pressing a pedal is enough to sound long notes on the external instrument.
1. Press the [HOLD] footswitch to activate the function.
The [HOLD] indicator lights to indicate that the hold function is active.
![ROLAND PK6 - Press the [HOLD] footswitch to activate the function. - 1](/content/2026/02/395138/images/abc5cd7e9ecaf6924483ab6b78e2221fdd97f53b7a299171fc5e86a90a1856c6.jpg)
2. Play on the PK-6's pedals.
The notes you play are held until you play different notes.
3. Press the [HOLD] foot switch again to switch off the function.
The [HOLD] indicator goes dark to indicate that the hold function is not active.
OCTAYER BASS function
When this function is on, a note is added to the lowest note you play. The added note can be 1~4 octaves lower than the lowest note you played (by default -1). Please see page 24 for how to set the octave value.
1. Press the [OCTAYER BASS] footswitch to activate the function.
The [OCTAYER BASS] indicator lights to indicate that the function is active.
![ROLAND PK6 - Press the [OCTAYER BASS] footswitch to activate the function. - 1](/content/2026/02/395138/images/0a2da7c69ecad176c2e145061998193ece0d4a982d4639e9c7922de9290a6ba9.jpg)
2. Play on the PK-6's pedals.
The lowest note you play is doubled by a note that is one or several octaves lower (the octave interval can be changed).
NOTE
Press and hold [OCTAYER BASS] to jump to the function that allows you to change the octaver value ("oCv"). See page 24.
3. Press the [OCTAYER BASS] footswitch again to switch off the function.
The [OCTAYER BASS] indicator goes dark to indicate that the function is not active.
PORTAMENTO function
When this function is on, the note pitches no longer change in clearly defined steps: they produce glides from one note to the next. Use the "Portamento Time" parameter (page 24) to specify the speed at which those glides are carried out. The higher the value, the slower the transitions.
NOTE
This function controls the Portamento parameter of the MIDI device the PK-6 is connected to. If the external instrument doesn't support Portamento, this footswitch has no effect.
1. Press the [PORTAMENTO] footswitch to activate the function.
The [PORTAMENTO] indicator lights to indicate that the function is active.
![ROLAND PK6 - Press the [PORTAMENTO] footswitch to activate the function. - 1](/content/2026/02/395138/images/87a43f292984b4673d00c3ee01d261f0ed6761217af8d9a8347b6cce31998841.jpg)
2. Play on the PK-6's pedals.
Now, the notes you play seem to be controlled by an automatic pitch bend effect. The speed of the effect can be changed.
3. Press the [PORTAMENTO] footswitch again to switch off the function.
The [PORTAMENTO] indicator goes dark to indicate that the function is not active.
NOTE
Press and hold [PORTAMENTO] to jump to the function that allows you to change the Portamento Time ("Por"). See page 24.
Cross Portamento function
The Cross Portamento function is a combination of the OCTAYER and PORTAMENTO functions. It produces note glides between the lowest and highest notes you play and creates a spectacular effect.
1. Press the [OCTAYER BASS] footswitch to activate it.
The [OCTAYER BASS] indicator lights to indicate that the function is active.
2. Press the [PORTAMENTO] footswitch to activate it.
The [PORTAMENTO] indicator also lights.
3. Play on the PK-6's pedals.
4. Press the [OCTAYER BASS] footswitch again to switch off Octaver Bass function.
5. Press the [PORTAMENTO] footswitch again to switch off Portamento function.
5. Other useful functions
Below please find additional functions that may come in handy while you are playing.
Transpose function
This function allows you to transpose the note pitches of the pedals in semi-tone steps. The interval you set applies to MONO, POLY and DRUM modes and cannot be set for each mode individually.
| Function Value Default | |
| Transpose -5~6 0 |
- Press the [SHIFT] footswitch to activate Shift mode (secondary footswitch functions).
The [SHIFT] indicator lights.

The display shows:

- Press the [POLY/TRANSPOSE] footswitch.
The [TRANSPOSE] indicator flashes and the display shows the current transposition interval. If you selected this parameter by mistake and do not want to change it, proceed to step (4).
The display shows:

- Press the [OCTAYER BASS/DOWN] or [PORTAMENTO/UP] footswitch to decrease or increase the current value.
This setting will be used until you switch the PK-6 off.
- Press the [ENTER] pedal (far right) or the [SHIFT] footswitch to leave Shift mode.
NOTE
You can save this setting so that it will still be available the next time the power is turned on. To save the setting, proceed as described in "Saving the settings (Write Function)" auf S. 23.
Octave function
This function allows you to transpose the note pitches of the pedals in octave steps. The interval you set applies to the currently selected mode (MONO, POLY or DRUM) and can be set for each mode individually.
| Function Value Default | |
| Octave 0~ -8 MONO mode=2 | POLY mode=4 DRUM mode=2 |
- Press the [SHIFT] footswitch to activate Shift mode (secondary footswitch functions).
The [SHIFT] indicator lights. The display shows:

- Press the [DRUM/OCTAVE] footswitch.
The [OCTAVE] indicator flashes and the display shows the current transposition interval. If you selected this parameter by mistake and do not want to change it, proceed to step (4).
The display shows the current Octave value:

3. Press the [OCTAYER BASS/DOWN] or [PORTAMENTO/UP] footswitch to decrease or increase the current value.
This setting will be used until you switch the PK-6 off.
NOTE
You can also set the octave interval with the PK-6's pedals (0~9). See the figures above the pedals. In this case, press the [ENTER] pedal to confirm your setting. You can cancel your input by pressing the [CANCEL] pedal.
4. Press the [ENTER] pedal (far right) or the [SHIFT] footswitch to leave Shift mode.
NOTE
You can save this setting so that it will still be available the next time the power is turned on. To save the setting, proceed as described in "Saving the settings (Write Function)" auf S. 23.
Sending program change messages to external devices (PG)
This function allows you to transmit program change and bank select messages ("memory selection clusters") on the fly. These are MIDI messages that cause an external instrument or device to select a different memory (i.e. another sound or effect).
NOTE
The PK-6 memorizes the last program change number sent in each of the following modes: MONO, POLY, DRUM, MIDI CONTROLLER, but it will cancel these settings when it is switched off. You can save these settings so that they will still be available the next time the power is turned on. To save the setting, proceed as described in "Saving the settings (Write Function)" auf S. 23.
The PG function transmits the following messages as a group:
Bank Select messages (CC00 and CC32)
Bank select messages are used to select sound banks (if the receiving instrument contains several banks). These messages must be transmitted before a program change message to be effective.
Program Change messages (PC)
Program change messages allow you to select up to 128 memories on a remote MIDI device.
To transmit a memory selection cluster:
1. Press the [SHIFT] footswitch to activate Shift mode (secondary footswitch functions).
The [SHIFT] indicator lights. The display shows:
![ROLAND PK6 - Press the [SHIFT] footswitch to activate Shift mode (secondary footswitch functions). - 1](/content/2026/02/395138/images/34bc04866da07a27ad646225d1fba9f4f6a5567d9d11a7f493d9ebae2d7079c2.jpg)
2. Press the [MIDI CONTROLLER/PG] footswitch.
The [PG] indicator flashes.
![ROLAND PK6 - Press the [MIDI CONTROLLER/PG] footswitch. - 1](/content/2026/02/395138/images/477aba1e1c89a261188b433750344434bb9f333dfd5ea347aad523573ef795bc.jpg)
The following message appears for a few seconds:
![ROLAND PK6 - Press the [MIDI CONTROLLER/PG] footswitch. - 2](/content/2026/02/395138/images/c953b6ba2e70398086dec4e094389adca2a9b87697517958411a4c32e34069e2.jpg)
It means that the PK-6 expects you to input a value for the CC00 (MSB) message.
NOTE
If you only need to enter a PC value (because the previous CC00 and CC32 values are the same), press the [MIDI CONTROLLER/PG] footswitch twice to skip the "C00" and "C32" pages and proceed to step (7).
- Use the pedals labeled [0]~[9] to enter the CC00 (MSB) value.
The value you entered flashes.

Example: To set the CC00 value to "16", press the [1] and [6] pedals.
NOTE
If you pressed the wrong pedal while specifying the number, you can cancel your input by pressing [CANCEL] pedal.
NOTE
You can also use the [DOWN] and [UP] footswitches to decrement/increment the value shown in the display.
NOTE
If you entered a value higher than "127" for the CC00 message, the PK-6 automatically corrects it to "127" when you press the [ENTER] pedal.
- Confirm by pressing the [ENTER] pedal.
The following message appears for a few seconds:

It means that the PK-6 expects you to input a value for the CC32 (LSB) message.
- Use the pedals labeled [0]~[9] to enter the CC32 (LSB) value.
The value you entered flashes.

NOTE
If you entered a value higher than "127" for the CC32 message, the PK-6 automatically corrects it to "127" when you press the [ENTER] pedal.
- Confirm by pressing the [ENTER] pedal.
The following message appears for a few seconds:

The PK-6 now expects you to input a program change value.
- Use the pedals labeled [0]~[9] to enter the PC value.
The value you entered flashes.
NOTE
If you entered a value higher than "127" for the PC message, the PK-6 automatically corrects it to "127" when you press the [ENTER] pedal.
- Confirm by pressing the [ENTER] pedal.
The PK-6 now transmits the memory selection cluster (CC00, CC32 and PC) and immediately leaves Shift mode.
MIDI transmit channels
This setting specifies the MIDI channel on which the PK-6 will transmit.
MIDI uses sixteen "MIDI channels," which are numbered 1 through 16. By connecting MIDI devices and specifying the appropriate MIDI channel for each device, you can play and/or select sounds on those devices.
The PK-6 allows you to select different MIDI channels for the following modes: MONO, POLY, DRUM, and MIDI CONTROLLER.
| Function Value Default | |
| MIDI channel 1~16 MONO mode=2 POLY mode=11 DRUM mode=10 MIDI CONTROLLER mode=10 | |
- Select the mode whose MIDI channel setting you want to change.
Press the appropriate footswitch: MONO, POLY, DRUM, or MIDI CONTROLLER.
- Press the [SHIFT] footswitch to activate Shift mode (secondary footswitch functions).
The [SHIFT] indicator lights.
The display shows:
- Press the [MONO/MIDI CHANNEL] footswitch.

The [MIDI CHANNEL] indicator flashes and the display shows the current MIDI channel value.
- Use the pedals labeled [0]~[9] to enter the MIDI channel number.
The value you entered flashes.

Example: To select MIDI channel 10, press the [1] and [0] pedals.
NOTE
You can also use the [DOWN] and [UP] footswitches to decrement/increment the value shown in the display.
- Confirm by pressing the [ENTER] pedal.
The PK-6 now uses the newly selected channel and immediately leaves Shift mode.
NOTE
You can save this setting so that it will still be available the next time the power is turned on. To save the setting, proceed as described in "Saving the settings (Write Function)" auf S. 23.
6. Advanced settings (Parameter mode)
Parameter mode lets you make various settings for this unit.
Basic operation in Parameter mode
Here's the basic procedure for making settings in Parameter mode.
- Press the [SHIFT] footswitch to activate Shift mode (secondary footswitch functions).
The [SHIFT] indicator lights.
The display shows:

- Press the [HOLD/PARAMETER] (HOLD) footswitch.
The [PARAMETER] indicator flashes.
The PK-6 is now in Parameter mode. The display shows:

- Press the [OCTAYER BASS/DOWN] or [PORTAMENTO/UP] footswitch to select the desired parameter.
For details on each parameter, refer to "Parameter settings" auf S. 24.
- Press the [ENTER] pedal to confirm.
The display shows the value.
- Press the [OCTAYER BASS/DOWN] or [PORTAMENTO/UP] footswitch to change the value.
For certain parameters, you can also use the pedals labeled [0]~[9] to enter the desired value.
- Press the [ENTER] pedal or the [SHIFT] footswitch to confirm the value and leave Parameter mode.
Saving the settings (Write Function)
When the PK-6's power is turned off, it will return to its default settings. However, if desired, you can save the following settings so that they will be remembered even after the power is off.
| Parameter settings that are saved Page | |
| Retrigger 24 | |
| Velocity 24 | |
| Touch 24 | |
| Portamento Time 24 | |
| Octaver Value 24 | |
| Pedal Assign 24 | |
| MIDI Controller User Edit 25 | |
| Drum User Edit 25 | |
| Auto Off 25 | |
| Transpose 19 | |
| Octave 19 | |
| Program change 20 | |
| MIDI Channel | 21 |
- Press the [SHIFT] footswitch to activate Shift mode (secondary footswitch functions).
The [SHIFT] indicator lights.
- Press the [HOLD/PARAMETER] foot switch.
The [PARAMETER] indicator flashes.
The display will indicate "rEt". The PK-6 is now in Parameter mode.
- Press the [OCTAYER BASS/DOWN] or [PORTAMENTO/UP] footswitch to select the "Wri" parameter.

- Press the [ENTER] pedal to confirm.
The display shows "ok" and the PK-6 leaves Parameter mode.
Parameter settings
Below please find a list of the PK-6 parameters you can set.
Retrigger
| Display Value Default | ||
| -ET | Off, On Off | |
When this parameter is on, some special effects can be obtained.
In MONO mode, the pedal board is monophonic: if you press two pedals simultaneously, only the last note played will sound. When that note is released, the previous note will sound, so a pleasant alternating effect can be obtained.
NOTE
This parameter is only used in MONO mode.
Velocity
| Display Value Default | ||
| DEL | On, 1~127 On | |
If this parameter is on, your playing dynamics are translated into MIDI velocity values (1~127). If you choose a fixed value (1~127), the PK-6 transmits all notes with that value.
Touch (velocity curve)
| Display Value Default | ||
| Lit (Light), Med (Medium), Hea (Heavy) | Med | |
The PK-6's pedals are velocity sensitive. If necessary, you can select a different velocity curve to suit your playing style.
Portamento Time
| Display Value Default | ||
| Por | 0~127 50 | |
"Portamento" means that the pitch doesn't change in clearly defined steps: it produces glides from one note to the next. Use this parameter to specify the speed at which those glides are carried out. The higher the value, the slower the transitions.
NOTE
If the receiving MIDI instrument doesn't support this parameter, this setting will have no effect.
Octavervalue
| Display Value Default | ||
| OCU | -4~ -1 -1 | |
This parameter allows you to specify the pitch of the note that is added while the [OCTAYER BASS] footswitch lights. See page 17 for details.
Pedal Assign
| Display Value Default | ||
| PED | Exp (Expression), Cut(Cutoff), Res (Resonance),Pbd, (Pitch Bend Down),Pbu (Pitch Bender Up),Mod (Modulation), Hld(Hold), Vol (Volume), Pan(Panpot), C16 (Control Change 16), C17 (Control Change 17), C18(Control Change 18), C19(Control Change 19) | Exp(Expres-sion) |
This parameter allows you to assign a function to the pedal you connect to the EXTERNAL PEDAL socket.
MIDI Controller User Edit
| Display Value Default | ||
| CEE | Not, FA (Start), FB (Cont- nue), FC (Stop), In1 (Intro1), In2 (Intro2), In3 (Intro3), In4 (Intro4), Mn1 (Main1), Mn2 (Main2), Mn3 (Main3), Mn4 (Main4), Fu1 (Fill Up1), Fu2 (Fill Up2), Fu3 (Fill Up3), Fd1 (Fill Down1), Fd2 (Fill Down2), Fd3 (Fill Down3), En1 (Ending1), En2 (Ending2), En3 (Ending3), En4 (Ending4), Brm (Break Mute), Oin (Old Intro), Oen (Old Ending), Ofv (Old Fill To Variation), OFo (Old Fill To Original) | See "MIDI CONT- ROLLER mode"on page 16. |
Using this parameter, you can assign the desired control functions to the PK-6's pedals. See also "MIDI CONTROLLER mode" auf S. 16. Proceed as follows:
(a) Press the [SHIFT] footswitch to activate Shift mode (secondary footswitch functions). The [SHIFT] indicator lights. The display shows"---".
(b) Press the [HOLD/PARAMETER] footswitch. The [PARAMETER] indicator flashes.
(c) Press the [OCTAYER BASS/DOWN] or [PORTA-MENTO/UP] footswitch to select the "CtU" parameter.
(d) Press the [ENTER] pedal to confirm. The display now shows "---" to signal that you need to press a pedal.
(e) Press the pedal you want to assign a new function to. The display shows the function currently assigned to that pedal.
(f) Press the [OCTAYER BASS/DOWN] or [PORTAMENTO/UP] footswitch to select the desired function (see the table above).
(g) If you want, repeat from step (e) to assign a new function to the other pedals.
(h) When finished, press the [SHIFT] footswitch to exit Parameter mode.
Drum User Edit
| dru | 1~128 See | "DRUM mode" on page 15. |
This parameter allows you to select note numbers to the pedals, which will be used in DRUM mode—but only if you select the "drU" setting. See also "DRUM mode" auf S. 15.
Proceed as follows:
(a) Press the [SHIFT] footswitch to activate Shift mode (secondary footswitch functions). The [SHIFT] indicator lights. The display shows"---".
(b) Press the [HOLD/PARAMETER] footswitch. The [PARAMETER] indicator flashes.
(c) Press the [OCTAYER BASS/DOWN] or [PORTAMENTO/UP] footswitch to select the "drU" parameter.
(d) Press the [ENTER] pedal to confirm. The display now shows "---" to signal that you need to press a pedal.
(e) Press the pedal you want to assign a note number to. The display shows the note number currently assigned to that pedal.
(f) Press the [OCTAYER BASS/DOWN] or [PORTAMENTO/UP] footswitch to select the desired note number (see the table above).
(g) If you want, repeat from step (e) to assign a new note number to the other pedals.
(h) When finished, press the [SHIFT] footswitch to exit Parameter mode.
Battery Status
| BAT | 0~100 (cannot be changed) | - |
Refer to "Battery charge indication" auf S. 10.
Auto Off
| RoF | Off, 10, 30, 240 240 |
This parameter allows you to specify how long the PK-6 should wait before switching itself off while you are not using it. If you don't want the power to turn off automatically, select "Off".
Factory Reset
Refer to "Restoring the settings to the factory condition (Factory Reset)" auf S. 26.

MIDI Dump
Refer to "Archiving and restoring your settings (MIDI Dump)" auf S. 26.

Write
Refer to "Saving the settings (Write Function)" auf S. 23.

Archiving and restoring your settings (MIDI Dump)
You can archive and restore your settings using a computer (with a MIDI interface, commercially available) or an external sequencer.
Getting ready to archive/restore
- Use a MIDI cable (commercially available) to connect the MIDI IN socket of external sequencer to the PK-6's MIDI OUT socket.
- Use a MIDI cable (commercially available) to connect and the MIDI OUT socket of the external sequencer to the PK-6's MIDI IN socket.
Note: Your computer may have to be connected to a MIDI interface. The PK-6 needs to be connected to the MIDI interface.

3. Switch on the external sequencer and the PK-6.
NOTE
To prevent malfunction and/or damage to speakers or other devices, always turn down the volume, and turn off the power on all devices before making any connections.
Archiving your settings to the external sequencer
- Press the [SHIFT] footswitch to activate Shift mode (secondary footswitch functions).
The [SHIFT] indicator lights. The display shows --- - Press the [HOLD/PARAMETER] footswitch.
The [PARAMETER] indicator flashes. The display will indicate "rEt". The PK-6 is now in Parameter mode. - Press the [OCTAYER BASS/DOWN] or [PORTAMENTO/UP] footswitch to select the "dMP" parameter.
- Activate data reception or recording on the external device.
- Wait until the sequencer's count-in (if applicable) is finished and press [ENTER] pedal to start the MIDI Dump.
When the MIDI Dump has been completed, the display will indicate "ok" and the PK-6 will leave Parameter mode.
- Stop recording on the external sequencer and save the data.
Transmitting your settings back to the PK-6
- Start the playback of the data you saved (and loaded).
All of the PK-6's indicators light and the display shows "dMP" (Dump).
When the data dump has been received, the display briefly indicates "ok".
Restoring the settings to the factory condition (Factory Reset)
The settings you've changed in Parameter mode (page 23) can be restored to their factory-set condition. This operation is called "Factory Reset."
- Press the [SHIFT] footswitch to activate Shift mode (secondary footswitch functions).
The [SHIFT] indicator lights. The display shows --- - Press the [HOLD/PARAMETER] footswitch.
The [PARAMETER] indicator flashes. The display will indicate "rEt". The PK-6 is now in Parameter mode. - Press the [OCTAYER BASS/DOWN] or [PORTAMENTO/UP] footswitch to select the "FAC" parameter.
- Press the [ENTER] pedal to confirm.
When the Factory Reset has been completed, the display will indicate "ok" and the PK-6 will leave Parameter mode.
7. Appendix
Troubleshooting
If the PK-6 does not function as you expect, please check the following points first. If this does not resolve the problem, contact your dealer or a nearby Roland service center.
No power
If the PK-6 is supposed to be powered via its PK OUT socket.
Did you connect the supplied PK cable to the external instrument's PK IN connector and the PK-6's PK OUT socket?
Please see "Connecting the PK-6 to an external instrument with its PK cable" auf S. 11.
Did you switch on the external instrument?
Switch on the external instrument. The PK-6's power is switched on/off in tandem with the external instrument when it is connected via PK cable.
If the PK-6 is supposed to be powered using batteries or an optional adaptor.
Did you press the PK-6's [POWER] switch (rear panel)?
Press the PK-6's [POWER] switch.
Did you install the supplied batteries?
Install the supplied batteries. See page 10.
Are the batteries depleted?
Insert new LR6 AA-type batteries or connect an optional adaptor.
Did you connect the optional AC adapter?
Connect an optional adapter, or install batteries.
Did the PK-6 go off after several minutes?
The "Auto Off" function may be active. Set it to "Off" (page 25).
No sound plays.
Does the external instrument's MIDI channel match the PK-6's MIDI channel?
When connecting to any external MIDI device, you must match the PK-6's MIDI channel to the MIDI channel set on the connected device. See "MIDI transmit channels" auf S. 21 for how to set the PK-6's transmit channels.
■ Sounds are not playing correctly.
Confirm whether or not the OCTAVE switch is set correctly (page 19).
The external pedal doesn't operate correctly.
Is the expression pedal or footswitch connected correctly?
Please check the connection. See "Connecting an optional expression pedal or footswitch to PK-6" auf S. 13.
Are you using an EV-series expression pedal or a Roland DP-series or BOSS FS-5U footswitch?
Use only the specified expression pedal (Roland EV-series, sold separately) or pedal switch (Roland DP-series, BOSS FS-5U). By connecting any other expression pedal or footswitch, you risk causing malfunction and/or damage the unit.
Did you assign a function to "Pedal Assign" parameter that is supported by the receiving device?
Please see "Pedal Assign" auf S. 24 and the owner's manual of the external MIDI instrument.
Did you connect the MIDI cable correctly?
Please see "Connecting the PK-6 to an external MIDI device" auf S. 12.
Specifications
Roland PK-6 Dynamic MIDI Pedal
Pedal board: 13 velocity sensitive keys
Modes: MONO, POLY, DRUM, MIDI CONTROLLER
Functions: Hold
Octaver Bass On/Off, Octaver value
Key Touch (Light, Medium, Heavy)
Real Time Backing Controller
External pedal assign
MIDI Merge
Controls: MONO switch
POLY switch
DRUM switch
Connectors: EXTERNAL PEDAL jack (Switch/Expression, programmable)
PK OUT Jack
MIDI connectors (IN, OUT, THRU)
DC IN
Power supply: AC adaptor (PSB-1U)
Via PK cable
Dry battery (LR6 (AA) type) x6
Current Draw: 130 mA (DC 9 V)
Dimensions: 598 (W) x 478 (D) x 118 (H) mm
23-9/16 (W) x 18-7/8 (D) x 4-11/16 (H) inches
Weight: 8.8kg / 19 lbs 7 oz
Owner's Manual
Accessories:
Dry battery (LR6 (AA) type) x6
PK cable
MIDI cable
Options: AC adaptor (PSB-1U), DP-series/ BOSS FS-5U foot switch, Roland EV-series expression
pedal
NOTE
In the interest of product improvement, the specifications and/or appearance of this unit are subject to change without prior notice.
Roland
PK-6
Bedienungsanleitung
BK-7m, BK-5, JUPITER-80 usw.
MIDI Controller User Edit
| Display Wert Vorgabe | ||
| CEEU | Not, FA (Start), FB (Cont- nue), FC (Stop), In1 (Intro1), In2 (Intro2), In3 (Intro3), In4 (Intro4), Mn1 (Main1), Mn2 (Main2), Mn3 (Main3), Mn4 (Main4), Fu1 (Fill Up1), Fu2 (Fill Up2), Fu3 (Fill Up3), Fd1 (Fill Down1), Fd2 (Fill Down2), Fd3 (Fill Down3), En1 (Ending1), En2 (Ending2), En3 (Ending3), En4 (Ending4), Brm (Break Mute), Oin (Old Intro), Oen (Old Ending), Ofv (Old Fill To Variation), OFo (Old Fill To Original) | Siche "MIDI CONT- ROLLER- Modus" auf S. 42. |
| RoF | Off, 10, 30, 240 240 |
Key Touch (Light, Medium, Heavy)
Real Time Backing Controller
MIDI-Buchsen (IN, OUT, THRU)
DC IN-Buchse
Batterien x6 (LR6 (AA))
Batterien x6 (LR6 (AA))
PK-Kabel
MIDI-Kabel
BK-7m, BK-5, JUPITER-80 etc.
MIDI Controller User Edit
| Ecran Réglage | Par défaut | |
| CEEU | Not, FA (Start), FB (Conti-nue), FC (Stop), In1 (Intro1), In2 (Intro2), In3 (Intro3), In4 (Intro4), Mn1 (Main1), Mn2 (Main2), Mn3 (Main3), Mn4 (Main4), Fu1 (Fill Up1), Fu2 (Fill Up2), Fu3 (Fill Up3), Fd1 (Fill Down1), Fd2 (Fill Down2), Fd3 (Fill Down3), En1 (Ending1), En2 (Ending2), En3 (Ending3), En4 (Ending4), Brm (Break Mute), Oin (Old Intro), Oen (Old Ending), Ofv (Old Fill To Variation), OFo (Old Fill To Original) | Voyez "Mode MIDI CON-TROL-LER" à la page 68. |
| RoF | Off, 10, 30, 240 240 |
Key Touch (Light, Medium, Heavy)
Real Time Backing Controller
Prises MIDI (IN, OUT, THRU)
Prise DC IN
Consummation: 130mA DC 9V
Dimensions: 598 (L) x 478 (P) x 598 (H) mm
Poids: 8,8kg
Piles sèches (LR6 (AA)) x6
Cable PK
Cable MIDI
BK-7m, BK-5, JUPITER-80 ecc.
| Schermo Valore Default | ||
| PED | Exp (Expression), Cut(Cutoff), Res (Resonance),Pbd, (Pitch Bend Down),Pbu (Pitch Bender Up),Mod (Modulation), Hld(Hold), Vol (Volume), Pan(Panpot), C16 (Control Change 16), C17 (Control Change 17), C18(Control Change 18), C19(Control Change 19) | Exp(Expres-sion) |
MIDI Controller User Edit
| Schemo Valore Default | ||
| CEE | Not, FA (Start), FB (Conti-nue), FC (Stop), In1 (Intro1), In2 (Intro2), In3 (Intro3), In4 (Intro4), Mn1 (Main1), Mn2 (Main2), Mn3 (Main3), Mn4 (Main4), Fu1 (Fill Up1), Fu2 (Fill Up2), Fu3 (Fill Up3), Fd1 (Fill Down1), Fd2 (Fill Down2), Fd3 (Fill Down3), En1 (Ending1), En2 (Ending2), En3 (Ending3), En4 (Ending4), Brm (Break Mute), Oin (Old Intro), Oen (Old Ending), Ofv (Old Fill To Variation), OFo (Old Fill To Original) | Vedi "ModiMIDICON-TROL-LER" a pagina 9 4. |
| RoF | Off, 10, 30, 240 240 |
Key Touch (Light, Medium, Heavy)
Real Time Backing Controller
Connettori MIDI (IN, OUT, THRU)
Committre DC IN
BK-7m, BK-5, JUPITER-80etc.
| Pantalla Valor | Por defeto | |
| PED | Exp (Expression), Cut(Cutoff), Res (Resonance),Pbd, (Pitch Bend Down),Pbu (Pitch Bender Up),Mod (Modulation), Hld(Hold), Vol (Volume), Pan(Panpot), C16 (Control Change 16), C17 (Control Change 17), C18(Control Change 18), C19(Control Change 19) | Exp(Expres-sion) |
MIDI Controller User Edit
| Pantalla Valor | Por defejo | |
| CBBU | Not, FA (Start), FB (Conti- nue), FC (Stop), In1 (Intro1), In2 (Intro2), In3 (Intro3), In4 (Intro4), Mn1 (Main1), Mn2 (Main2), Mn3 (Main3), Mn4 (Main4), Fu1 (Fill Up1), Fu2 (Fill Up2), Fu3 (Fill Up3), Fd1 (Fill Down1), Fd2 (Fill Down2), Fd3 (Fill Down3), En1 (Ending1), En2 (Ending2), En3 (Ending3), En4 (Ending4), Brm (Break Mute), Oin (Old Intro), Oen (Old Ending), Ofv (Old Fill To Variation), OFo (Old Fill To Original) | Consulte "Modo MIDI CONTRO- LLER" en la págrina 1 20. |
| RoF | Off, 10, 30, 240 240 |
Key Touch (Light, Medium, Heavy)
Real Time Backing Controller
Conectores MIDI (IN, OUT, THRU)
Jack DC IN
WAARSCHUWING WAARSCHUWING
② EXTERNAL PEDAL-connector
BK-7m, BK-5, JUPITER-80 enz.
■Programmakeuze-commando's (PC)
| Display Waarde | Fabrieksinstelling | |
| PED | Exp (Expression), Cut (Cutoff), Res (Resonance), Pbd, (Pitch Bend Down), Pbu (Pitch Bender Up), Mod (Modulation), Hld (Hold), Vol (Volume), Pan (Panpot), C16 (Control Change 16), C17 (Control Change 17), C18 (Control Change 18), C19 (Control Change 19) | Exp (Expression) |
MIDI Controller User Edit
| Display Waarde | Fabrieksinstellung | |
| CEE | Not, FA (Start), FB (Conti-nue), FC (Stop), In1 (Intro1), In2 (Intro2), In3 (Intro3), In4 (Intro4), Mn1 (Main1), Mn2 (Main2), Mn3 (Main3), Mn4 (Main4), Fu1 (Fill Up1), Fu2 (Fill Up2), Fu3 (Fill Up3), Fd1 (Fill Down1), Fd2 (Fill Down2), Fd3 (Fill Down3), En1 (Ending1), En2 (Ending2), En3 (Ending3), En4 (Ending4), Brm (Break Mute), Oin (Old Intro), Oen (Old Ending), Ofv (Old Fill To Variation), OFo (Old Fill To Original) | Zie "MIDI CON-TROLLER-mode" op blz. 146. |
| RoF | Off, 10, 30, 240 240 |
Key Touch (Light, Medium, Heavy)
Real Time Backing Controller
OCTAYER BASS-schakelaar
PORTAMENTO-schakelaar
SHIFT-schakelaar
POWER-schakclaar
MIDI-connectors (IN, OUT, THRU)
DC IN-connector
Vocding: Adapter (PSB-1U)
Via PK-kabel
Batterijen x6 (LR6 (AA))
Opgenomen vermogen: 130mA (DC 9V)
Afmetingen: 598 (B) × 478 (D) × 118 (H) mm
Gewicht: 8,8kg
Accessoires: Handleiding
Batterijen x6 (LR6 (AA))
PK-kabel
MIDI-kabel
Model: PK-6 Dynamic MIDI Pedal Date: Dec. 12, 2011
Recognized Receive Data
System Realtime Messages
Status
FEH
- By receiving an Active Sensing message, the PK-6 enters the mode timing the interval between incoming MIDI messages. If the interval exceeds 500ms, the PK-6 transmits Note Off messages corresponding to the transmitted notes being On, and returns from this mode.
System Exclusive messages
Data Set 1 (DT1) is the only System Exclusive messages received by the PK-6.
Data set 1 DT1 (12H)
Status Data byte Status F0H 41H, 10H, 00H, 02h, 12H, aaH, bbH, ccH, ddH, ... eeH, sum
Byte Explanation
FOH Exclusive status 41H ID number (Roland)
10H Device ID
00H Model ID (MSB)
02H Model ID (LSB)
12H Command ID (DT1)
aaH Address MSB: upper byte of the starting address of the data to be sent (12H).
bbH Address: middle byte of the starting address of the data to be sent (Parameters Group address 00H - 02H).
ccH Address LSB: lower byte of the starting address of the data to be sent (00H)
ddH Data: the actual data to be sent. Multiple bytes of data are transmitted in order starting from the address.
:
eeH
Data
sum
Checksum
F7H EOX (End Of Exclusive)
Address of parameter groups
Address(H)
Parameter group
12 00 00 Retrigger, Velocity, Touch, Portamento Time, Octaver Value, Pedal Assign, Auto Off, Transpose, Octave, Program changes, MIDI Channel
12 01 00 MIDI Controller User Edit
12 02 00 Drum User Edit
All other messages received
The messages received via MIDI IN are mixed ("merged") with the PK-6's MIDI messages and transmitted via MIDI OUT ("Soft Thru" function).
Version: 1.00
Transmitted Data
Channel Voice Messages
Note off
Status 2nd byte 3rd byte 8nH kkH 00H
n= MIDI channel number 0H-FH (Ch.1~16)
kk= note number 00H~7FH (0~127)
W = note off velocity 00H-7FH (0-127)
Note on
Status 2nd byte 3rd byte 9nH kkH vvH
n= MIDI channel number: 0H-FH (Ch.1-16)
kk= note number: 00H-7FH (0-127)
vv= note on velocity: 01H-7FH (1-127)
Control Change
Bank Select (Controller number 0,32)
Status 2nd byte 3rd byte
BnH 00H mmH
BnH 20H IIH
n= MIDI channel number: 0H~FH (Ch.1~16)
mm= Bank number MSB: 00H~7FH
II= Bank number LSB: 00H~7FH
Modulation (Controller number 1)
Status 2nd byte 3rd byte BnH 01H vH
n= MIDI channel number: 0H~FH (Ch.1~16) v = Modulation depth: 00H~7FH (0~127)
Portamento Time (Controller number 5)
Status 2nd byte 3rd byte
BnH 05H vvH
n= MIDI channel number: 0H~FH (Ch.1~16) v = Portamento Time: 00H~7FH (0~127),
Volume (Controller number 7)
Status 2nd byte 3rd byte BnH 07H vH
n=MIDI channel number 0H-FH (Ch.1-16) W = Volume: 00H~7FH (0-127)
n=MIDI channel: 0H-FH (ch.1-16) W = expression: 00H-7FH (0-127)
Pan (Controller number 10)
Status 2nd byte 3rd byte BnH 0AH vvH
n= MIDI channel number: 0H~FH (Ch.1~16)
vv= Pan: 00H~40H~7FH (Left~Center~ Right),
Expression (Controller number 11)
Status 2nd byte 3rd byte BnH OBH wH
n=MIDI channel: 0H-FH(ch.1-16)
vv=expression: 00H-7FH(0-127)
General Purpose (Controller number 16)
Status 2nd byte 3rd byte BnH 10H vH
n= MIDI channel number: 0H~FH (Ch.1-16)
w= Control value: 00H~7FH (0~127)
General Purpose (Controller number 17)
Status 2nd byte 3rd byte
11H wH
n= MIDI channel number: 0H~FH (Ch.1~16)
W = Control value: 00H~7FH (0~127)
General Purpose (Controller number 18)
Status 2nd byte 3rd byte
BnH 12H vvH
n= MIDI channel number: 0H~FH (Ch.1~16)
vv=Controlvalue:00H~7FH(0~127)
General Purpose (Controller number 19)
Status 2nd byte 3rd byte
13H wH
n= MIDI channel number: 0H-FH (Ch.1-16)
vv = Control value: 00H~7FH (0~127)
Hold 1 (Controller number 64)
Status 2nd byte 3rd byte
BnH 40H vvH
n= MIDI channel number: 0H~FH (Ch.1~16)
w = Control value: 00H~7FH (0~127)
Portamento (Controller number 65)
Status 2nd byte 3rd byte
BnH 41H wH
n= MIDI channel number: 0H~FH (Ch.1~16)
vv=Controlvalue:00H-7FH(0~127)0-63=OFF,
64~127=ON
Filter Resonance (Timbre/Harmonic Intensity) (Controller number 71)
Status 2nd byte 3rd byte
47H vH
n= MIDI channel number: 0H~FH (Ch.1~16)
W = Resonance value 00H-7FH (-64~0~+63)
(relative change):
Cutoff (Controller number 74)
Status 2nd byte 3rd byte
4AH wH
n= MIDI channel number: 0H~FH (Ch.1~16)
w= Cutoff value 00H~7FH(-64~0~+63)
(relative change):
Program Change
Status 2nd byte 3rd byte
CnH ppH
n= MIDI channel number: 0H~FH (Ch.1~16)
pp=Program number:00H~7FH(prog.1~prog.128)
Pitch Bend Change
Status 2nd byte 3rd byte
EnH IIH mmH
n= MIDI channel number: 0H~FH (Ch.1~16)
mm,II=Pitch Bend value:00 00H-40 00H-7F 7FH
(-8192 - 0 - + 8191)
Channel Mode Messages
MONO (Controller number 126)
Status 2nd byte 3rd byte
7EH mmH
n= MIDI channel number: 0H~FH (Ch.1~16)
mm=mono number:00H\~10H(0\~16)
POLY (Controller number 127)
Status 2nd byte 3rd byte
BnH 7FH 00H
n= MIDI channel number: 0H~FH (Ch.1~16)
System Realtime Messages
Active Sensing
Status
FEH
This message is transmitted at intervals of approximately
250 ms.
Start
Status
FAH
- Continuc
Status
FBH
- Stop
Status
FCH
System Exclusive messages
Data Set 1 (DT1) is the only System Exclusive messages
transmitted by the PK-6.
Data set 1 DT1 (12H)
Status Data byte Status
FOH 41H, 10H, 00H, 02h, 12H, aaH, bbH
ccH,ddH,...eeH,sum
Byte Explanation
FOH Exclusive
41H ID number (Roland)
10H Device ID
00H Model ID (MSB
02H Model ID (LSB)
12H Command ID (DT1)
aaH Address MSB: upper byte of the
starting address of the data to be
sent (12H).
bbH Address: middle byte of the starting
address of the data to be sent
(Parameters Group address 00H -
ccH Address LSB: lower byte of the
starting address of the data to be
sent (00H)
Multiple bytes of data are
transmitted in order starting from
:
eeH Data
sum Checksum
F7H EOX (End Of Exclusive)
Address of Parameters Group
Address(H) Parameter group
12 00 00 Retrigger, Velocity, Touch, Portamento Time,
Octaver Value, Pedal Assign, Auto Off
Transpose, Octave, Program changes, MIDI
Channel
12 01 00 MIDI Controller User Edit
120200 Drum User Edit
MIDI Implementation Chart
[Dynamic MIDI Pedal] Date: Dec. 12, 2011
Model: PK-6 Version: 1.00
| Function... Transmitted Recognized Remarks | |||||
| Basic Channel | Default Changed | 2, 10, 11 *1 1~16 *2 | X X | 2= MONO, 11= POLY, 10= DRUM, 10= MIDI CONTROLLER | |
| Mode | Default Message Altered | Mode 4 Mode 3, 4 (M=1) **** | X X | ||
| Note Number True Voice | 0~127 **** | X X | |||
| Velocity | Note ON Note OFF | 0 0 | X X | ||
| After Touch | Key's Ch's | X X | X X | ||
| Pitch Bend O X | |||||
| Control Change | 0,32 1 0 X M o d u l a t i o n 5 0 X Portamento Time 7 0 X V o l u m e 10 0 X Panpot 11 0 X Expression 16 0 X Controller number 16 17 0 X Controller number 17 18 0 X Controller number 18 19 0 X Controller number 19 64 0 X Hold 1 65 0 X Portamento 71 0 X Resonance 74 0 X Cutoff | 0 | X | Bank | |
| Program Change True # | 0 **** | X | Program Number 1~128 | ||
| System Exclusive O O | |||||
| System Common | Song Position Pointer Song Sel Tune | X X X | X X | ||
| System Real Time | Clock Commands | X 0 | X X | ||
| Aux Messages | All Sounds Off Reset All Controllers Local On/Off All Notes Off Active Sensing Reset | X X X X X X 0 X | X X X X X 0 X | ||
| Notes | *1 Factory Reset *2 Memorized All events received from MIDI IN are merged with the messages generated by the PK-6 and retransmitted via MIDI OUT. | ||||
Mode 1: OMNI ON, POLY Mode 2: OMNI ON, MONO 0: Yes Mode 3: OMNI OFF, POLY Mode 4: OMNI OFF, MONO X: No
Information
When you need repair service, call your nearest Roland Service Center or authorized Roland distributor in your country as shown below.
AFRICA
EGYPT
AI Fanny Trading Office
9, EBN Hagar Al Askalany Street
ARD E1 Golf, Heliopolis,
Cairo 11341,EGYPT
TEL:(022)-417-1828
REUNION
MARCEL FO-YAM Sarl
Royal Cape Park, Unit 24
Londonderry Road, Ottery
Cape Town, SOUTH AFRICA
TEL: (021) 7994900
ASIA
CHINA
Roland Shanghai Electronics
Co., Ltd.
SF.No.1500 Pingliang Road
Shanghai 200090, CHINA
TEL: (021) 5580-0800
Roland Shanghai Electronics
Co., Ltd. (BEIJING OFFICE)
3F, Soluxe Fortune Building
63 West Dawang Road, Chaoyang 100000, China
Distc,BeijingCHINA
TEL: (010) 3960-2583
HONG KONG
Tom Lee Music
11/F Silvercord Tower 1
30 Canton Rd
Tsimshatsui, Kowloon
HONG KONG
TEL:852-2737-7688
Parsons Music Ltd.
8th Floor, Railway Plaza, 39
Chatham Road South, T.S.T.
Kowloon, HONG KONG
TEL:852-2333-1863
INDIA
Rivera Digitec (India) Pvt. Ltd.
411, Nirman Kendra Mahalaxmi
Flats Compound Off. Dr. Edwin
Moses Road, Mumbai-400011,
INDIA
TEL: (022) 2493 9051
INDONESIA
PT.Citra Intirama
Ruko Garden Shopping Arcade
Unit 8 CR, Podomoro City
Dr.Letjend.S.ParmanKav.281
Jakarta Barat 11470, INDONESIA Tel: (21) 5600-2510/5520
KOREA
Cosmos Corporation
1461-9,Seocho-Dong.
Seocho Ku, Seoul, KOREA
TEL: (02) 3486-8855
MALAYSIA/
SINGAPORE
Roland Asia Pacific Sdn. Bhd.
45-1,BlockC2,Jalan PJU 1/39
Dataran Prima, 47301 Petaling
Jaya, Selangor, MALAYSIA
TEL: (03) 7805-3263
PHILIPPINES
G.A. Yupangco & Co. Inc.
339 Gil J. Puyat Avenue
Makati, Metro Manila 1200,
PHILIPPINES
TEL: (02) 899 9801
TAIWAN
ROLAND TAIWAN ENTERPRISE
CO.,LTD.
9F-5, No. 112 Chung Shan
North Road Sec. 2 Taipei 104
TAIWAN R.O.C.
TEL: (02) 2561 3339
THAILAND
Theera Music Co., Ltd.
100-108 Soi Verng Nakornkasem,
New Road, Sumpantawong.
Bangkok 10100,THAILAND
TEL: (02) 224-8821
VIET NAM
VIET THUONG CORPORATION
386 CACH MANG THANG TAM ST
DIST.3, HO CHI MINH CITY
VIETNAM
TEL: (08) 9316540
ECUADOR
Mas Musika
Boulevard Andrews, Albrook,
Panama City, REP. DE PANAMA
TEL:31
PARAGUAY
155, New National Road
Patras 26442, GREECE
TEL:2610435400
HUNGARY
Roland East Europe Ltd.
- Torokbalint, FSD Park 3.ep.
HUNGARY
TEL (23) 511011
IRELAND
Roland Ireland
E2 Calmount Park, Calmount
Avenue, Dublin 12,
Republic of IRELAND
TEL (01)4294444
ITALY
Roland Italy S.p.A.
Roland Systems Group EMEA, S.L.
Branch Office Porto
Rotunda Eng. Edgar Cardoso
23,9°C
4400-676Vila Nova de Gaia,
PORTUGAL
TEL(+351)226080060
ROMANIA
FBS LINES
Plata Libertatii 1
535500 Gheorgheni, ROMANIA
TEL (266) 364 609
RUSSIA
Roland Music LLC
Dorozhnaya ul3,korp.6
Roland Systems Group EMEA, S.L.
Paseo Garcia Faria, 33-35
08005 Barcelona, SPAIN
TEL 934939100
SWEDEN
Roland Scandinavia A/S
SWEDISH SALES OFFICE
Marbackagatan 31,4 tr.
SE-123 43 Farsta, SWEDEN
TEL(0)86830430
SWITZERLAND
Roland (Switzerland) AG
Atlantic Close, SWANSEA SA7 9FJ
UNITED KINGDOM
TEL(01792)702701
MIDDLE EAST
BAHRAIN
Moon Stores
No.1231&1249 Rumaytha
Building Road 3931,
Manama 339,BAHRAIN
TEL:17813942
IRAN
MOCO INC
Jadeh Makhsous Karaj (K-9)
Nakhe Zarin Ave
Jalal Street, Reza Alley No.4
Tehran 1389716791, IRAN
TEL(021)-44545370-5
ISRAEL
Halilit P. Greenspoon & Sons
Ltd.
8 Retzif Ha'alia Hashnia St.
Tel-Aviy-Yafo ISRAEL
TEL: (03) 6823666
JORDAN
Al-Yousif Service Center
P.O.Box 126 (Safat) 13002,
KUWAN
TEL:00965802929
LEBANON
Chahine S.A.L
George Zeidan St., Chahine Bldg.
Achrafieh, P.O.Box: 16-5857
Beirut,LEBANON
TEL (01) 20-1441
OMAN
TALENTZ CENTRE L.L.C.
Malatan House No.1
Al Noor Street, Ruwi
SULTANATE OF OMAN
TEL:24783443
QATAR
AL-EMADI TRADING &
CONTRACTING CO.
P.O.Box 62,Doha, QATAR
TEL:4423-554
SAUDI ARABIA
aDawliah Universal Electronics
APL
Behind Pizza Inn
Prince Turkey Street
aDawliah Building,
POBOX2154
Alkhobar 31952
SAUDI ARABIA
TEL(03)8643601
SYRIA
Technical Light & Sound Center
PO Box 13520 Bldg No.49
Khaled Abn Alwalid St.
Damascus, SYRIA
TEL (011) 223-5384
TURKEY
ZUHAL DIS TICARET A.S.
Galip Dede Cad. No.33
Beyoglu, Istanbul, TURKEY
TEL: (021) 24985 10
U.A.E.
Zak Electronics & Musical
Instruments Co. L.L.C.
Zabeel Road, Al Sheroog Bldg.
No.14.Ground Floor.Dubal
U.A.E.
TEL: (04) 3360715
NORTH AMERICA
CANADA
Roland Canada Ltd.
(Head Office)
5480 Parkwood Way Richmond B.
C.V6V2M4.CANADA 电话:(800)375-1699
TEL: (604) 270 6626
Roland Canada Ltd.
(Toronto Office)
170 Admiral Boulevard
Mississauga On LST 2N6
CANADA
TEL (905) 362 9707
U.S.A.
Roland Corporation U.S.
5100 S. Eastern Avenue
Los Angeles, CA 90040-2938
U.S.A.
TEL(323)8903700
m : x = 1 或 3x + 4y + 1 = 0
m - 1 0 ;
12 × 12 = 64
1 + u8 = 1.5
( x - 2x) t - xy^2 = ( x - 2x) f^ t
1
m = 311
1,2,3
For EU countries


This symbol indicates that in EU countries, this product must be collected separately from household waste, as defined in each region. Products bearing this symbol must not be discarded together with household waste.