
ERGC50 - Beard trimmer PANASONIC - Free user manual and instructions
Find the device manual for free ERGC50 PANASONIC in PDF.
| Product type | Beard trimmer |
| Brand | Panasonic |
| Model | ERGC50 |
| Dimensions (L x W x H) | 6.7 × 2.5 × 9.2 cm |
| Weight | 175 g |
| Power supply | AC adapter + built-in rechargeable Ni-MH battery |
| Motor voltage | 1.2 V DC |
| Charging time | Approx. 8 hours (16 hours for initial charge) |
| Runtime | Approx. 40 minutes |
| Blades | Stainless steel, water-washable, with cleaning lever |
| Combs included | Comb A (1-5 mm), Comb B (6-25 mm) |
| Cutting length without comb | 0.5 mm |
| Cleaning | Under running water or with the supplied brush |
| Lubrication | Before and after each use (oil supplied) |
| Blade lifespan | Approx. 2 years (for use 2 times per month, 20 minutes) |
| Battery lifespan | Approx. 3 years (for recharging 3 times per month) |
| Usage | Household use only |
| Safety | Do not use on animals, do not use if blades are damaged |
Frequently Asked Questions - ERGC50 PANASONIC
User questions about ERGC50 PANASONIC
0 question about this device. Answer the ones you know or ask your own.
Ask a new question about this device
Download the instructions for your Beard trimmer in PDF format for free! Find your manual ERGC50 - PANASONIC and take your electronic device back in hand. On this page are published all the documents necessary for the use of your device. ERGC50 by PANASONIC.
USER MANUAL ERGC50 PANASONIC
Operating Instructions
(Household) AC/Rechargeable Hair Clipper
Model No. ER-GC70/ER-GC50
English 2 Dansk 39 Česky 75
natural_image
Line drawing of a handheld hairbrush with circular head and handle (no text or symbols)Before operating this unit, please read these instructions completely and save them for future use.
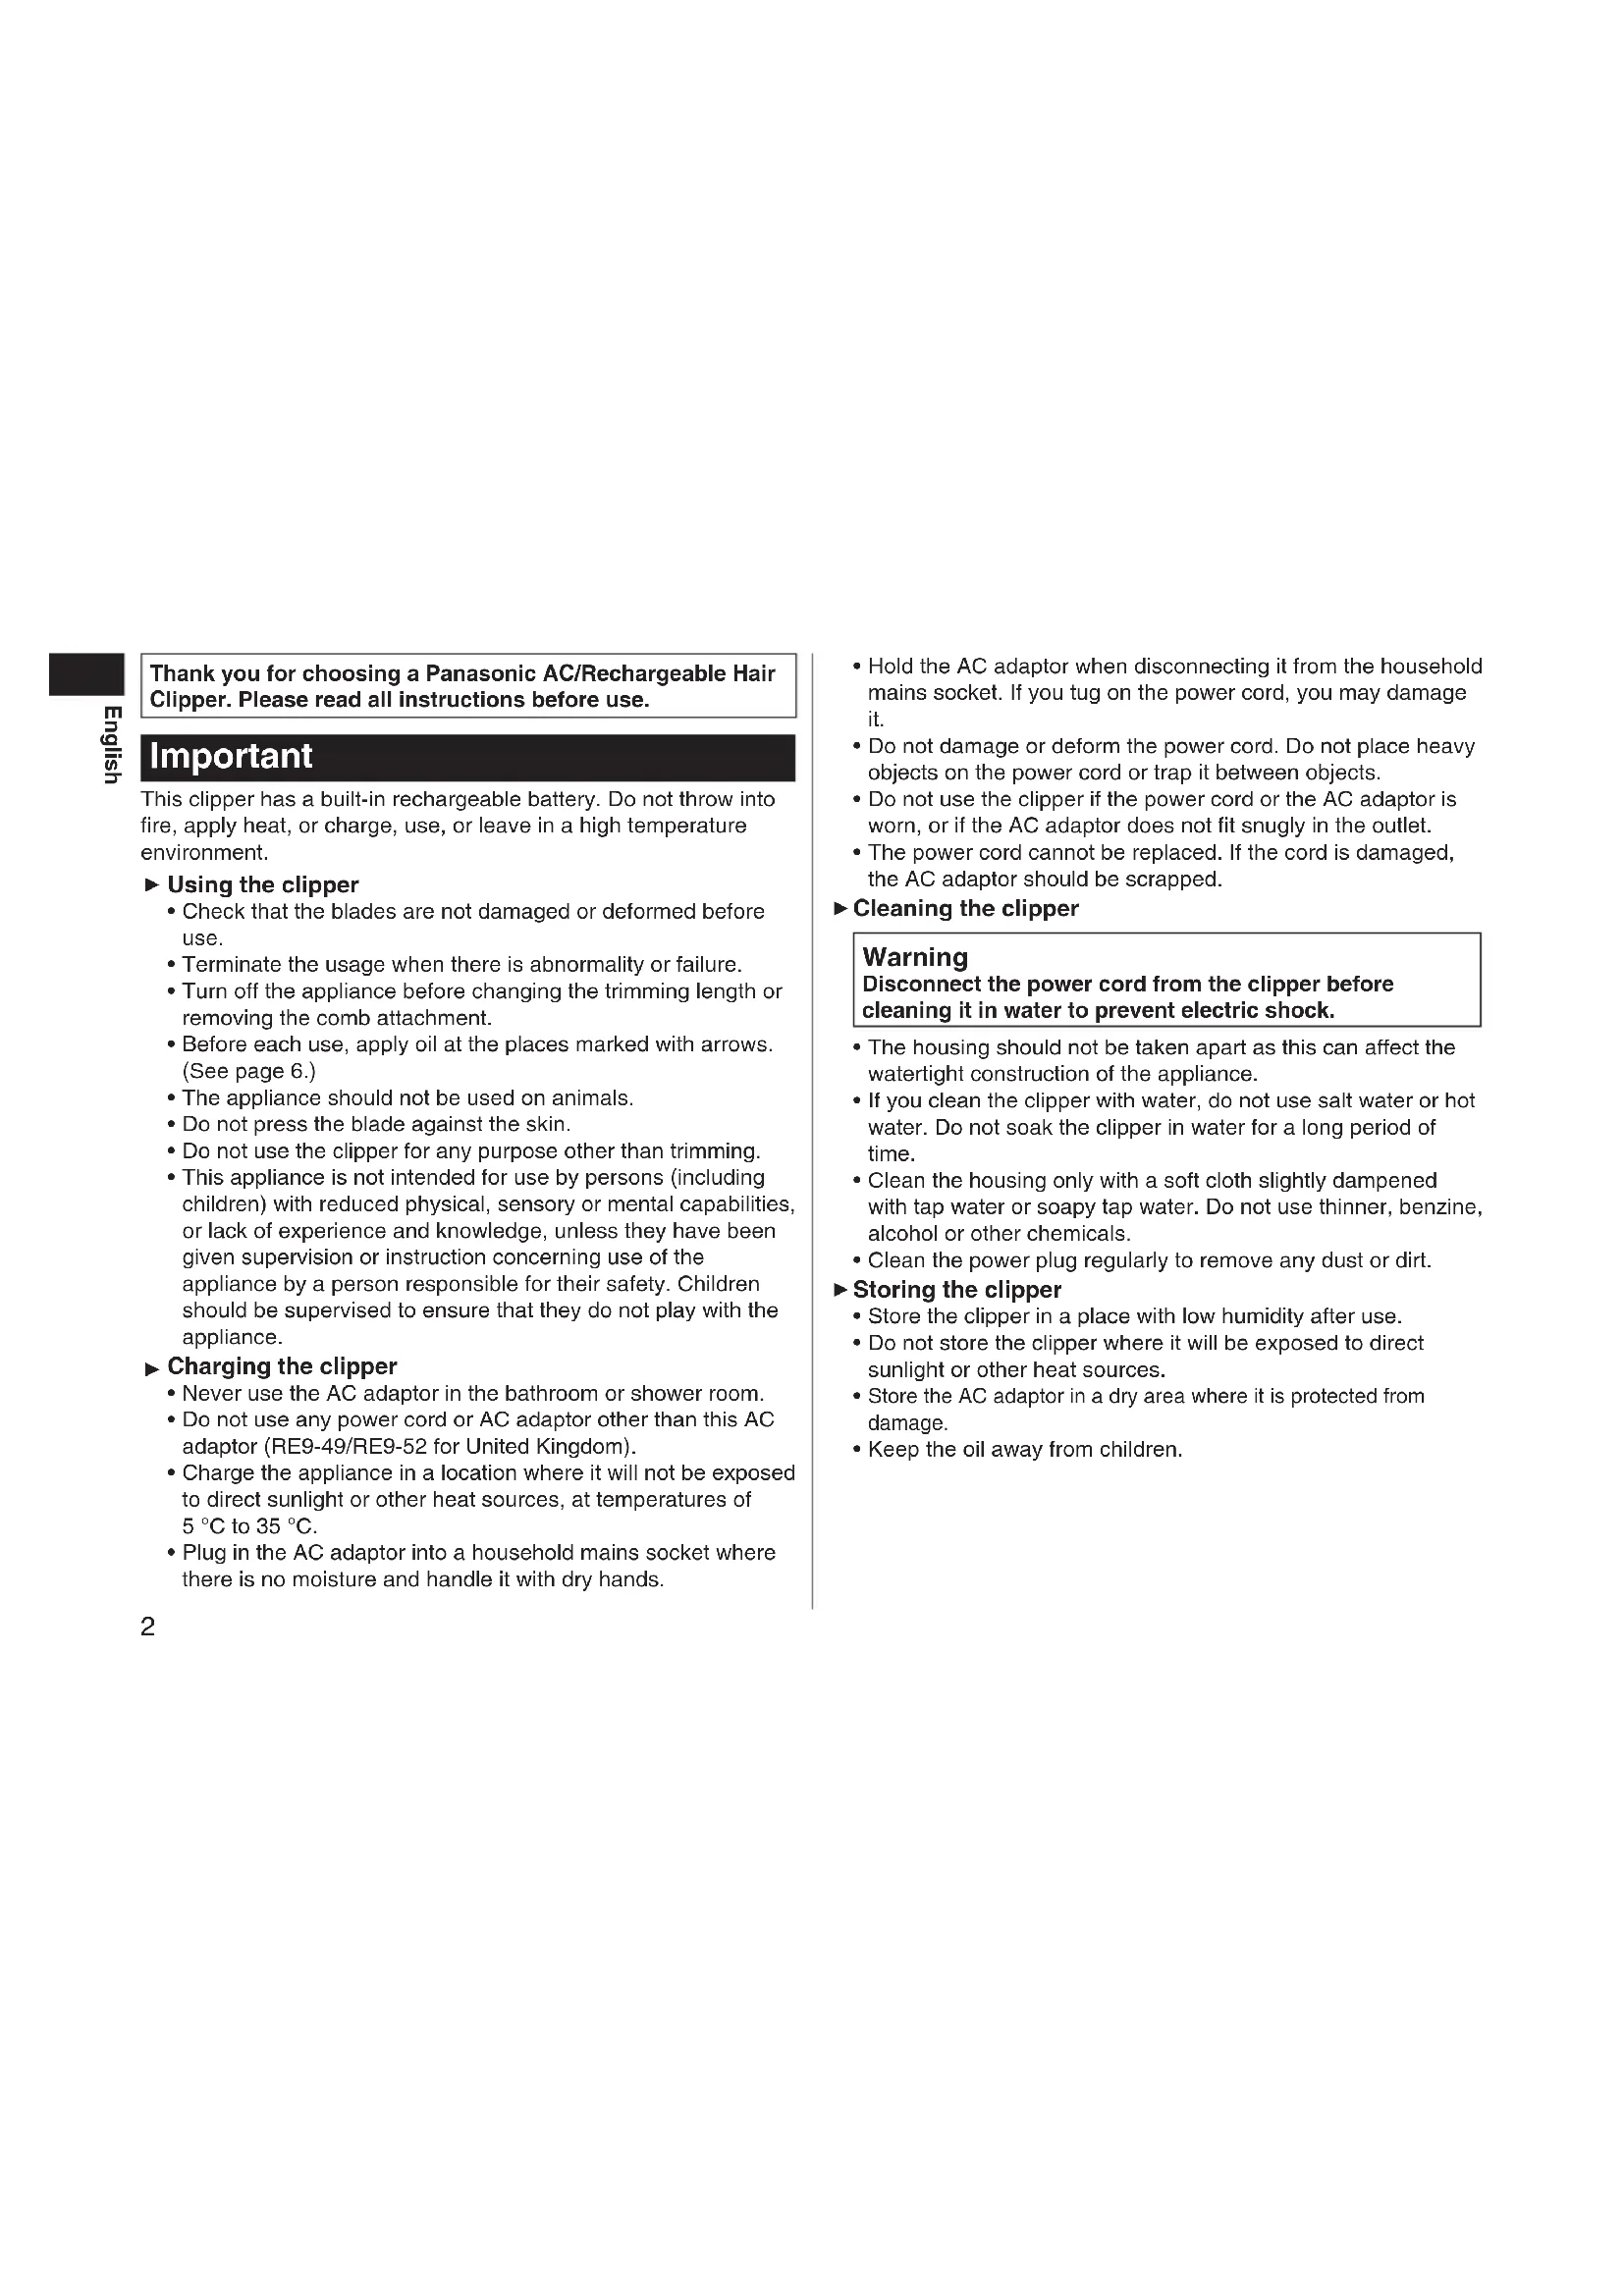
Thank you for choosing a Panasonic AC/Rechargeable Hair Clipper. Please read all instructions before use.
Important
This clipper has a built-in rechargeable battery. Do not throw into fire, apply heat, or charge, use, or leave in a high temperature environment.
▶ Using the clipper
- Check that the blades are not damaged or deformed before use.
- Terminate the usage when there is abnormality or failure.
- Turn off the appliance before changing the trimming length or removing the comb attachment.
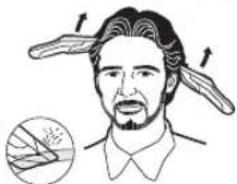
- Before each use, apply oil at the places marked with arrows. (See page 6.)
- The appliance should not be used on animals.
- Do not press the blade against the skin.
- Do not use the clipper for any purpose other than trimming.
- This appliance is not intended for use by persons (including children) with reduced physical, sensory or mental capabilities, or lack of experience and knowledge, unless they have been given supervision or instruction concerning use of the appliance by a person responsible for their safety. Children should be supervised to ensure that they do not play with the appliance.
▶ Charging the clipper
- Never use the AC adaptor in the bathroom or shower room.
- Do not use any power cord or AC adaptor other than this AC adaptor (RE9-49/RE9-52 for United Kingdom).
- Charge the appliance in a location where it will not be exposed to direct sunlight or other heat sources, at temperatures of 5^ to 35^ .
- Plug in the AC adaptor into a household mains socket where there is no moisture and handle it with dry hands.
- Hold the AC adaptor when disconnecting it from the household mains socket. If you tug on the power cord, you may damage it.
- Do not damage or deform the power cord. Do not place heavy objects on the power cord or trap it between objects.
- Do not use the clipper if the power cord or the AC adaptor is worn, or if the AC adaptor does not fit snugly in the outlet.
- The power cord cannot be replaced. If the cord is damaged, the AC adaptor should be scrapped.
▶ Cleaning the clipper
Warning
Disconnect the power cord from the clipper before cleaning it in water to prevent electric shock.
- The housing should not be taken apart as this can affect the watertight construction of the appliance.
- If you clean the clipper with water, do not use salt water or hot water. Do not soak the clipper in water for a long period of time.
- Clean the housing only with a soft cloth slightly dampened with tap water or soapy tap water. Do not use thinner, benzine, alcohol or other chemicals.
- Clean the power plug regularly to remove any dust or dirt.
▶ Storing the clipper
- Store the clipper in a place with low humidity after use.
- Do not store the clipper where it will be exposed to direct sunlight or other heat sources.
- Store the AC adaptor in a dry area where it is protected from damage.
- Keep the oil away from children.
Parts identification
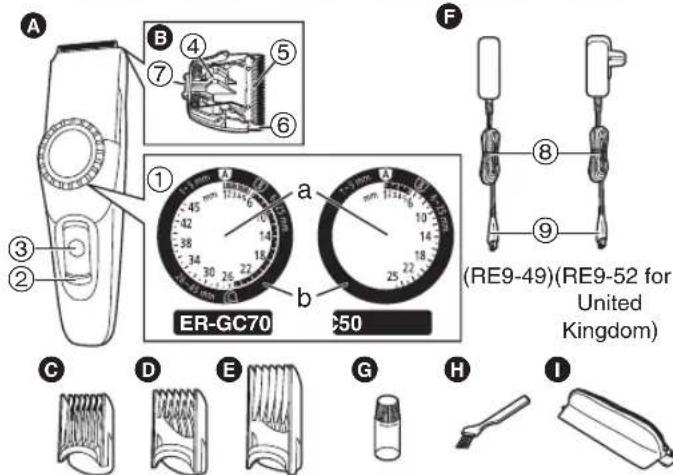
A Main body
① Dial
a. Scale marks
b. Instruction marks
② Charge indicator lamp
③ Power switch [0/1]
B Blade block
④ Cleaning lever
⑤ Moving blade
⑥ Stationary blade
⑦ Mounting hook
C Comb attachment [A] (1 mm to 5 mm)
D Comb attachment [B] (6 mm to 25 mm)
E Comb attachment [C] (26 mm to 45 mm)
F AC adaptor (RE9-49/RE9-52)
⑧ Power cord
⑨ Appliance plug
G Oil
H Cleaning brush
Travel pouch
| Accessories ER-GC70 ER-GC50 | ||
| CComb attachment [A] (1mm to 5 mm) | √ | √ |
| DComb attachment [B] (6 mm to 25 mm) | √ | √ |
| EComb attachment [C] (26 mm to 45 mm) | √ | - |
| ITravel pouch | √ | - |
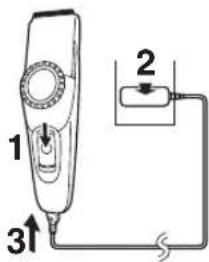
Charging the clipper
If the clipper is losing speed, it can be fully charged in 8 hours. A full charge supplies enough power for approximately 40 minutes of use.
- Slide the power switch on the main body to the "0" position to turn off the clipper.
- Plug in the AC adaptor into a household mains socket.
- Insert the appliance plug into the clipper.
The charge indicator lamp lights and stays on until the AC adaptor is removed from a household mains socket.
- Disconnect the AC adaptor from a household mains socket when charging is completed.
When charging the clipper for the first time or when it has not been in use for more than 6 months, please charge it for 16 hours (in order to activate the rechargeable battery). If you charge the clipper with the battery completely discharged, the charge indicator lamp may not glow immediately. However, the lamp will glow normally after charging for a few minutes.
AC operation
You can use the clipper while charging, even if the battery capacity is low. If the clipper does not work, continue charging it for approx. 1 minute.
Using
Using comb attachments
- Slide the power switch on the main body to the "0" position to turn off the clipper.
- Make sure there is no damage to the blade.
- Mount the attachment and adjust the dial. See pages 4 and 5.•
- Slide the power switch on the main body to the "1" position to turn on the clipper.
After adjusting the trimming length, make sure the attachment is fixed with the switch in the "1" position. When the attachment is mounted correctly, the dial will not turn with the switch set to "1".
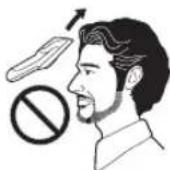
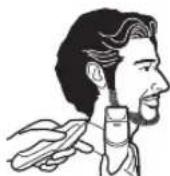
- Cut hair to the correct height by moving the clipper back against the flow of the hair.
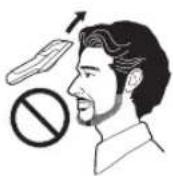
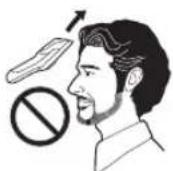
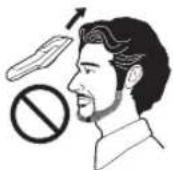
Do not use the clipper in an inverted position. This can cut hair too deeply.
▶ Trimming without attachment combs
Trimming your hair without an attachment will trim hair length to approx. 0.5 mm.
- Cut hair by placing the clipper head directly on the scalp.
Installing the attachment comb
Comb attachment [A] (1 mm to 5 mm)
![PANASONIC ERGC50 - Comb attachment [A] (1 mm to 5 mm) - 1](/content/2026/02/394954/images/ae7583de88d109e75aa19b266696260b5bfbc0f867e696c6551885ec978589c1.jpg)
![PANASONIC ERGC50 - Comb attachment [A] (1 mm to 5 mm) - 2](/content/2026/02/394954/images/1d0657f6b130b8796395cce93c9a2206850ad977c17a160bc7b5c98046b5dae7.jpg)
![PANASONIC ERGC50 - Comb attachment [A] (1 mm to 5 mm) - 3](/content/2026/02/394954/images/0c494acb0d8243ba915aa3a62741bdf60bab51e1e76abc0f3db9a3da5afe226e.jpg)
-
Align the instruction mark "A to "1".
-
Mount the comb attachment [A] to the main body.
-
Align the instruction mark "to the length you want to cut.
| Cutting length (mm)(estimate) | 1 2 | 3 4 5 | |||
| Scale marks 1 2 3 4 5 |
- The dial will turn past the indicator "6" even when the comb attachment [A] is being used. The clipper will not cut well above 6 mm, so do not try to cut more than 6 mm with the comb attachment [A] mounted.
• Actual hair length will be a little longer than the height you set.
Comb attachment [B] (6 mm to 25 mm)
![PANASONIC ERGC50 - Comb attachment [B] (6 mm to 25 mm) - 1](/content/2026/02/394954/images/f6ff429b9c63517405e29fa069e16a6ac505e9618f2d36ce34aaa5b0af287484.jpg)
![PANASONIC ERGC50 - Comb attachment [B] (6 mm to 25 mm) - 2](/content/2026/02/394954/images/474687d70a50e4405e49ab1fb77cc00cace6b4cf7297b53ba16599b746b9f02f.jpg)
![PANASONIC ERGC50 - Comb attachment [B] (6 mm to 25 mm) - 3](/content/2026/02/394954/images/137134e88efd2536c7cc459d39fb3cd95c9958e137e176558331989625630f5e.jpg)
-
Align the instruction mark "B to "6".
-
Mount the comb attachment [B] to the main body.
-
Align the instruction mark "B to the length you want to cut.
| Cutting length (mm)(estimate) | 6 7 | 8 9 | 10 11 | 12 | |||
| Scale marks 6 • • • 10 • • | |||||||
| Cutting length (mm)(estimate) | 13 1 | 4 15 | 16 17 | 18 19 | |||
| Scale marks | • 14 • • • | 18 • | |||||
| Cutting length (mm)(estimate) | 20 2 | 21 22 | 23 24 | 25 | |||
| Scale marks • • 22 • • • |
Actual hair length will be a little longer than the height you set.
Comb attachment [C] (26 mm to 45 mm) ER-GC70
![PANASONIC ERGC50 - Comb attachment [C] (26 mm to 45 mm) ER-GC70 - 1](/content/2026/02/394954/images/419ab93dbbdfe9f979fc8f2410706d1c45ff7abb629214cfccab6fd408e11f31.jpg)
![PANASONIC ERGC50 - Comb attachment [C] (26 mm to 45 mm) ER-GC70 - 2](/content/2026/02/394954/images/9fcc98d2ac93fd8e71d9b3a9c6a9327007f35d45acb77704b183c77707014486.jpg)
![PANASONIC ERGC50 - Comb attachment [C] (26 mm to 45 mm) ER-GC70 - 3](/content/2026/02/394954/images/884aba4d2ea44adfebf42dc48a090e481496138c950aa337e4e3a9859d275fc2.jpg)
-
Align the instruction mark "C to "26".
-
Mount the comb attachment [C] to the main body.
-
Align the instruction mark "to the length you want to cut.
| Cutting length (mm)(estimate) | 26 | 27 | 28 | 29 | 30 | 31 | 32 | |||
| Scale marks 26 | • • | • | 30 • | |||||||
| Cutting length (mm)(estimate) | 33 | 34 | 35 | 36 | 37 | 38 | 39 | |||
| Scale marks | • | 34 • | • • | 38 • | ||||||
| Cutting length (mm)(estimate) | 40 | 41 | 42 | 43 | 44 | 45 | ||||
| Scale marks | • • | 42 • | • | 45 |
Actual hair length will be a little longer than the height you set.
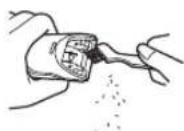
Cleaning
Cleaning with brush
- Disconnect the power cord from the clipper.
- Be sure to set the switch to "0" before you remove the blade.
- Remove the comb attachment.
- Hold the main body, place your thumb against the blades and then push them away from the main body.
- Brush off any hair trimmings from the main body and from around the blade.
- Brush any hair trimmings out from between the stationary blade and the moving blade while pressing down the cleaning lever to raise the moving blade.
Cleaning in water

The mark on the left means suitable for cleaning under an open water tap.
Warning
Disconnect the power cord from the clipper before cleaning it in water to prevent electric shock.
- Disconnect the power cord from the clipper.
- Remove the blade.
- Rinse off any hair trimmings that are sticking to the blades with running water.
- Rinse out any hair trimmings that are inside the clipper with running water.
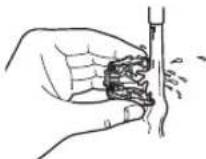
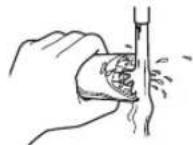
- Gently shake the clipper 4 or 5 times and then wipe off any water drops from the clipper and the blade.
- Place the clipper on a towel with the power switch on the main body facing downwards to let it dry fully.
Lubrication
Apply the oil to the clipper before and after each use.
Apply a drop of the oil to the points indicated by the arrows.
natural_image
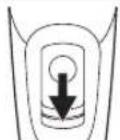
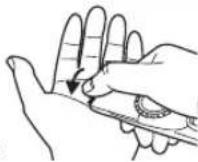
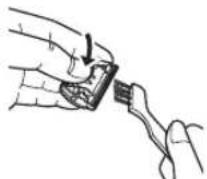
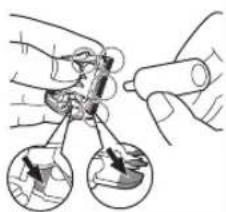
Illustration of hands holding a tool with two circular insets showing internal components (no text or symbols)Remounting the blade
Fit the mounting hook into the blade mounting on the clipper and then push in until you hear a click.
natural_image
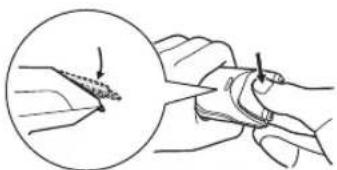
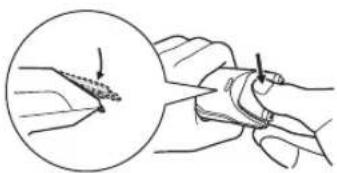
Illustration of a hand holding a pen, with an inset showing a magnified view of the pen tip (no text or symbols present)▶ Blade life
Blade life will vary according to the frequency and length of use. It is expected to be about 2 years when using the clipper twice a month for 20 minutes each time. If cutting efficiency is reduced despite proper maintenance, change the blades.
▶ Battery life
Battery life will vary according to the frequency and length of use. If the batteries are charged 3 times a month, the service life will be approximately 3 years.
- It is recommended that the clipper be recharged at least every 6 months even when not in regular use because the charge will drain from the battery and its service life may be shortened.
Disposal of the clipper battery
Remove the built-in rechargeable battery before disposing of the clipper. Please make sure that the battery is disposed of at an officially designated location if there is one. Do not dismantle or replace the battery so that you can use the clipper again. This could cause fire or an electric shock. Replace it at an authorized service center.
- Disconnect the power cord from the clipper when removing the battery.
- Discharge the battery completely before removing it.
- Be careful not to short the + and - terminals of the battery after removing it.
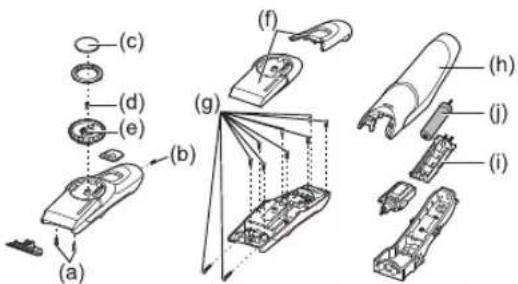
- Perform steps 1 to 8 and lift the battery, and then remove it.
- Disconnect the power cord from the clipper.
- Remove the blade from the clipper. Remove the 2 screws (a).
- Remove the screw (b).
- Detach the dial cover (c), remove the screw (d) and disconnect the dial (e).
- Detach the housing (f).
- Remove the screws (g).
- Disconnect housing (h).
- Disconnect the battery chamber (i) and remove the battery (j).
Do not attempt to replace the battery for the purpose of reusing the clipper. This could result in the risk of fire or electric shock.
Important notice regarding environmental protection
The built-in rechargeable Nickel-Metal Hydride battery contains substances that may be environmentally harmful. Please remove the battery before discarding your clipper.
For environmental protection and recycling of materials
This clipper contains a Nickel-Metal Hydride battery. Please make sure that the battery is disposed of at an officially assigned location, if there is one in your country.
Specifications
| Power source | See the name plate on the AC adaptor. (Automatic voltage conversion) |
| Motor voltage 1.2 | V DC |
| Charging time Approx. | 8 hours |
This product is intended for household use only.
Airborne Acoustical Noise: 60 (dB (A) re 1 pW)
Please read "Information for Users on Collection and Disposal of
Old Equipment and used Batteries" on page 107.
natural_image
Illustration of hands holding a tool with two circular insets showing mechanical components (no text or symbols)natural_image
Illustration of a hand holding a finger with a pen, showing a magnified view of the nail being held (no text or symbols present)
▶ Coupe sans sabot
natural_image
Illustration of hands holding a tool with two circular insets showing internal components (no text or symbols)Remonter la lame
natural_image
Illustration of a hand holding a finger with a pen, showing a magnified view of the needle being inserted (no text or symbols present)natural_image
Illustration showing two hand-drawn steps of a tool application, one applying material to a surface and the other holding a sample (no text or symbols present)natural_image
Illustration of hands using a tool to adjust or install a mechanical component, with two views showing internal components (no text or symbols present)natural_image
Illustration of a hand holding a finger with a pen inserted, showing the application of a tool (no text or symbols present)Durata della lama
natural_image
Illustration of hands holding a tool with two circular insets showing mechanical components (no text or symbols)natural_image
Illustration of a hand holding a finger with a pen, showing a magnified view of the finger being held (no text or symbols present)
natural_image
Illustration of a hand holding a pen, with a magnified inset showing the tip and arrow (no text or symbols)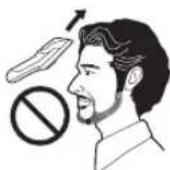
▶ Trimning uden kamaggregater
natural_image
Two-step illustration showing hand holding a small object above a vertical rod, then applying powder to another (no text or symbols)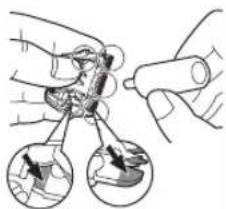
natural_image
Illustration of hands holding a tool with two views of a mechanical component (no text or symbols)natural_image
Illustration of a hand holding a pen with a magnified inset showing the tip of the pen (no text or symbols present)▶ Bladets levetid
natural_image
Illustration of hands using a tool to adjust or install a mechanical component, with two circular insets showing close-ups of the parts (no text or symbols present)natural_image
Illustration of a hand holding a finger with a pen, showing a magnified view of the finger being held (no text or symbols present)F Vekselstrømsadapter (RE9-49/
RE9-52)
⑧ Strømkabel
⑨ Utstyrsplugg
G Olje
H Rengjøringsbørste
Reiseveske

natural_image
Illustration of hands holding a tool with two views of the tool, showing internal components (no text or symbols)natural_image
Illustration of a hand holding a pen with a magnified inset showing the tip of the pen (no text or symbols present)▶ Bladets levetid
natural_image
Two-step illustration showing hands using a tool to remove or clean material from a pipe (no text or symbols present)
natural_image
Illustration of hands holding a tool with two views of the tool, showing internal components (no text or symbols)natural_image
Illustration of a hand holding a pen, with an inset showing a magnified view of the pen tip (no text or symbols present)▶ Bladets livslängd

Kampaosa [C] (26–45 mm) ER-GC70
natural_image
Illustration of hands using a tool to adjust or install a mechanical component, with two circular insets showing close-ups of the parts (no text or symbols present)natural_image
Illustration of a hand holding a finger with a pen, showing a magnified view of the finger being held (no text or symbols present)▶ Terän käyttöikä
natural_image
Two-step illustration showing hand holding a small object above a cylindrical object, with no visible text or symbols.
natural_image
Illustration of hands holding a tool with two views of the tool, showing internal components (no text or symbols)natural_image
Illustration of a hand holding a pen with a magnified inset showing the tip of the pen (no text or symbols present)▶ Trwałość ostrza
natural_image
Illustration showing two hand-drawn steps of a tool application, one applying material to a surface and the other holding a sample (no text or symbols present)
natural_image
Illustration of hands holding a tool with two views of the tool, showing internal components (no text or symbols)natural_image
Illustration of a hand holding a finger with a pen, showing the application of a pen tip (no text or symbols present)▶ Životnost čepele
natural_image
Illustration of hands using a tool to adjust or install a mechanical component, with two views showing different parts (no text or symbols present)Nainštalovanie čepele
Montážny háčik zasuňte do miesta namontovania čepele na strihači a zatlačte, dokial' nebudete počuť kliknutie.
natural_image
Illustration of a hand holding a piece of material with a magnified inset showing a tool tip (no text or symbols)▶ Životnost' čepeli
natural_image
Illustration of hands using a tool to adjust or install a mechanical component, with two views showing different parts (no text or symbols present)natural_image
Illustration of a hand holding a pen, with an inset showing a magnified view of the pen tip (no text or symbols present)
natural_image
Illustration of two hands performing a manual tool manipulation technique (no text or symbols present)natural_image
Illustration of hands holding a tool with two circular insets showing foot positions (no text or symbols)Reinstalarea lamei
natural_image
Illustration of a hand holding a finger with a magnified inset showing a finger pointing to the tip (no text or symbols)natural_image
Illustration of two hands performing a manual tool manipulation technique (no text or symbols present)natural_image
Illustration of hands holding a tool with two circular insets showing close-ups of mechanical components (no text or symbols)Biçağı tekrar takma
natural_image
Illustration of a hand holding a small object with a pencil, showing a magnified view of the object (no text or symbols present)▶ Bıçak ömrü
Wanbao Base, Shiguang Road, Panyu District, Guangzhou,
Guangdong, China
YETKILI TEMSILCI
Panasonic Elektronik Satis A.S.
Maslak Mah. Bilim Sok.
Sun Plaza No:5 K:16
34398 Maslak-Sisli
Istanbul Turkey
Tel : (+90) 212 367 94 00
Fax: (+90) 212 286 21 11
www.panasonic.com.tr
MÜŞTERİ HİZMETLERİ: 444 72 62
ÜRÜNÜN KULLANIM ÖMRÜ 7 YILDIR
Information for Users on Collection and Disposal of Old Equipment and used Batteries
These symbols on the products, packaging, and/or accompanying documents mean that used electrical and electronic products and batteries should not be mixed with general household waste.
For proper treatment, recovery and recycling of old products and used batteries, please take them to applicable collection points, in accordance with your national legislation and the Directives 2002/96/EC and 2006/66/EC.
By disposing of these products and batteries correctly, you will help to save valuable resources and prevent any potential negative effects on human health and the environment which could otherwise arise from inappropriate waste handling.
For more information about collection and recycling of old products and batteries, please contact your local municipality, your waste disposal service or the point of sale where you purchased the items.
Penalties may be applicable for incorrect disposal of this waste, in accordance with national legislation.
For business users in the European Union If you wish to discard electrical and electronic equipment, please contact your dealer or supplier for further information.
[Information on Disposal in other Countries outside the European Union]
These symbols are only valid in the European Union. If you wish to discard these items, please contact your local authorities or dealer and ask for the correct method of disposal.
![PANASONIC ERGC50 - [Information on Disposal in other Countries outside the European Union] - 1](/content/2026/02/394954/images/a2d2333c9186075fb3b7110f34111dce001f8e8022cc44bcdb8ad57d403e5180.jpg)
Note for the battery symbol (bottom two symbol examples):
This symbol might be used in combination with a chemical symbol. In this case it complies with the requirement set by the Directive for the chemical involved.
Deutsch


- Important
- ▶ Using the clipper
- ▶ Charging the clipper
- ▶ Cleaning the clipper
- Warning
- ▶ Storing the clipper
- Parts identification
- Charging the clipper
- AC operation
- Using
- Using comb attachments
- Installing the attachment comb
- Comb attachment [A] (1 mm to 5 mm)
- Comb attachment [B] (6 mm to 25 mm)
- Comb attachment [C] (26 mm to 45 mm) ER-GC70
- Cleaning
- Cleaning with brush
- Cleaning in water
- Lubrication
- Remounting the blade
- ▶ Blade life
- ▶ Battery life
- Disposal of the clipper battery
- Important notice regarding environmental protection
- For environmental protection and recycling of materials
- Specifications
- ▶ Coupe sans sabot
- Remonter la lame
- Durata della lama
- ▶ Trimning uden kamaggregater
- ▶ Bladets levetid
- ▶ Bladets livslängd
- Kampaosa [C] (26–45 mm) ER-GC70
- ▶ Terän käyttöikä
- ▶ Trwałość ostrza
- ▶ Životnost čepele
- Nainštalovanie čepele
- ▶ Životnost' čepeli
- Reinstalarea lamei
- Biçağı tekrar takma
- ▶ Bıçak ömrü
- YETKILI TEMSILCI
- Information for Users on Collection and Disposal of Old Equipment and used Batteries
- [Information on Disposal in other Countries outside the European Union]
- Note for the battery symbol (bottom two symbol examples):
- Deutsch
Brand : PANASONIC
Model : ERGC50
Category : Beard trimmer