FGGA0501WWE - Surveillance Camera FRIEDLAND - Free user manual and instructions
Find the device manual for free FGGA0501WWE FRIEDLAND in PDF.

| Product type | Indoor wireless IP surveillance camera |
| Brand | Friedland |
| Model | FGGA0501WWE |
| Power supply | DC 5V / 1A (power adapter included) |
| Operating temperature | 0°C to 50°C (indoor use only) |
| Relative humidity | 20% to 80% |
| Wireless interface | IEEE 802.11b/g/n (up to 150 Mb/s) |
| Wireless range | 100 m in open space |
| Image sensor | RGB VGA 1/4 inch CMOS (day/night distinct) |
| Display resolution | VGA 640x480 / QVGA 320x420 |
| Lens | 3.2 mm, F2.0, viewing angle 60.3° |
| Night vision | Infrared LED, range 10 m, 0.0 Lux with IR |
| Video compression | H.264 (baseline profile level 3.1) |
| Storage | Micro SD card up to 32 GB (4 GB included) |
| Recording capacity | Approximately 300 clips of 33 seconds (2 GB) |
| Package contents | Camera, stand, power adapter, Ethernet cable, Micro SD card, mounting hardware, manual |
| Warranty | 2 years (repair or replacement) |
| France customer service | 0810 59 60 63 (Monday to Friday, national rate) |
| Maintenance and cleaning | Clean with a soft, dry cloth. Do not use abrasive products. |
| Safety | Follow instructions: install in a dry, ventilated environment, do not open, use gloves and goggles when drilling. |
Frequently Asked Questions - FGGA0501WWE FRIEDLAND
User questions about FGGA0501WWE FRIEDLAND
0 question about this device. Answer the ones you know or ask your own.
Ask a new question about this device
Download the instructions for your Surveillance Camera in PDF format for free! Find your manual FGGA0501WWE - FRIEDLAND and take your electronic device back in hand. On this page are published all the documents necessary for the use of your device. FGGA0501WWE by FRIEDLAND.
USER MANUAL FGGA0501WWE FRIEDLAND
natural_image
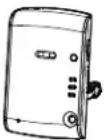
Line drawing of a portable electronic device with mounting base (no text or symbols)CE
ENGLISH Installaon and Operaon Manual 2
1 Intended use 3
2 Safety 3
2.1 Product 3
2.2 Power supply unit....3
2.3 Installaon....3
3 Descripon....3
3.1 Package contents....3
3.2 Required tools 4
3.3 System requirements 4
4 Overview 4
5 Installaon 5
5.1 Assembling the camera 5
5.2 Installing the camera....5
5.3 Electrical installaon 6
5.4 Viewing video from the camera 7
6 Wireless conncon setup....8
6.1 Wireless conncon (router without WPS buon) 8
6.2 Wireless conncon (router with WPS buon) 9
7 Operaon 9
7.1 Live-viewing the camera....9
7.2 Recording video to the Micro SD card....9
7.2.1 Manually recording video 9
7.2.2 Recording video with security detectors 9
7.3 Playing back video les from the Internet....10
7.4 Backing up video les from the Micro SD card on the PC 10
7.5 Playing back video les stored on the PC 10
8 Troubleshoong....11
9 Technical data....11
10 Disposal and recycling....12
11 EC declaraon of conformity.... 12
12 Guarantee .... 12
13 Customer support 12
1 Intended use
The FGGA0501WWE / FGGA05* Series / HIS5A kit is a wireless indoor IP camera. You can view and capture video and store it on a memory card.
2 Safety
2.1 Product
- Keep all safety warnings and instrucons for future reference.
- Obey the local regulaons applicable to the installaon of the product.
- Install the devices in dry, well-venlated environments (excepon for external components). Do not install the devices in humid environments (e.g. bathrooms).
- Do not expose the devices to direct sunlight or high temperatures.
- Do not aempt to open the devices.
2.2 Power supply unit
• Make sure that the mains voltage corresponds to the voltage on the rang plate.
- Do not try to replace the charger unit with a regular mains plug.
2.3 Installaon
- Wear safety gloves when drilling into walls.
- Wear safety glasses when drilling into walls.
• Make sure that there are no electrical wires and water pipes when drilling into walls. - Posion ladders onto a level and stable surface and at a safe angle.
3 Descripon
3.1 Package contents
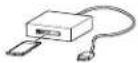
| Part | Descripon | Part | Descripon | Part | Descripon |
 | Wireless camera (1x) | 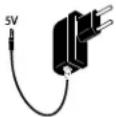 | Power adaptor (5V/1A) |  | Manual |
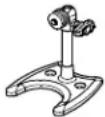 | Camera stand (1x) | 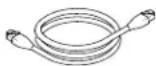 | Ethernet cable (RJ45 / 0.5m) (1x) | ||
 | Fasteners (1x) |  | Micro SD card (1x) |
Note:
If you replace the supplied Micro SD card, make sure that the new Micro SD card is formed into FAT32 format on a Windows PC before inserting it into the camera.
3.2 Required tools
| Tool | Descripon | Tool | Descripon |
 | Safety glasses |  | Bradawl |
 | Safety gloves | 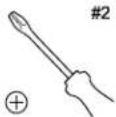 | Phillips screwdriver (#2) |
 | Memory card reader for PC (if PC has no built-in memory card reader) | 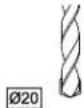 | Masonry drill bit (20 mm) |
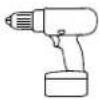 | Electric drill | 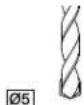 | Masonry drill bit (5 mm) |
 | Hammer |
3.3 System requirements
You must install and set up a GlobalGuard home alarm system and create an online account before you install the FGGA0501WWE / FGGA05* Series / HIS5A kit.
| Operang system | Windows XP / Windows Vista / Windows 7 |
| Web browser | Internet Explorer 6.x (or higher) |
| Central processing unit (CPU) | Penum 4: 1 GHz (or higher) |
| VGA card resoluon | 800x600 (or higher) |
| Video memory size | 128 Mb (or higher) |
| Internet bandwidth | 512 kbps(recommended upload speed for 1 camera) |
| Memory card | Micro SD: 4 GB (included) / 32 GB (supported) |
4 Overview
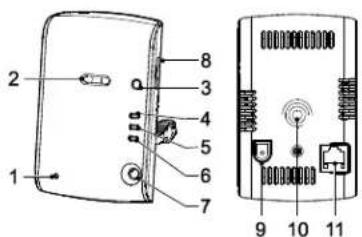
- Microphone
- Lens
- WPS buon
- Micro SD card indicator (yellow)
- Ethernet conncon indicator (blue)
- Internet conncon indicator (red)
- Infrared LED
- Memory card holder
- Power jack
- Mounng point for camera stand
- Ethernet jack
5 Installaon
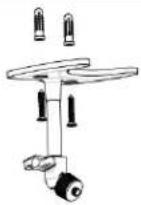
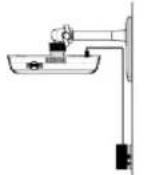
5.1 Assembling the camera
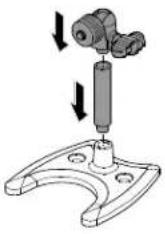 | 1. Assemble the camera stand. |
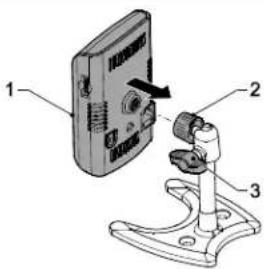 | 2. Tighten the camera (1) onto the camera stand. Set the camera to the correct angle. Tighten the knob (2).3. Loosen the thumbscrew (3).4. Set the camera (1) to the correct posion.5. Tighten the thumbscrew (3). |
5.2 Installing the camera
The camera has a built-in infrared LED to allow you to view at night for 24-hour surveillance. The LED will automatically acvate at night and the picture viewed will turn to black and white. The night vision range is up to 10 metres. If necessary, use a lamp to improve night vision.
Posion the camera in view of a door/window contact detector or a PIR movement detector. The camera can record video aer a security detector has been triggered by an intruder provided the camera has been setup with same locaon seng as the security detector.
The camera has an open-eld radio-frequency operang range of up to 100 metres. The amount by which the wireless range will reduce depends on the obstrucon between the camera and the wireless router. The eect on the range of mulple walls is cumulave.
| Wall type | Range reducon |
| Dry-lined paron wall | 10-30% |
| Single-layer brick wall | 20-40% |
| Double-layer brick wall | 30-70% |
| Metal panel/radiator | 90-100% |
| Wall | Ceiling | |
 |  | 1. Use the camera stand to mark the posion of the mounng holes on the wall or the ceiling. |
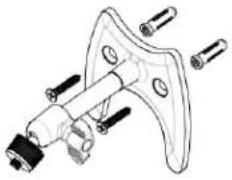 |  | 2. Drill mounng holes (5 mm) into the wall or the ceiling according to the mounng slots in the camera stand.3. Insert a supplied wall plug into each mounng hole.4. Tighten the camera stand to the wall using the supplied screws. |
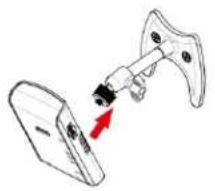 |  | 5. Tighten the camera onto the camera stand. Set the camera to the correct angle. Tighten the knob. |
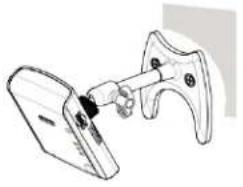 | 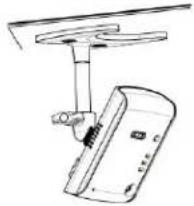 | 6. Loosen the thumbscrew.7. Set the camera to the correct posion.8. Tighten the thumbscrew. |
 | 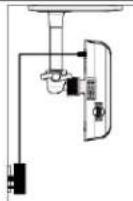 | 9. Connect the power adaptor to the camera.10. Switch on the camera.11. Check the live-view video from the website.12. If necessary, adjust the camera angle. |
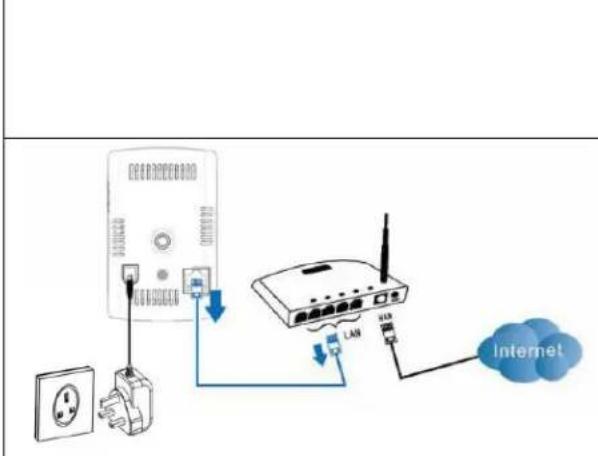
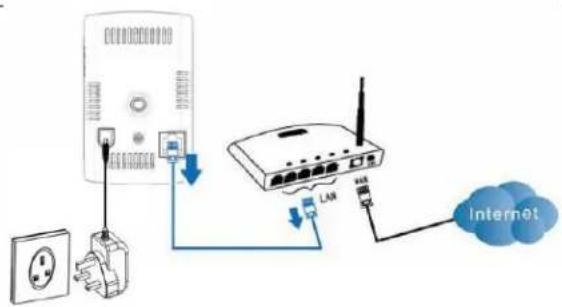
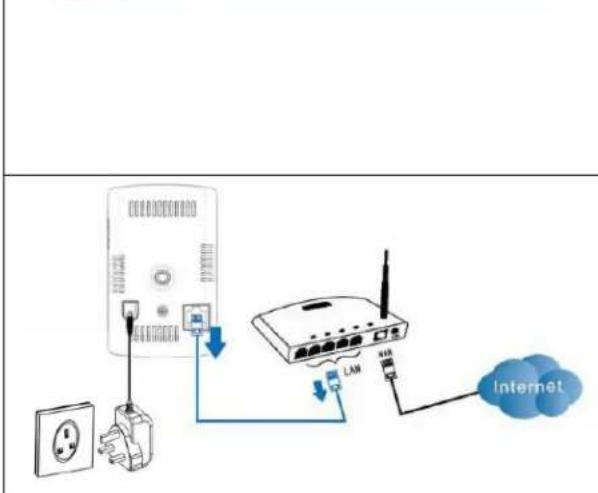
5.3 Electrical installaon
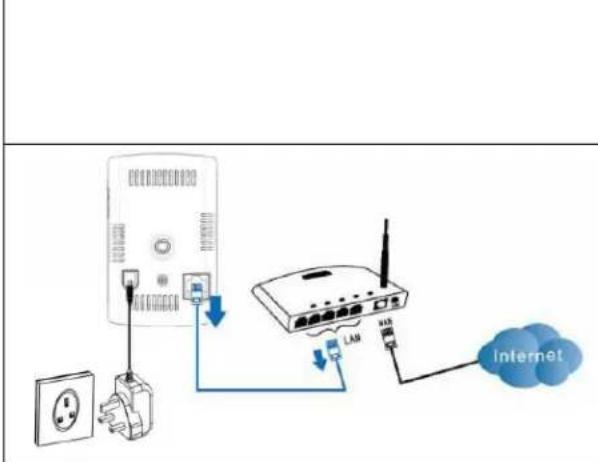
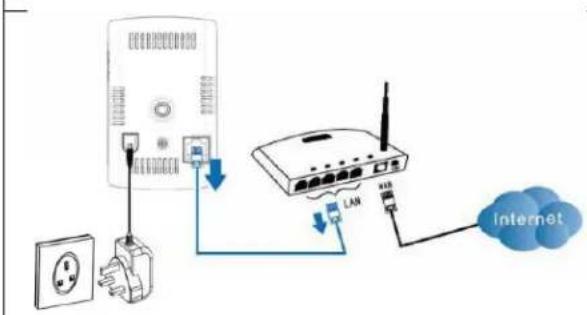
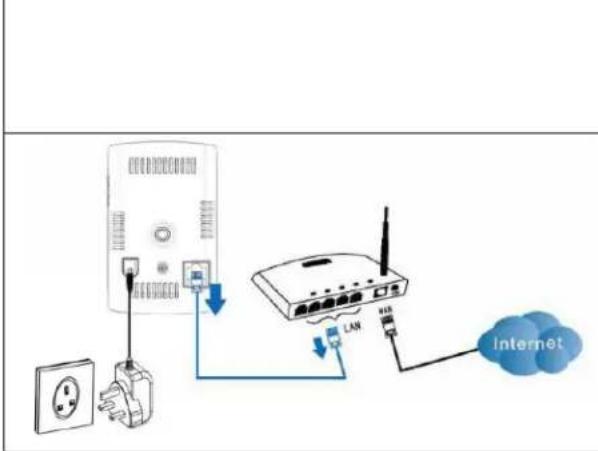
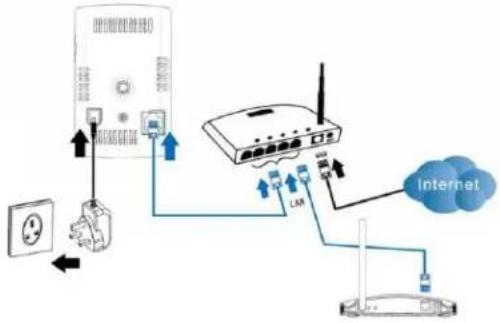 | 1. Connect the camera as shown.The Internet conncon indicator lights connuously to indicate that the Internet conncon is successful.Note:The camera must be connected to the same local network as the IP gateway to ensure recording. |
5.4 Viewing video from the camera
natural_image
Line drawing of a wireless router with four ports labeled 1 to 4 (no text or symbols beyond port numbers)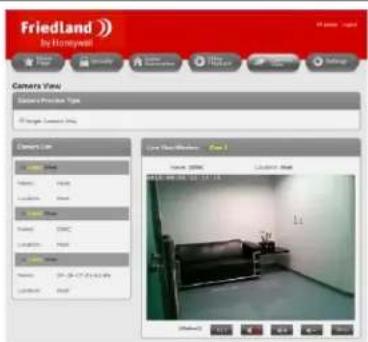
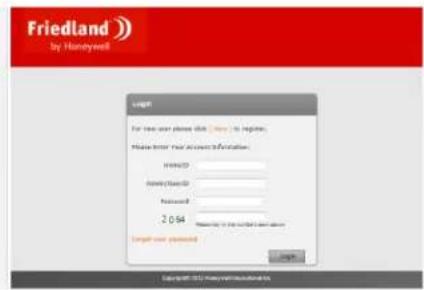
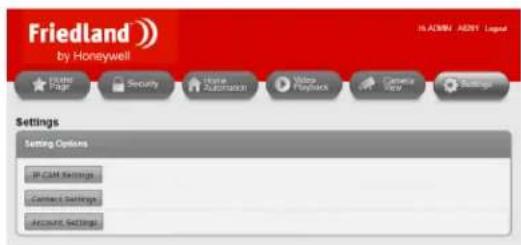
1. Log in to the website
hps://GlobalGuard.Friedland.co.uk on your PC.
a) Enter your account informaon:
"Home ID", "Admin/User ID", "Password".
b) Enter the 4-digit code.
c) Click "Login".
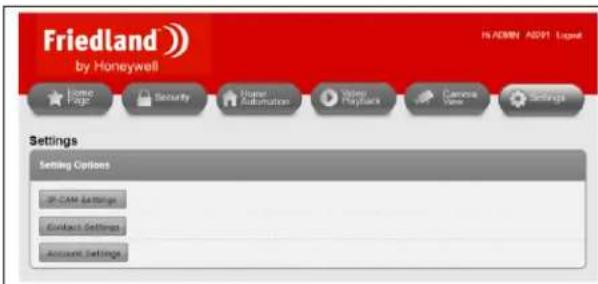
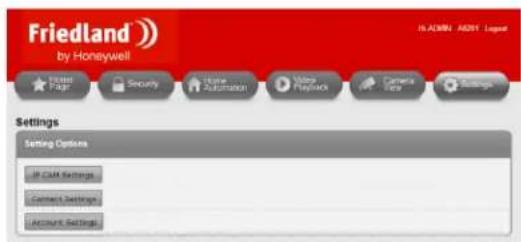
2. Add the new camera:
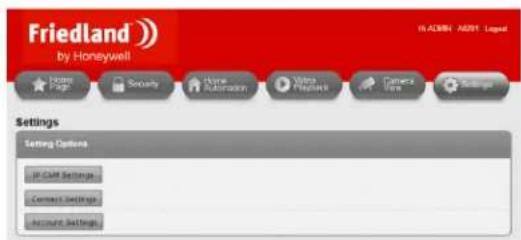
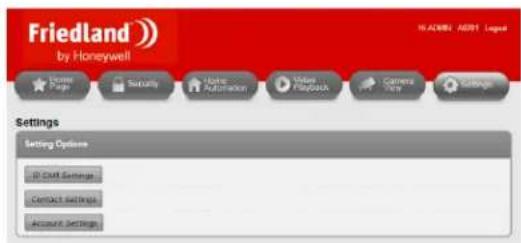
a) Click "Sengs".
b) Click "IP CAM Sengs"
c) Click "Add IPCAM" to add a new camera.
d) Enter the MAC address of the camera.
(The MAC address is printed on the camera.)
Note:
Follow the on-screen instrucons for registering the camera to operate with your system correctly.
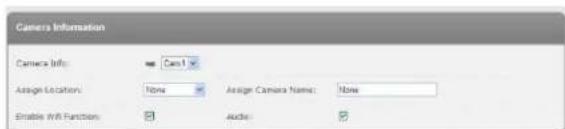
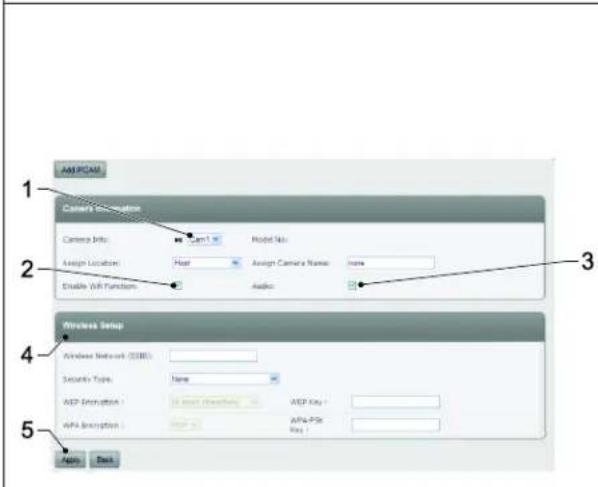
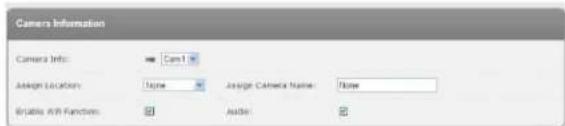
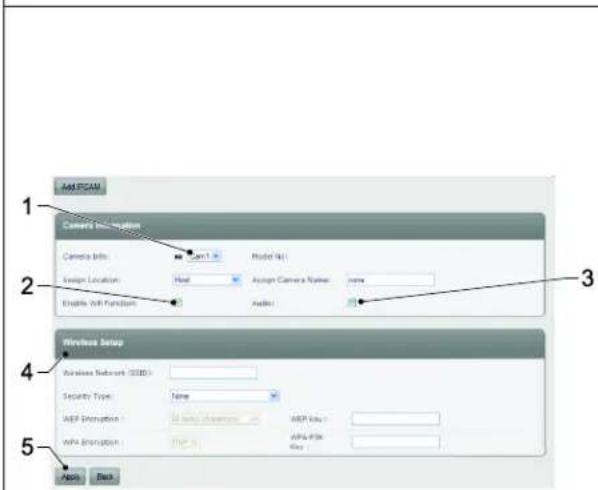
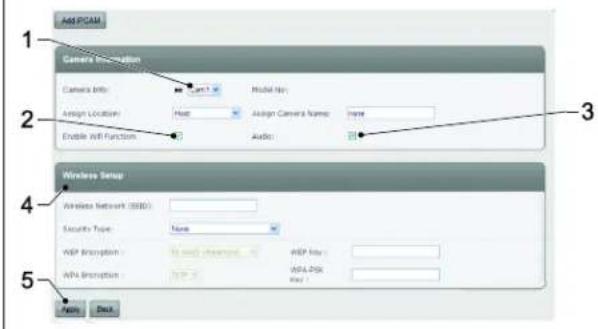
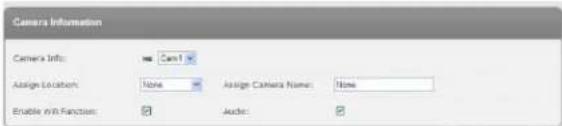
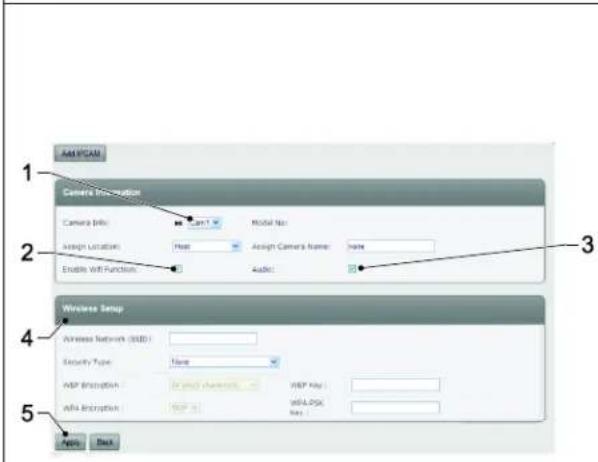
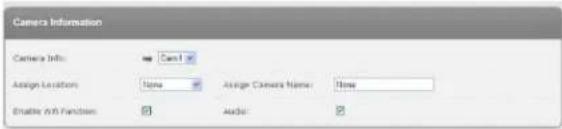
3. Assign advanced sengs to the camera:
- "Camera Info": camera number(automacally assigned to the camera)
- "Assign Locaon": camera locaon
- "Assign Camera Name": camera name
- "Enable Wi Funcon": to switch the Wi-Fi funcon on/o.
- "Audio": to switch the audio on/o.
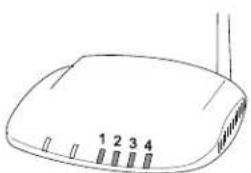
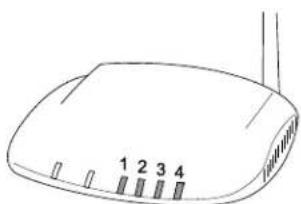
The indicator on the IP gateway comes on to indicate that the new camera has been added to your system:
Note:
The 4 indicators s the conneccon status of up to 8 cameras:
- If you connect camera 1-4, indicators 1-4 will become green.
- If you add camera 5, indicator 1 will become orange (etc.).
- If you disconnect camera 1 but camera 5 is sll acve, indicator 1 will become red (etc.).
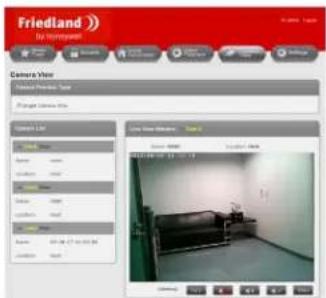
- Click "Camera View".
- Select the camera.
- Click "View".
6 Wireless conncon setup
6.1 Wireless conncon (router without WPS buon)

flowchart
graph TD
    A["Power"] --> B["Switch"]
    B --> C["Router Router"]
    C --> D["Internet"]
    D --> E["Switch"]
    E --> F["Switch"]
    style A fill:#f9f,stroke:#333
    style B fill:#ccf,stroke:#333
    style C fill:#cfc,stroke:#333
    style D fill:#fcc,stroke:#333
    style E fill:#cff,stroke:#333
    style F fill:#ffc,stroke:#333
- Log in to the website https://GlobalGuard.Friedland.co.uk on your PC.
- Click "Sengs".
-
Click "IP CAM Sengs".
-
Select the camera (1).
-
Select the Wi-Fi funcon (2).
-
Select the audio (3).
-
Enter the wireless security sengs (4):
-
Wireless Network: Enter the name of the wireless network of the router (SSID).
- Security Type: Select "None", "WEP" or "WPA/WPA2-PSK".
- WEP Mode: Select "64-bit (5 char)", "64-bit (10 hex)", "128-bit (13 char)" or "128-bit (26 hex)". Enter the WEP key.
- WPA-PSK Mode: Select "TKIP" or "AES". Enter the WPA-PSK key.
Note: "WPA2-PSK" is also supported. "WPA Enterprise" and "WPA2 Enterprise" are not supported.
- Click "Apply" (5) to save the changes. Wait for approximately one minute.
Note:
The IP camera must be connected to the same local network as the IP gateway.
- Disconnect the Ethernet cable from the camera to start the wireless conncon. The indicators on the camera come on and go o alternately. Within one minute, the indicators on the camera will go o and the camera will restart.
If the wireless conncon has been established, the Ethernet conncon indicator will ash and the Internet conncon indicator and the Micro SD card indicator will light connuously.
Note:
- If you change the camera to another locaon, disconnect the power adaptor from the wall socket, move the camera to the required locaon and connect the power adaptor to the wall socket again. If you move the camera much further away from the wireless router, check the signal strength of the wireless conncon using the signal strength meter on your PC or smartphone as a guide.
- If you use the wired Ethernet conncon, connect the Ethernet cable to camera again. If the wireless conncon between the camera and the router is poor, a wired conncon may also be required.
6.2 Wireless conncon (router with WPS buon)
flowchart
graph TD
    A["Power Input"] --> B["Switch"]
    B --> C["Router"]
    C --> D["Internet"]
    C --> E["Switch"]
    E --> F["Switch"]
    style A fill:#f9f,stroke:#333
    style B fill:#ccf,stroke:#333
    style C fill:#cfc,stroke:#333
    style D fill:#fcc,stroke:#333
    style E fill:#cff,stroke:#333
    style F fill:#ffc,stroke:#333
- Disconnect the Ethernet cable from the camera to start the wireless conncon.
- Press and release the WPS buon on the router. Within one minute, press and release the WPS buon on the camera. The indicators on the camera come on and go o alternately. Within one minute, the indicators on the camera will go o.
If the wireless conncon has been established, the Ethernet conncon indicator will come on.
7 Operaon
7.1 Live-viewing the camera
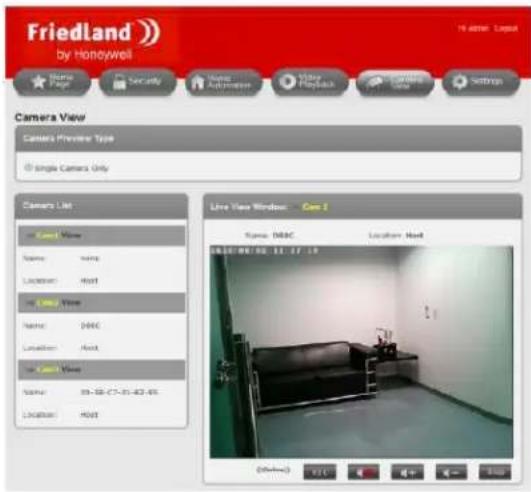
-
Log in to the website hps://GlobalGuard.Friedland.co.uk on your PC.
-
Click "Camera View".
- Select the camera.
- Click "View".
Note:
The Apple/Android GlobalGuard apps can be used to view cameras connected to your system. Download and install the app from the App Store (Apple) or from Google Play (Android). Use your login details for your GlobalGuard online account to sign in.
7.2 Recording video to the Micro SD card
7.2.1 Manually recording video
- Click "REC" to start recording for approximately 30 seconds.
- Click "REC" again 1x to stop recording.
7.2.2 Recording video with security detectors
If a door/window contact detector or a PIR movement detector is triggered while your alarm system is armed, the IP gateway will locate the corresponding IP camera in the same location and inform it to start recording for approximately 30 seconds.
Note:
- If the camera locaon is set to "None", it will record whenever any detector is triggered.
- All cameras will record when the control panel detects event conditions of "Panic", "Tamper", "Fire" and "Duress" regardless of the locaon the camera is set to.
7.3 Playing back video les from the Internet
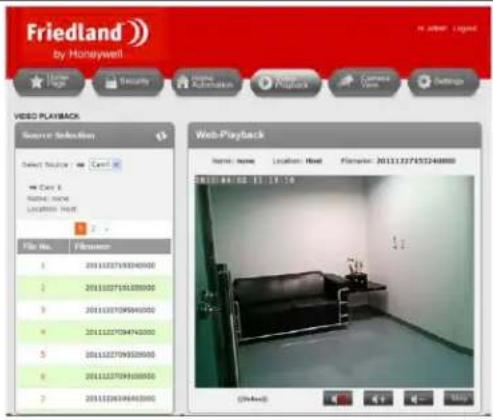
- Log in to the website hps://GlobalGuard.Friedland.co.uk on your PC.
- Click "Video Playback".
- Select the camera.
- Click the icon to refresh the playback list.
- Click the le name.
| Video le name format | A | B | C | D | E | F | G |
| 20111227153240000 | 2011 | 12 | 27 | 15 | 32 | 40 | 000 |
| Year | Month | Day | Hour | Minute | Second | sux to le name |
7.4 Backing up video les from the Micro SD card on the PC
- Remove the Micro SD card from the camera.
- Insert the Micro SD card into a suitable memory card reader for your PC.
- If your PC can read Micro SD cards directly, insert the Micro SD card into the built-in memory card reader.
- If your PC cannot read Micro SD cards directly, use a suitable external memory card reader.
- Aer your PC detects the storage device, copy the folder with the video les onto a locaon on your PC.
- If the process is completed, remove the Micro SD card from the memory card reader.
- Insert the micro SD card into the camera.
- Switch o the camera, wait for a few seconds and switch on the camera again to make sure that the camera can reboot its funconality correctly.
7.5 Playing back video les stored on the PC
If video les are stored on your PC, you can play back the les on the PC using the GlobalGuard CamPlay soware.
- Launch Internet Explorer on your PC.
- Go to the website "hps://GlobalGuard.Friedland.co.uk".
- Download the GlobalGuard CamPlay soware and the GlobalGuard soware manual.
- Install the soware.
- Open the soware.
- Refer to the secon "GlobalGuard Camplay soware" in the GlobalGuard soware manual.
Note: Not all features of the GlobalGuard CamPlay soware are applicable for the GlobalGuard Camera.
8 Troubleshoong
| PROBLEM | CAUSE | SOLUTION |
| The Internet conncon indicator on the camera ashes. | The internet conncon is not working correctly. | Make sure that the internet conncon is working correctly. |
| The picture quality is poor when the camera is connected to the router through wireless conncon. | The camera is installed too far from the router. | Install the camera closer to the router. |
| Too many devices are connected to the router. | Disconnect some devices from the router. | |
| The video can be viewed remotely, but the video quality is poor and the video somemes disconnects and connects again by itself. | The Internet bandwidth (conncon speed) is not large enough. | Upgrade for a beer internet conncon from your Internet service provider (ISP). The camera requires a minimum upload speed of 512 kbps. |
| A loud whistling sound from the camera can be heard on the PC. | The camera is installed too close to the PC. | 1. Decrease the speaker volume on the PC.2. Decrease the camera volume. |
9 Technical data
| Operang voltage | DC: 5 V / 1 A | |
| Operang condions | Operang temperature | 0 °C ~ 50 °C (indoor use only) |
| Relave humidity | 20% ~ 80% | |
| Wireless interface | IEEE 802.11n | 90-150 Mbps |
| IEEE 802.11g | 6-54 Mbps | |
| IEEE 802.11b | 1-11 Mbps | |
| Transmier power | 14.5 dBm typically at 802.11g17.5 dBm typically at 802.11b | |
| Receiver sensitivity | 54 Mbps: typically -73 dBm at 10% PER11 Mbps: typically -86 dBm at 10% PER | |
| Antenna gain | 0.01 dBi | |
| Communicaton range | 100 m (in open space) | |
| Image sensor | RGB VGA 1/4 inch CMOSSeparate image sensors for day and nightAutomac exposure controlAutomac white balanceAutomac brightness controlAutomac antenna gain control | |
| Light sensitivity | 0.2 Lux (infrared LED o)0.0 Lux (infrared LED on, 10 m) | |
| Lens / viewing angle | 3.2 mmF2.0Viewing angle: 60.3°Fixed irisSeparate lenses for day and night | |
| Night vision range | 10 m (max.) | |
| Video compression | H.264Baseline prole level 3.1 | |
| Display resoluon | VGA: 640x480QVGA: 320x420 | |
| Memory card | Micro SD: 4 GB (included) / 32 GB (supported) | |
| Video recording capacity | Approximately 300 video clips of 33 seconds (2GB) |
10 Disposal and recycling


The product is classified by the Waste Electrical or Electronic Equipment (WEEE) direcve. The product and the baeries of the monitor should not be disposed of with other household or other commercial waste. At the end of its useful life, the packaging and the product should be disposed of via a suitable recycling centre. For informaon on available facilities, please contact your local authority or retailer from where the product was purchased.
11 EC declaraon of conformity
Novar ED&S hereby declares that the product is in compliance with the essenal requirements and other relevant provisions of the Radio and Telecommunicaons Terminal Equipment (R&TTE) direcve (1995/5/EC).
12 Guarantee
Novar ED&S undertakes to replace or repair at its discreet goods, should they become defective within 2 year solely as a result of faulty materials and workmanship.
Understandably, if the product has not been installed, operated or maintained in accordance with the instrucons, if the product has not been used appropriately or if any aempt has been made to recfy, dismantle or alter the product in any way, the guarantee will be invalidated.
The guarantee states Novar ED&S enre liability. The guarantee does not extend to cover consequential loss or damage or installaon costs arising from the defective product. The guarantee does not in any way act the statutory or other rights of a consumer and applies to products installed within the EU only. If an item develops a fault, the product must be returned to the point of sale with:
- Proof of purchase.
- Full descripon of the fault.
- All relevant baeries (disconnected).
13 Customer support
For further product informaon and full installaon manuals where applicable go to www.friedlandproducts.com
Service Helpline UK & Northern Ireland
0844 736 9149
Monday to Friday 9:00 am - 5:00 pm
The phone calls are charged at the naonal rate of the service providers.
Inhaltsverzeichnis

flowchart
graph TD
    A["Power Supply"] --> B["Switch"]
    B --> C["LAN"]
    C --> D["Internet"]
    style A fill:#f9f,stroke:#333
    style D fill:#bbf,stroke:#333
natural_image
Line drawing of a wireless router with four ports and antenna (no text or symbols)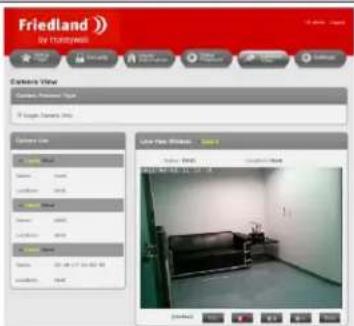
- Log op uw pc in op de website hps://GlobalGuard.Friedland.co.uk.
flowchart
graph TD
    A["Internet"] --> B["LAN"]
    B --> C["Switch"]
    C --> D["Radio Station"]
    D --> E["Power Hub"]
    E --> F["Electrical outlet"]
- Log op uw pc in op de website hps://GlobalGuard.Friedland.co.uk.
- Klik op 'Sengs' [Instellingen].
-
Klik op 'IP CAM Sengs' [IP-CAM-instellingen].
-
Selecteer de camera (1).
-
Selecteer de wi-funce (2).
-
Selecteer de audio (3).
-
Voer de draadloze beveiligingsinstellingen (4) in:
- Security Type [Beveiligingstype]: Selecteer 'None' [geen], 'WEP' of 'WPA/WPA2-PSK'.
- WEP Mode [WEP-modus]: Selecteer '64-bit (5 char)', '64-bit (10 hex)', '128-bit (13 char)' of '128-bit (26 hex)'. Voer de WEP-code in.
- WPA-PSK-modus: Selecteer 'TKIP' of 'AES'. Voer de WPA-PSK-code in.

flowchart
graph TD
    A["Power Supply"] --> B["Switch"]
    B --> C["LAN"]
    C --> D["Internet"]
    style A fill:#f9f,stroke:#333
    style D fill:#bbf,stroke:#333
"None" (Aucune), "WEP" ou "WPA/WPA2-PSK". - WEP Mode (Mode WEP) : Séleconnez "64-bit (5 char)", "64-bit (10 hex)", "128-bit (13 char)" ou "128-bit (26 hex)". Saisissez la clé WEP.
flowchart
graph TD
    A["Power"] --> B["Switch"]
    B --> C["Router Ethernet"]
    C --> D["Internet"]
    D --> E["Switch"]
    E --> F["Router"]
    F --> G["Internet"]
    style A fill:#f9f,stroke:#333
    style B fill:#ccf,stroke:#333
    style C fill:#cfc,stroke:#333
    style D fill:#fcc,stroke:#333
    style E fill:#cff,stroke:#333
    style F fill:#ffc,stroke:#333
    style G fill:#cfc,stroke:#333
natural_image
Line drawing of a wireless router with four ports and antenna (no text or symbols)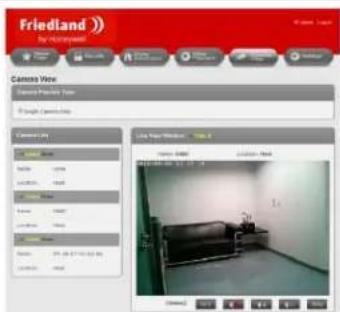

natural_image
Line drawing of a wireless router with four ports and a antenna (no text or symbols)