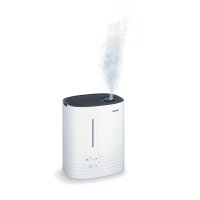
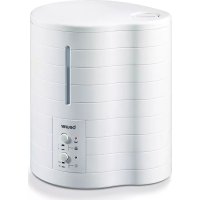
LW 110 - Humidifier BEURER - Free user manual and instructions
Find the device manual for free LW 110 BEURER in PDF.
| Product type | Ultrasonic air humidifier |
| Brand | Beurer |
| Model | LW 110 |
| Dimensions (L x W x H) | 25 x 12 x 34 cm |
| Weight (empty) | 1.5 kg |
| Power supply | 100-240 V ~ 50/60 Hz |
| Rated power consumption | 25 W |
| Tank capacity | 4 liters |
| Evaporation output | 300 ml/hour |
| Recommended room size | Up to 30 m² |
| Technology | Ultrasonic |
| Main functions | Continuous humidity control, automatic shut-off when water tank is empty, automatic shut-off when tank is removed, aroma compartment |
| Noise level | Quiet |
| Safety class | II (double insulation) |
| Included accessories | 1 humidifier, 15 replacement aroma pads, instruction manual |
| Fragrance options | Aroma compartment with aroma pad (essential oils optional) |
| Maintenance | Clean the membrane every 3 days, descale regularly, rinse the tank |
| Descaling filter | Optional (ref. 164.147), lifespan 2-3 months |
| Cable length | Approx. 1.5 m |
| Warranty | 3 years |
| Spare parts available | Descaling filter, aromatic oils (Vitality, Harmony, Relax, Sleep Well), aroma pads |
| Repairability | Repairs by a specialist only |
Frequently Asked Questions - LW 110 BEURER
User questions about LW 110 BEURER
0 question about this device. Answer the ones you know or ask your own.
Ask a new question about this device
Download the instructions for your Humidifier in PDF format for free! Find your manual LW 110 - BEURER and take your electronic device back in hand. On this page are published all the documents necessary for the use of your device. LW 110 by BEURER.
USER MANUAL LW 110 BEURER
Read these instructions for use carefully and keep them for later use, be sure to make them accessible to other users and observe the information they contain.
Table of contents
- Getting to know your device. 14
- Intended use 15
- Safety notes.. 15
- Device description.. 16
- Initial use 17
- Operation 18
-
Cleaning and maintenance 18
-
Additional anti-limescale filter 20
9.What if there are problems? 20 - Technical data.. 21
- Disposal 21
- Replacement items 21
13.Warranty/service 22

WARNING
- This device may be used by children over the age of 8 and by people with reduced physical, sensory or mental skills or a lack of experience or knowledge, provided that they are supervised or have been instructed on how to use the device safely, and are fully aware of the consequent risks of use.
Children must not play with the device. - Cleaning and user maintenance must not be performed by children unless supervised.
- Disconnect the device from the mains supply during filling or cleaning.
- Do not use any solvent-based cleaning products.
- If the mains connection cable of this device is damaged, it must be disposed of. If it cannot be removed, the device must be disposed of.
Dear customer,
Thank you for choosing a product from our range. Our name stands for high-quality, thoroughly tested products for applications in the areas of heat, weight, blood pressure, body temperature, pulse, gentle therapy, massage, beauty, baby and air.
Please read these instructions for use carefully and keep them for later use. Be sure to make them accessible to other users and observe the information they contain.
With kind regards
Your Beurer team
Included in delivery
1x Air humidifier
15x Replacement aroma pads
1x These instructions for use
1. Getting to know your device
Humans spend a large proportion of their time indoors. For ideal ambient air, a relative humidity level of between 40% and 60% is recommended. This value is often not reached, particularly in winter, when cold, dry air enters living spaces that are being aired and is then warmed up. This dry ambient air draws in moisture, drying out mucous membranes and skin, but also furniture.
Ambient air that is too dry has a number of negative effects:
Mucous membranes and lips dry out.
- Eyes become irritated.
- Infections and respiratory diseases are more likely to occur.
- Exhaustion, tiredness and difficulty concentrating.
- Pets and plants are put under unnecessary strain.
- Dust forms more quickly.
- Electrostatic charging of textiles made of synthetic fibres, such as carpets and plastic floor coverings.
- Wooden furniture and, especially, parquet floors, are damaged.
Musical instruments go out of tune.
Signs and symbols
The following symbols appear in the instructions for use, on the packaging and on the type plate:
| WARNING Warning notice indicating a risk of injury or damage to health. | |
| IMPORTANT Safety note indicating possible damage to the device/accessory. | |
| Note Note on important information. | |
| Observe the instructions for use. | |
| Disposal in accordance with the Waste Electrical and Electronic Equipment EC Directive - WEEE. | |
| CE | This product satisfies the requirements of the applicable European and national directives. |
| Manufacturer | |
| The unit is double-protected and thus corresponds to protection class 2. | |
| PAP | Dispose of packaging in an environmentally friendly manner. |
| EAC | Certification symbol for products that are exported to the Russian Federation and members of the CIS |
2. Intended use
This air humidifier is only intended for humidifying ambient air.
The device is intended for private use only.
3. Safety notes
Read these instructions for use carefully! Non-observance of the following information may result in personal injury or material damage. Store these instructions for use in a safe place and make them accessible to all users. Make sure you include these instructions for use when handing over the device to third parties.
Electric shock

WARNING
As with every electrical device, use this air humidifier carefully and cautiously in order to avoid hazards resulting from electric shock.
- Use the device only with the mains voltage specified on the device (the type plate is located underneath the base unit).
- Only insert the mains cable into the socket when the device is switched off.
- Never use the device if it or any of its accessories are visibly damaged.
- Do not use the device if it has sustained a fall or if water has penetrated the device interior.
- Do not use the device during a storm.
- In the event of defects or operational faults, switch off the device immediately. Pull the plug out of the mains socket.
- Do not pull on the mains cable or on the device to disconnect the plug from the socket.
- Never hold or carry the device by the mains cable.
- Do not clamp or pinch the mains cable.
- Keep the mains cable away from hot surfaces.
- Ensure that the mains cable and plug do not come into contact with water, steam or other liquids.
- Only use the device in dry internal rooms (e.g. never in the bathroom, sauna, etc.).
- Never reach for a device that has been submerged in water. Pull the plug out of the mains socket immediately.
- Do not drop the device or subject it to any impacts.
Repairs

WARNING
- Do not open the base unit.
- Only specialist personnel may perform repairs on electrical devices. Improper repairs may subject users to considerable danger. For repairs, please contact Customer Services or an authorised retailer.
Risk of fire

WARNING
There is a risk of fire if the device is used improperly or these instructions for use are ignored.
- Never use the device underneath a cover, such as a blanket or pillow.
- Never use the device near highly flammable substances.
Operation

WARNING
-
The device is only intended for the purpose described in these instructions for use. The manufacturer is not liable for damage resulting from improper or careless use.
If you suffer from a severe respiratory or lung disease, consult your doctor before using the air humidifier. -
Switch off the device after every use and before cleaning. Pull the plug out of the mains socket.
-
Ensure that the mains cable does not pose a trip hazard.

IMPORTANT
- Ensure that the device is placed on a firm, secure surface that is not susceptible to moisture.
- Do not insert any objects into openings on the device. Ensure that the moving parts can move freely at all times.
- Do not place any objects on the device.
- Do not expose the device to high temperatures.
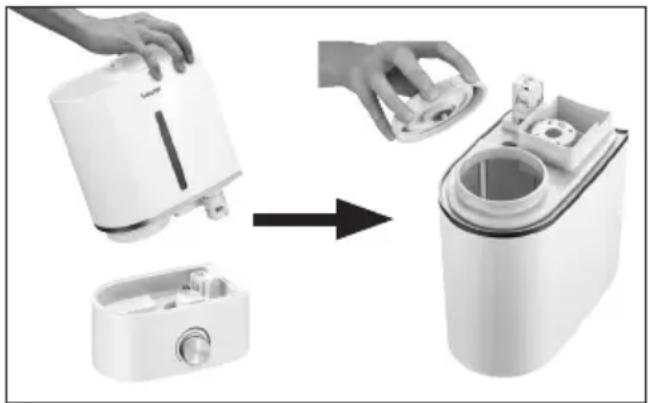
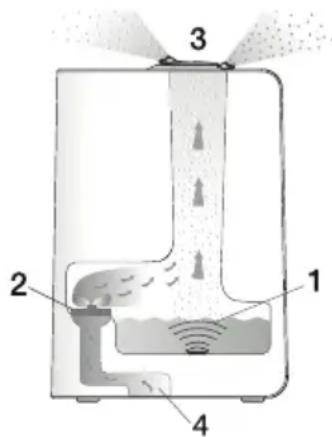
4. Device description
The air humidifier
- humidifies the air,
- runs quietly and is continuously adjustable,
is suitable for rooms up to 30m^2 - h as a low energy consumption and switches off automatically when the water tank is empty,
- switches off automatically when the water tank is removed,
- contains an aroma compartment for room fragrancing,
-
is easy to clean.
-
Mist outlet
- Water tank
- Anti-limescale filter
- Water tank screw plug
- Ultrasound membrane
- Control dial
- Fill level indicator
- Aroma compartment with aroma pad
- Base unit
- Mains cable
- Air filter

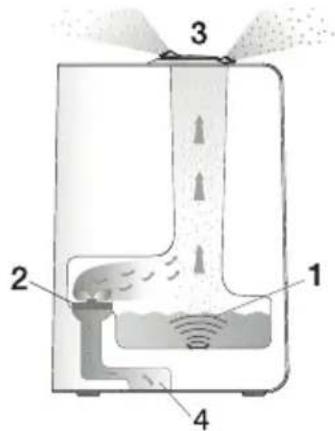
Principle behind the LB 45 air humidifier
- A membrane, vibrated by ultrasound, moves the water and releases tiny water droplets from the surface.
- The fan draws in air at the bottom of the device.
- The air is humidified with the released water droplets and blown gently upwards towards the opening.
- If you wish, the device can be used with aromas.
5. Initial use
Unpacking the device

WARNING
Keep packaging material away from children. There is the risk of suffocation.
- Open the cardboard packaging.
- Remove the protective insert. Keep the plastic film closed.
- Lift the device up and out of the packaging.
- Remove the plastic covering.
- Check the device, the mains plug and the cable for damage.
Installation location

WARNING
Read the safety notes before putting the device into operation.

Note
- The immediate vicinity of the air humidifier can become damp.
- Calcareous water can leave white deposits.
- Do not place the device on the floor, but in a raised position (e.g. on a table or chest of drawers).
- Position the device so that the mist outlet is not directed towards objects.
- Do not use the air humidifier in rooms with significant temperature variations since this could lead to condensation inside the device.
- Empty any remaining water when the device is not in use.
- Place the air humidifier on a firm, level and water-resistant surface.
If the device should accidentally tip over, water may escape, even if the device is switched off and unplugged.
Water

Note
- Do not add any essential oils or fragrances to the water. If additives are used, the plastic material may become discoloured and damaged. The ultrasound membrane gets stuck and is damaged.
- Use fresh drinking water in the device. If the drinking water is very hard, you can use demineralised or distilled water.
- Use warm water (30^ - 45^) and always fill the tank to the maximum level, otherwise the device could leak due to physical factors.
- Tip! If the water is hard, we recommend using the optional anti-limescale filter.
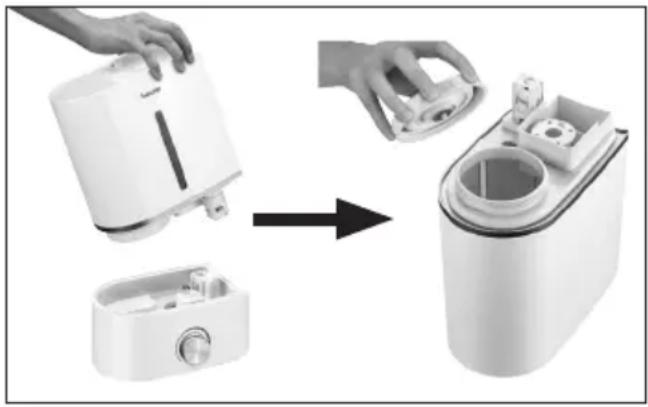
Filling the water tank
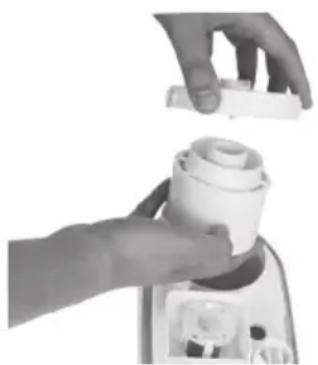
- Remove the water tank from the base unit in an upward direction.
- Turn the water tank over. The water tank is kept closed by means of a spring valve.
- Open the screw plug on the water tank.
- Fill the water tank with warm water (30^ - 45^) . The water tank holds a maximum of 4.0 litres. The water level is visible from the outside.
- Close the screw plug on the water tank tightly.
- Turn the water tank over.
- Place the water tank on the base unit. Ensure that the water tank is sitting firmly on the base unit.
6. Operation

Note
Check the humidity of your ambient air regularly. Intensive continuous operation can cause the ambient air to become excessively humid. The relative air humidity should not exceed 60% .
Switching on the device
- Plug the mains cable into a suitable socket.
- Turn the control dial clockwise.. The fill level indicator starts to glow blue. Mist now flows from the mist outlet. If there is not enough water or no water at all in the water tank, the fill level indicator will light up red and the device will switch off for safety reasons. Should the device switch off, fill the water tank as described in the section "Filling the water tank".
- Using the control dial, select the desired evaporation output. Evaporation is limited to a maximum of 300ml per hour.

Note
You may optionally add drops of aroma/scented oils to the aroma pad in the aroma compartment. This releases a fragrance into the air. Under no circumstances should you add the aroma directly to the water.
Switching off the device
- Turn the control dial left as far as it will go, until you feel slight resistance and the control dial clicks. The fill level indicator goes out.
- Unplug the mains cable from the mains socket.
7. Cleaning and maintenance
Regular cleaning and disinfection is a prerequisite for hygienic and fault-free operation. The level of contamination of the device depends on the water quality and how long it has been in operation. In any case, we recommend the following cleaning intervals.
| Every three days As required | |
| x | Cleaning the ultrasound membrane with a cotton bud, rinsing the base unit |
| x Rinsing the water tank, replacing the water | |
| x Cleaning the air humidifier inside and out | |
| x Descaling |

WARNING
Switch off the device after every use and before cleaning. Pull the plug out of the mains socket.

IMPORTANT
The water tank must be cleaned and the air humidifier completely emptied if the device has not been used for over a week.

Note
- Clean the device using only the methods specified.
- Under no circumstances may water enter the inside of the housing.
- Do not use any solvent-based cleaning products.
- Use only a mild detergent or vinegar/vinegar-based cleaner to perform cleaning or disinfection work.
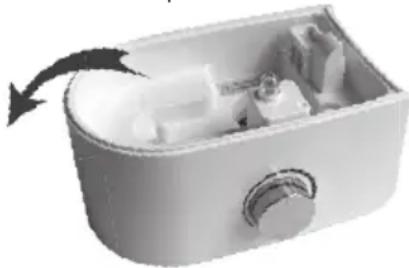
Cleaning the ultrasound membrane, rinsing the base unit

Note
Empty the water from the base unit via the side rim in the direction indicated by the arrow. Ensure that no water gets inside the device, e.g. via the fan opening.
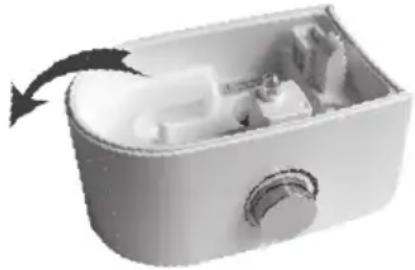
- Clean the ultrasound membrane with a cotton bud.
- Empty the water from the base unit via the side rim. Observe the markings on the device!
- Should dirty residue remain in the base unit, pour some clean, fresh water into the base unit and tip it out via the side edge.
Rinsing the water tank, replacing the water
Clean the water tank regularly, at least once a week if using daily. Use a mild cleaning product or vinegar/ vinegar-based cleaner.
- Clean the thread of the screw plug using a soft brush.
- Fill the water tank halfway with water.
- Close the screw plug on the water tank.
- Shake and turn the water tank over repeatedly.
- Open and empty the water tank completely.
- Repeat the process using clean, fresh water.
Cleaning the air humidifier inside and out
- Empty the water from the base unit via the side rim.
- Wipe the air humidifier with a damp cloth inside and out. Use only a mild detergent or vinegar/vinegar-based cleaner to perform cleaning work.
Dscaling
Dscaling the ultrasound membrane
Hard water can cause limescale to build up in the device and, especially, on the ultrasound membrane. This forms white deposits. Descale the device regularly.
- Drop some descaler onto the ultrasound membrane.
- Allow the descaler to work for 2 to 5 minutes.
- After this time, clean the ultrasound membrane with the cleaning brush provided.
- Rinse the base unit several times with clean, fresh water.
Cleaning inside the base unit
- Dip a damp, soft cloth briefly in descending solution.
- Wipe the inside of the base unit with the cloth.
- Carefully add some clean, fresh water into the base unit.
- Empty the water from the base unit via the side rim.
- Repeat the process using clean, fresh water.
Descaling the water tank
- Fill the water tank halfway with water.
- Add a small amount of descaler.
- Close the screw plug on the water tank.
- Shake and turn the water tank over repeatedly.
- Open and empty the water tank completely.
- Repeat the process several times using clean, fresh water.
8. Additional anti-limescale filter
TIP!
If the water is hard, we recommend using the anti-limescale filter (see section "12. Replacement items").

Note
- If the anti-limescale filter does not prevent limescale build-up, or if white deposits form on or in the device, the anti-limescale filter should be replaced.
The service life of the anti-limescale filter is around 2 to 3 months at most. - If the device is not used for a relatively long time, the anti-limescale filter must be removed from the water tank and dried out.
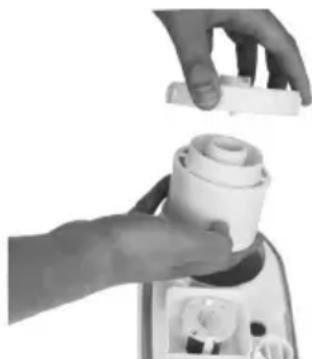
Fitting the anti-limescale filter
- Ensure that the device is switched off.
- Remove the water tank from the base unit in an upward direction.
- Turn the water tank over.
- Open the screw plug on the water tank.
- Screw the anti-limescale filter on the screw plug thread of the water tank.
- Close the screw plug on the water tank. The anti-limescale filter is now fitted.
9. What if there are problems?
| Problem Cause Solution | ||
| No mist is produced The | mains cable is not plugged in. Plug | the mains cable into a suitable socket. |
| The control dial is in the off position. | Turn the control dial clockwise towards the maximum position. | |
| The water level is too low; the water tank is empty. | Fill the water tank. | |
| The mist has a strange smell | The device is new. Lift up the water | tank, turn the screw plug and remove it. Air the open, empty water tank in a cool, dry place for 12 hours. |
| Stale or dirty water. Empty the base | unit and the water tank and clean them thoroughly. Fill the water tank with fresh water. | |
| Strange noise The water | tank is not positioned correctly on the base unit. | Lift up the water tank and position it correctly on the base unit. The tank should sit tightly on the base unit. |
| There is too little water in the water tank. | Fill the water tank. | |
| The device is not level and unstable. | Place the device on a firm, level surface. | |
| Mist escapes from underneath the water tank | The water tank is not positioned correctly on the base unit. | Lift up the water tank. Check whether the join between the base unit and water tank is clean. Clean if required. Position the water tank correctly on the base unit. The tank should sit tightly on the base unit. |
10. Technical data
| Dimensions (L x W x H) approx. 25 cm x 12 cm x 34 cm | |
| Cable length approx. 1.5 m | |
| Deadweight approx. 1.5 kg | |
| Mains voltage/frequency 100 - 240 V AC / 50/60 Hz | |
| Nominal power 25 watts | |
| Room size up to 30 m | 2 |
| Maximum capacity approx. 4 litres | |
| Evaporation output 300 ml/hour | |
11. Disposal
For environmental reasons, do not dispose of the device in the household waste at the end of its service life.
Dispose of the device at a suitable local collection or recycling point in your country. Dispose of the device in accordance with EC Directive - WEEE (Waste Electrical and Electronic Equipment).
If you have any questions, please contact the local authorities responsible for waste disposal.
12. Replacement items
For replacement parts and additional items visit www.beurer.com or contact the corresponding service address in your country (according to the service address list).
Replacement parts and additional items are also available from retailers.
| Item Item number | |
| Beurer by Taoasis “Vitality” aroma oil (10 ml) 681.30 | |
| Beurer by Taoasis “Harmony” aroma oil (10 ml) 681.31 | |
| Beurer by Taoasis “Relax” aroma oil (10 ml) | 681.32 |
| Beurer by Taoasis “Sleep Well” aroma oil (10 ml) | 681.33 |
| 10 aroma pads | 164.148 |
| Anti-limescale filter | 164.147 |
13. Warranty/service
Beurer GmbH, Söflinger Straße 218, 89077 Ulm, Germany (hereinafter referred to as "Beurer") provides a warranty for this product, subject to the requirements below and to the extent described as follows.
The warranty conditions below shall not affect the seller's statutory warranty obligations which ensue from the sales agreement with the buyer.
The warranty shall apply without prejudice to any mandatory statutory provisions on liability.
Beurer guarantees the perfect functionality and completeness of this product.
The worldwide warranty period is 3 years, commencing from the purchase of the new, unused product from the seller.
The warranty only applies to products purchased by the buyer as a consumer and used exclusively for personal purposes in the context of domestic use.
German law shall apply.
During the warranty period, should this product prove to be incomplete or defective in functionality in accordance with the following provisions, Beurer shall carry out a repair or a replacement delivery free of charge, in accordance with these warranty conditions.
If the buyer wishes to make a warranty claim, they should approach their local retailer in the first instance: see the attached "International Service" list of service addresses.
The buyer will then receive further information about the processing of the warranty claim, e.g. where they can send the product and what documentation is required.
A warranty claim shall only be considered if the buyer can provide Beurer, or an authorised Beurer partner, with
-
a copy of the invoice/purchase receipt, and
-
the original product.
The following are explicitly excluded from this warranty:
- deterioration due to normal use or consumption of the product;
- accessories supplied with this product which are worn out or used up through pro per use (e.g. batteries, rechargeable batteries, cuffs, seals, electrodes, light sources, attachments and nebuliser accessories);
- products that are used, cleaned, stored or maintained improperly and/or contrary to the provisions of the instructions for use, as well as products that have been opened, repaired or modified by the buyer or by a service centre not authorised by Beurer;
- damage that arises during transport between manufacturer and customer, or between service centre and customer;
- products purchased as seconds or as used goods;
- consequential damage arising from a fault in this product (however, in this case, claims may exist arising from product liability or other compulsory statutory liability provisions).
Repairs or an exchange in full do not extend the warranty period under any circumstances.
FRANÇAIS

Chere cliente, cher client,
BHHMaTeIbHo npOHTHe IHcTpyKcHIO NO npIMeHnIO, COxpaHnte ee dJa NocJeDyUoJero NcNoJIb3OBaHnA, XpaHnte B DoCTyHOM dJa DpyrNx POnb3OBaTeJ MeCTe n CJeDyJTe ee yKa3aHnAm.
Copepkanhe
- O3HaKOMITeJIbHaI INΦopMaζη.65
2.Испльбзоваиме по Ha3нayehи..66 - Yka3aHnno TeXnke 6e3oNaChOCTn...66
- OnscaHne np6opa.. 67
5.BBOD B 3Kcnpnyatauio 68 - YnpaBneHne 69
-
OuicTka u yxoI 69
-
ПотиьоиЗВeСТКOBый Фильтр Ка КдОпОнHTeЛБнаг РИнадnexHOCtB......71
- TTo DeIaTb npn BO3HKnHOBeHm npo6Jem? ..72
- TexHueckne xapaKTepcntuKn 72
11.Ytunnaua.. 73 - PpeMeTbI, npno6peTaemble dOnoJIHnTeJbHo .73
- rapaHTn/cepBnchoe 06cnyKBaHne.....73

PPEdUnpeKdEHN
- Даньий пибор может Исплььтбаядettingистарше 8 лe,
a ТаKKе Лцамс С ораганчehнblIMn ФиЗЧЕСКIMN, CEHCOPHBIMи ЛИ
ymCTBeHHbIMN CNoCObHOCTЯМN ЛИс HEDOCTaTOUHbIMN 3HaHЯМN
I ONbITOM B TOM Clyuae, ecЛи OHI HaxODЯТСЯ ПОД ппсмOTpOM B3poG-
Лых ЛИп ронстуктUpOBaHы O 6e3ОпаСHom ппмeHeHи пибopa
И BO3MOxHbIX ONaCHOCTAx.
He no3B0JTe DeTm nIgpaTb C np6Opom. - Дети He должны Bылолнять очиру пибopa и ухов 3a Нм 6e3 npincMOTpa B3pocJIbIX.
Bo Bpem 3aOpHHeHn OChCTKn OTcoeHNyIte npNbop OT cTe.
He nCnoIb3yIte yIcT8Ie cpeIcTba, coepkaIe pactBopntJI. - EcIn npoBOD cTeBOrO nHTaHnA npu6opa nobpeKdEh, erO Heo6xOJMo yTIN3nPoBaTb. EcIn OH HeCbeMHbI, Heo6XoJMo yTIN3nPoBaTb BeCb np6Op.
Ybaxkaembl nokynatelb!
Blaoropnmbac3a Bb60 npodykun Hawei kOmnaHm. Mbl npOn3BODIM COBpeMeHHbIe, TcaTeNbHO pOteTnpOBaHHbIe BbICOKOKaueCTBeHHbIe N3dJIy IJRA OoRpeBa TeJa, N3MepeHnMaCCbI, KPOBraHOro DaBHeHn, TemNepaTypbI TeJa, NyIbCa, JnJERKOJ TepaNN, MaccKa, KOCMeTNUeCKNX PPOeDpy, YXoDa 3a DeTbMn IOUcTKn BO3dyxa.
BhImaTeNbH npOHTte daHHyIO INCTpyKcIIO NO pPmHeHIO, COxpaHnte ee dIra nocJeUoero IcNoJIb-3OBaHnA, DepxKeTe ee B doCTyHOM DIA Dpynx PONb3OBaTeJe MeCe T cJeDyIe ee yKa3aHnM.
C HannyuHmN noKeJanaHnM, KOMnaHn Beurer
KOMNJIeKT NOCTABKN
1YbnaJHHTeNb BO3nyXa
15cmehhbx apomatnuecknx noodyweek
1 INHCTpyKzna no npImHeHnIO
1. O3haKOMTeJIbHЯ ИнфOPMaцnia
BoJIbIyU OaCTb BpeMeH YeIIOBek IpoBOIDIT B 3akpbITbIX NOMEeHnX. ONTImaJIbHaR OTHOCHTeJIbHaB BlaxKHOCTb BO3dyxa B NOMEeHnX COCTabIaIe TOT 40 Do 60%. YaIe BCero 3TOT noka3aTeIb 3aHnxKeH B 3IMHn IepNoI, KOrDa Iprn IpoBeTpIBAHm XoJOndHi cyxO B03dyX nonaJaET B NOMEeHne H aHrpeBa-ETcR. 3TOt cyxO B03dyX BnITbIaEt BlaIg U BBICyUINBaET CIn3NCTbIe OboIoQKn I KOxy, a TaKxE npEdMeTbl, HaxOJaIzIeCS B NOMEeHn.
CnIuKOM cyXoB Bo3dyx B NOMEeHnn npuBoDNT K pyy HeRaTNBbIx IocJeCTBn:
- BbICbIXaHINIO CnI3NCTbIX OBOJNoeK I r6;
- JXKHeHIOIJIa3;
- BO3HNKHOBENIO 6NaorponrTHbIX yCIOBn dIy INΦeKcI N 3a6OJIeBAHNI dbIXaTeNbHbIX nyTei;
- NOBHeHIO OUsUeHn BAnOCTn, yCTaIOCTn, CHNJaETCaKOHcHTpaCnBHNMaHn;
BO3HNKHOBEHIO He6laonpnaTHbIX yCNOBn IJy DOMaHHX XJBOTbIX N KOMHaTHbIX paCTeHH; - yckopeHHOMy 06pa3OBaHnIO nblIN;
- NOBblIeHIO CTaTNUeCKO 3apraIa I3dJIIM I3 NCKycCTBeHHbIX BOJOKOH, HApPIMep, KOBPOB IN CnHTeTIuYeCKNX HANoJIbHbIX NOKpbITNI;
- PnHHeHIO Bpea npEeMaTm Me6eNn3 DepeBa, B OcOeHHoCTn napKeTHOMy NOKpbITNIO;
pacCTpaBauHIO My3bIKAJIbHbIX INHCTpyMeHTOB.
IORCHENK CUMBOJAM
B INHCTpyKcNn NO npImeHeHHIO, Ha ynaKOBKe n HA TINOBoT Ta6JNUke IcNOJIb3yIOTc CJeDyUOJIne CmIBOJIbI:
He daBaIte ynaKOBOHbI MaTePnAaI DeTm. CyueCTByeT ONaCHOCTb yduWeHnA.
- BckpoTe KapToHHyU ynaKOBky.
2.ИЗВЕКИТЕ ВЕХИОУ 3aцИТHуЮ BКладу. He ChIMaIte ПLEнky.
3.ИЗВЕКЛЕУСТРОДТВОИЗУNASKOBKN,ПОДнЯВЕROВЕХ. - Chmnte nneHky.
- Y6eIITecB BOTcyTCTBnIOBpeJHn Ha npibope, cTeBOM wTeKepe n Ka6eJe.
MecTo yctaHOBKn np6opa

PPEyPPEKDEHNE
PpeKd Yem npctyntb K nCnoB3ObaHnIO np6opa, npoTnte yka3aHn NO TexHke 6e3OnacHocTn.

Yka3aHne
- O6laactb HenocpeDCTBeHHO BOKpyr yBnaXHnTeJI BO3dyxA MOxET CTaTb BJaXHOI.
- Pn nCnoJb3OBAHn CoepKauei N3BecTb BObl MoKeT o6pa3OBbIbA Tbcb 6eIbI ocAdoK.
CTabBte np6op He Ha non, a Ha BO3BbIeHn (Ha npImep, Ha cTOn, KOMoJ). - YctahabnBaIe npnbop TaK, yTo6bl BbIXOaIy nap He 6bl HAnpaBNeH Ha npedMeTbI.
He nCnOJIb3yIte yBnAIXHITeIb BO3dyxa B NOMEUeHNx C CNJbHbIMN KOJIe6aHINr TMnepaTpybl, TAK KAK 3TO MOKET npNBecTN K KOHdEHCauu BNHyTp npi6opa.
CnBaTe octabuOyIOc BDOy,ecn He nCNoIb3yeTe npu6Op. - YcTaHOBInTe yBnAaXHInTeIb BO3dyxa Ha npOHyIO, TOpN3OHTaIbHyIO IN BDOCTOnKyIO NOBepxHOCTb.
Pn cnyaHOM onpOKnbBaHn np6opa n3 Heo MoKeT BbTeyB Oda, daXe ecn np6op 6bl BbIKIOueH, a ceTeBOk Ka6elb BbITraHyT.
Boda

Yka3aHne
He doabnTe B Body 3nnpHbIe Macna IIN apomatueckne BeueCTBa. NcnoJb3ObaHne do6aBOK MoKet NOBpeNTb PnactIKOBbIM DeTaNIM IN IX NOKpbITNIO. YnbTpA3ByKOBAЯ Mem6paHa MOKeT 3acOpNTbcr N BblTN N3 CTPOI.
- NcnoIb3ynte B npnbope CbeKyo nITbeByo BOy. Ecnn nITbeBa BOa cNtIKOM JecTkA, Bbl moKeTe NCNOB3OBaTb BmecTo Hee DEmHepaIIIOBAHHy OIN DnCTUInIpOBAHHy BOy.
- IcnoIb3yIte TenIyIO Body (30-45 °C), BcerIa 3anOJHnIe pe3epByap Do MaKcIMMyA, B npOTNBOM Clyuae BO3MOXHO npOTEKaHne np6opa, oBycNobJIeHHoe fN3UeCKMn XapaKTepNCtIKamn.
Cobet!Ppi JceTKoB OBe peKOMeHdyETcA NCIOJIb3OBAbI pOTUBON3BecTKOBblΦNJbTp, NOCTaBJIeMbI no JeJenaHIO.
HanoJIHeHne BODaHOro pe3epByapa BoDoI
- Notarynte BBepx pe3epByap IJRA BOdbI N OTCOeINHNTe erO OT OCHOBbl.
2.перевернitepe3epByap.IpyxHHbIknanaH 3aKpbBaetBODHOJpe3epByap. - OTKpyTnTe HABINHnBaIOuOyOcKpbIuKy pe3epByapa.
- 3aJeIe Te TnIyIO BOdy (30 - 45^) B pe3epByap. BoJHO pe3epByap BMeuaeT MaKc. 4 J. YpOBeHb BObl BInDeH cHApxN.
- Плотно зakpyтnte habинчиBaIOUyOcЯ КрblИку Ha pe3epByape ДЯ ВОbl.
6.ПepeBepHnTe pe3epByap. - NocTaBbTe pe3epByap Ha ochOBy. Y6eIITecb yTo pe3epByap nIoTHO cnIIT Ha ochOBe.
6.Управленье

Yka3aHne
Perylarpno npoBepaTe ypoBeHb BnaXHOCTn BO3dyxa B NOMEeHN. INTEHCNBHOe n npOJXHTbHOe NCIOJIb3OBaHHe npI6opa MoKet npuBecTn K nepeyBnaXHeHIO BO3dyxa. OTHCNTeJIbHaB BlaXHOCTb He dOJIxHa npEblwAtb 60%.
BkIoueHne np6opa
- BCTaBbTe ceTeBOI Ka6eJIb B noDxoJyUo po3eTky.
- IobepHnTe peryIaTOp no yacOBoCtpeKe HappBO. INHdkaTOp ypoBHa 3anolHeHna 3arOpNTc CnHIM CBETOM. N3 OTBepCTnJa BbInycka napa HaHHT BbIXOHTb nap. EcnB B OdoHOM pe3epByape HeT BObl IIN ee HeIOCTaTOUHO, Ha INHdkaTope ypoBHa 3anOLHeHna 3arOpNTc KpaChbI CBeT N B ceJIAX 6e3OnaNCHocTn np6op OTKIIouHTcE. Ecn np6op BbIKIIOHTcR, 3anOLHnTe pe3epByap dIra BObl, KaK OnicaHO B rIabe «HaonHHeHne BOaHoro pe3epByapa BoDor
- C nomoubio peryIraTopa yctahOBte Jekaemyo MOUHocTb nCnapeHna. MaKcImaJIbHaR moUHocTb nCnapeHna coCTabJrE 300 mN/4.

Yka3aHne
No JeHaHIO Bb MoKeTe HaHeCTn apOMaTueCkne Macla Ha apOMaTueCkyo NodyuweKy, pacnoLoXeHNyIO B apOMaTueCkOM OTcKe. 3To npIaCT NomeuEHHIO npraTHbI 3anax. Hb Koe m clyuae He doabJIaIte apOMaTueCkoe BeueCTBO pIpMo B Body.
BbIKIIOUeHne npN6opa
- ПовернITE ренилардуураза Впебо, пoka He почбтbyete Heбольшоe copotиьене И He усышпеселчok рениларopa.Инданakotupурбня запоненяnorachet.
- BbIaHInTe ceTeBOi Ka6eIb n3 ceTeBOi po3eTKn.
7. OuNTka n yxOa
Perynna Oocntka npnbopa yBnEeTcra nABHbIM ycNoBnem ero 6ecnepeboHoi paobtui co6IHOENrnnHebl.3aep3HeHHocTb npnbopa 3aBNCNT OT kaeeCTBa BObl IN BpemeHn paobtbl.B IIObOM clyuaeMb peKOMeHdyem CLeNyUOUINE INHTepBaJIbIoNCTKN.
OuNTka yIbTpaa3ByKOBoM Me6paHbI, npOMbIBKa OCHOBb IyBnaXHnTeJIa

Yka3aHne
CInBaIte BDOy n3 OCHOBbl yBnaxKnHTeJype3 60KOBoK pauB HAnpaBLeHN, yKa3aHHOM cTpeNkoi. CJeDITe, UTO6bl BHyTpB npnbopa He nonana BOda, HanpIMep, yepe3 OTBepCTne BeHTNJrTopa.
- OuICTe yIbIpa3ByKObyo Mem6paHy C NOMOJIbIO BaTHOH naiouKn.
- CnBaIte Body n3 oCHOBbl yBnaJHnteJIy chepe3 6OKOBon KpaJ. O6paTHe BHMaHne Ha MapKnpoBky Ha npu6ope!
- Ecnn B OCHOBE OCTaIncb KaKne-Im6o 3aRpy3HeHnA, 3aJeIte B Hee HEMHO rNCTOu CBExKe BObl n CLeIte ee uepe3 bokOBov KpaI.
YdaJIeHne n3BeCTKOBOrO HaJeTa
YdaJIeHHe n3BecTKOBOro HaneTa C yIbTpA3ByKOBoM MEm6paHbI
XecTkaj Boda MoKet npNBecTu K Bo3HnKHOBeHnO n3BecTu Ha np6ope u B oco6eHHocTn Ha yIbTpA3ByKOBOJ Mem6paHe. Ee moKHo 6hApXHTb nO 6eLomy ocaky. PeryJIrpHo ydaJIaIte n3BecTKOBbl Hane Tc np6opa.
- HaneiTe HeckoIbKO kaneIb cpeIcTBa dny ydaJeHnna 3BeCTn Ha yIbTpA3ByKObyo MEm6paHy.
- OctaBbTe Ha 2-5 MNHyT.
- OuInCTHe yIbTpA3ByKOByo Mem6paHy, IcNoJIb3yra KInCTOChy IJr YnCTKn.
4.ДвждыnpOMоTe OCHOByчToB CBexKe BdoI.
BHyTpENHJa YnCTKa OCHOBbl
- Hehaolno onyctnte BnaXHy moarkyo caTkyB pactbop IyaIaHnHa n3BeCTn.
- CanpeTko npoTpne OCHOBy n3Hytpn.
- AkkypaTHo HaneITe CBexkyu YnCTyO BODy BOCHOby.
4.CnBaIte BOy n3 OCHOBbl yBnaXHnTeY uepe3 60KoBOk KpaI. - NOBTOPuTE npoecc, nCNoB3yry HnctTyIO CBexkyIO BOyI.
YdaneHne n3BeCTKOBOrHaJeTa C BODaHOro pe3epByapa
- HanoIobHy 3aIopJIHnTe pe3epByap BOIoN.
- 106abTe HEMHOro cpeCTBa IyIyIaIeHnI N3BecTn.
- Плотно зakpyтnte habинчивагуюс Кршky peЗеры.apa.
- HeckoJIbko pa3 nepeBepHnTe nIOTpncHTe BoJHO npEepByap.
5.CneTe BcIO Body. - NOBTOPiTe npoecc eue HeckoIbKO pa3, nCnoJIb3y uHCTyU CBexkyU BODy.
- EcJn, HecMOTpHa Ha yCTaHOBky npOTINBOUN3BeCTKOBOrO 0JIbTpA, Ha npI6ope o6pa3OBaIacb n3BeCTb nn BundeH 6JIbN OCAIDOK, 0JIbTp Heo6xOdmo 3aMeHHTb.
Cpok cnjxkbipnoTbON3BecTKOBORo hnIbtpa coCTabnaret He 60nee 2-3 MeceB. - Ecni npn6op doJrOe Bpem He nCNoB3yeTcR, Heo6xOIMo N3BnEYb IpOTNBOU3BeCTKOBbI ΦnIbTp n3 BoaHoro pe3epByapa n npocuHTb erO.
YcTaHOBka npOTnBOU3BeCTKOBOrO qNlbTpa
- Y6eIntecb, yTo npnbop BvIKJIOueH.
- Notaryte BBepx pe3epByap Iry BObl I OTOeHNHTe erO OT OCHOBbl.
3.ПepeBepHnTe pe3epByap. - OtkpyTne HabINHnBaHOUcOyoc KpbIuKy pe3epByapa.
- Habintte npotubon3BeCTKOBbI ΦnIbTp Ha pe3b6y HabINHuaIOuec KpbIuKN BOJHOrO pe3epByapa.
- Плотно зakpyтnte habинчиваюся крblшky pezeры.apa. ПpoТИВОИЗВЕСТКOBБИФИЛТР установлен.