USER MANUAL London Deluxe CHICCO
natural_image
Illustration of a blue children's stroller with wheels and a back cover (no text or symbols)
• ISTRUZIONI D'USO
• MODE D'EMPLOI
• GEBRAUCHSANLEITUNG
• INSTRUCTIONS FOR USE
• INSTRUCCIONES DE USO
• INSTRUÇÕES PARA A UTILIZAÇÃO
• GEBRUIKSAANWIJZINGEN
• ANVÄNDNINGSINSTRUKTIONER
• NÁVOD K POUŽITÍ
• INSTRUKCJE SPOSOBU UŻYCIA
• ΟΔΗΓΙΕΣ ΧΡΗΣΗΣ
• KULLANIM BİLGİLERİ
• ИНСТРУКЦИЯ ПО ЭКСПЛУАТАЦИИ
• РЬКОВОДСТВО ЗА ЕКСПЛОАТАЦИЯ
• تعليمات الاستعمال

IMPORTANTE: CONSERVARLO PER OGNI RIFERIMENTO FUTURO – LEGGERE ATTENTAMENTE
F IMPORTANT: LE CONSERVER EN VUE D'UNE EVENTUELLE CONSULTATION FUTURE – LIRE ATTENTIVEMENT
D WICHTIG: FÜR ZUKÜNFTIGES NACHSCHLAGEN AUFBEWAHREN-BITTE DIESE GEBRAUCHSANLEITUNG SORGFÄLTIG LESEN
GB IMPORTANT: KEEP FOR FUTURE REFERENCE - READ CAREFULLY
E IMPORTANTE: CONSERVELO PARA FUTURAS CONSULTAS. – LEA ATENTAMENTE
P IMPORTANTE: CONSERVE-O PARA CONSULTAS FUTURAS – LEIA ATENTAMENTE
NL BELANGRIJK: VOOR LATERE
RAADPLEGING BEWAREN – LEES DEZE
GEBRUIKSAANWIJZINGEN
s VIKTIGT: SPARA FÖR FRAMTIDA BRUK – LÄS NOGGRANT
DÜLEŽITÉ: USCHOVESTE PRO PŘÍPADNÉ
DALŠÍ POUŽITÍ – POZORNĚ SI PŘEČTĚTE!
natural_image
Illustration of a mechanical component with a red arrow indicating assembly or force direction (no text or symbols)
natural_image
Illustration of a person using a medical device to lift a patient's chest (no text or symbols)
natural_image
Illustration of a person using a stroller to lift a baby (no text or symbols)
natural_image
Diagram of a mechanical assembly with a red arrow indicating a downward motion, no text or symbols present
natural_image
Blue line drawing of a vehicle seatbelt with straps and a red circular label '5A' (no text or symbols on the diagram itself)
natural_image
Diagram of a blue safety harness with a red oval highlighting the seat area (no text or symbols)
natural_image
Illustration of hands adjusting blue cable clips with a 5C label (no text or symbols on the diagram itself)
natural_image
Illustration of a baby stroller with blue outline and wheels, no text or symbols present

natural_image
Illustration of a hand using a tool to adjust or install a mechanical component, no text or symbols present
natural_image
Illustration of a robotic arm with a red circular head and blue mesh panel, no text or symbols present
natural_image
Technical illustration of a mechanical assembly with labeled parts (no readable text or symbols)
natural_image
Diagram of a mechanical assembly with two wheels and a red arrow indicating downward motion (no text or symbols)

natural_image
Diagram of a vehicle's landing gear system with two wheels and a central hub, showing no text or symbols.
natural_image
Illustration of a blue airplane fuselage with four wheels and a red circular marker labeled '14' (no text or symbols on the diagram itself)
natural_image
Illustration of a toy car with wheels and a red arrow indicating motion (no text or symbols)
natural_image
Illustration of a person performing a leg exercise using a medical device, showing body positioning and motion direction (no text or symbols)
natural_image
Illustration of a baby stroller with a red ball on top (no text or symbols)
natural_image
Illustration of a person's head with two rectangular objects and a red circular marker labeled '20' (no text or symbols on the objects themselves)
natural_image
Diagram of a mechanical component with labeled part '21' (no text or symbols beyond label)
natural_image
Illustration of a person adjusting a baby bottle on a stroller, with no visible text or symbols.
natural_image
Illustration of a hand adjusting a mechanical component with a red dot (no text or symbols)

natural_image
Illustration of a hand adjusting a mechanical component with a red upward arrow, no text or symbols present
natural_image
Illustration of a blue stroller with wheels and a transparent cover, no text or symbols present
natural_image
Illustration of a person holding a walking fitness equipment (no text or symbols)
natural_image
Illustration of a person adjusting a baby seat using a blue and white chair (no text or symbols visible)
natural_image
Illustration of a person adjusting a seatbelt device (no text or symbols visible)

RUZIONI GENERALI
AVVISO IMPORTANTE
IMPORTANTE: PRIMA DELL'USO LEGGERE ATTENTAMENTE QUESTO LIBRETTO D'ISTRUZIONI PER EVITARE PERICOLI NELL'UTILIZZO E CONSERVARLO PER OGNI FUTURO RIFERIMENTO. LA SICUREZZA DEL VOSTRO BAMBINO PUO' ESSERE INFLUENZATA SE NON SEGUITE QUESTE ISTRUZIONI
ATTENZIONE: PRIMA DELL'USO RIMUOVERE ED ELIMINARE EVENTUALI SACCHETTI DI PLASTICA E TUTTI GLI ELEMENTI FACENTI PARTE DELLA CONFEZIONE DEL PRODOTTO O COMUNQUE TENERLI LONTANI DALLA PORTATA DEI BAMBINI.
AVVERTENZE
FSTRUCTIONS GÉNÉRALES
AVERTISSEMENT IMPORTANT
IMPORTANT: LIRE CES INSTRUCTIONS
AVEC ATTENTION AVANT UTILISATION
ET LES CONSERVER PUOR LES BESOINS
FUTURS. SI VOUS NE RESPECTIEZ PAS CES
INSTRUCTIONS, LA SÉCURITÉ DE VOTRE
ENFANT POURRAIT EN ÊTRE AFFECTÉE
ATTENTION : AVANT UTILISATION, OTER
ET ELIMINER TOUS LES SACHETS EN
PLASTIQUE EVENTUELS ET TOUS LES
ELEMENTS
COMPOSANT L'EMBALLAGE DU PRODUIT ET LES TENIR HORS DE PORTEE DES ENFANTS.
AVERTISSEMENTS
1 Fussack (79251.930)
1 Schultertasche (79253)
1 Matratze (79253)
MONTAGE DER VORDERRÄDER
READ THESE INSTRUCTIONS CAREFULLY BEFORE USE AND KEEP THEM FOR FUTURE REFERENCE. YOUR CHILD'S SAFETY MAY BE AFFECTED IF YOU DO NOT FOLLOW THESE INSTRUCTIONS.
WARNING: BEFORE USE, REMOVE AND DISPOSE OF ALL PLASTIC BAGS AND PACKAGING MATERIALS AND KEEP THEM OUT OF REACH OF CHILDREN.
WARNINGS
- WARNING: A CHILD'S SAFETY IS YOUR RESPONSIBILITY.
- WARNING: children should be harnessed in at all times and should never be left unattended.
- WARNING: The child should be clear of moving parts while making adjustments. This stroller requires periodic maintenance by the user.
Overloading, incorrect folding or use of accessories not approved by the manufacturer could damage or break the stroller.
- WARNING: It may be dangerous to leave your child unattended;
- WARNING: before assembly, ensure that the product and all its components have not been damaged during transport. Should this not be the case, do not use the product and keep it out of reach of children.
- The stroller is intended for use with children between the ages of 0 months and 36 months, up to a maximum weight of 15 kg.
- WARNING: Ensure that all the locking devices are engaged before use. In particular, ensure that the stroller is locked in the open position, by checking that the rear-locking device is effectively locked.
- Do no overload the storage basket. Maximum weight 3 kg.
- Do not carry more than one child at a time.
- Do not use accessories, spare parts or any component not supplied or approved by the manufacturer.
-
WARNING: be careful, any load attached to the handle affects the stability of the pram/pushchair.
-
WARNING: the use of the crotch strap and safety harness is necessary to guarantee the safety of your child. Always use the crotch strap in combination with the waist belt.
- Ensure that the person using the stroller knows how to use it safely.
WARNING: when opening or closing the stroller, ensure that your child is at a safe distance. Do not attempt to open or close the stroller with a child on board. Ensure that during these operations, the movable parts of the stroller do not come into contact with your child.
• Always apply the brakes whenever the stroller is stationary.
- WARNING: never leave the stroller on a sloped surface with a child on board, even with the brakes applied.
- Do not let other children play unattended close to the stroller or climb on it. To prevent the risk of choking, do not give to your child, or place near him/her, any objects with strings.
WARNING: Do not use the stroller on stairs or escalators: it could cause the loss of control of the stroller. Pay special attention when maneuvering the stroller up or down pavements or a step.
- If the stroller is left exposed to direct sunlight for a long time, allow it to cool before placing your child in it. Prolonged exposure to direct sunlight may cause the materials and fabric to fade.
- Do not use the product if some of its parts are broken, torn or missing.
- WARNING: When it is not used, the stroller must be kept out of the reach of children.
- WARNING: This product is not suitable for running or skating.
- Prevent the stroller from coming into contact with salt water. It may cause the formation of rust.
- Do not use the stroller on the beach.
- WARNING: This product must only be pushed by an adult.
CLEANING
The cover cannot be removed. Clean all fabric parts with a damp sponge and neutral detergent. Please refer to the care labels for instructions on how to clean the fabric parts. Below are the cleaning symbols and their meanings:

Wash by hand in cold water

Do not bleach

Do not tumble dry

Do not iron

Do not dry clean
Periodically wipe clean plastic parts with a soft damp cloth. Always dry the metal parts to prevent the formation of rust if the stroller has come into contact with water.
Certain models include a seat pad which should be cleaned following the instructions on its care label
MAINTENANCE
Lubricate the moving parts only if necessary, with the light application of a silicone based lubricant. Regularly check the condition of the wheels and, keep them clean of dust and sand. To avoid friction that may prevent the correct operation of the stroller, ensure that all the movable plastic parts placed along the metal frame are clean of dust, dirt or sand. Keep the stroller in a dry place.
LIST OF COMPONENTS
Check that you have all the parts required for this model before assembling the product. If any parts are missing, please contact the Chicco Customer Care Service. No tools are needed to assemble the product. The following parts are needed to assemble the product:
1 stroller
1 hood
2 front wheels
1 rain cover
1 carry-all basket
1 sleep sack (79251.930)
1 shoulder carry strap (79253)
1 seat pad (79253)
HOW TO ASSEMBLE THE FRONT WHEELS
- Fit the front wheel unit to the stroller and lock it into position (see diag. 1). A "click" will be heard indicating that the front wheel unit is fitted correctly into position. Repeat this operation with the other wheel unit.
WARNING: Before use, ensure that the wheel units are safely locked into position.
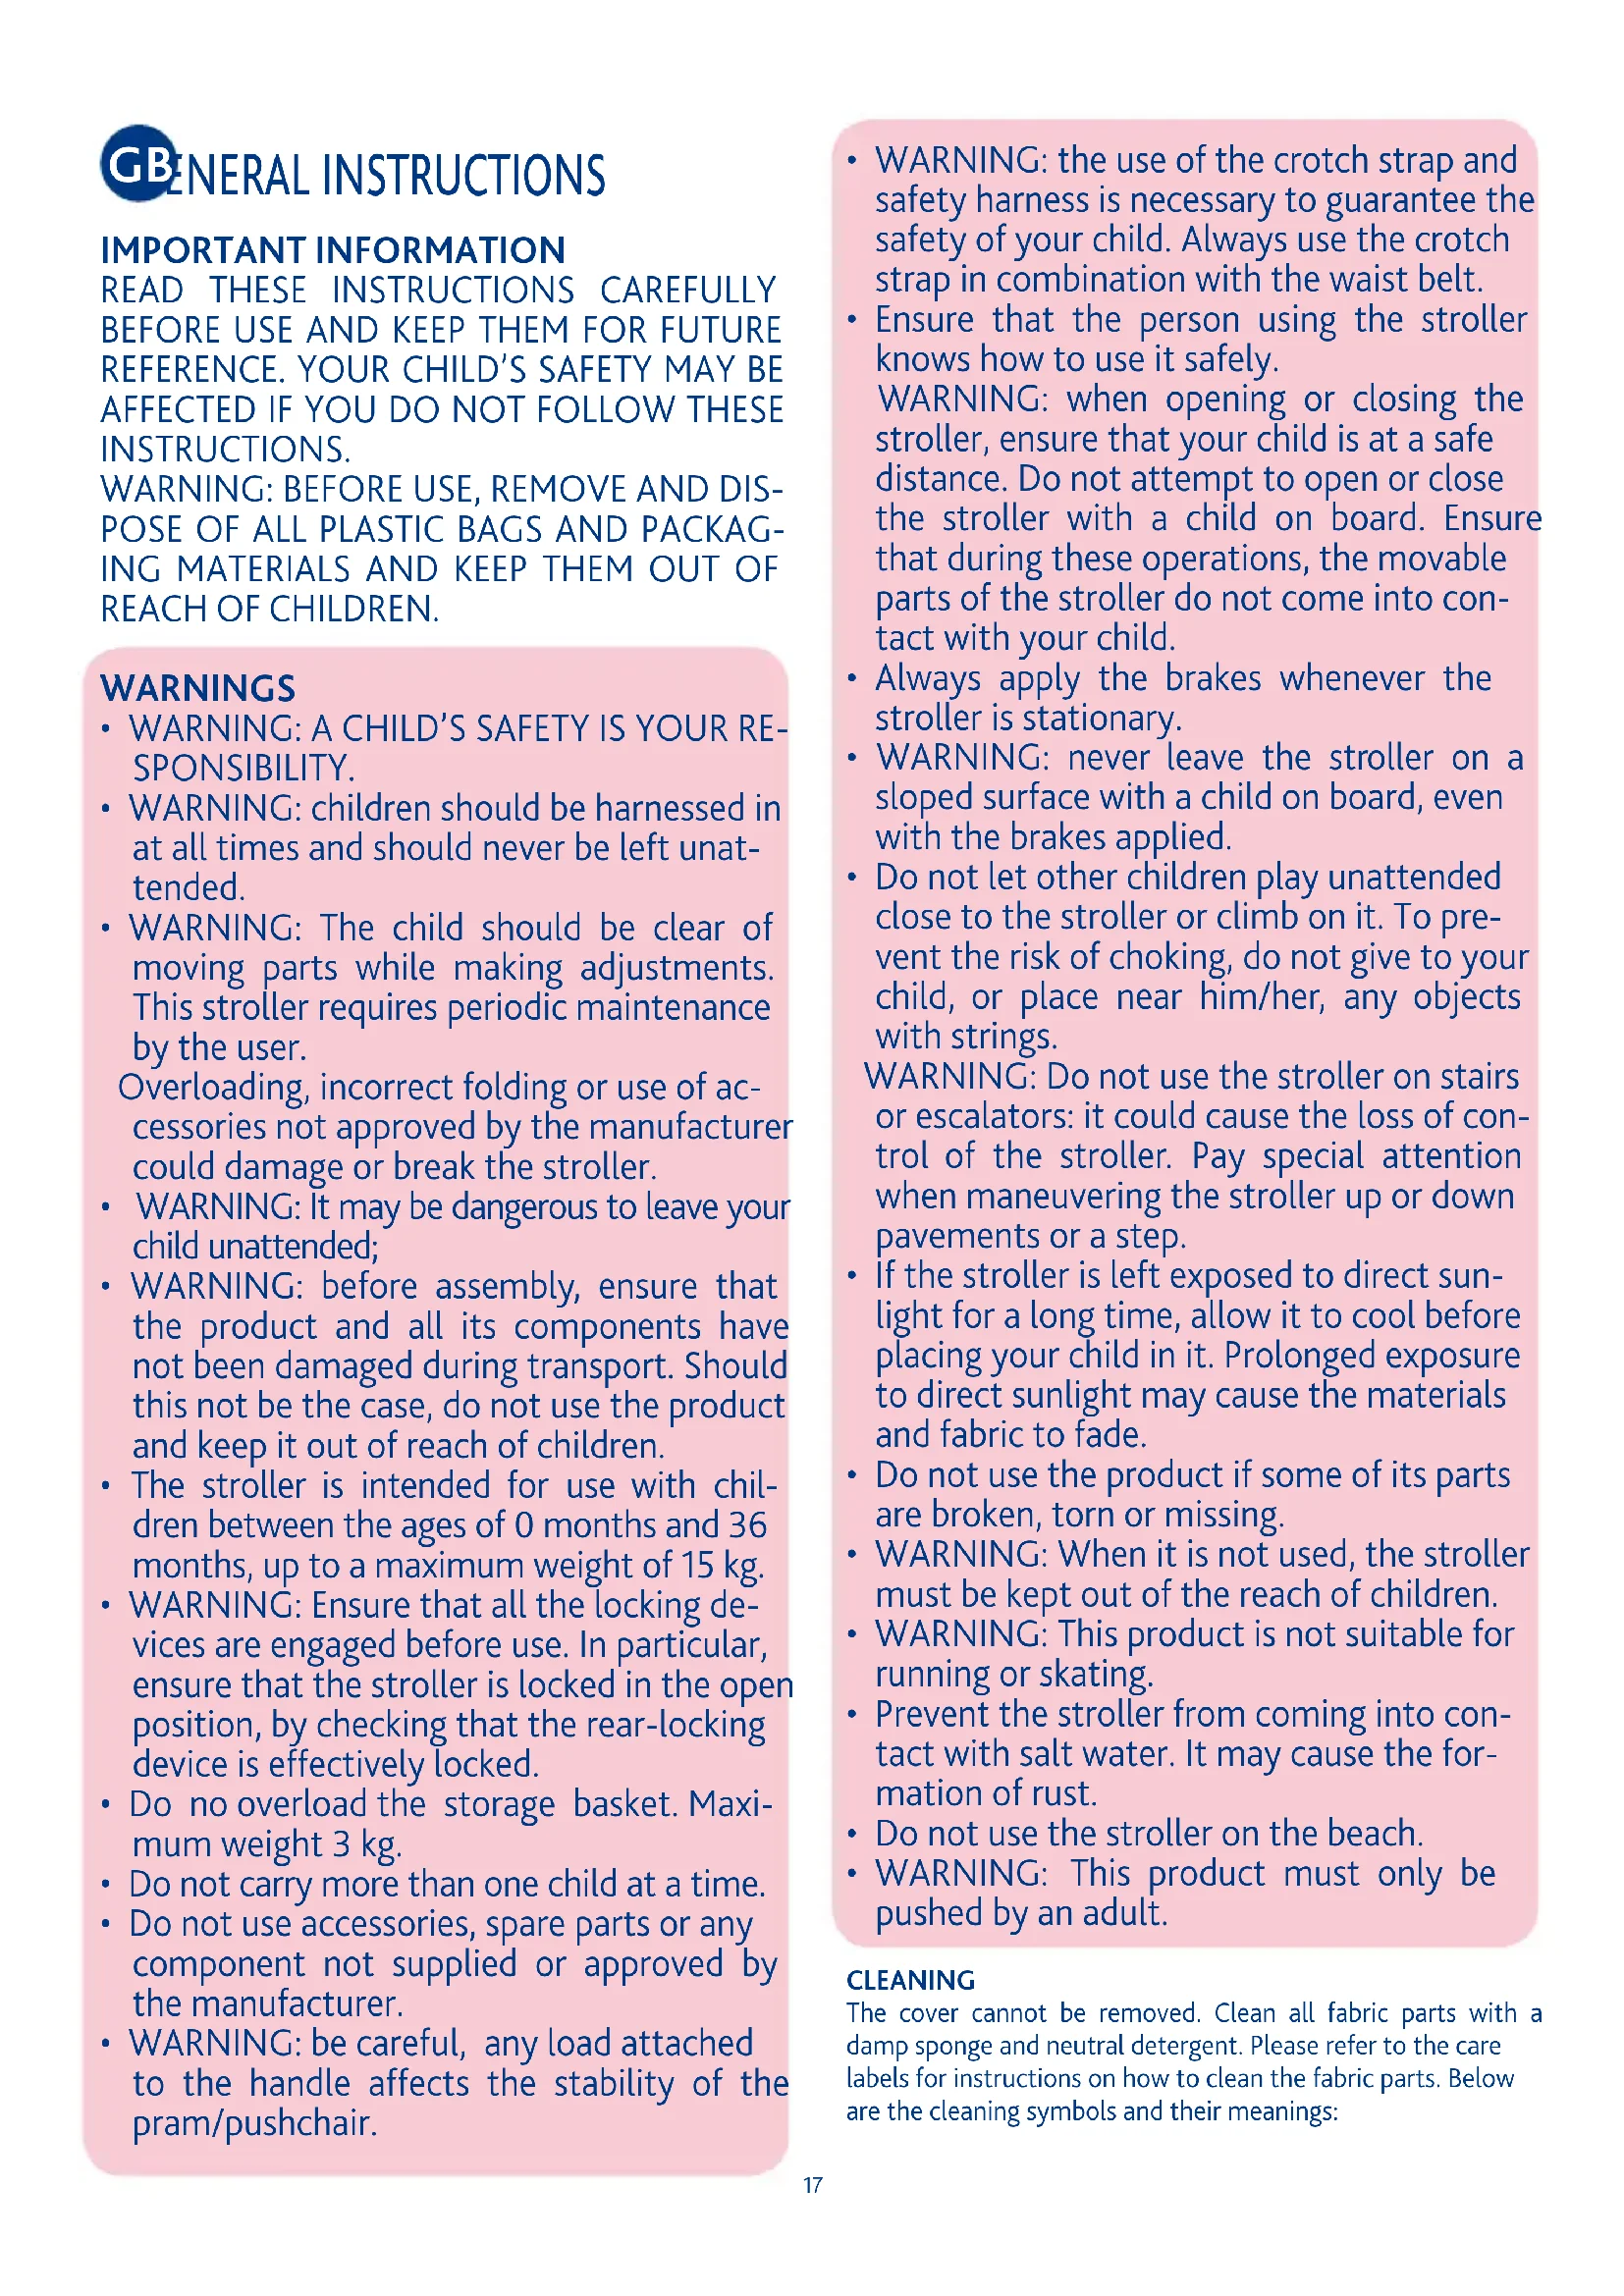
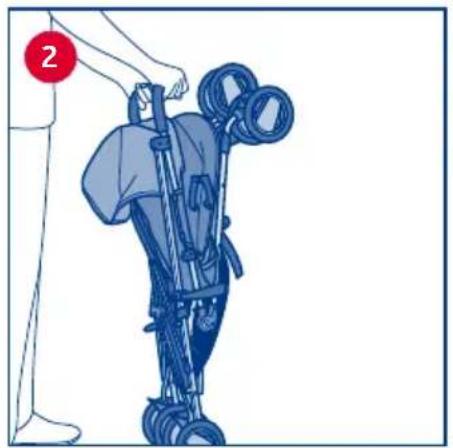
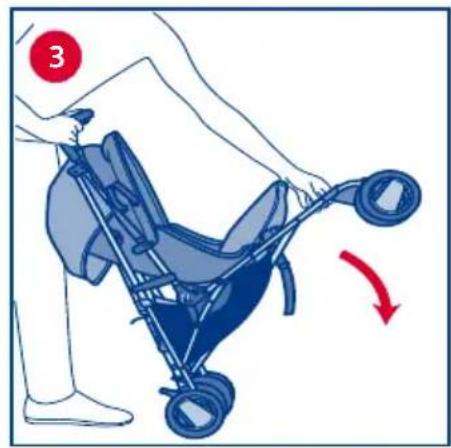
OPENING INSTRUCTIONS
WARNING: When opening the stroller, ensure that your child, or other children, are at a safe distance. Ensure that during these operations, the movable parts of the stroller do not come into contact with your child.
-
Remove the stroller from the package. Then hold the stroller in a vertical position, with the wheels facing forward (Diag. 2).
-
Release the closing device and push the front part of the stroller forward (Diag. 3).
-
Use your foot to press the rear crossbar downwards and check
that the stroller is now completely open (Diag. 4).
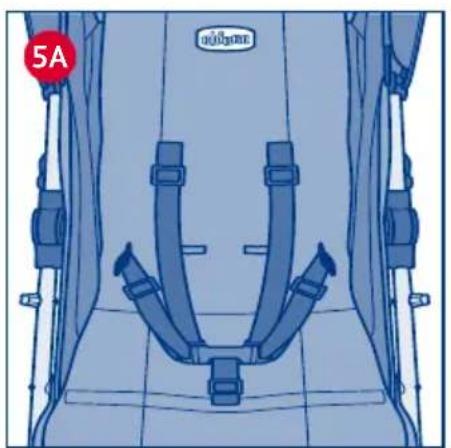
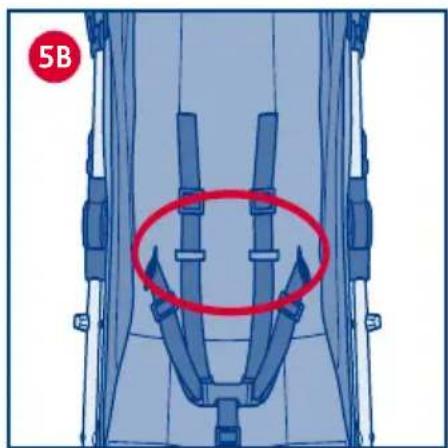
SAFETY HARNESS
- The stroller has a five-point safety harness that features two shoulder straps, a waist strap and a crotch strap, with a safety buckle, which prevents the accidental opening by the child.
WARNING: Always fasten the safety harness. After fastening the buckles, adjust the length of the safety harness as required to ensure a secure fit. Always use the safety harness together with the crotch strap.
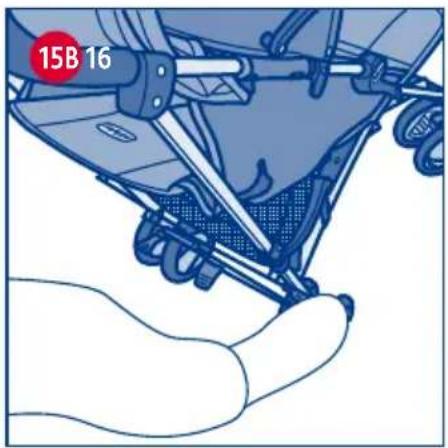
WARNING: when carrying children from 0 to 6 months of age, the shoulder straps must be threaded through the two adjuster slots before being fastened (diag. 5B).
WARNING: the safety harness must always be fastened to guarantee complete safety for your child. For extra safety, the stroller is fitted with D rings, which can be used to fit a separate safety harness, compliant with BS 6684 Standards. The rings are fitted on the right and left side of the stroller seat, as seen in points A and B.
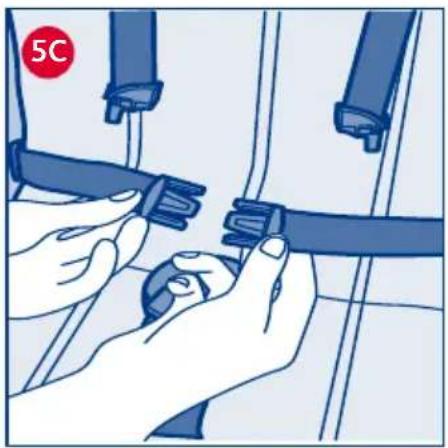
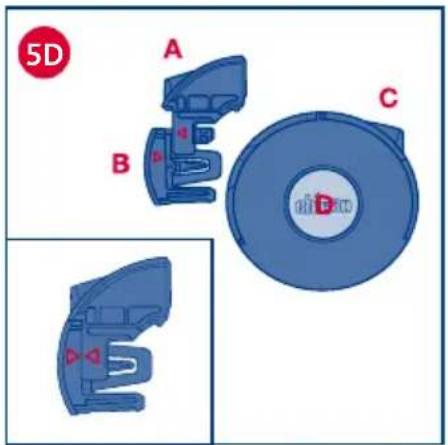
London Deluxe 79253: Diag. 5C-5D. Bring the upper harness strap clasp (A) in line with the triangle on the lap belt clasp (B) and then insert them both in the harness buckle (C). Press the centre button (D) to release the safety harness straps.
RECLINING THE BACKREST
-
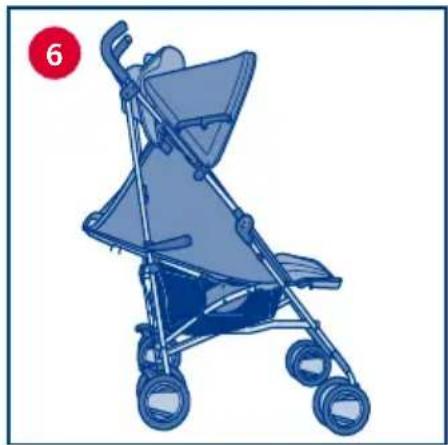
The backrest can be reclined to 5 different positions (diag.6).
-
Press the button on the stroller backrest and adjust the height as required; now release the button and the backrest will lock in the nearest position(diag. 7).
-
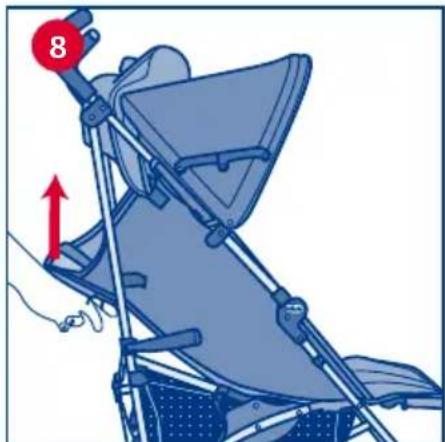
Simply push the backrest upwards to raise it to the desired height (diag. 8).
WARNING: Check that the backrest is locked correctly into position. The child's weight can make these operations difficult. When adjusting the backrest, ensure that movable parts of the stroller do not come into contact with the child.
ADJUSTING THE LEG REST
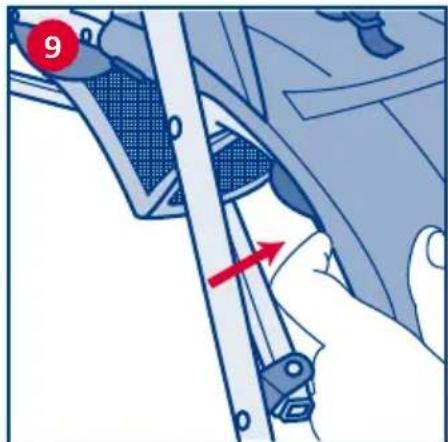
- The stroller leg rest can be adjusted to 2 different positions to ensure maximum comfort for your child. Press both side adjustment buttons at the same time to adjust the position of the leg rest as required (diag. 9).
BRAKES
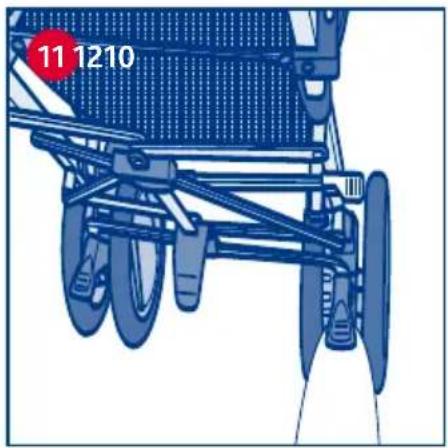
The rear wheels have linked brakes, which can be applied simultaneously to the two dual rear wheels by using only one pedal.
-
To apply the brakes, push the lever located at the centre of the rear wheels in a downward direction (diag. 10).
-
To unlock the braking system, push one of the two levers located at the centre of the rear wheels in an upward direction (diag. 11).
WARNING: Always apply the brakes whenever the stroller is stationary. Never leave the stroller on a sloped surface, with a child onboard, even with the brakes applied. WARNING: After operating the brake's lever, ensure that the brakes are correctly applied on all the rear wheels.
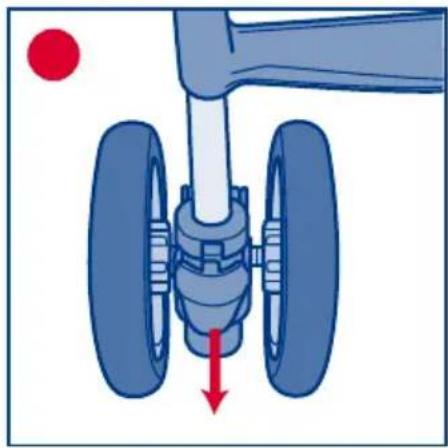
FRONT SWIVEL WHEELS
-
Use the swivel wheels on smooth surfaces. To unlock the wheels, push the lever located between the wheels in a downward direction (diag. 12).
-
Pull the lever in an upward direction to lock the wheels
(diag. 13).
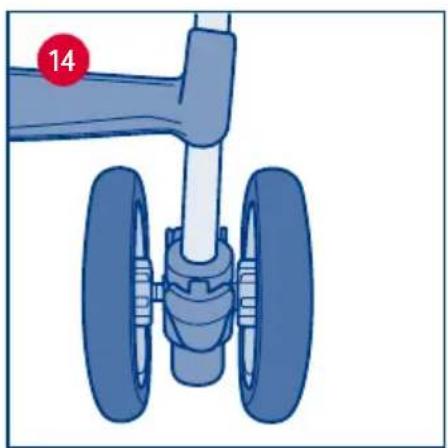
- The swivel wheels make the stroller easier to manoeuvre; on uneven surfaces it is recommended to use locked wheels to guarantee the safe use of the stroller (on gravel, unpaved roads, etc.) (diag. 14).
WARNING: All wheels must always be locked or unlocked at the same time.
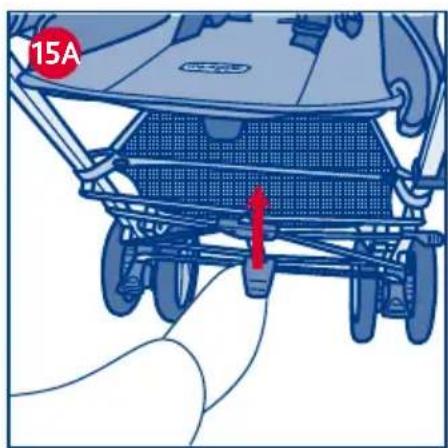
WARNING: when closing the stroller, ensure that your child and all other children are at a safe distance. Ensure that during these operations the moving parts of the stroller do not come into contact with your child.
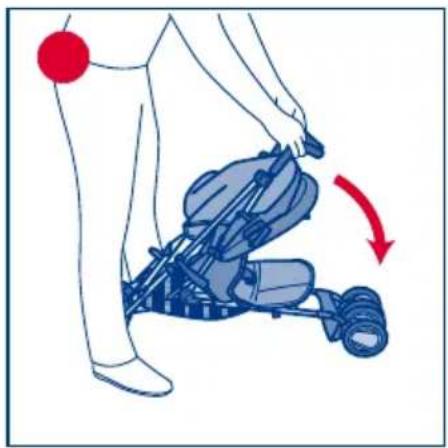
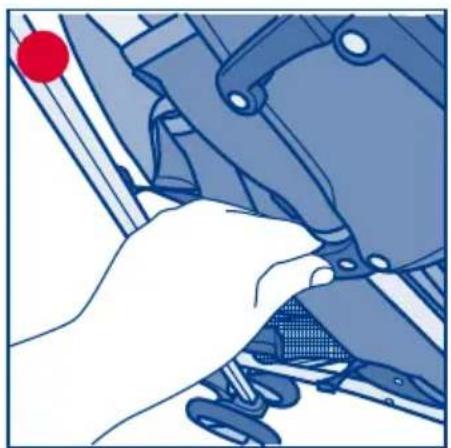
- To close the stroller, pull the rear locking mechanism in an upward direction (diag. 15A), and unlock the pedal, located on the right side of the stroller, with your foot (see diag. 15B).
- To close the stroller completely, push the handles forward (diag. 16).
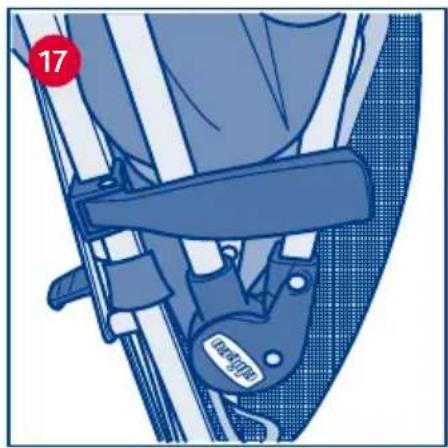
- Lock the stroller in the closed position with the locking device located on the side (see diag. 17). This operation prevents the accidental opening of the stroller.
ACCESSORIES:
WARNING: The accessories described below are not necessarily available on some versions of the product. Please read the instructions relative to the accessories fitted on the type of stroller you purchased carefully.
STORAGE BASKET
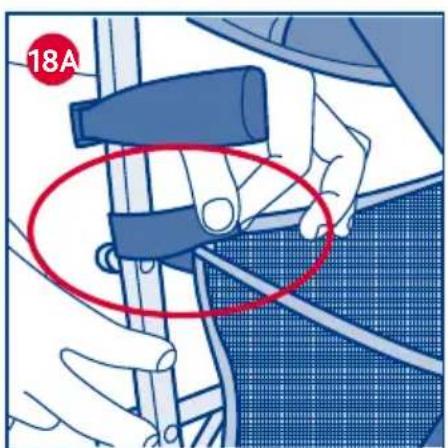
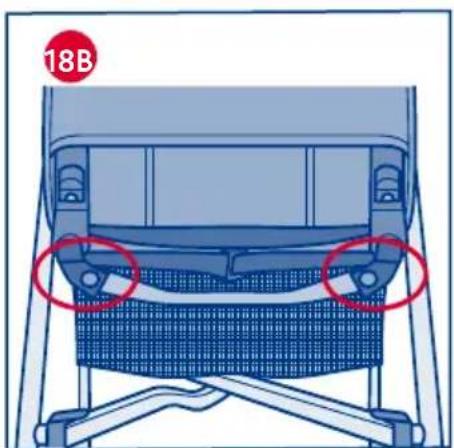
- The stroller is equipped with a storage basket. Fit the storage basket by pressing the buttons (diag. 18A-18B). Do not load the storage basket with weights over 3 Kg. Do not close the stroller with anything in the storage basket.
- The fleece footmuff can be fitted to the stroller with the zip located under it; fasten the zip located under the leg rest of the stroller (diag. 19).
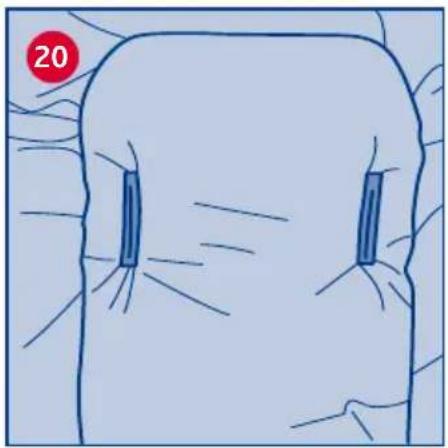
- The rear part of the fleece footmuff has holes for inserting the 5-point safety harness, as well as the crotch strap (diag. 20).
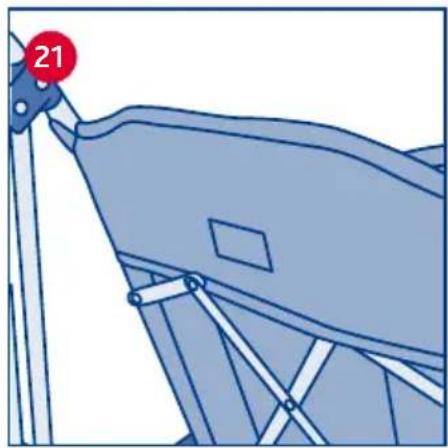
- Fasten the upper part of the fleece footmuff to the rear of the backrest with the buttons/Velcro straps (diag. 21).
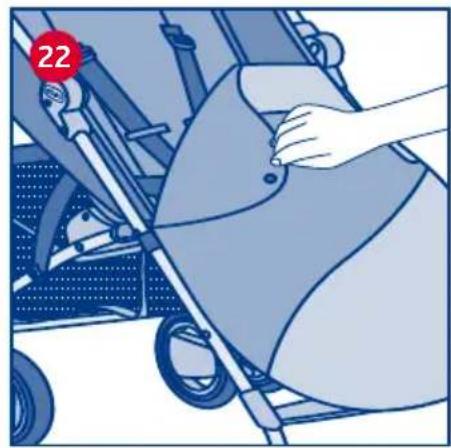
- The fleece footmuff can be separated into two parts; by unfastening the zip, you can remove the upper part and leave the mattress in the stroller seat (diag. 22).
SUN CANOPY
- To fit the sun canopy, fasten its clips to the tubes of the stroller, as shown in the diagram (diag. 23).
- Open the sun canopy, pushing the twoside calliper shaped mechanisms in a downward direction to tension the canopy (diag. 24).
- Before closing the stroller, always remember to close first the sun canopy, raising the twoside calliper shaped mechanisms and pulling the front part to wards you (diag. 25).
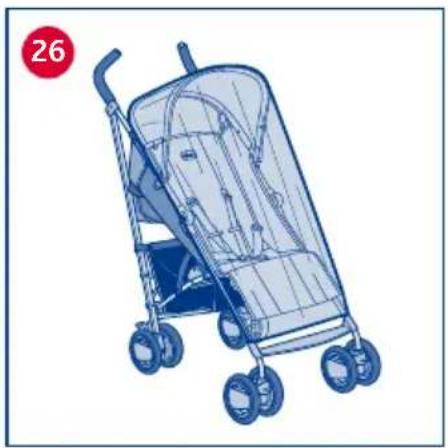
RAIN COVER
- The stroller is also fitted with a practical and light rain cover. Open the rain cover and fit it over the sun hood until it covers the whole stroller. Fasten the rain cover to the front legs and sides of the stroller using the Velcro fasteners
(diag. 26).
WARNING: pay particular attention when using the rain cover.
WARNING: The rain cover cannot be used on a stroller that has no canopy or sun-hood as it could suffocate the child. When the rain cover is fitted on the stroller, never leave it exposed to direct sunlight with the child inside, as the temperature will rise considerably.
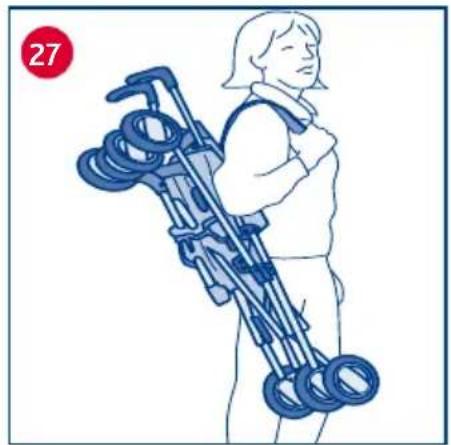
CARRY STRAP
- The stroller comes with a carry strap to carry it around when not in use (diag. 27). The strap can be used fitted to the stroller or to the carry bag.
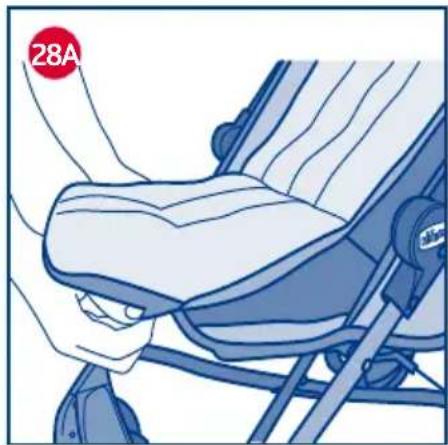
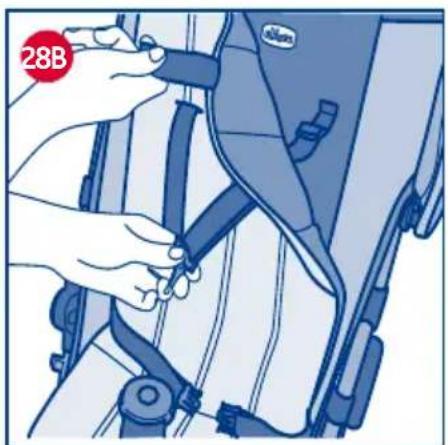
FITTING THE MATTRESS
- Fasten the mattress to the stroller seat using the flap on the back, as seen in diag. 28A (when using in double face mode, turn the flap over beforehand). Thread the crotch and shoulder straps through the slots, as seen in diag. 28B.
Now fasten the mattress to the stroller backrest using the velcro straps on the upper section of the mattress
Warning: only use the mattress when it is correctly fastened to the frame and the harness straps are all done up
Postal address: ARTSANA SPA - Customer Care
Lowmoor Road Business Park
Kirkby in Ashfield
Nottinghamshire
NG17 7LF
Customer Services:
Tel: 01623 750870 (office hours only)
www.chicco.com
ESTRUCCIONES GENERALES
AVISO IMPORTANTE
"IMPORTANTE: ANTES DE UTILIZAR LEER DETENIDAMENTE ESTE LIBRO DE INSTRUCCIONES PARA EVITAR PELIGROS DURANTE EL USO Y GUARDARLO PARA FUTURAS CONSULTAS. LA SEGURIDAD DE TU NINO PUEDE VERSE AFECTADA SI NO SIGUES ESTAS INSTRUCCIONES". ADVERTENCIA ANTES DE UTILIZAR, RETIRAR Y ELIMINAR LAS POSIBLES BOLSAS DE PLASTICO Y TODOS LOS DEMAS COMPONENTES QUE FORMEN PARTE DEL EMBALAJE DEL PRODUCTO Y, EN TODO CASO, MANTENERLOS LEJOS DEL ALCANCE DE LOS NINOS.
ADVERTENCIAS
RÅD FÖR RENGÖRING OCH SKÖTSEL