KEB 2656 - Coffee machine CLATRONIC - Free user manual and instructions
Find the device manual for free KEB 2656 CLATRONIC in PDF.
User questions about KEB 2656 CLATRONIC
0 question about this device. Answer the ones you know or ask your own.
Ask a new question about this device
Download the instructions for your Coffee machine in PDF format for free! Find your manual KEB 2656 - CLATRONIC and take your electronic device back in hand. On this page are published all the documents necessary for the use of your device. KEB 2656 by CLATRONIC.
USER MANUAL KEB 2656 CLATRONIC
General Safety Instructions
- Read the operating instructions carefully before putting the appliance into operation and keep the instructions including the warranty, the receipt and, if possible, the box with the internal packing.
- The appliance is designed exclusively for private use and for the envisaged purpose. This appliance is not fit for commercial use. Do not use it outdoors (except if it is designed to be used outdoors). Keep it away from sources of heat, direct sunlight, humidity (never dip it into any liquid) and sharp edges. Do not use the appliance with wet hands. If the appliance is humid or wet, unplug it immediately. Do not put it in water.
- When cleaning or putting it away, switch off the appliance and always pull out the plug from the socket (pull on the plug, not the cable) if the appliance is not being used and remove the attached accessories.
- Do not operate the machine without supervision. If you should leave the workplace, always switch the machine off or remove the plug from the socket (pull the plug itself, not the lead).
- To protect children from the dangers posed by electrical appliances, make sure that the cable is hanging low and that children do not have access to the appliance.
- Check the appliance and the cable for damage on a regular basis. Do not use the appliance if it is damaged.
- Do not try to repair the appliance on your own. Always contact an authorized technician. To avoid the exposure to danger, always have a faulty cable be replaced only by the manufacturer, by our customer service or by a qualified person and with a cable of the same type.
- Use only original spare parts.
- Pay careful attention to the following "Special Safety Instructions".
Special Safety Instructions Espresso Machine
- The metallic parts become extremely hot. Touch only the handle.
- Place the machine on a heat-resistant, smooth, flat and non-slip surface.
- In order to avoid overheating, do not place the machine inside or under a cabinet. Make sure that enough space is left around the machine.
- Watch out for the hot vapor when opening the boiler lid.
- Never use the machine without water in it.
Always fill the boiler with cold water. - In order to make sure that no vapor pressure is left from the previous brewing operation, place a recipient filled with cold water under the vapor jet. Lift the recipient until the vapor nozzle is immersed in the water. Turn the control knob to vapor release mode.
-
Remove the filter holder and the boiler's lid only if all the vapor has been let out.
Turn the boiler lid to the left to screw it off;
Turn the boiler lid to the right to screw it on. -
Make sure that the boiler lid and the filter holder are properly and securely closed while using the machine since this machine is pressurized when operating.
- Use only water to fill the boiler. Do not use any other liquid!
- If difficulties are encountered when unscrewing the boiler lid, this may indicate that the machine is still pressurized. Let out the pressure with the procedure described above.
Special Safety Instructions Coffee Machine
- Only fill the water tank with cold water!
- Never rinse out the filter during boiling. Never open the water tank lid while boiling water as this could lead to scalding.
- The hot plate and the coffee pot become very hot. DANGER OF SCALDING!
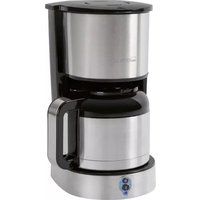
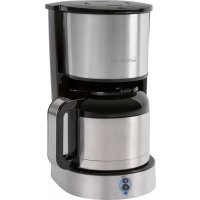
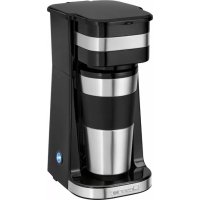
A. Hinged water container lid
B. On/off key
C. Swiveling filter holder
D. Glass pot
E. Thermostat-controlled hotplate
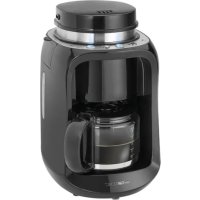
Espresso/Cappuccino
a - Water container seal
b - Espresso/cappuccino on/off key
c - Espresso strength selector
d - Steam control button
e - Steam nozzle
f - Filter holder
g-Metal filter
h - Glass pot with handle and lid
i - Removable overflow grid
j-2 cup adapter
Espresso/Cappuccino/Fresh Coffee
Before switching on
Before using for the first time it is highly recommended to become acquainted with all the parts of this appliance. Make sure that the plug is not inserted and fit the metal filter (g) in the filter holder (f). Place the filter holder (f) in the brewing head and remove the water container seal (a).
Wash all the loose parts in warm soapy water. Clean them thoroughly and dry the parts. Run the appliance once without any coffee powder according to the operating instructions.
Warning - The espresso machine generates pressure!
As the appliance works, pressure is developed in the water container. Never forget to open the seal (a) or the filter holder when there is no more pressure in the water container. Follow the instructions to determine whether the appliance is under pressure. The safety instructions below are to be followed during the operation of the appliance and for about 15 minutes after brewing:
GB
- Make sure that the machine is switched off.
2.Pull out the plug. - Place a pitcher of cold water under the steam nozzle and insert the steam nozzle in the pitcher. Turn the steam head counter-clockwise until the water container is empty.
- Turn the steam control button back again.
- Now you can remove the water container seal and the filter holder.
If there is still water in the water container, remove the glass pot and pour out the remaining water.
Preparing an Espresso
- Insert the plug in a duly installed protective contact socket. The espresso switch must be in off position.
- Place the metal filter (g) in the filter holder (f). Fill the filter up to the desired level with ground espresso coffee. Do not press too much. Remove any coffee powder on the edge of the filter holder.
- Place the filter in the machine. Lift the filter holder into the brewing head and turn it as far as possible to the right until it is firmly in place.
- Screw in the water container seal (a) counter-clockwise.
- Fill the fresh, cold water up to the desired mark in the water container with the aid of the glass pot. Attention: never fill the water container while the appliance is working. The appliance must be off.
- Turn the water container seal (a) clockwise.
- Position the pot lid on the pot (h) so that the opening is directed towards the pouring mouth of the pot and fit these under the filter holder.
- If you wish to fill the espresso directly in the cups, fit the cup adapter (j). Place a cup directly under each of the two openings.
- Just press the "espresso/cappuccino" key to switch on the appliance. The on/off display lights up. Turn the espresso strength selector to the desired level. Note: Please do not turn the espresso strength selector switch too far in the direction of "Strong" as this prevents the water running into the filter holder.
- After about 2 minutes the water reaches the right temperature. Now the water pours through the coffee powder and the espresso flows into the pot or into the cups.
- Once the brewing is over, switch the appliance off by pressing the "espresso/cappuccino" key. The operating LED switches off.
- Before removing the filter holder for cleaning, make sure that there is no longer any pressure in the water container (see the section Warning - Pressure).
Warning - Hot Surface:
The filter holder becomes very hot during operation. In order to remove the filter holder, turn it to the left until the holder comes out of the appliance.
The metal parts remain out for a long period of time. In order to avoid burns, hold the filter in place with the special level on the handle. Turn the filter holder and knock out the used coffee. You can cool it by placing it under cold running water. Before making other coffees, make sure that the water container is empty and no longer under pressure (see the section Warning - Pressure). Remove the filter holder (f) Empty the metal filter. Repeat steps 2 to 4 of this section. To stop the brewing, turn the strength selector to the right. To continue turn the strength selector counter-clockwise.
Preparing a Cappuccino
- To make a cappuccino, proceed first in the same way for the making of an espresso. Fill the glass pot with the desired amount of water. Then add some water for the frothing of the milk. (See the paragraph "Preparing an Espresso).
- Fill a narrow container up to 1/3 - 1/2 with fresh, cold milk.
- Switch on the appliance to prepare an espresso. As soon as half of the desired quantity of espresso has flowed out, turn the espresso strength selector clockwise. The brewing is interrupted. Wait until the green steam pressure display lights up. Now the water container has enough pressure and steam to froth the milk.
- Dip the steam nozzle with frothing accessory halfway into the container with the milk. Turn the steam control button counter-clockwise. You can help the frothing by moving the container up and down. Do not boil the milk (the milk boils when large bubbles start to surface on the milk surface). Then put the milk aside and leave it to rest.
- Turn the steam control button clockwise to stop the steam. Warning! The steam nozzle can become very hot during the process.
- Turn the espresso strength selector counter-clockwise again to the desired level and complete the espresso brewing.
- Pour the espresso into a large cup. Add the milk and the forth. The amount of espresso and milk depends on your own taste. In Italy usually 1 part of espresso is mixed with 2 parts of milk plus froth.
Only Steam
If you wish to heat only the milk, fill the glass pot up to the "steam" mark. It is enough for about 1 min. of steam. Make sure that espresso strength selector is closed (all the way to right).
- Pour the water into the water chamber and switch on the appliance.
- Place a cup under the steam nozzle to collect any water that may drip. As soon as the green light turns on, turn the steam control button.
- Repeat steps 4 and 5 for preparing a cappuccino and switch off the appliance when you have finished.
GB
Problems and their Causes when making an Espresso
(Always check that the plug is plugged in and the appliance is switched on).
Problem
- The espresso runs out of the filter holder:
Cause
The filter holder is not fit in properly.
The filter holder is not pressed in far enough.
The seal on the inside is dirty and must be cleaned.
There is coffee powder on the edge of the filter holder.
- No espresso comes out:
No water in the water container.
No coffee powder in the filter holder.
The strength selector is off.
The filter is clogged, because the powder is too fine or pressed in too much.
- No steam comes out of the steam nozzle:
Not enough water in the water container. The steam nozzle is clogged (see Cleaning).
- Not enough froth when frothing:
Not enough water in the water container to make steam for 45 to 60 seconds.
The milk was not cold enough.
Use a stainless steel froth container.
The milk was not fresh.
Making coffee
Before making your first cup of coffee, it is highly recommended to let only clear water run through the system for one or two times (without coffee powder in the filter) in order to remove the dust that may have collected in the appliance during transport.
Make sure that the water chamber is empty. Take out all the descriptions and other things that may be found in the water chamber.
Make sure that the swiveling filter is closed properly during the brewing. Press it in firmly until the handle touched the side of the appliance.
Attention: the drop stop mechanism works only when the pot is placed correctly on the hotplate and the swiveling filter is closed correctly. Make sure that the glass pot is positioned correctly when making coffee.
Filling the coffee powder
- Open the swiveling filter (C) and insert a paper filter. Fit the paper filter with your hand in the filter holder. This improves the result of the brewing.
- Put the coffee powder in the paper filter.
- Close the filter with care.
Filling the water
- Open the hinged water chamber lid. Pour in the desired amount of water. The number of cups that can be filled can be read with the water level display on the side of the appliance. Place the glass pot with the lid correctly on the hotplate.
- Switch on the appliance with the ON/OFF key. The light display shows that brewing has started.
Cleaning
These instructions apply both for the coffee machine and for the espresso maker. Switch the appliance off before cleaning. Pull out the plug and leave the appliance to cool. The filter holder, filter basket, pot, pot lid, overflow grid and the collecting tray can be washed in the top tray of the dishwasher. Wipe the appliance with a moist cloth. Never dip the appliance in water or in any other liquid.
Clean the brewing head of the espresso maker with a moist towel and remove the coffee powder. If there is still water in the water container, leave the appliance to cool, remove all the loose parts and empty the appliance by turning it over.
Cleaning the steam nozzle
Clean the steam nozzle after each time it is used, otherwise the inside of the nozzle will clog up and the milk on the outside will become hard and very hard to remove. The front part can be removed for cleaning. If the nozzle is clogged, remove all the milk remains with a sewing needle. After frothing the nozzle should be immediately wiped with a moist cloth. Hold the cloth close to the steam opening and turn the steam control button. Steam the cloth for 1 - 2 seconds. The milk remains are hence expelled. Switch off the appliance.
Attention: never open the appliance.
Decalcifying the appliance
Both appliances are to be decalcified on a regular basis. The interval depends on the hardness of the water and the frequency of use. Before decalcifying the espresso maker, the brewing sieve on the brewing head must be removed by unscrewing the two screws on the brewing sieve with a cross screwdriver. Tip: these screws are easier to reach when the appliance is tilted to the back. Make sure there is no water in the appliance.
Clear signs are:
The machine is louder than usual.
The machine takes longer than usual.
If the appliance is used regularly, decalcify as follows:
Use only a commercial decalcifier. Dose it as prescribed on the package or in the instructions and put it into the water container.
GB
Switch on the device and steam control button and wait until steam starts to come out of the steam nozzle. Let the steam escape for about 30 seconds.
Switch off the steam control button and leave the decalcifying solution run through the brewing head.
Switch off the appliance after each brewing and leave it to cool. Repeat the procedure.
Let two water containers of clear water run through the system. Switch off the appliance and leave it to cool. Put the brewing sieve back into place and screw it firmly into place.
This device has been tested according to all relevant current CE guidelines, such as electromagnetic compatibility and low voltage directives, and has been constructed in accordance with the latest safety regulations.
Subject to technical changes without prior notice!
Guarantee
The device supplied by our Company is covered by a 24 month guarantee starting on the date of purchase (receipt).
During the life of the guarantee any fault of the device or its accessories *) ascribable to material or manufacturing defects will be eliminated free of charge by repairing or, at our discretion, by replacing it. The guarantee services do not entail an extension of the life of the guarantee nor do they give rise to any right to a new guarantee!
Proof of the guarantee is provided by the proof of purchase. Without proof of purchase no free replacement or repair will be carried out.
If you wish to make a claim under the guarantee please return the entire machine in the original packaging to your dealer together with the receipt.
^* Damage to accessories does not mean automatic free replacement of the whole machine. In such cases please contact our hotline. Broken glass or breakage of plastic parts are always subject to a charge.
Defects to consumables or parts subject to wearing (e.g. motor pistons, kneading blades, drive shafts, spare remote control, spare toothbrushes, saw blades, etc.) as well as cleaning, maintenance or the replacement of said parts are not covered by the guarantee and hence are to be paid!
The guarantee lapses in case of unauthorized tampering.
After the expiry of the guarantee
After the expiry of the guarantee repairs can be carried by the competent dealer or repair service against the payment of the ensuing costs.
PpuroToBJIeHne KoΦe-3cnppecco
- BCTaBbTe BnIky B po3eKy C hAnpJxKeHnem cEtN 230 B, 50 Hz, yCTaHOBJIeHHyO B COOTBeTCTBnC npeDncaHnAMy. NpeeklIOuataJIb "3cnpcecco"doJxhen HaxoOnTbcra B noIoXeHn "AUS"(BblKI).
- BCTaBbTe MeTJIInueckn fNlbTp (g) B DepeXaTeIb (f). HAnOIHNte fNlbTp Do Heo6xOIMMOm METKMOJOTbIM KOe-3cnpcecco. IoxaJyIcTa, He yILOTHaIte eRO CINuKOM CNbHO. YdaJIte npocbIaBUnieCra KPOUKN MOJOTOrO KoFe C KpOMKn fNlbTpra.
- BCTaBbTe āepkαteIb ΦnIbTpBa KoΦeBapKy. 3aIbHbTe erO B KInIaTbnHyIO rONOBky I NOBepHNTe BnpaBO KaK MoXHO daJIbSe, YTObI OH KpeNko cnIeI.
- OtkpyTte 3AMOK BOJHORO 6aUka (a), Bpaaer ernpOTNB YacOBOn CTpeJIKN.
- Ipn n oMOU CTeKJIaHHoro KoFeHnHa HAnOJHnTe BOJHO BaoKdo Heo6XoDMoM MetKNuCTOn, XoJIoHDHO BoDoI.
BHHMaHHe: HIKoRda He HaJIbAaTe BOy B BoJHOb 6aOcK BO BpeM pa60Tb KoefeBapKn. KoefeBapKa dOJxHa 6bItb BbIKIIOyeHa.
- 3aKpyTnte 3aMOK BOJHOrO 6aUka (a), BpaUaERo no YacOBoi CTpeJIke.
- Hakoite CTeknHHKoHk KpbIkoTak,TO6bIO TBepCTne Ha KpbIke COBnaIO CO CINHBIM OTBepCTnEM KoHnKa I NOCTaBBTe erO npabNbHO IOd DEpXaTeJIbΦIbTpA.
- IOTOBH KOΦe-3Cnpecco MOxHO HApPMyo pa3nBaTb B YauKn.ДЯ 3TOrO HaJeHbTe NepExoHnK (j) Ha DepxKaTeIb φnIbTpA. POnCTaBbTe HeNOCpeDCTBeHHO NOk KaJdbi CTOK No YauKe.
- Дя Вкюевая Кофеварки постTo нахмITEHa BыКлчаTeь "Espresso/Cappuccino".Сбетондikatop сети наунhaet CBETNTbCЯ. Yстановпусятup кpenoctTu Kофe-эспесcoВ Heo6xodmoe NOLOXGEHne.
IpimmeaHne:IOXaJIyNCTa He NOBOpaUHbAte pblarpeYJITopa cnJIb Kofoe-3cnpcecco ouHb CnIbHO B HappaBHeHn "Stark", TaK ka 3To npedotBpaTNT NoCTynaHne BOdbI B DepxaTeNb fNilbTp a.
10.Приимерно чес 2 мИнту bOДа Harpeетс До HeobxODIMОI TemпераТурbl.
Tenepb OHa npoxoHT uee3 fNltp C MOJOTbIM KOfe I rOTOBiKofoE-3cnpecco Haunhaet NOCTyNaTB B CTekJIaHHbI KOFeiHnK NIN IOCTabJIeHHbIe YauKn.